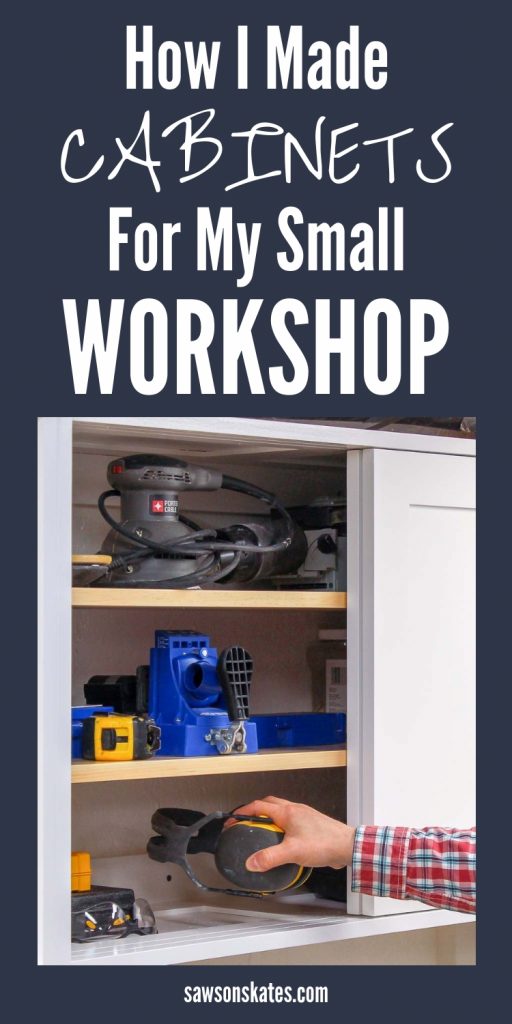
DIY Tool Storage Cabinets
Build your own DIY tool storage cabinets with these free plans! They feature adjustable shelves and sliding doors. Perfect for organizing a small workshop.
DIY Tool Storage Cabinets
Organize your tools with these DIY tool storage cabinets specifically designed for a small workshop. The free plans show how to build space-saving cabinets with adjustable shelves and sliding Shaker-style doors. They’re easy to build with pocket holes and pocket screws.
You may also enjoy 9 Clever Ways to Make Your Small Workshop Feel Bigger.
This tutorial contains affiliate links to supplies and tools. Purchases made using these links help support the Saws on Skates website and allows me to share more projects and tips with you. There is no cost to you for using these links. Visit my site policies for more information.
My Small Workshop was Disorganized
I’ll admit it. My small workshop was a disorganized mess. I tried to get organized a few years ago. I built a simple cabinet and I had it packed to capacity as soon as I hung it on the wall.
Related: My 12×13 Small Woodshop Layout
There were many tools scattered around my shop that still didn’t have a permanent home. This meant I was constantly moving tools from one flat surface to another. This was not an efficient way to work.
The original cabinet I built also had some design flaws for a small workshop. The doors were hinged so they needed to swing into my shop in order to open. This took up valuable floor space. Plus I hit my head and shoulders on these open doors more times than I care to admit!
My goal was to get organized, add enough storage for all of my tools and design some cabinets that would work well in a small space.
Related: 4 Reasons Why I Don’t Use Pegboard in My Small Workshop
Before we get into how to make DIY tool storage cabinets for a small workshop, be sure to click the subscribe button at the bottom of this page to sign up for my FREE weekly newsletter loaded with helpful pocket hole tricks, space-saving workshop ideas, clever DIY tips and more!
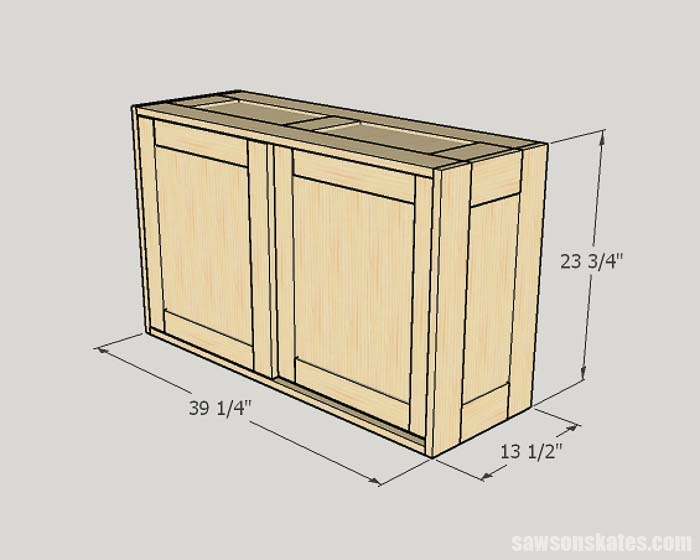
DIY Tool Storage Cabinets Designed for a Small Workshop
I planned to rethink everything for my new DIY storage cabinets. The cabinets would use a frame-and-panel design instead of plywood, the doors would slide rather than swing and the shelves would be adjustable.
Shaker-Style Storage Cabinets and Doors
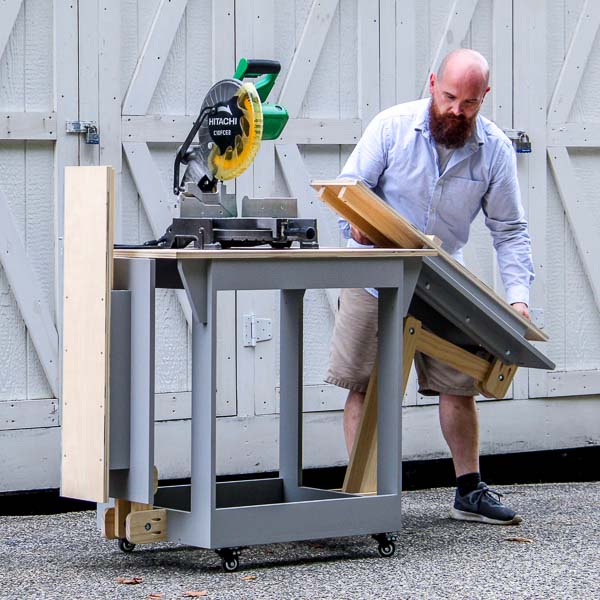
My original cabinet was made with plywood. Plywood sheets are tricky to work with in a small workshop. Just like my Flip-Top Workbench, I decided not to build my new DIY tool storage cabinets with plywood.
Instead of plywood construction, I would build my DIY cabinets in a Shaker-style or with frame-and-panel construction.
Related: How to Build DIY Shaker Cabinet Doors
With frame-and-panel construction, a panel is surrounded by a frame. The panel floats in a groove routed into the frame which allows the panel to swell and shrink with seasonal changes.
For the carcass of the cabinet, the frames would be built with 1x4s and the door frames would be built with 1x3s. It’s much easier for me to work with 1x3s and 1x4s in my small shop than it is to work with sheets of plywood. It’s also easier for me to get 1x material in my car.
There are a few trade-offs I knew I would be making with this design. It’s easier for me to work with 1x3s and 1x4s in my small shop, but it would have been much quicker to build the carcass of the cabinet with plywood. It was a trade-off I was willing to make.
I have some good news if you build with plywood. The free plans have instructions to build the cabinets with a frame-and-panel carcass and a plywood carcass.
One final thought about plywood. Plywood is flat. The frame-and-panel design adds some dimension and visual interest to my small space. To me, this dimension makes my small workshop feel bigger.
DIY Tool Storage Cabinet Panels
Using plywood sheets would have been the quickest and easiest way to make the panels for the storage cabinets. As I mentioned plywood is tricky to work with in a small workshop, so instead, I made solid wood panels for my workshop cabinets.
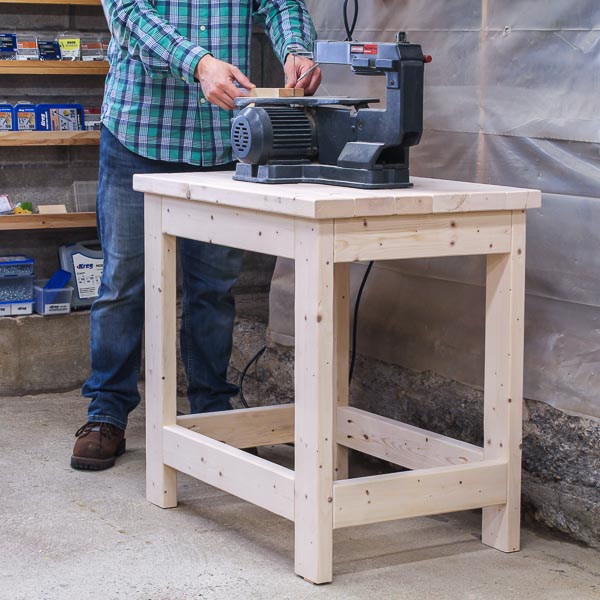
I used my bandsaw to resaw inexpensive 2x4s into pieces that were about a ½” thick. What is resawing? Imagine splitting a piece of wood lengthwise and then opening it like a book.
The faces of the resawed pieces were then smoothed on the jointer and planer. Once the pieces were smooth and square they were edge glued to form a ¼” panel. I used a similar technique to make book-matched panels for this DIY Bathroom Vanity.
Related: How to Make DIY Cabinet Doors (Without Special Tools)
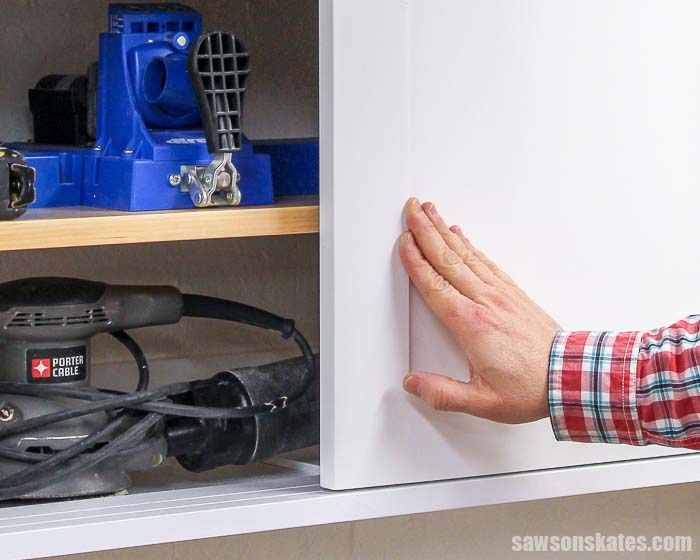
DIY Storage Cabinet Doors: Sliding vs Swinging
The original cabinet I built for my workshop had hinged doors so they needed to swing into my shop in order to open. This took up valuable floor space. Plus these doors were a hazard. I often hit my head and shoulders on the doors when they were open.
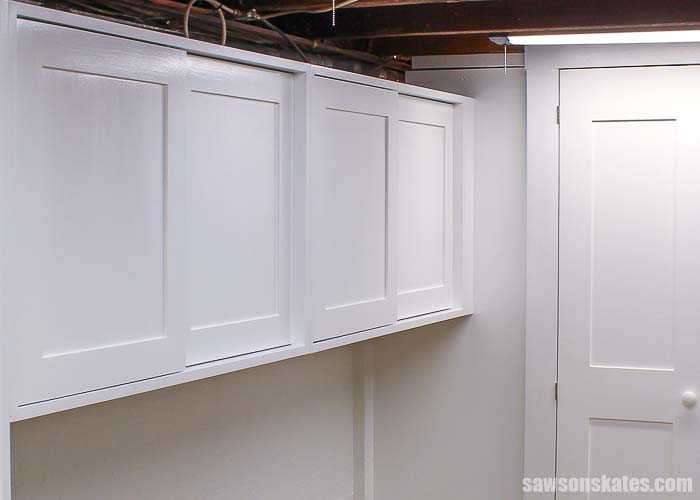
I decided to use sliding doors for my DIY tool storage cabinets. The sliding door hardware was easy to install and the doors would not take up valuable floor space in the open position. And it would be virtually impossible for me to hit my head or shoulders on these doors!
The dark brown hinges of my old cabinets did something else to my workshop. They made a visual break or stop when I looked at the cabinets. The sliding doors of the new cabinets look continuous. In other words, there’s nothing to stop your eye which makes the wall look longer. It’s just another visual trick to make my small workshop look bigger.
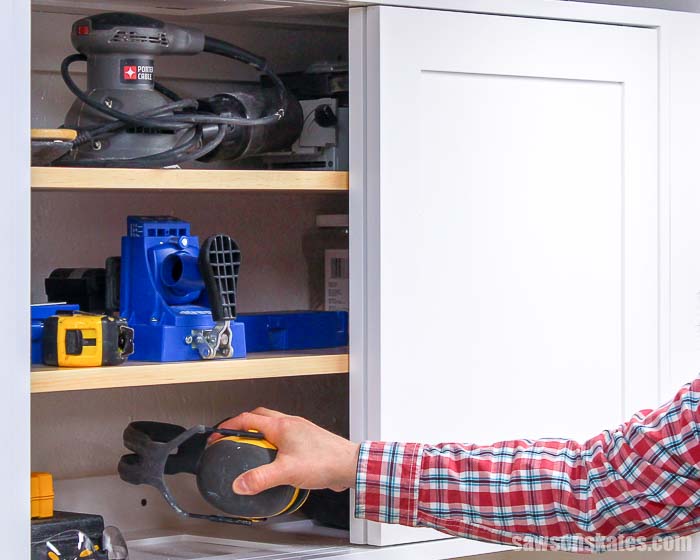
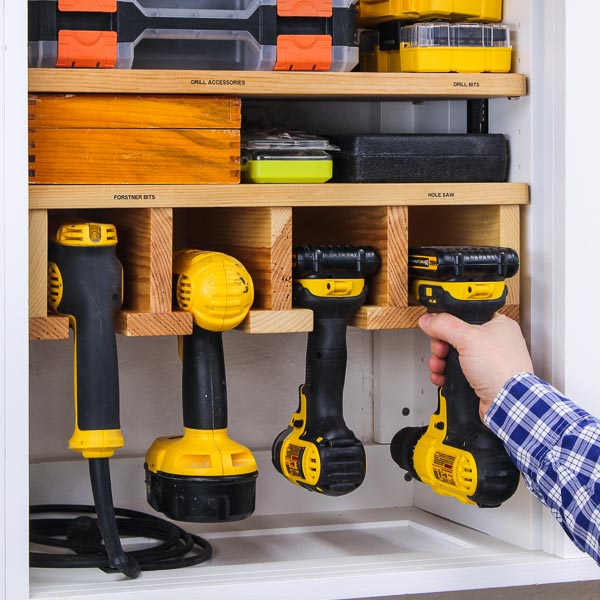
Adjustable Shelves add Storage Flexibility to Cabinets
The original cabinet I built for my workshop had some adjustable shelves, but I didn’t drill enough shelf pin holes. My DIY storage cabinets would have more shelf pin holes. This would make it easier for me to organize and store tools of different shapes and sizes.
Skate over to How to Make Adjustable Shelves with a Shelf Pin Jig to see the easy way I add shelves to my furniture and DIY projects.
Install the DIY Tool Storage Cabinets
Watch as I add some much-needed storage to my small workshop! See my shop before I added the cabinets, how I installed the DIY tool storage cabinets and take a look at the sliding doors in action.
Organize Your Tools
The DIY storage cabinets are hung on the wall. Now it’s time to get our tools organized!
In the How to Organize Tools in a Small Workshop post, I’m sharing 5 steps to get your tools organized. We’ll compare pegboard vs. cabinets, ways to store hand and power tools and how to keep them organized once and for all.
Skate over to How to Organize Tools in a Small Workshop now!

DIY Tool Storage Cabinet Plans
Printed Plan
- Click here to get the FREE plans (includes the frame-and-panel carcass plan, plywood carcass plan and the Shaker door plan)
Supplies
- Wood (per printed plan)
- Wood Glue
- 1-1/4″ Pocket Screws
- Spacer Balls
- Sliding Door Pins
Tools
- Tape Measure
- Miter Saw
- Kreg Jig
- Shelf Pin Jig
- Table Saw or Circular Saw
- Jig Saw
- Router
- Router Table
- 1/16” Straight Router Bit
- 1/4″ Straight Router Bit
Step 1. Cut the Top and Bottom Pieces
Cut 4 pieces of 1×4 to 37-¾”. Cut 6 pieces of 1×4 to 6-½” and drill pocket holes in each end.
Related: How to Use a Kreg Pocket Hole Jig
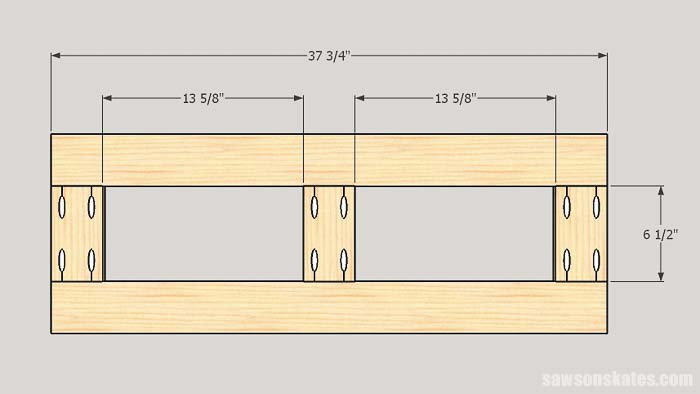
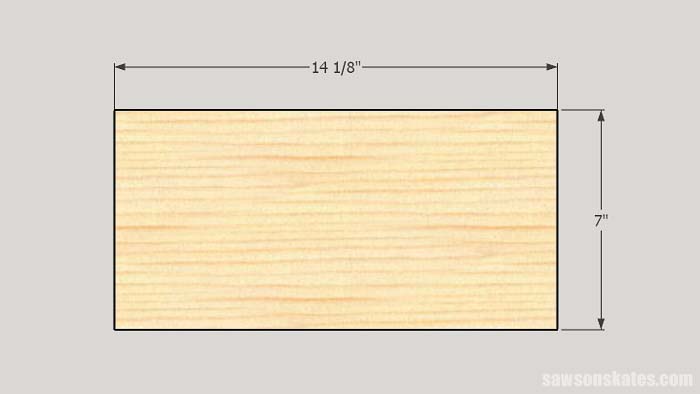
Step 2. Cut the Top and Bottom Panels
Cut 4 pieces of ¼” material (I made solid wood panels from 2x4s) to 14-⅛” x 7”.
Step 3. Assemble the Top and Bottom
To assemble the Top and Bottom of the cabinet follow the How to Build Shaker Cabinet Doors with a Kreg Jig instructions beginning with Step 2.
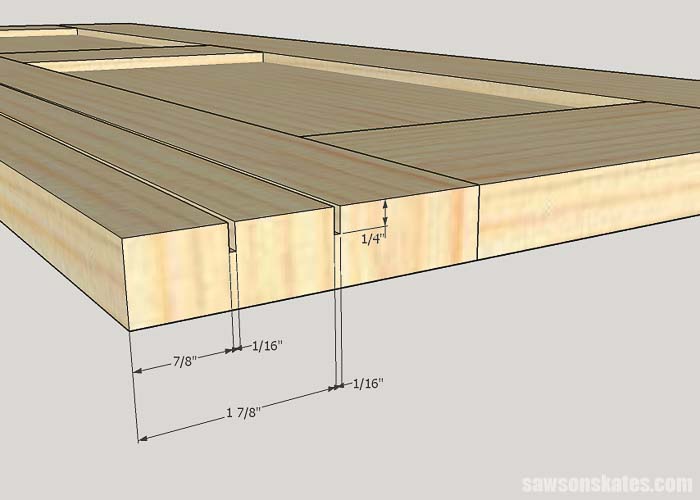
Step 4. Rout the Grooves for the Door Hardware
I mounted 1/16th router bit in my router table and set the bit to a depth of a 1/4”.
Related: How to Use a Router Table
I set the router fence so the first groove was 7/8” from the front edge and routed the groove in the top and bottom assemblies.
I repositioned the router fence so the second groove was 1-7/8” from the front edge and routed the groove in the top and bottom assemblies.
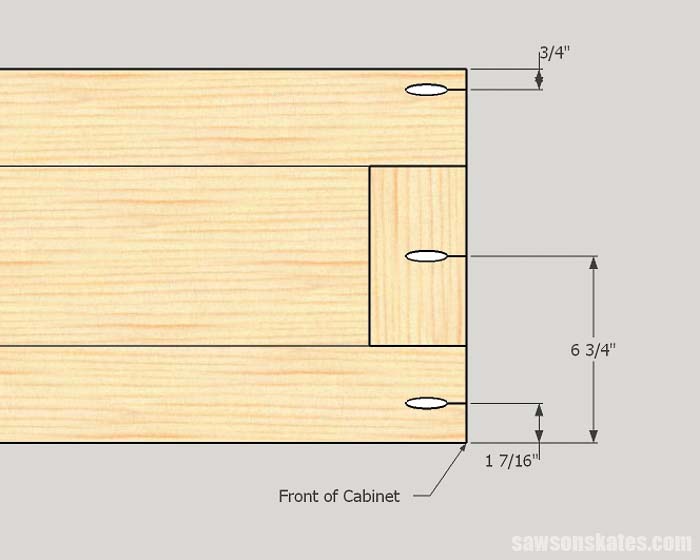
Drill pocket holes in the ends of the top and bottom assemblies making sure to avoid drilling pocket holes in the grooves.
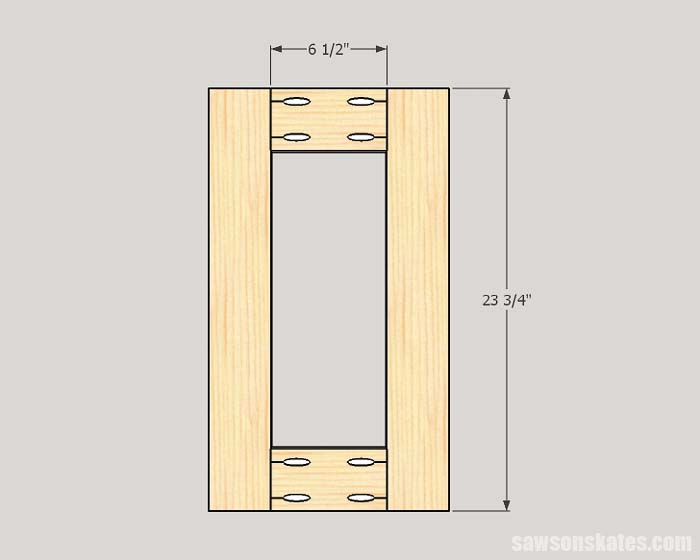
Step 5. Cut the Side Pieces
Cut 4 pieces of 1×4 to 23-¾”. Cut 6 pieces of 1×4 to 6-½” and drill pocket holes in each end.
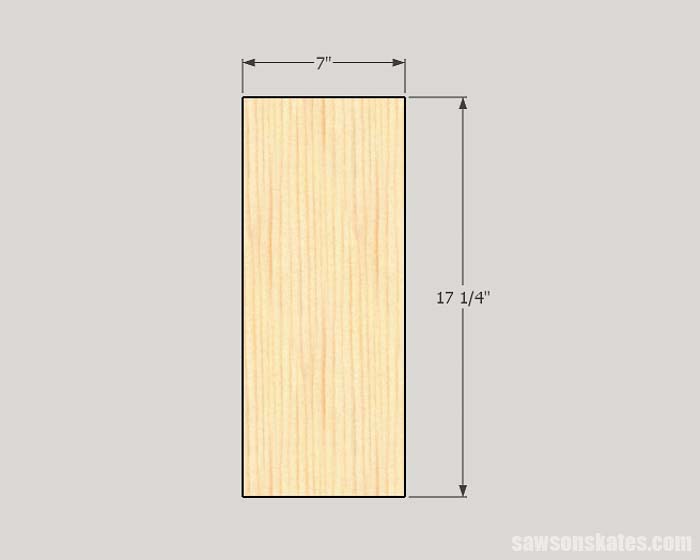
Step 6. Cut the Side Panels
Cut 4 pieces of ¼” material (I made solid wood panels from 2x4s) to 7” x 17-¼”.
Step 7. Assemble the Sides
To assemble the Sides of the cabinet follow the How to Build Shaker Cabinet Doors with a Kreg Jig instructions beginning with Step 2.
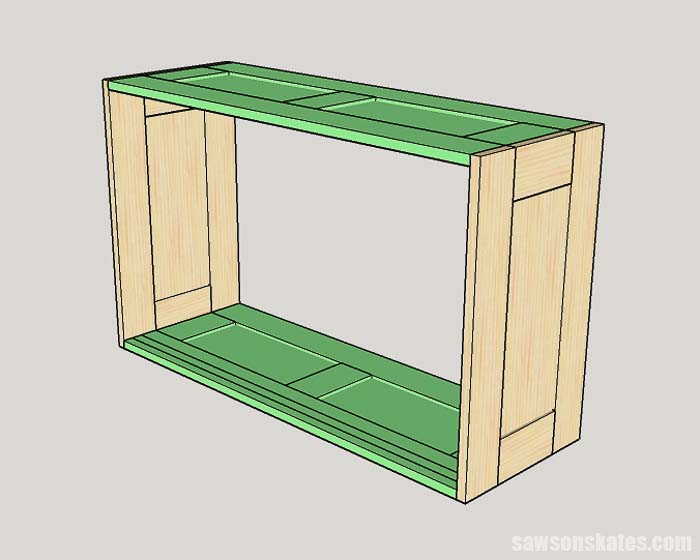
Step 8. Assemble the Cabinet
Apply glue to the ends of the top and bottom assemblies, position on the side assemblies and clamp. Attach with 1-¼” pocket screws.
Step 9. Drill the Shelf Pin Holes
I wanted my shelf pin holes to start about 2-½” from the bottom of the cabinet so first I clamped a piece of 1×3 scrap wood to the side of the cabinet.
Related: How to Use a Shelf Pin Jig
The front shelf pin holes need to set back 2-⅝” from the front of the cabinet to the center of the shelf pin hole. This will allow room for the the doors to slide.
For the front shelf pin holes, I removed the fence from the shelf pin jig. I placed the bottom of the jig on the scrap wood and the back edge of the jig so that it was flush with the front of the cabinet. I clamped the jig in position and drilled the shelf pin holes.
For the back shelf pin holes, I attached the fence to the jig so the holes would be positioned 1” from the edge of the cabinet. I placed the bottom of the jig on the scrap wood and the fence against the back of the cabinet. I clamped the jig in position and drilled the shelf pin holes.
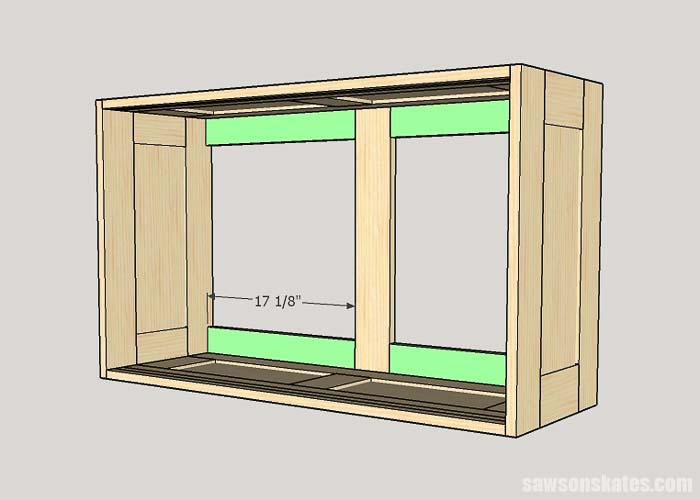
Step 10. Attach the Back Braces
Cut 1 piece of 1×4 to 22-¼” and drill pocket holes in each end. Apply glue and center on the back of the cabinet (17-⅛” from each side). Attach with 1-¼” pocket screws.

Cut 4 pieces of 1×3 to 17-⅛” and drill pocket holes in each end. Apply glue to each piece and position at the back of the cabinet. Attach with 1-¼” pocket screws.
Step 11. Make the Shaker Doors
Follow the Shaker Cabinet Door plan to build 2 doors for the storage cabinet. Be sure to measure the opening in the cabinet from top to bottom. The door should be built so it allows for ⅛” on the top and bottom. Adjust the measurements if necessary.
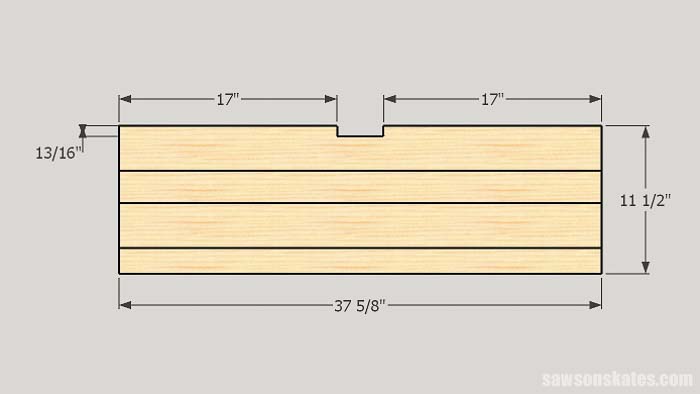
Step 12. Make the Shelves
Cut 4 pieces of 1×4 to 37-⅝” and 4 pieces of 1×3 to 37-⅝”. Glue 2 1x4s to 2 1x3s. When the glue is dry rip the shelf to 11-½” and use a jig saw to cut a notch for the back brace. Repeat for the second shelf.
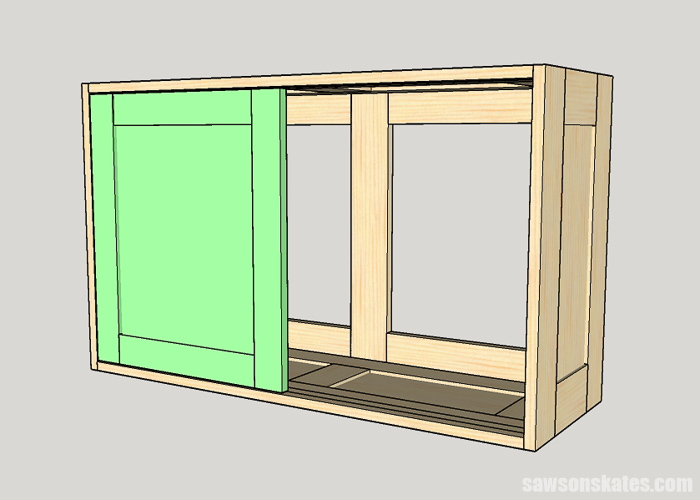
Step 13. Install the Doors
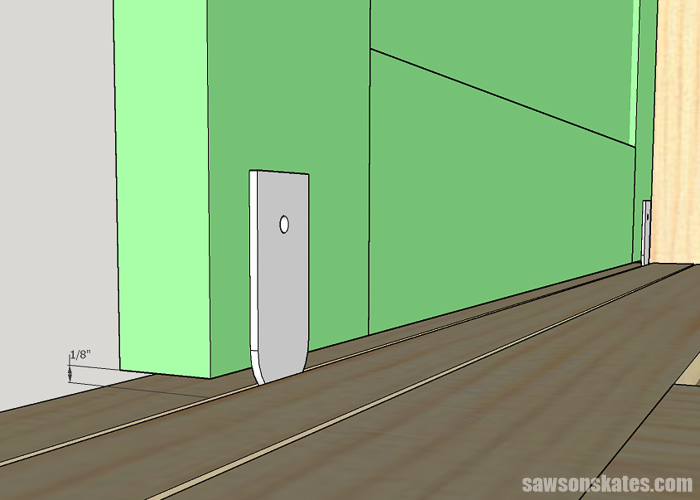
The doors need an ⅛” of clearance at top and bottom. I used playing cards to help with this spacing. I set the door in the opening, and I inserted as many cards as I could between top of the door and the cabinet. Then, I divided those cards in half. I placed half the cards under the door and the other half of the cards on top of the door.
I placed a sliding door pin in the groove and marked the hole on the door. I repeated this for the three other corners. I removed the door from the opening and attached the pins with screws. I left the screws loose so I could fit the door in the opening. I set the door in the opening, adjusted the pins so the door would slide easily, and tightened the screws.
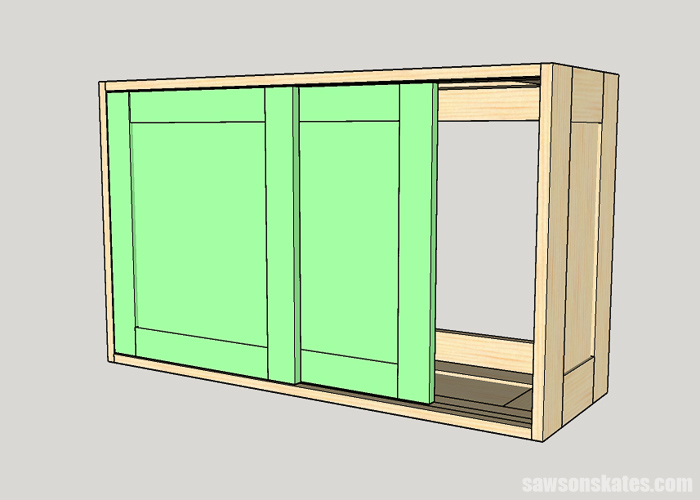
I attached the second door the same way as I attached the first door.
Step 14. Finish the DIY Tool Storage Cabinet
Sand, prime and paint the cabinet. Use the back braces to attach the cabinets to the wall studs. The shelves were sanded and finished with three coats of shellac.
Related: What You Need to Know About a Shellac Wood Finish
Final Thoughts
Organize your shop with these DIY storage cabinets specifically designed for a small workshop. The free plans show how to build space-saving cabinets with adjustable shelves and sliding Shaker-style doors. They’re easy to build with pocket holes and pocket screws.
Thank you for stopping by. If you found this information helpful, would you please pin it to Pinterest? Other DIYers would appreciate it and I would too! Thank you – Scott
Recommended For You
Pin This For Later
Where can I find the sliding door hardware?
Hi Thomas – Thank you for stopping by. I got my sliding door hardware at Rockler. I have a link to it in the supplies list.
Thanks for the quick reply.
Great Idea that, I will try to have a go later on when other things sorted out. In America you are very lucky as you have plenty of wood and good wood, and all kinds. Tools are plenty, and Kreg Products easy to come by and buy if you have the means to do so. Same too in the UK where I come from, I am an Ex-Pat now living in the Philippines. Started to learn more about DIY Woodworking a while back. Tools and good wood are very limited here, and expensive too. I managed to grab a few Kreg Items over the years, and some tools too, but not all that I would like to have. I enjoy your emails and projects and things to learn about. Many thanks Ken.
Thank You Scott For All You Do, I Appreciate You… And Your Valuable Time, To Always Keep Me Up To Date. Keoki
Hi Scott, are the sliding doors hardware only the pins? Thanks
Hi Carlos – Thank you for stopping by. Yes, the only hardware for the sliding doors is the sliding door pins. The pins slide in the grooves I made in the cabinet with my router.
Really like your projects and shop organization ideas. Have applied some of your concepts to my shop. Building tool stands on wheels for my jointer, drill press, router table etc. Putting drawers in the tool stands to store tools that go with what I have on the stand, ie router cutters with the stand for my router table. Utilizes space and helps keep things organized and accessible.