How to Use a Kreg Pocket Hole Jig 320
Learn how to use a Kreg Pocket Hole Jig 320! This ultimate guide shows you step by step how to quickly set the jig to make repairs and build new projects.
Kreg Pocket Hole Jig 320
The Pocket Hole Jig 320 is the newest addition to the Kreg family of pocket hole jigs. The 320 has an entry-level price but is loaded with foolproof and time-saving features!
It’s the perfect solution for making repairs to existing pieces or building new projects from scratch. It’s great for constructing small and large projects including those made with plywood. Plus, it’s compact so it doesn’t take up much space in a small workshop or toolbox.
Thank you to my friends at Kreg Tool for sponsoring this post!
This tutorial contains affiliate links to supplies and tools. Purchases made using these links help support the Saws on Skates website and allows me to share more projects and tips with you. There is no cost to you for using these links. Visit my site policies for more information.
Before we get into how to use the Kreg Pocket Hole Jig 320, be sure to click the subscribe button at the bottom of this page to sign up for my FREE weekly newsletter loaded with helpful pocket hole tricks, space-saving workshop ideas, clever DIY tips and more!
Table of Contents
- What is a Pocket Hole Jig?
- What is a Kreg Pocket Hole Jig 320?
- What’s Included With the 320 Pocket Hole Jig?
- VIDEO: How to Use a Kreg Jig 320
- How to Drill Pocket Holes with a Kreg Pocket Hole Jig 320
- How to Drive Pocket Screws
- Where to Position the 320 Pocket Hole Jig
- How to Change the 320 Pocket Hole Jig Configuration
- How to Use the Kreg Pocket Hole Jig 320 for Repairs
- Get the Free Kreg Jig 320 Setup Guide
What is a Pocket Hole Jig?
A Kreg Jig or pocket hole jig is an easy way for both beginners and advanced DIYers to join pieces of wood. I use my Kreg Jig for nearly every DIY project I build. In fact, I created an entire resource center for pocket hole joinery. It’s loaded with helpful posts about pocket hole jigs, pocket hole joints, and tips for troubleshooting pocket holes.
A Kreg Jig uses a guide block with preset holes to drill angled pocket holes into a workpiece. A pocket screw, specifically designed to be used with pocket holes draws the two workpieces together to form a strong joint.
What is a Kreg Pocket Hole Jig 320?
The Pocket Hole Jig 320 is the newest addition to the Kreg family of pocket hole jigs. The 320 looks similar to the Kreg Jig Mini and the Kreg Jig R3. What sets it apart from its pocket hole siblings is the advanced features at a beginner level price.
The engineers at Kreg Tool stepped up their game when they designed this new pocket hole jig. The simple settings of the 320 make drilling the right pocket hole for our projects nearly goof-proof.
Related: 9 Pocket Hole Mistakes You Don’t Want to Make
The 320 is an excellent choice for beginner, intermediate and advanced DIYers. It’s the perfect solution for making repairs to existing pieces or building new projects from scratch. It’s great for constructing small and large projects including those made with plywood. Plus, it’s compact so it doesn’t take up much space in a small workshop or toolbox.
What’s Included With the 320 Pocket Hole Jig?
Drill Guides
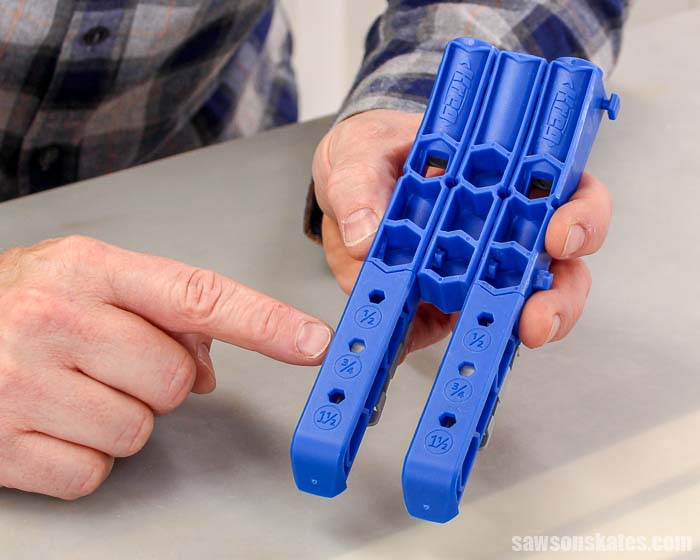
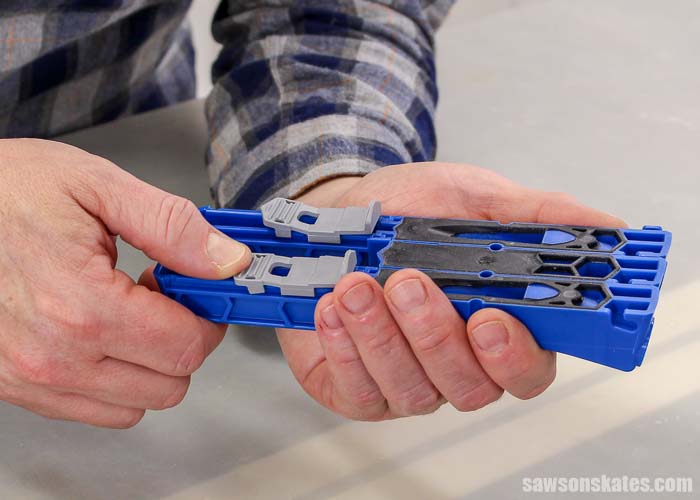
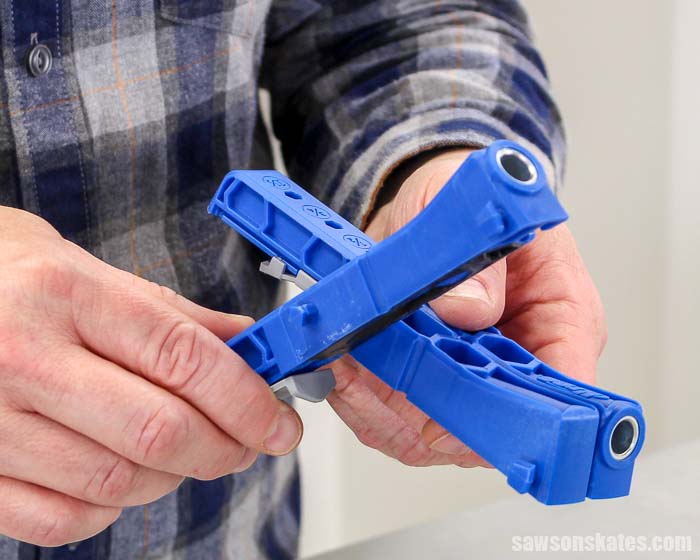
The 320 comes with two drill guides and a drill guide spacer. What’s unique about the drill guides is that they can be configured for a variety of applications.
The drill guides simply twist apart. This means a single drill guide can be used by itself for drilling one pocket hole at a time in projects like plywood. Two drill guides can be used side by side for drilling pocket holes in wood like a 1×2. Or it can be used with a spacer in between the two drill guides for drilling pocket holes in wood like a 1×4.
Related: Beginner’s Guide to Wood Sizes
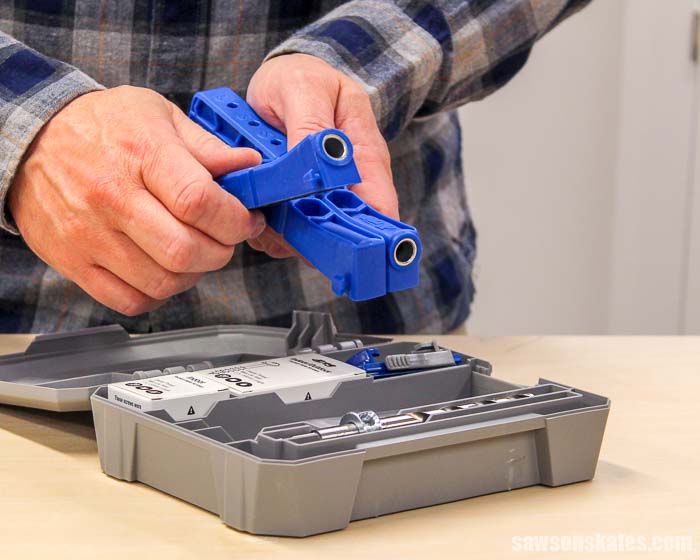
The drill guides also have material thickness stops. The thickness stops help properly position the jig on the workpiece. These stops can be adjusted to common thicknesses like ½”, ¾” and 1-½”. The thickness stop sections can also be removed so the drill guides can be used for making repairs to existing pieces.
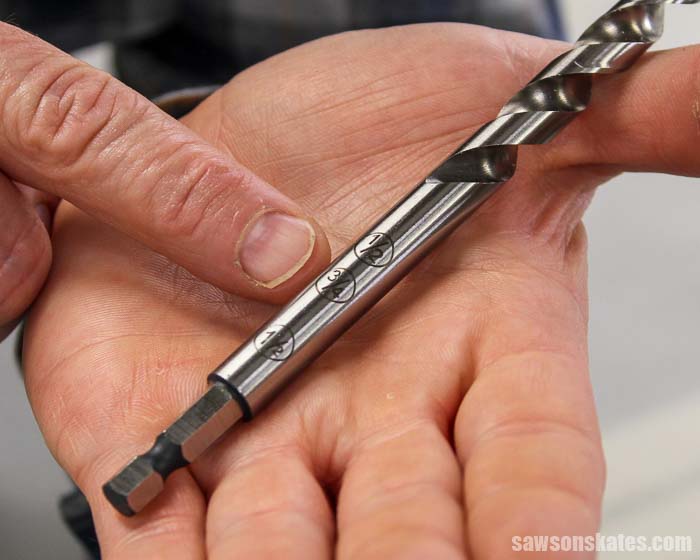
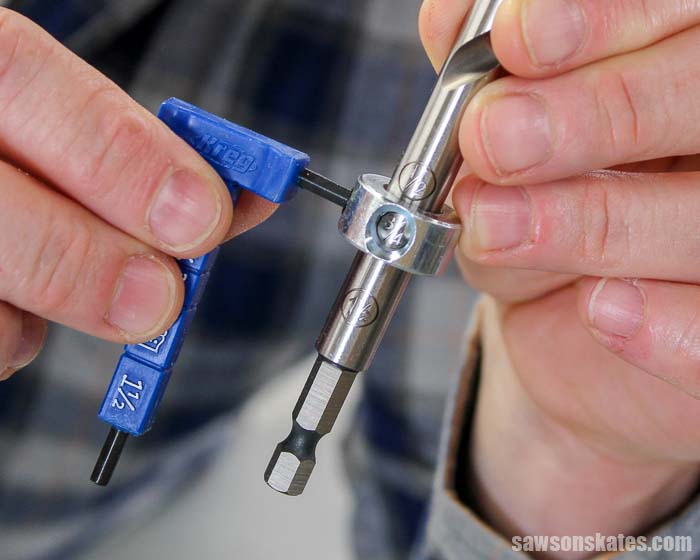
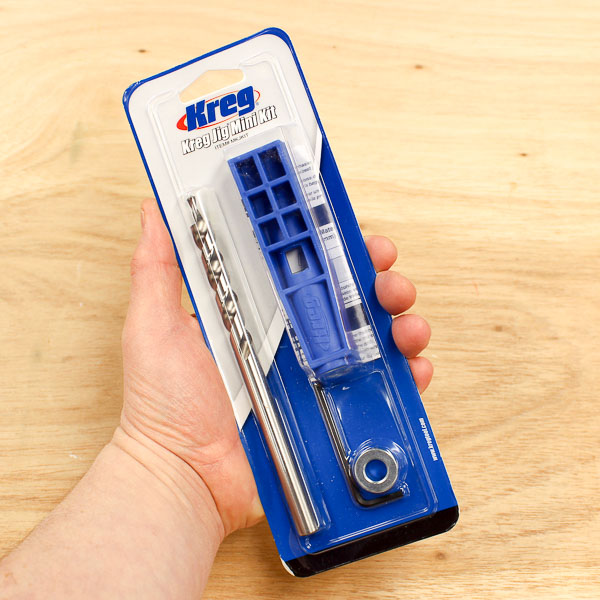
Drill Bit and Stop Collar
The 320 takes the guesswork out of setting the depth of the drill bit. The drill bit is engraved with common thicknesses like ½”, ¾” and 1-½”. All we have to do is slide the window in the stop collar over the thickness measurement on the bit and tighten the hex screw. So easy!
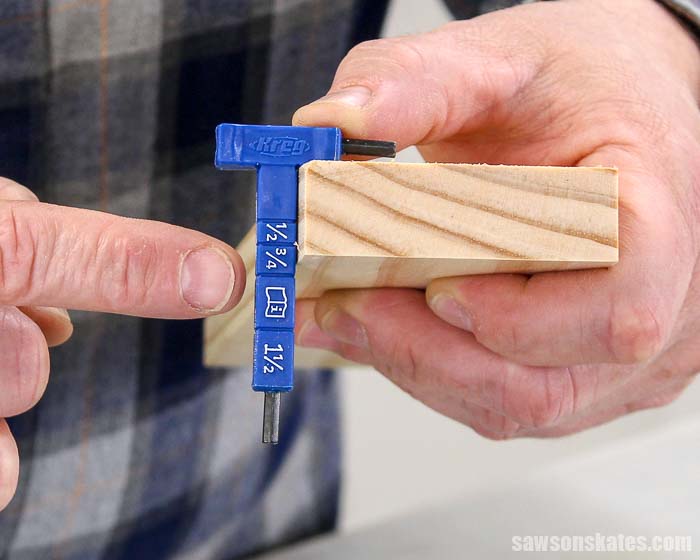
Material Thickness Gauge
The material thickness gauge is two tools in one. First, it’s used to measure the thickness of the wood we want to join. And second, it’s a hex wrench used to tighten the screw in the drill bit stop collar. Smart design!
6” Driver
The 320 includes a 6” square driver used for driving pocket screws.
Universal Clamp Pad Adapter
The Pocket Hole Jig 320 includes an adjustable clamp pad adapter that can be used with clamps like the Kreg Face Clamp.
Sample Screws
The 320 includes a package of 1-¼” pocket screws and a package of 2-½” pocket screws to get us up and building quickly.
VIDEO: How to Use a Kreg Jig 320
Watch this quick video now to see how to set up the 320 and use it for repairs with and without a clamp!
How to Set Up a Kreg Pocket Hole Jig 320
Step 1. Measure the Material Thickness
The first step to setting up a 320 is to determine the thickness of the wood we want to join. All we have to do is place the material thickness gauge on the side of our board. We’ll use this thickness measurement to set up the drill bit and the drill guides.
Related: How to Join Different Thicknesses with Pocket Holes
Step 2. Set the Stop Collar
Next, we’ll set the stop collar. All we have to do is match the thickness from the material thickness gauge to thickness engraved on the drill bit. We’ll slide the window in the stop collar over the thickness measurement on the bit and tighten the hex screw with the material thickness gauge.
Step 3. Position the Material Thickness Stop
The last thing we’ll do is set the thickness stops on the drill guides. Again, we’ll match the thickness from the material thickness gauge.
To change the setting of the material thickness stop we’ll simply press down on the gray tab. Then we can push the stop back and forth to the setting we need.
How to Drill Pocket Holes with a Kreg Pocket Hole Jig 320
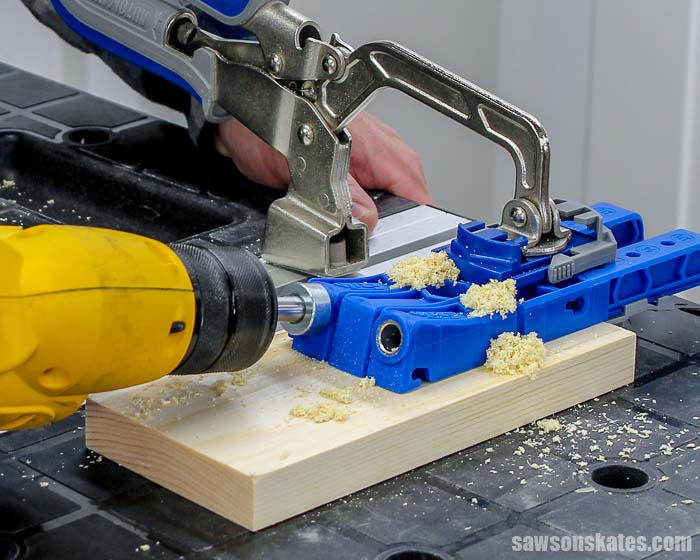
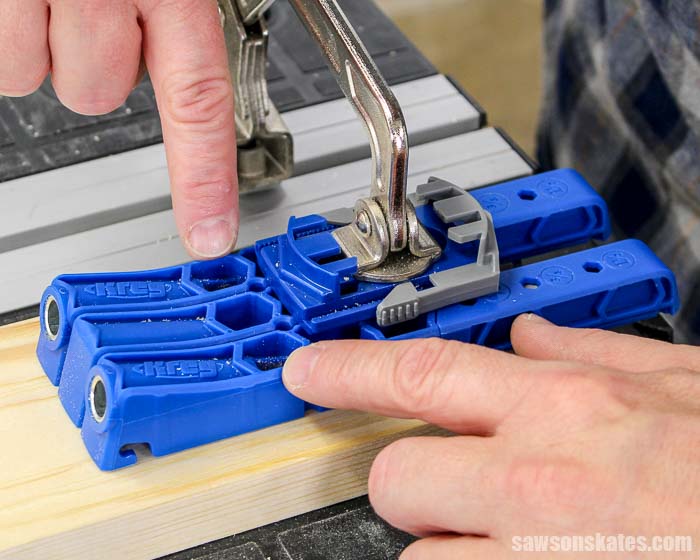
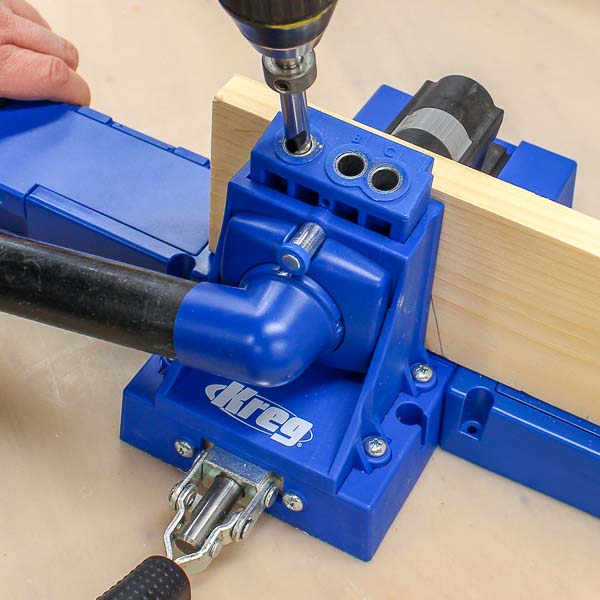
Step 1. Clamp the Jig to the Workpiece
We need to clamp the jig to the workpiece. Don’t drill pocket holes without a clamp. This could be dangerous to our hands!
First, we’ll position the material thickness stops on the edge of the board.
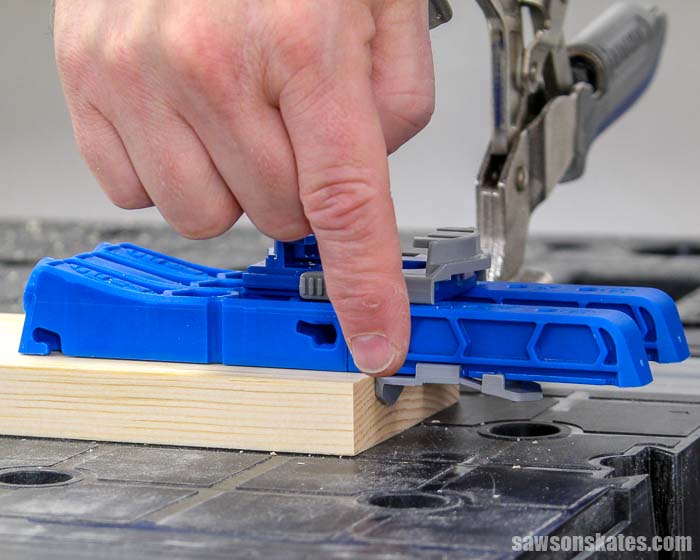
Then, we’ll clamp the jig to the board. Make sure the clamp isn’t blocking the chip ejection holes.
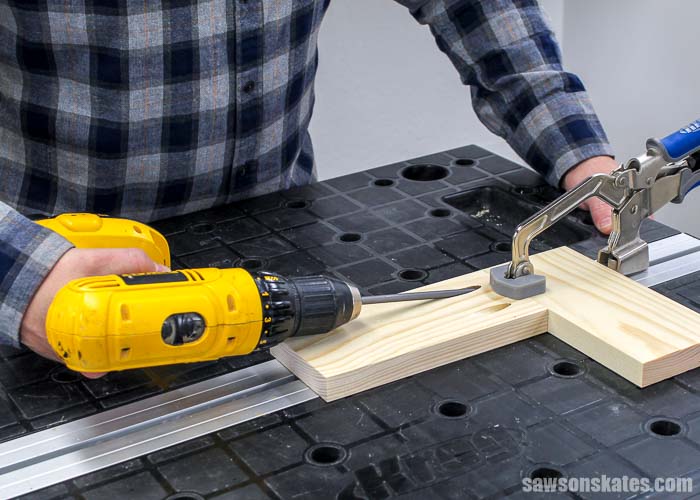
Step 2. Drill the Pocket Hole
Next, we’ll drill the pocket holes. I prefer to use a corded drill for drilling pocket holes. A cordless drill begins to slow down as the battery loses its charge. A corded drill keeps a constant speed because it has a constant supply of power. This constant speed produces pocket holes with crisp, clean edges. Be sure the battery is fully charged if you’re drilling pocket holes with a cordless drill.
Related: 5 Easy Fixes Guaranteed to Prevent Rough Pocket Holes
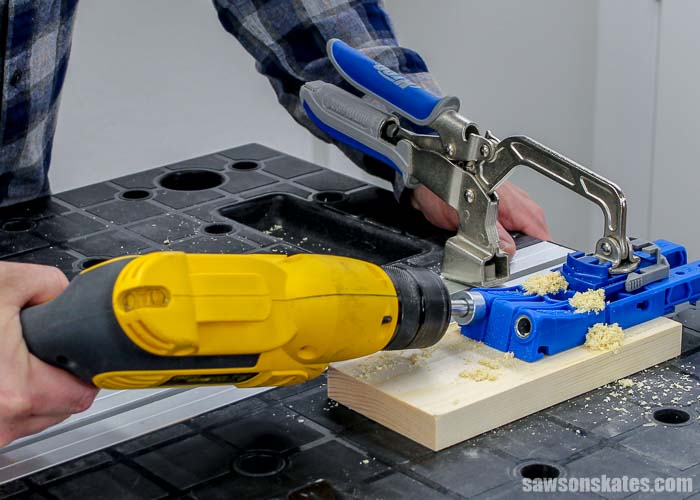
We’ll chuck the drill bit in our drill and insert the drill bit into the guide block until it touches the wood. Slightly raise the drill bit and bring the drill up to full speed. Then, gently lower the bit into the wood and start drilling the pocket hole. Keep drilling until the stop collar on the drill bit touches the drill guide.
TIP: Don’t push the drill. Allow the drill to pull itself through the wood.
How to Drive Pocket Screws
Pocket screws are available in two thread patterns. We need to choose the right thread pattern for the type of wood we’re working with.
- Fine-thread pocket screws are designed to be used with hardwoods like oak, maple, and poplar.
- Coarse-thread pocket screws are designed to be used with softwoods like pine, plywood, and MDF.
Related: 7 Ways to Prevent Pocket Screws from Splitting Wood
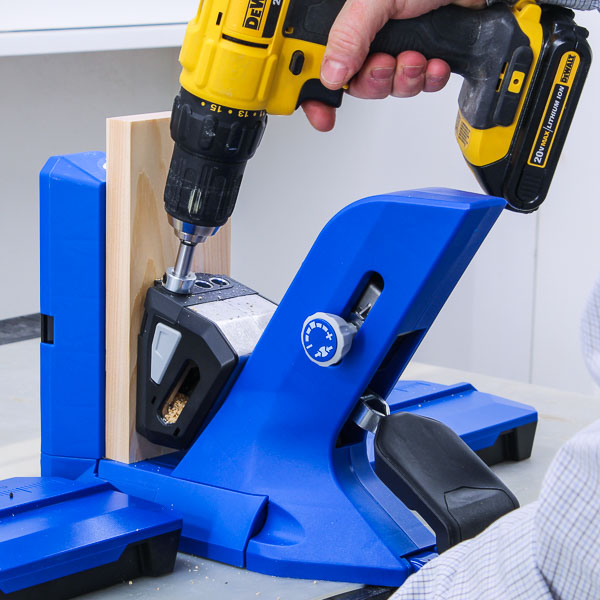
Step 1. Clamp the Joint
I’ve tried to assemble pocket hole joints without using clamps. The joints always come out of alignment and the faces of those joints are never flush. Sure, we can assemble without clamps, but that means those joints will require a lot of sanding to get the faces flush. It’s much easier to properly clamp the joint and avoid all of that extra sanding.
We can use a Face Clamp, Right Angle Clamp or bar clamps to clamp the joint. For this example, I used the Bench Clamp on my Kreg Mobile Project Center.
Related: How to Prevent Pieces from Moving When Assembling Pocket Hole Joints
Step 2. Drive the Screws
I prefer to use my cordless drill to drive pocket screws. My cordless drill has a clutch. Setting the clutch prevents overtightening the pocket screws.
Related: Impact Driver vs Drill: What’s the Difference?
Pocket screws should only be tightened until they’re just snug. Overtightening can strip the pocket hole. My drill works best for driving pocket screws on setting number 3.
Place the pocket screw in the pocket hole and drive the screw until it’s just snug.
Where to Position the 320 Pocket Hole Jig
1×2 Wood (1-1/2″ Wide)
Configure the 320 with two drill guides and center the jig on the workpiece.

1×4 Wood (3-1/2″ Wide)
Configure the 320 with a spacer in between two drill guides and center the jig on the workpiece.
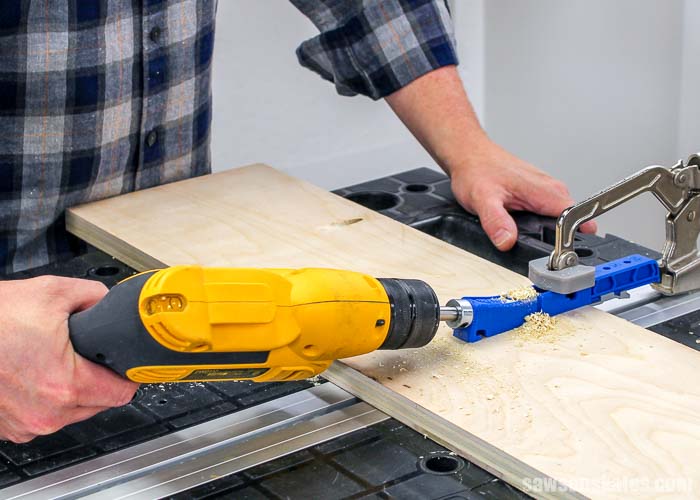
Wide Workpieces
For wide workpieces like plywood and for joining boards to build panels or tabletops use one drill guide.
Related: How to Use Pocket Holes on Edge Joints
How to Change the 320 Pocket Hole Jig Configuration
It’s easy to change the configuration of the 320 Pocket Hole Jig. Simply push the drill guide, twist and pull apart. Just reverse the steps to reattach the guides and the spacer.
How to Use the Kreg Pocket Hole Jig 320 for Repairs
The 320 is great for making repairs to existing pieces. Get the free Kreg Jig 320 Setup Guide. It includes the complete setup tutorial and instructions about how to use the jig for repairs! Get your free setup guide now!
Final Thoughts
The Pocket Hole Jig 320 is the newest addition to the Kreg family of pocket hole jigs. The 320 has an entry-level price but is loaded with foolproof and time-saving features! It’s the perfect solution for making repairs to existing pieces or building new projects from scratch. It’s great for constructing small and large projects including those made with plywood. Plus, it’s compact so it doesn’t take up much space in a small workshop or toolbox.
Thank you for stopping by. If you enjoyed this tutorial, would you please take a moment and pin it to Pinterest? I’d really appreciate it!
Recommended For You
Pin This For Later

Hi Scott, great post! I bought a Kreg jig a few years ago and haven’t even opened the box yet! I am wondering if you would recommend this new Kreg tool over the older one for someone who has never used one? I can always sell the other one on Craigs, etc, if the newer one is a LOT better for beginner. (I like the term “almost fool proof”) Thanks for your input! Julie
Hi Julie – Thank you for the compliment! This is a really tough call. All of the Kreg Jigs work well. The 320 does have some settings that make it really easy to set up. I especially like the 320 drill bit with the engraved measurements. My other drill bits don’t have this feature and in the past I’ve accidentally drilled a few pocket holes too deep. It’s great to be able to look at the drill bit and know exactly what thickness it’s set for!
Thanks Scott! I think you’ve convinced me to put my old “new” unopened Kreg jig on Craigs. Btw, I absolutely love your posts. So informative…and so easy to understand! Julie
Hi Scott, I really appreciate you taking the time to make these videos. I’ve retired recently and am beginning to set-up my shop. I’ve purchased everything KREG has to offer and look forward to using them proficiently. Your instructional videos provide that needed insight.
Thanks again,
J. Myers
Thank you for stopping by and for the compliments. Kreg makes some awesome tools!
Which Kreg jig would you buy as an absolute beginner to this tool. Do you also need special screws or other items to get started?
Hi Sue – I think the Kreg Jig 320 is great for beginners. It’s affordable and loaded with features that make it easy to use for beginners. You will need to use pocket screws to join pocket hole joints. Most jigs come with a few screws to get you started. The site has more than 20 tutorials to help you get started with pocket hole joinery. I would begin by checking out How to Use a Kreg Jig and 9 Pocket Hole Mistakes You Don’t Want to Make.
So I recently bought the Kreg 320 and have just made my first pocket hole! I’m using 1/2 inch wood and the smaller screws that came with the tool, but the screws don’t drive all the way in and the head of the screw can still be seen protruding slightly from the hole. What am I doing wrong? I love your posts, but would also love them in printed form. (I was not born in the computer age!) Any plans for writing a book?
Cheers
Sue
Hi Sue – You’re not doing anything wrong. Pocket screws are just barely flush with the surrounding or sometimes protrude when working with 1/2″ material. Unfortunately, 1/2″ material isn’t thick enough to completely hide the head of the screw and to leave enough material at the bottom of the hole for the screw to seat against. Thank you so much for your compliments. Sure, I could write a book! Is there a particular area of woodworking that I should focus on?