How to Use a Tape Measure Correctly (Tips for Success)
Are you confused about reading a tape measure? This step-by-step guide will show you how to use a tape measure and take accurate measurements every time.
Tape measures are among the most common tools used in carpentry, woodworking, and home improvement projects. They’re also one of the least understood. Are you intimidated about using a tape measure? Tired of measuring incorrectly and getting the wrong results? I’m sharing need-to-know tricks and tips to help you conquer your tape measure and use it like a pro!
This tutorial contains affiliate links to supplies and tools. Purchases made using these links help support the Saws on Skates website and allows me to share more projects and tips with you. There is no cost to you for using these links. Visit my site policies for more information.
Table of Contents
What is a Tape Measure?
A tape measure, also called a measuring tape, is a tool used to accurately measure distances between points such as an object’s length, width, or height. It has a long, flexible ribbon or tape that can be pulled out and retracted into a housing. The tape is usually yellow and marked with graduated units of measurement, typically in inches or centimeters.
Tape measures are frequently used in construction, architecture, building, home improvement projects, crafts, and woodworking for a variety of tasks, the most popular of which is to take measurements.
Measuring with a tape measure allows you to calculate how much material you will need to buy or the size of an object. In addition to measuring objects and distances, you can also use a tape measure to mark out spaces.
Tape measures range in length from 6 feet to 25 feet and even longer.
Shorter tapes are best for smaller-scale interior projects like hanging artwork, measuring cabinets, or measuring the inside width of a windowsill. Longer tapes are best for larger-scale tasks like measuring rooms, framing, decks, and outdoor projects.
Tapes may also be used for applications beyond measuring, like drawing circles.
Back to Table of ContentsParts of a Tape Measure
Although each tape measure may look slightly different or have different features, the following are the essential parts you’ll want to be familiar with.
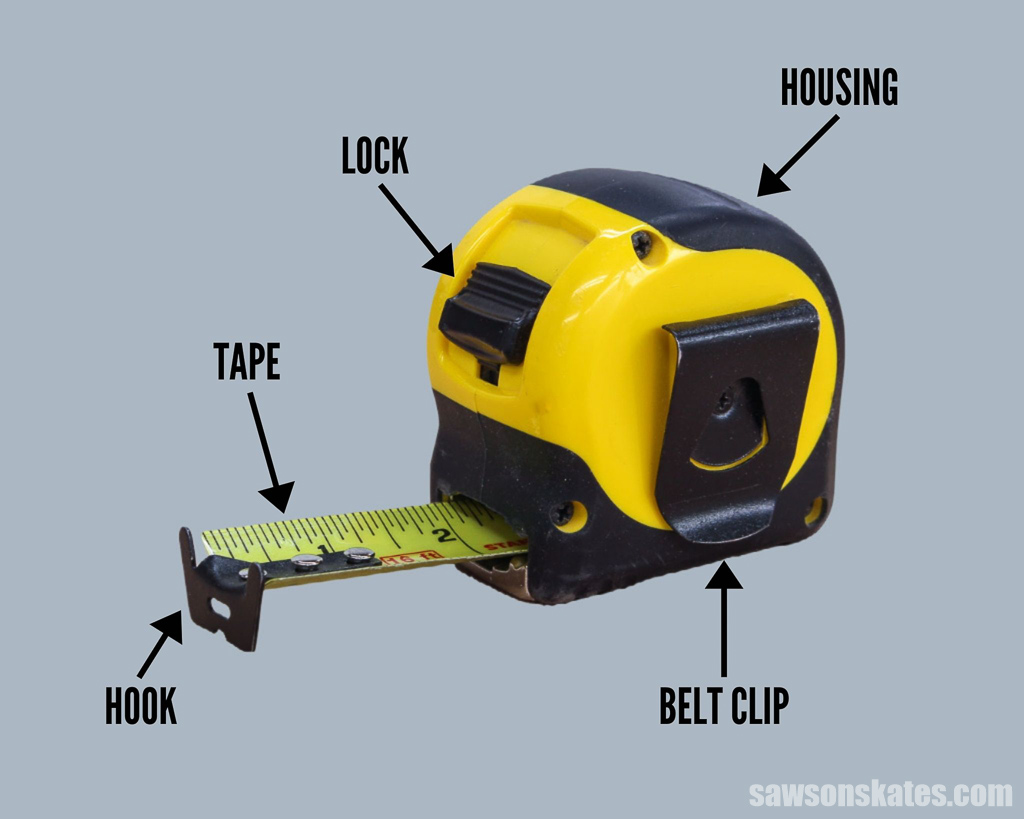
Housing
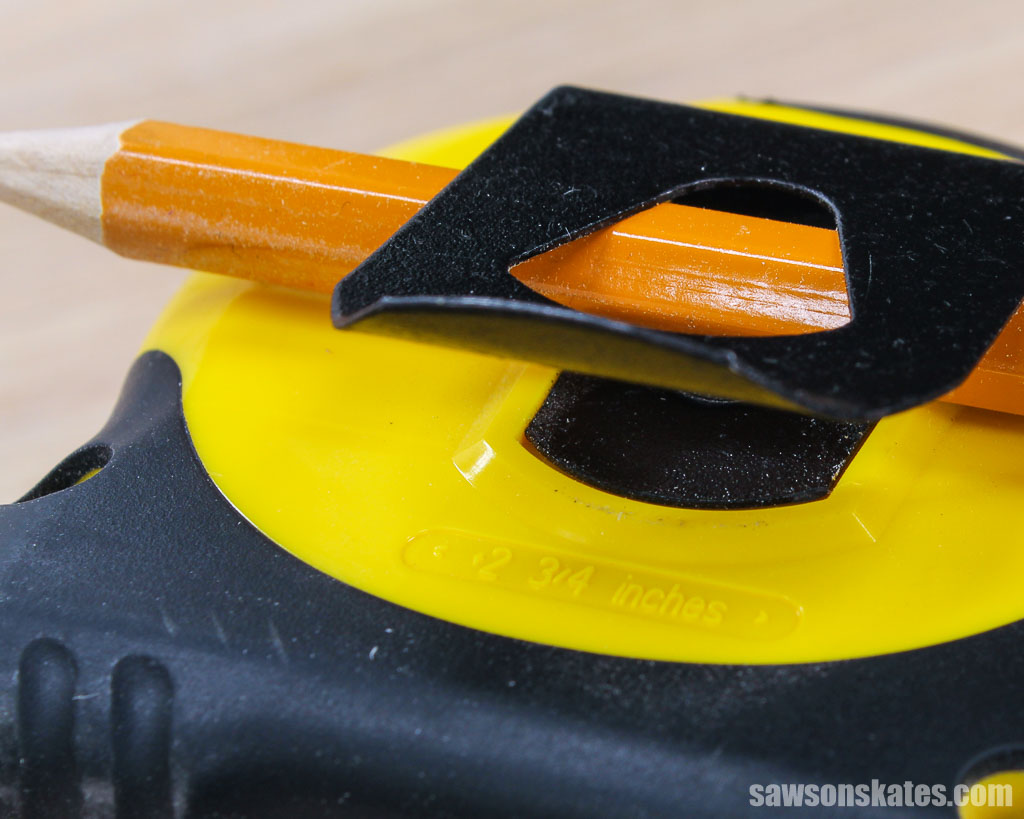
The housing, or case, is the holder for the coiled tape. Plastic or metal is typically used to make most housings. The housing is also a measuring tool used when taking inside measurements. The length of the housing is generally indicated near the base of the tool.
Hook
At the end of the tape, the hook (also known as a tab, tang, latch, lip, clip, or bracket) serves several functions. It’s used to remove the tape from the housing and keep it from disappearing inside when it recoils.
The hook also holds the tape in place for measuring. It may be hooked over or under the edge of an object, or latched around the head of a screw or nail. It may also be pressed against surfaces, such as a wall.
Lock
A spring wound around a post within the housing connects to the tape. After it’s been extended, tension from the spring causes the tape to recoil. You can use your thumb to engage the lock and hold the tape at the required length once it has been extended.
The lock prevents the tape from being pulled out further or retracting, and releasing the lock allows the tape to retract into the housing.
Tape
The tape or blade is the flexible, retractable part of the tool. The tape is a metal strip marked with graduated units of measurement, typically in inches or centimeters, and some are marked with both inches and centimeters. Tapes are most often yellow but can also be white.
Tapes have a curved design that helps them maintain their shape even when stretched out over long distances.
Tapes come in various lengths, from 6 feet to 25 feet, and some are even longer. Tapes are also available in various widths. Wider tapes are stronger, more durable, and can extend farther without buckling than narrow ones. The maximum length a blade may extend before collapsing due to its own weight is known as standout.
Belt Clip
Many tape measures have a belt clip attached to the housing. The clip lets you hang your tape measure from your belt, tool belt, or pocket for convenient access while working on a project.
Back to Table of ContentsHow to Read a Tape Measure
Reading a tape measure can be intimidating. It’s understandable to feel overwhelmed or to be confused by all of the lines and symbols. But taking accurate measurements is essential for woodworking and home improvement projects.
The best way to master reading a tape measure is to practice. The more you use a tape measure, the better your eye will get at recognizing how an inch is divided.
Reading a Tape Measure is as Easy as Pie
When measuring an object, the measurement will likely fall somewhere between the inches rather than exactly on an inch mark. This is known as a fraction. For some people, the word fraction brings up unpleasant memories of their dreaded high school math class. Don’t panic. These fractions are as easy as pie.
Let’s imagine an apple pie (or a pizza pie if you’re not in the mood for dessert). Cut your pie precisely down the middle into two equal parts and move one part to a plate. The precise middle of an object is known as half. The term half is used anytime a measurement is divided into two equal parts. You moved one half (written as ½) of your pie onto the plate. That’s a fraction!
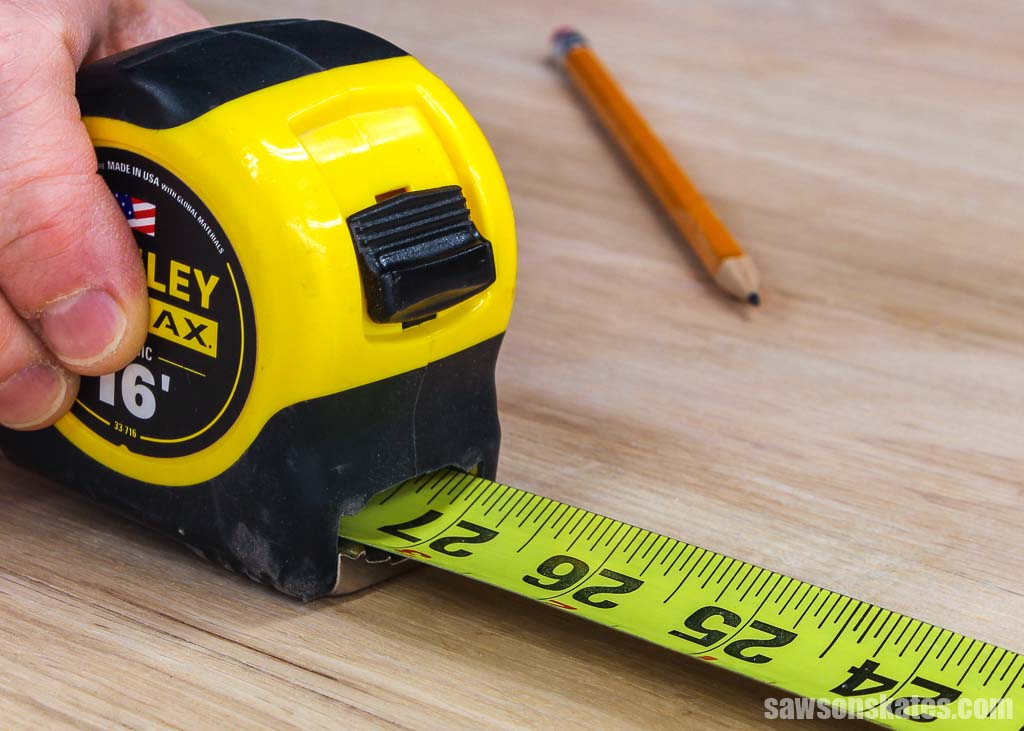
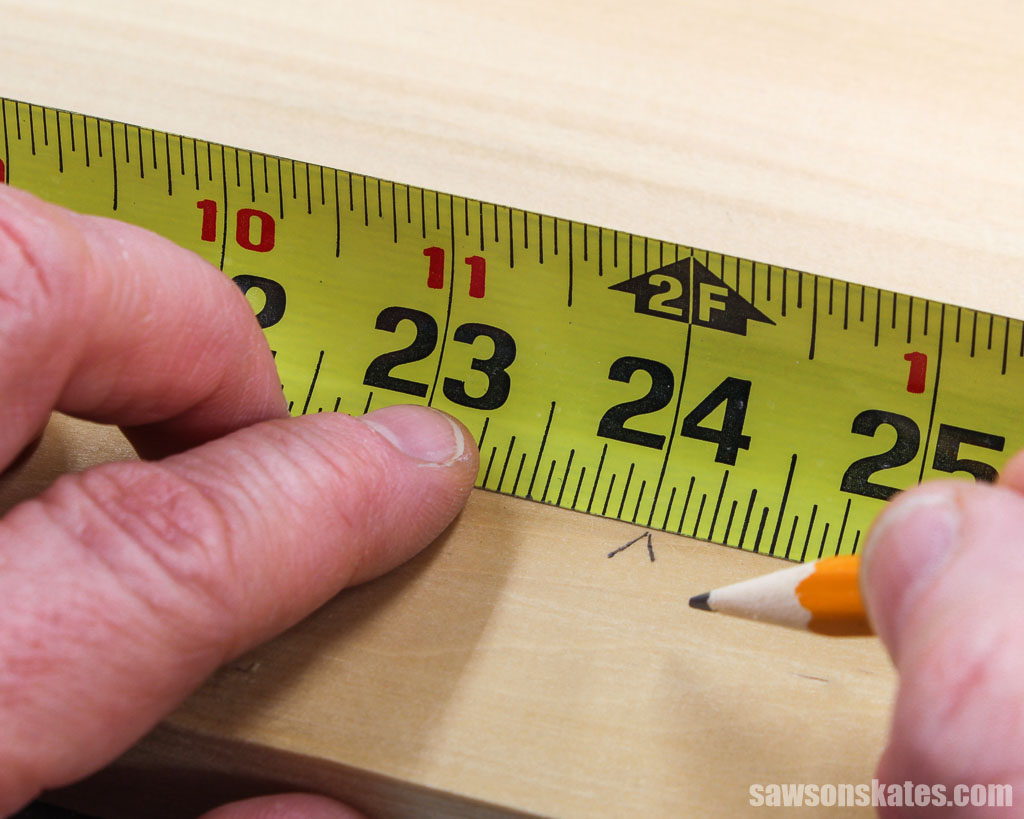
💡 TIP: Some measuring tapes like this one label the fractions on the tape, making the increments easier to read.
You can divide an inch into small equal parts just like you divided the pie. The bottom number of the fraction indicates how many parts something is divided into.
- When an inch is divided into two equal parts, each part is called a half or half of an inch (written as 1/2).
- When an inch is divided into four equal parts, each part is called a fourth or a quarter of an inch (written as 1/4).
- When an inch is divided into eight equal parts, each part is called an eighth or an eighth of an inch (written as 1/8).
- When an inch is divided into sixteen equal parts, each part is called a sixteenth or a sixteenth of an inch (written as 1/16).
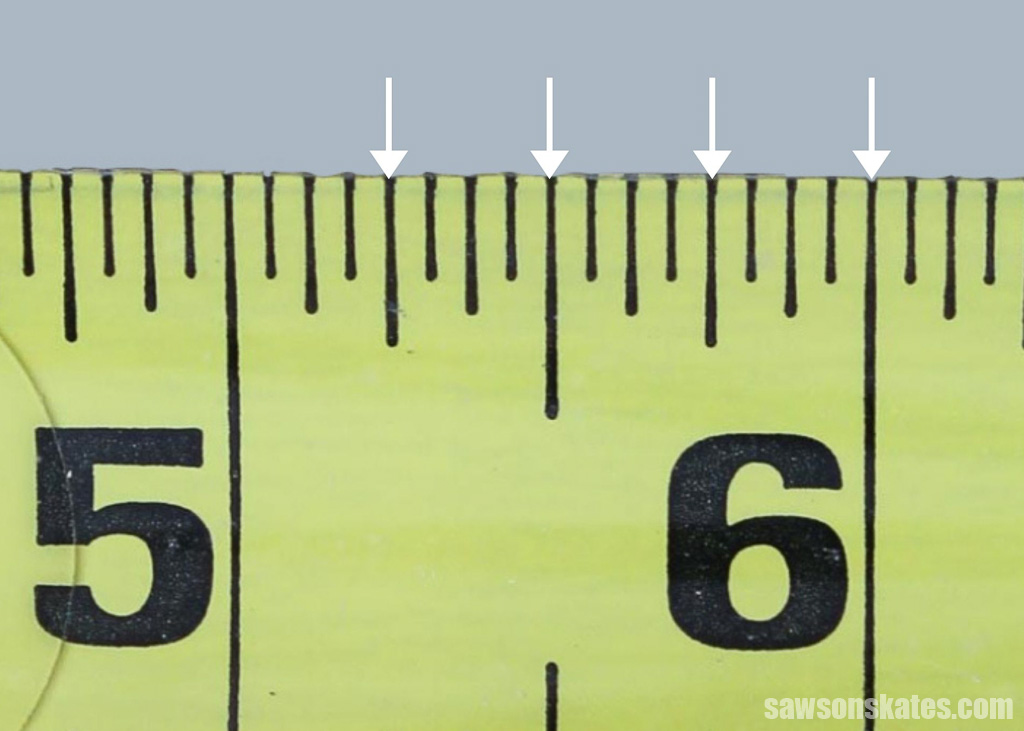
Check out the tape measure below, paying close attention to the lines between the 5” and 6” marks. Every line on a tape measure is like a slice of pie, dividing an inch into equal parts. Each of these lines is a different length making your tape measure easier to read. Generally speaking, the longer the line, the longer the measurement.
Sixteenth (1/16)
Count the white arrows, and you’ll see there are sixteen spaces. These lines are 1/16 of an inch apart, usually spoken as a sixteenth of an inch, and written as 1/16″. A sixteenth is the smallest increment on this tape measure, and they are also the shortest lines.
There are sixteen (16) equal parts or sixteenths (1/16) in one inch. Common sixteenth measurements are 1/16″, 3/16″, 5/16″, 7/16″, 9/16″, 11/16″, 13/16″, and 15/16″.
16/16″ equals one full inch, so rather than saying 16/16″, you would say an inch.

Eighth (1/8)
Next, count the white arrows on every second mark or the next longest line, and you’ll see there are eight spaces. These lines are 1/8 of an inch apart, usually spoken as an eighth of an inch, and written as 1/8″. An eighth-inch is longer than a sixteenth, and eighth-inch markings are the second-longest lines.

Two sixteenth marks are equal to one eighth (1/16 + 1/16 = 2/16 but this fraction can be reduced. When a fraction is reduced, it’s written in the smallest value that will still produce a whole number. In other words, reducing a fraction divides the numerator (top number) and denominator (bottom number) by their greatest common divisor. For example, 2/16 is divisible by 2, and the reduced fraction is 1/8 (one eighth).
There are eight (8) equal parts or eighths (1/8) in one inch. Common eighth measurements are 1/8″, 3/8″, 5/8″, and 7/8″.
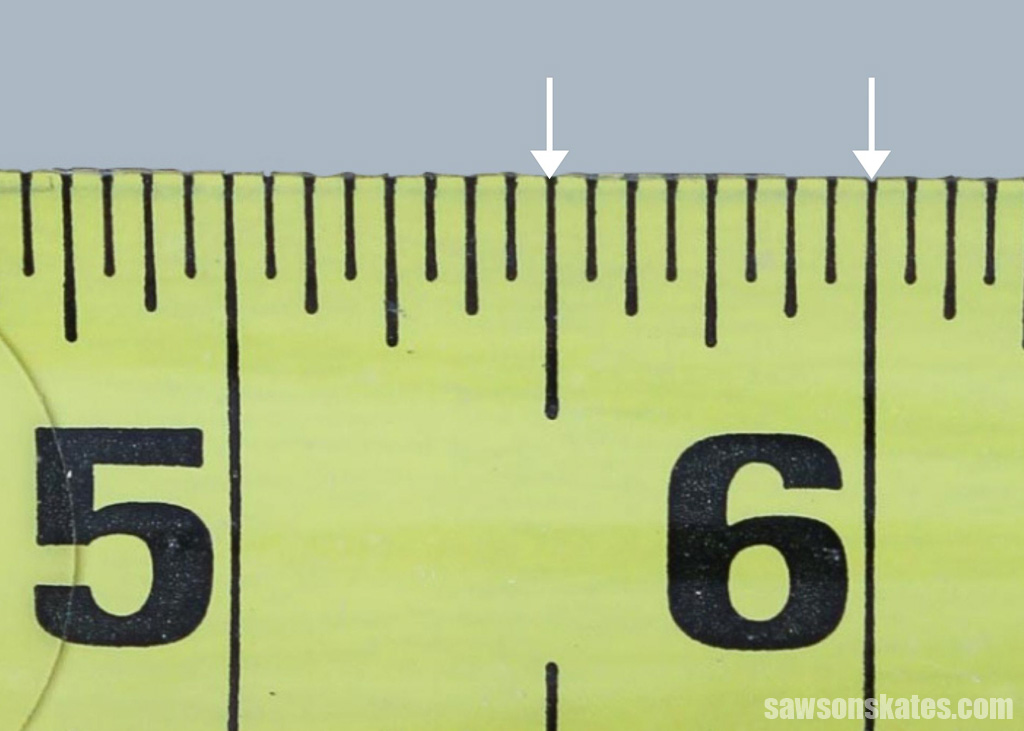
Quarter (1/4)
Count the white arrows on every fourth mark or the mid-length line, and you’ll see there are four spaces. These lines are 1/4 of an inch apart, usually spoken as a quarter of an inch, and written as 1/4″. A quarter inch is longer than an eighth, and its marks are the third-longest lines.
Two eighth marks are equal to one quarter (1/8 + 1/8 = 2/8 but this fraction can be reduced to 1/4 (one quarter).
There are four (4) equal parts or quarters (1/4) in one inch. Common quarter measurements are 1/4″ or 3/4″.
Half (1/2)
The remaining and longest line between the inch marks is ½ because it divides the inch into two equal parts. The half-inch mark is halfway between a full inch.
Some measuring tapes only show line at the half-inch mark, and others show the line, and the 1/2.
Two quarter marks are equal to one half (1/4 + 1/4 = 2/4 but this fraction can be reduced to 1/2 (one half).
Inches
The distance between the two largest marks on a tape measure is one inch. On a tape, inches are usually the most straightforward measurement to read. Inch marks are traditionally bold, large numbers and extend along the length of the tape.
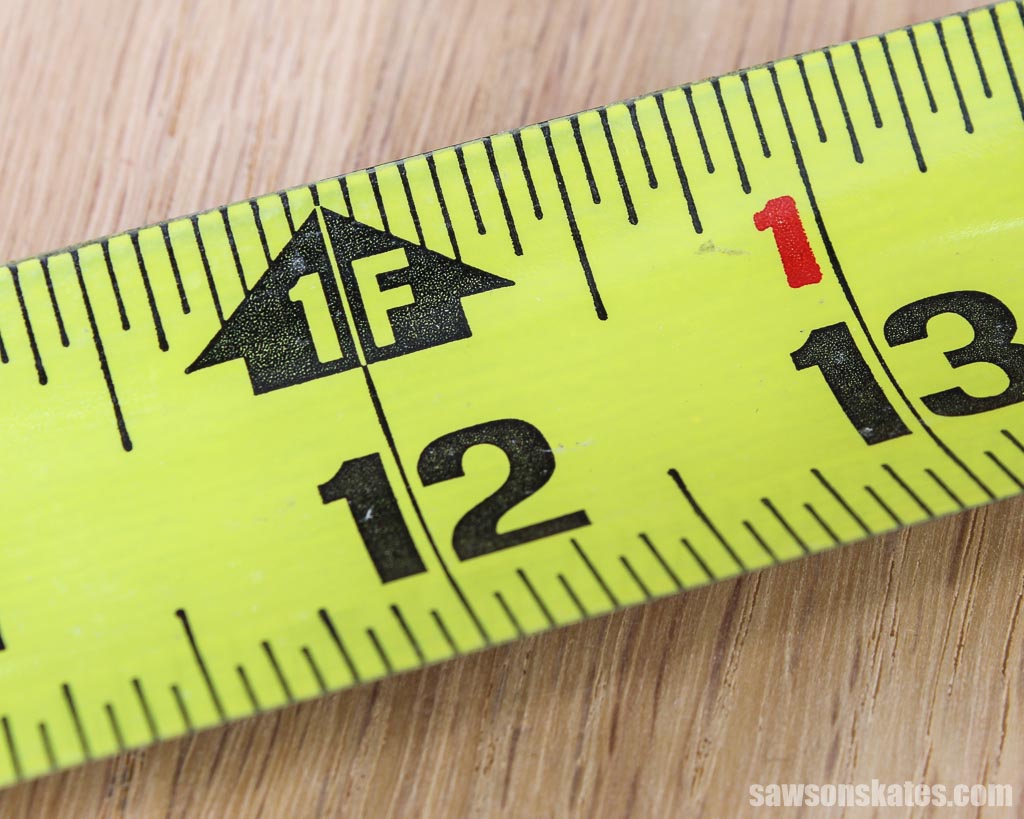
Foot
Twelve inches is equal to one foot. A quarter inch is longer than an eighth, and its marks are the third-longest lines. Inside the box, you’ll see a measurement like 1F, which indicates you’ve reached the one-foot mark. The tape is marked in 12-inch intervals making it simple to read the total feet and inches.
1⁄32
Some tapes are divided into thirty-seconds (1⁄32) which are even smaller than sixteenths.
Additional Marks
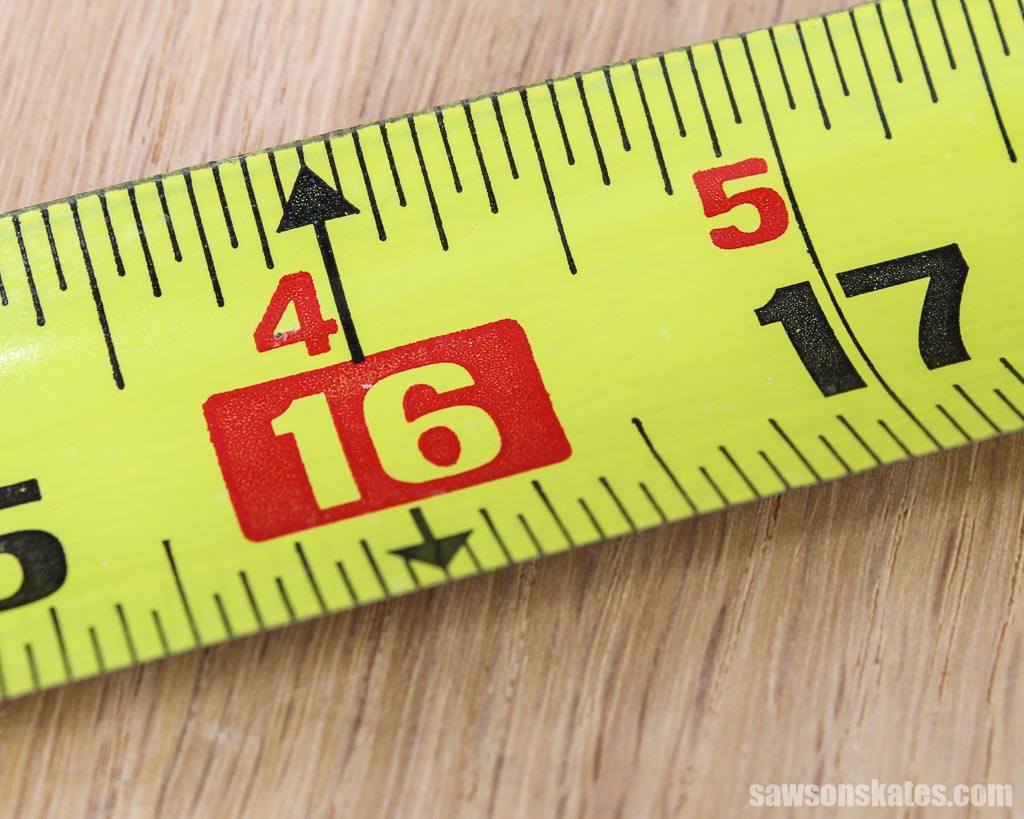
- Red Squares
- Wall studs are generally set apart 16-inches on center in home construction. This distance enables 8-foot sheets of material to be attached without being cut. Some tape measures have red squares every 16-inches, making it quick and straightforward to determine the stud locations.
- When you know where one stud is, you can simply measure from one to locate the next.
- Some floor joists are also spaced 16-inches on center.
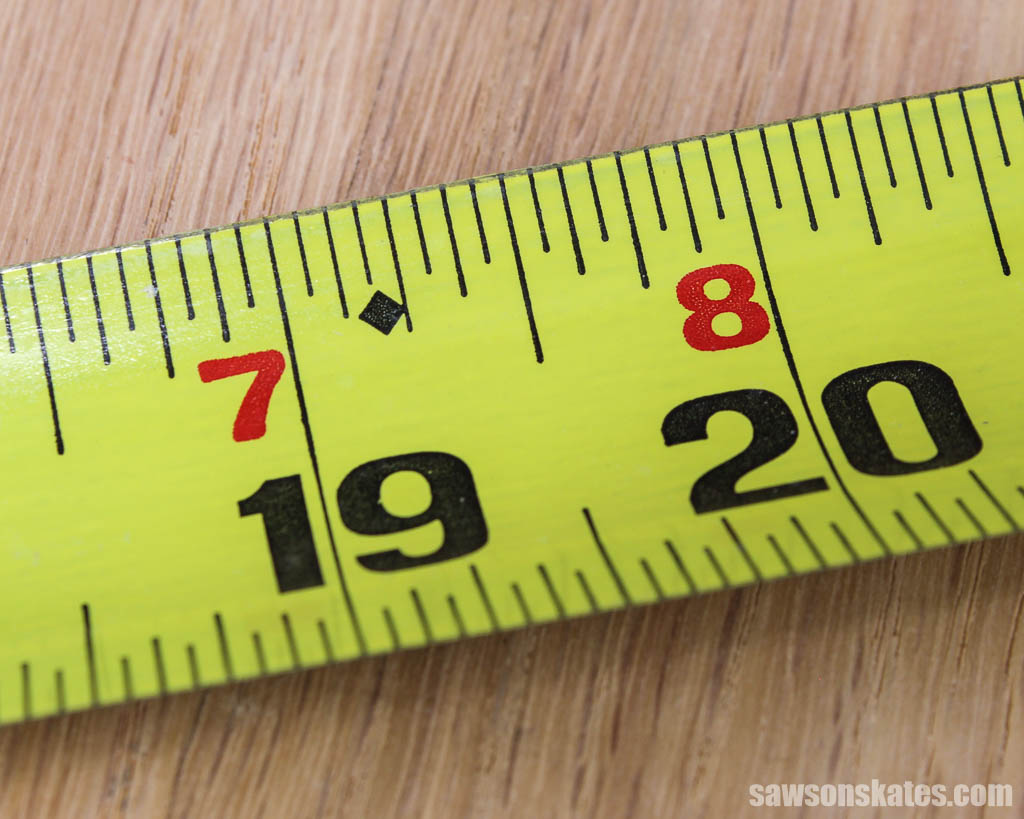
- Black Diamonds
- Engineered joists are generally set apart 19-3/16-inches on center in home construction. This distance enables 8-foot sheets of material to be attached without being cut. Some tape measures have black diamonds every 19-3/16-inches, making it quick and simple to determine these locations.
Metric
Most tape measures in the United States use the imperial measurement system (inches and feet); however, some blades include imperial and metric systems. Tapes with both imperial units and metric measurements usually have the inches in red on the top of the blade, while the centimeters are on the bottom in black.
Millimeter or 1mm
The millimeter is the smallest measurement on a metric measuring tape, and they are not numbered; instead, the shortest lines indicate millimeters on the blade. Every fifth millimeter line is somewhat longer to show the halfway point between centimeters.
Centimeter or 1cm
A centimeter is equal to ten millimeters. Centimeters are numbered and the longest line on a metric measuring tape: 1=1cm, 2=2cm, 3=3cm
Decimeter or 1dm
Ten centimeters is equal to one decimeter. Decimeters are usually indicated with a red numeral: 10=1dm, 20=2dm, 30=3dm
Meter or 1m
One hundred centimeters or ten decimeters is equal to one meter. Meters are usually indicated as 1m, 2m, 3m, and so on.
Back to Table of ContentsConversion Chart
| Inches | Decimal | Millimeters |
|---|---|---|
| 1/16 | .0625 | 1.5875 |
| 1/8 | .125 | 3.1750 |
| 3/16 | .1875 | 4.7625 |
| 1/4 | .25 | 6.3500 |
| 5/16 | .3125 | 7.9375 |
| 3/8 | .375 | 9.5250 |
| 7/16 | .4375 | 11.1125 |
| 1/2 | .5 | 12.7001 |
| 9/16 | .5625 | 14.287 |
| 5/8 | .625 | 15.875 |
| 11/16 | .6875 | 17.462 |
| 3/4 | .75 | 19.050 |
| 13/16 | .8125 | 20.6375 |
| 7/8 | .875 | 22.2251 |
| 15/16 | .9375 | 23.8126 |
| 1 | 1 | 25.4000 |
Measuring Terminology
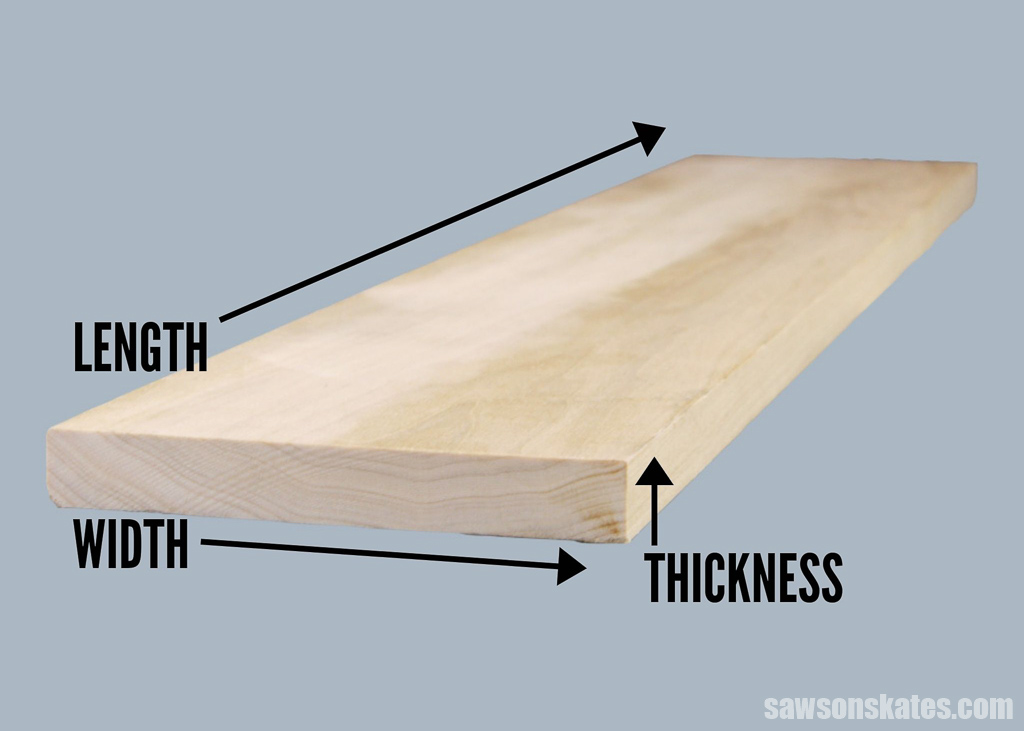
It’s important to understand the terminology when purchasing wood or using woodworking plans. The three measurements used to identify boards are thickness, width, and length. These measurements will always appear in the same order when referencing lumber.
Thickness
The first number refers to the thickness of the board. If the board was laying flat on its widest side, its thickness is the vertical distance between its two opposing sides.
Width
The second number refers to the width of the board. If the board was laying flat on its widest side, its width is the horizontal distance between its two opposing edges.
Length
The third number refers to the length of the board. The length is the longest dimension of a board, running parallel to its thickness.
Back to Table of ContentsHow to Use a Tape Measure
The Hook is Loose for a Reason
The hook is the most misunderstood part of a tape measure. Take a closer look, and you’ll notice that it’s loose. Many beginners believe that this means their tape measure is broken when, in fact, a properly functioning hook will slide back and forth.
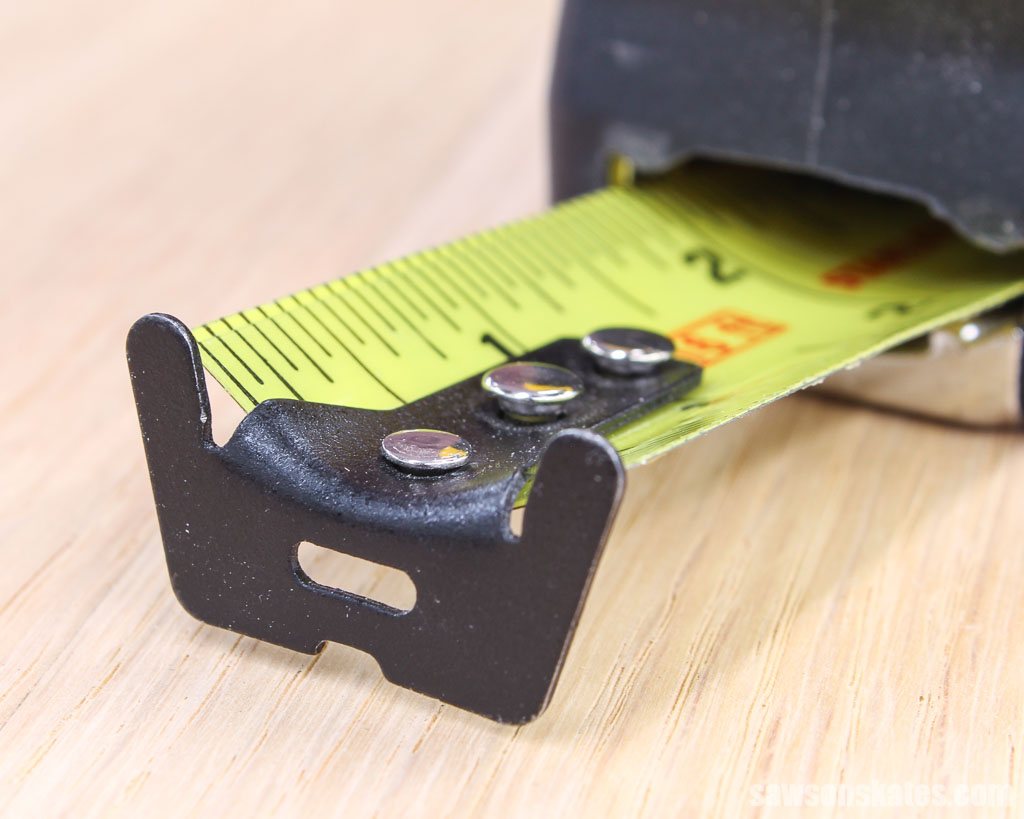
The distance a hook slides is determined by the thickness of the hook itself, which is usually 1/16″ for most tape measures. Allowing the hook to slide lets the tape accurately measure both inside and outside dimensions.
On a measuring tape, the first inch is short by 1/16″ to account for the thickness of the hook. When measuring an inside dimension, such as the width of a door opening, the hook slides back against the blade, and the thickness of the hook is added to compensate for the missing 1/16″.
When measuring an outside dimension, such as the length of a board, the hook slides out 1/16″ to compensate for the missing 1/16″.
💡 TIP: When measuring an outside dimension, make sure the hook is completely extended.
Outside Measurements
Hook the Tape
Grab the hook, pull the tape out from the housing, and extend it to the length of the object you want to measure.
Attach the hook to the edge of the object firmly. If the hook isn’t completely pressed against the object, your measurement will be off. Hold your tape tight and straight. A loose or sagging tape will produce a longer measurement than a tight, straight one.
When measuring, try to keep the tape as straight as possible. You won’t be able to get an accurate reading if it sags.
If you’re taking measurements on your own, you can drive a fastener, like a nail, or screw into the outside edge of the object to use as an anchor point. Then, attach the hole in the hook around the fastener.
Lay Flat
Check that the tape is as flat as possible; otherwise, you won’t get an accurate reading. You may need to rotate or press your tape slightly so that the edge lies flat against the surface.
Lock
If your tape measure has a lock, you can engage it now. Otherwise, hold the tape in place firmly with your hand.
Measure and Mark
Read the tape measure and mark the surface as close to the tape as possible, or write down your measurements if you’re planning a project.
If you’re marking the surface, use a pencil to make a “V” with the bottom point directly on your measurement. Using a “V” is more accurate than drawing a single line.
💡 TIP: To prevent cutting a board too short, round up to the next largest measurement. Even if you need to repeat the measuring and cutting process, it’s better than wasting material because the board is too short for your project.
Disengage the Lock
Take care when retracting a tape measure. The tape or hook can be damaged if you let it slam back into the housing too quickly. It’s also possible that the edges of tape might cut your hand, which feels like the worst paper cut you’ve ever had!
Rather than letting the tape snap back with too much force, disengage the lock slowly to allow the measuring tape to coil safely into the housing.
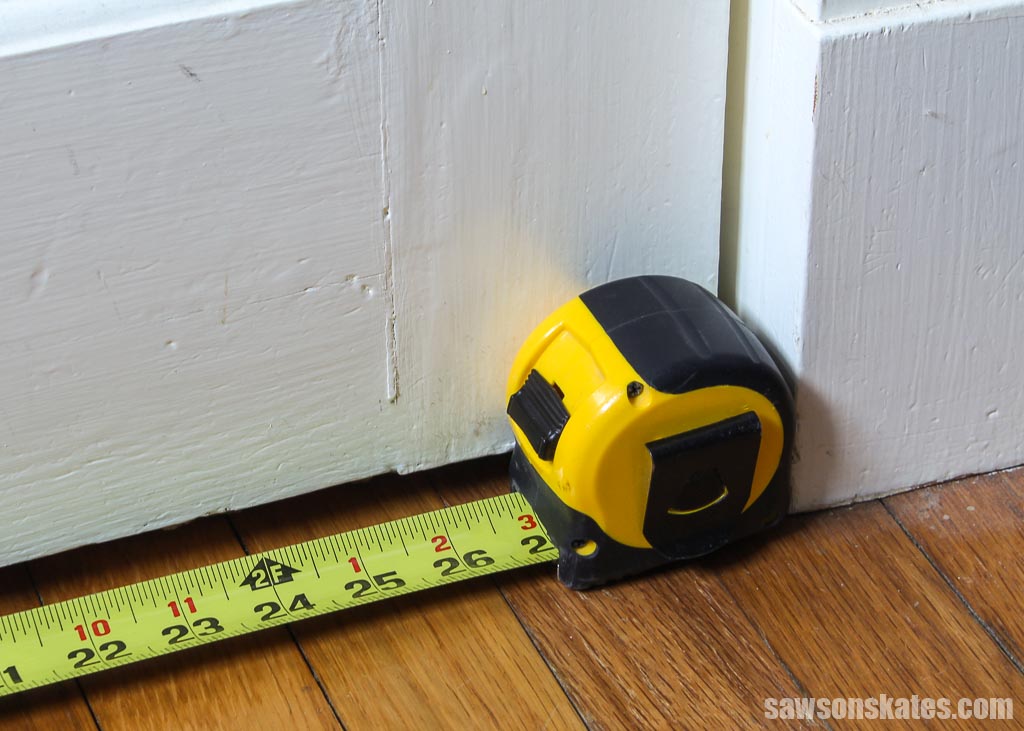
Inside Measurements
When measuring the inside of an item (such as the inside of a windowsill for a shade or length of a bookshelf), it’s tempting to push the hook against one side and then pull the tape out farther than necessary, bending it to fit against the other side.
There are several reasons why you shouldn’t bend the tape. First and foremost, it won’t provide an accurate reading. Second, repeatedly bending the tape damages it and causes it to wear out prematurely.
Instead of bending the tape, place the housing against one side of the object, pull the hook out, and hold it against the other side. To get the exact measurement, add the length of the housing (usually noted near the bottom of the case, although on my tape, it was hidden beneath the belt clip) to the reading from the tape.
This technique gives you an accurate reading and prevents the tape from being damaged.
Burn an Inch
You can also “burn an inch” to achieve greater accuracy. Instead of measuring from the hook, begin your measurement at the 1-inch mark. Just remember to subtract 1″ from your reading.
Back to Table of ContentsMore Tape Measure Tips
Use One Measuring Tape
If you’re building a project, like a piece of DIY furniture, I recommend using only one tape measure. Using only one tape measure will ensure all of your measurements will be the same.
If you must use multiple measuring tapes for the same project, it’s a good idea to calibrate all of them to one ruler or yardstick so that they’re all the same. The hooks may be adjusted slightly by bending them until the measurements match.
Measure From Above
Many larger measuring tapes have two vertical pieces extending upward from the hook’s end, similar to a goal post. This “goal post” allows you to attach your tape under an object and take measurements from above without bending to read them from underneath.
Measure From the Side
Some tape measures, such as tapes used for framing, have wide hooks that extend upwards and outwards from the sides of the blade. These wider hooks may be attached to the edge of an object and don’t require twisting to read the measurements.
Use the Hook to Scribe
If you lose your pencil while marking a measurement, you may use the bottom of the hook to scribe a line. Simply press on the hook and move it back and forth to mark the surface.
Draw Straight Lines
If you need to make a straight line that doesn’t need to be precise, you can use your tape measure.
To begin, place the hook on the edge of an object such as a board. Then, pull the tape and put the pencil at the desired length. Next, allow the housing to touch the pencil and lock it in place.
With one hand, hold the pencil and housing; with your other hand, press the hook against the edge. Now, pull out the tape measure, pencil, and hook to draw the line.
Make Circles
Here’s a quick video showing how to draw a circle using a measuring tape.
How to Buy a Tape Measure
There are different tape measures available, each with its own set of features. When shopping for a measuring tape, consider the things you need to measure, the length you need to measure, and your budget.
- A wider tape will usually be stronger and more durable than a narrower one.
- Are the measurements easy to read?
- Do you need a tape with inches and centimeters?
- Would you prefer a tape where the fractions are labeled?
- How does it feel in your hand? Is it comfortable to use? You can try out tape measures at your local home improvement store.
- Do you prefer to measure with your right hand or with your left? Tape measures available in many stores are only readable when used with your right hand; otherwise, the numbers are upside down. If you want to use a tape measure with your left hand, you can order a left-handed one online.
My go-to tape measure is the 16′ Stanley FatMax. It’s strong, durable, easy-to-read, and fits well in my hand.
Back to Table of ContentsFinal Thoughts
Knowing how to use a tape measure is essential for any carpentry, woodworking, or home improvement project. Now that you understand the ins and outs of using a measuring tape, it’s time to put your new skills into practice. Grab your tape measure and get started on your next project! Before you know it, you’ll be measuring like a pro and getting accurate results every time.
Thank you for stopping by. If you enjoyed this tutorial, would you please take a moment and pin it to Pinterest? I’d really appreciate it!
Pin This For Later

Hi there – I’m Scott, a woodworking enthusiast and creator of Saws on Skates, a site I started in 2015 to share easy-to-follow tutorials, space-saving shop tips, and project inspiration for DIYers at any skill level. Learn more about my woodworking journey here.
One essential difference in tape measures is the locking mechanism, to suit some people who might prefer another way of locking the tape in place when pulled out. Some locks automatically lock when the tape is pulled out, and retract when the knob, normally for locking, is depressed. This comes in very handily for cabinet makers and a few furniture makers. Some people find this feature quite valuable in some circumstances!
You said that when you burn an inch you subtract an inch. I didn’t understand this
Can you go in to more detail for me?
Instead of starting from the hook, you place the one-inch mark on the object you want to measure when you burn an inch. So if the measurement of the object reads 7 inches, you’ll need to subtract 1 inch because you began your measurement at the 1-inch mark rather than at the hook.
This is the best article I have read about a tape measure. Thank you for that. I found out about the “Hook” from trivia but much of the rest I did not know.
I’m glad you enjoyed this article, Pam. Thank you for the compliments!