How to Make Adjustable Shelves with a Shelf Pin Jig
Adjustable shelves make it easy to store items of different sizes. They’re simple to install in a bookshelf or kitchen cabinets with a drill and shelf pin jig.
You may also enjoy 5 Clever Tools to Simplify Building Furniture and Cabinets.
Adjustable shelves makes it easier to store and organize because the shelves can be repositioned to accommodate items of different shapes and sizes. A shelf pin jig takes the guesswork out of installing adjustable shelves in cabinets and other DIY projects.
This post contains affiliate links to supplies or tools I used to complete this project. Purchases made using these links help support the Saws on Skates website and allow me to share more DIY projects. and DIY tips with you. There is no cost to you for using these links. Click here to visit my site policies.
I received the Kreg Shelf Pin Jig in exchange for my honest review. All thoughts and opinions are my own.
I’m officially DONE with my disorganized workshop! My goal this year is to get my small workshop organized once and for all!
One of the ways I’m planning get organized is by designing and building custom workshop cabinets. I want the design of the cabinets to be flexible so I can change the configuration of the storage space as my collection of tools continues to grows. The best way to make the storage space flexible is to install adjustable shelves.
Adjustable Shelves vs. Fixed Shelves
Fixed shelves provide a place for storage but the downside is they often limit how we can store our things. Fixed shelves can’t move so it can get a little tricky to store items of different shapes and sizes within the space available.
I have a variety of tools and workshop necessities I want to store in my new workshop cabinets. Everything from drills and drill bits to sanders and sandpaper. None of these items will fit into one standard area so I need a storage solution that can accommodate items of many different shapes and sizes.
A more flexible option for storage are adjustable shelves. Adjustable shelves can be repositioned to accommodate items of different shapes and sizes which makes it easier to organize. Plus, adjustable shelves can change as our storage needs change.
Types of Adjustable Shelves
There are several ways we can add adjustable shelves to our DIY projects. We could use shelf standards or shelf pins.
Shelf Standards
Shelf standards look like metal strips with slots. The standards attach to the surface of our DIY project. Or we could use a router to cut a groove and mount the shelf standards so they are flush with the surface of our projects. Shelf brackets or shelf supports then clip into the slots in the standards and support the shelves.
Shelf Pins
A shelf pin jig is attached to our project and a drill with a shelf pin drill bit is used to drill shelf pin holes. Then, shelf pins are pushed into the holes and the pins support the shelves. In my opinion shelf pins have a cleaner, more polished look compared to shelf standards.
Where Can You Put Adjustable Shelves?
- Bathroom and Linen Closet
- Cabinets and Cupboards
- Closets
- Bookshelf and Bookcases
- Kitchen and Pantry
- Laundry Room
Can You Make Shelf Pin Holes Without a Jig?
Years ago I used a piece of pegboard as a makeshift jig to drill holes for shelf pins. I laid the pegboard on my project and used a drill bit to drill the holes for the shelf pins. The problem is over time the drill bit made the holes in the pegboard larger, and the shelf pin holes shifted side to side, which made my project looked a little sloppy.
The Kreg Shelf Pin Jig makes drilling shelf pin holes so easy. We simply clamp the jig on our workpiece and drill holes in the guide. That’s it! Perfect shelf pin holes EVERY TIME!
Before we get into how to make adjustable shelves with a shelf pin jig, be sure to click the subscribe button at the bottom of this page to sign up for my FREE newsletter loaded with helpful pocket hole tricks, space-saving workshop ideas, clever DIY tips and more!
How to Make Adjustable Shelves with a Shelf Pin Jig
Tools
Kreg Shelf Pin Jig
Kreg Face Clamp
Drill
Supplies
5mm Shelf pins
Step 1. Choose the Location of the Shelf Pin Holes. The Kreg Shelf Pin Jig gives us two locations or setback options for the shelf pin holes.
We can attach the included fence to one side of the jig which sets the holes 1” from the edge of our workpiece or we can attach the fence to the other side of the jig which sets the holes 2-1/8” from the edge of our workpiece. We can also use the jig without the fence to drill shelf pin holes in pieces with face frames already attached.
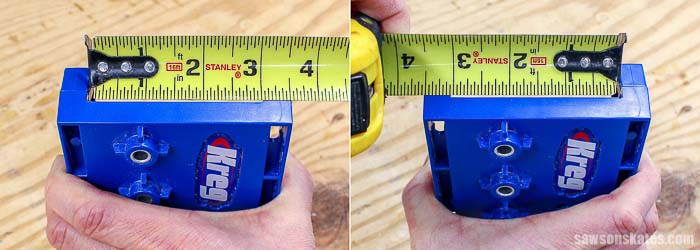
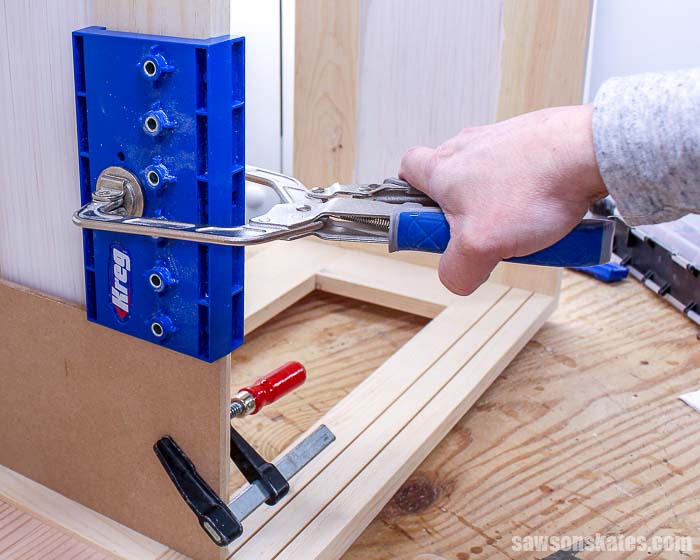
I wanted my adjustable shelves to start about 6-½” from the bottom of my cabinet. I ripped a scrap piece of MDF to 6-½” and clamped it to the bottom of the cabinet. I wanted the setback of my shelf pin holes to be 1” so I attached the fence to 1” side of the jig and then clamped the jig to the side of my cabinet.
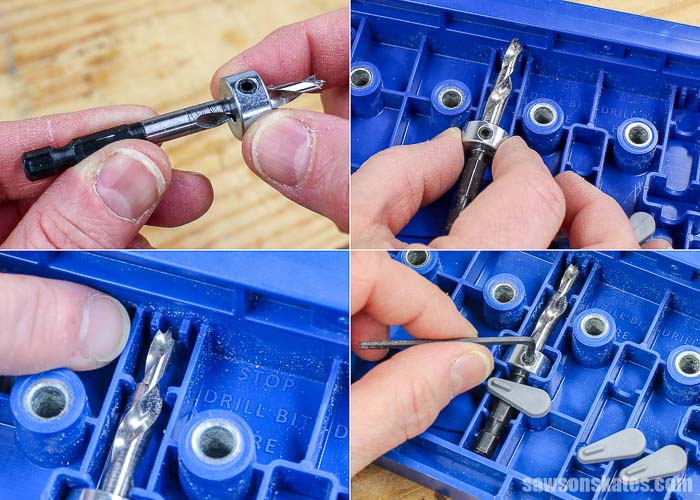
Step 2. Set the Shelf Pin Drill Bit Depth. First, we’ll slide the stop collar onto the bit. Next, we’ll position the bit and collar in the storage slot on the back of the jig. We need to make sure the cutting edges of the drill bit are positioned against the area marked “STOP DRILL BIT HERE”. Then, we’ll tighten the stop collar set screw with the hex wrench. All that’s left is to chuck the shelf pin drill bit in our drill.
Step 3. Drill the Shelf Pin Holes. Insert the shelf pin drill bit into the guide and drill the shelf pin hole. I found I got the cleanest looking shelf pin holes by using a corded drill and drilling slowly to about half the depth of the bit. Then I pulled the drill bit out to remove some of the chips and continued drilling until the stop collar made contact with the jig. I was working in a tight spot so I use my DeWALT Right Angle Drill Attachment.
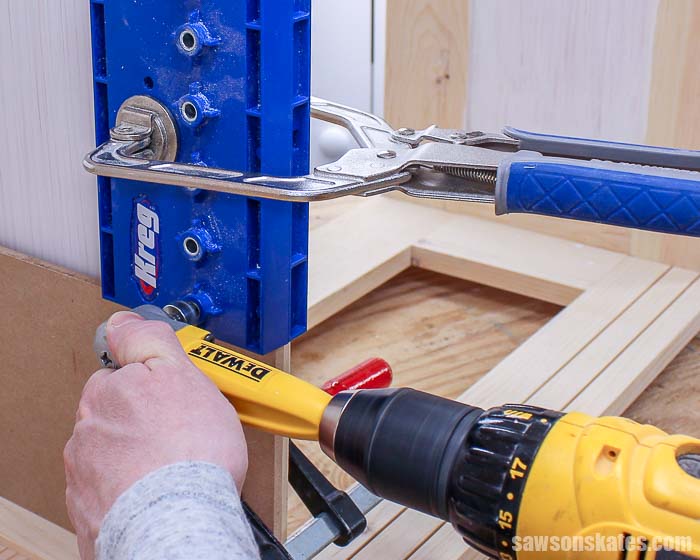
Step 4. Reposition the Shelf Pin Jig. The indexing pin takes the guesswork out of repositioning the jig and it keeps the holes perfectly spaced. Insert the indexing pin into the top shelf pin hole. Place the bottom hole of the Shelf Pin Jig over the indexing pin and clamp to the workpiece. Continue to drill the shelf pin holes as we did in Step 3.
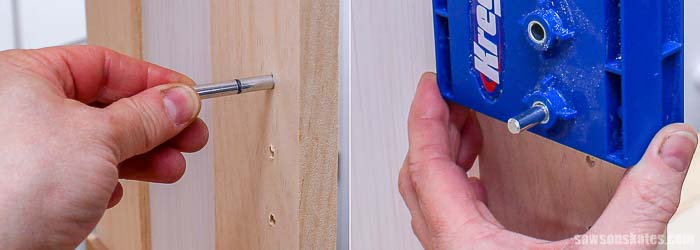
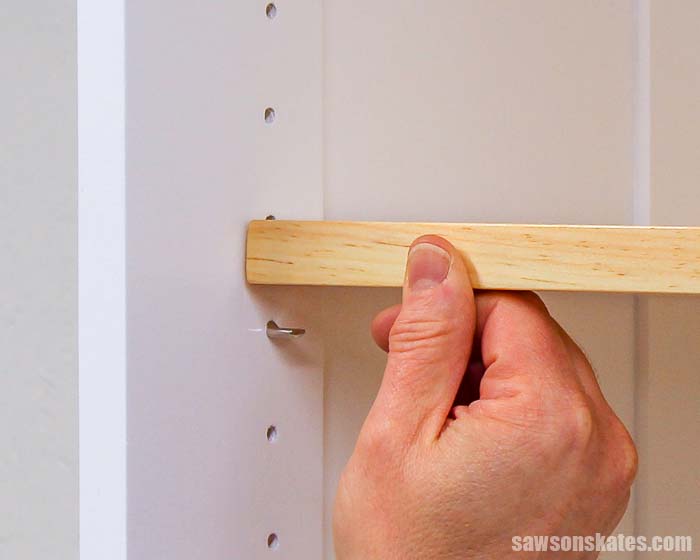
Step 5. Insert the Shelf Pins and Install the Shelf. Push the shelf pins into the shelf pin holes and position the shelf. That’s it! We just made adjustable shelves!
Final Thoughts
Adjustable shelves makes it easier to store and organize because the shelves can be repositioned to accommodate items of different shapes and sizes. A shelf pin jig takes the guesswork out of installing adjustable shelves in cabinets and other DIY projects.
Thank you for stopping by. If you found this information helpful, would you please pin it to Pinterest? Other DIYers would appreciate it and I would too! Thank you – Scott

Hi there – I’m Scott, a woodworking enthusiast and creator of Saws on Skates, a site I started in 2015 to share easy-to-follow tutorials, space-saving shop tips, and project inspiration for DIYers at any skill level. Learn more about my woodworking journey here.
Thank You this is a great idea. I can use this is in my shop but also in my kitchen to make smaller spces between my shelves to store spices.
Hi there – Thank you for stopping by. That’s a great idea to use the jig for creating new storage space for your spices!
I have yet to see a kreg product that didn’t take the guess work out of project. Not to mention HUGE time saver. Drilling 4 holes for every shelf can be overwhelming.
Great job Kreg
Thanks
Brad
Hi Brad – Thank you for stopping by. I agree with you. I love the Kreg Shelf Pin Jig. I just used it for another project this past weekend.
Hey Scott, how do I prevent the wood from blowing out around the tops of each hole?
Hey Andrew – Thank you for stopping by. I haven’t run into this issue yet. Are you using a corded or cordless drill? If you’re using a cordless drill be sure the batteries are fully charged so the drill is spinning at full speed. Also, be sure to put the drill bit in the hole, start the drill and let it come up to full speed then lower the bit into the wood. Let me know how it goes and then we can go from there.
Scott, for the shelf itself, how would you drill the semi-holes where it rests on circular pins (to keep it from sliding out)? Clamp two shelves together and drill at the intersection?
Hi Damon – Most of my projects have a face frame that prevents the shelf from sliding out, so I don’t drill holes in the shelves. I believe shelf pins are available with rubber bumpers that prevent the shelf from sliding. I think there are also shelf pins available with holes. This way, screws can be driven through the hole in the pin into the shelf which prevents the shelf from sliding.