9 Clever Ways to Make Your Small Workshop Feel Bigger
A small workshop can feel cramped, but with a few clever tips your shop will feel bigger, DIYing will be easier and shop time will be more enjoyable.
Setting up a small workshop can be more challenging than setting up a large workshop. Square footage is at a premium, so it’s critical to make the most of your limited space.
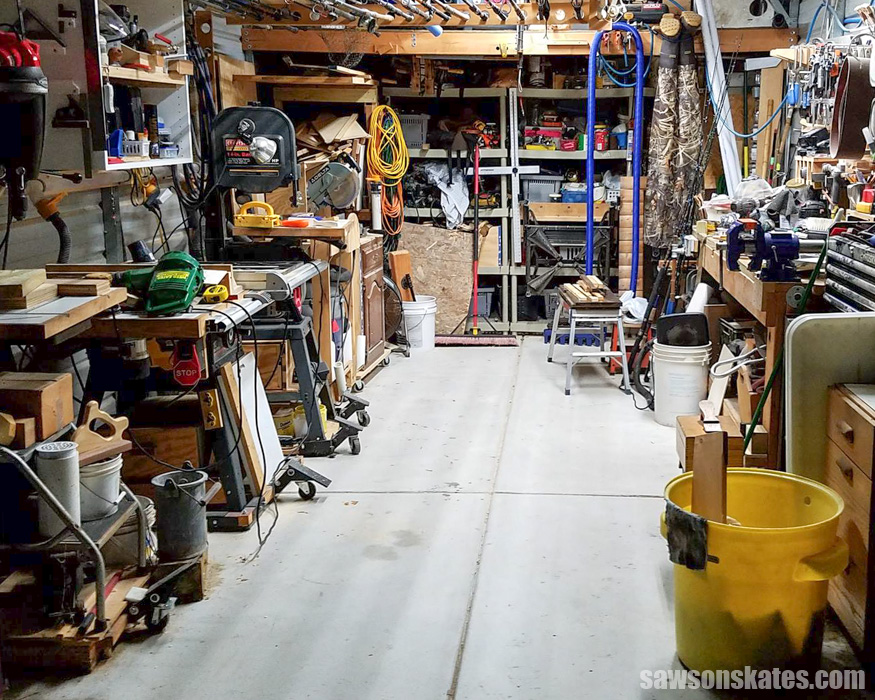
Note: The workshop photo above is not my shop. It’s the workshop of Saws on Skates community member Barry Thomas Sr. of New Jersey. My workshop is so small that it’s difficult to back up far enough to get a good pic lol Thank you to Barry for giving me permission to use his small workshop pic for this post.
For your convenience, this post contains affiliate links to supplies or tools I used to complete this project. Purchases made using these links help support the Saws on Skates website and allow me to share more DIY projects. and DIY tips with you. There is no cost to you for using these links. Click here to visit my site policies.
My goal with Saws on Skates® is to prove that you don’t need a HUGE workshop to DIY or to build quality DIY furniture. Do you want some proof? All of the DIY furniture plans I share with you were built in my tiny 12′ × 13′ workshop. The point is no matter if your small workshop is in your basement, garage or shed the floor plan isn’t as important as how you make the best use of your limited space.
The big question is how can you make the best use of your tiny space AND make your shop feel as big as possible? For me, there are three things that contribute to making a small workshop feel even smaller:
- Too Dark – Poor lighting and dark walls can make a workshop feel unnecessarily small.
- Oversized Workshop Furniture – Workshop furniture that is not properly scaled to the size of the space will make a small workshop feel even smaller.
- Poorly Organized – Disorganized spaces feel cluttered and cramped. Organized spaces no matter the size feel large and spacious.
With some careful planning, space-saving workshop furniture, and a little organization your small workshop can feel bigger and DIYing in your shop will be easier. Plus, a well thought out small workshop will make spending time in your shop more enjoyable.
How to Make Your Small Workshop Feel Bigger
- Paint your space
- Install bright LED shop lights
- Make your tools mobile to maximize workshop space
- Choose a space-saving workbench
- Build a space-saving miter saw stand
- Build a space-saving table saw station
- Create a plan for dealing with scrap wood
- Organize your scrap wood
- Organize your workshop
1. Paint Your Space
The previous owners of my house were DIYers and had set up an area to use as a workshop. The workshop was well used and the shop walls were dingy, scraped and scuffed. Who cares what our workshop walls look like, right? It’s just a workshop! That’s what I thought, so I loaded up the shop with tools and workshop furniture.
The fact is after working in the shop for a bit those dingy, scraped and scuffed walls got kind of depressing. Not only that, the shop was dark and uninviting which made me not want to spend a lot of time in there.
This prompted me to give my workshop a makeover. Well, actually two makeovers! I moved all of the workshop furniture and painted the walls a bright lime green. The lime green was fun and inviting but it looked AWFUL in the build photos I was sharing of my furniture projects. So, I moved all of the workshop furniture again and painted the walls a gloss white.
The dingy, scraped and scuffed walls were gone replaced with crisp, white walls which are fresh and inviting. The small workshop now feels larger and airier. The gloss white paint helps to reflect the light and makes the space brighter. The shop not only looks clean but thanks to the slick, gloss paint it’s also easier to clean.
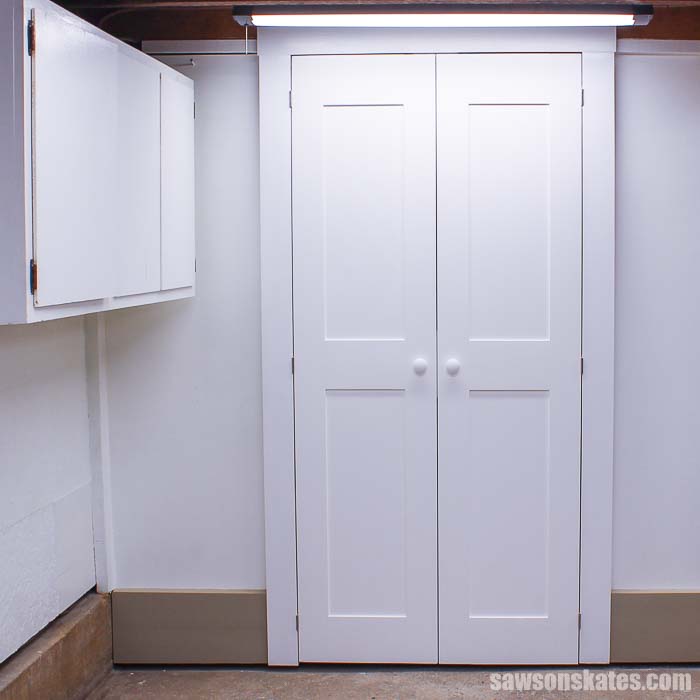
I also painted the door and cabinet the same color as the walls. If I had painted the cabinet and door a different color it would have made the space feel smaller. Painting the walls, door and cabinet the same color tricks the eye and makes the small workshop feel bigger.
Oh, and those doors? I built them! Skate over to my plans to Make a Door with Pocket Holes.
Looking back I wish I had given the floor a makeover too. My workshop floor is unsealed concrete and sawdust sticks to it like a magnet. I would love to seal the floor with something like the Rust-Oleum Garage floor coating kit. The coating would make the floor easier to clean and also help to reflect more light. Sealing the floor is on my wish list.
Paint the walls and coat the floor in your small workshop. It will make your shop feel larger, it will brighten your space and you’ll want to spend more time in your shop.
2. Let There Be Light
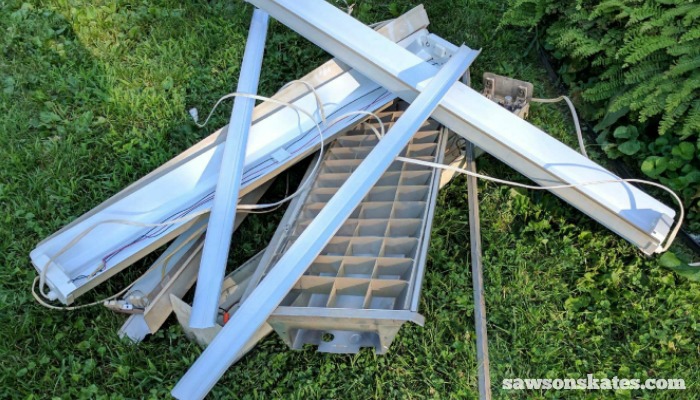
The previous owners of my house installed five fluorescent shop lights in the workshop, despite the lights the space was very dark. It reminded me of working in a cave. I installed four additional fluorescent shop lights but the shop was still dark. Painting the walls gloss white helped to brighten the small workshop but still wasn’t as bright as I had hoped.
Last year I removed the fluorescent light fixtures and replaced them with bright LED light fixtures. The difference is literally like night and day! Now the small workshop feels larger and is sooo much brighter. I went from feeling like I was in a cave to what now feels like working on the set of TV studio! Replacing old shop lights with LED shop lights will brighten your space and make your small workshop feel larger.
3. Make Your Tools Mobile
Have you ever wondered why the name of this site is “Saws on Skates”? It’s because my saws are on skates. Well, not literally, but all of my workshop tools are on wheels to maximize space in my small workshop.
Making your tools mobile in a small workshop is not just a good idea, but it’s a necessity to maximize your workshop space. For some furniture projects, I pull out all of my tools… pull out the table saw and push it back, move the router table to the left, shift the workbench to the right, etc. Sometimes I feel like I’m playing a life-size game of Tetris in my shop!
Making your tools mobile will make your small workshop feel larger, will make the layout of your shop more flexible and will maximize your limited workshop space. Skate over to this post to see 7 Ideas to Make Your Tools Mobile and Maximize Workshop Space.

4. Space-Saving Workbenches
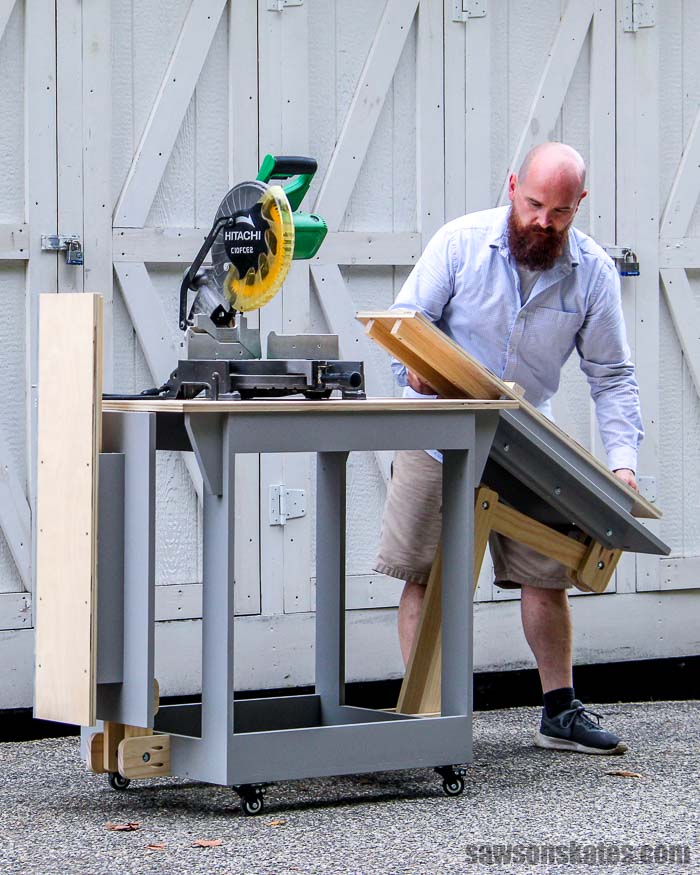
Every small workshop needs a space-saving flip-top workbench. With a flip-top workbench, you can mount a tool, like a miter saw on one side, then flip the top and the other side reveals a sturdy workbench. It’s like two pieces of workshop furniture in one.
I use this flip-top workbench for nearly every project I build. If you have seen any of my furniture plans chances are it was built on this workbench. Build a DIY flip-top workbench and double the size of your workbench space. Skate over and get the flip-top workbench cart plan.

Folding Workbench
This DIY folding workbench is perfect for those DIYers with a small workshop. It’s easy to set up when you’re ready to work and folds down when you’re done. It can be used as an assembly table, as a place to paint/stain a project or can be used for an outdoor project. Skate over and get the DIY folding workbench plan.
Mobile Project Center
I received the Mobile Project Center in exchange for my honest review. All thoughts and opinions are my own.
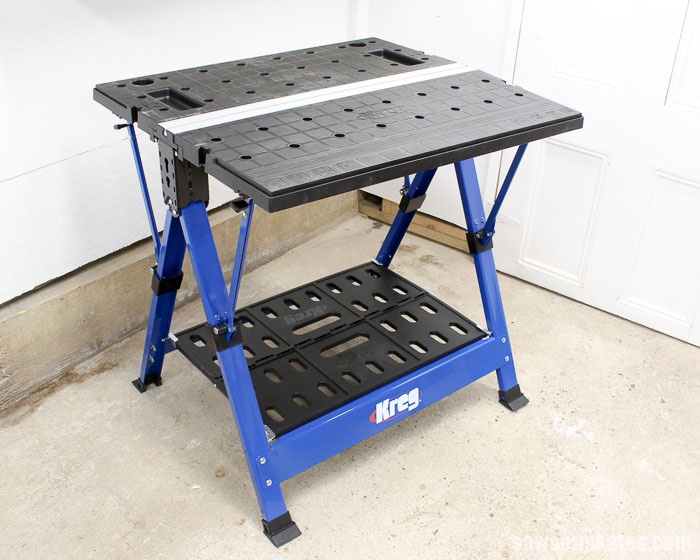
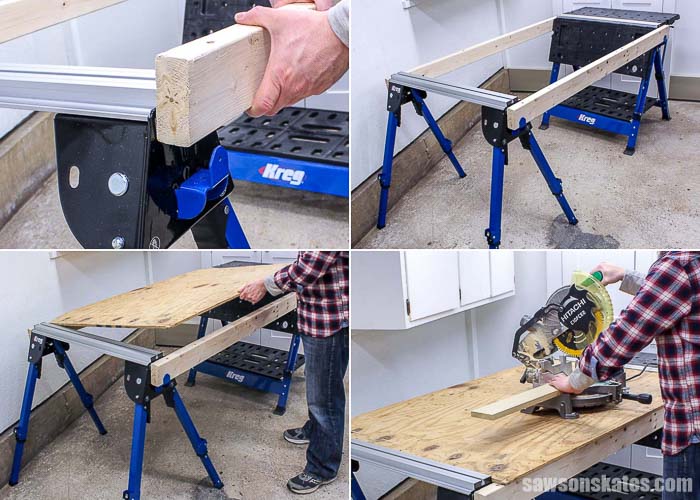
I’m not sure if there is anything the Kreg Mobile Project Center can’t do. It’s a workbench, it’s an assembly table, a clamping station, it can be used as a sawhorse, it folds flat, it was named a This Old House Top 100: Best New Home Products 2017, and it’s perfect for a small workshop! I have one and I want a second one and maybe even a third!
I thought my DIY folding workbench was handy, but the Mobile Project Center has it beat hands down. Not only can it do all of the things I mentioned above, but it also has pre-drilled holes for mounting a Kreg Jig, a drill holster, a lip around the perimeter to hang Kreg screw containers, plus so much more. If you need a workbench for your small workshop than look no further than the Mobile Project Center. Skate over to see 12 reasons why a Mobile Project Center will replace your traditional workbench.
Track Horse
Kreg Tool sponsored my honest review of the Track Horse. All thoughts and opinions are my own.
The Kreg Track Horse isn’t a one trick pony. It’s sturdy, folds to save space, and is height adjustable. It includes a bench clamp so it can also be used as a clamping station. Plus, it can be used in combination with other Kreg workspace solutions like the Mobile Project Center to make a huge, portable workbench. The versatility of the Track Horse makes it perfect for a small workshop.
More Space-Saving Workbench Ideas
Looking for even more space-saving workbench options? Check out these DIY workbench plans that are perfect for a small workshop and this DIY power tool stand.
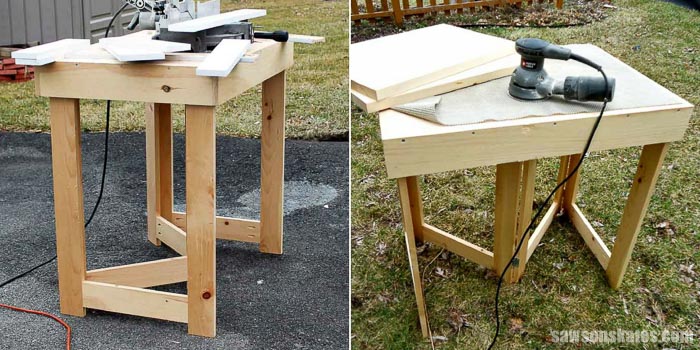
5. Build a Space-Saving Miter Saw Stand
One of the best projects I’ve built for my small workshop is a folding miter saw station. The stand has a spot for a miter saw and folding arms or wings on either side. The wings extend to provide extra support when cutting long boards and then can be folded back when the cutting is complete. It’s a big miter saw stand when you need it and then tucks neatly away to save space. And of course, my miter saw stand is on wheels.
Related: DIY Portable Miter Saw Station
Skate over to see these 7 DIY Space-Saving Miter Saw Stand Ideas perfect for a small workshop. There are a few folding miter saw stand ideas and a few options for small, but slightly larger workshops.
6. Build a Space-Saving Table Saw Station
Who wouldn’t want one of those large cabinet style table saws? Oh man, all of that surface area makes ripping plywood a breeze! Oh yes, those of us with a small workshop definitely want one, but because of the size of our shops, they simply won’t fit. That’s why most of us with a small shop end up with a benchtop table saw.
But there is a way to create more workspace on our benchtop table saws. Just like a miter saw stand provides more support when cutting long boards a DIY table saw station provides more support when cutting on a table saw. A table saw station virtually turns our benchtop table saw into a cabinet style saw. Skate over to 6 DIY Table Saw Stations perfect for a small workshop to find an option that would fit your shop the best.
7. Deal with Your Scrap Wood
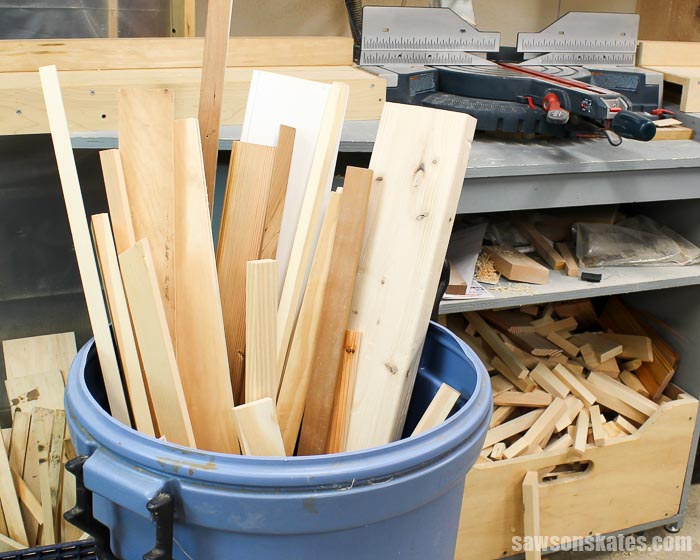
Nothing makes a small workshop feel even smaller than being surrounded by piles of scrap wood. I’ve struggled with scrap wood ever since I started building DIY furniture. Sure, I have made lots of projects with scrap wood, but at some point, you have to let some of it go. Constantly moving piles of scrap wood, or worse yet tripping over piles of scrap wood is not only a safety issue, but it makes a small workshop feel cramped.
The quicker we can make decisions about what scrap wood to keep and what to toss, the quicker we can get back to our DIY projects! And the safer our shops will be, and as we know, safety is always number one. Establish a what to keep and what to toss policy. It will make your small workshop safer and more organized. Skate over to How to Decide What Scrap Wood to Keep to see the scrap wood policies I use in my small workshop.
8. Organize Your Scrap Wood
Now that we’ve decided what scrap wood we’re going to toss, where are we going to organize and store the wood we want to keep? Even though I have been building for years, I still haven’t found a method for storing lumber and wood scraps that completely works for me. But I can say developing a method of sorting and storing wood is imperative for keeping your shop safe, organized and to feel as large as possible
What’s the best method for storing wood in a small workshop? That’s something I’m still struggling with. Someday I’ll figure it out. In the meantime here are 9 wood storage ideas I’m considering for my small workshop.
9. Organize Your Workshop
Disorganization can make our small workshop feel cramped and cluttered. Organizing helps our small space feel larger than it actually is. Here are a few simple ways we can organize our space.
Related: 4 Reasons Why I Don’t Use Pegboard
DIY Workshop Storage Cabinets
These space-saving DIY tool storage cabinets are perfect for a small space. They feature sliding Shaker-style doors made with a Kreg Jig. The adjustable shelves make it easy to store tools of different shapes and sizes. The glossy white paint reflects light and makes my shop feel large and bright.
Skate over to DIY Workshop Storage Cabinets for the plans. Watch the video below to see my shop before I added the cabinets, how I installed the cabinets and take a look at the sliding doors in action.
Organize Your Tools
Are your tools neatly organized or in a jumbled pile on your workbench? My tools were a MESS, but I finally got them organized!
In the How to Organize Tools in a Small Workshop post, I’m sharing 5 steps to get your tools organized. We’ll compare pegboard vs. cabinets, ways to store hand and power tools and how to keep them organized once and for all.
Skate over to How to Organize Tools in a Small Workshop now!

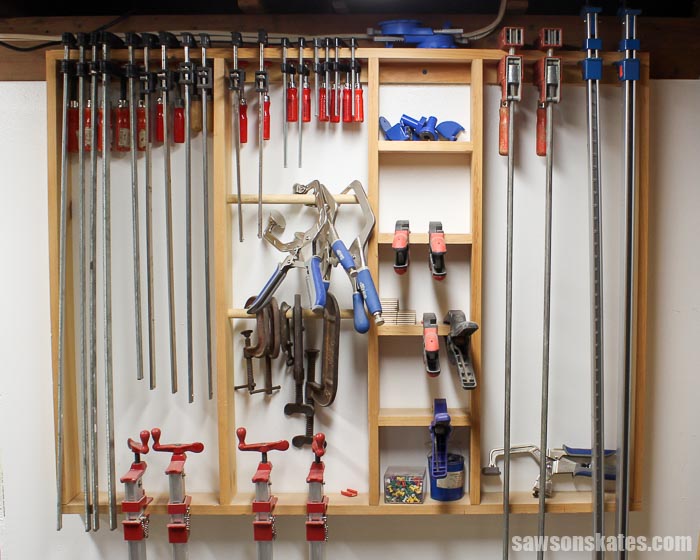
Organize Your Clamps
You know what they say. You can never have too many clamps, but finding a place to store those clamps in a small workshop can be tricky. And no, piling clamps on a workbench is not an option!
Wall space and floor space are always at a premium in a small shop so we have to get creative with our storage. Skate over to see 7 clever DIY clamp storage ideas that are perfect for a small workshop.
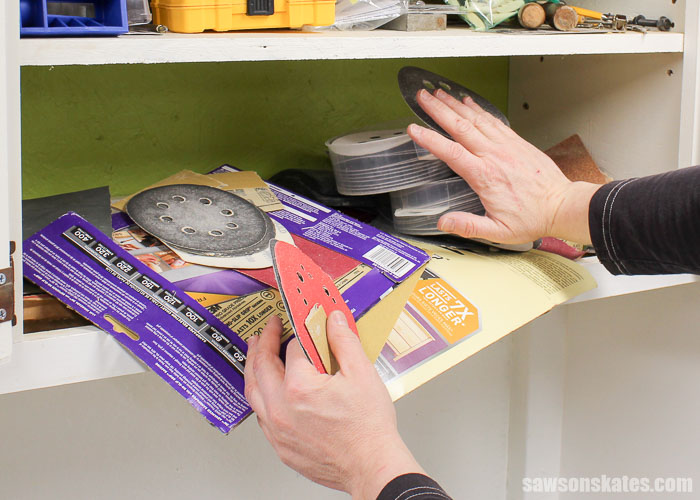
Organize Your Sandpaper
How do you store your sandpaper? Up until recently, my sandpaper was just thrown in the bottom of my workshop cabinet. Norm Abram would have declared my sandpaper “storage area” a DISASTER ZONE! It was time get organized. Skate over and see the WEIRD way I store my sandpaper! And here’s a hint… you won’t find this storage solution at the hardware store.
Final Thoughts
A small workshop can feel cramped, but with a few clever tips your shop will feel bigger, DIYing will be easier and shop time will be more enjoyable. What techniques do you use to make your small workshop feel bigger? Please share your ideas in the comments.
Thank you for stopping by to check out some ideas to make your small workshop feel bigger. If you found this information helpful, would you please pin it to Pinterest? Other DIYers would appreciate it and I would too! Thank you – Scott

Hi there – I’m Scott, a woodworking enthusiast and creator of Saws on Skates, a site I started in 2015 to share easy-to-follow tutorials, space-saving shop tips, and project inspiration for DIYers at any skill level. Learn more about my woodworking journey here.
The information on setting up your shop is GREAT! The shed that I’m converting to my shop is 12’x12′. There are rafters in the ceiling area that I placed some old slab doors to hold trim work, etc. Should the rafters be painted, too? I imagine that outside under the roof where there are screened in air passage needs to be covered. I started using R-13 fiberglass insulation to insulat the inside. What can be used to cover the insulation that is inexpensive? Because the weather is cold right now I’ll have to hold up on the painting. Today I bought the 2″x4″s & wheels to start my wheeled workbench. I realized that some type of chair rail will to be put up. Thank you for your & your readers comments. Very good information.
Hi Chuck – Thank you for stopping by. I’m glad this info was helpful to you. If I were building a shop like this, I would try to paint the rafters too. I think it would make the space feel taller and brighter. Good luck with your shop build. Can’t wait to hear how it turns out.
Hi Scott. Thanks for your ideas. Keep them coming. My work shop I call it my (Man Shad.)
Is 10’x 10’ yes and it is important to keep it tidy. and give it a quick clean up after I use it.
Just bought myself a better bandsaw. And the caster idea is brilliant. makes it much easier to manage.
Mervyn Northern Ireland
Thank you, Mervyn. I’m glad this was helpful for you.