What I Use Instead of Wood Conditioner
Why should you use a wood conditioner? Let’s look at what it does, how to apply it, the drawbacks, and I’ll share the natural methods I use instead.
Wood Conditioner
Have you ever stained wood, and it ended up looking splotchy or blotchy? Almost like someone spilled bleach on it?
The bad news is your wood project looks unattractive and unprofessional. The good news is, it’s not your fault. Some woods just don’t take stain very well.
Let’s look at which woods are difficult to stain, how to use a store-bought wood conditioner to make wood stain evenly, and what I use instead of a pre-stain conditioner for my wood projects.
This tutorial contains affiliate links to supplies and tools. Purchases made using these links help support the Saws on Skates website and allows me to share more projects and tips with you. There is no cost to you for using these links. Visit my site policies for more information.
Before we get into looking at wood conditioners, be sure to click the subscribe button at the bottom of this page to sign up for my FREE weekly newsletter loaded with helpful pocket hole tricks, space-saving workshop ideas, clever DIY tips and more!
Table of Contents
- Why Does Wood Get Blotchy?
- What Does a Wood Conditioner Do?
- Types of Wood Conditioner
- When Should You Use a Wood Conditioner?
- Is Wood Conditioner Necessary for Pine?
- How to Apply Wood Conditioner
- Do You Sand After Applying Wood Conditioner?
- Do You Let Wood Conditioner Dry Before Staining?
- What I Use Instead of a Wood Conditioner
Why Does Wood Get Blotchy?
Have you ever stained wood, and it ended up looking splotchy or blotchy? Almost like someone spilled bleach on it?
The bad news is your wood project looks unattractive and unprofessional. The good news is, it’s not your fault.
Porous woods just don’t take stain very well. Think of a porous wood like a sponge. But not just any sponge. A sponge that has areas with different densities.
Now let’s apply some stain to the surface of our sponge. The stain will soak into the areas of the sponge that are less dense. The stain will stay closer to the surface in the areas where the sponge is denser.
The same thing happens when we apply stain to woods that are porous. What we end up with is an ugly piece of splotchy, blotchy wood.
Both softwoods and hardwoods can be porous. Porous softwoods include pine, fir, alder, and birch. Porous hardwoods include maple.
Is there anything we can do to make porous woods stain evenly?
Yes. We can apply a wood conditioner.
Back to Table of ContentsWhat Does a Wood Conditioner Do?
A wood conditioner or pre-stain conditioner helps wood to stain more evenly. It works by preventing the stain from soaking too deeply into the wood.
There are some drawbacks to using a wood conditioner. First, in my experience, store-bought wood conditioners produce a lighter stain color.
Sometimes they don’t always work. In other words, the wood may still end up with a splotchy, blotchy look.
Back to Table of ContentsTypes of Wood Conditioner
Store-bought wood conditioners are available in oil-based and water-based.
The rule of thumb is to match the pre-stain conditioner to the type of stain we plan to use for our project.
Oil-Based Wood Conditioner
We should use an oil-based conditioner if we plan to use an oil-based stain.

Water-Based Wood Conditioner
We should use a water-based conditioner if we plan to use a water-based stain.

When Should You Use a Wood Conditioner?
We should use a wood conditioner any time we plan to stain interior projects made with porous woods like pine, fir, alder, birch, and maple
Back to Table of ContentsIs Wood Conditioner Necessary for Pine?
Yes. Pine is a porous wood and prone to blotching. It’s necessary to condition pine in order for it to stain evenly.
Back to Table of ContentsHow to Apply Wood Conditioner
- Start by smoothing the wood with sandpaper
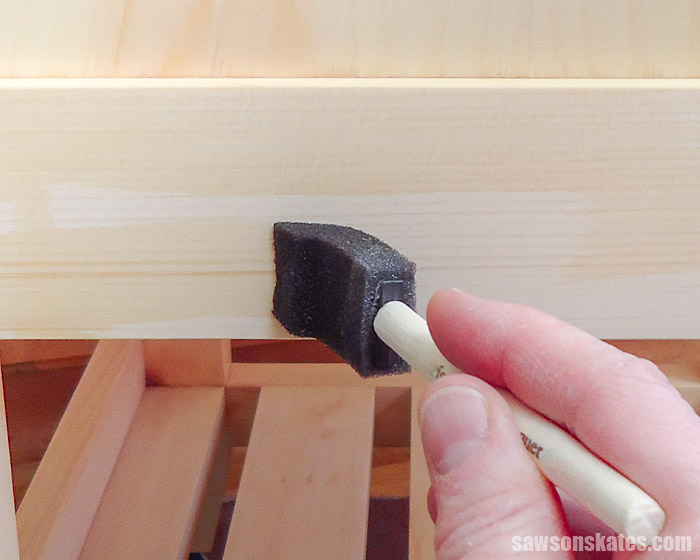
- Apply the wood conditioner with a brush or clean rag
- Allow the conditioner to soak into the wood for 5-15 minutes and wipe off the excess
- A second coat of wood conditioner might be needed for some difficult to stain woods
- It’s important to apply the stain within 15 minutes to two hours (follow directions for your specific conditioner)
- The wood conditioner may lose effectiveness if the stain is not applied during this time
- The conditioner will cause the stain color to be lighter than anticipated
- A second coat of stain may be needed
Do You Sand After Applying Wood Conditioner?
Oil-based wood conditioners do not need to be sanded. Just apply, allow it to soak in, and remove any excess with a clean rag.
Water-based products, like water-based wood conditioners, raise the grain of the wood. This means the surface of the wood is no longer smooth.
Water-based wood conditioners need to be sanded to smooth the wood.
Back to Table of ContentsDo You Let Wood Conditioner Dry Before Staining?
No. The stain should be applied within 15 minutes to two hours after applying the conditioner. The wood conditioner may lose effectiveness if the stain is not applied during this time.
Back to Table of ContentsWhat I Use Instead of a Wood Conditioner
Store-bought wood conditioners help prevent wood from getting blotchy when a stain is applied.
But store-bought pre-stain conditioners have some drawbacks.
- They cause the stain color to be lighter.
- They need to be applied in a certain window of time.
- They can lose effectiveness if they are not applied during that window.
I prefer to use natural alternatives to store-bought wood conditioners. And you can make a few of them with stuff you have in your kitchen.
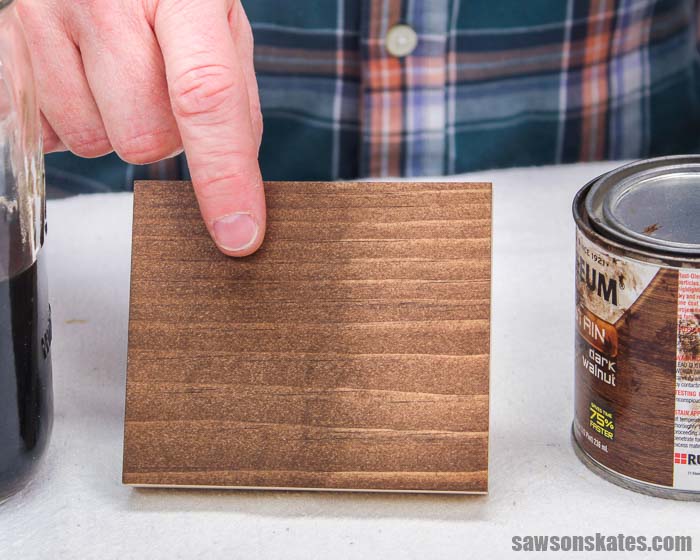
I prefer to condition my hard-to-stain wood projects with a tea stain, coffee stain, or a homemade black walnut stain.
But here’s the thing. I don’t know the exact science behind why they work, but I do know they work.
It could be that these natural conditioners help to fill the pores of the porous woods.
Or it could be because of the way they react with the tannins in the wood.
Wood contains tannic acid. Tannic acid contributes to the color of the wood. Typically lighter woods have less tannic acid and darker woods have more tannic acid.
Tea and coffee also contain tannins. The tannins in tea and coffee react with the tannins in the wood.
In my experience, this reaction:
- Evens out the tone of the wood
- Helps to reduce blotchiness
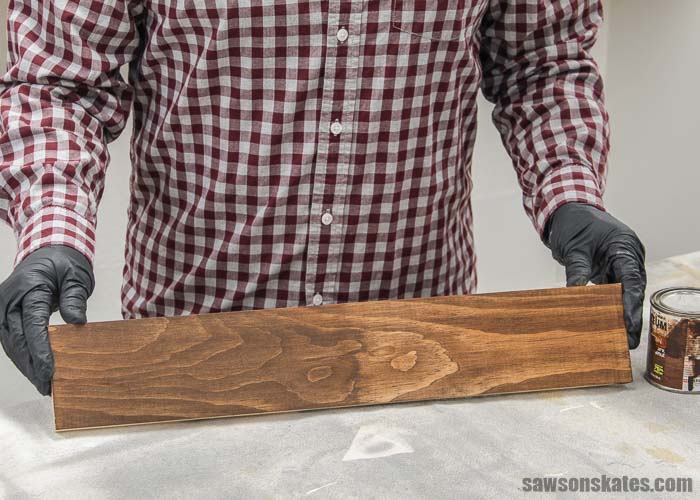
- Gives the wood a uniform, warm color
- Works well with oil-based stains
TIP: All woods take stain differently. As with any stain, it’s a good idea to test it on some sample boards before using it on your project. This way, you can be sure it will produce the color you’re looking for.
Tea Stain
- Made with water and black tea
- My favorite method to pre-condition wood projects
Related: How to Make a Tea Stain
Black Walnut Stain
- Made with water and black walnuts or black walnut hull powder
- Can be used to pre-condition wood or as a stain
Related: How to Make a DIY Black Walnut Stain
Coffee Stain
- Made with water and coffee
- Can be used to pre-condition wood or as a stain
- Gives wood a warm, caramel tone
Related: How to Stain Wood With Coffee
Final Thoughts
Wood stained without a wood conditioner can end up looking splotchy or blotchy. Store-bought pre-stain conditioners help wood to accept stain more evenly, but they have some drawbacks.
They cause the color of the stain to be lighter. They need to be applied in a certain window of time. And they can lose effectiveness if they are not applied during that window.
I prefer to use natural alternatives to store-bought wood conditioners. And you can make them with stuff you have in your kitchen.
Thank you for stopping by. If you enjoyed this tutorial, would you please take a moment and pin it to Pinterest? I’d really appreciate it!

Hi there – I’m Scott, a woodworking enthusiast and creator of Saws on Skates, a site I started in 2015 to share easy-to-follow tutorials, space-saving shop tips, and project inspiration for DIYers at any skill level. Learn more about my woodworking journey here.
After your first introduction to tea stain I tried it with unsweetened instant tea. Worked great.
Hi Patrick – Thank you for sharing this trick. I’m going to have to give this a try!
I would be interested in your comments on using aniline wood dyes instead of stain.
I used wood dye on a few projects several years ago. The projects looked OK. Maybe it’s time to do some more research and give them another shot.
Thank you for the tip! I have a project with hard maple and the stain I’m using does look blotchy. Luckily I’ve only applied it to test boards yet. The stain is water-based. Does it work on water-based stains as well?
I haven’t tried it with store-bought water-based stain, so I recommend trying it on some test pieces before applying it to your project.