6 Tips to Clamp Your DIY Project Like a Pro
As DIYers we pour our heart and soul into the projects we build, so we want to be sure they’ll last. One of the areas that can literally make or break a project is the strength of the joints. It’s important to use the right amount of glue and the right amount of clamping pressure to create a strong joint.
Do you know the science behind clamping? What’s the best position for clamps? How many clamps do you really need? 6 Tips to Clamp your DIY Project Like a Pro will answer all these questions, plus a few more!
For your convenience this post contains affiliate links to products or tools I used to complete this project. Click here to visit my site policies.
6 Tips to Clamp Your DIY Project Like a Pro
Have you ever tried to drill a pocket screw into a pocket hole without clamping the two pieces together? It can be done, but sometimes the joint can look a little sloppy. It’s best to clamp your projects for assembly, but did you know there is a science to clamping? Clamping not only provides maximum contact between the pieces being joined, but it also keeps the faces flush while attaching the pieces together. Applying the proper amount of glue and using proper clamping techniques will ensure a strong joint that can last a lifetime.
1. Strong Joints Begins with Glue
Let’s say we’re edge gluing three pieces of wood to build the top for the DIY air conditioner dresser. Creating a strong joint between these pieces of wood begins with selecting a quality wood glue. Once you have the right glue, you need to apply the right amount of glue. Search for the best glue to use for your DIY projects? This glue is the only one I use for my furniture projects!
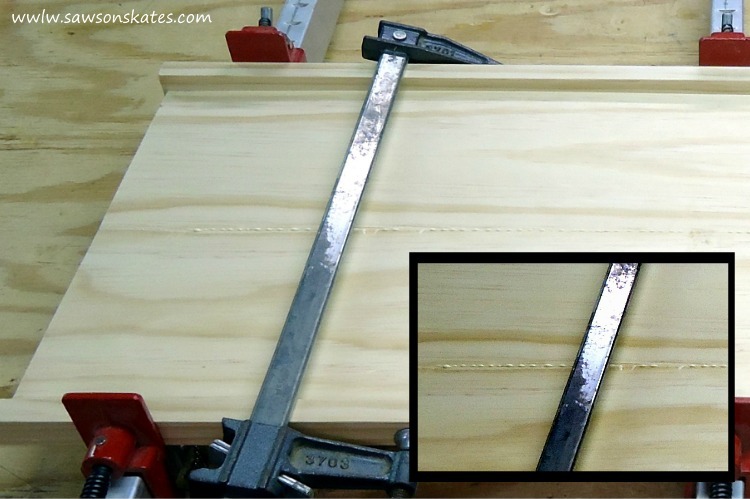
You want a little of the glue to “squeeze out” of the joint like below when I was assembling a book-matched panel. When you see squeeze out it means there is ample glue between the pieces and the glue will provide a tight bond. No squeeze out could indicate a “dry joint”. Meaning there’s not enough glue in the joint to create a good bond. A dry joint could be weak and fail over time.
WORKSHOP TIP: Apply glue from the glue bottle, then use a glue spreader to apply an even amount of glue over the workpiece. Ya know all of those credit card offers you get in the mail? Some of them include a fake credit card. Those fake credit cards make great, free glue spreaders!
2. Clamping Science
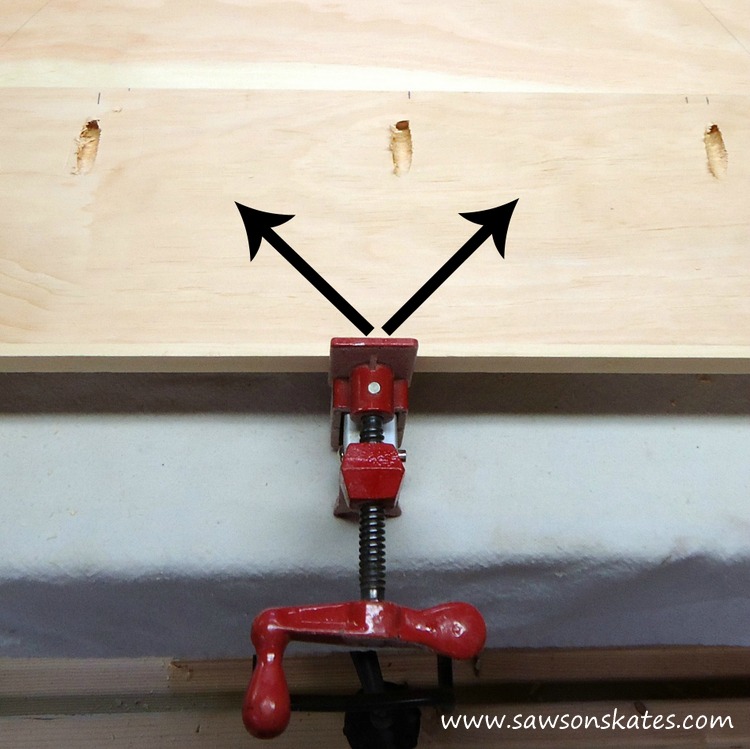
After you apply the proper amount of glue you need to bring those joints together. Enter the clamp. When you use a clamp, like a bar clamp, it exerts force in a 45 degree angle to the left and to the right from where the clamp contacts the wood. The clamps should be placed, so the same amount of force is being applied along the entire workpiece.
3. Where to Position the Clamps
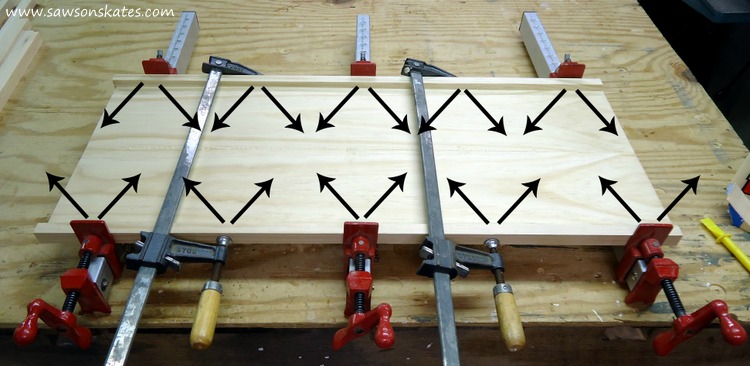
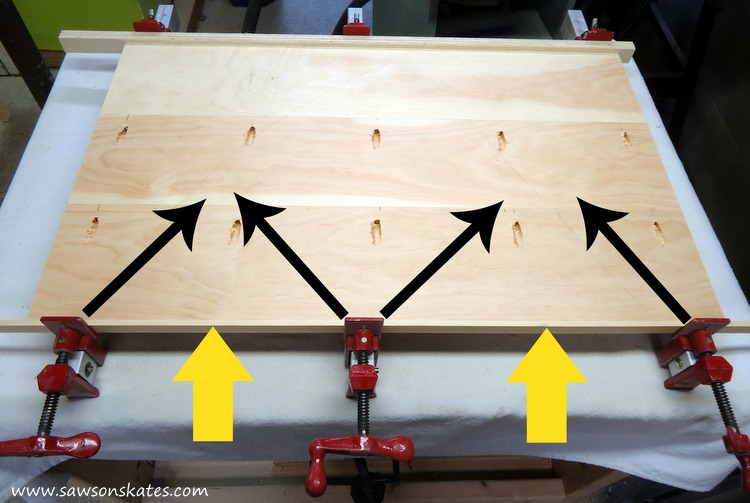
Take a look again at the air conditioner dresser top. Above we learned the science behind how clamps work. Clamps apply pressure at 45 degree angles from the clamp contact point and we should clamp, so there is even pressure all along the workpiece. Do you notice any issues with where I placed the clamps?
The same amount of force is not being placed along the entire workpiece. I should have placed an additional clamp at each yellow arrow.
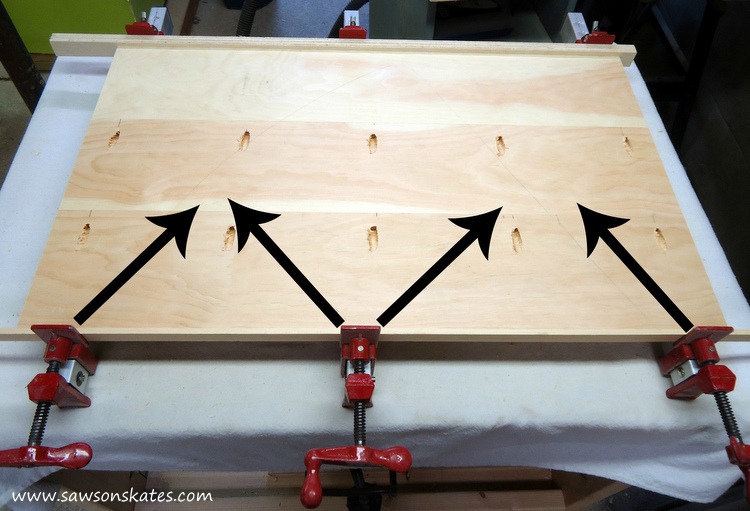
Here is an example of a similar sized panel where I used more clamps. In this example the clamps exert the same amount of force along the entire workpiece to create a strong joint.
WORKSHOP TIP: It’s not only a good idea to apply equal pressure along the workpiece, it’s a good idea to alternate your clamps from top to bottom. Notice the red clamps are clamped below the workpiece and the grey/wood handle clamps are clamped above the workpiece. This configuration will apply equal force along the workpiece and at the top and bottom of the workpiece ensuring a strong joint.
4. How Many Clamps Do You Need?
You’ve probably heard the saying “you can never have enough clamps.” And it’s true! If you look at the pic above you’ll notice I used five clamps to assemble the panel. For assembling some projects I use nearly every clamp I own!
So how many clamps do you really need? Here’s what I suggest: two 4″ bar clamps, two 6″ bar clamps, two 12″ bar clamps, and five to six 24″ bar clamps.
Please understand… I’m not telling you to go out and buy all of these clamps in one shot! I’m just suggesting that after years of building furniture projects and collecting clamps, I’ve found this assortment seems to be the clamp sweet spot!
5. Clamping Cauls
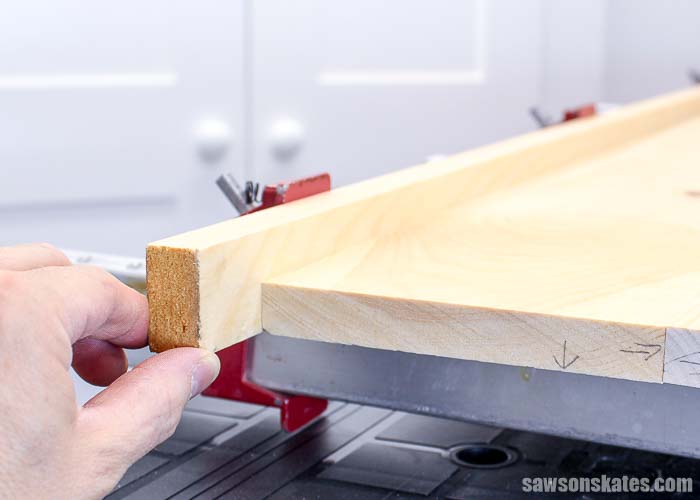
Did you notice the pieces of wood in between the workpiece and the clamps? Those pieces of wood are called clamping cauls.
Clamping cauls serve two purposes. First, they help the clamps exert equal pressure along the workpiece. They also protect the workpiece from being damaged by the clamp. I save some of my scrap wood to use as clamping cauls.
6. Clamping and Gluing Butt Joints
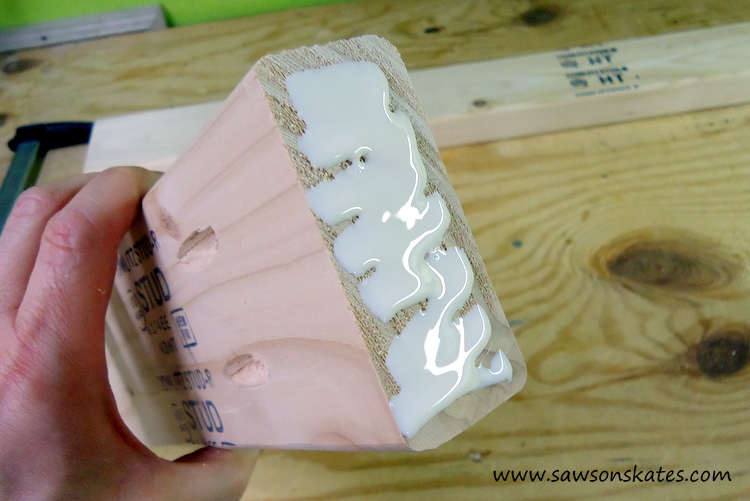
To glue, or not to glue butt joints, that is the question! I’ve heard and read that gluing butt joints is a waste of glue. What’s a butt joint? A butt joint, joins the end grain of one piece of wood to the edge of another piece of wood like when I assembled the chalkboard shadowbox.

The end grain of wood is like a box of drinking straws. Imagine applying glue to the end of a box of drinking straws. What would happen to the glue? That’s right, the glue is going to just drip down inside the straws.
That’s basically what happens when you apply glue to end grain and why it raises the question if you should even bother applying glue to end grain. For me, I always apply glue to butt joints just like I did with the fliptop workbench cart.
A few times I’ve applied glue to end grain joint, later realized I messed up the plan and wanted to pull that joint apart. I can tell you, a glued butt joint is waaay more difficult to pull apart than a butt joint that wasn’t glued. So for me, I glue butt joints.
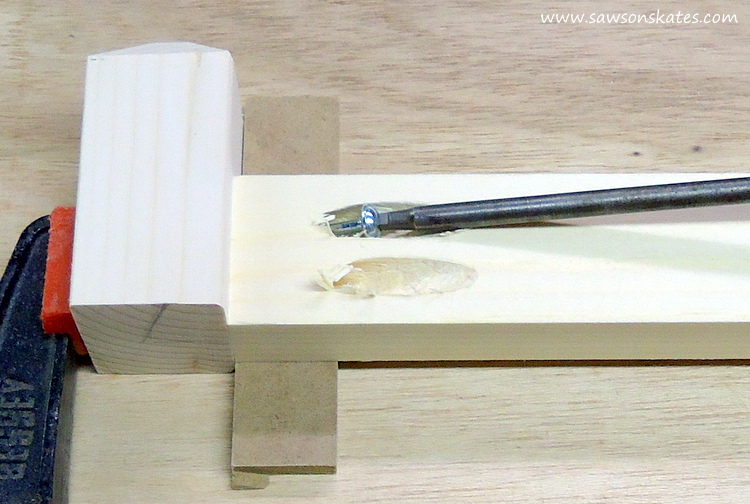
After the glue is applied, the joint is clamped using a bar clamp and the pocket screw is driven in using a drill. This example shows the leg assembly for the DIY dog bed.
Thank you for stopping by to learn my tips for making strong joints and how to clamp your DIY project like a pro. Do you have any clamping tips? Please share them in the comments.
PIN THIS!

Hi there – I’m Scott, a woodworking enthusiast and creator of Saws on Skates, a site I started in 2015 to share easy-to-follow tutorials, space-saving shop tips, and project inspiration for DIYers at any skill level. Learn more about my woodworking journey here.
Thank you for the tips. I glared a three inch thick table top 6′ long with Biscuit joints and used 9 bar clamps. I used lots of glue and spread it out with 9 bisquits between the 2 ,18″ planks . I left them clamped together for 4 days it came out well.
Terrific article, thank you!
Thank you Leanne – glad you found it useful!
A couple of comments to add in addition to what you have already said.
1) Alternating the clamps top to bottom also prevents the glued up piece from cupping or bowing. If you glue up a wide piece with multiple boards and put all the clamps on one side, you could end up with a top shaped beautifully like a “C” because the clamps, while exerting pressure toward the joints, will also try to force the pieces up and out of the clamps. The higher the number of boards and wider the pieces you glue up, the more risk there is of deformation.
2) Clamping cauls are a great way to distribute pressure evenly along the glue joints but in order to do this, the cauls need to be thick enough to transfer the force to the project, not just protect the edge from damage. Think of the forces shown on the photo which show force extending out at 45 degree angles, but is actually in a radial patter starting at the clamping point. If the caul is thick, this force extends out at angles as shown but at the contact point with the work piece will cover a larger area and actually go in a more perpendicular direction except at the edge of the caul, then extend at an angle.
3) More is not always better. What I mean by this is too much clamping pressure can actually force too much glue out of the joint and starve the joint the same as not applying enough glue. You don’t need to crank on the clamps so hard they’re starting to bow. Clamp with enough pressure to get squeeze out from a thin layer of glue and apply enough pressure to hold the pieces firmly together. Fight the urge to keep adding pressure, you will only be making a weaker joint than you could have had.