Avoid a DIY Furniture Fail with This Simple Tip
We’ve all had a DIY furniture fail. We’ve accidentally driven a pocket screw through the edge of a board or ripped a piece too narrow on our table saw. These mistakes are a waste of time, a waste of money and cause us major frustration. The other thing is these mistakes aren’t accidents at all. Most can be avoided by creating samples or test pieces.
For your convenience, this post contains affiliate links to supplies or tools I used to complete this project. Purchases made using these links help support the Saws on Skates website and allow me to share more DIY projects and DIY tips with you. There is no cost to you for using these links. Click here to visit my site policies.
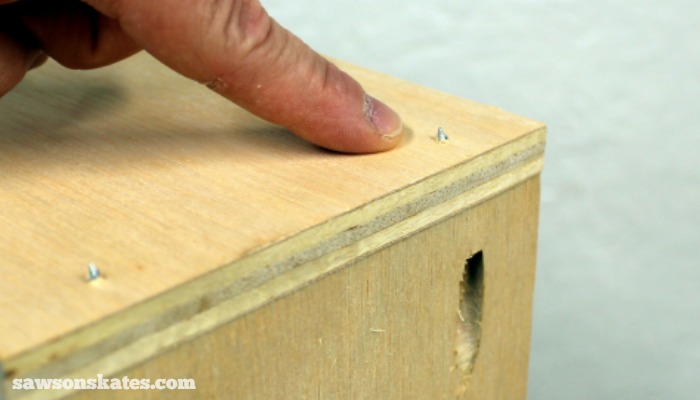
A few weeks ago I shared 9 Pocket Hole Mistakes You Don’t Want to Make. In that post, I shared how when I was building the Mid-Century Modern Nightstand I drove several pocket screws through the edge of the 3/4″ plywood.
Plywood, like 3/4″ plywood is actually a little thinner than 3/4″. So if you set your pocket hole drill guide to 3/4″ and drill bit collar to 3/4″, then attach the two pieces of plywood with a pocket screw, the screw will actually poke through the edge of the plywood. Exposed screws are not an attractive look for DIY furniture!
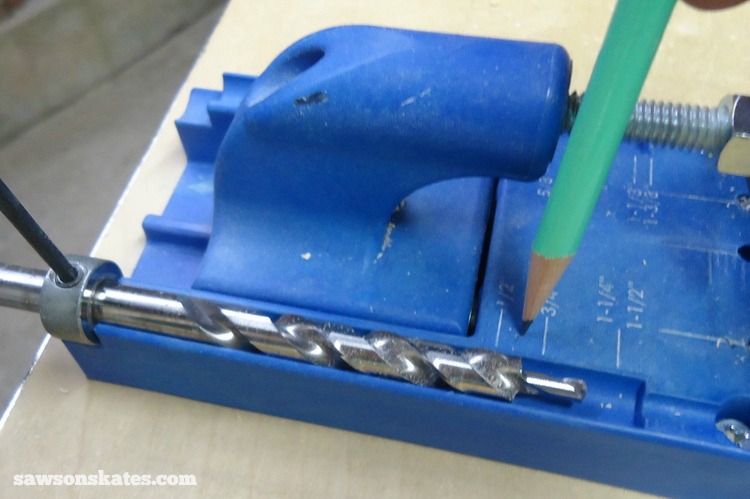
The solution to avoid screws protruding through the edges of our plywood furniture projects is to set the drill guide to the thickness of the plywood, so for example, set the drill guide to 3/4″. Then set the drill bit collar, so it’s shallower than the thickness of the wood. For the Mid-Century Modern Nightstand, I set the drill guide between the 1/2″ and 3/4″ mark.
Reader Reminder
My issue with the Mid-Century Modern Nightstand resonated with one of my readers. In part, John said:
I was joining some 1/2 inch plywood yesterday and ruined a fairly intricate piece I had made and finished by putting a screw through it. I’ve been trying to figure out what I did wrong and how I could improve my set up. I looked for shorter 3/4″ screws (I used 1″) but they make them in fine threads. I thought about putting washers on the screws to keep them from going so deep and that might work. The ultimate solution is to set the collar at a shallower depth however. Unfortunately I will have to remake the piece I drilled through and the piece I put the pocket holes in. I will do a test piece first this time, however.”
We’ve all been there right, but did you catch John’s last sentence? “I will do a test piece first this time, however.” Oh man, this really hit home for me and serves a great reminder. Sure, I do test pieces for complicated assemblies, but rarely do them for assemblies that I know, errr, that I think will work.
Why Create Samples or Test Pieces
Creating a sample or test piece is NOT a waste of time. You know what’s a waste of time? Going to the big box store to get more wood, recutting the parts you messed up, drilling new pocket holes and reassembling your furniture project because you didn’t take the time to make a test piece. Taking the time to create a sample or test piece actually saves time in the long run and will make you a better builder.
Not creating a sample or test piece is also a waste of money. If you have to get in your car, make an extra trip to the big box store and buy more wood then you’re wasting money. Gas and supplies are expensive. If you’re DIYing to save money, then you’ll want to create a sample or test piece.
After we mess up a piece for a furniture project we’re a little frustrated, right? Just imagine how frustrated we’ll be after we have to take extra time to get in our car, waste gas on driving to the big box store where we’ll waste more money on more supplies. Then we’ll waste more gas driving home where we’ll recut the messed up parts and reassemble. Frustrating, right? I’m frustrated typing this and I haven’t even messed up a project! Avoid frustration and create a sample or test piece.
When Should You Create a Test Piece
Ideally, you should do a sample or test piece for every step of your project. I know what you’re thinking. “What? This bald guy is crazy!” I know, and I’m not gonna lie, I don’t create a sample or test piece for each step. But I should, here’s why.
Just the other day I changed the setup in my Kreg Jig from drilling pocket holes in 1-1/2″ material to drill into 3/4″ material. I adjusted the drill guide and set the stop collar. All looked good except I didn’t tighten the collar enough. When I drilled a few pocket holes I immediately noticed something was wrong. The drill bit drilled nearly all the way through the end of the piece.
Because I didn’t properly tighten the collar, the collar slipped and allowed the drill bit to drill too deeply in the piece. This wasn’t a complicated setup or tricky joint. It was just a regular run of the mill pocket hole. It was an easy mistake to avoid. I could have simply thrown a piece of scrap wood in the Kreg Jig and tested my setup.
How to Create Sample or Test Pieces
Creating a sample or test piece is easy. When you’re cutting parts for your furniture project, cut a few extra pieces to use a sample or test piece. Scrap wood also works great for sample or test pieces. Plus it’s a great way to use up all of those scrap pieces lying around your shop.
How to Use a Sample or Test Piece
Using our sample or test piece is sooo easy. Use them the same way you would for the pieces for your actual furniture project. We can use them to test our pocket hole setup like I mentioned above.
We can use them to test the setup of our table saw to be sure we’re ripping to the correct width. We can also use them to test complicated angle joints.
Year’s ago, before I was a full blown DIYer, I had someone do some work on my bathroom shower. I had to remove the door trim, so they could work and noticed a problem when I tried to replace the trim. A side note about this trim, the previous owner had painted a faux marble look on the trim. The previous owner did an amazing job and I wanted to keep the trim.
The problem with replacing the trim was that the work down to the shower was not plumb (straight from the ceiling to the floor). When I tried replacing the trim there was a big gap between the edge of the trim and the shower. GRRRRR!
At the time I was taking a furniture making class, so I asked my instructor Bob how he would handle this. His answer was simple. “Make a test piece of the trim, so you don’t ruin the faux paint treatment. When you have the test piece fitting the way you want it, you can trace the test piece onto the trim piece.” So simple – why didn’t I think of that!!!
Conclusion
We’ve all had a DIY furniture fail. These mistakes are a waste of time, a waste of money and cause us major frustration. These fails are easy to avoid. Make test pieces – save time, save money and save your sanity!
PIN THIS!

Hi there – I’m Scott, a woodworking enthusiast and creator of Saws on Skates, a site I started in 2015 to share easy-to-follow tutorials, space-saving shop tips, and project inspiration for DIYers at any skill level. Learn more about my woodworking journey here.