Setting up the Kreg Pocket Hole Jig and using it to build DIY furniture is sooo easy! Despite that mistakes are easy to make, and trust me, I’ve made most of them! Today I’m sharing with you 9 pocket hole mistakes you don’t want to make.
For your convenience, this post contains affiliate links to supplies or tools I used to complete this project. Purchases made using these links help support the Saws on Skates website and allow me to share more DIY projects. and DIY tips with you. There is no cost to you for using these links. Click here to visit my site policies.
I use my Kreg Jig for nearly every DIY furniture project I build. Over the years I’ve had a lot of pocket hole successes, but I’ve also made a few pocket hole mistakes along the way. Today I’m sharing those mistakes with you, so you don’t make them too!
9 Pocket Hole Mistakes You Don’t Want to Make
We can experience pocket hole problems no matter what brand of pocket hole jig we use. Before we dive into the pocket hole mistakes we want to avoid let’s review what a Kreg Jig does and how to properly set it up for building DIY furniture.
What is Pocket Hole Joinery?
The Kreg Jig uses preset holes to drill angled pocket holes in a piece of wood. A pocket screw, specifically designed for use with pocket holes draws the two pieces of wood together to form a strong joint.
Kreg Jig Setup
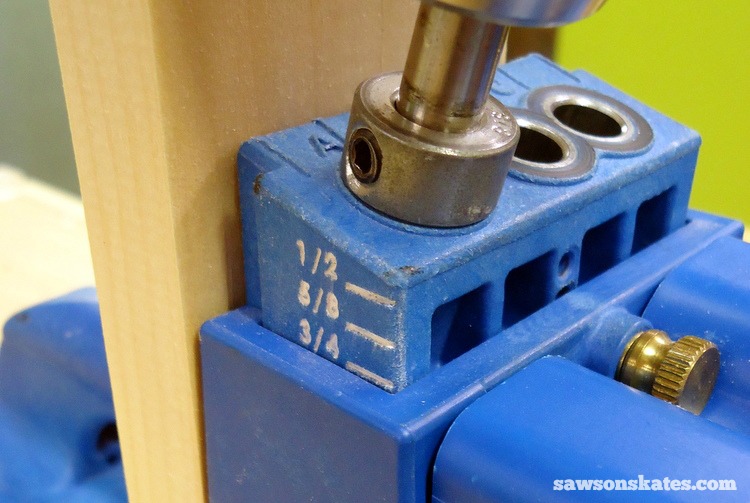
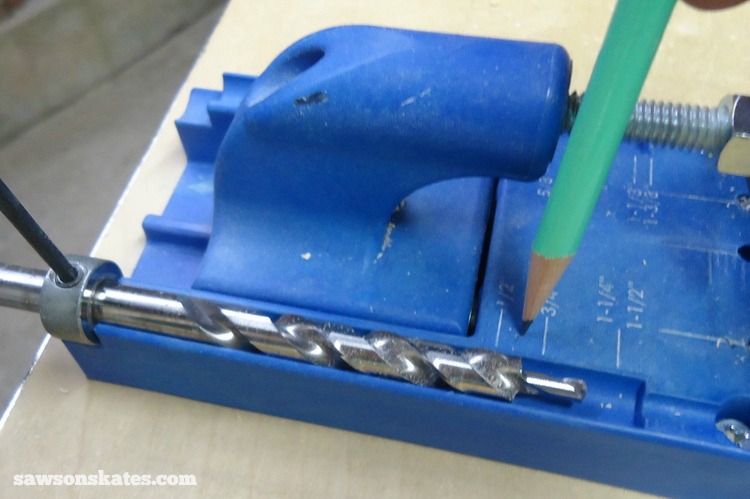
Step 1 – Set the Drill Guide
The first step to using the Kreg Jig is to adjust the drill guide to the thickness of your board. If your board is 1-1/2″, set the jig for 1-1/2″. For this example, our board is 3/4”, so we’ll set the drill guide to 3/4”.
Step 2 – Set the Drill
The next step is to set the drill depth. Again, you’ll want to match the drill depth to the thickness of your board. For this example, our board is 3/4”. Loosen the collar with an Allen key and move the shoulder of the drill bit (or the bottom of the stepped area of the drill bit) to correspond with the 3/4” mark and tighten the collar.
Step 3 – Drill Pocket Holes
Next clamp the board in the jig to correspond with the appropriate drill holes. Chuck the drill bit in your drill and insert the drill bit into the guide block until it hits the wood. Slightly raise the drill bit and bring the drill up to full speed. Then gently lower the bit into the wood and start drilling the pocket hole. Keep drilling until the collar on the drill bit contacts the drill guide.
Tip: For wood that is 1-1/2” wide, center the wood between holes B and C, and drill in holes B and C. For wood that is 2-1/2” wide, center the wood between holes A and B, and drill in holes A and B. Wood that is 3-1/2” wide, center the wood between holes A and C, an drill in holes A and C.For all other widths of wood, make sure your pocket holes are set in a minimum of 3/4” from the edge to avoid possibly cracking the wood.
1. Avoid the End Grain
The most common pocket hole joints we’ll make with our Kreg Jig are butt joints and edge joints.
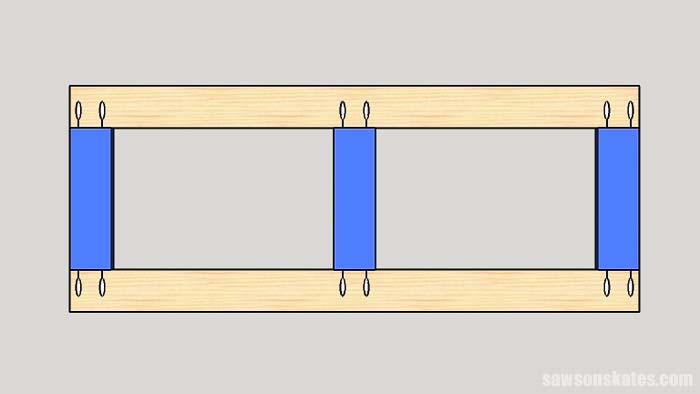
A butt joint joins the end of one piece of wood to the edge of another piece of wood. Common uses for butt joints are frames for side assemblies and doors.
An edge joint joins the edges of two boards. Common uses for edge joints are panels and table tops.
Butt Joints
Pocket holes need to be drilled into the ends of a board when creating butt joints. Let’s say we are going to build a frame. We need to drill the pocket holes into the vertical (blue) pieces not the horizontal (wood grain) pieces.
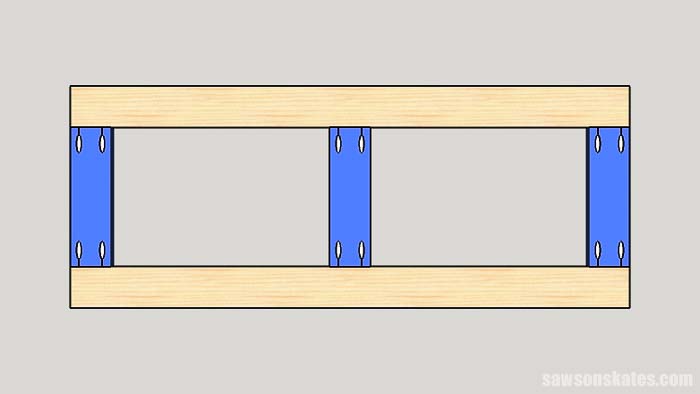
We don’t want to drill pocket holes into the edge of a board (horizontal wood grain pieces) and drive pocket hole screws into end grain because this would not create a strong joint. The grain of wood runs the length of the board. The end of the board is referred to as the end grain.
Think of the wood grain or wood fibers like a box of drinking straws. Imagine driving a screw into the end of a box of drinking straws. What would happen to the screw? That’s right, it would just spin around in the ends of the straws. Driving screws into end grain does not create a strong joint.
Edge Joints
There’s an exception to every rule, so there is a time when it’s OK to drill pocket holes into the edge of the board and that’s when we are edge joining to make panels, table tops, etc. When edge joining the pocket screw is driven through the edge of the wood and this makes a strong joint.
My friend Mike at Kreg Tool recommends setting the pocket holes about 2″ from the ends of a board when edge joining. Mike also recommends spacing pocket holes approximately 6″ apart along the edge of a board.
Skate over to Need to Know Pocket Hole Tips for Edge Joints for more helpful edge joining tips and tricks
2. Change Setup for Different Wood Thicknesses
Many furniture projects use different thicknesses of wood. It’s important to change the drill guide and the collar on the drill bit match the thickness of the wood you’re drilling pocket holes into.
Let’s say you’re drilling pocket holes into a 2×4. You’ll set the drill guide to 1-1/2″ and drill bit collar to 1-1/2″. Then let’s say after you drill the pocket holes into the 2×4 you need to drill pocket holes into 1×4 and you do that without changing the drill guide and drill bit collar. Well, you’ll drill all the way through the end of the board. Not Good! And yes, I have done this on more than one occasion!
How can you prevent this pocket hole mistake from happening? If I’m batch drilling pocket holes, I may use one of my 5 Unexpected Uses for Painter’s Tape tips and label the parts that require different depths of pocket holes.
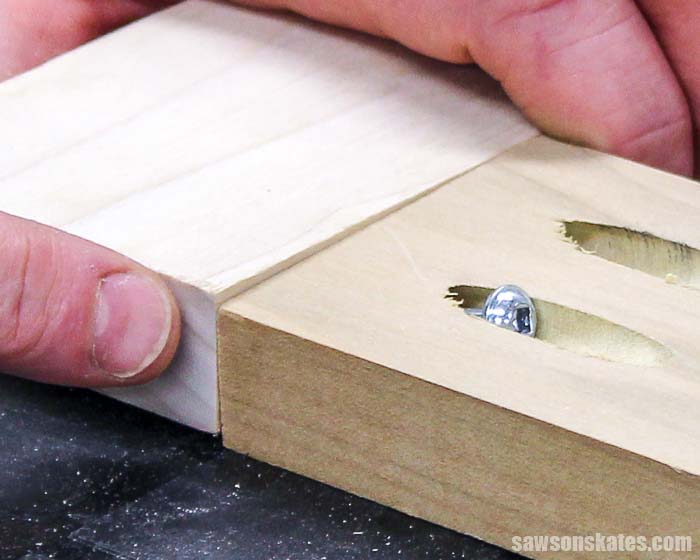
3. Adjust Drill Bit for Plywood
Plywood, like 3/4″ plywood is actually little thinner than 3/4″. So if you set your drill guide to 3/4″ and drill bit collar to 3/4″, then attach the two pieces of plywood with a pocket screw, the screw will actually poke through the edge of the plywood. Exposed screws are not an attractive look for DIY furniture! Yup, I’ve made this mistake too when I was building the Mid-Century Modern nightstand.
To avoid screws protruding through the edges of your plywood furniture projects set the drill guide to the thickness of the plywood, so for our example, set the drill guide to 3/4″. Then set the drill bit collar, so it’s shallower than the thickness of the wood. For our example set the drill guide between the 1/2″ and 3/4″ mark.
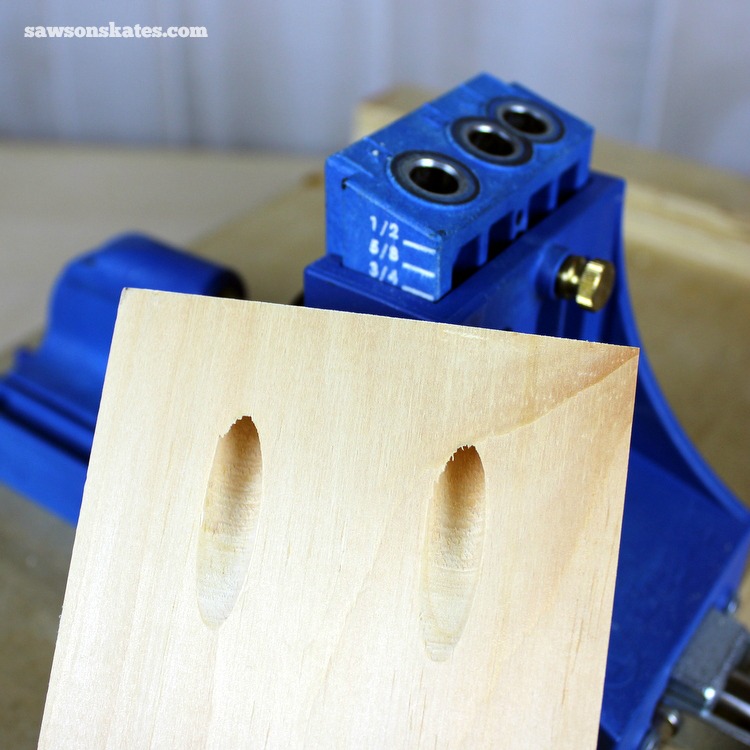
4. Replace Worn Bits
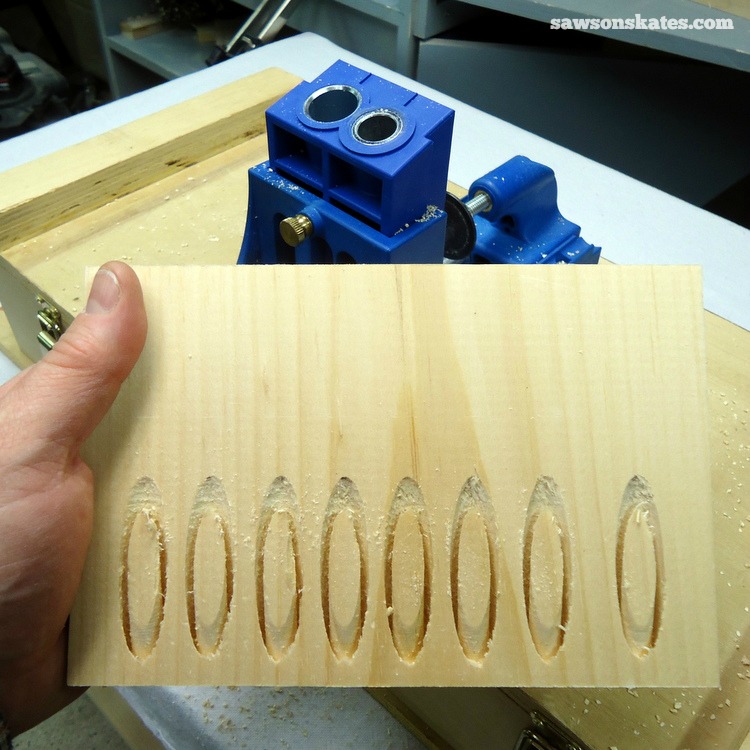
I use my Kreg Jig to drill pocket holes for nearly every furniture project I build. It only makes sense eventually the drill bit would become worn. It’s important to know the signs of a worn drill bit because worn bits drill more slowly, get hot quickly and produce a “fuzzy”, jagged looking pocket hole.
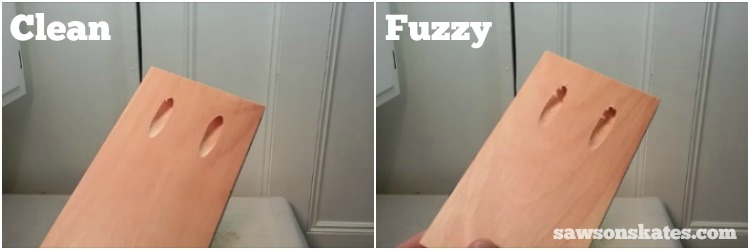
A jagged pocket hole is a particular concern if you’re going to use a pocket hole plug cutter to fill the pocket holes with plugs. With a crisp, clean pocket hole you can place the plug in the pocket hole, sand the plug flush with the surrounding wood and the pocket hole will virtually disappear. With a jagged pocket hole you can place the plug in the pocket hole, sand the plug flush with the surrounding wood, but edges of the pocket hole will still appear jagged. It’s time to replace your pocket hole drill bit if your pocket holes look fuzzy or jagged.
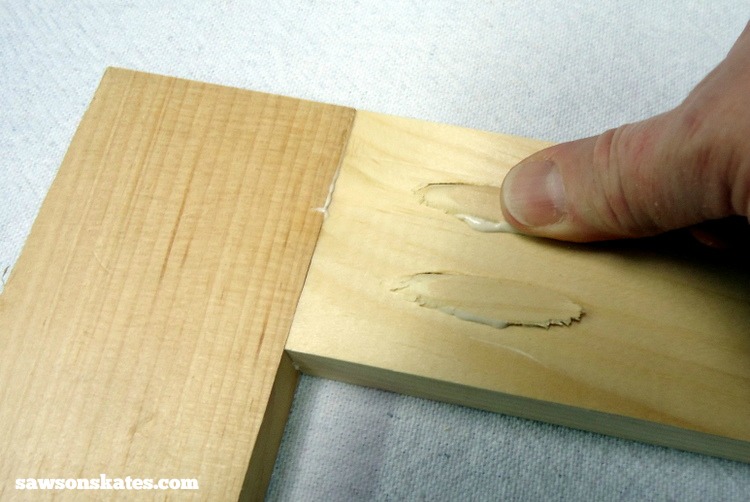
5. Use Wood Glue
Pocket hole joints don’t require wood glue, but that doesn’t mean you shouldn’t use glue when assembling your furniture projects. When a pocket screw is driven through an angled pocket hole it draws the two pieces of wood together tightly. The pocket holes make a strong joint, but it doesn’t take into account the wood itself. Wood is a living thing.
Wait, did I just say wood is a living thing?! Well, not exactly living, but it is hygroscopic. Wait, did I just say hygroscopic – what’s that? Simply put, hygroscopic means it absorbs moisture from the air. Wood is constantly absorbing and giving off moisture, just as it would when it was alive. Remember earlier how I described wood like a box of drinking straws. When the drinking straws, ummm wood, fills with moisture it swells and gets bigger. When it loses moisture it shrinks and gets smaller. If you build a project when it’s humid, you may notice when the air is drier that some of the joints don’t fit as well as it did when there was more moisture in the air.
I’ve noticed this joint issue when edge joining tops for furniture projects. I built my air conditioner dresser in the summer when it was humid, but I didn’t edge glue the top pieces. The top looked great in the summer, but in the cooler months the joints of the top just ever so slightly pulled away from each other. And the edge of one of the pieces even started to slightly curl up.
Can you stop wood movement? The short answer is no, but you can help reduce some of these issues by gluing the joints. If I glued the top of the air conditioner dresser it wouldn’t be moving like it does. Skate over to Mistakes with Wood Can Cause Your DIY Furniture to Crack for more details about the seasonal movement of wood.
Why didn’t I glue the top? Well, I knew I wanted to stain the piece and regular glue doesn’t accept stain. Almost all of us have had a finish ruined by glue squeeze out. The glue squeezed out, we stained the piece and the glue prevented the stain from soaking into the wood. What we’re left with is what looks like a big bleach stain on our project. Regular glue just isn’t stainable. Since then I found Elmer’s Wood Glue Max. This glue creates a strong bond and is stainable.
Pocket holes create a strong, lasting joint, but that joint is made better by adding wood glue.
6. Use Clamps
By now we know how a pocket hole joint works. A pocket screw is driven through an angled pocket hole, and the screw draws the two pieces of wood tightly together. Despite this, you still need to use clamps to properly align the joint before attaching it the joint with pocket screws.
Don’t try to properly align pocket hole joints with your hands. The workpieces will move, and you’ll likely end up with a misaligned, poorly fitting joint.
Nothing beats the mechanical advantage of a clamp. Your pocket hole joints will stay in place, the joints will fit better and your furniture projects will look more professional.
Specifically designed pocket hole clamps are available, but in my How to Prevent Pieces from Moving When Assembling Pocket Hole Joints post I shared that I prefer to use an assortment of bar clamps. This way I can layout the entire assembly, get all of the joints the way I want them, tighten the clamps and attach with pocket screws.
Use clamps when you assemble your pocket hole joints, and the look of your projects will go from amateur to professional.
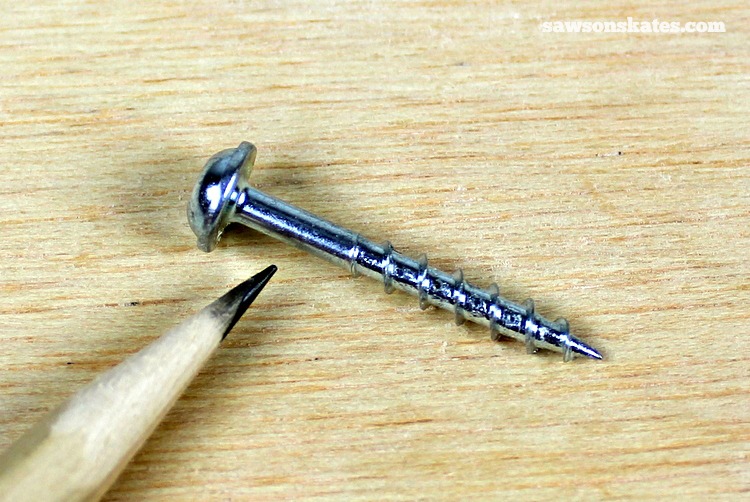
7. Use Pocket Hole Screws
Pocket screws are specifically designed to work with pocket holes. Pocket screws have threads only on the lower portion, while the upper portion, or shank is not threaded. This design allows the shank of the pocket screw to slide through the pocket hole and pull the joint tight together.
Unlike pocket screws, wood screws have threads along the entire length of the shank. These threads won’t allow the wood screw to slide through the pocket hole. Wood screws may not pull the boards together resulting in a loose-fitting joint. Worse yet wood screws may crack the board.
Use only Kreg brand pocket screws or another authentic pocket screw by another brand to create a tight pocket hole joint.
Pocket Screw Threads
Pocket screws are available in coarse thread and a fine thread. Use coarse thread pocket screws for softwoods like pine, plywood, particle board and MDF. Use fine thread pocket screws for hardwoods like oak, maple, hickory, cherry, walnut and birch.
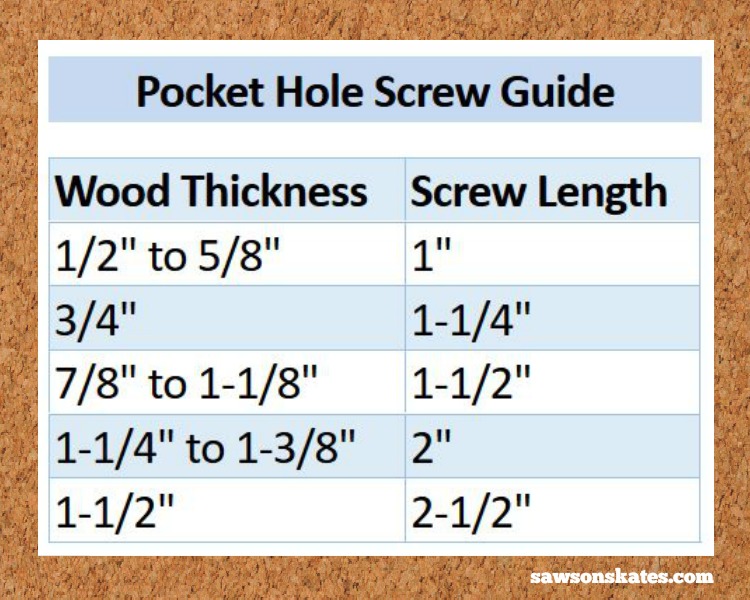
8. Use the Correct Length Pocket Screw
Always use the correct length pocket screw for the pocket hole you have drilled. Using a pocket screw that is too short won’t connect the boards together and using pocket screws that are too long could drive the screw through the edge of the other piece. Check out the pocket hole screw guide below to be sure you’re using the right pocket screws for your project.
Tip: When I use different length screws for a furniture project I will sometimes write lightly in pencil next to the pocket the length of screw I need to use. Other times I will use painter’s tape to write a note of the length of screw I need to use.
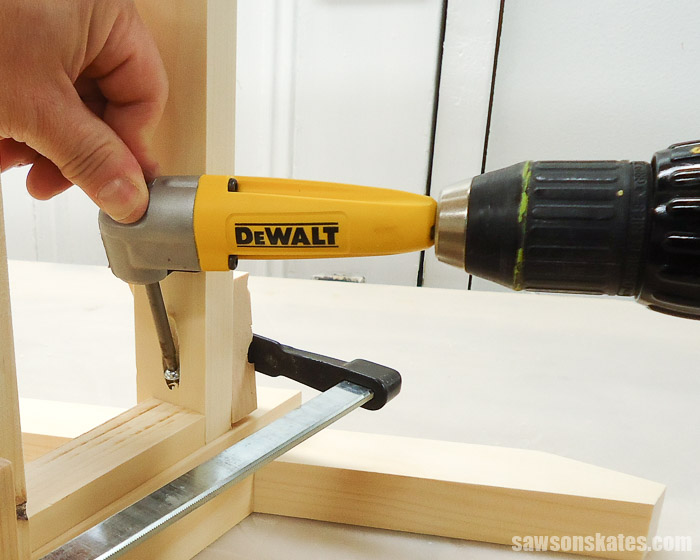
9. Avoid Over Tightening
As we discussed earlier pocket screws are different than wood screws, and that means we have to take a different approach when driving them into the workpieces.
Unlike a wood screw, pocket screws only need to be driven until they’re “just snug” to create a strong joint. Basically we want to stop driving the pocket screw when we start feeling some resistance.
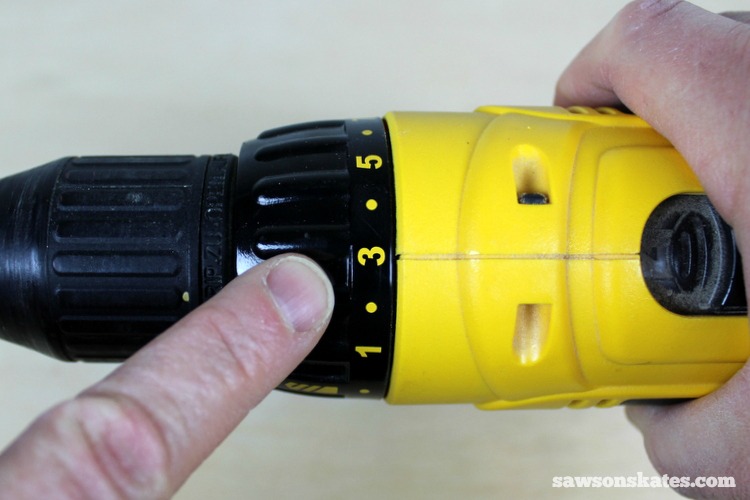
Overtightening a pocket screw can strip the pocket hole which can create a loose joint. Overtightening could even drive the screw through the other workpiece. I set the clutch on my drill to avoid overtightening pocket screws.
Setting the clutch prevents the drill from driving the screw any further when the drill meets a certain amount of resistance. This prevents over tightening and stripping the pocket hole. For driving pocket screws into softwoods like pine my DEWALT drill works well when I set the clutch to 3.
One more thing while we’re chatting about drills. I recommend using a drill for both drilling pocket holes and driving the screws rather than an impact driver. The impact action of an impact driver can loosen the drill bit depth collar when drilling pocket holes and could possibly strip the the pocket hole when driving the screw. Stick with a drill and you’ll be good to go.
Tip: Over tightening a pocket screw is just one way a pocket hole can become stripped. Another way a pocket hole can become stripped is if you remove a pocket screw and then reattach it. Fixing a stripped pocket hole is as easy as grabbing some wood glue and heading to the kitchen for some toothpicks.
Bonus Tip – Make Your Pocket Holes Virtually Disappear
The Kreg Pocket Hole Plug Cutter will take your furniture building to the next level! The plug cutter makes plugs to fill pocket holes. The plugs are cut from leftover scrap wood from your project, so the plugs will exactly match the wood color and wood grain of your project.
The plugs are glued into the pocket holes and then sanded flush. With a pocket hole plug cutter, your pocket holes virtually disappear and you’ll make your DIY projects look more professional. This a “gotta have it” tool for the DIYer! Check out my plug cutter setup tips and video!
Bonus Tip – Secret Weapon For Hard-to-Reach Pocket Holes
It will happen to all of us at some point. We’ll chuck the pocket hole driver in our drill, attempt to drive the pocket hole screw into the pocket hole and… CRASH!!! The drill/driver combo is too large to fit in our DIY furniture project. We can’t tighten the screw. What do we do now? You need my secret weapon I keep in my tool arsenal for hard-to-reach pocket holes – a right angle attachment!
Get Answers to Your Pocket Hole Questions!
If you didn’t find the answer to your pocket hole question in this post or in the Kreg Jig Tips and Tricks directory you can ask your pocket hole questions here!
Download the Pocket Hole Mistakes Guide
Master your pocket hole projects with this FREE ten-page Pocket Hole Mistakes You Don’t Want to Make Guide! The guide includes all of the useful tips in this post plus much more! Just click the link below and I’ll skate over to your inbox with your free guide!
Final Thoughts
Thank you for stopping by to check out my 9 Pocket Hole Mistakes You Don’t Want to Make. Have you made a pocket hole mistake that I didn’t discuss? Tell me about it in the comments. Oh, and if you found this helpful, would you please pin it to Pinterest? I’d really appreciate it! Thank you – Scott
Rich says
Thanks….very much appreciate the info
Scott - Saws on Skates says
Thank you Rich – glad I could help!
AL Baker says
Very very helpful,thanks!
Scott - Saws on Skates says
Thank you – I’m glad you found it useful!
James says
I need help on route ing inside corners for glass I build my door and now I’m rabbeting around inside corners for glass to put in but the corners aren’t square there round
Scott - Saws on Skates says
Hi James – There are a couple of ways to tackle these round corners. You could square the round corners with a chisel. Or you can use a specially made corner chisel like this one to square the corners.
Mar says
Very helpful, thanks for this information. I made a bed frame with headboard and footboard, and had to add another panel to the headboard as it was too ‘short’ making the bed look ridiculous once we put the boxspring and mattress on. I added the panel just fine, but didn’t use glue for the add-on. Winter came along with terrible dryness, and guess what? That panel popped up eventhough I used the Kregg jig and screws! I could see light coming through between the panels. It looked so shoddy. I had to unscrew, glue, reclamp, then rescrew it all….I hope someone reads this article before making the same mistake.
Scott - Saws on Skates says
Thank you for stopping by. There’s nothing worse than spending a bunch of time on a project only to have to redo something later… been there and done that! Glad you go it fixed.
Tom DiBuono aka "Dusty Britches says
Thanks for sharing your tips on pocket hole joinery. Very useful information.
Scott - Saws on Skates says
Thank you so much for stopping by and for the compliments. I’m glad you found it useful!
A. Blugh Sr. says
Excellent review.. Now we can learn from your mistakes and not repeat them.. Thanks..
Wesley Robertson says
I definitely value the information in this article. I haven’t used my Kreg Jig yet but I will definitely pin this to my Pinterest board so I can refer back to it when I get time to start making some projects.
Scott - Saws on Skates says
Wesley, you’ll LOVE the Kreg Jig once you start using it! Let me know if you have any questions when you get started – I’d be happy to help.
John Perott says
I am ready to purchase a pocket hole gig (probably Kreg) and after reading your article, I found there was a multitude of things that I didn’t know and need to know. I am glad I found it. Can’t imagine why I haven’t used this method for years. It seems so easy, much more so than dwells or mortise and tenon joints. Thanks for the info.
Scott - Saws on Skates says
Thank you John. Good luck with your pocket hole jig… you’re going to LOVE it!!!
John Thomas says
Thanks for the tips. I have been using a Kreg jig for some time and recently got the K5. I was joining some 1/2 inch plywood yesterday and ruined a fairly intricate peice I had made and finished by putting a screw through it. I’ve been trying to figure out what I did wrong and how I could improve my set up. I looked for shorter 3/4″ screws (I used 1″) but they make them in fine threads. I though about putting washers on the screws to keep them from going so deep and that might work. The ultimate solution is to set the collar at a shallower depth however. Unfortunately I will have to remake the piece I drilled through and the piece I put the pocket holes in. I will do a test piece first this time however.
Scott - Saws on Skates says
Hey John – Thank you for stopping by. I’m sorry to hear about your project. I’ve been there and done that. You mentioned a great tip… it’s always good to do a test piece first. I’m always so excited to get my project together that I sometimes to forget to do a test piece. Thank you for the reminder and good luck with your project.
irinahill says
Hi Scott, these tips are amazing! I also benefitted greatly from your clamping article. I’m a DIY newbie, so most of these were things I hadn’t seen before.
I’m having a pocket hope issue, hope you don’t mind if I ask you:
I have been trying to work with the Kreg jig. I made pocket holes successfully and I’m joining two pieces at a 90 degrees angle. I clamped everything down, drove the kreg screws in, and found that the thing wobbled. I tried screwing them in more, on the theory they’d go in further, but maybe that messed things up. I removed one of the screws to check the size, tried a longer one, and found that it went through the bottom of the test piece ( so I had the right size screw). Then I was checking the wobble, gave it a yank, and the pieces pulled apart! Since it was a test piece, I tried it without glue, but if I had glued it, there might still have been a gap…
If you can spot my mistake and suggest a solution, I would greatly appreciate it! Thanks so much for the great articles!!
Scott - Saws on Skates says
Hey there – thank you for stopping by and for the compliments! I’m sorry to hear about your pocket holes – we’ll get this figured out! You didn’t mention the thickness of the wood you’re working with, so I’ll presume 3/4″. Let’s first verify the guide block is set to 3/4″. Next let’s verify the shoulder of the the stepped drill bit is also set to 3/4″. When we clamp the workpiece into the jig we’ll want to make sure the workpiece is firmly seated on the jig and the clamp is tight. To assemble we’ll want to make sure the parts are firmly clamped together. I prefer to use a bar clamp. Pocket holes are easily stripped, so set the clutch on your drill to a low setting. For 3/4″ material we’ll want to use 1-1/4″ pocket screws. Drive the screw until the clutch stops the drill. This will create a strong joint. If you’re still having an issue, please send me some pics of each step and we will figure this out! My email is sawsonskates at gmail dot com. Good luck and let me know how it goes!
Shane says
If u are screwing a 2×4 to 3/4 plywood what do u set guides to
Scott - Saws on Skates says
Hey Shane – You didn’t what type of assembly you’re building, but for an example I’m going to presume you’re attaching a 3/4″ plywood panel to a 2×4 leg. In this case I would set my Kreg Jig/drill bit to drill into 3/4″ material and drill the pocket hole in the plywood. Then I would attach the 3/4″ plywood to the leg using 1-1/4″ pocket screws. Here’s an example:
Barry says
“… Next let’s verify the shoulder of the the stepped drill bit is also set to 3/4″. …”.
The stepped drill bit should be set to the screw length. I’m pretty sure I read that in one of your articles.
Scott - Saws on Skates says
Hey Barry – I should have asked what Kreg Jig they were using before I responded. The stepped drill bit for the Kreg Mini, Kreg R3 and Kreg K4 should be set to the thickness of the workpiece. But yes, you are correct, For the Kreg K5 the stepped drill bit is set to the length of the screw.
Ryan says
Can you post plans on how you made the box that your kreg jig is attached to please?
Scott - Saws on Skates says
Hi Ryan – I actually found that plan in a woodworking magazine a few years ago. I’m not sure if I have the magazine anymore, but I think I’ve seen the plan floating around Pinterest. I’ll poke around and see if I can find it for you.
Kathy Scott says
Have just found this and love the advice my only problem was converting all the measurements to metric when using my Kreg and in my haste to use it made lots of mistakes . Next time I will just slow down
Mike says
I’m a noob to wood work but have always been amazed at how some people make it look so easy to create true works of art. I look forward to more of your posts and hopefully I can learn a thing or two.
David Sandlin says
Another good tool to have for putting pocket screws into places where your drill won’t fit is a square drive screwdriver. If you can’t find one for sale in the tool department try looking in electrical. The “medium” size red handle fits the kreg screw.
labrat7357 says
G’day Scott, Thanks for the article. An observation about the dust extraction which is great and very effective if you can get the keg dust extraction fitting to stay together in one piece. I have been using it wth an old Miele vacuum, surplus to requirement in the home. It takes almost no load on the fitting for it to come apart where it swivels as it is made of very thin plastic and only has 4 x 1/8″ wide hooks that are completely ineffective. Swivels can be made far stronger just look at vacuum cleaners such as Kirby you can not get the swivels apart with out a lot of force and tools. I know as I used an old kirby hose for dust extraction an a Hegner finger jointing machine. If Kreg want to improve anything on this terrific jig it would be that fitting. I would pay heaps for an upgraded version to avoid the frustration of it falling apart every five minutes and me stopping work to put it back together each time. All the best.
Barry says
I just use duct tape to keep it in place.
Scott Chapin says
Here is a mistake I don’t want to make again. Never hold the joint with your hand as you drive in the screws. The driver tip slipped on me and drove into my palm of my hand. It hurt and I went to the doctor and after a exray they cleared me of any broken bones, but this is very easy to do. Use a clamp to hold together for safety.
Scott - Saws on Skates says
Hey Scott – I’m glad to hear that you’re OK. This is a great tip and a good reminder to always think safety first.
Mark Morningstar says
Very useful information. I can’t say I have run into many of your 9 errors, a couple of them, yes, but that’s all.
I just wanted to mention the Kreg Jig Mini. I have used this item so many times with hard to reach repairs. My parents have had a small motel for 40 years, and I do all the upkeep! Repairs you wouldn’t believe…so many creeps exist to do damage. Wow! Anyway, I have had repairs to chair legs, bed frames, window sills (inside and out) roof fascia boards, roof underlayment, planter boxes, doors, etc. I always keep my Kreg Jig Mini in my go-to tool box along with a selection of screw types and lengths, short 2″ and long 6″ square drive bits (sometimes the drill chuck gets in the way on intricately shaped repairs), and a couple clamps (2″, 3″, 4″ and a 6″ welder’s vice-grip to have ready for any type of repair!
I have even made some wooden frames with clear plastic stretched across like a painting canvas with closed cell foam surrounding the edges of the frame to insert in the window wells to seal out drafts. What a difference it makes in a warm room in Vermont during the cold winters!
Thanks again for the heads-up!
Mark Morningstar
Scott - Saws on Skates says
Hey Mark – Thank you so much for stopping by! Your email address sounds familiar… I think may have driven by your place on the way to the Vermont Country Store. It’s funny that you’re posting this comment, because I’m just finishing up a post about the Kreg Jig Mini! You’ve provided some great info here, so I hope you won’t mind if I pull some quotes to use in my new post. Thank you again for all the info and for stopping by – Scott
R says
Awesome article! I have been using the Kreg Jig Junior for almost two years now and while I’ve learned a few things, I’ve not seen some of these and certainly haven’t seen them all written down in one place. I love how links show more information and as a hobbyist it is refreshing to see I’m not the only one who makes a mistake now and again! I’m looking forward to reading other posts!
Scott - Saws on Skates says
Thank you so much – I appreciate the compliments!
Carlos says
Why not put the screws at sides of legs going into the panels and then put wood plugs to cover the holes made on the sides of the legs or as I love dowels and have no hole marks at all and better than screws where they come loose as you move the furniture around and in a few years must throw away due to loose screws?
Blaine says
Very informative, thank you.
Scott - Saws on Skates says
Thank you Blaine – Glad you found it useful.
Donald says
Great tips because if a mistake can be made I’ll make it. I have a question about gluing versus not on pocket hole joints. I’m in the process of building a kitchen table for a friend. She wants to use yellow pine 2×10’s. The boards are from the local lumber yard and we all know that wood from a yard is not totally dry. My way of thinking is to not glue so the screws can be tightened as it drys. I would like to hear your input as well as your other followers. I know ultimately it would be better to let the wood dry more but she wants it asap. Thanks
Donald
Scott - Saws on Skates says
Hey Donald – As you mentioned it would definitely be better to let this wood acclimate to the humidity level of where it’s going to “live”. So I’m sure you’re already aware of the risks of cracking, etc by building while it’s wet. That said, for wood that is relatively dry and had a chance to acclimate to the humidity level I always recommend gluing pocket hole joints. While you don’t need to glue pocket hole joints, I think it makes for a better quality joint.
Ken says
I use my Kreg tool all the time and love it. However, I’m so grateful for these tips. Not that I’ve ever failed to reset my drill bit length, adjust the jig for the wood thickness, drill into the end grain so that the screws don’t hold, make fuzzy holes with a dull bit, and drill my holes ON THE WRONG SIDE OF A BOARD a million times, not use glue in the summer and have my wife mention cracks in the winter when the wood pulls apart, etc. etc. etc. Nope, not me. Thanks so much Scott. These tips are fantastic and I had no idea Kreg came out with a hole plug cutter and the right angle drill attachment for tight areas; why didn’t I think of that? Thanks again!
Scott - Saws on Skates says
Hi Ken – Thank you for stopping by. I’m glad you found the tips helpful!
Rick says
Thanks for the tips, very helpful for a brand new Kreg jigger. Question though, on the jig there is the bit depth guide, 2 1/4 and 2 1/2 share the same dash, Is this accurate or does 2 1/2 setting stop at the end of the guide? Thanks !
Scott - Saws on Skates says
Hi Rick – Thank you for stopping by and welcome the to the Kreg Jig club! That’s a good question. The 2-1/4″ and 2-1/2″ do share the same dash, so yes, that is accurate. Hope that helps. Good luck with your jig!
Dave Pottinger says
As I was a shop teacher for 35 years I find your site very informative, your instruction is right on. I have been using pocket holes for about 8-10 years now, they are great to use. I find that pocket holes & screws make joints that I would only try when I had a “weekend” to do the project, now the time is cut down a couple of hours.
Scott - Saws on Skates says
Hi Dave – Thank you for stopping by and for the compliments! I appreciate it!
William G says
Thanks Scott! Question: For overly long work pieces, will the Kreg jig work if I place it on its side (so my work piece becomes effectively 5.5″ high instead of 8′ high)?
Scott - Saws on Skates says
Hey William – Thank you for stopping by. I’ve always had those long boards sticking into the ceiling of my workshop, so your idea totally makes sense! I’ve never tried it, but I don’t see why it wouldn’t work. Please let me know how it goes if you give it shot.
Sean says
Thanks for the tips Scott, I’m running into a problem though, maybe you can help. I’ve been using the micro pocket hole jig to drill into 1/2″ oak. These pieces tie into another 1/2″ oak piece but every time the screws have either cracked the second piece or not gone in far enough and wobbled to the point where the two boards aren’t even attached. I set both the guide and drill depth to 1/2″ and am using 1″ fine thread pan head pocket hole screws. Not really sure what I’m doing wrong here. Any advice would be greatly appreciated!
Scott - Saws on Skates says
Hi Sean – Thank you for stopping by. Working with hardwoods like oak, especially thin hardwoods can be tricky because they tend to crack. It sounds like you have your jig set up properly, so I think the issue is with the wood itself. Here’s a few things you can try on some test pieces. Lubricate the screw with some candle wax or Johnson paste wax (this is the wax I use on my table saw) before driving the screw. This should allow the screw slide in without cracking the wood and seat all the way into the hole. If the wood is still cracking you can try drilling your pocket hole, clamping your workpieces together, and then predrilling a pilot hole. This will clear some space for the screw when you drive it in and should prevent cracking. I would still use a little wax to help the screw slide through the hole. Also, be sure to drive the screw very slowly. If you have a clutch on your drill, adjust it to a low setting to avoid over tightening and potentially cracking the wood. Good luck and please let me know how it goes.
Joey says
Good Article. I have another question though. Have you run into an issue where small dimples are showing up in a table top when sanding over the pocket holes? It is 1×6 pine material. Could it be that I didn’t fill the pocket holes underneath before sanding?
Thanks.
Scott - Saws on Skates says
Hi Joey – Thank you for stopping by. It almost sounds like the end of the pocket screw is nearly pushing through the surface of the wood. I would confirm that the guide block and stop collar are properly adjusted for the thickness of your material and that the appropriate length pocket screw was used. I would also tighten the pocket screw until it’s “just snug”. Over tightening could push the end of the screw closer to the surface of the wood than it should be.
Sherryl Wand says
I am new to Woodworking and definitely new to the Kreg and making pocket holes. I failed to make sure that my stop collar was staying tight and secure on my drill bit and thrilled a spot in the Kreg. What do you suggest as the best way to repair it? Thanks
Scott - Saws on Skates says
Hi Sherryl – Thank you for stopping by. Don’t feel bad… this happens to all of us! My Kreg Jig has one or two of these holes. I wouldn’t be concerned about repairing it. Your Kreg Jig will still function properly. And speaking from experience it will probably happen again.
Kristin Fantin says
Scott, I rarely do this, but when I see a great site, I like to acknowledge the writer. I am a woman just starting some woodworking projects. Kreg jigging seemed intimidating. I am trying to let my husband alone as much as possible (he has is own projects) and figure things out on my own (good for Alzheimer’s prevention).
Your sites are very detailed with great pictures. Many people leave out steps or talk about things that don’t need to be discussed. I have started to follow you on Pinterest and hope to see much more of you now.
Scott - Saws on Skates says
Hi Kristin – Thank you for stopping by. And thank you so much for the compliments. You totally made my day!!!
Adrian says
Thanks so much, I have made most of these mistakes at diff times but never thought how or why they occurred this has been really helpful thanks again
Scott - Saws on Skates says
Hi Adrian – Thank you for stopping by and for the compliments. I’m glad you found this helpful.
Milad says
Hi,thank you for good information
Scott - Saws on Skates says
Hi Milad – Thank you so much for stopping by. I’m glad this was helpful for you.
Neil M Shargel says
Thanks for the tips…very helpful. I was wondering…can you use pocket screws with primed finger joint lumber?
Scott - Saws on Skates says
Hi Neil – Thank you for stopping by and for the compliments. I’ve never tried pocket holes in primed finger joint lumber, but it seems like it would work without any issues. You may want to try a few test pieces first just to be sure before committing to an entire project.
Claire says
Hi Scott, thanks for the article. I clamped my joints for assembly but one of them still shifted a few mill leaving a slightly wonky connection with a 1-2mm gap at the front. I’m wondering if I should try to redrill or if that will just strip the whole joint as the new hole will be so close to the old one. Unfortunately remaking the piece I’m drilling into isn’t an option.
Scott - Saws on Skates says
Hi Claire – Thank you for stopping by. I’m sorry this happened to you. If were working on this project I would fill the hole in the second workpiece with a little glue and toothpick. Then clamp the joint and drive the screw again. The toothpick will fill the hole and give the screw something to bite into.
Claire says
Thanks very much for your answer! I’ll give that a go.
Ken Lynch says
I would like to make a pocket hole in the middle of a 14” wide board to close a crack in the board. Any suggestions on how to clamp the small jig to the flat board where typical clamps are not deep enough to hold the jig?
Scott - Saws on Skates says
The Kreg Jig R3 is great for making repairs. It has a hole in the body of the jig. We can drive a screw through the hole to attach the jig to the workpiece.
This means we don’t need any clamps to attach the jig to a workpiece. And we can position the jig just about anywhere we need to drill some pocket holes.
Check out Tip #4 of my Kreg Jig R3 post for more information.
Kelly says
So no judgement please…I was letting my daughter help me and forgot to adjust the drill bit and she drive through pocket hole A through the plastic. Is this completely worthless now??? Is there a replacement part to the kreg?
Scott - Saws on Skates says
Hi Kelly – Thank you for stopping by. No worries here. This is a judgement-free pocket hole zone! And no worries about the holes in your jig. It will still work just as it did before. And if it’s any comfort my jig has holes in it too!