How to Use a Pocket Hole Jig (& Beginner Pitfalls to Avoid)
Don’t let intimidation keep you from woodworking. I’ll show you how to use your pocket hole jig like a pro with just a few simple steps!
A pocket hole jig is the ideal tool for easily and accurately assembling woodworking projects, although I understand using one can be intimidating for first-timers. Not to worry, I’m here to show you how simple it really is!
In this tutorial, I’m providing step-by-step instructions on using a pocket hole jig and common pitfalls to avoid along the way. With just a few simple steps, you’ll be creating strong joints that will stand the test of time!
Originally published February 10, 2016, updated March 21, 2023.
Table of Contents
- What is the Purpose of a Pocket Hole?
- What is the Advantage of Pocket Holes?
- What are Pocket Holes Used For?
- When Should You Not Use Pocket Holes?
- What are the Parts of a Kreg Jig?
- How to Use a Kreg Jig to Drill Pocket Holes
- What is Special About Pocket Hole Screws?
- How to Join Boards with Pocket Hole Screws
This article contains affiliate links. If you purchase from these links, I may earn a small commission at no additional cost to you. Visit my site policies for more information.
What is the Purpose of a Pocket Hole?
The purpose of a pocket hole is to join two pieces of wood. The connection is made by drilling an angled hole or pocket into one workpiece.
Then, the first workpiece is connected to a second with a pocket hole screw.
What is the Advantage of Pocket Holes?
The primary advantage of pocket hole joinery is it allows DIYers of any skill level to quickly and easily create a tight fit between two pieces of wood that won’t easily come apart.
Speed
You can make pocket holes in minutes as opposed to traditional joinery methods like mortise and tenons, dovetails, and box joints, which can be more time-consuming. Depending on the complexity of your project, you can often build it in a weekend rather than several months.
Ease
Compared to other traditional joinery methods, pocket holes don’t require a high level of expertise or years of practice to make. Pocket hole joinery is simple enough that a beginner can produce professional-looking results within minutes of unboxing the jig.
Strength
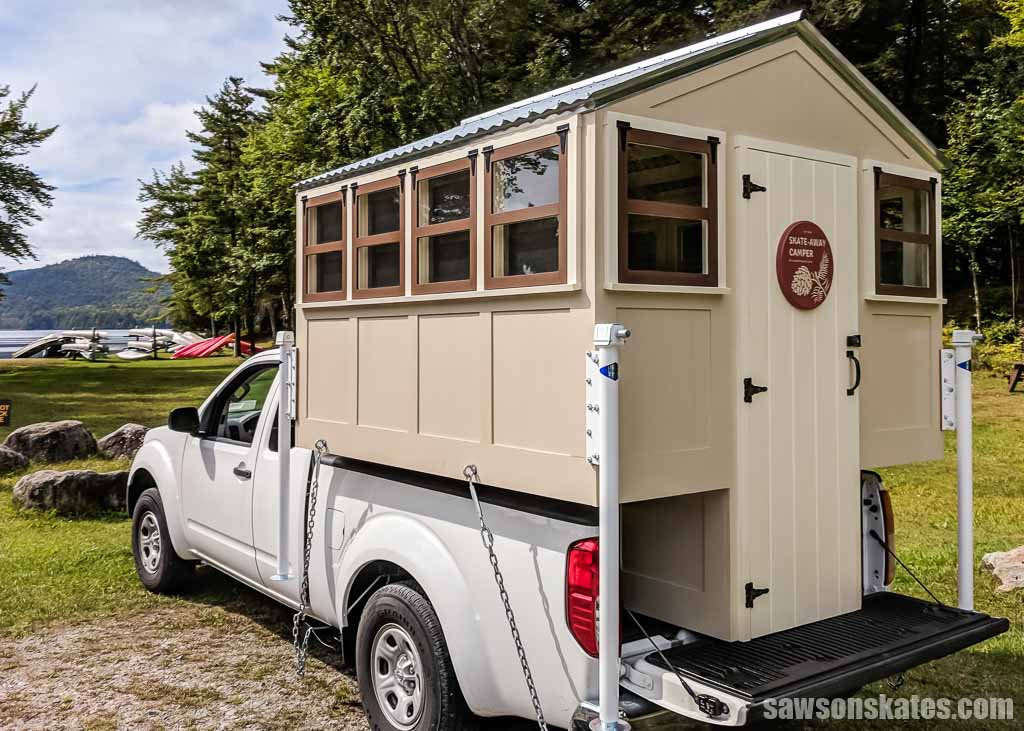
When done correctly, pocket hole joinery creates an incredibly strong connection that won’t easily come apart. I’ve used pocket holes for nearly 15 years and can’t remember ever having a joint fail. I even used them to assemble my DIY truck camper, which travels down the road at 60+ miles per hour!
What are Pocket Holes Used For?
You can use pocket holes nearly anytime you want to join boards together, such as building furniture and assembling cabinets. I’ve used them to make chairs, drawers, and cabinet doors.
I’ve also used them for making projects like picture frames, spice racks, step stools, and more.
You can also use pocket holes to repair existing pieces such as tables, chairs, and other furniture.
Pocket holes are frequently used for making butt joints where the end of one board is joined to the edge of another.
You can use pocket holes to assemble miter joints and join materials of different thicknesses.
I’ve used pocket holes for edge joining, a method for making tabletops and wide panels. However, I must mention that you can also assemble edge joints with nothing more than glue. Today’s PVA glues create a powerful bond, so much so that the wood will break before the glue joint does.
Related: What is PVA Glue? (Types, Benefits & Uses)
Speed is the most notable advantage of using pocket holes to construct tabletops and panels. I often use wood glue and pocket screws when assembling them, allowing me to continue working while the screws act like clamps as the glue dries.
Pocket holes can be used to join softwood such as pine and hardwoods like poplar, oak, and maple. They can also be used to assemble projects made with sheet goods like plywood and construction lumber such as 2×4s.
Related: Beginner’s Guide to Wood Sizes
When Should You Not Use Pocket Holes?
Pocket hole joinery is a great solution for many projects; however, there are certain situations when you may want to consider an alternative joinery method.
Materials Less Than ½-inch Thick
You cannot use pocket holes on materials that are less than ½-inch because there is not enough material for the screw to bite into.
When using pocket screws on ½-inch material, I should mention that the screw’s head is usually proud, meaning it’s raised above the surface.
Screws that protrude above the material can prevent other components from fitting together correctly, so it’s important to consider this when designing your project.
Visible on the Finished Project
Another consideration is whether the pocket holes will be visible on your finished project. You can hide them using plugs, which makes them less conspicuous, though whenever possible, I prefer to design my projects, so pocket holes aren’t visible from the outside.
Sometimes your only option is to drill pocket holes in locations where they will be visible. In that case, you may want to consider using a different method, such as dowels or traditional joinery like mortise and tenon joints.
Cross Grain Construction
You should not use pocket hole joinery for cross grain construction when the grain of one board runs in a different direction from the adjacent board.
A common pitfall for beginner woodworkers is not accounting for wood movement. Wood expands and contracts due to seasonal changes caused by humidity and temperature changes. The most noticeable expansion and contraction occurs across its width.
Related: Mistakes with Wood Can Cause Your DIY Furniture to Crack
Cross grain construction is tricky because each part expands and contracts in different directions because of its grain orientation. Preventing the wood from moving, such as locking it in place with pocket hole screws, can cause it to split or crack. For this reason, you should use a joinery method that allows for seasonal expansion.
Breadboard Ends
Breadboard ends are a decorative feature used to finish table tops. They consist of two end pieces, with the grain running perpendicular to the top.
Breadboards are a cross grain situation and, therefore, not a good candidate for pocket hole joinery. Traditional joinery methods such as mortise and tenons are a better option but can be difficult for rookies; however, I have an easy solution for making a breadboard table top.
Related: How to Make a DIY Farmhouse Table Top with Breadboard Ends
Attaching Solid Wood Table Tops
Attaching a solid wood top to a table’s aprons is another application where you should avoid pocket hole joinery. Table aprons, sometimes called the skirt, are the boards that run perpendicular to and connect a table’s legs.
The table top expands and contracts with seasonal changes, and locking it in place with pocket hole screws can result in the top splitting, the table’s leg joints separating from the aprons or both.
A better solution is to use table top fasteners, which securely attach the top to the aprons and allow for seasonal movement.
Related: How to Attach a Table Top to a Base (The Right Way)
How Do You Drill a Pocket Hole?
The quickest and most accurate way to drill pocket holes is with a special tool called a pocket hole jig. Sure, you can drill them without one, but they won’t be as accurate. The jig allows you to position it wherever you need it and holds the bit at the precise angle every time, ensuring each pocket hole is exactly the same.
There are several brands of jigs on the market, each offering a range of models varying in price, size, and features. Brands available include Massca, Milescraft, Armor Tool, and a few others. However, the Kreg Jig stands out as one of the most popular, so I’ll focus on it as we move forward.
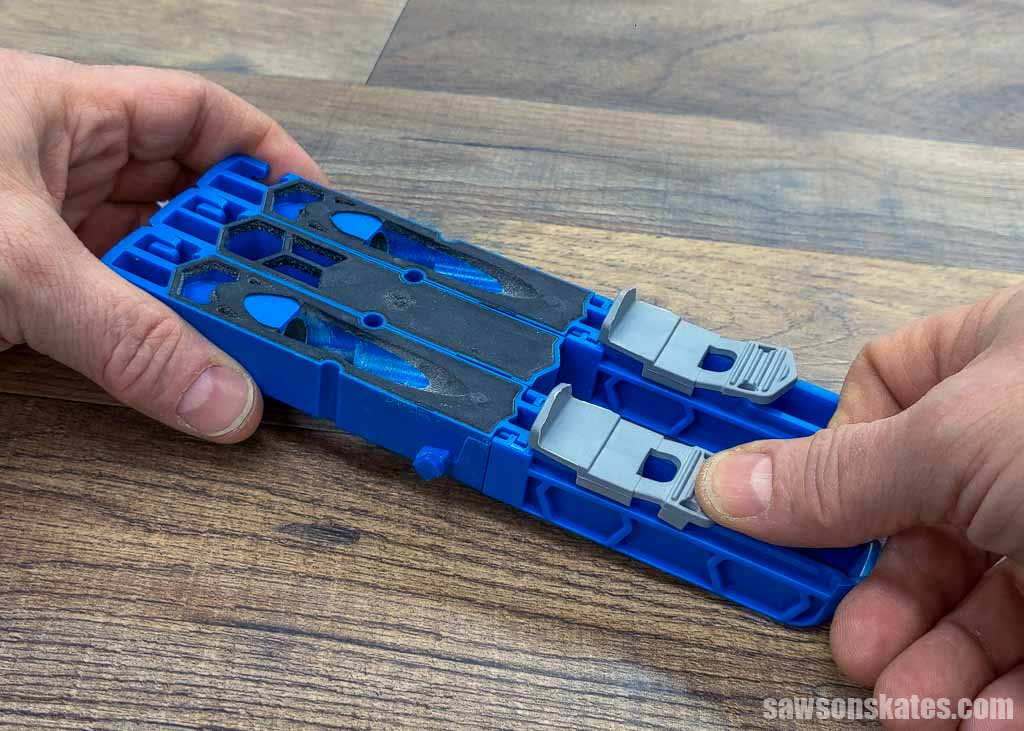
What are the Parts of a Kreg Jig?
There are several variations of Kreg Jigs, and each looks a little different, but all have three primary components: a drill guide, a drill bit, and a drill bit stop collar.
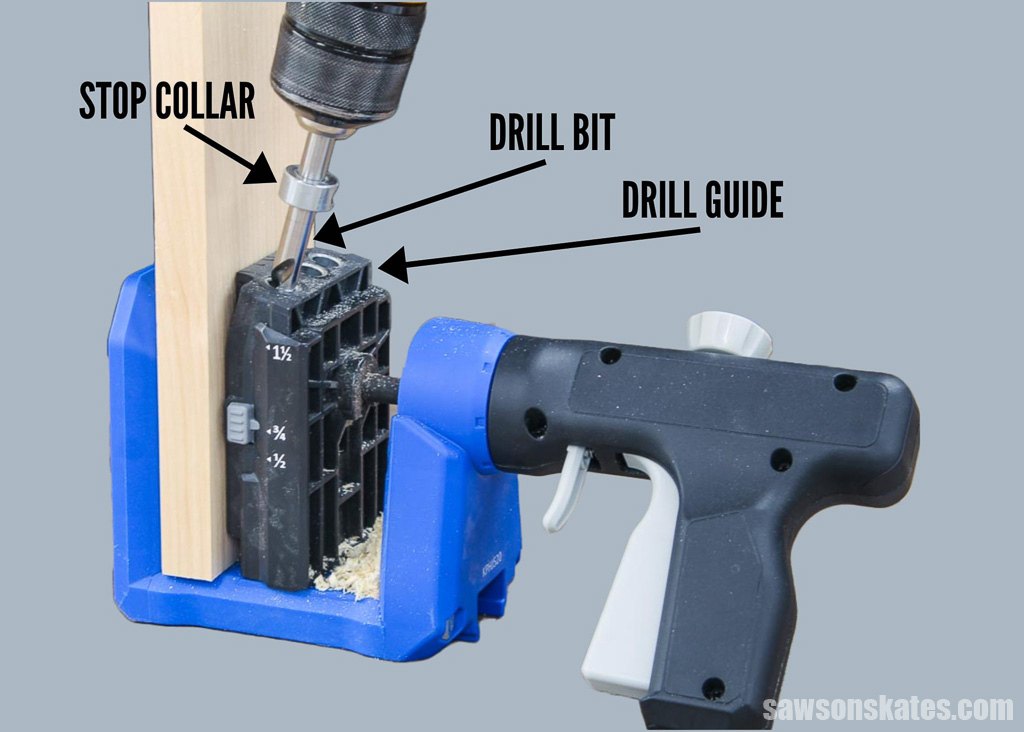
Drill Guide
The drill guide holds the bit at the correct angle for drilling pocket holes, and it adjusts to match the thickness of your material.
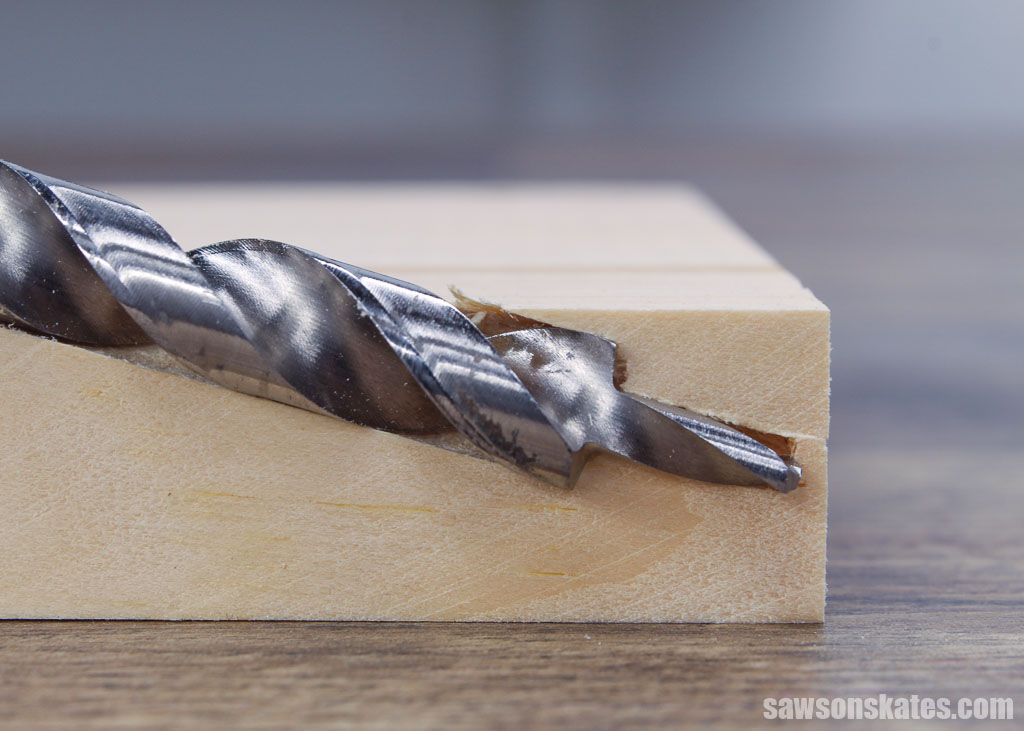
Drill Bit
The drill bit cuts the wood and creates the pocket hole. Pocket hole drill bits have a stepped design that makes an opening for the screw to pass through, a flat surface for the screw’s head to seat against, and the recessed area of the pocket hole.
Related: 14 Types of Wood Drill Bits (Which to Use & Why)
Drill Bit Stop Collar
The stop collar or depth collar controls how deep the pocket hole is drilled, meaning how much of the bit can penetrate the wood.
Types of Kreg Jigs
The primary difference between Kreg Jigs is how they attach to the material.
Jigs such as the Mini, R3, and 300 Series require a separate clamp to attach it to your workpiece.
Jigs like the 520PRO, 720, and the Foreman have a built-in clamp.

The advantage of a jig with a built-in clamp is that it is quicker to use and increases your efficiency when you have a lot of pocket holes to drill.
Which Kreg Jig Pocket Hole Jig Should You Buy?
Between the different parts of a Kreg Jig and whether it requires a clamp or has one built in, you might feel a bit overwhelmed. You’re not alone!
That’s why I wrote this article. It’s a deep dive into which Kreg Jigs are available, comparing the pros and cons of each and helping you decide which jig is right for you.
Related: Which Kreg Jig Should You Buy? (Here’s the Answer)
How to Use a Kreg Jig to Drill Pocket Holes
Using a pocket hole jig is simple once you know how. Here’s a step-by-step guide to help you get started. Remember, each jig looks a little different, but the process of using them is the same.
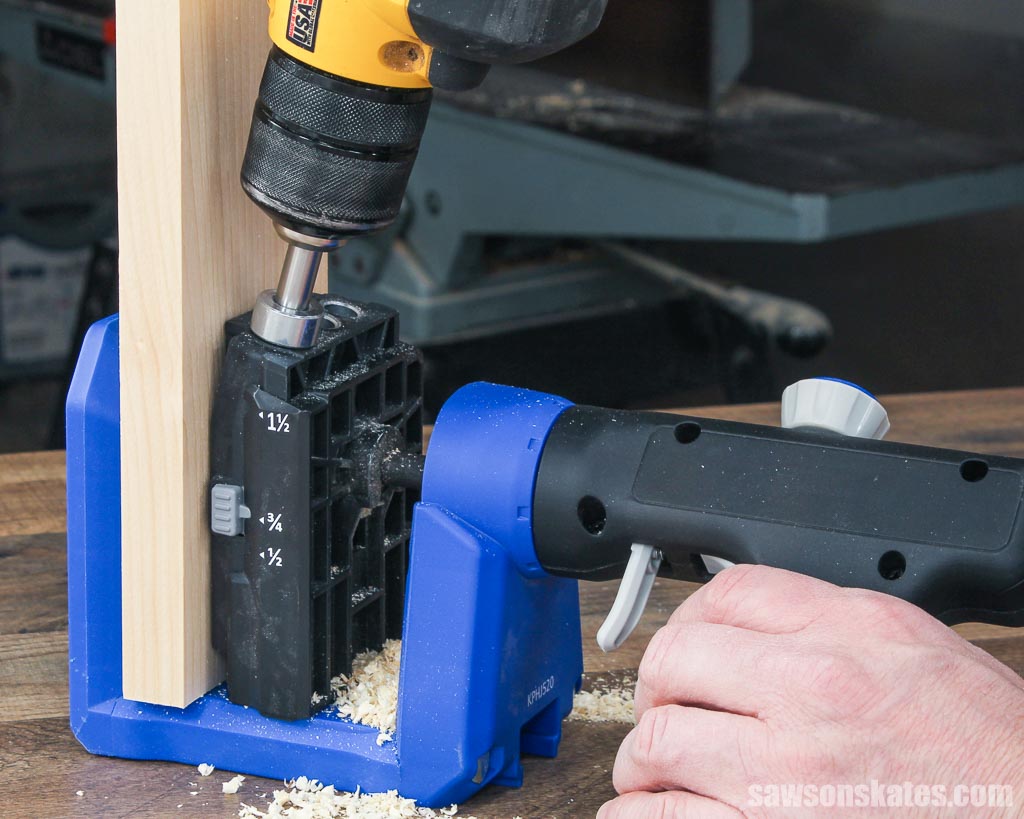
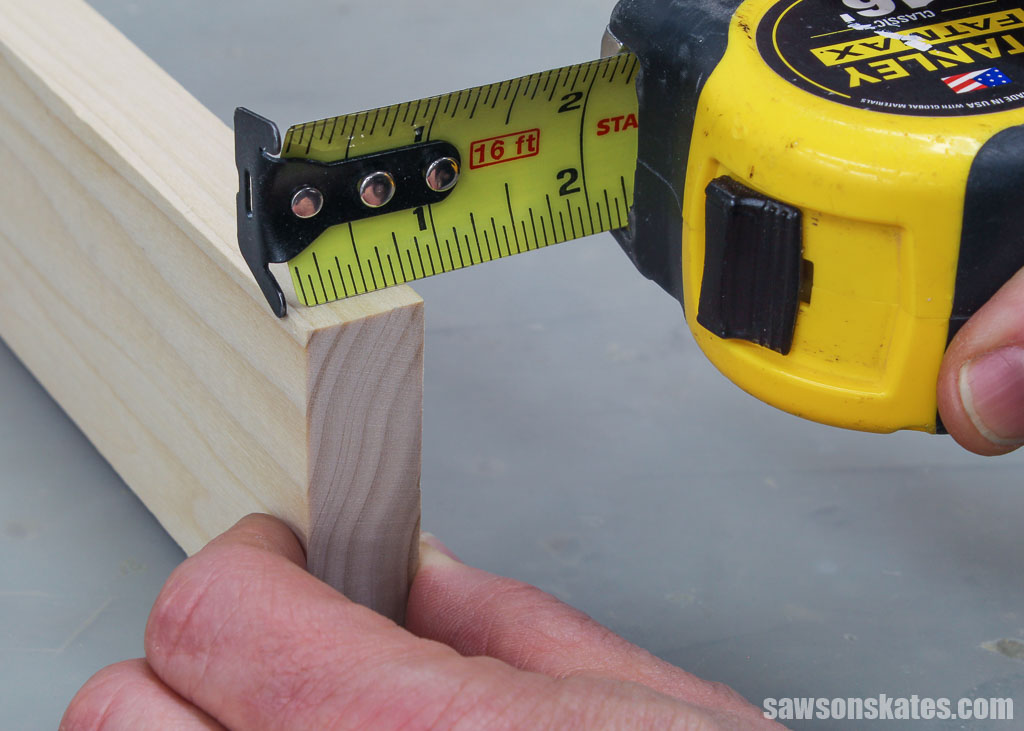
Step 1. Measure the Material Thickness
To begin, measure the thickness of the wood you want to join. You’ll need this measurement to set the drill guide and the drill bit collar to the proper depth.
One way to determine your material’s thickness is with a tape measure.
Related: How to Use a Tape Measure Correctly (Tips for Success)
If your jig has one, you can use the material thickness gauge to determine your workpiece’s thickness.
For this tutorial, we’ll be using a board that measures ¾” thick.
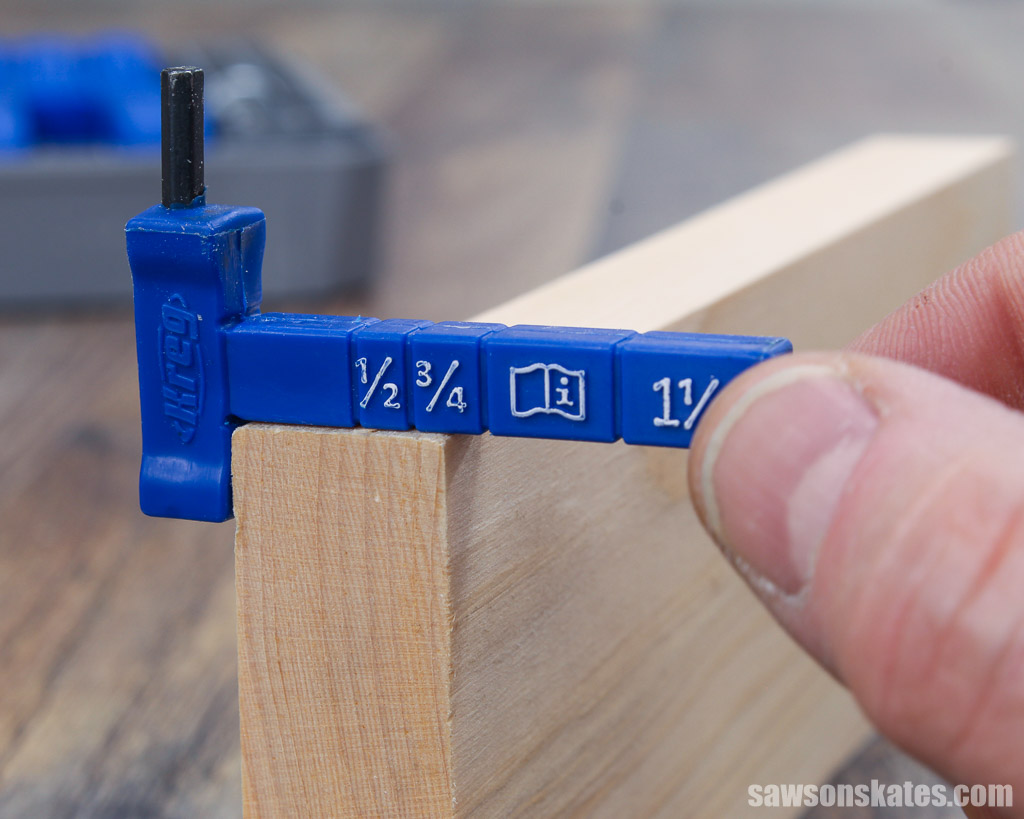
Step 2. Set the Drill Guide
Next, using your material’s measurement from Step 1, you’ll set the drill guide to the correct thickness for your pocket holes. How you adjust for the thickness depends on which jig you have.
For the Kreg Jig Mini, check out this guide about where to position the jig.
For some jigs, you’ll slide the material thickness stop to the desired thickness.
For jigs like the 520PRO, you’ll adjust the drill guide up or down to the desired thickness.
For jigs like the 720 with a drill guide that automatically adjusts to your material’s thickness, you can go to Step 3.
Step 3. Set the Drill Bit Stop Collar
Using the measurement from Step 1, you’ll set the stop collar to the correct thickness for your pocket holes.
Most newer Kreg Jigs include a drill bit featuring thickness measurements etched onto the bit’s shank. You’ll slide the “window” in the collar over your desired measurement for these drill bits and tighten the hex screw.
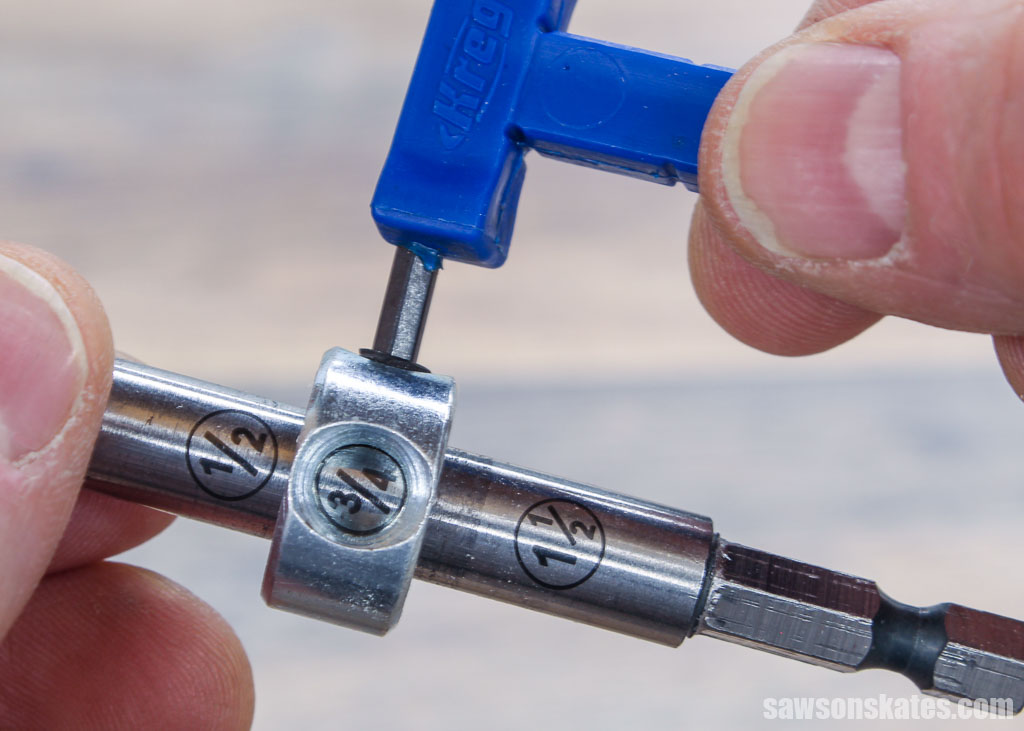
If your bit doesn’t have engraved measurements, your pocket hole jig’s case or your jig’s body may have a guide for positioning the depth collar.
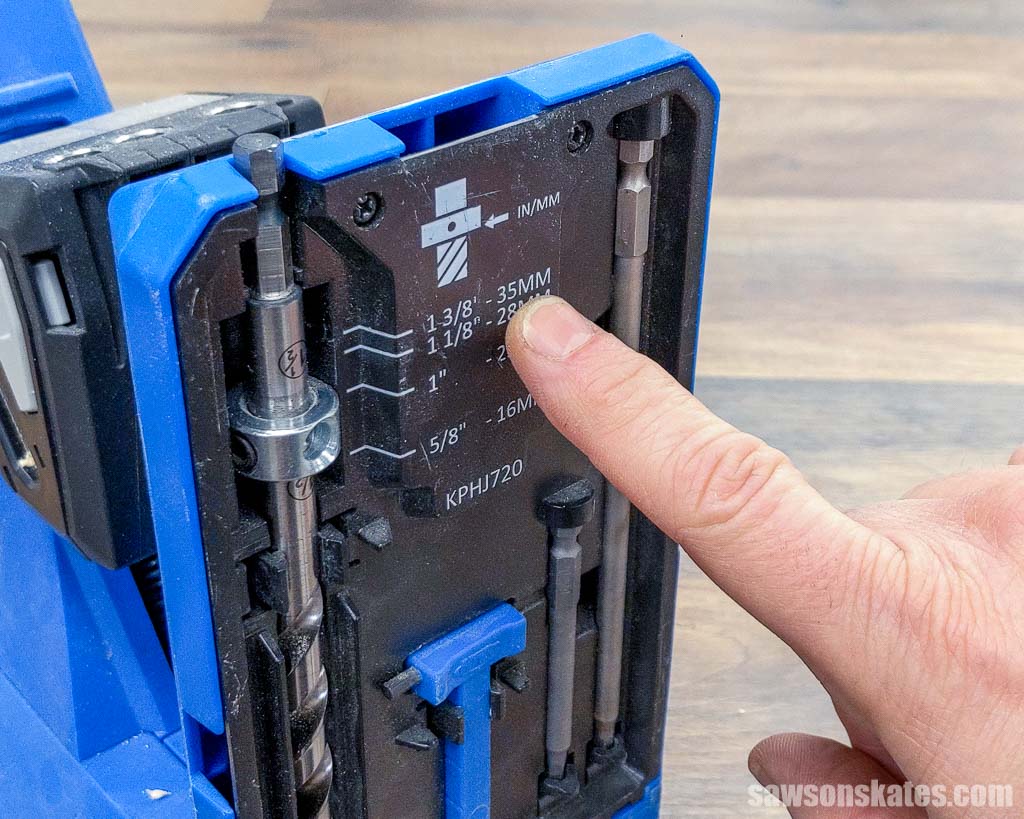
For this tutorial, we are using ¾” material, so we’ll slide the window over the ¾” mark and tighten it up.
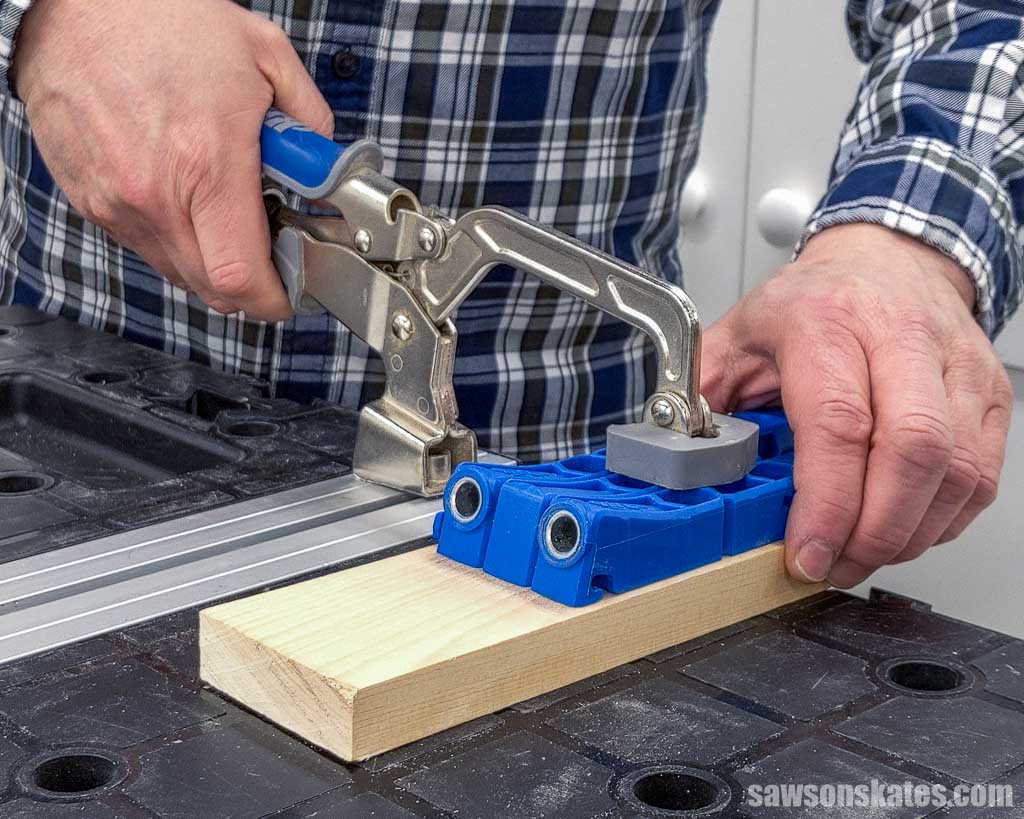
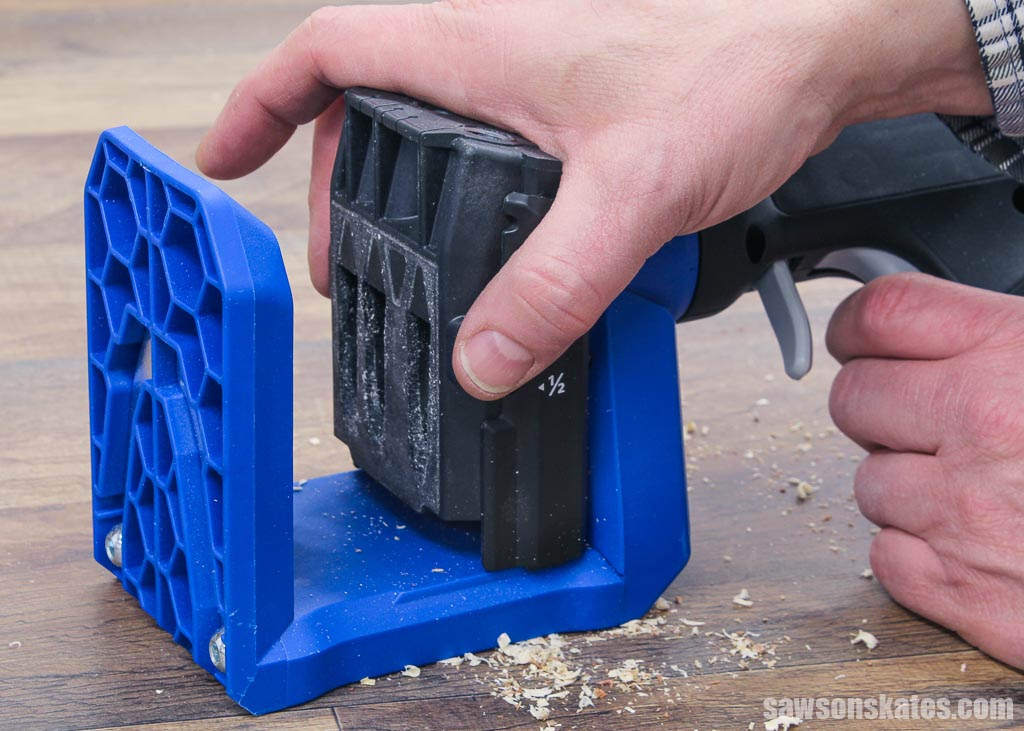
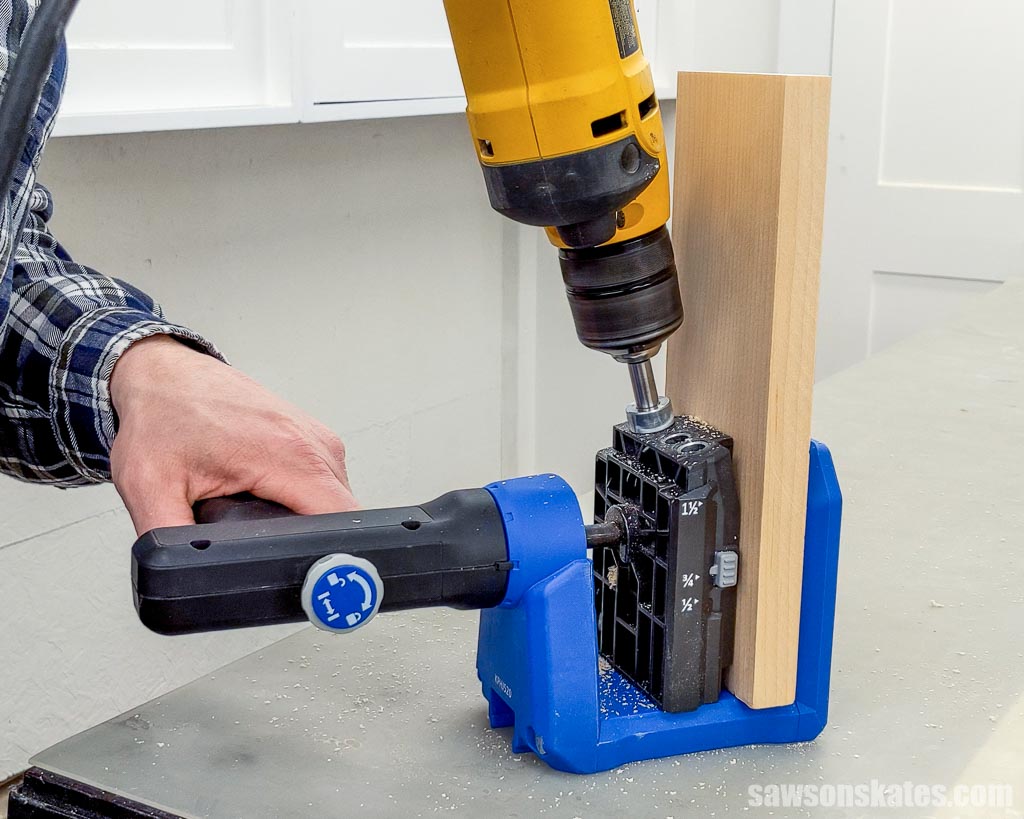
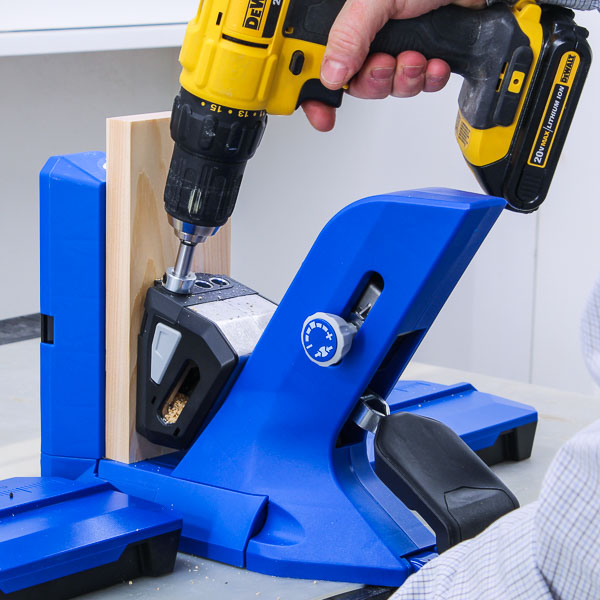
Step 4. Clamp the Material
You’re almost ready to drill your pocket holes, but first, you’ll need to clamp the drill guide to your workpiece.
For jigs that require a separate clamp, you must clamp the jig. Don’t try to hold it with your hands because the bit could slip and cause a serious injury!
For jigs with a built-in clamp, position the material in the jig and tighten the clamp.
Where Should You Position the Pocket Holes?
Generally speaking, pocket holes should be positioned about ¾” from the edge of boards to prevent cracking the workpiece. Pocket holes should be spaced approximately every 6″ for edge joining or drilling holes along the material’s length.
| Kreg Jig | 1×2 (1-½” wide) | 1×3 (2-½” wide) | 1×4 (3-½” wide) | 1×6 (5-½” wide) |
|---|---|---|---|---|
| Mini | Drill one hole about ¾” from each edge | Drill one hole about ¾” from each edge | Drill one hole about ¾” from each edge | |
| R3 | Center on board | Drill one hole about ¾” from each edge | Drill one hole about ¾” from each edge | Drill one hole about ¾” from each edge |
| 300 Series (no spacer) | Center on board | See below | Drill one hole about ¾” from each edge | Drill one hole about ¾” from each edge |
| 300 Series (w/spacer) | See above | Center on board | Drill one hole about ¾” from each edge | Drill one hole about ¾” from each edge |
| 520PRO | Use middle and right guide holes | Use left and middle guide holes | Use left and right guide holes | Drill one hole about ¾” from each edge |
| 720 | Use middle and right guide holes | Use left and middle guide holes | Use left and right guide holes | Drill one hole about ¾” from each edge |
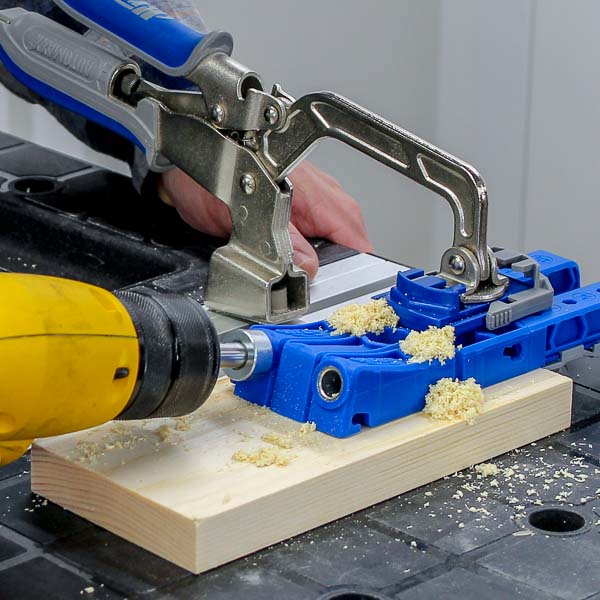
Step 5. Drill the Pocket Holes
Now you’re ready to drill your pocket holes!
When it comes to drilling pocket holes, you can make them with a battery-powered drill, but I prefer using my corded drill. The drawback of using a cordless drill to make pocket holes is that it will begin to slow down as the battery loses its charge, resulting in the bit tearing at the wood rather than slicing through it.
A corded drill’s constant power supply allows it to maintain a consistent speed, producing holes with crisp, clean edges.
If you’re using a cordless drill, make sure your battery is fully charged before you start.
First, chuck the drill bit into your drill. Chucking a bit means inserting the bit into your drill’s chuck.
Related: How to Change a Drill Bit (Step-by-Step)
Next, adjust your drill’s settings:
- Switch to the forward direction, usually identified by an arrow pointing toward the front of the tool.
- Set the speed to the highest setting.
- Rotate the torque adjustment to the drill setting, usually a symbol resembling a drill bit.
Related: How to Use a Drill (Tips & Techniques)
Insert the drill bit into the guide block until it touches the workpiece. Then slightly raise the drill bit and bring the drill up to full speed.
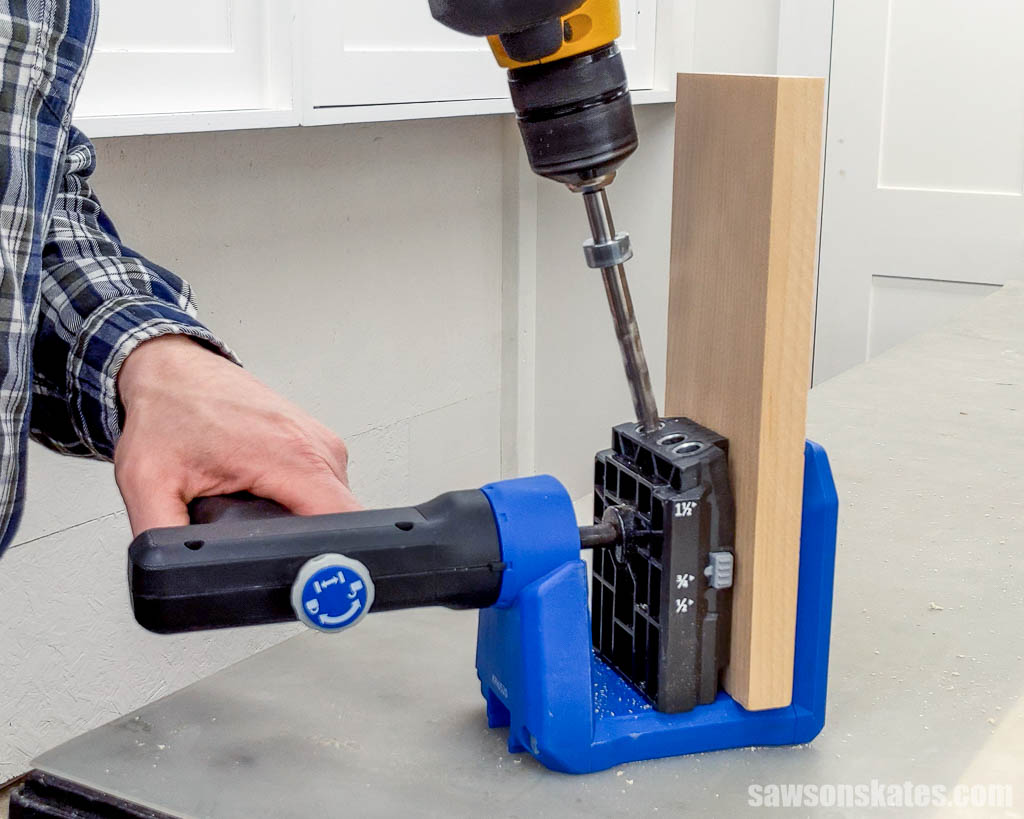
Then, gently lower the bit into the wood and start drilling the pocket hole.
If your bit has difficulty penetrating the wood, try raising it a few times to remove the chips that have built up in the hole.
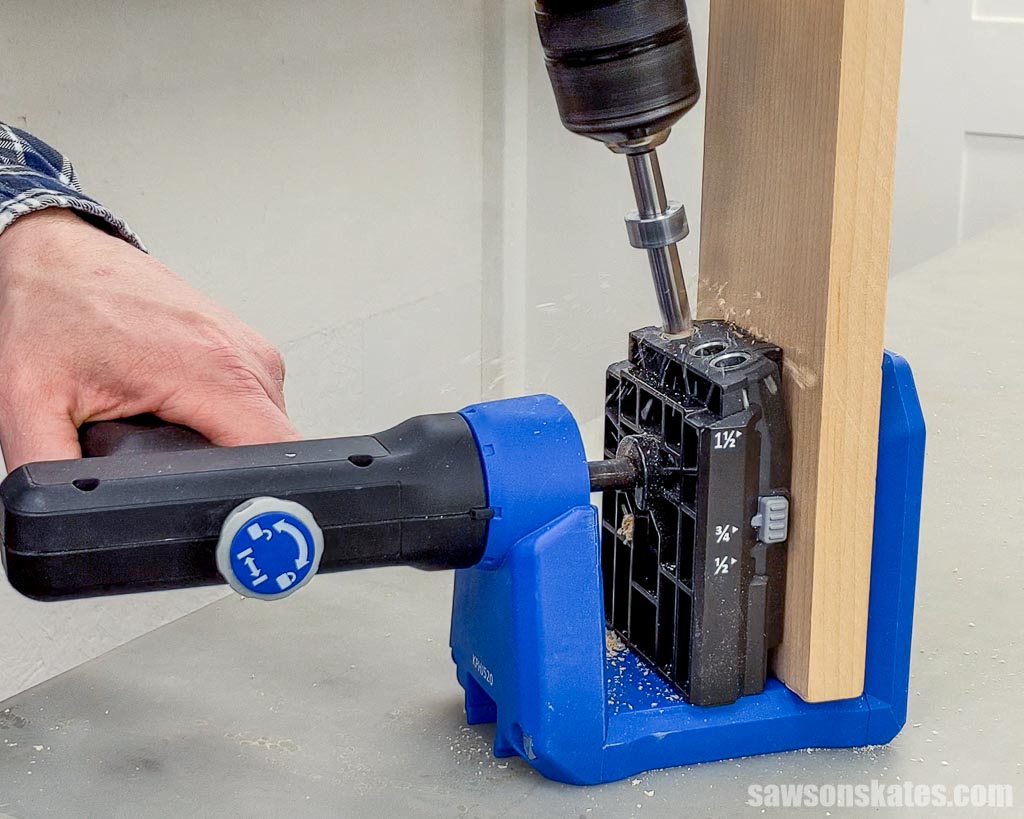
Keep drilling until the stop collar touches the drill guide.
Video: How to Use a Kreg Jig
Are you someone who learns better by watching how to do something? Check out this quick video on how to use a Kreg Jig.
What is Special About Pocket Hole Screws?
Pocket hole screws are specifically designed to work with pocket holes. Using another type of screw, such as a wood screw, can cause the workpieces to crack.
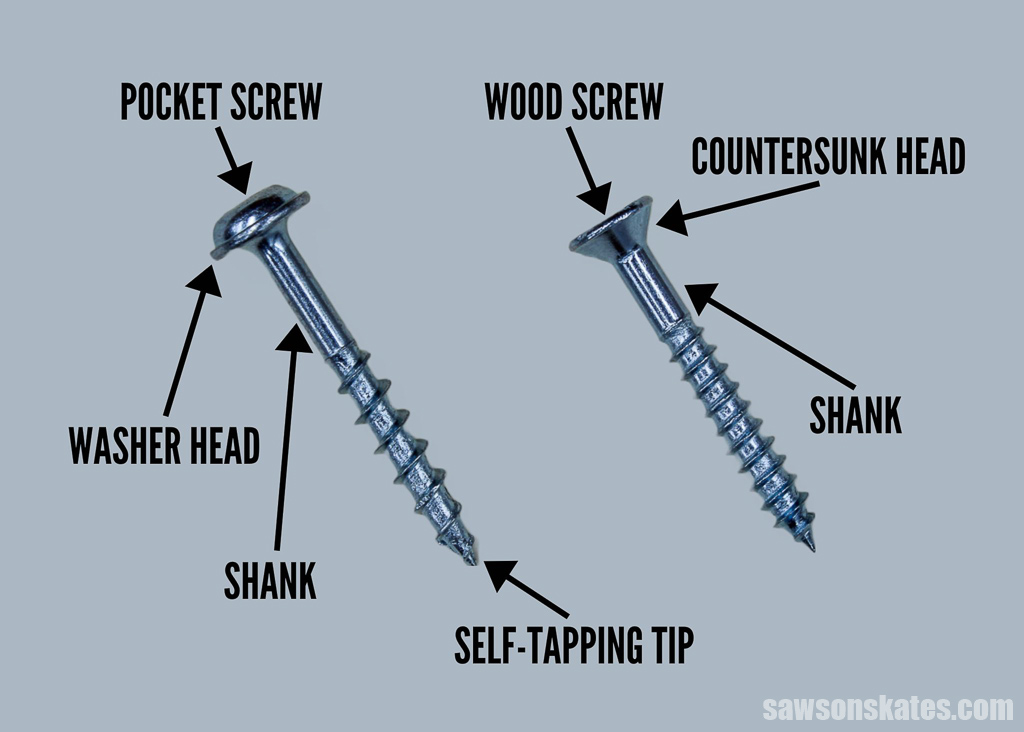
Shank
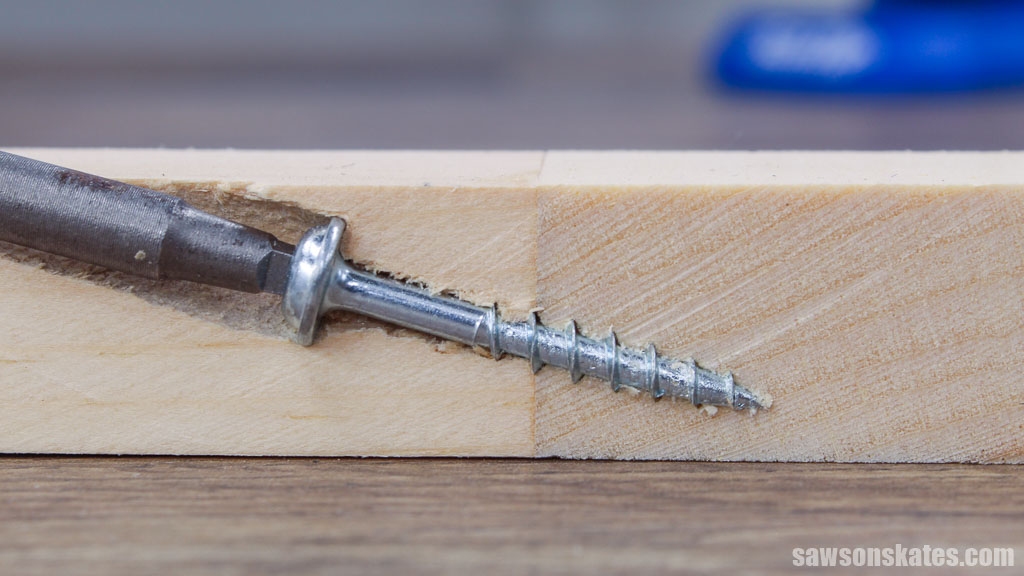
The primary difference between a pocket hole screw and a wood screw is its shank.
A wood screw’s shank is threaded nearly its entire length, while a significant portion of a pocket hole screw’s is smooth.
A pocket screw’s smooth shank allows it to pass through the pocket hole, allowing the threads to bite into the adjacent board and tightly draw both workpieces together.
In contrast, a wood screw’s threaded shank will bite into the pocket hole as it attempts to draw the workpieces together, which frequently causes the pocket hole to crack.
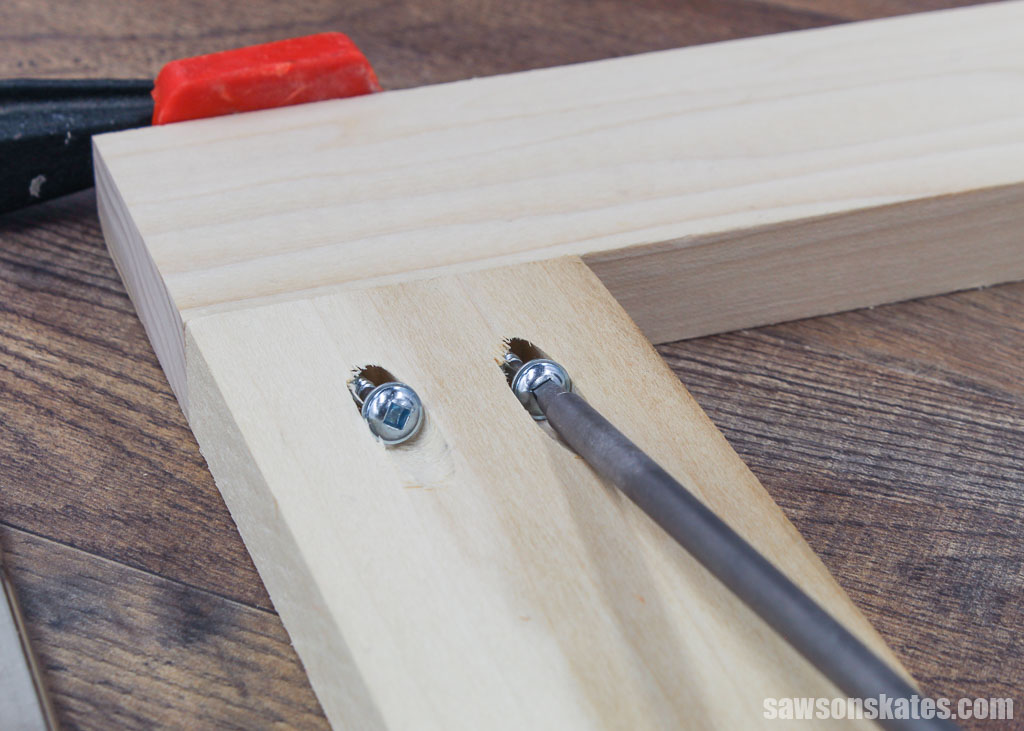
Head
Pocket screws have a flat washer head that seats against the pocket hole’s flat bottom, which helps draw the two workpieces together.
Wood screws, on the other hand, have a tapered head that acts like a wedge which can cause the wood to split as it attempts to draw the workpieces together.
Tip
Pocket screws feature a self-tapping tip that creates its own pilot hole as it’s driven into the mating workpiece. Wood screws don’t have a self-tapping tip which can cause them to split the wood as you drive them in.
Threads
Pocket screws come in two thread patterns, coarse thread for softwoods like pine and fine thread for hardwoods such as poplar, maple, and oak. Wood screws, on the other hand, are only available with a single thread type.
Related: 7 Tips for Using a Pocket Hole Jig with Hardwoods
How to Join Boards with Pocket Hole Screws
Now that we covered how pocket screws differ from wood screws let’s look at how to use them to join boards.
Step 1. Clamp the Joint
I always recommend clamping workpieces before you begin driving pocket hole screws for the best results.
Beginners frequently tell me their workpieces move out of alignment when assembling their pocket hole joinery projects. When I ask if they used clamps to hold the parts together, they usually say “no” and that they were holding them together with their hand.
Related: How to Prevent Pieces from Moving When Assembling Pocket Hole Joints
First, holding the parts with your hand is dangerous because the bit can slip, leading to a nasty injury!
Second, whenever I tried to drive pocket screws without a clamp, I always ended up with an unprofessional-looking misaligned joint that required extra sanding to flush the workpieces. For that reason, I recommend clamping the joint before you begin driving pocket screws.
I typically use an assortment of bar clamps to clamp my pocket hole joints.
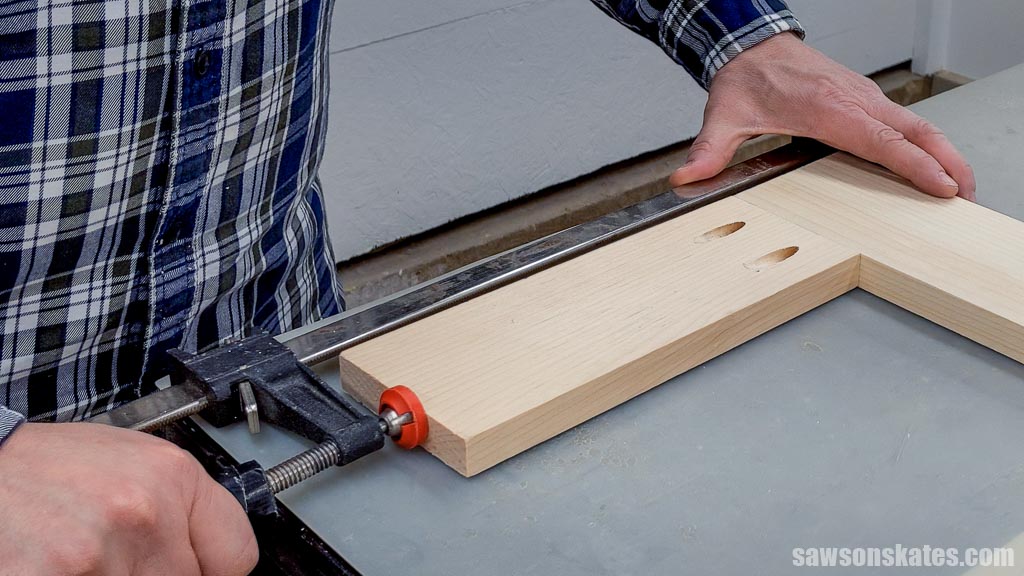
I also recommend using a face clamp in addition to a bar clamp for narrow workpieces like 1×2s and projects made from hardwood. When you drive screws into the wood, it creates an outward force that can cause these materials to crack. The face clamp controls the outward pressure reducing the risk of the wood splitting.
Another question readers frequently ask me is if you should use glue when assembling pocket hole joints. While it’s not necessary, I generally use glue for most pocket hole projects because I feel it creates a stronger, more professional-looking joint.
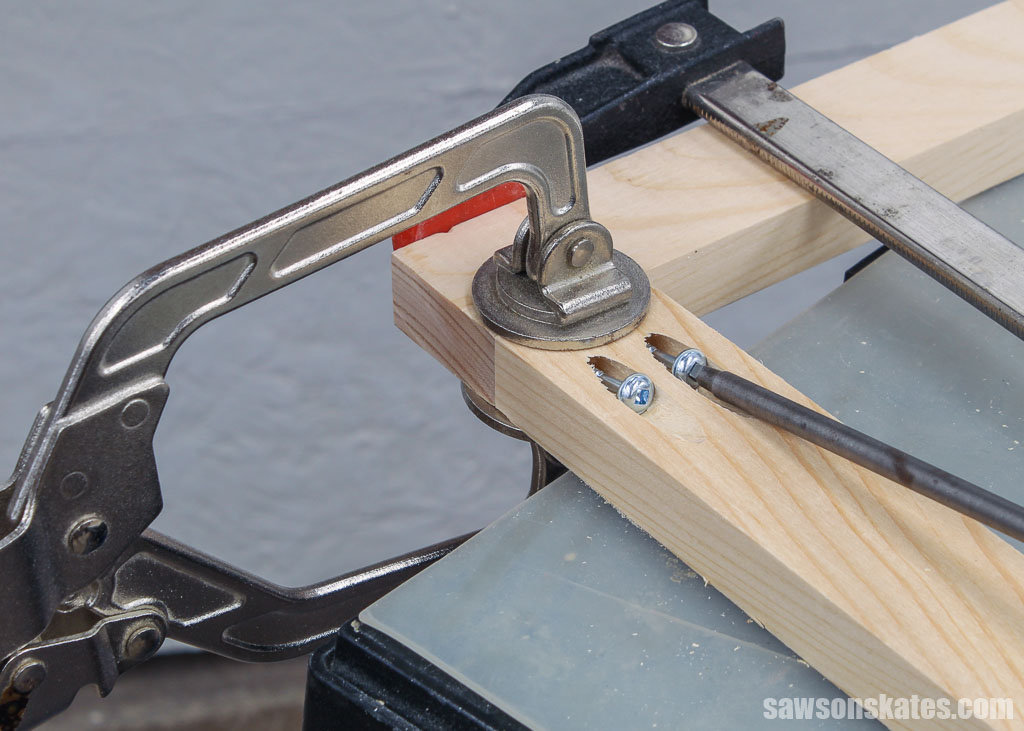
Step 2. Choose the Correct Screws
Once you have your joint clamped together, you’ll need to choose the correct pocket hole screws for your project.
Pocket hole screws come in various lengths and thread patterns, and you’ll want to choose one that matches the thickness and type of wood you’re using.
Length
- ½ inch material, use 1 inch pocket screws
- 3/4 inch material, use 1-¼ inch pocket screws
- 1-½ inch material, use 2-½ inch pocket screws
Thread Pattern
- Use coarse-thread screws for softwoods such as pine
- Use fine-thread screws for hardwoods such as oak, poplar, and maple
We’re joining ¾” pine for this tutorial, so we’ll use 1-¼” coarse-thread pocket hole screws.

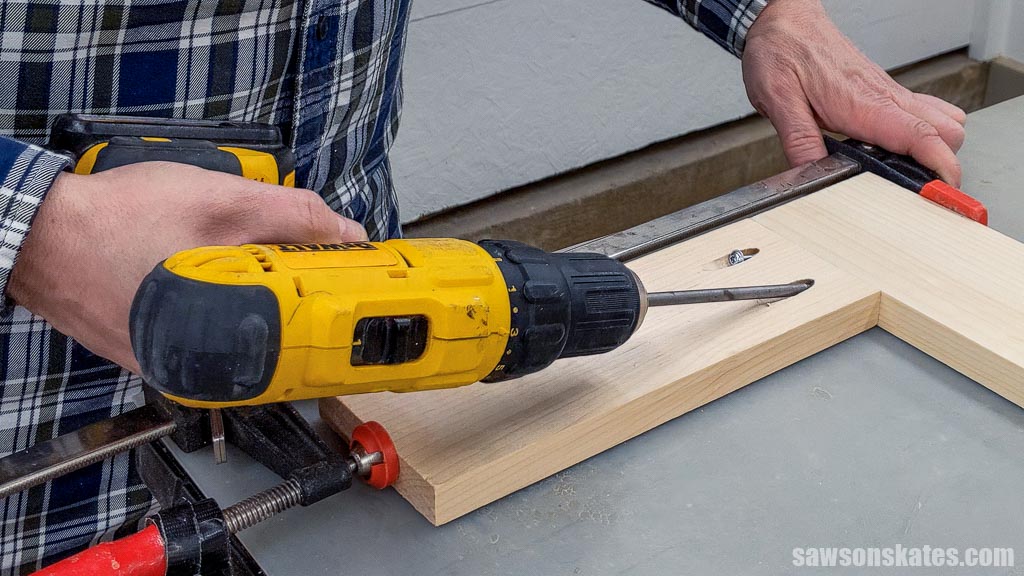
Step 3. Drive the Pocket Hole Screws
Once you have selected the correct screw, it’s time to drive them into the pocket hole.
I don’t recommend using an impact driver to drive pocket screws because it’s too powerful, which can cause the screw to break or become stripped, meaning it won’t tighten up.
Related: Impact Driver vs Drill (Which to Use & Why)
First, insert the square driver bit into your drill.
Next, adjust your drill’s settings:
- Switch to the forward direction, usually identified by an arrow pointing toward the front of the tool.
- Set the speed to the lowest setting.
I also adjust my drill’s clutch or torque setting, which controls the amount of twisting force. You should only tighten pocket screws until they are just snug. If you over-tighten, you risk stripping the screws resulting in a loose-fitting joint.
Setting the clutch prevents you from over-tightening the screws because the drill stops turning when it meets a certain amount of resistance. When driving pocket screws in softwood, my cordless drill works well on setting number 3.
Position the driver into the screw’s head, switch the drill on, and drive the screw until it’s flush with the bottom of the pocket hole. Continue this process until all of your joints are securely fastened together.
Final Thoughts
A pocket hole jig is an easy, efficient way for do-it-yourselfers of any skill level to join wood. By following this comprehensive step-by-step guide, you can create strong, professional-looking joints for all of your woodworking projects.
Thank you for stopping by. If you enjoyed this tutorial, would you please take a moment and pin it to Pinterest? I’d really appreciate it!
Recommended For You
Pin This For Later

Hi there – I’m Scott, a woodworking enthusiast and creator of Saws on Skates, a site I started in 2015 to share easy-to-follow tutorials, space-saving shop tips, and project inspiration for DIYers at any skill level. Learn more about my woodworking journey here.
Nothing wrong with keeping it simple. I think as long as you glue the joint properly and like you mentioned, don’t strip the holes this joinery will last a long time. It may not out last the tried and true mortise and tenon but sometimes getting the job done and it lasting 50yrs as opposed to 100 is worth the trade off. My brother in law built an entire mission style dining room table completely with pocket hole joinery. Its a couple of years old now and you would never know it wasn’t traditional joiner unless he told you. I don’t currently have one of these jigs but its on my wish list.
Hey Brian – I totally agree with you. I know how to hand cut mortise and tenon joints and dovetails too, but it’s time consuming! I want my projects to last, but I also want to be able to enjoy them. Pocket hole joinery allows me to speed up the construction process and still yield a sturdy joint.
If your ever really concerned about longevity I understand that some folks are using biscuit joints in conjunction with pocket screws to get a quasi “best of both worlds” joint. But that’s yet another expensive tool if your going to make them fast anyway.
That’s a good idea – I may have to try the biscuit/pocket hole combo joint on a project! I used a biscuit joiner for years before I switched to pocket joinery. I have a Harbor Freight biscuit joiner that I got dirt cheap and it still works well!
I have my eye on one. Its just not top priority. I’m sure I’ll end up with one before too long. I generally watch craigslist for things like that. Get them cheap or don’t get them.
How is the plug cutter different from the conventional plug cutters?
A conventional plug cutter cuts a round plug suitable for filling a round hole. When you sand it flush, the grain pattern of the plug matches the grain pattern of the surrounding wood. A pocket hole leaves an oval shaped hole in the surface of the wood. If you inserted a round plug in a pocket hole and sanded it smooth, the grain pattern of the plug would not match the surrounding wood. Imagine cutting a 45 degree bevel on the end of a board and what that grain pattern looks like, then cutting out an oval shape out of that grain pattern. Now insert that into a pocket hole and the grain pattern won’t match. A pocket hole plug cutter cuts a plug at same angle as the pocket hole, so when the plug is inserted in the pocket hole, it will match the surrounding wood.
I enjoyed this how-to-guide…thanks for creating it! I am planning to purchase a kreg jig to make a table. Can I do all I need with the cheapest option, the kreg-mini? Could you explain the differences between the various kreg jigs and why the prices differ so much? Thanks!
Hi James – Thank you for stopping by and for your question! Yes, you could definitely use the Kreg Mini to make your table. Keep in mind most of the Kreg Mini kits do not include a clamp to attach the jig to the wood. So you’ll need to buy a clamp if you don’t have one. Depending on the Mini you buy, it might not include the Kreg square driver bit , so you’ll need to purchase one separately.
The Kreg Jig K4 has a built in clamp to hold the wood against the drill guide. It also has a depth stop, so the pocket hole will be perfectly positioned every time. I would say the next biggest difference between the Mini and the K4 is time. Because the Mini needs to be reposition to drill each pocket hole, clamped and then drilled, it does take a bit of time.
I like the K4 Jig because the spacing on the drill guide is setup for drilling into the common wood widths… 1-1/2”, 2-1/2” and 3-1/2”. So with the K4, you can position the wood once to drill several pocket holes, flip the piece and drill some more pocket holes on the other end… probably all in the time it would take to set up one pocket hole with the Mini. They are both great products, but I LOVE my K4!
Hope this helps. Thank you again for stopping by and please let me know if you have any more questions.
Can the Kreg Jig be used to help hold 2×10 lumber together for a kitchen countertop? I bought a Kreg 3 jig in hopes it was the right tool for the job and was planning to use 2 1\2″ screws to do the job. Also how far do the screws need to be apart? Thanks for the tutorial on setup and use of kreg products.
Hi Richard – A Kreg Jig can be used to build panels and table tops, so I don’t see why you couldn’t use it for a countertop. I double-checked with my friends at Kreg and although there are no hard and fast rules for spacing they recommend keeping the pocket holes about 2″ from the edge of the boards to avoid cracking the wood then spacing approximately 6″ apart. I would also recommend that you use a quality wood glue in addition to the pocket holes. I would love to see your project – please send some pics when you’re done!
I have never used one of these before, so I am a little confused. I am trying to join two 2X2 boards, but the Kreg Jig I got only has settings for wood up to 1 1/2″ thick. The plans I have say to use 1 1/2″ Pocket screws. Sorry if this is a dumb question.
Hi Ron – We’ll get this figured out, but first I have a few question for you. Do you know which Kreg Jig you have? What type of project are you building? A 2×2 measures 1-1/2″ x 1-1/2″ so the Kreg Jig you have will work for joining your project. Are you joining the 2×2 to a thinner piece of wood? The reason I ask is typically you would use 2-1/2″ pocket screws to join two 2x2s together, but a shorter screw for joining a 2×2 to a thinner piece of wood.
Thank you SO much Scott for your quick reply and your willingness to help. I thought I posted a reply a couple of days ago, but it doesn’t show up on the site, so I will try again. I have the Kreg Jig Pocket Hole System, about $40 at Home Depot : https://www.homedepot.com/p/Kreg-Jig-Pocket-Hole-System-R3/202269070
I am building a crib for my son and daughter-in-law. The baby is due in October, but want to try to finish this by mid July as that is when it will be convenient for us to deliver it to them in Portland.
The plans are online at this URL: http://www.onhouseandhome.com/200-diy-crib-tutorial/
The pieces I will be joining with the pocket holes are the 2X2’s that make up the four corner posts and top and bottom railings. It looks like from the drawings in the plan, that one pocket hole is used for each connecting point.
Thanks again for your help. I have also sent an email to tech support at Kreg, but no response so far. 🙁
Ron
Hi Ron – I’m having trouble finding the step you’re referring to on the plan. Can you direct me to the step number please?
Yes, it’s this part of step 1:
First make your cuts, then pre-drill two pocket holes into the top and bottom 2x2s for attachment to the vertical, front facing 2×2. See Img 1 for reference.
This is IMG 1:
https://i1.wp.com/www.onhouseandhome.com/wp-content/uploads/2015/05/Crib-Front-2×2-attachment.jpg?fit=300%2C150
Thanks
Hi Ron – Typically for this type of joint you would set your jig for 1-1/2″ material and attach using a 2-1/2″ pocket screw, but I’m having some difficulty following the instructions for this plan. Have you tried contacting the author for clarification?
Thanks again Scott. I will try contacting the author.
Somehow I lost my setup piece for setting the depth collar on the drill bit. Is there a formula to follow to set it for different thicknesses?
Hi Paul – Thank you for stopping by. Please check out Step 2 of my Kreg Jig Mini Guide. I have measurements there for setting the depth collar with a ruler for 1/2″, 3/4″ and 1-1/2″ material.