DIY Tabletop Reindeer (Easy Scrap Wood Project)
Add some holiday magic to your home with this DIY tabletop reindeer made from scrap wood. Easy step-by-step instructions and pattern included.
What Should I Build Next?
That's the question I help answer.
Every week, I send woodworking ideas to 17,000 DIYers who love building things.
You'd fit right in.
Why wait for St. Nick to bring the holiday cheer,
When you can make your own tabletop reindeer?
Using scrap wood, oh what fun to create,
Festive decor to grace your mantel or tablescape.
So grab your template and your tools of the trade,
And follow along as we make a reindeer parade.
From a humble piece of wood, create a magical sight,
A DIY reindeer to cherish for many a winter’s night!
Table of Contents
- A Quick Note About This Project
- How to Make a DIY Tabletop Reindeer
- Get the PDF Plan
This article contains affiliate links. If you purchase from these links, I may earn a small commission at no additional cost to you. Visit my site policies for more information.
A Quick Note About This Project
When I originally published this project in November 2023, it was available for free. Due to some recent business challenges, I’ve had to make the difficult decision to begin charging for many of my plans to help support the site and the work I do.
You may still come across older pins on Pinterest that say this project is free. Unfortunately, once others repin a pin, I can’t edit it. Thank you for understanding and for supporting independent creators like me.
Inspiration for This Wooden DIY Tabletop Reindeer
I mentioned in this tutorial that I recently visited an estate sale while traveling. The home, belonging to a woodworker with a crafts business, was filled with his creations and patterns he used to make his projects.
I wanted to buy everything, but I was too far from home. Instead, I chose a few small projects to share with you, including a template for a tabletop reindeer. I traced the pattern, making minor changes to its size and shape.
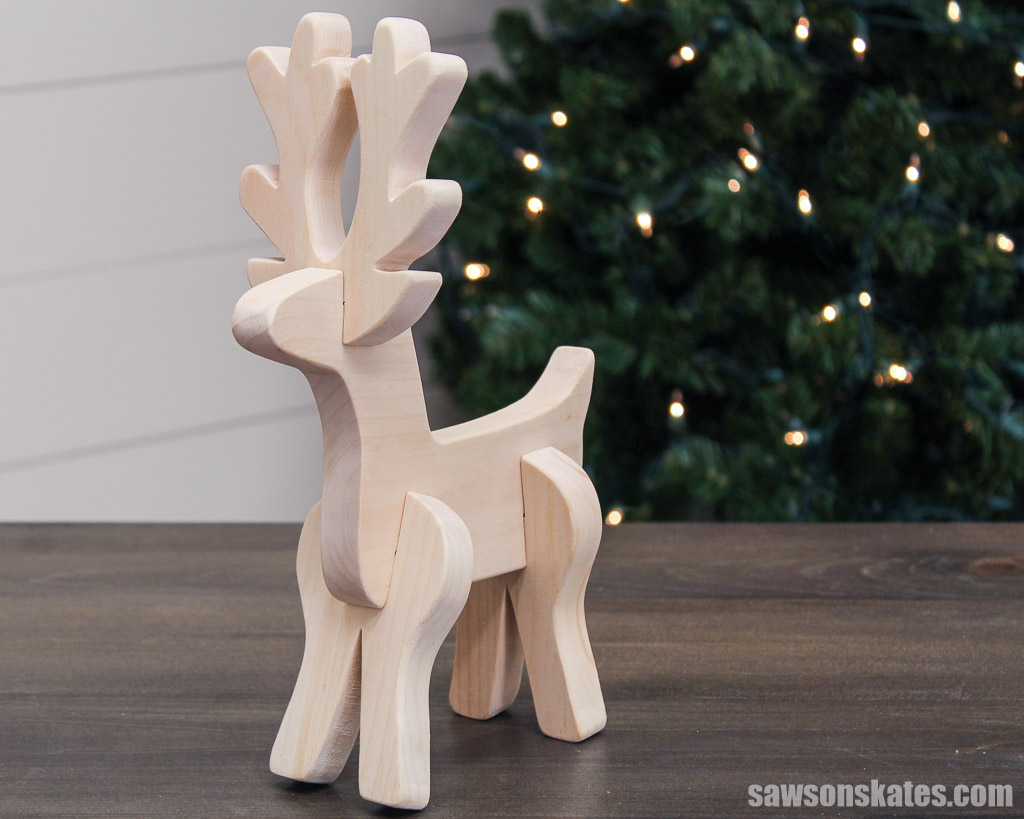
Here’s what I came up with: a wooden reindeer with interlocking legs and antlers that stands on its own. It’s perfect for Christmas or to use throughout the winter, and you can customize it any way you like to complement your decor.

What Tools Do You Need?
I used a scroll saw to make my DIY tabletop reindeer. I also used a portable spindle sander to smooth the curves and a file to fine-tune the interlocking joints, but you could use sandpaper instead.
What Wood Should You Use?
I used pine for my deer because I had scraps left over from another project, and it’s a softwood that’s easy to sand and shape. However, you can use any wood type you like.
How Do You Draw the Reindeer Shape?
I’ve included a reindeer template in the printed plan. You can print it out and trace it onto the wood. It’s that easy!
How Do You Finish the Tabletop Reindeer?
I left my deer natural, but you can paint, stain, or decorate yours however you like, adding glitter, ribbon, or other festive touches for extra holiday flair.
DIY Tabletop Reindeer
Printed Plan
Get the PDF plan here (includes detailed instructions, measurements, and bonus tips)
Supplies
- Wood (per the printed plan)
- Carbon Paper (optional)
- Manilla Folder and Spray Adhesive (optional)
Tools
- Scroll Saw
- Portable Spindle Sander (optional)
- Rasp or file (optional)
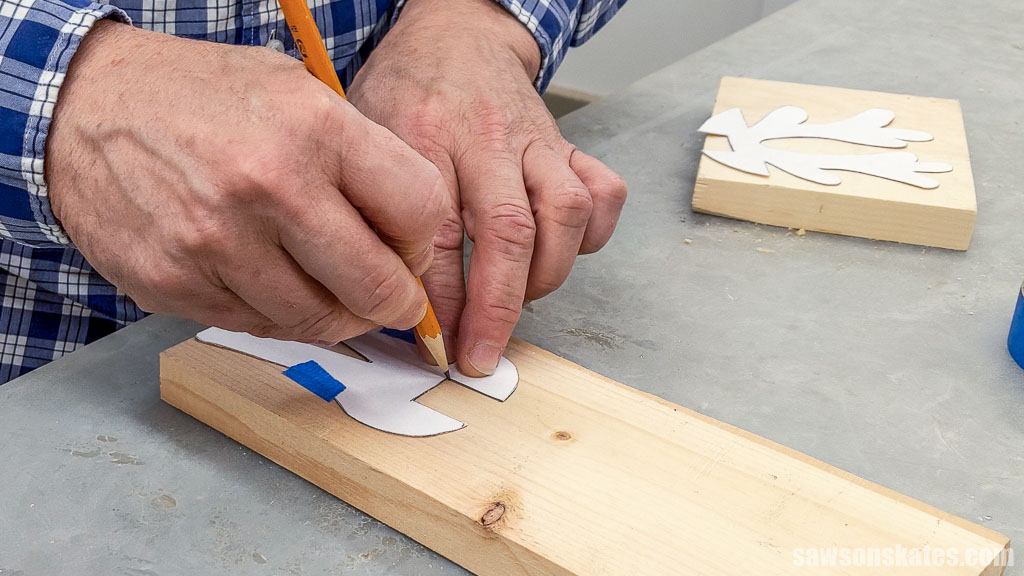
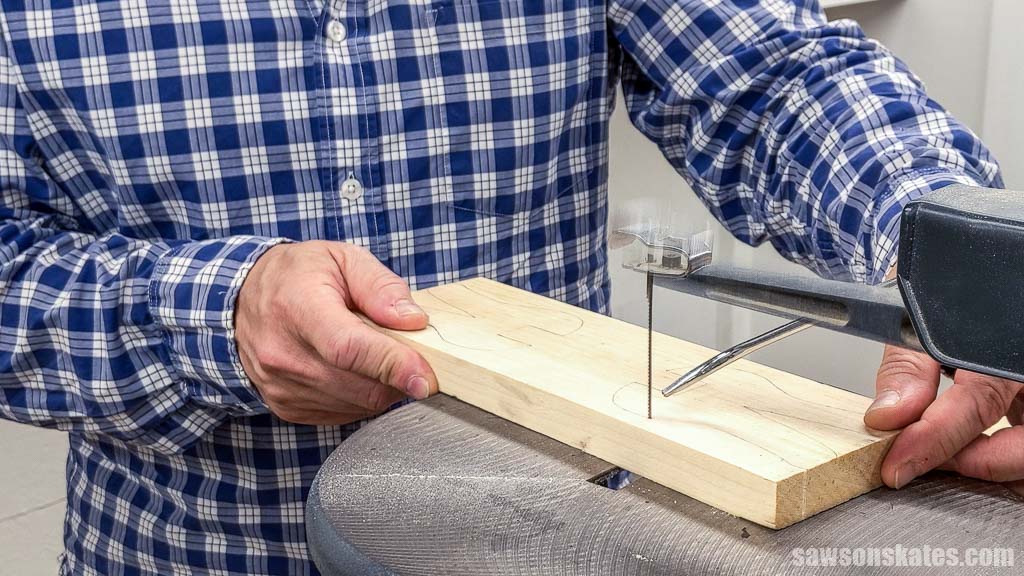
Step 1. Trace the Pattern
Print the template at the end of the plan.
TIP: When printing the template, make sure the scale is set to 100%.
You can trace the pattern by placing carbon paper between the printed template and the wood. Then, trace the template’s lines with a pen or pencil, transferring the design onto the wood.
If you don’t have carbon paper, you can attach the pattern to a stiff material, such as a manila folder or cereal box, using spray adhesive and cut it out with scissors. The material’s edge acts as a guide for your pencil to trace around.
I placed my pattern on the wood, temporarily attached it with painter’s tape, and traced it with a pencil.
Step 2. Cut the Parts
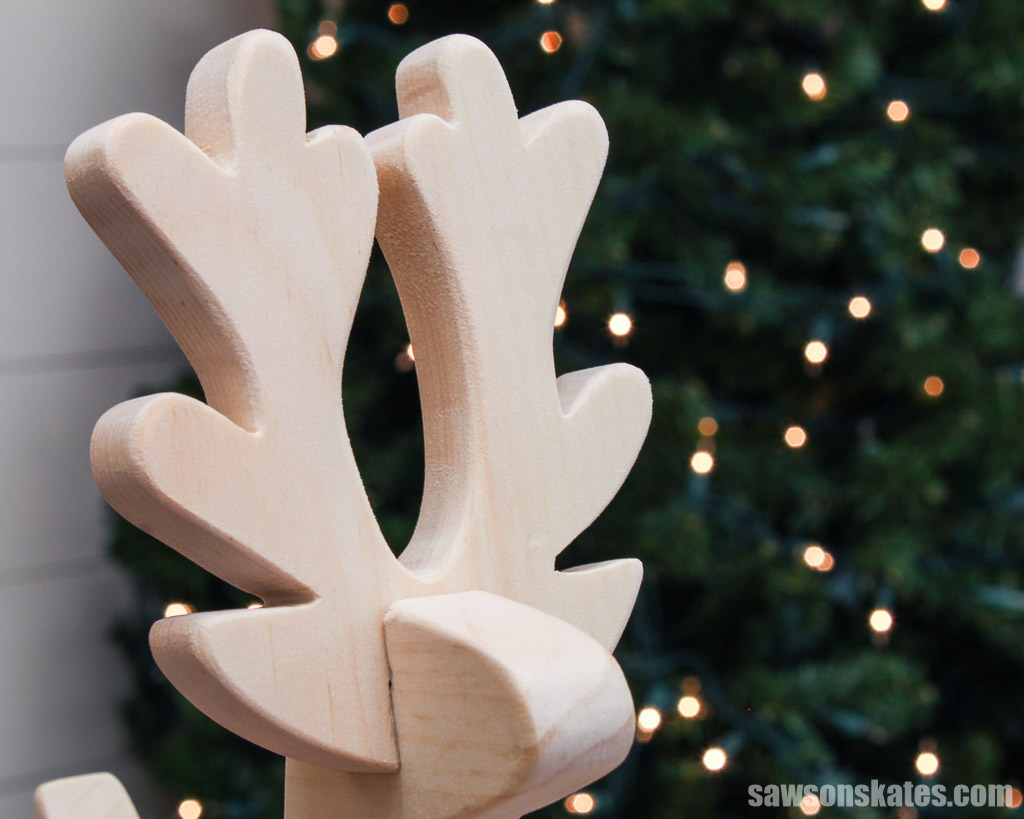
I cut out the deer’s body, legs, and antlers using a scroll saw. For best results, I recommend cutting slightly outside the line and then fine-tuning your cut by sanding up to it. Leaving a narrow margin around the pencil line is especially important for the interlocking legs and antlers, as it will ensure a snug fit.
NOTE: Don’t worry if your interlocking legs don’t fit together. I’ll show you how to adjust them in Step 3.
I used a fine-toothed, 18.5 teeth per inch (TPI) blade, resulting in smooth cuts and easy maneuverability around the reindeer’s delicate curves.
Smoothing the deer’s curved edges is the fastest and easiest with a portable spindle sander, but you can also smooth them using sandpaper if you don’t have one.
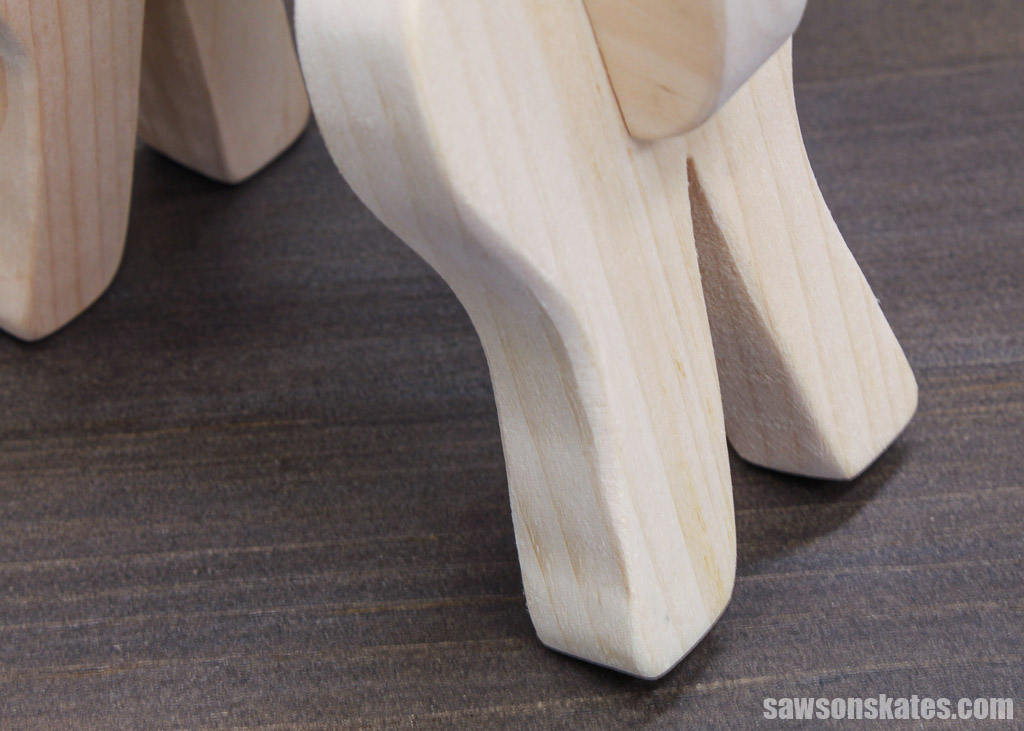
Next, I used sandpaper to round the reindeer’s sharp edges and contour body parts, such as the antlers and knees, making them appear smaller, as they would in nature.

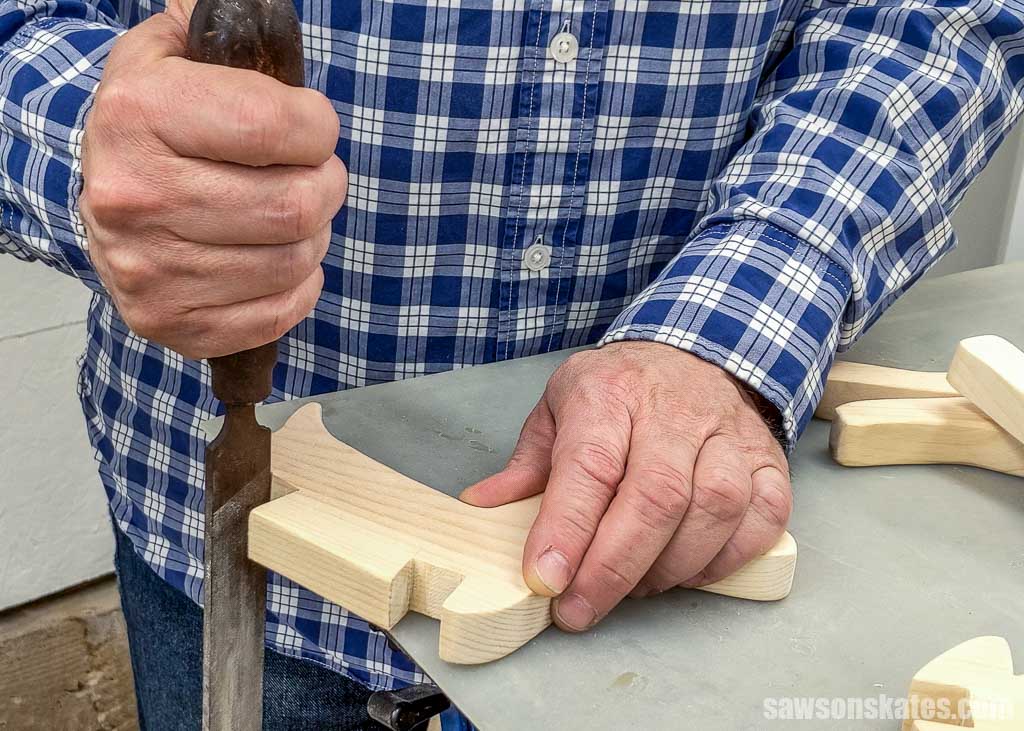
Step 3. Assemble the Tabletop Deer
As I mentioned earlier, when cutting, it’s best to leave a small margin around the pencil line, ensuring a snug fit for the interlocking parts.
I wanted a friction fit, when two parts are held together by pressure rather than glue or fasteners. This way, I could disassemble the deer, making it easier to store, but you can use glue if you want.
Because I cut outside my pencil lines, my interlocking legs didn’t fit together.
First, I attempted to interlock each part, noting where it got stuck.
Then, using my grandfather’s file (a rasp would also work), I removed small amounts of wood until the pieces fit snugly together. You can also use sandpaper, but I found it was easier to keep the opening square using a file.
And that’s it. Your reindeer is ready to decorate your mantel or table.
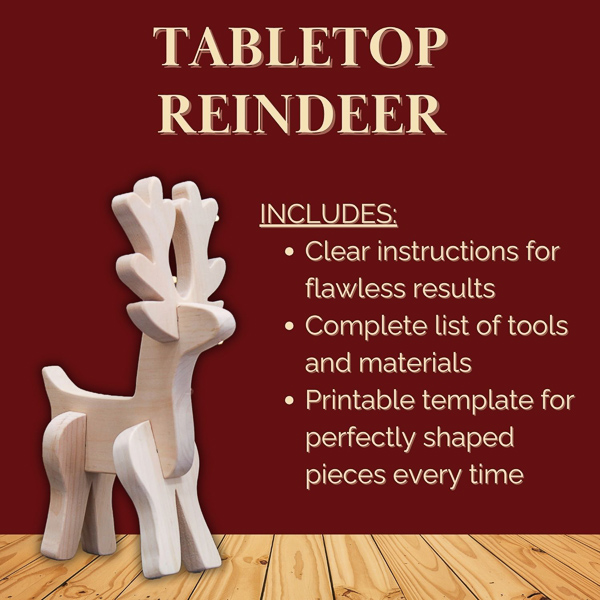
Includes:
- List of tools and materials
- Easy-to-follow instructions
- Step-by-step photos
- Reindeer Template
or get the best value:
Final Thoughts
This tabletop reindeer is an adorable addition to your holiday decor, and the best part is you can make it from scrap wood.
Don’t wait. Get your PDF plan (including the detailed instructions and measurements) now!
Thank you for stopping by. If you enjoyed this tutorial, would you please take a moment and pin it to Pinterest? I’d really appreciate it!
Recommended For You
Pin This For Later

Hi there – I’m Scott, a woodworking enthusiast and creator of Saws on Skates, a site I started in 2015 to share easy-to-follow tutorials, space-saving shop tips, and project inspiration for DIYers at any skill level. Learn more about my woodworking journey here.
How thick is your board?
Hi Julie – I used 3/4-inch thick material for my reindeer.