How to Adjust a Miter Saw for Accurate Cuts
Is your miter saw cutting crooked? It’s easy to fix! Simple adjustments to the saw blade and the fence will guarantee straight and accurate cuts every time.
You may also enjoy How to Change Blade on Miter Saw in 3 Easy Steps and 7 Miter Saw Tricks Every DIYer Should Know.
A miter saw is one of the tools we use the most for building our DIY projects. Today we’ll learn how to check if our saw is out of alignment and how to adjust our miter saw for accurate cuts every time.
Originally published September 27, 2016 updated March 26, 2019
This tutorial contains affiliate links to supplies and tools. Purchases made using these links help support the Saws on Skates website and allows me to share more projects and tips with you. There is no cost to you for using these links. Visit my site policies for more information.
Before we get into how to adjust a miter saw for accurate cuts, be sure to click the subscribe button at the bottom of this page to sign up for my FREE weekly newsletter loaded with helpful pocket hole tricks, space-saving workshop ideas, clever DIY tips and more!
NOTE: This is meant to be supplemental information. Always refer to your miter saw manual for safety information, how to adjust your specific saw and how to use your miter saw.
What is a Power Miter Saw?
A power miter saw has an overhead mounted interchangeable rotating saw blade. The wood to be cut, or workpiece, is placed on the table and against the fence. The saw blade is lowered to make the cut and then released to return to its original position.
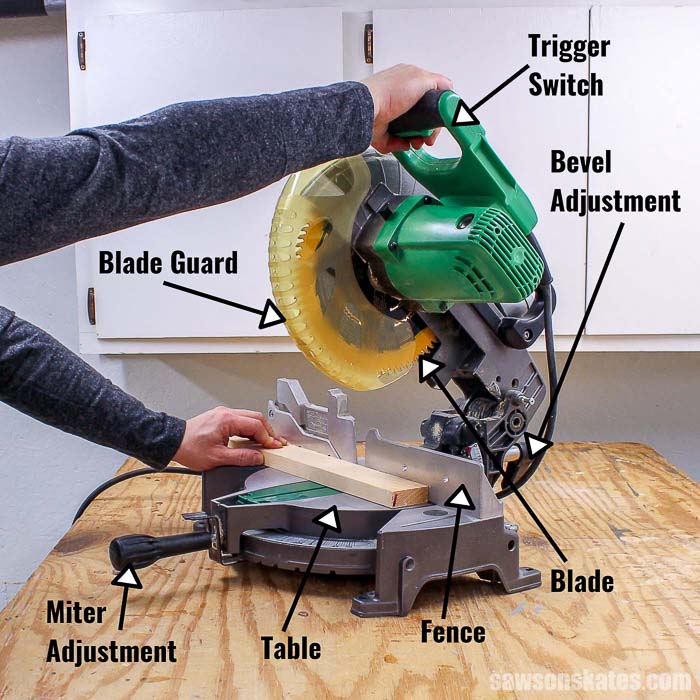
The default miter saw angle is set for a 90 degree crosscut. The table features a handle that allows you to change the angle to common preset angles like 22.5 degrees, 45 degrees or angles anywhere in between.
The preset angles feature a detent, or catch that prevents the table from moving during the cut. Angles without a detent are held in place by tightening the handle.
The miter saw is a great choice for cutting parts for DIY furniture projects, home decor projects, outdoor projects, installing baseboard molding, moulding around windows and doors, crown moulding, plus much more.
Types of Miter Saw Cuts
Crosscut
A crosscut is made across the grain of the wood.
Miter Cut
A miter cut is an angle cut made on the face of a piece of wood.
Bevel Cut
A bevel cut is an angle cut made on the edge of a piece of wood. A bevel cut changes the profile of the wood.
Compound Miter Cut
A compound miter cut combines a miter cut and a bevel cut. Compound miter cuts are needed to install crown moulding.
Types of Miter Saws
Compound Miter Saw
A compound miter saw can make crosscuts, miter cuts, bevel cuts and compound cuts. Some compound miter saws are single compound, in other words, it only cuts a bevel in one direction. Other miter saws are dual compound and can cut bevels in both directions.
Sliding Miter Saw
A sliding miter saw, just like a compound miter saw, can make crosscuts, miter cuts, bevel cuts and compound cuts. The difference is the saw blade sits on sliding rails which allows the saw to cut much wider widths of wood than a compound miter saw.
Miter Saw Safety
Be sure to disconnect the power before making any adjustments to your miter saw. Never make any adjustments with the power connected. Always refer to your miter saw manual for safety information, how to adjust your specific saw and how to use your miter saw.
Before we fire up our miter saw or pick up any tool for that matter we need to think about safety. Read, follow, and understand the safety instructions for your tools. If you don’t understand, contact the manufacturer or ask a pro. You also need to protect your eyes with safety glasses, your ears with hearing protection and your lungs with a quality respirator.
How to Adjust a Miter Saw for Accurate Cuts
You should check your saw for accuracy anytime you buy a new saw. Saws are set at the factory, but can come out of adjustment during shipping. You should also check for accuracy when you have kickback. You know, when you unexpectedly hit a knot in the wood and the saw kicks back?! That’s a good time to check your saw. Also it’s good practice to check the saw a few times throughout the year, because they can come out of adjustment during use.
What You’ll Need to Adjust Your Miter Saw
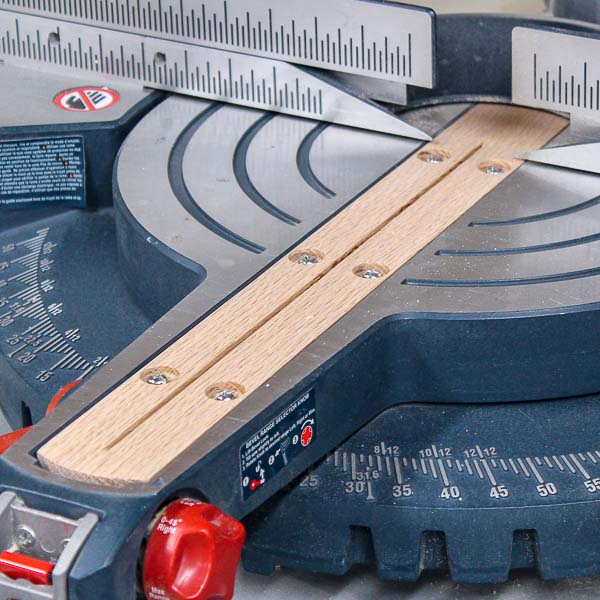
To check and adjust the saw you’ll need a speed square like this one. I also like to have a 3′ level on hand. Next, begin by setting your saw on a stable work surface or miter saw stand. For this demonstration I setup my Hitachi miter saw on my folding workbench.
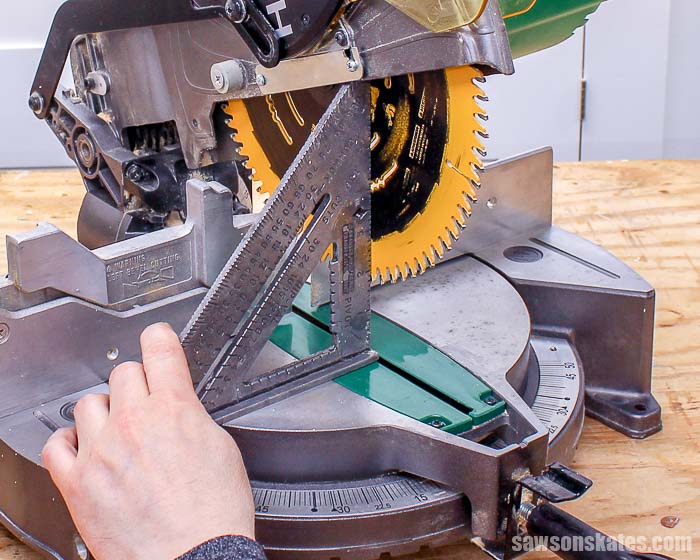
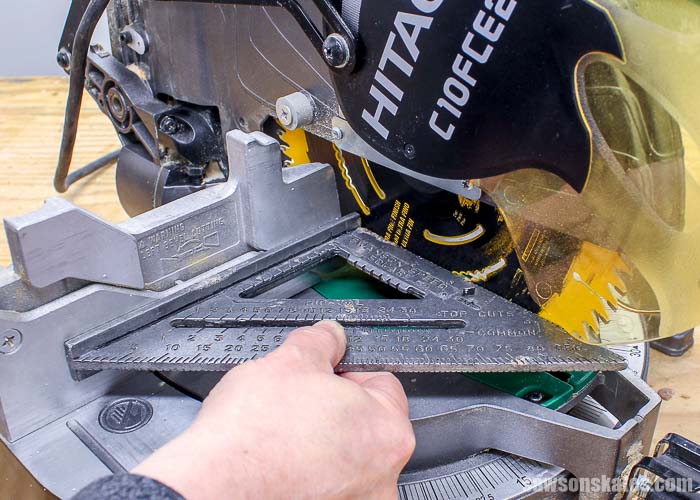
Is the Miter Saw Blade Square to the Table?
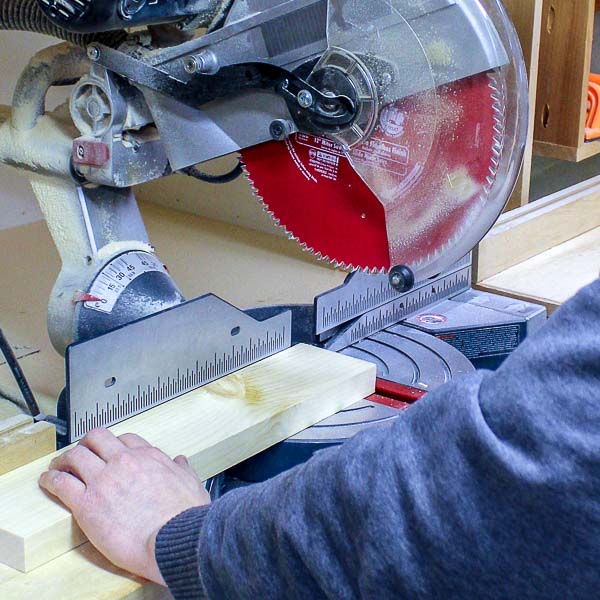
The first thing we need to check is if the saw blade is square or 90 degrees to the table. Disconnect the power and hold the blade guard out of the way.
Place a speed square flat on the miter saw table. Lower the saw blade down towards the table. Move the speed square against the side of the saw blade making sure to avoid the teeth.
The saw blade is properly adjusted when we sight down the blade, and the edge of the speed square makes complete contact with the side of the blade.
If there is either a gap at the top or the bottom edge of the speed square, then the saw blade is not square to the table and will need to be adjusted.
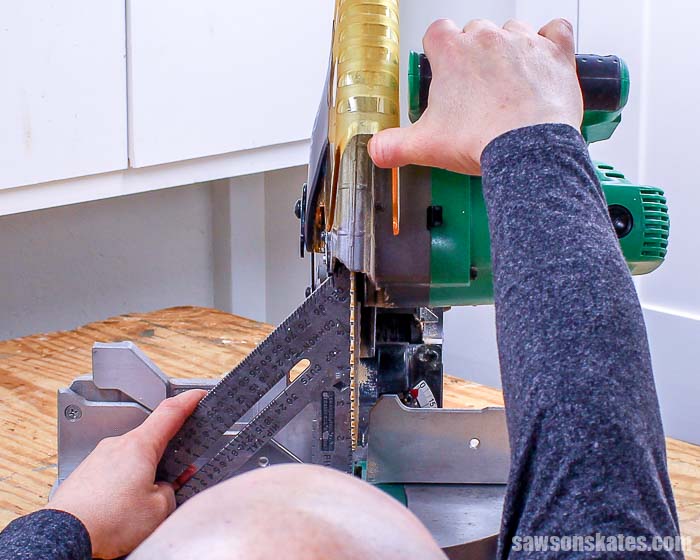
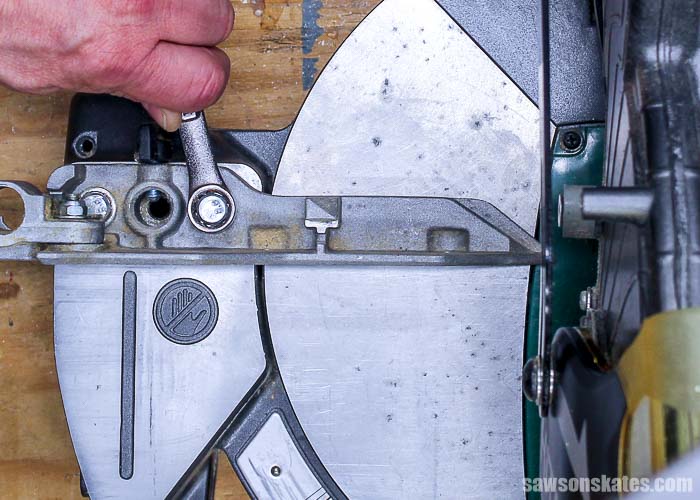
How to Adjust the Miter Saw Blade
To adjust the saw blade on this Hitachi miter saw first loosen the bevel handle at the back of the saw.
Then, adjust the bevel of the blade until it makes complete contact with the speed square and tighten the handle.

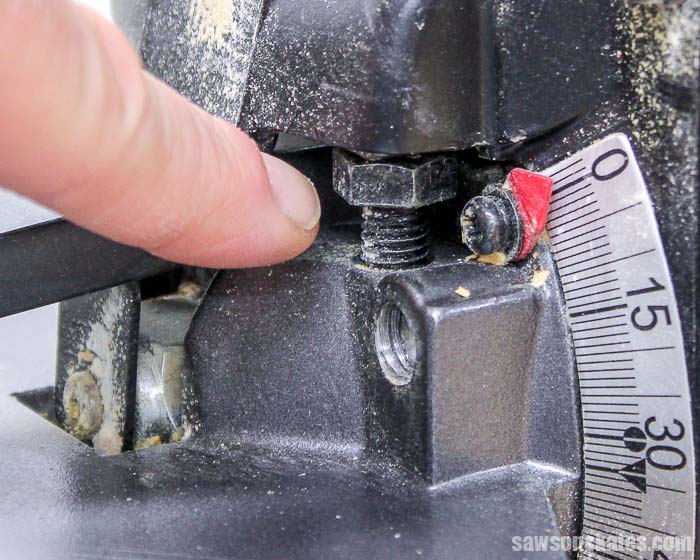
With the saw blade square to the table adjust the stop bolt until it meets the stop. Now if the bevel is changed, and then returned to 0 (zero), the bolt will stop the blade, so it’s square or 90 degrees to the table. Lastly, adjust the indicator, so it points to 0 (zero).
NOTE: Check the stop bolt if you’re having difficulty squaring the blade to the table. The stop bolt may be preventing the blade from being adjusted to 90 degrees. Drive the bolt further into the table and recheck for square.
Is the Miter Saw Fence Square to Blade?
The next thing we need to check is if the fence is square or 90 degrees to the blade. Disconnect the power and hold the blade guard out of the way.
Place a speed square flat against the fence. Lower the saw blade down to the table. Move the square against the side of the blade making sure to avoid the teeth.
The blade is properly adjusted when we sight down the blade, and the edge of the speed square makes complete contact with the side of the blade.
If there is either a gap at the front or the back edge of the speed square the blade is not square to the fence and will need to be adjusted.
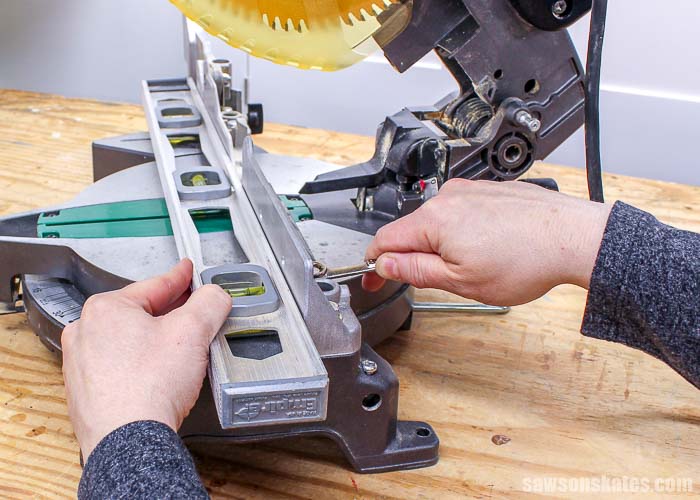
How to Adjust the Miter Saw Fence
To adjust the fence on this Hitachi miter saw first loosen the two bolts on the left-hand side of the fence.
Next, adjust the fence, so the speed square makes complete contact with the side of the saw blade and tighten the bolts.
Loosen the bolts on the right-hand side of the fence and place a 3’ level across the fences. Next, adjust the right fence until it’s flush with the left fence and tighten the bolts.
Another Reason for Crooked Miter Saw Cuts
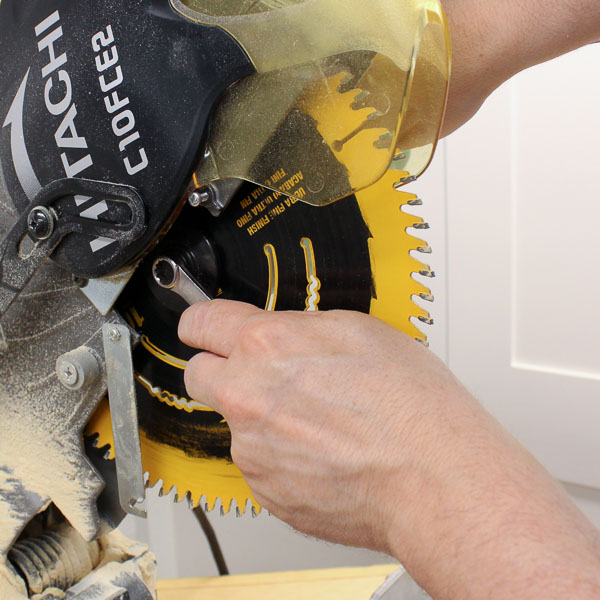
Other factors can contribute to crooked cuts. Remember the kickback after you hit that knot in the wood you were cutting? Well, your blade could be bent. Disconnect the power. Carefully and slowly spin the blade with your fingers. Does the blade wobble? If so, you’re blade is likely bent and will need to be replaced.
Roughly cut wood or lots of splinter could indicate a dull blade. If it’s been a while since you replaced your blade or have never replaced your blade, it might be time for a new one.
How to the Change Blade on a Miter Saw
Need help changing your miter saw blade? Please skate over to How to Change the Blade on a Miter Saw for a tutorial or check out the quick video below.
How to Make Cleaner Miter Saw Cuts
If you make a cut with your miter saw and then flip the board over is the cut smooth and crisp or rough and jagged?
If you said rough and jagged skate over to Prevent Miter Saw Tear-Out and I’ll share with you how I use a piece of scrap wood to reduce tear-out and make cleaner cuts with my miter saw!
7 Miter Saw Tricks Every DIYer Should Know
Want to learn more about your miter saw? Then you NEED to check out my 7 Miter Saw Tricks Every DIYer Should Know! It’s packed with helpful tips and useful tricks for getting the most of your miter saw. Check it out now!
Final Thoughts
It’s easy to fix a miter saw that isn’t cutting straight. Simple adjustments to the saw blade and the fence will guarantee straight and accurate cuts every time.
Thank you for stopping by. If you found this information helpful, would you please pin it to Pinterest? Other DIYers would appreciate it and I would too! Thank you – Scott
Recommended For You
Pin This For Later

Hi there – I’m Scott, a woodworking enthusiast and creator of Saws on Skates, a site I started in 2015 to share easy-to-follow tutorials, space-saving shop tips, and project inspiration for DIYers at any skill level. Learn more about my woodworking journey here.
I really appreciate the fact you took time to make this easy for all us stupid people out there. I had no idea how to do this. You are the MAN!! Thanks
Thank you Daniel – I’m glad it was helpful for you!
Great article! I noticed today that the zero degree miter stop on mine was off a bit. Guess it’s time to tweak the fences some. Thanks for the info!
LOVE WHAT I’ve read so far. I’ve been doing wood work projects for several years and I’m always looking for good tips & tricks. I’m just getting into using a pocket hole jig so your information is really timely.
Thank you for the compliments – I really appreciate it!
I really like this site. While I am an old time wood worker and home remodeler, there is never a day when I do not learn something new. This site has taught me a lot and reminded me of maintenance that I need to do on a regular basis.
Thank you for the brief and to the point articles. You are my go to place for quite a while now. P.S. I noticed you answer every message, that is classy.
Hi Joe – Thank you sooo much for all of your compliments! I really appreciate it! I’m glad you’ve been hanging around here for a while and have found some useful info. I try to get to every message, but I’m sure a few slip through the cracks. Thank you again – Scott
Thank you very much, For taking so much time. I have the same great kudos as other comments. Love the detail. I’m just starting my woodworking adventures. Really nice to see other comments from other women too. But, still in the box is a brad nailer, small compressor, and 7 1/2 mitre saw !!! Baby step, and safety first. I’ll be hanging out here for a while looking for that one first DIY piece to build. Big Thank You, and Hugs from Ontario, Canada
Hi Mary Ann – Thank you so much for stopping by and for all of the compliments! I really appreciate it!
You all are over thinking it! Just lay a speed square in the slot where the blade comes down and use ANOTHER square butted up against it to square your fence!
I had an issue with my 40 year old DeWalt miter saw. The blade had a tendency to wobble during cuts, checked tightness, straightness, of the blade, checked good. It turns out the shaft bearing was worn out. I found a replacement bearing locally for under $10.00, changed it out myself, (froze the bearing overnight) saw is cutting straight and true. Really enjoy this site & use your tips regularly. Keep up the good work!
Just come across this site, great advise regarding a ensuring that the mitre saw is square at all times, to be truthful, my mitre saw is reasonably old, and I have never checked if it was straight or not; the other day when cutting a couple 4 x 2, i did notice that the cut was not square; I shall be sorting the mitre saw out tomorrow, more so after reading this topic. Thank you for a interesting topic, I shall be visiting this site a lot more, now I am aware of it. Keep up the excellent work; Ian Mac
Hi Ian – Thank you for stopping by and for the compliments. I’m glad you found this helpful!
Just found this page and a big thanks for showing how to get the best cuts from my mitre saw . Rob in Norwich UK.
Hi Rob – Thank you for stopping by. I’m glad you found this helpful!
Thank you so much for this information. I lost my beloved husband about 19 months ago. Over the years he had accumulated a lot of woodworking machinery, mostly gifts I had bought for him once we moved into his childhood family farm, which had a barn and and a huge detached garage(all formerly used to work on things needed for the farm” . Since his death, I learned with the help of my brother and a nephew, how to use the mitre saw, table saw, and the table belt sander, needless to say no one taught me how to care for these items. I have made doll furniture and recently made jewelry boxes for all the guys in my family for Christmas. I learned about sanding, staining, using wood glue, attaching hinges, clasps and lining the insides. I really enjoyed making them, and each one got better than the last, I ended up making 22 of them. Different sizes, but my guys all loved them. I made them more personal by placing wooden monograms on the top for each person. I am 67 years old and even though I come from a construction family, I had never done anything like that. Thank you so much for the information.
Hey Karen – Thank you for stopping by. I’m sorry to hear about the loss of your husband. But I’m glad this post was helpful for you and that you’ve found some happiness in your new woodworking hobby. Keep up the good work!