How to Change Blade on Miter Saw in 3 Easy Steps
How to change the blade on a miter saw is something every DIYer needs to know. Here’s a quick overview of the 3 easy steps needed to replace a blade.
Here’s a quick look at how to change a blade on a miter saw because whether you have a DeWALT, Ryobi, Hitachi, Bosch, Delta, Craftsman, Porter Cable or another brand of miter saw at some point you’ll need to replace the blade.
You may also enjoy How to Change a Circular Saw Blade
For your convenience, this post contains affiliate links to supplies or tools I used to complete this project. Purchases made using these links help support the Saws on Skates website and allow me to share more DIY projects. and DIY tips with you. There is no cost to you for using these links. Click here to visit my site policies.
Why Change Miter Saw Blades
There are several reasons you may need to change the blade on your miter saw. Your blade may be dull. You may have a wood cutting blade installed in your miter saw, but need to cut some metal. Or you may have a 24 tooth blade installed that is good for cutting studs, but you want to install a 100 tooth blade to cut some pieces for a furniture project.
Miter Saw Blade is Dull
Probably the most common reason to change the blade on a miter saw is the blade has become dull and no longer produces quality cuts.
What kind of blade should you get if your miter saw blade is dull? That will depend a lot on what type of cuts you’ll be making and we’ll dive into this more in depth below in “Different Miter Saw Blade for Different Cuts”.
In the meantime, if you’re like me and most of your miter saw cuts are for DIY furniture projects I love the Freud 100 tooth Diablo Ultra Fine saw blade. This is the blade I have installed on the miter saw in my small workshop. The cuts are smooth and crisp – exactly what I want for my DIY furniture projects.
Is Your Blade Really Dull?
Did you know a dirty blade can act like a dull blade? With each cut we make wood pitch collects on our miter saw blades. As the wood pitch builds on the blade it can affect the quality of the cuts which makes us think the blade is dull. If left unchecked this wood pitch can also corrode the blade.
How do you remove wood pitch from your miter saw blade? With a special blade and bit cleaner. Cleaning our miter saw blades is so simple and an important part of properly maintaining our tools. Please skate over to Clean Saw Blades for Peak Performance and Quality Cuts to see which cleaner I use, the simple procedure I use to clean my saw blades and saw blade cleaning video.
Different Miter Saw Blade for Materials
Another reason to change the blade on your miter saw is to cut a different material. Saw blades are designed to cut specific materials. Not to make this sound overly simplistic but if you need to cut some wood you’ll want a blade designed to cut wood and if you need to cut some metal you’ll want a blade designed to cut metal.
Different Miter Saw Blade for Different Cuts
Once you have determined what type of material you’ll be cutting the next thing to look at is the number of teeth on the blade. I’m not an expert on saw blade construction, but here’s my simple look at how the number of teeth work on a miter saw blade.
Saw blades with more teeth produce cleaner, crisper cuts, while blades with fewer teeth produce rough, choppy cuts. Blades with more teeth are great for cutting pieces for our DIY furniture projects. Blades with fewer teeth are great for cutting studs to build a house where you don’t care what the cut looks like.
As I mentioned earlier my go-to saw blade is the Freud 100 tooth Diablo Ultra Fine saw blade. This is the saw blade I have installed on my miter saw in my small workshop. I use this saw to almost exclusively build DIY furniture. The cuts are smooth and crisp – exactly what I want for my DIY furniture projects.
Quick Steps to Change Miter Saw Blade
- Disconnect the miter saw plug from the outlet
- Press the spindle lock and loosen the bolt
- Remove the miter saw blade
- Install the new miter saw blade
- Press the spindle lock and tighten the bolt
How to Change Blade on Miter Saw
This tutorial shows how to replace the saw blade on a 10” Hitachi Miter Saw. Please refer to your owner’s manual for how to change the blade on your specific miter saw. Are you missing the manual for your saw? No worries most manuals for modern tools are available online. Just google the name and model of your saw or tool (ex: Hitachi miter saw manual) and I bet you’ll find the manual for your saw.
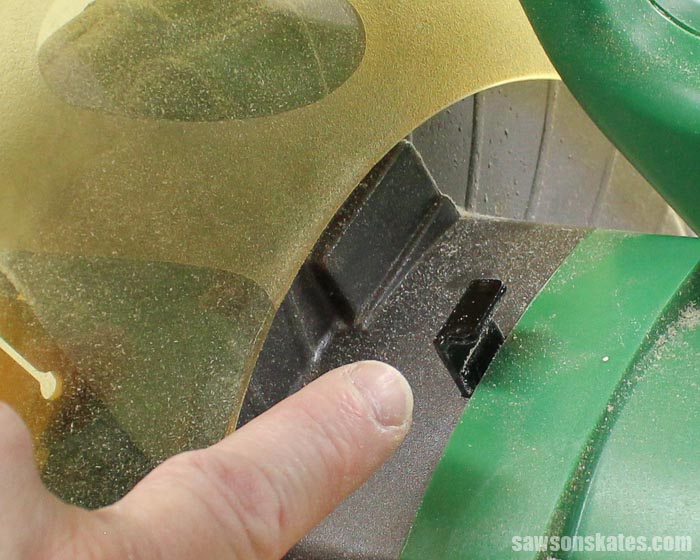
Step 1. Remove the Spindle Cover. Rotate the blade guard to the top position. Remove the front screw from the spindle cover and allow the spindle cover to pivot on the back screw and drop out of the way.
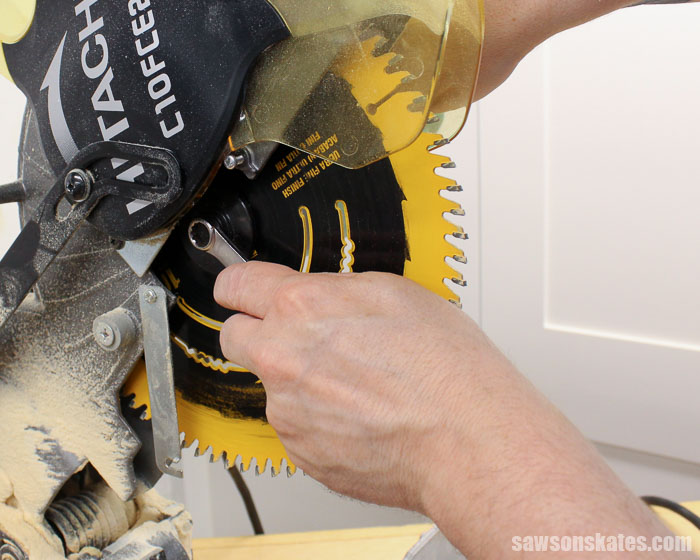
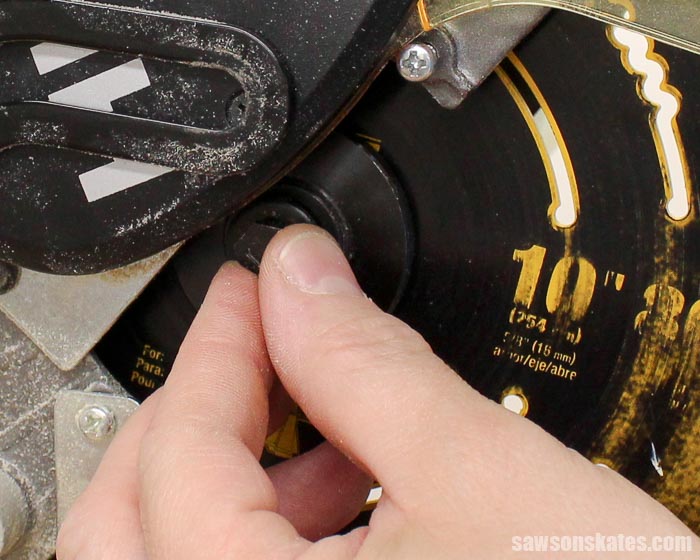
Step 2. Remove the Blade. Press the spindle lock to fully lock the spindle. If the spindle lock cannot be fully locked turn the spindle with a 10mm wrench while applying pressure to the spindle lock.
While pressing the spindle lock use a 10mm wrench to remove the bolt.
Remove the bolt and washer.
Then remove the blade from the miter saw.
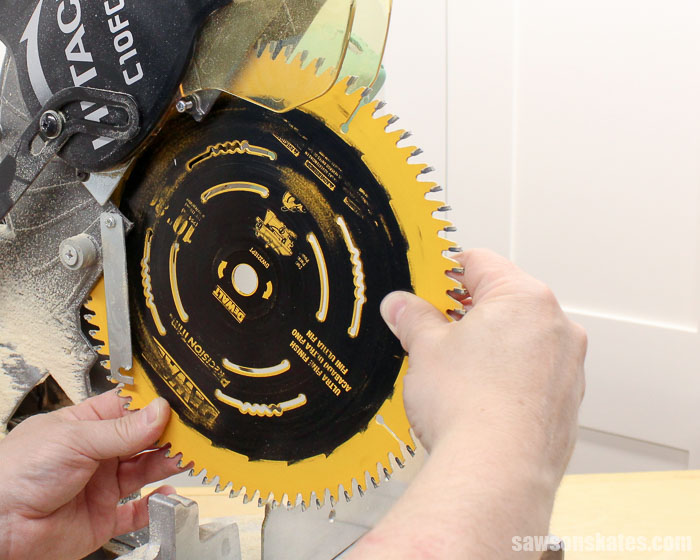
Step 3. Replace the Blade. Replacing the blade is opposite of removing the blade. Remember to use the direction arrows printed on the blade to install in the correct direction. Replace the washer and bolt (remember the bolt will turn to the left to tighten). Press the spindle lock and tighten the bolt with a 10mm wrench. Replace the spindle cover screw and lower the blade guard.
Tune-Up Your Miter Saw
Over time our miter saws can come out of adjustment. Sometimes even new saws out of the box need to be adjusted. To ensure accurate cuts we need to be sure the blade is square to the table and the fence is square to the blade.
Skate over to see how to check your miter saw and get my full tune up procedure in How to Adjust a Miter Saw for Accurate Cuts post.
Improve Your Miter Saw Skills
Now that we’ve replaced our miter saw blade and tuned up our miter saw let’s learn some new skills. Skills like why you should trim the ends of your boards, why you should “leave the line” and why you should let the miter saw come to a full stop.
Please skate over to 7 Miter Saw Tricks Every DIYer Should Know to improve your miter saw skills.
Build a DIY Miter Saw Stand
We’ve tuned up our miter saw and learned some new miter saw tricks let’s give our miter saw a proper “home”. Please skate over to 6 DIY Space-Saving Miter Saw Stand Plans for a Small Workshop.
Final Thoughts
How to change the blade on a miter saw is something every DIYer needs to know. Whether you have a DeWALT, Ryobi, Hitachi, Bosch, Delta, Craftsman, Porter Cable or another brand of miter saw at some point the blade will need to be replaced. Use the 3 steps along with your miter saw owner’s manual to easily replace a blade.
Thank you for stopping by. If you found this information helpful, would you please pin it to Pinterest? Other DIYers would appreciate it and I would too! Thank you – Scott
More Like This:

Hi there – I’m Scott, a woodworking enthusiast and creator of Saws on Skates, a site I started in 2015 to share easy-to-follow tutorials, space-saving shop tips, and project inspiration for DIYers at any skill level. Learn more about my woodworking journey here.
Thank you for the instructions and video …. VERY helpful and well done!!!!
Hi Deanna – Thank you for stopping by and for the compliments!
My DeWalt 7717 requires an Allen wrench along with a combination wrench to correctly change the blade. Allen wrench holds the spindle while loosening the nut. A spindle lock wasn’t installed 40 years ago when it was made, safety was not a priority then. Too bad a lot of the things we’ve learned about safety were written in blood. We should always remember these are potentially dangerous pieces of equipment we are using if not treated with respect.