Smart Strategies to Organize Woodworking Projects
Learn how to organize woodworking projects without losing your mind! I’m sharing simple, smart strategies to get organized now with stuff you already have.
What Should I Build Next?
That's the question I help answer.
Every week, I send woodworking ideas to 17,000 DIYers who love building things.
You'd fit right in.
Get Organized Now
How many woodworking projects do you work on at one time?
I usually work on one or two, but recently I was working on four projects, and I was seriously thinking about starting a fifth.
Building multiple woodworking projects at the same time or just one project with lots of parts can become overwhelming without a strategy to keep things organized.
Today, I’m giving you a behind the scenes look into my workshop and sharing simple solutions that you can do right now to get your projects organized with stuff you already have.
Yes, that means FREE!
This tutorial contains affiliate links to supplies and tools. Purchases made using these links help support the Saws on Skates website and allows me to share more projects and tips with you. There is no cost to you for using these links. Visit my site policies for more information.
Before we get into the organization strategies for woodworking projects, be sure to click the subscribe button at the bottom of this page to sign up for my FREE weekly newsletter loaded with helpful pocket hole tricks, space-saving workshop ideas, clever DIY tips and more!
Smart Strategies to Organize Woodworking Projects
The first step to staying organized whether, we’re working on one project or five projects, is to start with the basics. That means, clean as we go, and put tools away when we’re done with them.
Building is much more enjoyable when our workspace is neat and tidy. That means, let’s take the time to clean up those wood chips before moving on to the next step.
This also means putting tools away after we finish a step. Putting our tools away after each step:
- Makes it easier to find them the next time
- Keeps our workspace organized
- Keeps our work area safe
Related: How to Organize Tools in a Small Workshop
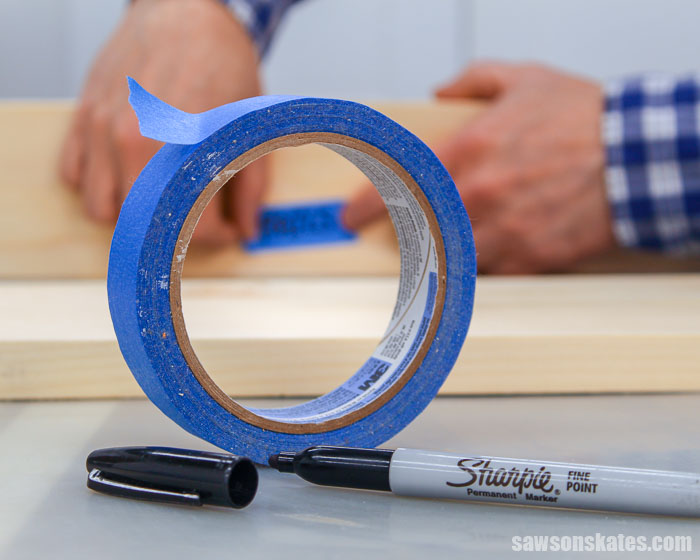
Painter’s Tape
Painter’s tape is my secret weapon for keeping my woodworking projects organized. I have a roll that I keep with my painting supplies, but I also have a roll dedicated for use in my workshop.
I use painter’s tape for sorting, labeling, and bundling. And occasionally, I’ll use it to clamp small parts.
I like painter’s tape because it’s sticky, but it doesn’t leave a sticky residue behind when it’s removed.
Sorting
Before I begin any new project, I always look through my scrap wood to see if there are any pieces I can use.
I prefer to use up scrap wood before I start cutting up new pieces of wood.
I take measurements of the scrap pieces and compare them to the wood needed for the project.
This is a good time to thoroughly inspect the pieces. Can I cut around the knots, and end up with a clear piece of wood for my project?
Does the piece have damaged edges? The piece may look rough as a 1×4, but it would make a great 1×3 if I ripped it to width on my table saw.
Related:
When I find a piece of scrap wood that’s close to what I need, I make a note on it with a piece of painter’s tape:
- “Cut to length for rails in Step 5”
- “Cut out knots”
- “Remove cracked edge – rip to 1×3”
Labeling
When possible, I try to batch my workflow. In other words, I try to make all of my cuts one day and then assemble the next day.
It’s important for us to wear personal protective equipment (PPE) while we’re woodworking. We need to protect our eyes, ears, and lungs. I don’t mind wearing safety glass or hearing protection, but I’m not a fan of wearing my respirator.
Related: Personal Protective Equipment I Use in My Workshop
When I batch my workflow, I can wear the respirator on days when I’m making sawdust and then skip the respirator on days when I’m not making sawdust. In other words, I can skip the respirator on days when I’m doing assembly work.
It’s easy to lose track of parts when I break up the workflow this way, or if I’m not able to get back in the shop the following day.
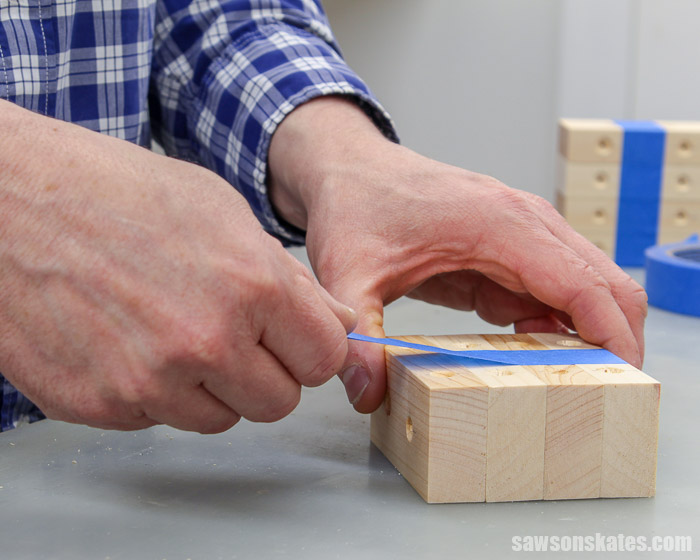
I use painter’s tape to label the parts immediately after they have been cut. I label them with the part name AND the project name so they don’t get confused with another project (ex. “Legs for STEP STOOL”).
Bundling
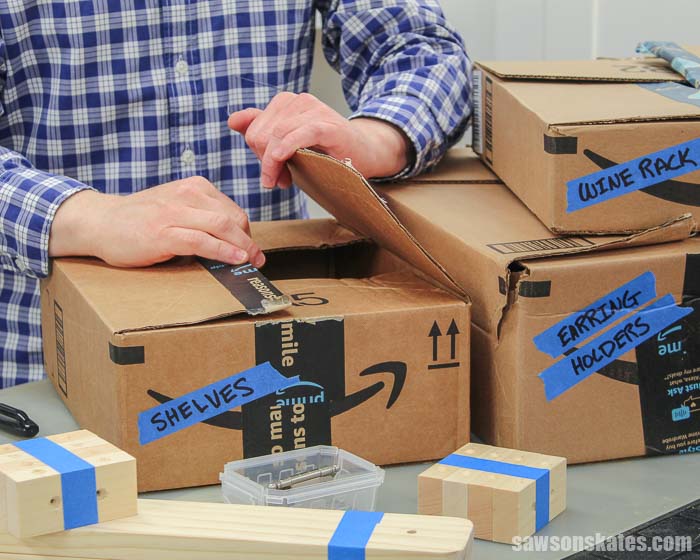
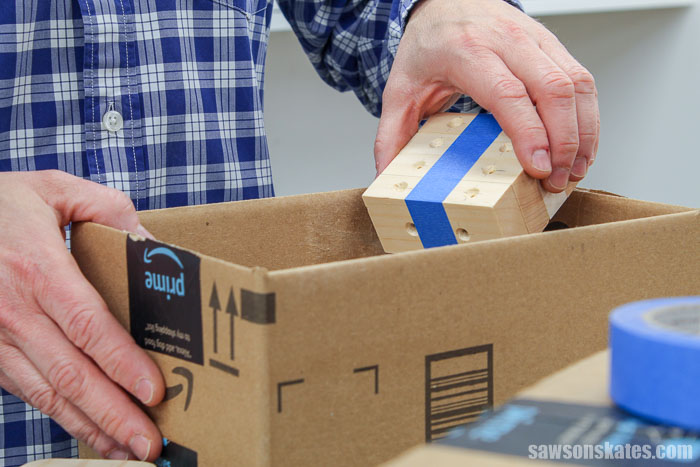
I also use painter’s tape to bundle parts together. I bundle parts for different reasons. Sometimes I bundle parts by the type of part (ex. “Legs”), by the step (ex. “Parts for Step 5”), or by the project (ex. “Wine Rack”).
Bundling parts:
- Easy way to keep them together
- Don’t need to label each part
- Better control over the parts especially if there are lots of them
Organize Large Parts
Now that I have my parts labeled and bundled, I need a place to store them. Enter the Amazon box. Cost = FREE.
We all have an Amazon box or two laying around. It doesn’t have to be an Amazon box. Any box will work.
The size and shape of our projects will vary so it’s helpful to have a handful of boxes that are different shapes and sizes.
TIP: No room to store empty boxes? Save space and flatten the boxes before storing them.
Once I find a box that will fit my project, I label it with painter’s tape (ex. “STEP STOOL”).
Then, I store the box below my workbench. My workbench is two Mobile Project Centers that sit side by side on this DIY base.
Related: My 12×13 Small Woodshop Layout
The Mobile Project Center has a shelf at the bottom. The shelf isn’t designed to hold a lot of weight, so I make sure the box can straddle the two legs. Or I place some pieces of scrap wood across the legs and then place the boxes on top of the scrap wood.
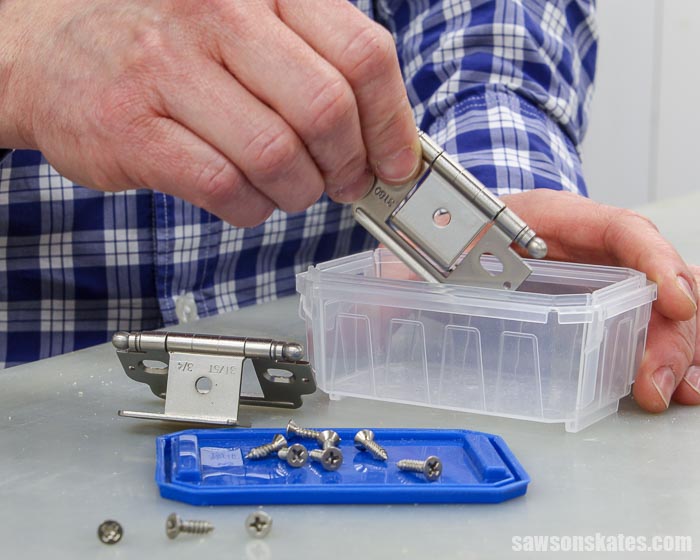
Organize Small Parts
Many of my projects have small parts like hinges, knobs, etc. Parts like hinges and knobs are often sold in bags. Those bags can be stored in the Amazon box until the parts are ready to be installed.
Many times, I remove the hinges and knobs after they are installed so I can either paint or stain the project.
These small parts are easy to lose in the workshop or get confused with another project. I use Kreg pocket screw containers to store these parts. Cost = FREE.
You can buy the Kreg hardware containers but I use my empty containers. The Kreg containers have lids so they are the perfect way to keep small parts safe.
No Kreg containers? No problem. A buddy of mine restores cars. He uses empty tuna cans to sort the parts for his restoration projects. Cost = FREE.
Make a List
Before I leave the shop for the day I make a list of what needs to be done on the project the next time.
Why do you usually stop working for the day? For me, it’s because I made a mistake or ran into a snag.
My list usually includes what steps I need to do to fix that mistake or what I need to do to get around that snag.
Having a list of next steps means I can immediately get back to work on my next visit to the shop. The list is especially helpful if I can’t get back into the shop in the next day or two.
I place the list in the box for that project and leave the shop knowing exactly what needs to be done the next time.
Final Thoughts
It’s easy to become overwhelmed when building multiple woodworking projects at the same time or just one project with lots of parts. Use these smart strategies to organize those projects using stuff you already have.
Thank you for stopping by. If you enjoyed this tutorial, would you please take a moment and pin it to Pinterest? I’d really appreciate it!
More Like This

Hi there – I’m Scott, a woodworking enthusiast and creator of Saws on Skates, a site I started in 2015 to share easy-to-follow tutorials, space-saving shop tips, and project inspiration for DIYers at any skill level. Learn more about my woodworking journey here.
Thank you for all of your posts, tips, hints, advise and projects. They are always very informative, useful and appreciated.
Hi Laverne – Thank you for the compliments. I’m glad you find them useful.