My 12×13 Small Woodshop Layout
Come see how I layout my 156 sq ft woodshop! I’m sharing all of the space-saving ideas I use to setup my power tools, tool storage, and worktables.
What Should I Build Next?
That's the question I help answer.
Every week, I send woodworking ideas to 17,000 DIYers who love building things.
You'd fit right in.
Small Woodshop Layout Ideas
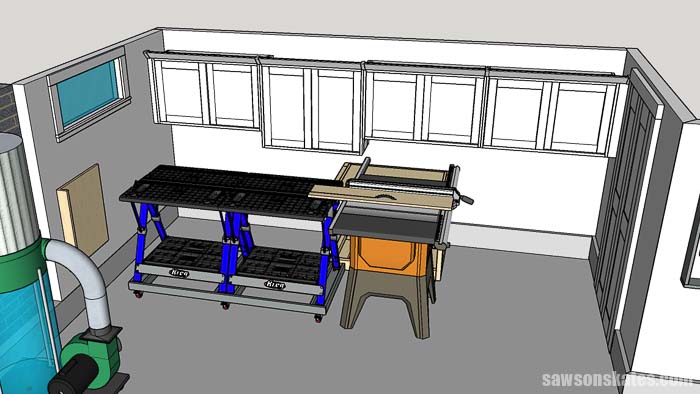
I often receive messages asking to see how I layout my woodshop. I’d love to share pics of my shop with you, but there’s a big issue. My shop is small! It’s around the size of an average bedroom. It measures about 12×13. Which is only about 156 square feet, making it difficult to capture pictures of the entire space.
Recently, I designed a new shop project in SketchUp and wondered if I could use it to design my entire workshop?
SketchUp is the same program I use to create the 3D models you see in many of my DIY plans, so I opened it up and started laying everything out.
I’ve been using it for years to think through projects this. If you’d like to learn the basics of modeling simple woodworking projects in SketchUp, I walk through that step by step in my beginner class. You can learn more about it here.
Now I’m ready to share my 156 sq ft woodshop layout with you!
You may also enjoy 9 Clever Ways to Make Your Small Workshop Feel Bigger
The SketchUp models I used for this post are a combination of my designs and models I sourced from the SketchUp 3D Warehouse (dust collector, table saw, bar clamps, etc.)
This tutorial contains affiliate links to supplies and tools. Purchases made using these links help support the Saws on Skates website and allows me to share more projects and tips with you. There is no cost to you for using these links. Visit my site policies for more information.
Before we get into my small woodshop layout, be sure to click the subscribe button at the bottom of this page to sign up for my FREE weekly newsletter loaded with helpful pocket hole tricks, space-saving workshop ideas, clever DIY tips and more!
Navigation
- My 12×13 Small Woodshop Floor Plan
- Miter Saw Layout
- Tool Storage Layout
- Cabinets and Tool Storage Ideas
- Dust Collection Layout
- Clamp and Fastener Layout
- Table Saw Layout
- Worktable Layout
- Lighting Layout
My 12×13 Small Woodshop Floor Plan
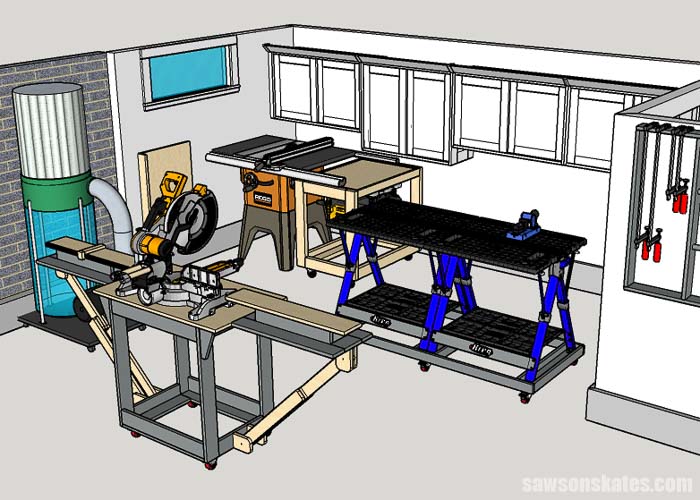
One of the reasons I started Saws on Skates® is to prove you can build quality DIY projects in just about any small space like a garage, basement or shed. All of the free plans that I share with you were built in my 12×13 woodshop. That’s right. My shop is only about 156 square feet.
The tools in my woodshop are mounted on wheels to maximize space. The name “Saws on Skates” is a wink and a nod to my tiny, mobile woodshop.
Related: 7 Ideas to Make Your Tools Mobile & Maximize Workshop Space
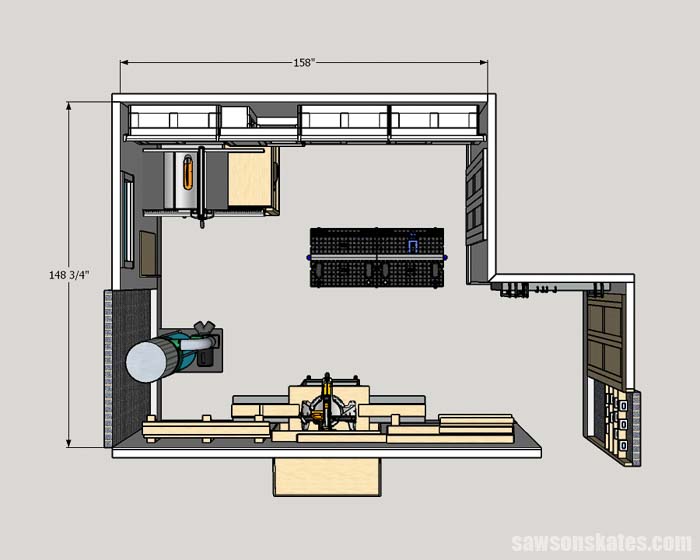
In my woodshop floor plan, you can see where I generally setup my tools. I say generally because as I mentioned the tools are mounted on wheels. All of the tools are mobile so they can be rearranged based on the project that I’m building.
You’ll also notice in this overview that I have a little extra space that’s connected to my woodshop. I didn’t include this space in the 156 sq ft calculation because the floor space isn’t usable. The area connects to two doorways. This area needs to be kept clear to enter and exit the shop.
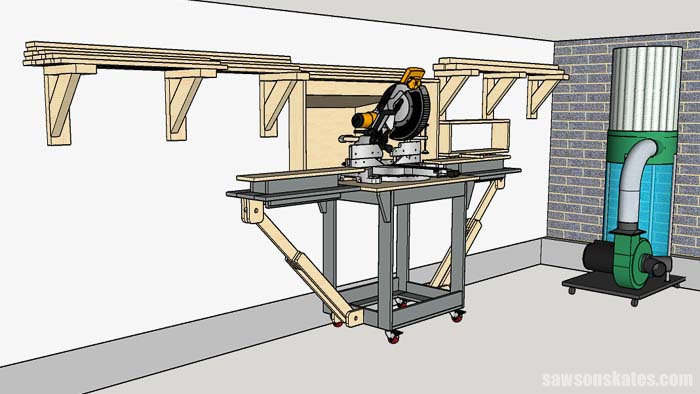
Miter Saw Layout
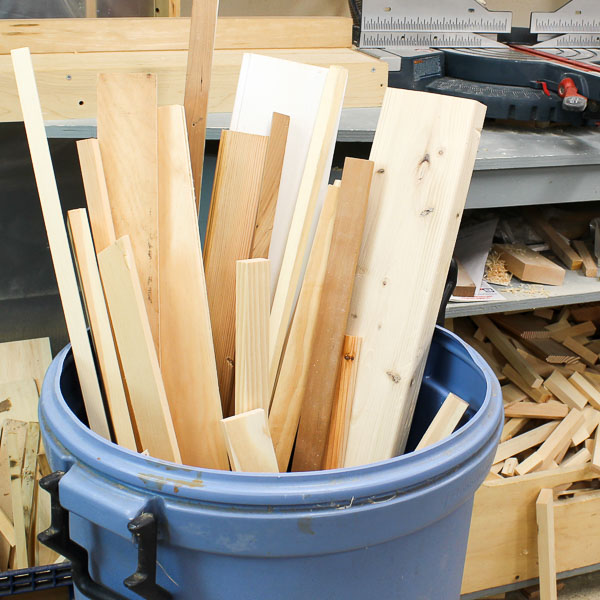
My miter saw wall serves two purposes. It’s the place where I use my miter saw and where I store my scrap wood.
The actual miter saw stand I use in my woodshop is slightly different from the one you see in this sketch. The miter saw stand I use in my shop was built using plans from a woodworking magazine. The miter saw station you see in the sketch is my design.
This portable DIY miter saw station is unique because of the side wings that fold like a pocket knife. The folding design is easy to set up when you’re ready to work and fold down when you’re done. It’s the perfect space-saving project for a small workshop, garage or shed.
Related: DIY Portable Miter Saw Station
The area below the miter saw station is a blank canvas. It would be a great place to add some storage shelves or drawers. The shelves or drawers could be used to store extra saw blades, hand tools and more.
Behind my miter saw is a miter saw dust hood that connects to the dust collection system.
Related: How to Make a DIY Miter Saw Dust Hood
I also store my scrap wood on this wall. I’ll be the first to admit this is not the best way to store scrap wood.
Related: 6 DIY Space-Saving Miter Saw Stand Plans for a Small Workshop
Design Goals for the Miter Saw Layout
My goal for the miter saw wall is to build a stationary miter saw stand. I know, I know! I just told you all of my tools are on wheels and now I’m telling you I want to build a stationary tool stand.
But hear me out on this. I haven’t moved my miter saw stand from this position in years. So obviously I’m committed to having it in this location. And second, there is a lot of space beneath each of the side wings that I could use for storage.
In this space, I could add storage cabinets on either side of the miter saw. This would give me a place to store extra saw blades, hand tools, small power tools, router bits, etc. This area would also be a great place to store tools like my router table. My router table still doesn’t have a permanent home in my shop.
I’m also hoping to come up with a better way to store the scrap wood when I redesign the miter saw wall.
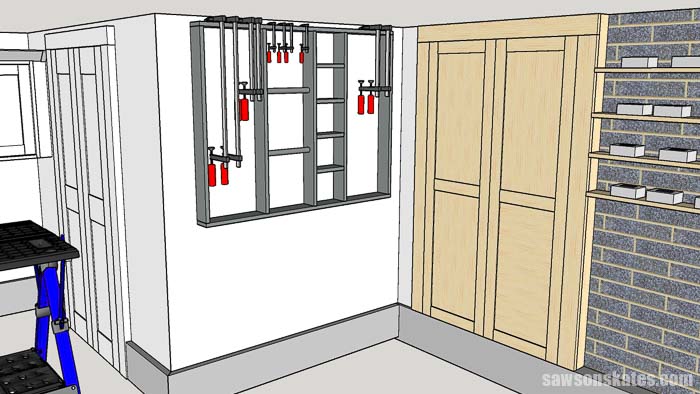
Tool Storage Layout
My tool storage wall is one of my favorite areas of my woodshop layout. I built these tool storage cabinets from scratch.
Related: 4 Reasons Why I Don’t Use Pegboard in My Small Workshop
The cabinets were installed on the entire length of the wall. This gives the illusion that the wall is longer than it actually is. The cabinets were painted white to make my shop look bigger and brighter.
I built the cabinets with sliding doors. Hinged doors would need to swing into my shop to open. Swinging doors take up valuable floor space. Sliding doors don’t take up any floor space in the open position.
Related: How to Make DIY Tool Storage Cabinets
Design Goals for the Tool Storage Layout
I recently redesigned this area and installed the DIY tool storage cabinets. Overall I’m pleased with the functionality of this area and don’t have any upcoming plans to update it.
Cabinets and Tool Storage Ideas
Watch this quick video to see how I organized the tools in my small workshop!
Related: How to Organize Tools in a Small Workshop
Dust Collection Layout
I’m often asked about the best way to handle dust collection in a tiny woodshop. The reason I haven’t shared this info is that I haven’t come up with a good solution yet.
Right now I have a dust collector from Harbor Freight. The dust collector works well, but it’s way too big for this area. Plus, the wall behind the dust collector is wasted space.
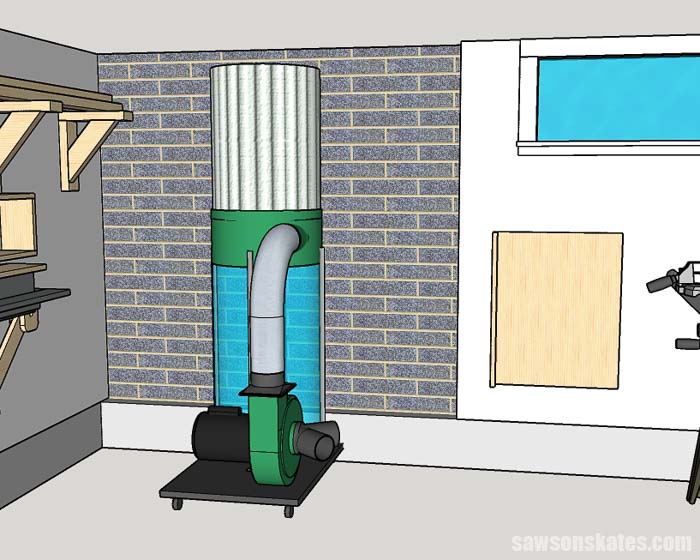
Design Goals for the Dust Collection Layout
My first goal for this area is to move the dust collector from the floor to the wall. This means mounting my current dust collector on the wall or buying a new wall-mounted dust collector. Mounting the dust collector on the wall will free up valuable floor space.
I’ve watched several YouTube videos about converting a Harbor Freight dust collector to a wall-mount dust collector. Many of these conversions required some metal fabrication, etc. I’m pretty handy with wood, but not so much with metal fabrication, etc. That means I would probably buy a new wall-mounted dust collector rather than trying to convert my floor-mount dust collector to a wall-mount.
My second goal is to make the wall more functional. This area would be a great place to store scrap wood.
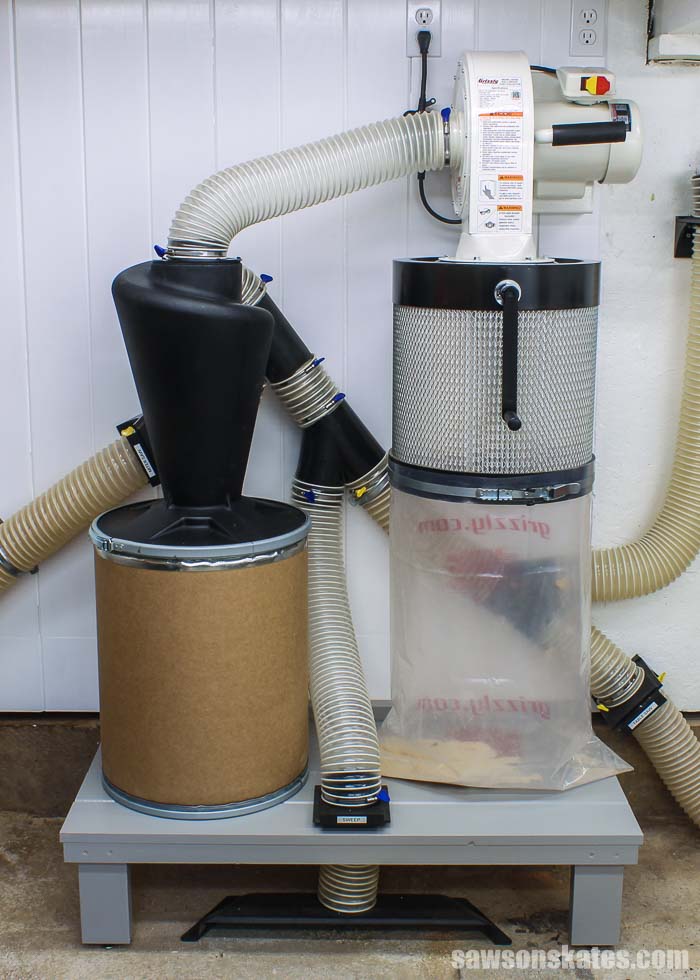
Update
I’ve completely overhauled my dust collection system. In this article, I’m taking you for a behind-the-scenes look at the space-saving solutions I use to banish dust in my small workshop, including the wall-mount dust collector, cyclone separator, and more.
Related: My Small Workshop Dust Collection System
Clamp and Fastener Layout
The clamp rack and fastener area are located in the entryway of the woodshop. The floor space needs to be kept clear, so nothing else can be stored in this area.
Clamps are stored on a DIY wall-mounted rack to the left of the door. Fasteners (screws, nails, etc.) are stored to the right of the door. The fasteners are stored on shelves mounted between the wall studs. The shelves are just pieces of scrap wood. Pocket holes were drilled in the ends of the shelves and attached to the studs with pocket screws.
Related: 7 Clever Clamp Storage Ideas for a Small Workshop
Design Goals for the Clamp/Fastener Area
I plan to paint the door, wall and shelves. I’ll paint everything white to match the rest of the shop. The white paint will make the this area feel bigger and brighter.
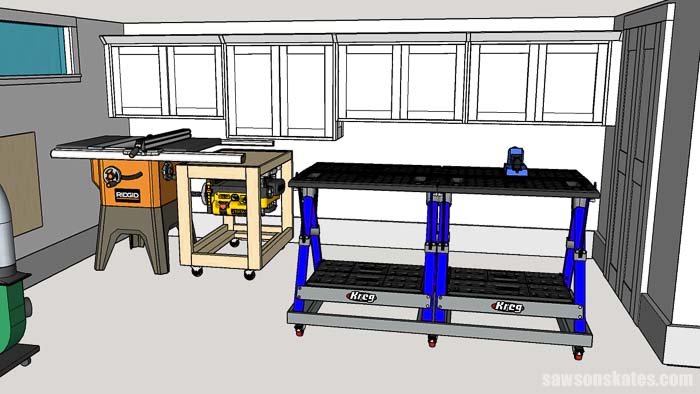
Table Saw Layout
The table saw, when not in use, is generally stored on the left side of my woodshop beneath the tool storage cabinets. This table saw works well, but it’s way too big for this space. If I were to do it over again I would buy a small benchtop table saw and build a DIY table saw stand instead.
Related: 7 DIY Table Saw Stations for a Small Workshop
My flip top tool stand is stored underneath the wing of my table saw. The flip top tool stand is great for a tiny woodshop because the top flips or rotates. This means a tool can be mounted to one side. Then the top flips to become a workbench. I use the workbench as an extra assembly table for my DIY projects.
Related: How to Build a DIY Flip Top Tool Stand
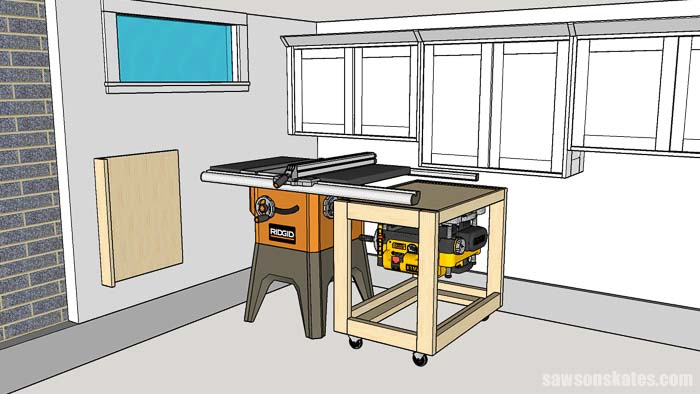
The shop is reconfigured when I need to use the table saw. I move the table saw and flip top tool stand towards the middle of the shop. The worktable is moved behind the table saw. The worktable acts as an outfeed table for the table saw. Then everything is moved back to its original position when I’m done using the table saw.
Design Goals for the Table Saw Area
This area works well for me. There are no future plans to update this area.
Worktable Layout
The main workbench or worktable I use in my woodshop is actually two tables. The workbench I use is two Kreg Mobile Project Centers that sit on top of a wooden base with wheels.

This worktable is the ultimate workbench. It rolls where I need it. Or I can fold it up and completely remove it from the woodshop for a big build. The Mobile Project Center is the perfect solution for a small shop!
Related: 3 Reasons Why I Don’t Use a Woodworking Bench

Design Goals for the Worktable Area
This worktable is awesome! There are no future plans for this area.
Lighting Layout
I wanted my woodshop to be light and bright. I mounted 9 LED shop lights in the ceiling of my woodshop.
Related: Why I Replaced My Fluorescent Workshop Lights with LED Shop Lights
Final Thoughts
I hope this tour of my small 12×13 woodshop will be an inspiration for your garage, basement, or shed. Use these space-saving ideas to design your workspace, setup your power tools, and to organize your tools and worktables.
Thank you for stopping by. If you found this information helpful, would you please pin it to Pinterest? Other DIYers would appreciate it and I would too! Thank you – Scott
Recommended For You
Pin This For Later

Hi there – I’m Scott, a woodworking enthusiast and creator of Saws on Skates, a site I started in 2015 to share easy-to-follow tutorials, space-saving shop tips, and project inspiration for DIYers at any skill level. Learn more about my woodworking journey here.
Suggestion for a router table. between the rails of your table saw mount a piece of thick mdf. purchase a rectangular router base and route it into the mdf. a dedicated router would be best so you can remove it when not in use and still store the flip top tool stand
Hi John – That’s a good idea. Thank you for the suggestion!
Thanks Scott. I have a 10×12 shed that I work out of and it gets tight quickly when working on larger projects. Might have to rethink my layout now.
Hi Sherry – I’m glad this info was helpful for you!
You are very well organised. My workshop is a bit smaller at 10×14, I managed to squeeze everything in that I wanted which was ok until someone gave me a lathe which in nearly 5ft long. So I have now built an extension on my workshop to house the dust extractor. Unfortunately I have not had time to commission the extractor yet as I have been restoring the lathe and making bowls!
Hi Bill – Thank you for the compliment. I think these sketches make my shop feel more organized than it actually!
Hi Scott. Reviewing your small shop layout certainly provided a lot of food for thought. Made me realize I just have to pare down what I want to have in a workshop. In the process of developing a revised shop and your ideas sound great. Thanks.
Hi John – Thank you for stopping by. I’m glad this was helpful for you. Good luck with your workshop redesign.
I’ve been really enjoying your small garage posts… today I completed my first major project! My mobile table saw stand!
Hi Sherri – I’m glad you’re enjoying these tips and congrats on finishing your first big project!
Thank you for sharing design ideas. I would also be interested in how/where you store your tools. Are they in the cabinets? I struggle with the question; drawers or pegboard. Haven’t seen a cabinet design. No one needs 18 screwdrivers.
Hi Ken – I keep the majority of my tools in the wall-mounted cabinets. There are a few exceptions for small tools like screwdrivers, etc. I keep those in a small tool tote. This solution might not work for everyone. But I often need these tools in the yard, at a buddy’s house, etc., and it’s handy to have them in a tote that I can grab and go.
Thanks I have been getting your emails for sometime. I have recieved some of your project plans and find them really easy to follow. My shop is 12x30but so cluttered I’m going to design the one half to your plans and then I will have room for extra lumber and assembly area. Thanks for some great ideas.
Hi Scott
I too have a very small basement shop, not as organized as your shop yet, but everything except tables away is on wheels (jobsite saw on stand, easy to move but stable). I mounted all tools on movable cabinets or I closed in the steel bases for storage. Tried to share pics but couldn’t figure it out.
Love your site.
I have a 12×32 and it is so cluttered that most work is done outside. So I’m going to move stuff out and start over knowing if I keep to your plans I’ll be able to work rain or shine hot or cold thank for the great ideas.
Greatly enjoy your channel and find inspiration. Workshop layouts are always a challenge. But your demonstration advice, presentations and videos provide answers. Thank you