Bob’s Miracle DIY Finish for Wood
This wipe-on finish is a great alternative to polyurethane. It’s easy to make and easier to apply than poly. Use this clear top coat on raw and stained wood.
You may also enjoy 3 Reasons Why I Don’t Use Polyurethane and Spray Polyurethane Rather Than Brush for Professional Looking DIY Furniture.
Finishes like polyurethane seem so fussy and difficult to apply. “Don’t brush it too much.” “Don’t create bubbles because they’ll get trapped in the finish.” “Don’t let dust fall on it while it’s drying.” “Sand and reapply.” This all sounds like a lot of work to me!
Originally published February 26, 2015 updated January 15, 2019
This tutorial contains affiliate links to supplies and tools. Purchases made using these links help support the Saws on Skates website and allows me to share more projects and tips with you. There is no cost to you for using these links. Visit my site policies for more information.
Have you had it with fussy finishes? Do you wish there was an alternative to polyurethane to use on stained wood projects? If so, I have the finish for you! It’s easy to apply and it looks great every time! Today I’m sharing the recipe for the clear wood finish I use on many of my DIY projects.
Years ago I took a couple of furniture making classes. Bob, the instructor shared with the class his recipe for the finish he uses on his woodworking projects. Bob’s DIY top coat was made with just three ingredients.
This finish was simple to make, easy to apply and provided a nearly foolproof finish every time. I’ve been using this finish on my DIY projects ever since I took those furniture making classes.
There’s probably a technical name for it, but in my workshop, I’ve always just called this top coat “Bob’s DIY Miracle Finish for Wood”.
Why I love Bob’s Miracle Finish
Why do I love Bob’s Miracle Finish so much? I can sum it up in one word. Forgiving! It’s so easy to make, it’s so easy to apply and almost impossible to mess it up. There are never any brush marks, we don’t have to sand between coats and it looks professional every time.
Plus, it’s a great finish for beginner’s because it’s so easy to use. It really is like a miracle!
Where Can You Use Bob’s Miracle Finish?
I need to give you a heads up about Bob’s Miracle Finish. It’s not as durable as polyurethane. It works best for projects that are used infrequently or don’t see a lot of wear and tear.
I’ve used Bob’s Miracle Finish for Wood on many of my DIY projects like my bar cart, chalkboard shadowbox, craft beer growler carrier, wine cabinet, and more.
Bob’s Miracle Finish Works Best on:
- Occasional tables or side tables
- Decorative items like picture frames, lamps or wood boxes
- Floating shelves, etc.
Avoid Using Bob’s Miracle Finish on Surfaces That Require Durability:
- Dining room tables
- Countertops
- Doors, trim and mouldings
Bob’s Miracle DIY Finish for Wood Recipe
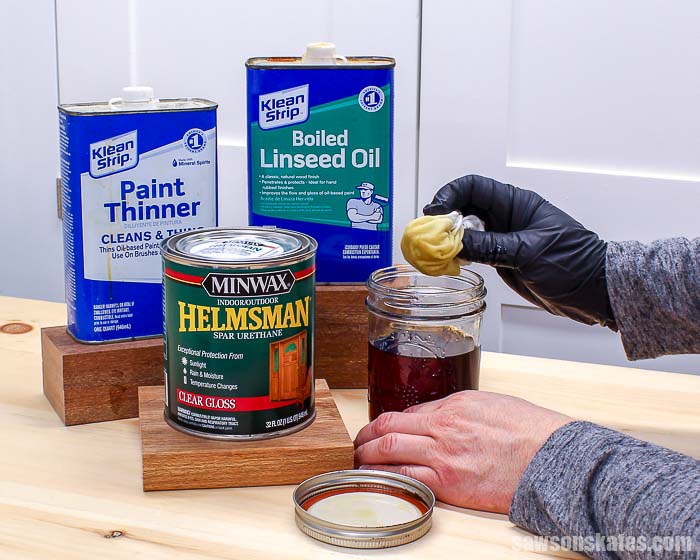
1 part Gloss Spar Varnish
1 part Boiled Linseed Oil
1 part Paint Thinner
Making Bob’s Miracle Finish couldn’t be easier. All we have to do is mix equal parts of Gloss Spar Varnish, Boiled Linseed Oil, and Paint Thinner.
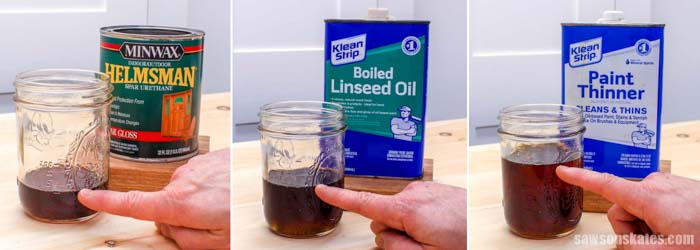
We could mix Bob’s Miracle Finish using an inexpensive measuring cup from the dollar store but I think the simplest way to mix it by using the marks on a mason jar.
To mix using a mason jar all we have to do is pour the Gloss Spar Varnish to the 100-ml mark, pour the Boiled Linseed Oill to the 200-ml mark, and then pour the Paint Thinner to the 300-ml mark. This gives us three equal parts of each ingredient.
One important note when mixing Bob’s Miracle Finish is to make sure all ingredients are oil-based. Oil-based products and water-based products are not compatible which means they will not mix together.
How Much Should You Make at One Time?
We can make Bob’s Miracle Finish in larger quantities and store it for future use, but I recommend mixing it in smaller batches to use as needed.
Bob’s Miracle Finish acts like super glue and the lid of the mason jar is often difficult to remove after the mixture dries. When storing we need to make sure to clean any of the mixture from the rim before sealing. Sometimes I’ll put a piece of wax paper between the rim and the lid, but the lid can still be difficult to remove.
Bob’s Miracle Finish is quick and easy to mix, so my recommendation would be to mix it in small batches to use as needed.
How Do You Apply Bob’s Miracle Finish?
One of the reasons I love Bob’s Miracle Finish is because it’s so forgiving. There isn’t a right or wrong way to apply it. In other words, it doesn’t matter if we use straight strokes or rub it in circles.
First we need to work in a well-ventilated area. Next we need to put on a pair of disposable gloves to protect our hands. Then we’ll dip a clean rag into the Bob’s Miracle Finish mixture and gently rub it on the surface of our project. We’ll continue this process until our entire project is coated with the mixture.
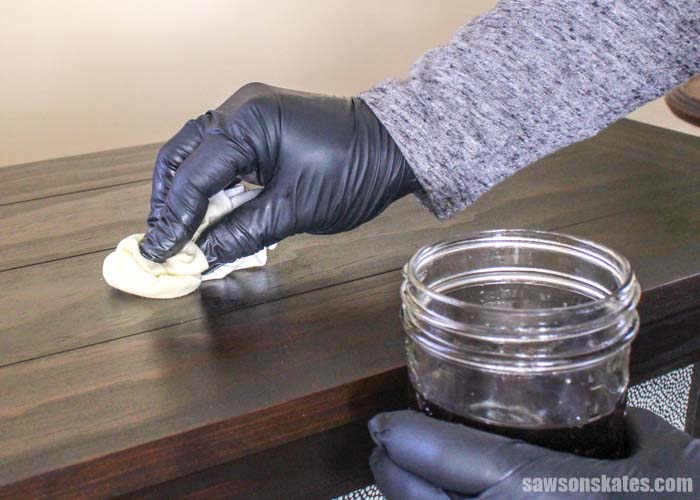
Bob’s Miracle Finish penetrates into the wood rather than sitting on top of the surface like other top coats. So like I mentioned, it doesn’t matter if we apply with straight strokes or circles. Think of applying Bob’s Miracle Finish like you would apply lotion to your hands or arms.
📝 NOTE: We can apply Bob’s Miracle Finish to raw wood right away. If we stained our DIY project we should wait 24 hours for the stain to dry before applying Bob’s Miracle Finish.
How Long Do You Leave it on Before Removing the Excess?
We should let Bob’s Miracle Finish penetrate the surface of our project for a few minutes. After a few minutes, we’ll remove the excess with a clean rag.
We’ll notice the surface will almost feel dry to the touch when the excess is removed. This is another reason I love Bob’s Miracle Finish. We don’t have to worry about dust or debris getting trapped in the finish.
How Long Do You Wait Before Reapplying?
We should allow Bob’s Miracle Finish to dry for 24 hours before applying additional coats.
How Many Coats Do You Apply?
I usually apply three coats of Bob’s Miracle Finish to my DIY projects. We can apply more or fewer coats, but I’ve found three coats gives the best coverage and gives me the look I want for my DIY projects.
Do You Need to Sand Between Coats?
Here’s one more reason I love Bob’s Miracle Finish. We don’t need to sand between coats! We can simply apply additional coats after 24 hours without sanding.
Related: 11 Secrets for Sanding Wood Projects Like a Pro
What Does it Look Like When it’s Dry?
This recipe uses Gloss Spar Varnish, but despite that Bob’s Miracle Finish looks similar to a satin-like finish. It resembles an old-school hand rubbed finish without the need to worry about brush marks or sanding in between coats.
Can You Make Bob’s Miracle Finish More Glossy?
I prefer a satin-like to a semi-gloss finish for my DIY projects, so I haven’t tried to make Bob’s Miracle Finish glossier or to get a greater shine.
It may be possible to adjust the ratios so there is a higher concentration of gloss varnish which might help to get a glossier finish. As I mentioned, I haven’t tried this. This would definitely require some testing on sample pieces to see how it would turn out.
Does Bob’s Miracle Finish Yellow With Age?
Bob’s Miracle Finish soaks into the wood rather than sitting on top of the wood like other top coats. I’ve used this finish for years and I’ve never noticed any yellowing of my projects.
Can You Spray Bob’s Miracle Finish?
Bob’s Miracle Finish is a wipe-on top coat. There wouldn’t be any advantage to spraying Bob’s Miracle Finish because it easily wipes on and wipes off.
Can You Use Bob’s Miracle Finish on Painted Surfaces?
Bob’s Miracle Finish works best on raw wood and stained wood projects. I haven’t tried it on painted surfaces or over chalk-type paints.
My concern about using it on painted surfaces like chalk-type paint is that the paint is water-based and Bob’s Miracle Finish is oil-based. Oil-based products don’t usually work well on top of water-based products.
Related: How to Spray Chalk-Type Paint
Can You Use Bob’s Miracle Finish on Exterior Projects?
I would use Bob’s Miracle Finish exclusively for indoor furniture projects. For outdoor projects, I would use a clear coat specifically designed for exterior projects.
Can You Make Bob’s Miracle Finish More Durable?
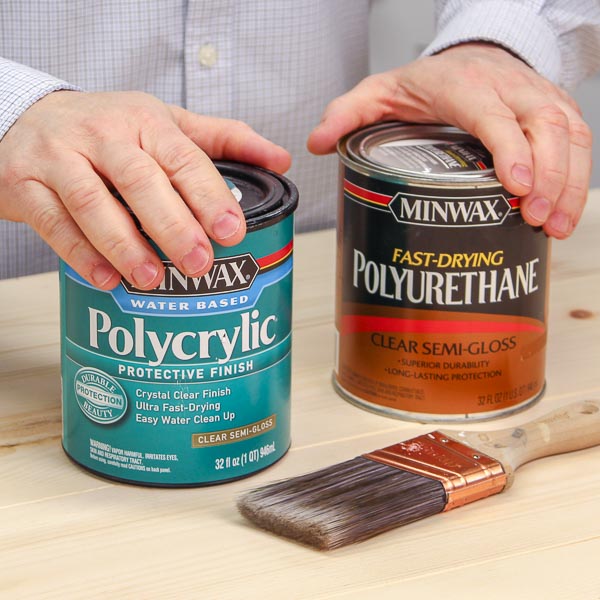
I haven’t tried to adjust the formula to make it more durable. I would use a finish like polyurethane for projects that require a more durable finish.
Related: Polycrylic vs Polyurethane: Are They The Same?
Use Caution
Gloss Spar Varnish, Boiled Linseed Oil, and Paint Thinner are all flammable. Please follow all safety instructions on the containers of these products. Please work in a well-ventilated area and dispose of any gloves, rags, etc safely.
Final Thoughts
I can sum up why I love Bob’s Miracle Finish in one word. Forgiving! It’s so easy to make, it’s so easy to apply and almost impossible to mess it up. There are never any brush strokes, we don’t have to sand between coats and it looks professional every time.
Thank you for stopping by. If you found this information helpful, would you please pin it to Pinterest? Other DIYers would appreciate it and I would too! Thank you – Scott
Recommended For You

Pin This For Later

Hi there – I’m Scott, a woodworking enthusiast and creator of Saws on Skates, a site I started in 2015 to share easy-to-follow tutorials, space-saving shop tips, and project inspiration for DIYers at any skill level. Learn more about my woodworking journey here.
Two questions, can you use this finish on outdoor projects and can this finish be sprayed. Thanks Firmin’s Woodworking
Hi Adley – Thank you for stopping by. I wouldn’t recommend using this finish on outdoor projects. I also wouldn’t recommend spraying it. One of the reasons I love this finish so much is because it’s so easy to apply. Just wipe it on and wipe it right off.
I am finishing my son’s bunk beds, ladder, and desk. Would you recommend this finish or use a poly. The ladder and desk will be used daily to get in and out the bed and homework, respectively.
Thank you for stopping by. You’ll need a really durable finish for your bunk bed project, so I would go with poly instead of Bob’s Miracle Finish.
Would it work to swap out the varnish for a flooring urethane to increase durability?
Hi Michael – I haven’t tried swapping the varnish for flooring urethane. Please let me know how it goes if you give it a shot. I’d be interested in hearing how it turns out.
Thanks for the recipe, will definitely try it out.
What do you suggest for a new finish for a piece of fine furniture, specifically a Gibbards mahogany table? The color is good, just needs a new stain top coat.
Hi Sean – Thank you for stopping by. I usually design budget-friendly, but quality built DIY furniture. I’m not sure if I’m qualified to comment on the proper top coat for fine or heirloom furniture.
Thank Scott for the humility, I will definitely try out the finish on my more modest personal projects. Happy New Year!
i recently started using Kramer’s Antique Restorer, which sounds similar to this. Love it.
My question to you, though, is over the 3 years since you first wrote this post, has anything yellowed? I stay away from oils and -urathane products, since they do yellow over time. With your recipe including lindseed oil, I was hesitant.
Love the note on a satin finish. I love that waxed, rubbed finish look!
Thanks for your info!
Hi Christine – Thank you for stopping by. I’ve been using this finish for years and it has never yellowed. It soaks into the wood rather than sitting on top of the surface like a thick coating, so I think that helps to prevent yellowing.
Good to know! Thanks. 🙂
A follow up question. I have 2 mahogany front doors that had been stained dark, have now been stripped. One is a great, grayed brown. I love it. On the other, I sadly used Cabot’s Australian Timber Oil on it before I knew any better. Another (whine) story. On the one that’s grayed, if I were to use Bob’s Miracle finish, then coat it with pure Spar Urethane, it should protect it outside. I’m thinking, anyway. j Given the -urethane part of it, as an unadulterated product, do you believe it would yellow? I’ve no experience with spar varnish.
Then… how to tone down the God-awful, golden oak color of my other mahogany door. What a mess! But that’s another post. 🙂
Thanks for your time,
Christine
Hi Scott, You indicated you use Helmsman Spar Urethane which is a perfect product for use on both inside and outside projects. Actually it is one of the best to use on outside projects. My question is why you are concerned Bob’s recipe would not work for outside projects? What exactly are your concerns? Have you had issues with it on projects? Or is this something that should be tried?
Hi Jim – Thank you for stopping by. You’re right. On its own, spar urethane is a great top coat for exterior projects. But in this case, it’s diluted by two other products, and the mixture penetrates into the wood rather than sitting on top of the surface like Spar Urethane.
I’ve used “Bob’s Miracle Finish” for years. The thing I’ve noticed is when comparing Spar Urethane to Bob’s is, Spar Urethane is much more durable.
In other words, wood top coated with Bob’s can be easily damaged. So just like I recommend not using Bob’s indoors if your project requires durability, I would recommend not using Bob’s outside because of durability issues.
I have not tried your finish recommendation yet, but thought before I try it I might post a question in case you have the answer immediately or someone else might have proof for me. I don’t use stain on my wood projects, but instead use Danish Oil. I mix my own colors to get the finish look I want and work primarily in pecan, walnut, oak and some mesquite (occasionally some 100 year old long leaf pine). I hand rub the Danish oil and sand between coats and then use a coat of Tung Oil rubbed til almost completely dry….lots of labor, but it sets up perfectly and then I can coat using whatever I like. I typically use a water based finish from General Finishes.
So, the question is, “how do you think this Miracle Finish will work using my method of prep before the application of Bob’s MF?”
Hi CJ – Thank you for stopping by. I’ll start first by saying that I think you have much more experience with finishes than I do. Danish oil, tung oil and Bob’s are all penetrating oil finishes so *I think* it should work similarly. My recommendation would be to continue doing what works for you. If you think you want to give this a try, I would definitely try it on some test pieces before using on your finished pieces.
If, after using Bob’s , I want something more durable can I use a poly over it?
Hi Roger – Thank you for stopping by. Yes, you could apply poly. But in many cases, you would use one or the other, but not both. One scenario might be if you had a dark wood like walnut. Bob’s would bring out the natural color, and beauty of the wood and the poly would protect it. But if you’re working with a stained piece of pine, and you needed the protection it might be best to skip Bob’s and go right to the poly. And it’s important to make sure Bob’s is completely dry before applying any poly.
How does this finish hold up to UV please?
Hi Simone – Thank you for stopping by. I don’t know the exact answer to your question, but my guess would be the UV protection would be minimal at best.
Hi Scott,
I have been reading over all your posts and comments. Thanks for sharing all the information. I purchased 12′ pine carsiding to put up on the ceiling. Never having worked much with pine did not realize all the yellow and orange undertone that would come out. I was hoping to achieve a light rich brown color. This is still a work in progress. Since this is going on the ceiling would you agree this should not have an issue with durability> I saw you mentioned no yellowing but this will be in a room with lots of sunlight. Have you ever noticed the fading because of extra light. Thanks.
Hi Michelle – Thank you for stopping by. I agree with you that there shouldn’t be an issue with durability as this will be on the ceiling. I don’t think Bob’s will offer much in the way of UV protection. That said, I haven’t noticed any fading on my stained pine projects that have been top coated with Bob’s.