How to Make DIY Collage Picture Frames
Collage picture frames are a unique way to display artwork or family photos. This DIY version is easy to make using wood, a miter saw, and a router table.
Collage picture frames are made specifically for displaying multiple pictures. They’re a great way to showcase memories of family, friends and even pets! Make these DIY frames for yourself or give them as gifts.
Thank you to my friends at Kreg Tool for sponsoring this post!
This post contains affiliate links to supplies or tools I used to complete this project. Purchases made using these links help support the Saws on Skates website and allow me to share more DIY projects. and DIY tips with you. There is no cost to you for using these links. Click here to visit my site policies.
Collage Picture Frame Inspiration
These DIY collage picture frames were inspired by a Target photo frame. I’ve had the frame forever, but I’ve never actually used it. I’m not sure why I’ve never used the frame. I think it was just a little too modern for my taste.
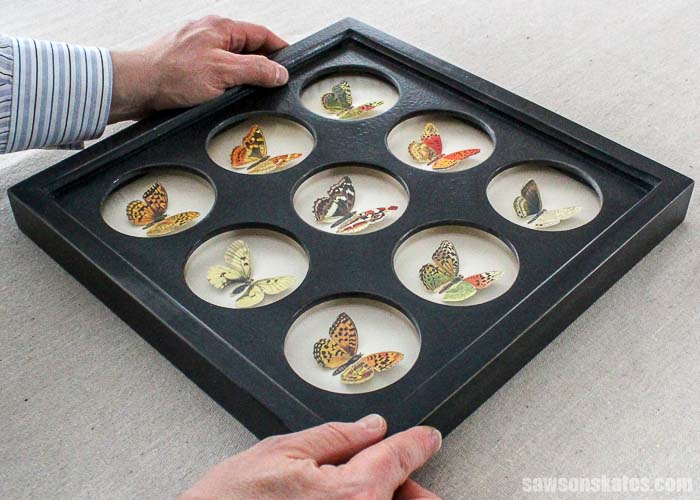
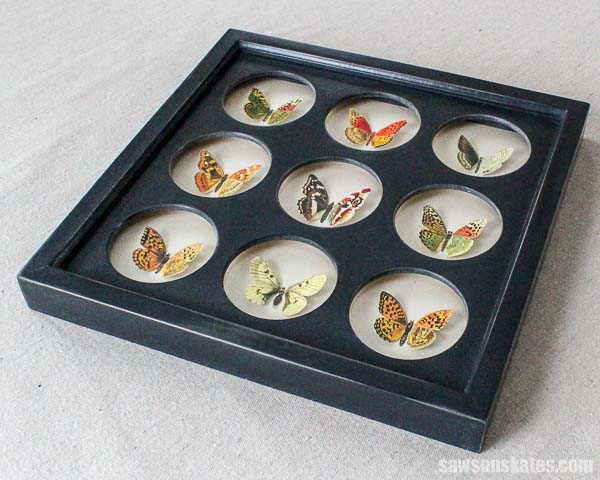
I liked the “bones” of the Target frame, so I used it as inspiration to make my own DIY picture frame. My idea was to give it a more traditional style using picture frame moulding. Here’s what I came up with. An easy to make frame with nine spaces for photos finished with chalk-type paint and lightly distressed.
What Should I Build Next?
That's the question I help answer.
Every week, I send woodworking ideas to 17,000 DIYers who love building things.
You'd fit right in.
Make Your Own Picture Frame Moulding with a Router
Making your own DIY collage picture frames may seem a little intimidating, but it’s actually pretty simple. I used my Kreg Precision Router Lift to make my own decorative picture frame moulding for these frames.

What’s a Router Lift?
Think of a router lift as an elevator for our routers. A router mounts to the router lift and the lift attaches to the router table top.
The difference between a router lift and a standard fixed router table plate is a router lift has the ability to easily move the router up and down.
A crank inserts into the micro-adjustment dial on the router lift and the crank can be turned right or left to raise or lower the router. The micro-adjustment dial makes it so easy to set the router bit exactly where we want it.
Skate over to A Router Lift is the No-Nonsense Way to Set Up a Router Table to see even more benefits of using a router lift.
Router Bit Depth Adjustments are Precise with a Router Lift
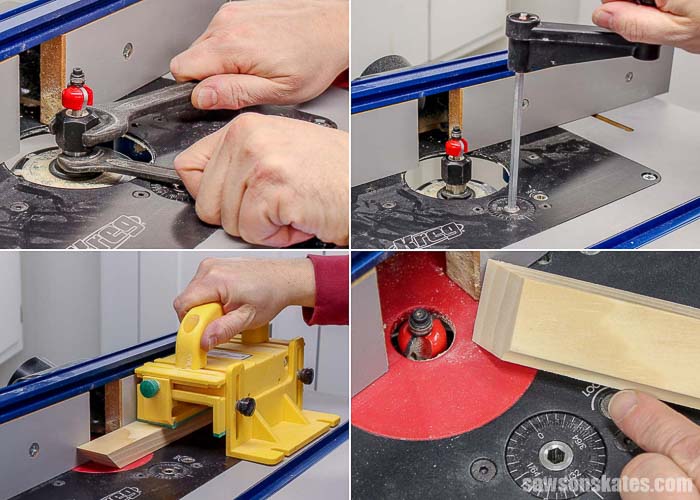
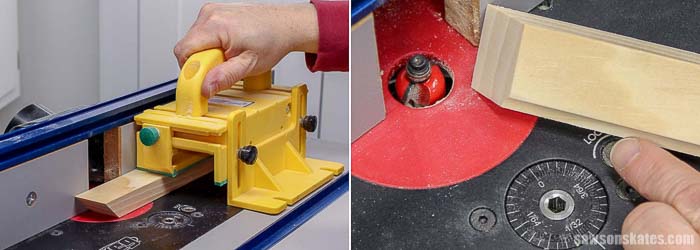
The Kreg Precision Router Lift and the Kreg Bench Top Router Table easily allows us to make the picture frame moulding for these DIY collage picture frames. First, I installed a cove bit in my router and used the micro-adjustment dial on the router lift to set the depth of the bit.
The micro-adjustment dial makes it so simple to precisely set the router bit depth. Each full turn of the crank changes the depth of the bit 1/16″. That means turning the crank a half of a turn or a quarter of a turn adjusts the depth of the bit a 1/32” or a 1/64”. Now that’s precision!
I routed a simple cove detail on the edge of the wood when the bit was adjusted exactly where I wanted it.
Router Bit Installation is Simple with a Router Lift
Next, I needed to install a straight cutting bit to make a groove to accept the plywood “mat”. Changing router bits with a fixed router table plate can be a real knuckle buster. That’s because the router “lives” below the router table top. This means changing the router bits must be done from the underside.
Two wrenches are needed to change a bit on my router. One wrench holds the router shaft and one loosens the collet. Turning those wrenches in opposite directions in a confined space beneath the router table top usually means a busted knuckle.
Changing bits with the Kreg Precision Router Lift is a breeze. We can use the crank to unlock the lift, insert the crank in the micro-adjustment dial and raise the router. Now the router bit can be changed easily above the router table. No more busted knuckles!
I used the Kreg Precision Router Lift to set the height of the straight cutting bit to a ¼”. Then I routed a groove for the plywood “mat”. That’s it. We just made our own picture frame moulding!
Customize Your Frame
We can easily customize the look of these DIY collage picture frames by using different router bits. The cove detail was routed on the inside edge of the frame, but we could also rout a roundover detail on the outside edge of the frame. Or we could swap out the cove bit for a Roman Ogee bit.
What if we don’t have a certain router bit? Well, it’s a great excuse to add to our router bit collection!
Artwork or Photos
Another way to customize these frames is what we choose to frame. We could frame pictures of family, friends or pets.
Or we could do something a little different. These DIY collage picture frames reminded me of specimen displays. So, I searched and found this amazing butterfly printable from Katja at A Home for Design.

I followed Katja’s tutorial to prepare the butterflies and used a glue stick to mount them on a piece of cardstock that I cut to fit the frame. I think they’re absolutely perfect for this DIY collage picture frame!
Skate over to A Home for Design to get your free butterfly printable!
How Do You Make Your Own Picture Frames?
- Use a router to make your own picture frame moulding
- Assemble the moulding to make a frame using wood glue and pin nails
- Sand the wood smooth using 120 grit sandpaper
- Finish the frame with paint, stain or leave natural
- Install the glass and add your artwork
- Hang the frame on the wall and enjoy
DIY Collage Picture Frame Plan
Supplies
1×2 – about 5’
¼” plywood – about 12” x 12”
Wood glue
1” pin nails
Painter’s tape
Glass or plexiglass
Cardboard
Push pins
Tools
Miter saw
Kreg Bench Top Router Table
Kreg Precision Router Lift
Table saw or circular saw
Router
Kreg Multi-Mark
Cove bit
¼” straight bit
Drill or drill press
3” Hole Saw
Pin nailer
Optional Items Needed to Display the Butterflies
¼” plywood – about 2” x 12”
Staple gun
⅜” staples
12″ x 12″ cardstock
Glue stick
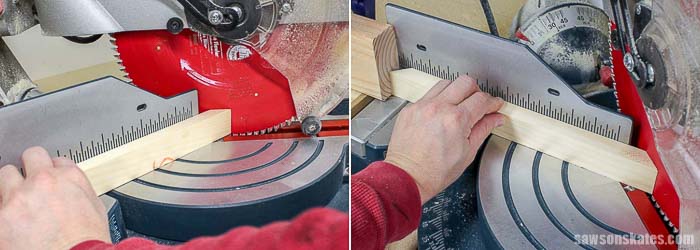
Step 1. Cut the Picture Frame Moulding. Cut a 45-degree angle on the end of a 1×2. Do not move the saw. Leave the saw in this position for the next cut. I’ve found that I get tight miter joints if I leave the saw in the same position rather than moving the saw to the other 45-degree mark.
Instead of moving the saw, flip the 1×2, measure 12-¾” from the long end of the miter and make a mark.
With the saw in the same position, set up a stop and make a 45-degree cut. Repeat for the remaining 3 pieces.
Step 2. Rout the Cove. I installed a cove bit in the router and used my Kreg Precision Router Lift to adjust the depth of the bit. There isn’t a measurement for this step. I just positioned the bit to where it cut a cove that was pleasing to my eye.
Step 3. Rout the Groove. Next, I made a groove to accept the plywood “mat”. I wanted the mat to sit about an ⅛” below the bottom of the cove. I set my Kreg Multi-Mark so it was about an ⅛” below the bottom of the cove and made a mark.
I wanted the groove to be a ¼” deep, so I set my multi-mark to ¼” and used my Kreg Precision Router Lift to adjust the bit exactly where I wanted it.
Then I used the pencil mark as a guide to adjust the fence and routed the grooves.

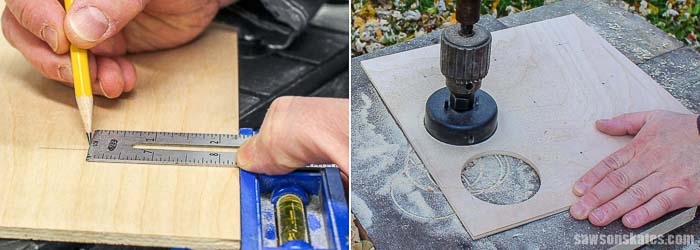
Step 4. Make the Plywood Mat. I used my table saw to cut an 11-¾” x 11-¾” piece of ¼” plywood. This can also be done with a circular saw. Next, I used this diagram to layout the locations of the circles.

I used my Kreg Multi-Mark to mark the locations of the circles and used an awl to mark the center of each circle. Then I used a drill press with a 3” hole saw to cut out the circles. This can also be done with a drill.
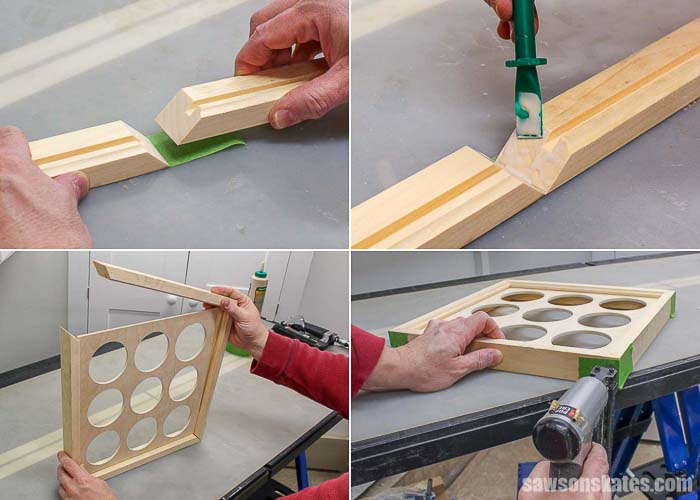
Step 5. Assemble the Frames. I used painter’s tape to temporarily connect the joints between the picture frame moulding. I applied glue to the joints and attached using 1” pin nails. I left the painter’s tape in place until the glue was completely dry.
Step 6. Sand and Paint. I sanded the frame and sprayed one coat of chalk-type paint. When the chalk paint was dry I rubbed the edges with a wet rag to lightly distress the frame. I protected the frame with a coat of furniture wax.
Step 7. Add the Glass. I had a piece of glass cut to 11-3/16” x 11-3/16”. Be sure to check the opening of your frame and adjust this measurement if necessary.
To mount pictures: I cut a piece of cardboard to 11-3/16” x 11-3/16”. The cardboard acts as a “backer” and helps to keep the photos in place. The cardboard is held in place with push pins. The push pins are pushed into the sides of the frame.
To mount the butterflies: First I cut a piece of cardstock to fit the frame (11-3/16” x 11-3/16”). Then, I followed the A Home for Design tutorial to prepare the butterflies.
Next, I temporarily placed the cardstock in the frame, placed the glass on top of the cardstock and held in place with a few push pins. I used a glue stick to mount the butterflies in the center of each opening. I removed the glass and cardstock when all of the butterflies were glued in place.
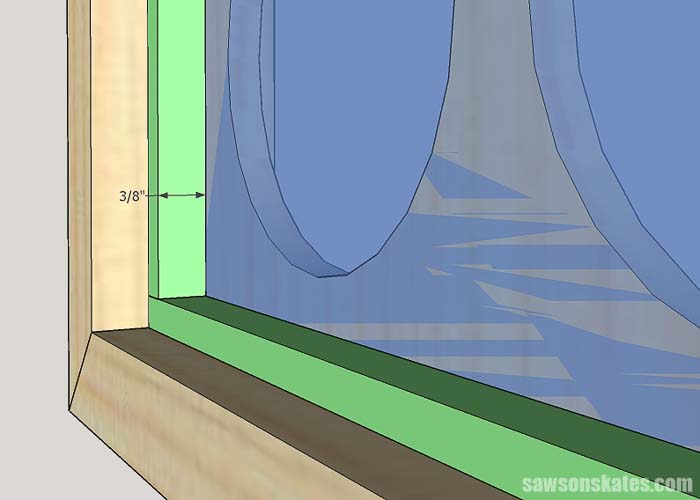
We’ll need to add some cleats to the side of the frame to allow space for the wings of the butterflies to expand.
To make the cleats I ripped ¼” plywood into ⅜” strips about 12” long. Using a miter saw I cut the strips to fit the sides of the frame. First, I placed the glass in the frame. Then, I applied glue to the ⅜” side of the cleats. The cleats were placed flush against the glass and glued to the sides of the frame. I finished by painting the cleats to match the frame.
Then I placed the cardstock (with butterflies attached) on top of the cleats and placed a piece of 11-3/16” x 11-3/16” cardboard on top of the cardstock. I attach the corners of the cardboard to the cleats with ⅜” staples.
Step 8. Hanging the Frame. These picture frames are deep so they will easily hang on a nail without using picture frame hangers.
Final Thoughts
Collage picture frames are a unique way to display artwork or memories of family, friends and even pets! This DIY version is easy to make using wood, a miter saw, and a router table. Keep them for yourself or give them as gifts.
Thank you for stopping by. If you found this information helpful, would you please pin it to Pinterest? Other DIYers would appreciate it and I would too! Thank you – Scott
Recommended For You
Pin This For Later

Hi there – I’m Scott, a woodworking enthusiast and creator of Saws on Skates, a site I started in 2015 to share easy-to-follow tutorials, space-saving shop tips, and project inspiration for DIYers at any skill level. Learn more about my woodworking journey here.
A great project. Thank you for this project that I will use.
Hi Raymond – I’m glad you like this project!
I love that you share all of your stuff with us. Being an amateur beginning woodworker A age 76 I can use all that you have to offer. Thank you.
Thank you for the compliments – I appreciate it!