DIY Halloween Stacked Pumpkin Trio
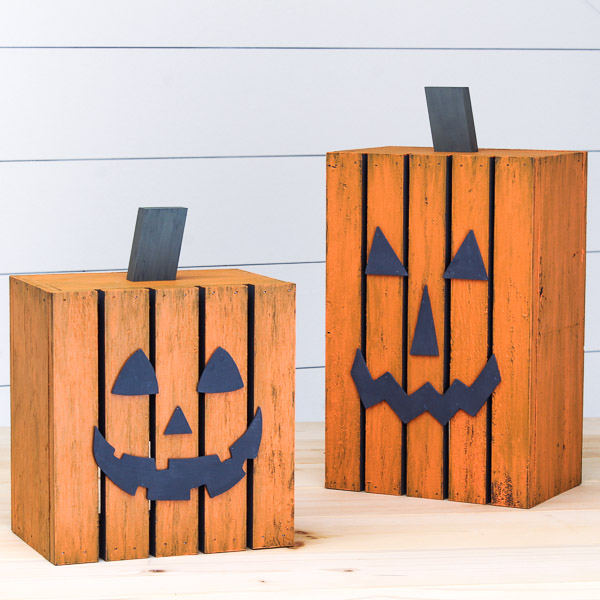
Looking for an easy Halloween woodworking project that makes a big impact? This stacked pumpkin trio is a fun decoration you can light up with an LED tea light or fairy lights.

What Should I Build Next?
That's the question I help answer.
Every week, I send woodworking ideas to 17,000 DIYers who love building things.
You'd fit right in.
If you’re like me, you probably have way more project ideas than you’ll ever have time to build. Case in point: I had this fun idea for a trio of stacked jack-o’-lanterns. I even had the perfect name picked out — “Stacked Jacks”! The only problem is, I’m not going to have a chance to build them this season. But the idea felt too good not to share.
So I’m trying something different. I used AI to create a “finished” photo to help you see what the project could look like once built. Think of it as a preview of the design — a way to spark your imagination.
Unlike my step-by-step tutorials, this project is all about the template. You’ll get a printable pattern and some simple guidance so you can make your own version however you like. The finished Stacked Jacks measure about 9″ high (plus the thickness of your base) — the perfect size for a porch, mantel, or tablescape.
How to Make a Stacked Pumpkin Trio
Printed Plan
Get the PDF plan here (includes detailed instructions, measurements, and bonus tips)
Materials
- Wood (per the printed plan)
- Wood Glue
- Brad Nails
- Sandpaper
- Craft Paints
- Battery-Operated Tea Light or Fairy Lights
Tools
- Scroll Saw
- Drill and Drill Bits
- Brad Nailer or Hammer
Step 1: Print and Prepare the Template
- Download and print the template (make sure the scale is set to 100% – usually found under “more settings”).
- Trace it onto your board.
TIP: You can use carbon paper to transfer the pattern, but I like to spray-mount the template to a manila folder. The folder’s edge creates a little lip that makes tracing easier and more accurate.
Step 2: Cut Out the Design
- Drill small starter holes inside each pumpkin’s face (eyes and mouth) so you can thread the blade through.
- Carefully cut along the lines.
- Use sandpaper to smooth the saw marks.
- For stability, cut a board to use as the base. Apply glue to the bottom of the pumpkin trio, set it on the base, and tack it in place with a few brad nails.
Step 3: Add Paint or Stain
- Paint pumpkins in traditional Halloween colors, or muted tones for a farmhouse look.
- Distress the edges for a rustic vibe.
Step 4: Light It Up
- Place a battery-operated tea light or fairy lights behind the pumpkins for a cozy glow.
TIP: Since this project is made of wood, only use flameless LED candles. Never use real candles. They’re a fire hazard!

Includes:
- Printable template
Final Thoughts
That’s it! A simple Halloween project you can make with some scrap wood and a scroll saw.
Recommended For You

Pin This For Later

Hi there – I’m Scott, a woodworking enthusiast and creator of Saws on Skates, a site I started in 2015 to share easy-to-follow tutorials, space-saving shop tips, and project inspiration for DIYers at any skill level. Learn more about my woodworking journey here.