DIY Ladder Storage Hooks (Easy, Cheap & Sturdy)
Get organized and save space with these easy DIY ladder storage hooks made from just a few pieces of 2×4! Simple, inexpensive, and practical.
What Should I Build Next?
That's the question I help answer.
Every week, I send woodworking ideas to 17,000 DIYers who love building things.
You'd fit right in.
Are you tired of your ladders taking up too much space or always falling over? Searching for a simple, affordable way to organize them while also having them easily accessible?
Then these DIY ladder storage hooks are the solution you’re looking for! Using only a few pieces of 2×4 and some basic tools, you can quickly build your own sturdy storage solution in no time.
Table of Contents
- Inspiration for These DIY Ladder Storage Hooks
- What Tools Do You Need?
- What Wood Should You Use?
- How to Make a DIY Ladder Storage Hooks
- Get the Free Plan
This article contains affiliate links. If you purchase from these links, I may earn a small commission at no additional cost to you. Visit my site policies for more information.
Inspiration for These DIY Ladder Storage Hooks
I’ve been on a mission to organize my garage, and one area that desperately needed help was my step ladders. For as long as I can remember, I had them propped in front of a storage cabinet.
Not only did they take up valuable space, but it was frustrating to move them every time I needed something from the cabinet.
I wanted a simple, inexpensive way to store them so they would be easily accessible but not always in the way.
That’s when it hit me. I should hang my ladders on the wall!
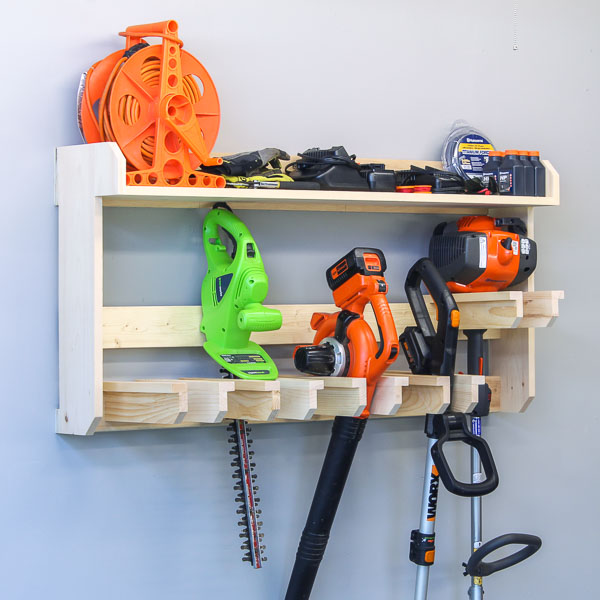
Here’s what I came up with: budget-friendly DIY ladder storage hooks made with a few scrap 2×4s. They’re sturdy enough to hold two ladders but don’t take up too much space in my garage.
What Tools Do You Need?
I made these DIY ladder storage hooks with only three tools! Here’s what I used:
Miter Saw
I used my miter saw to cut the holder’s parts to length.
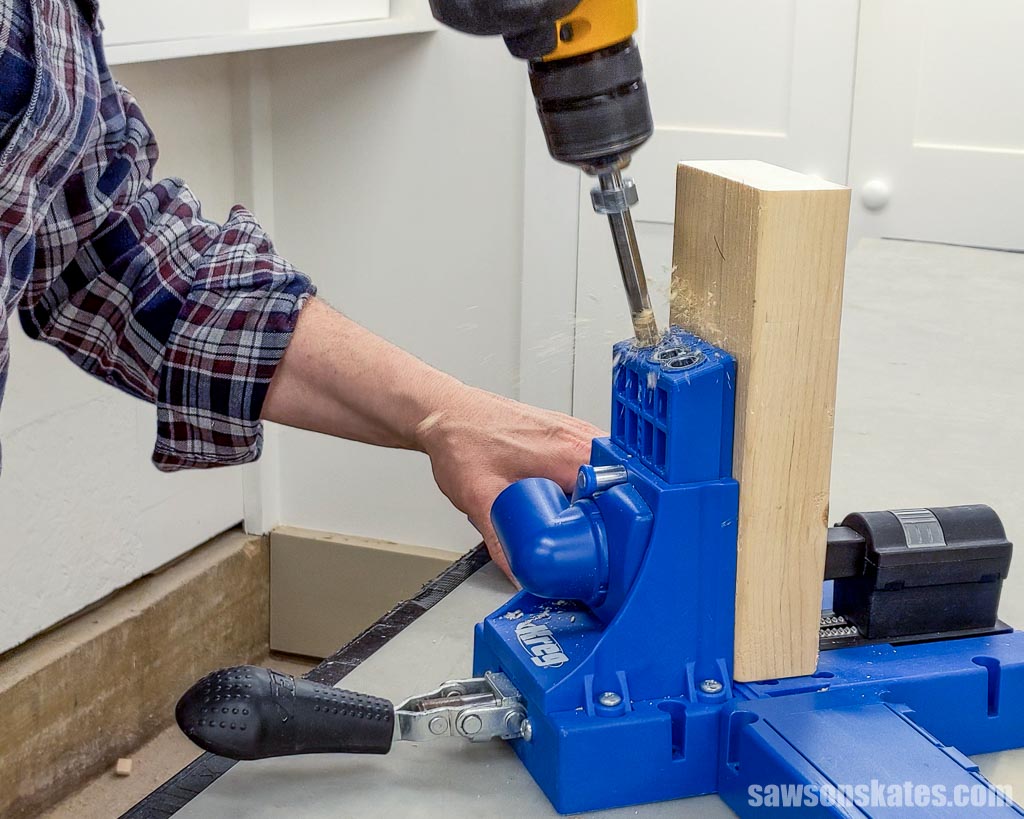
Pocket Hole Jig
I used a pocket hole jig to connect the holder’s parts.
Drill
I used my drill to make the pocket holes, drive the screws to join the parts, and make pilot holes to attach the hooks to the wall.
What Wood Should You Use?
I used scrap pieces of pine 2×4s to build my ladder hooks. You can buy a 2×4 at the home improvement store, but this project doesn’t require much wood. So you might have enough to make it if you have pieces of 2×4 leftover from another project.
DIY Ladder Storage Hooks
Printed Plan
Get the FREE plan here (includes detailed instructions, measurements, and bonus tips)
Supplies
- Wood (per the printed plan)
- Polyurethane Glue (I used Gorilla Glue)
- 2-½” Pocket Screws
- (2) 3-½” Lag Screws (¼” diameter – I used these to attach the hooks to the wall)
- (2) ⁵/₁₆” Washers (I used these with the lag screws)
Tools
- Tape Measure
- Miter Saw
- Kreg Multi-Mark
- Pocket Hole Jig
- Drill
- ⁵/₃₂” Drill Bit
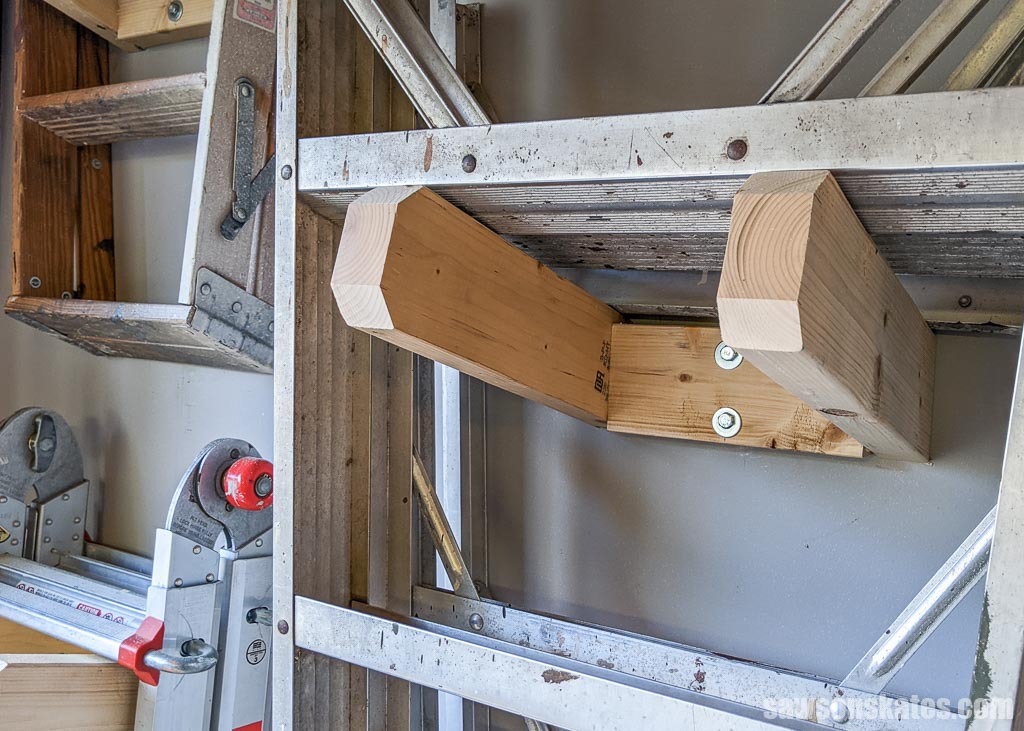
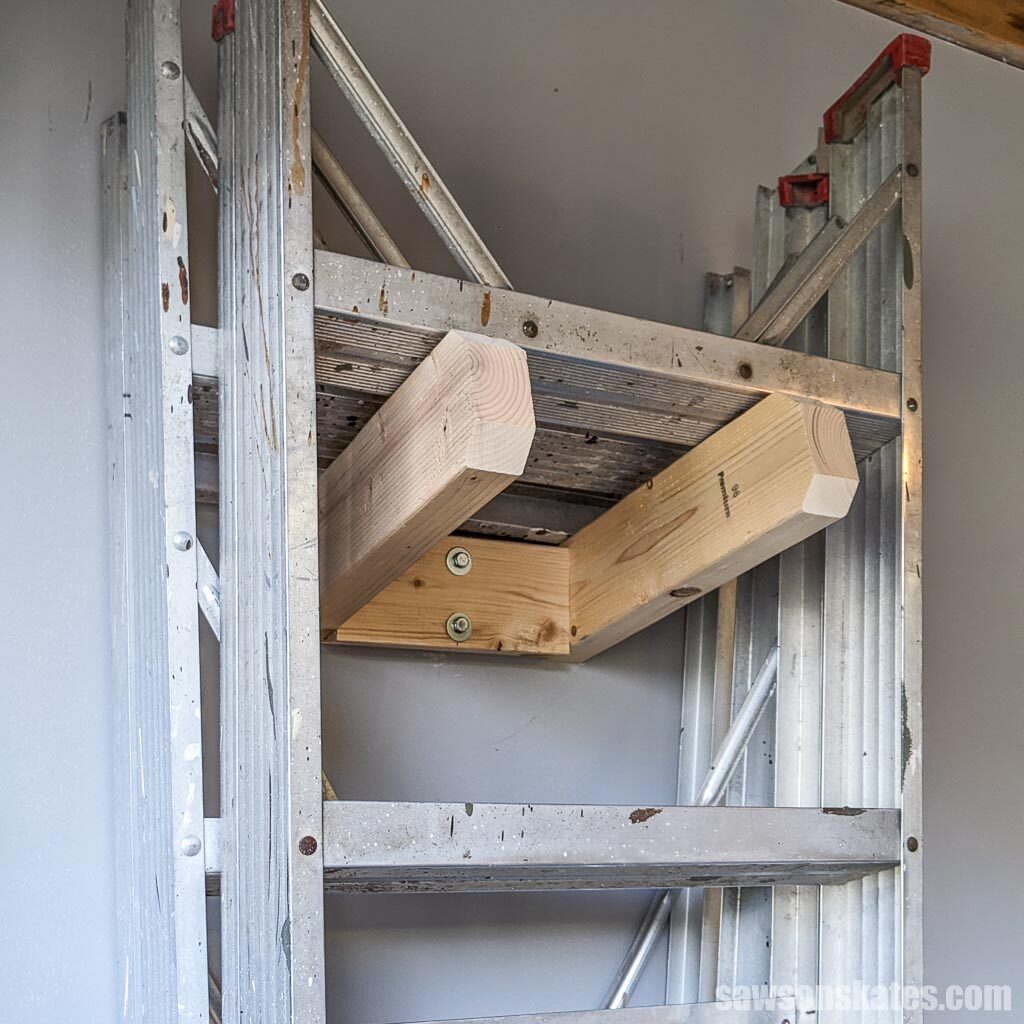
Step 1. Make the Stretcher
Cut one piece of wood to length for the stretcher.
Set your pocket hole jig for 1-1/2″ material and drill pocket holes in each end.
Related: How to Use a Pocket Hole Jig (& Beginner Pitfalls to Avoid)
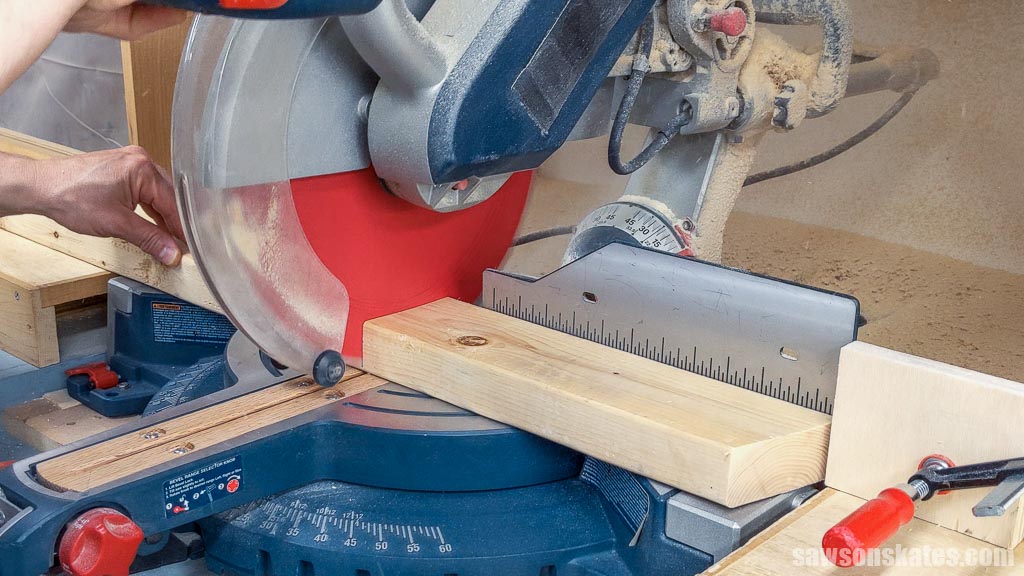
Step 2. Make the Arms
Cut two pieces of wood to length with an angle on one end.
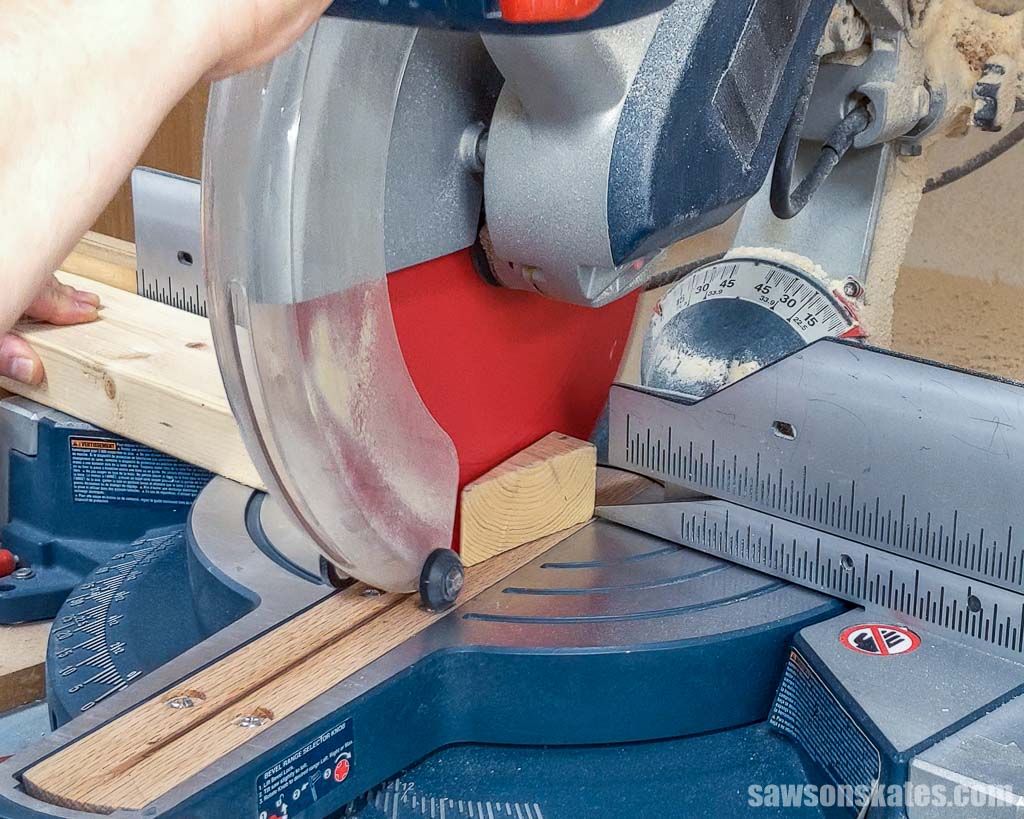
Then I measured from the long end of the angle and cut it to length.
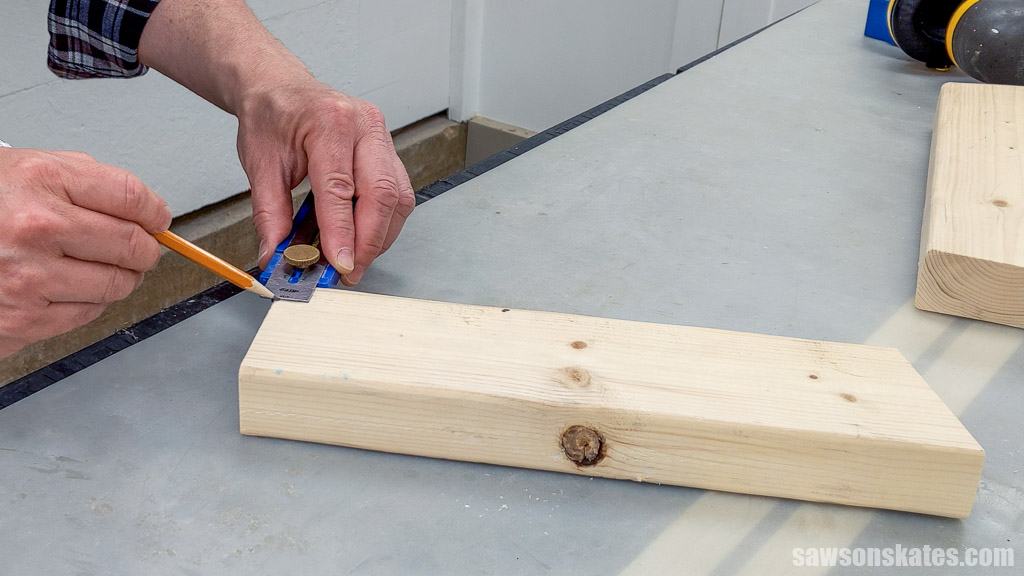
Use the diagram in the printed plan to mark the angle cuts on the ends of each arm.
I marked the locations using my Kreg Multi-Mark.
I set my miter saw and cut one side.
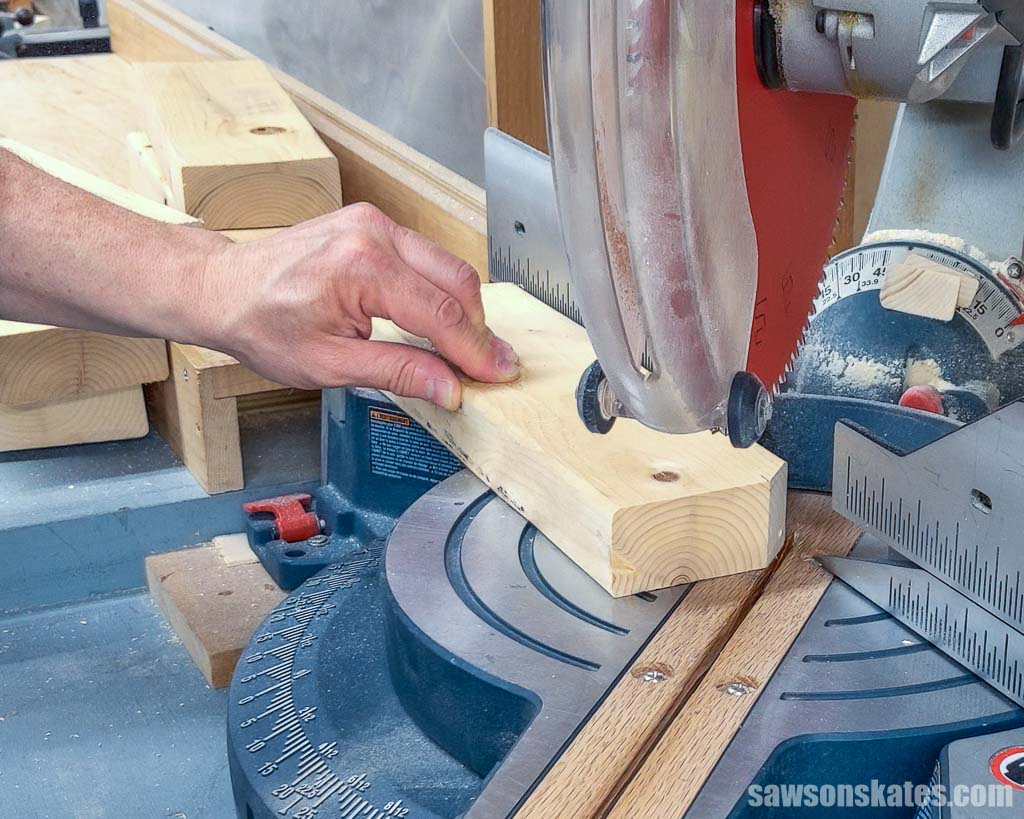
Then flipped the board and cut the other side.

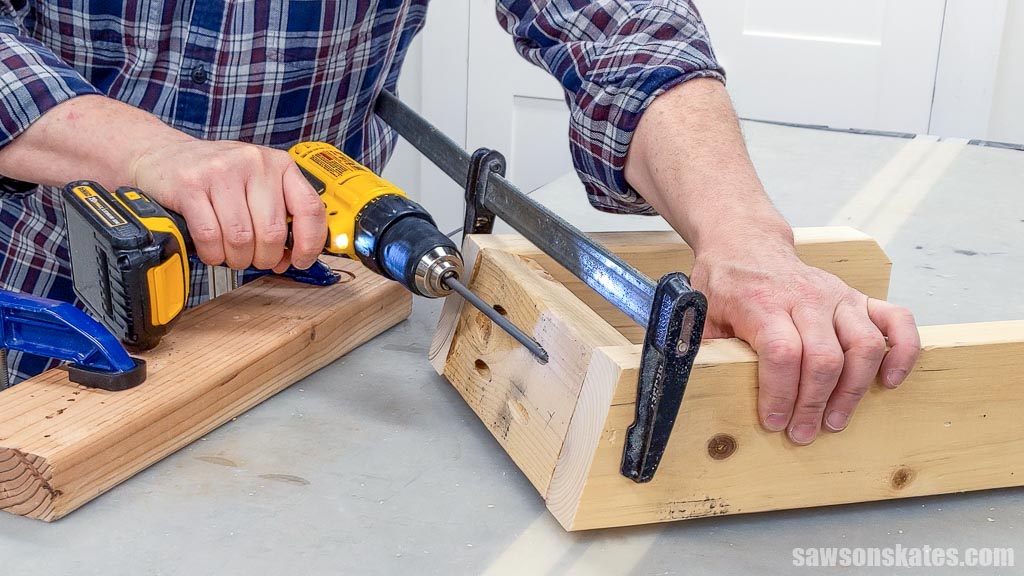
Step 3. Assemble the Ladder Storage Hooks
To begin, I clamped a scrap piece of wood to my workbench, which I used to help align the bottom edge of the storage hooks.
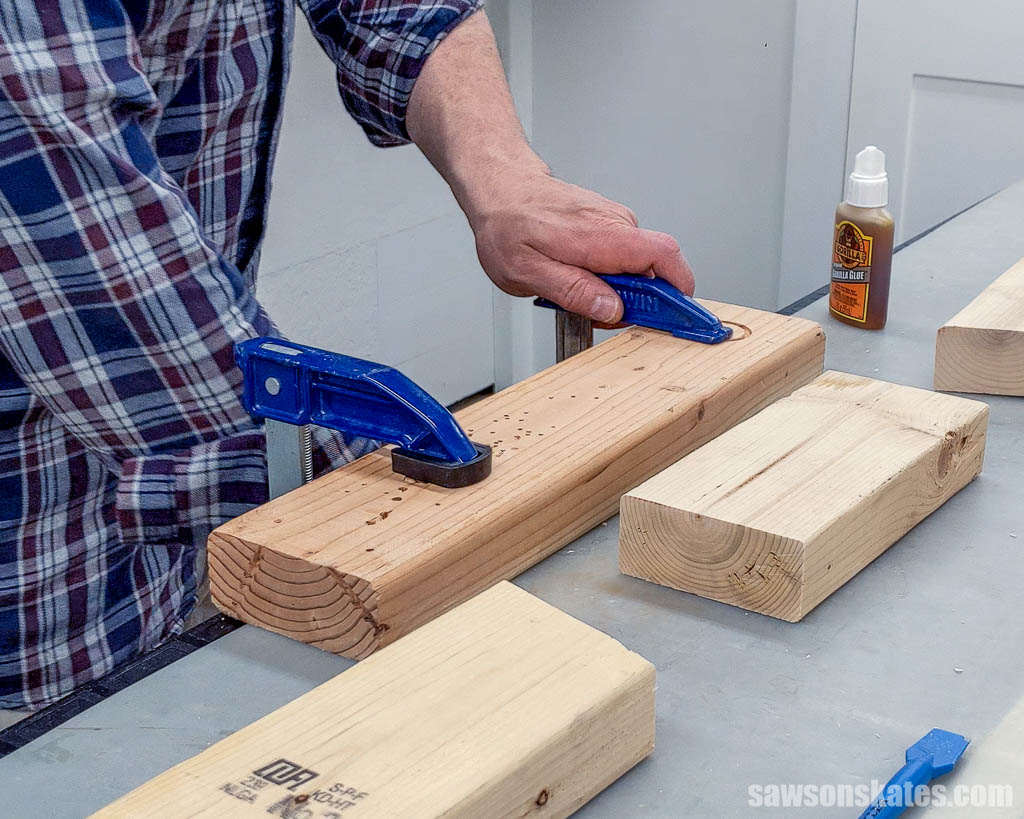
I choose to assemble my hooks with polyurethane glue. Wood glue is great for most woodworking projects but can be tricky to use on end grain. End grain is the area of the board where the pores are exposed, and these pores absorb the glue, making it difficult to create a strong bond.
Related: What is Polyurethane Glue? (Pros, Cons & Uses)
Polyurethane glue is a better option for end grain because it expands as it dries, filling the pores and creating a strong bond between the two pieces of wood. I’m hanging my ladders only a foot or two away from my car, so I definitely want a sturdy connection!
Polyurethane glue requires moisture to cure, so I misted each end of the stretcher with water.
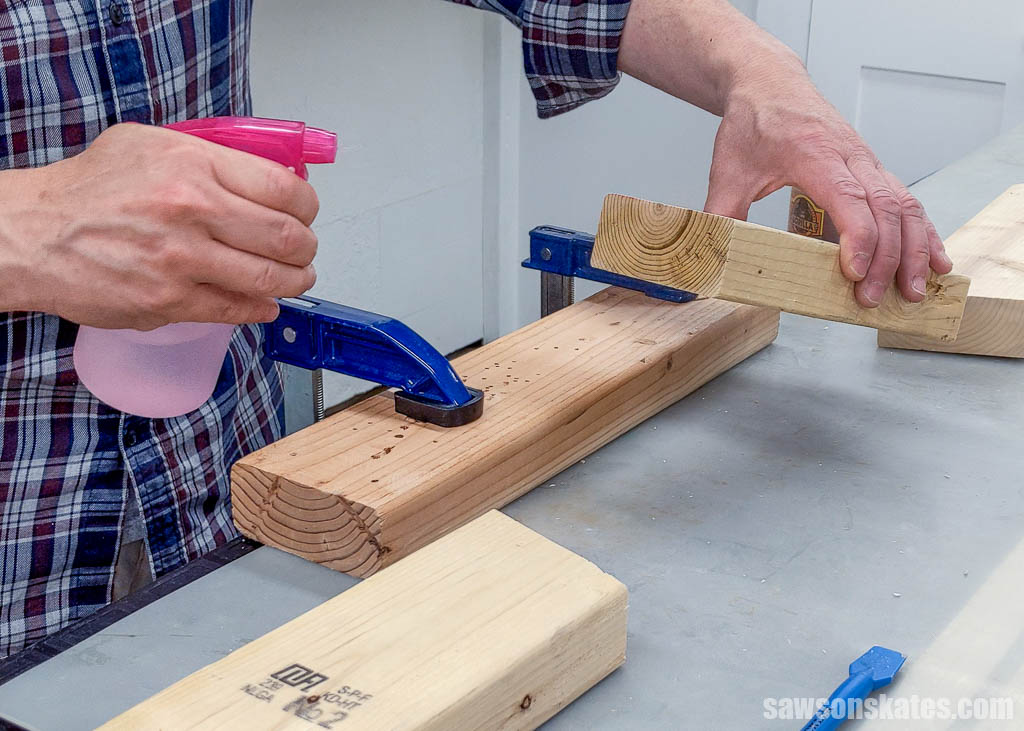
I applied the glue and used a spreader to coat the surface.

Unlike PVA wood glues, polyurethane glue can be difficult to remove from your hands, so you may want to wear disposable gloves.
Related: What is PVA Glue?
I positioned the bottom edge of the stretcher and arms against the scrap wood and clamped them.
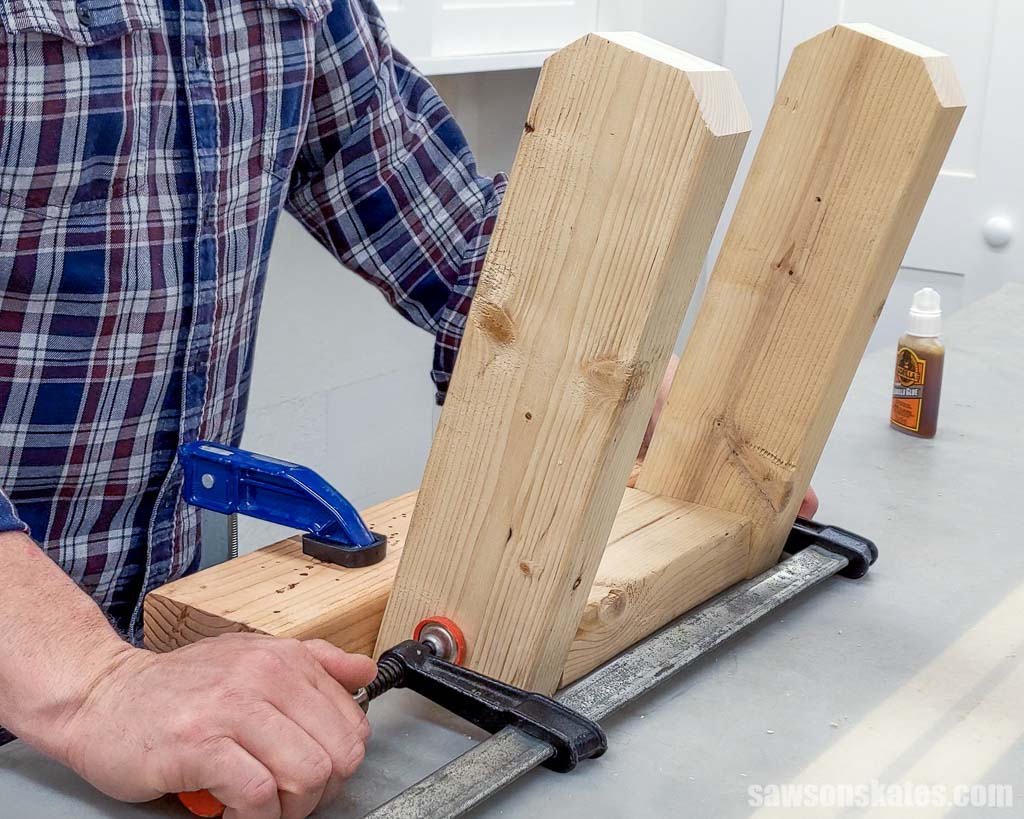
Attach using pocket hole screws.
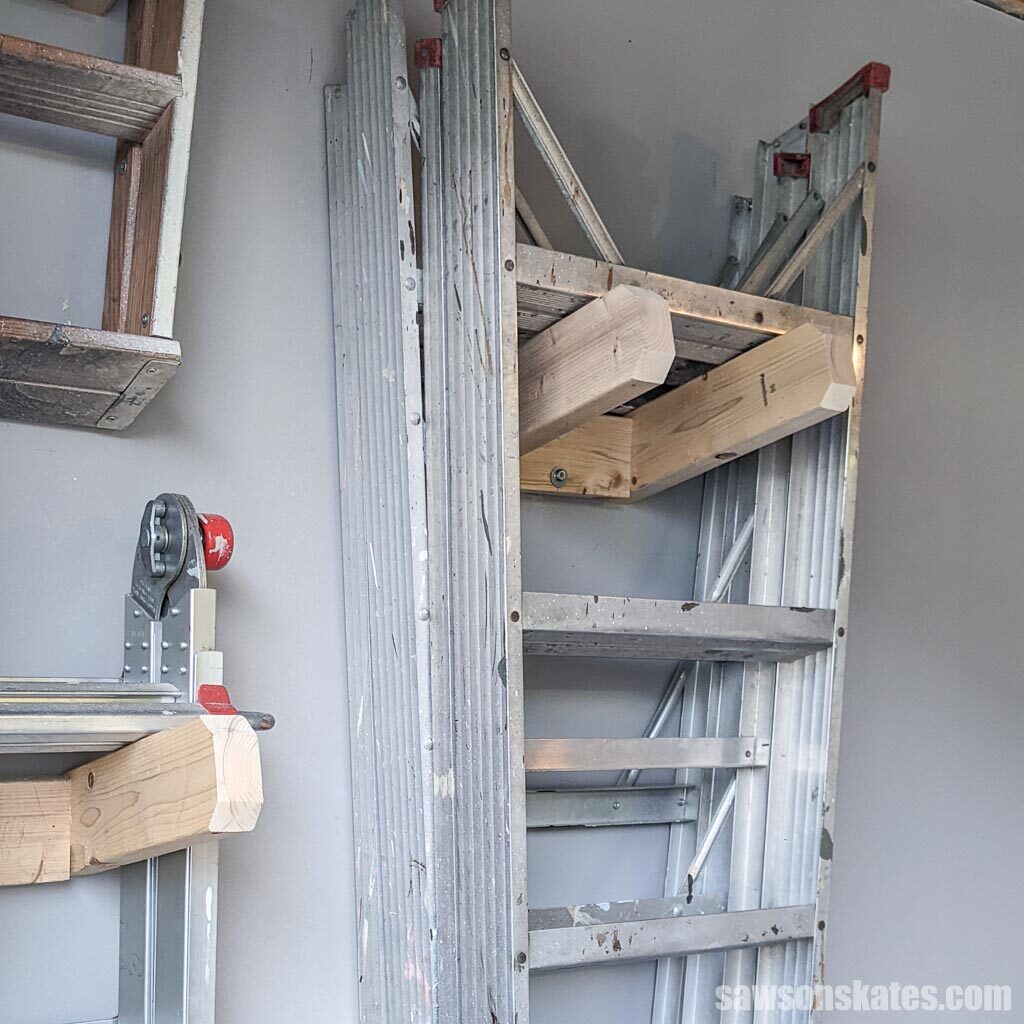
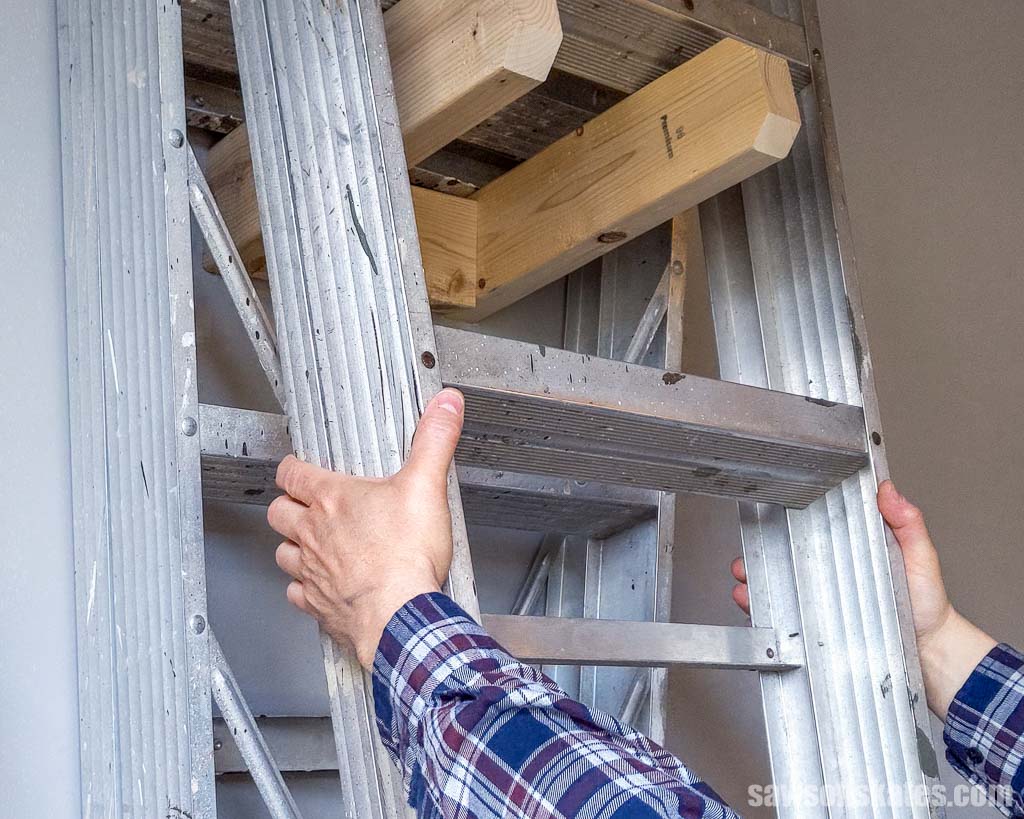
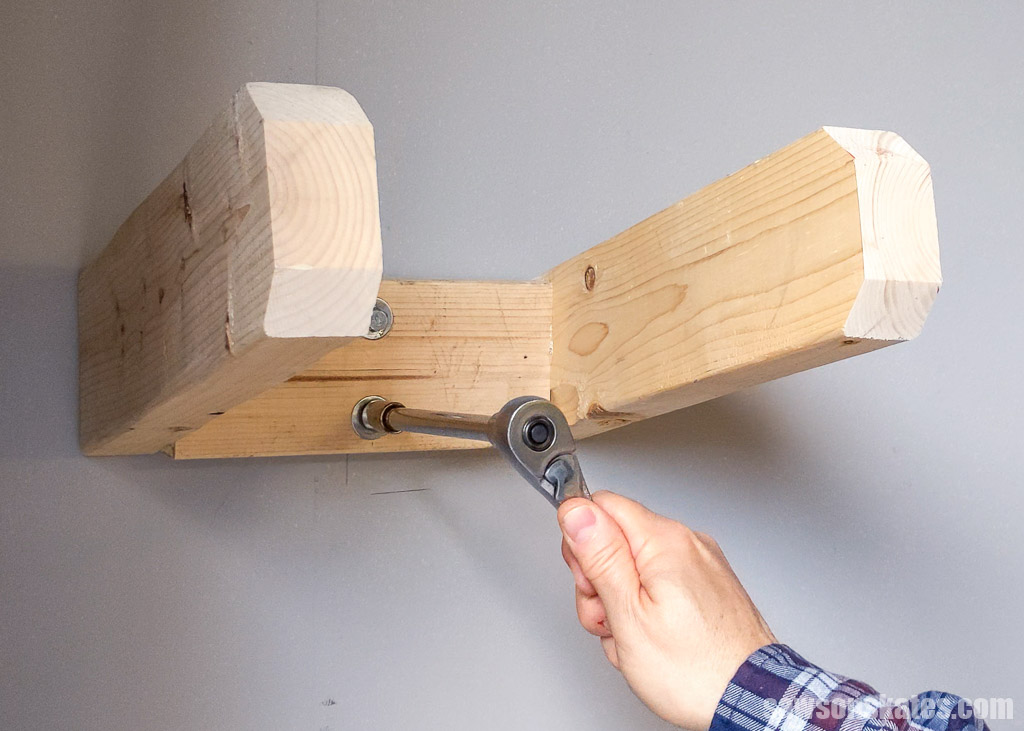
Step 4. Attach the Hooks to the Wall
I attached my hooks to the wall using lag screws, which might seem over the top, but again I’m storing the ladders next to my car, so I wanted them to be extra secure!
Use the diagram in the printed plan to mark the location for pilot holes.
Use an awl to make a starting point for the drill bit.
Related: What is an Awl? (+ How to Use It)
Then use a drill bit to make a pilot hole at each location.
Related: How to Drill Pilot Holes (Why, When & Correct Size)
I recently replaced the drywall where I installed my hooks, so I knew where the studs were. Studs are the vertical framing used to support the wall’s structure. If you’re unsure where your studs are, you’ll need to use a stud finder to locate them.
Using a level, I positioned the hooks on the wall where I wanted them. Next, I used the holes in the stretcher to pre-drill holes into studs for the lag screws.
I placed a washer over each screw and drove them into the wall using a ratchet.
And that’s it! Your DIY ladder storage hooks are ready to use.
Final Thoughts
Now you can easily hang your ladders and have them readily available whenever you need them! Plus, they take up minimal space in your garage or shed.
Don’t wait. Get your free plan (including the detailed instructions and measurements) now!
Thank you for stopping by. If you enjoyed this tutorial, would you please take a moment and pin it to Pinterest? I’d really appreciate it!
Recommended For You
Pin This For Later

Hi there – I’m Scott, a woodworking enthusiast and creator of Saws on Skates, a site I started in 2015 to share easy-to-follow tutorials, space-saving shop tips, and project inspiration for DIYers at any skill level. Learn more about my woodworking journey here.
Can you give plans for a Muli-fold ladder–say 22′ long?
Hi Jack – When you say multi-fold, do you mean like a Little Giant-type ladder? If so, I’m using these hooks to store my Little Giant. You can see the top edge of it in the lower lefthand corner in a few of the photos.