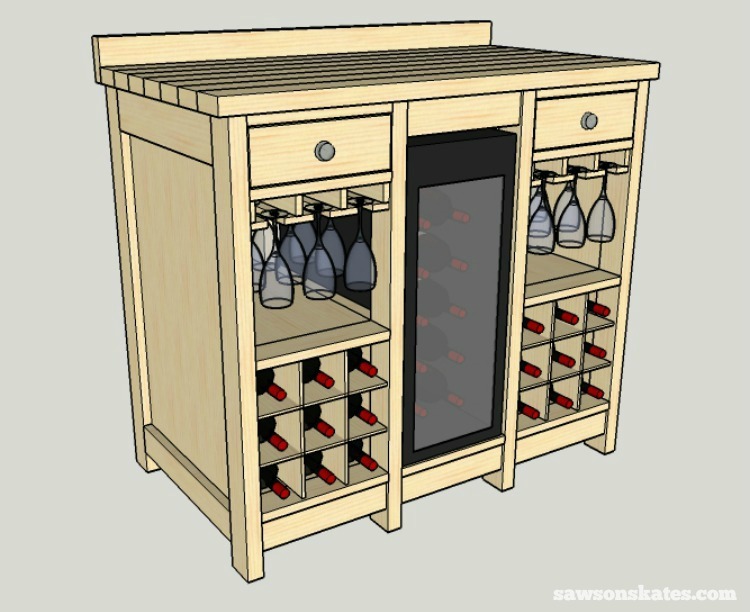
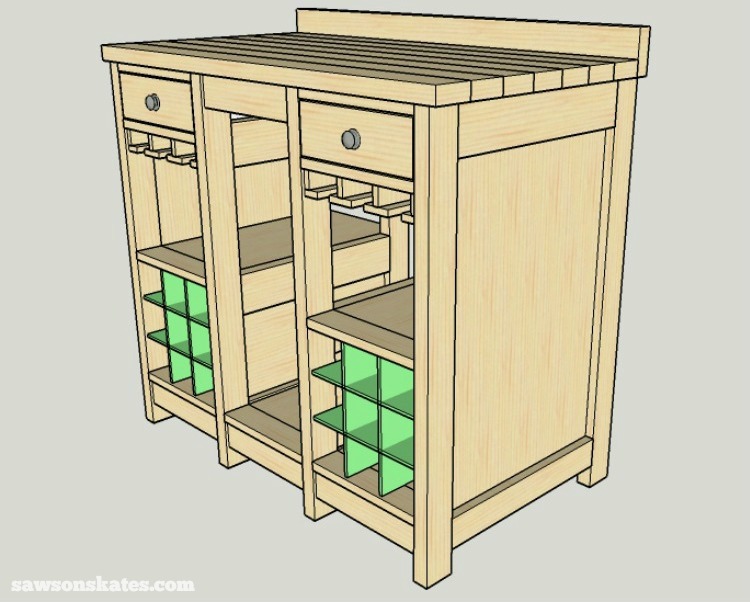
DIY Wine Credenza with Refrigerator
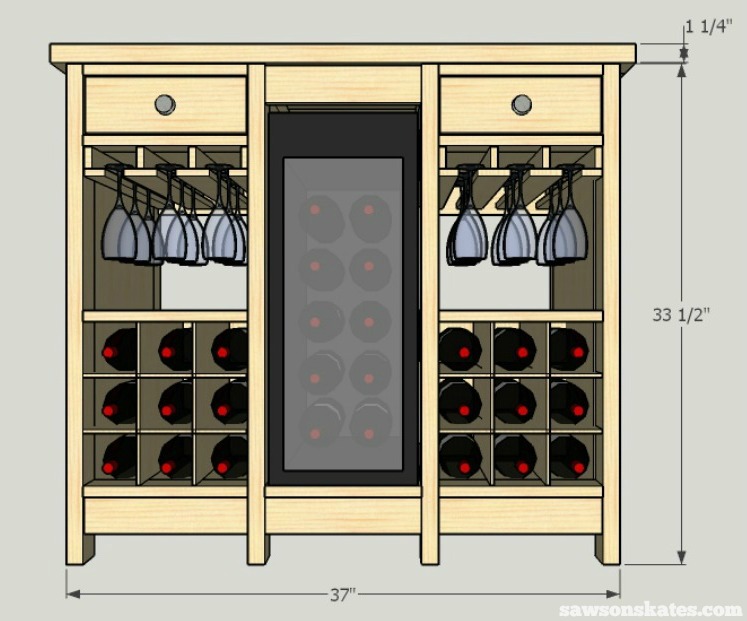
Use these free plans to build a DIY wine credenza with refrigerator! It features an area for a fridge, wine glasses and storage for 18 wine bottles.
For your convenience this post contains affiliate links to products or tools I used to complete this project. Click here to visit my site policies.
Wine glass and wine bottle sketches for this project were sourced here. Cabinet knob sketches were sourced here.
A few weeks ago Dennis posted a comment asking “Do you have a wine cabinet plan with a built in wine fridge?” I didn’t have a wine credenza plan that incorporated a wine fridge, but just like I did for Mary when she asked for a kitchen island, I designed one!
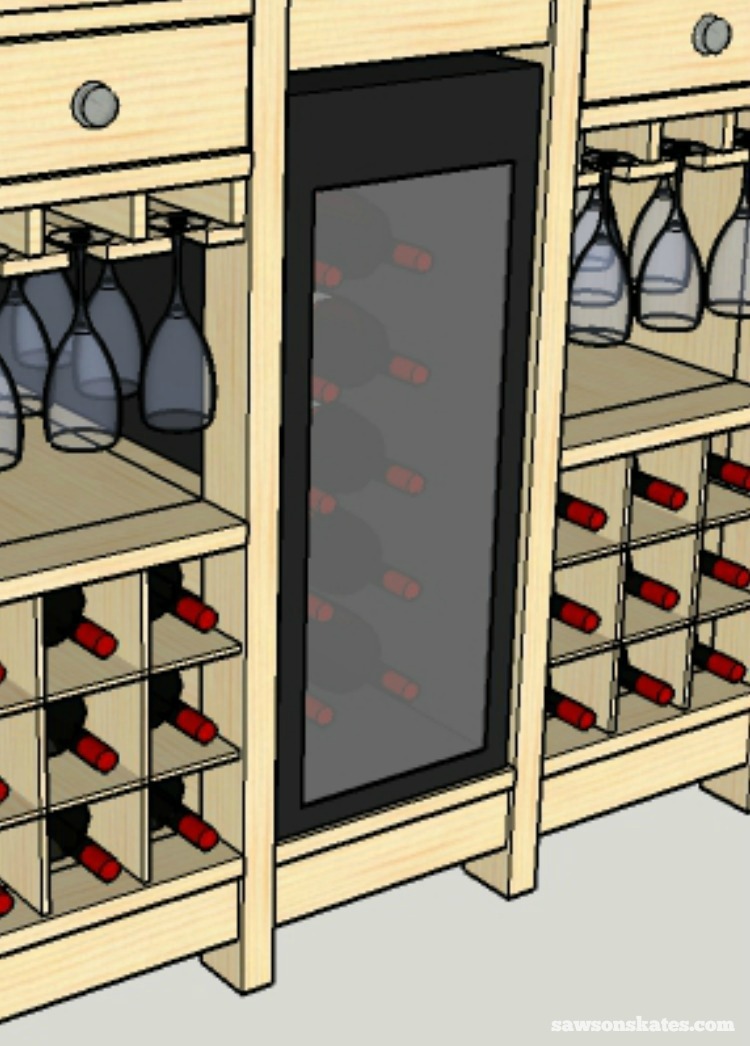
I started with my original wine cabinet plan and expanded it to a wine credenza designed to fit this wine refrigerator. Please check with the manufacturer of your refrigerator to be sure this wine credenza will have enough air flow for the refrigerator. Have a wider refrigerator? You can simply lengthen the center components to accommodate your fridge.
The original wine cabinet used 2×2’s for the legs, but they looked a little skimpy when I was designing the wine credenza, so I used 5/4 lumber for the legs. What’s 5/4 lumber? 5/4 is 1-1/8″ thick whereas 1x material is 3/4″ thick. When drilling pocket holes in the 5/4″ lumber, be sure to set your Kreg jig for 1-1/8″ material. Check out my Kreg jig quick start guide if you need help setting up your jig.
DIY Wine Credenza with Wine Refrigerator
Printed Plan
Supplies
- (3) 1x3x8
- (2) 1x4x8
- 1×5 – about 24″
- (1) 5/4x2x6
- (3) 5/4x3x8
- (4) 5/4x4x8
- (1) 24″x24″ 1/8″ Hardboard
- (1) 48″x96″ 1/2″ Plywood
- (1) 48″x96″ 3/4″ Plywood
- 1″ Brad Nails
- 1-1/4″ Brad Nails
- 1-1/4″ Wood Screws
- 1-1/2″ Wood Screws
- 1-1/4″ Pocket Screws
- 1-1/2″ Pocket Screws
- Elmer’s Wood Glue Max
Tools
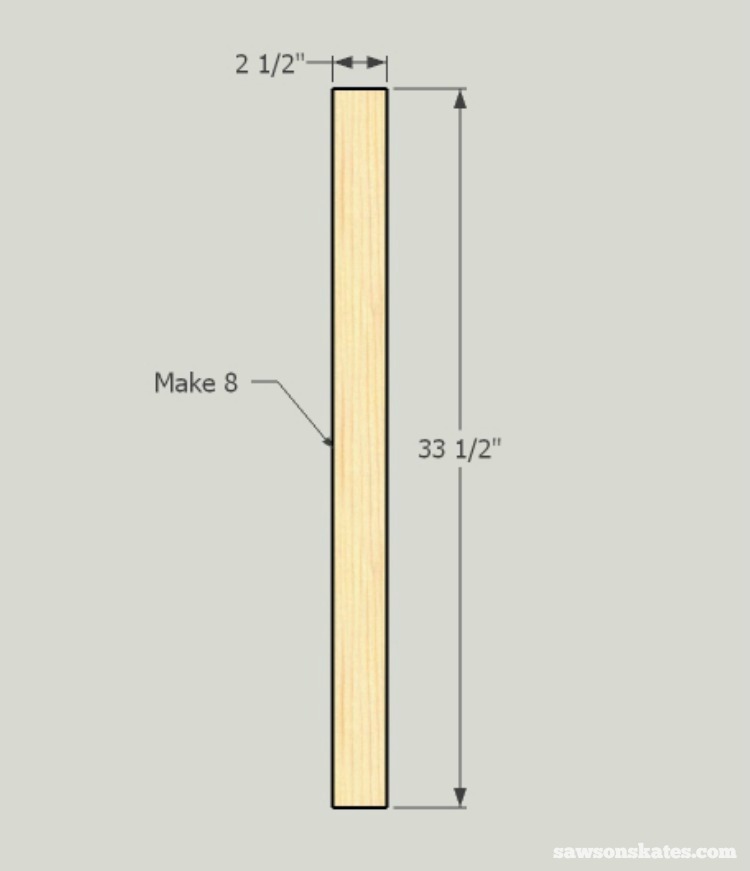
Step 1. Make the Legs
Cut 8 pieces of 5/4×3 to 33-1/2″.
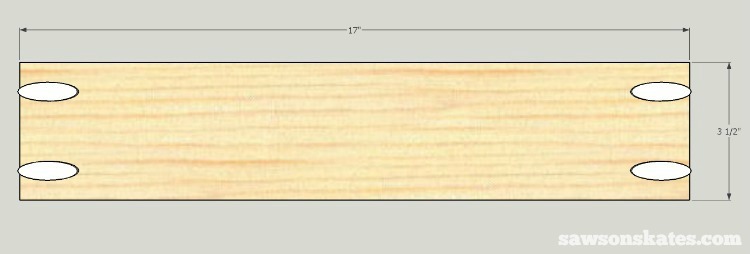
Step 2. Make the Side Top Rails
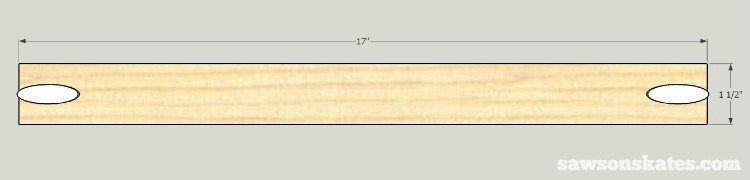
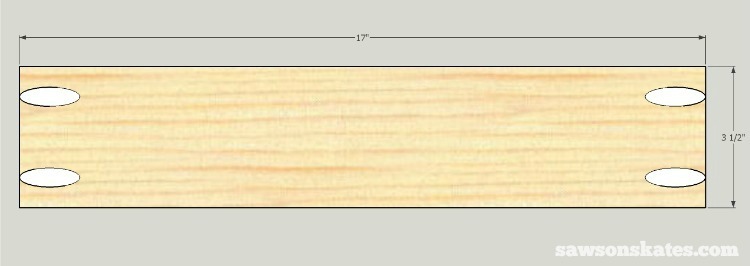
Cut 2 pieces of 5/4×4 to 17″. Set your Kreg Jig for 1-1/8″ material and drill pocket holes in each end.
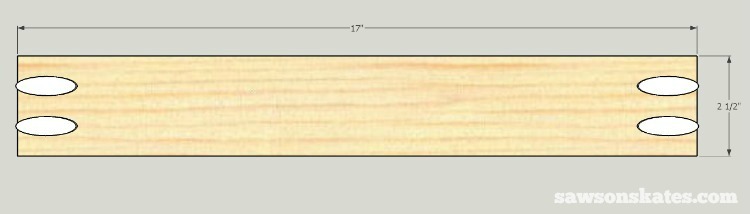
Step 3. Make the Side Bottom Rails
Cut 2 pieces of 5/4×3 to 17″. Set your Kreg Jig for 1-1/8″ material and drill pocket holes in each end.
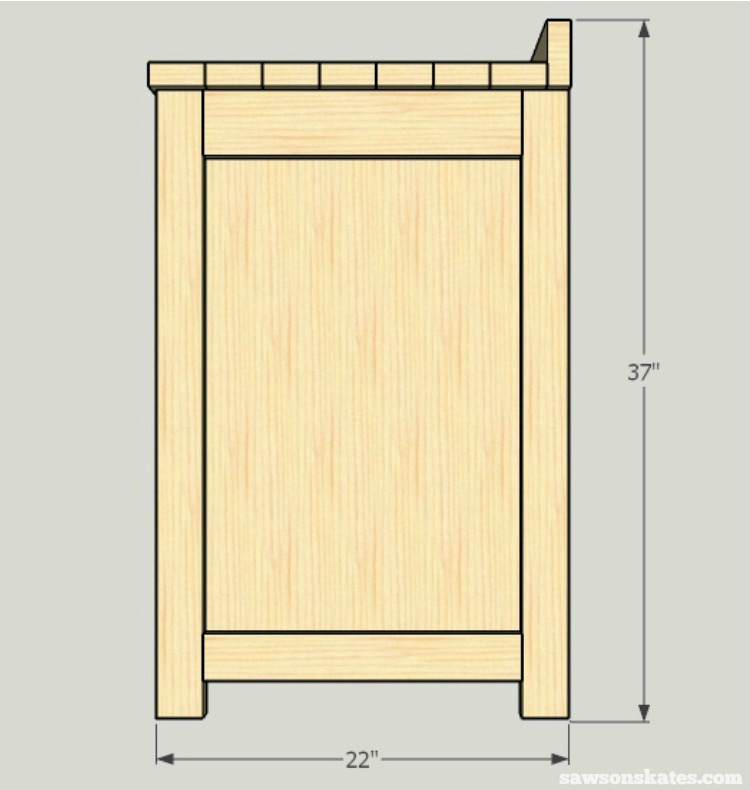
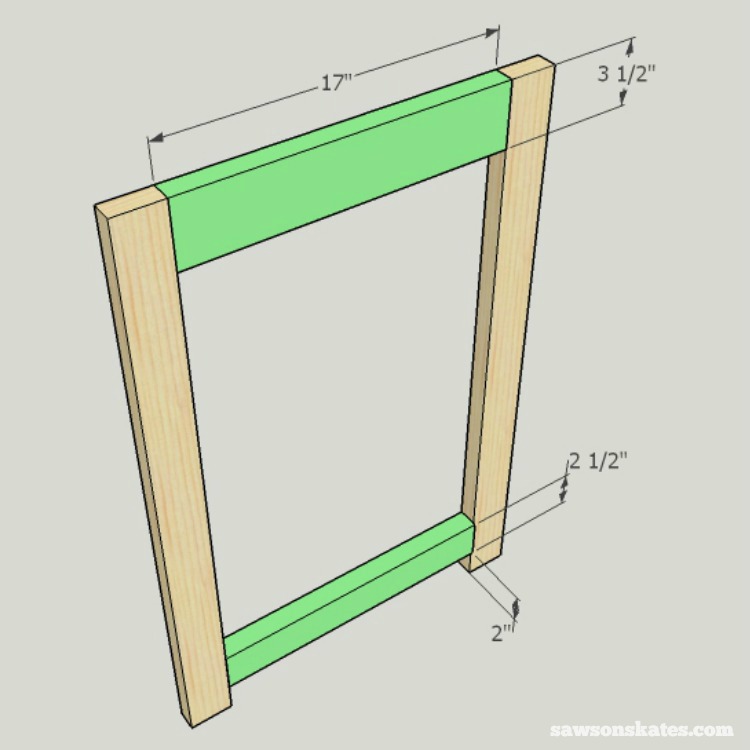
Step 4. Make the Side Assembly
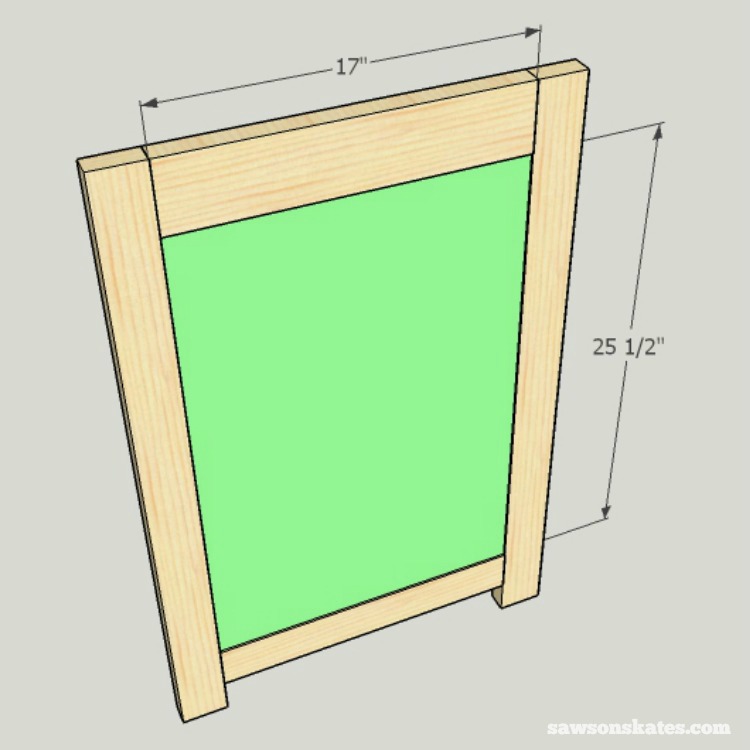
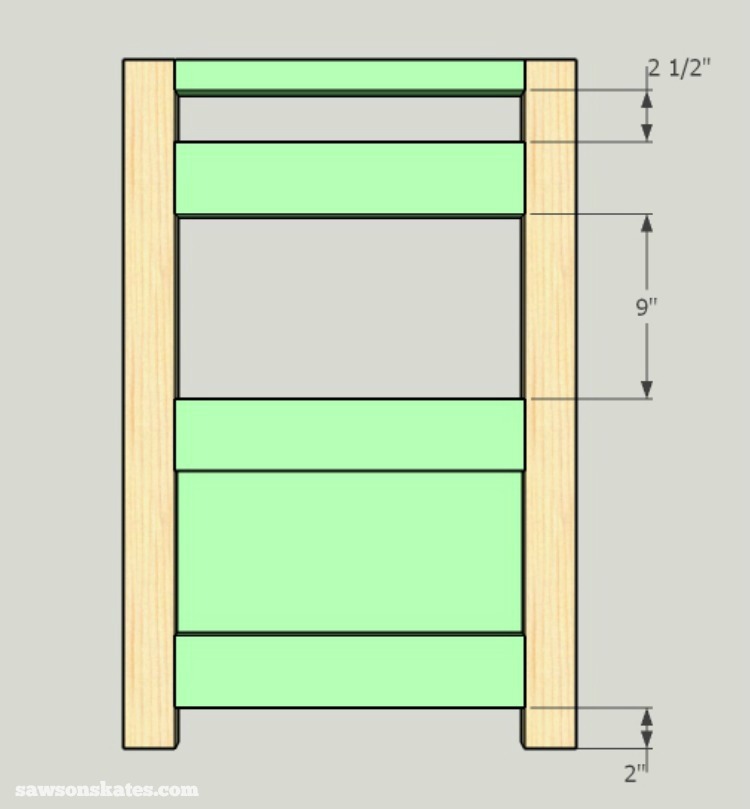
Layout 2 of the legs, apply glue to the top rail and place at the top of the legs. Apply glue to the bottom rail and place 2″ from the bottom of the legs. Clamp and attach using 1-1/2″ pocket screws. Repeat for the other side assembly.
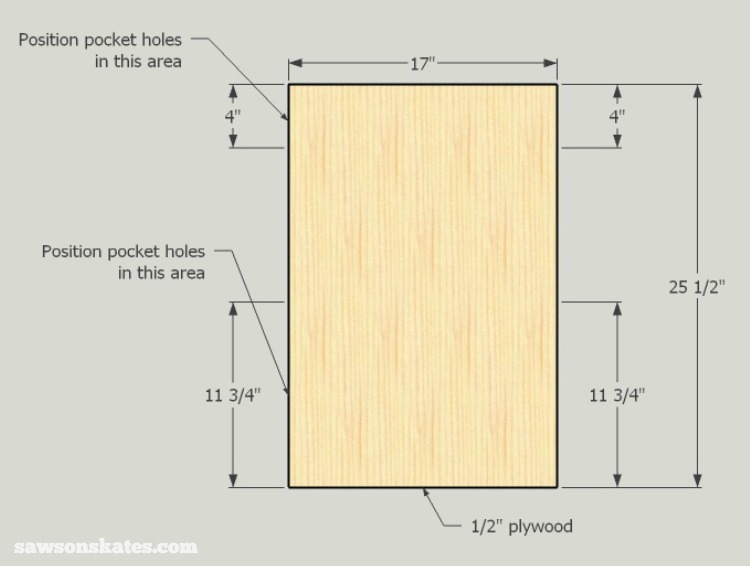
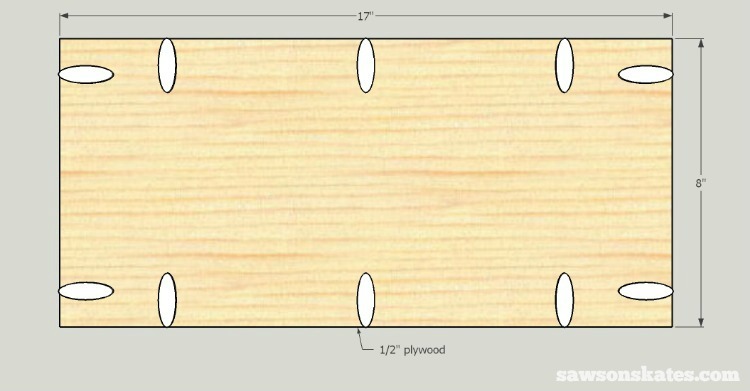
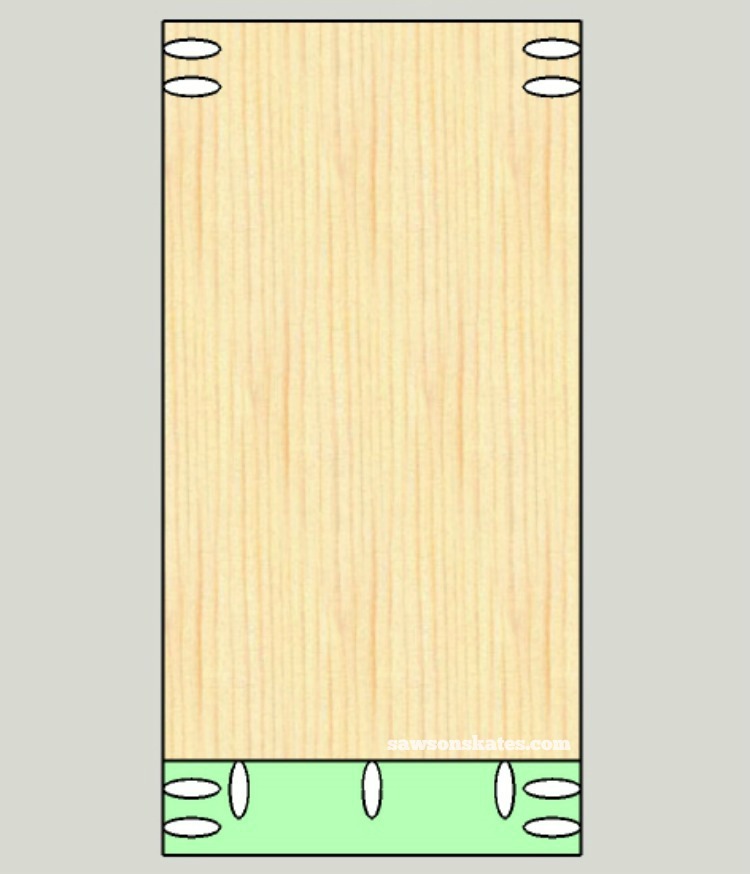
Cut 2 pieces of 1/2″ plywood to 17″ x 25-1/2″. Set your Kreg Jig for 1/2″ material and drill pocket holes in the top and bottom. Then drill pocket holes in the sides any where from 4″ from the top and 11-3/4″ from the bottom. This will ensure pocket holes won’t be seen in the wine glass area.
Attach the panel using 1″ pocket screws. Repeat for the other side.
Step 5. Make the Middle Top Rails
Cut 2 pieces of 5/4×2 to 17″. Set your Kreg Jig for 1-1/8″ material and drill pocket holes in each end.
Step 6. Make the Lower Middle Rails
Cut 6 pieces of 5/4×4 to 17″. Set your Kreg Jig for 1-1/8″ material and drill pocket holes in each end.
7. Make the Middle Panels
Cut 2 pieces of 1/2″ plywood to 17″ x 8″. Set your Kreg jig for 1/2″ material and drill pocket holes around the edge.
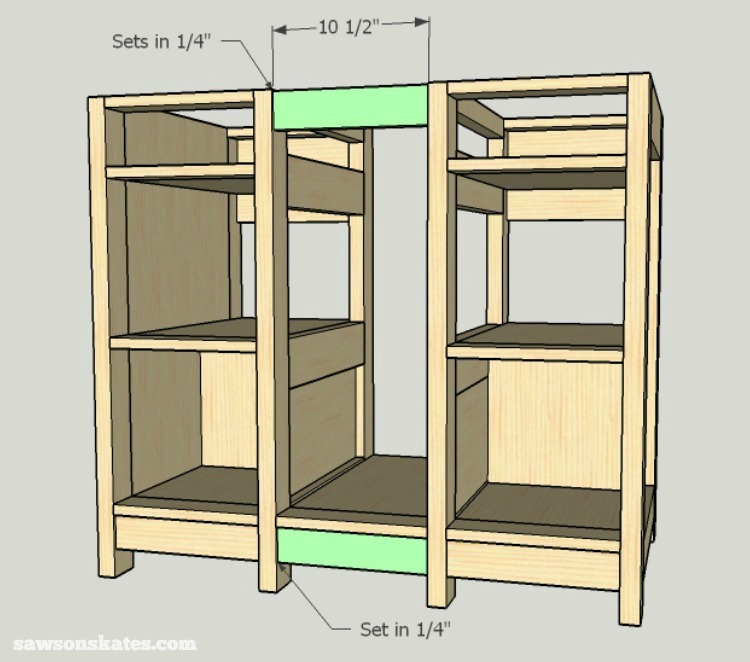
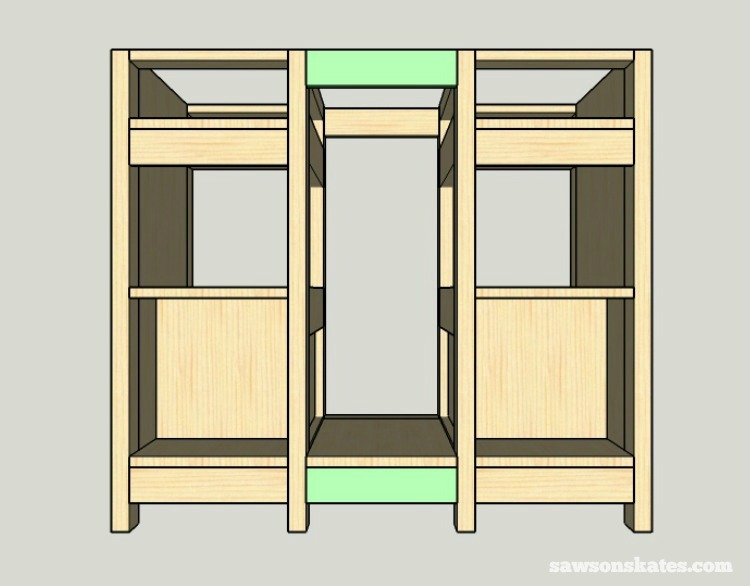
Step 8. Make the Middle Assembly
Apply glue to the top rail, lower rails, middle panel (the panel is flush with the outside of the legs) and clamp to legs. Attach rails using 1-1/2″ pocket screws and attach panel using 1″ pocket screws. Repeat for the other middle assembly.
Step 9. Make the Side Shelves
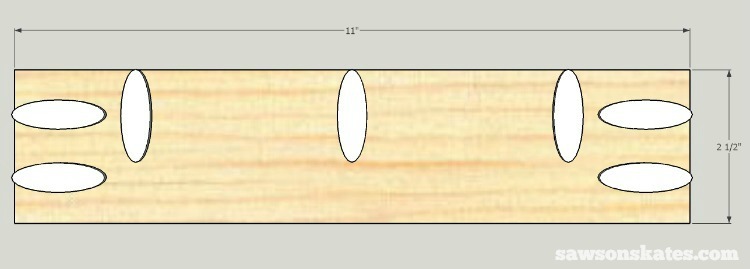
Cut 6 pieces of 1×3 to 11″. Drill pocket holes in each end and on one edge.
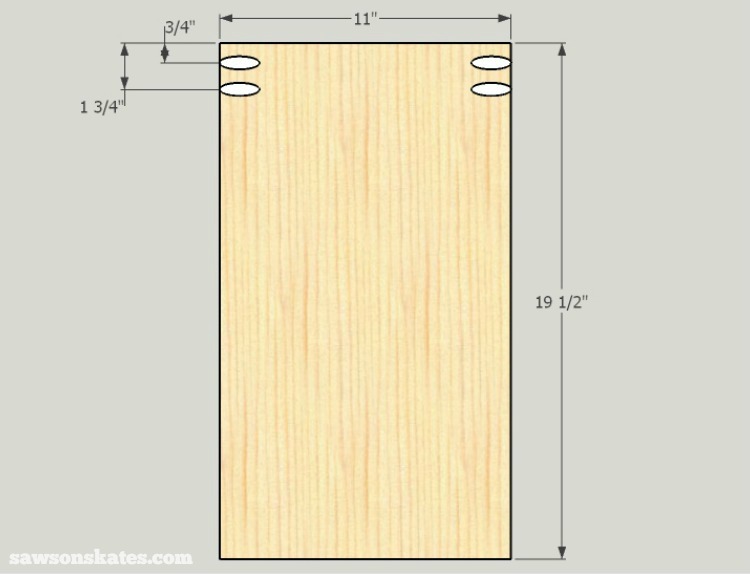
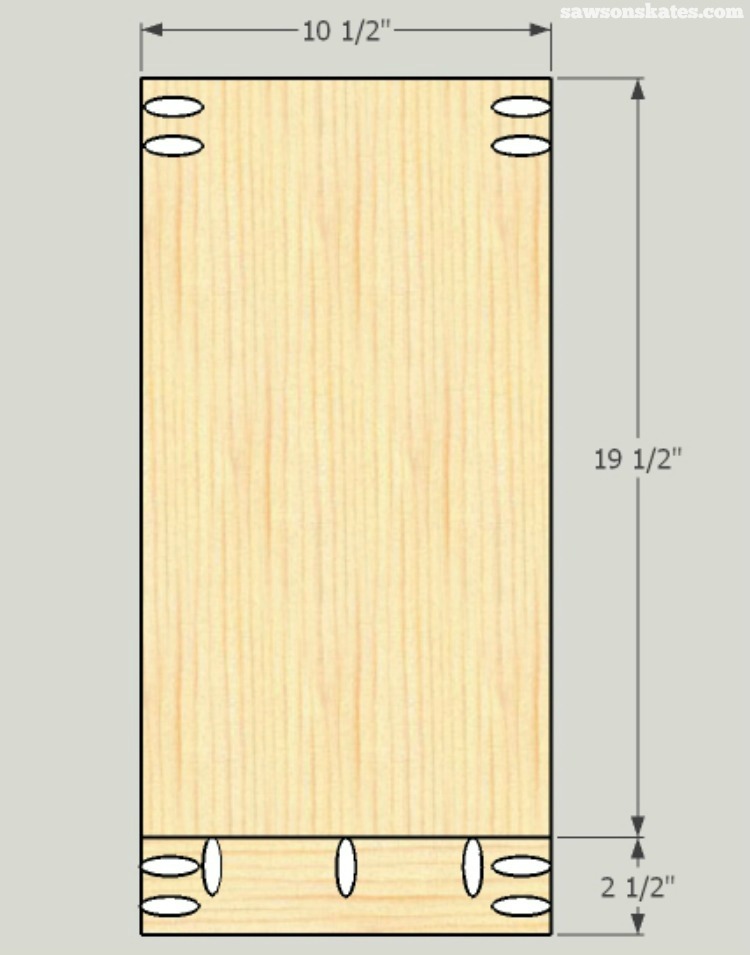
Cut 6 pieces of 3/4″ plywood to 11″ x 19-1/2″. Drill pocket holes according to the diagram.
Apply glue to the shelf edge, clamp to the plywood and attach using 1-1/4″ pocket screws. Repeat for remaining shelves.
Step 10. Assemble the Side
Apply glue to shelves, clamp to the side assembly and middle assembly and attach using 1-1/4″ pocket screws. Repeat for the other side.

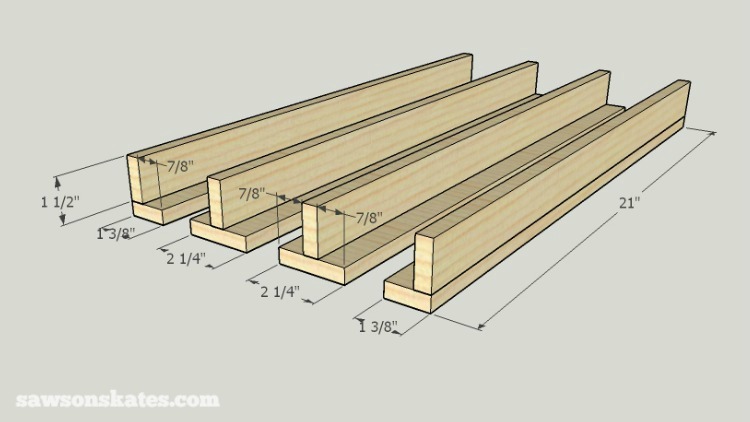
Step 11. Make the Stemware Holders
The stemware holders are made from 1/2″ plywood. Rip parts to width and cut to length, assemble using glue and 1″ brad nails. Make one set of stemware holders for each side.
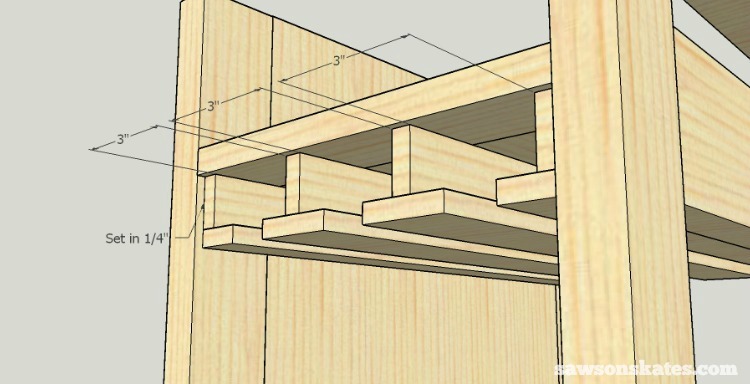
Step 12. Attach the Stemware Holders
Apply glue to the stemware holders, place under the top shelf and attach from the top using 1-1/4″ nails. The stemware holders set in 1/4″ from the front legs and 3/4″ from the back legs. Cut a piece of scrap wood to 3″ to use a spacer to properly align the holders.
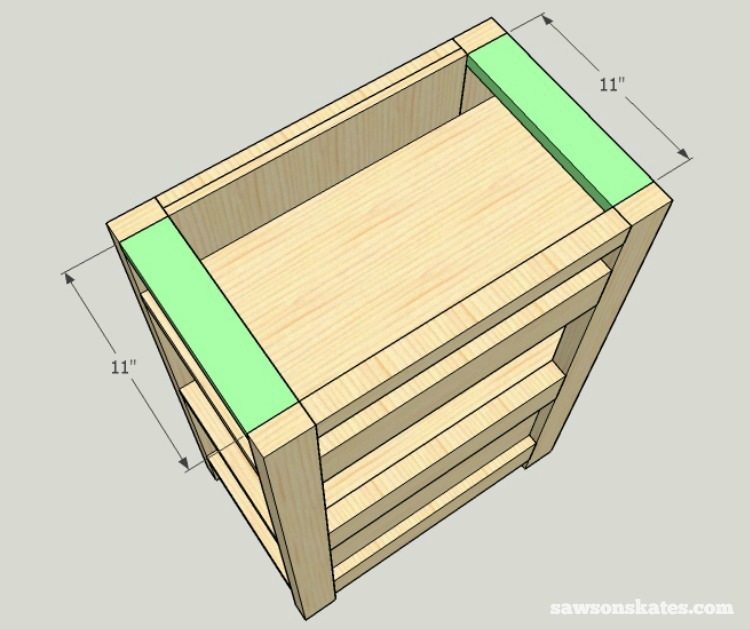
Step 13. Attach the Top Supports
Cut 4 pieces of 1×3 to 11″ and drill pocket holes in each end. Apply glue to the ends of the top supports, set the flush with the legs and attach using 1-1/4″ pocket screws. Repeat for the other side.
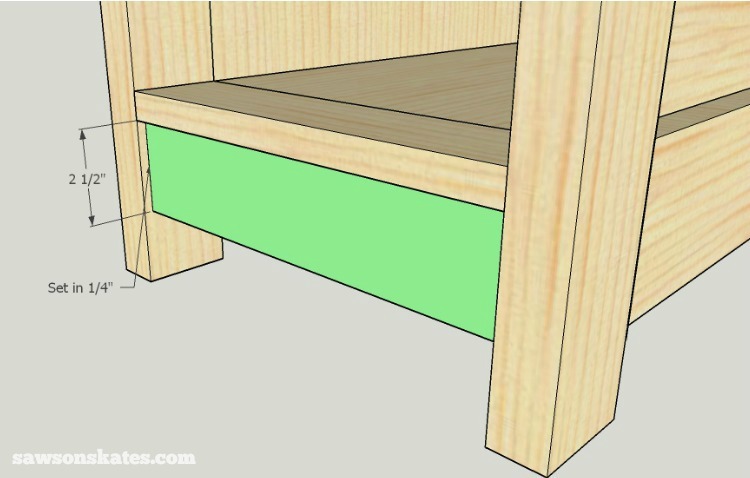
Step 14. Attach the Bottom Rails
Cut 2 pieces of 1×3 to 11″ and drill pocket holes in each end. Apply glue to the ends of the rail, set the front rail 1/4″ from the front and attach using 1-1/4″ pocket screws. Repeat for the other side.
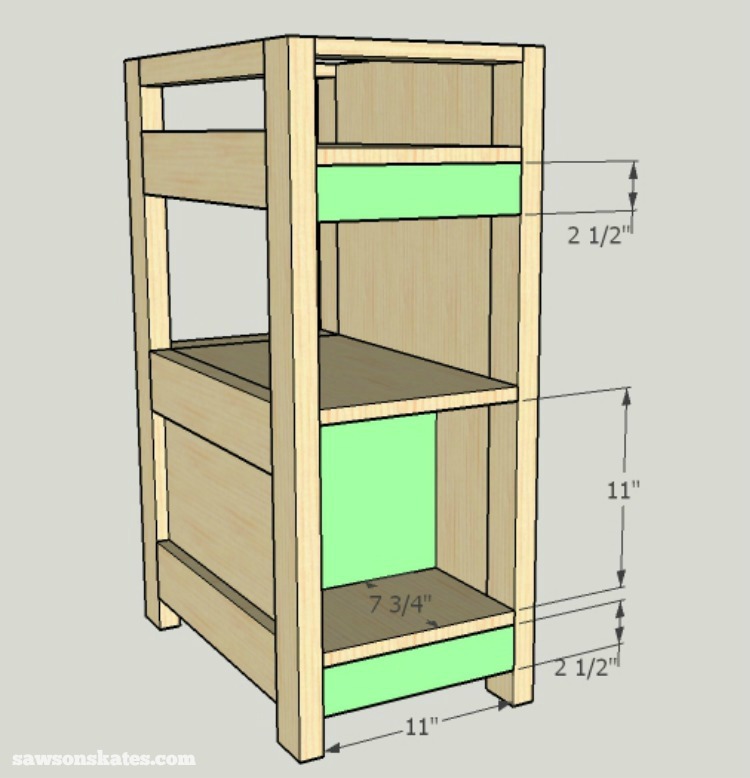
Step 15. Attach the Back Components
Cut 4 pieces of 1×3 to 11″ and drill pocket holes in each end. Apply glue to the ends, place one at the back of the stemware holders and one below the bottom shelf. Attach using 1-1/4″ pocket screws. Repeat for the other side.
Cut 2 pieces of 1/2″ plywood to 11″ x 11″. Set your Kreg Jig for 1/2″ material and drill pocket holes around the edges. Place in the wine bottle opening and set 7-3/4″ in from the back. Attach using 1″ pocket screws.
Step 16. Make the Middle Shelf
Cut 1 piece of 1×3 to 10-1/2″ and drill pocket holes. Cut 1 piece of 3/4″ plywood to 10-1/2″ x 19-1/2″ and drill pocket holes. Apply glue to the shelf edge, clamp to the plywood and attach using 1-1/4″ pocket screws.
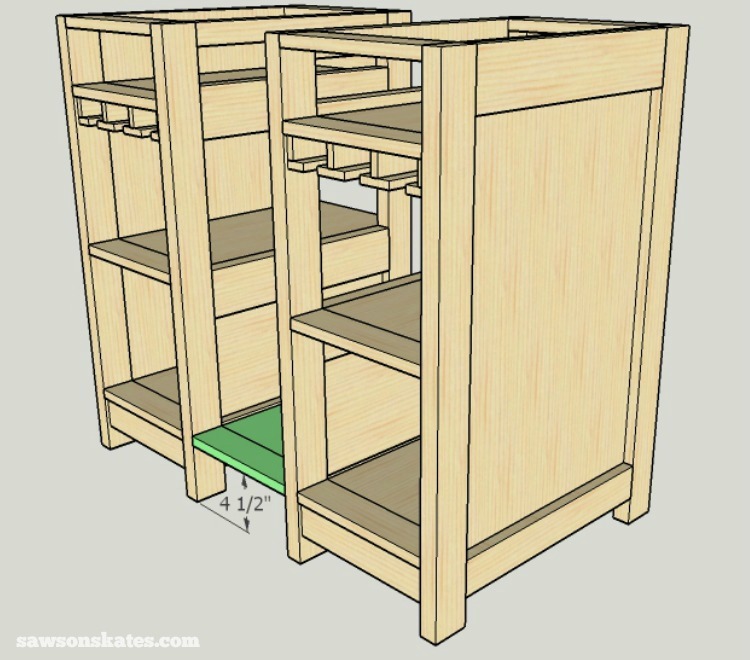
Step 17. Attach the Side Assemblies
Apply glue to the middle shelf, set 4-1/2″ from the bottom, clamp and attach using 1-1/4″ pocket screws.
Cut 4 pieces of 1×3 to 10-1/2″ and drill pocket holes in each end. Apply glue to the ends, set in 1/4″ from the front and attach using 1-1/4″ pocket screws.
Apply glue to the ends of the remaining rails, set flush with the back legs and attach using 1-1/4″ pocket screws.
Step 18. Install the Top
Cut 8 pieces of 5/4 1×4 to 39″ and rip 7 of the pieces to 3″. Drill pocket holes in the edges of the 3″ pieces, apply glue, clamp and attach using 1-1/2″ pocket screws. Apply glue to the back, place the 3-1/2″ piece and clamp. Drill countersink holes and attach using 2″ wood screws. Attach the top to the top supports using 1-1/2″ wood screws.

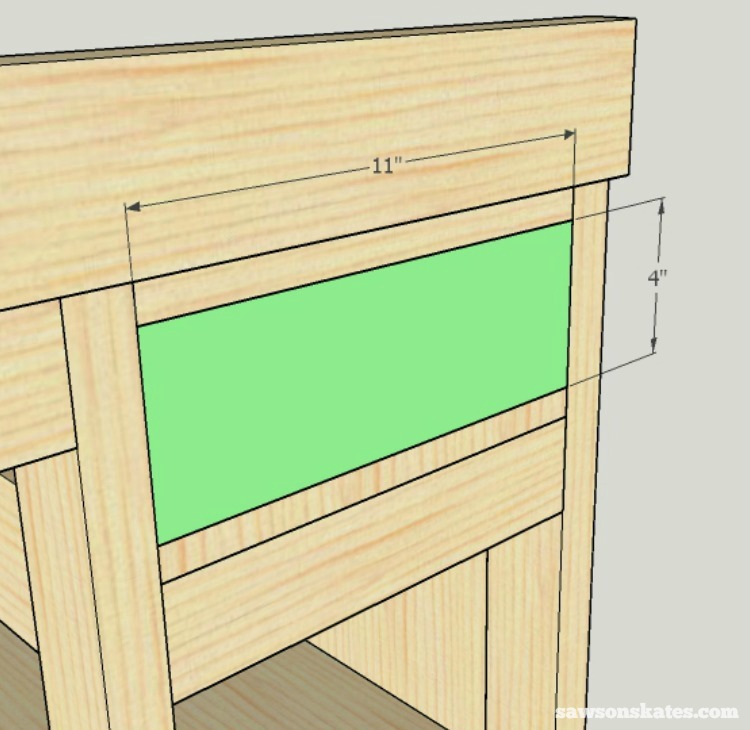
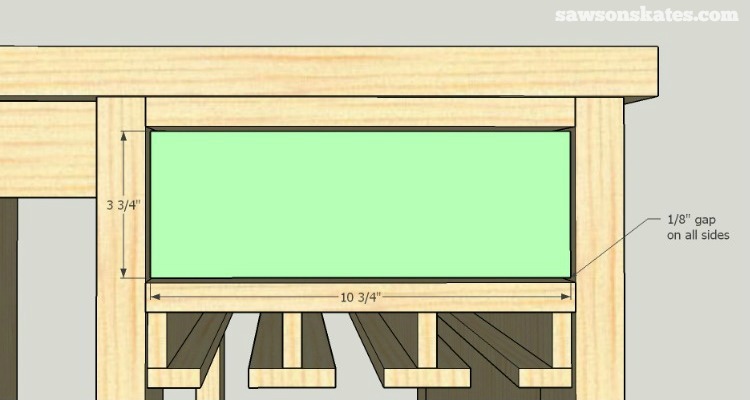
Cut 2 pieces of 1/2″ plywood to 11″ x 4″. Set your Kreg jig for 1/2″ material and drill pocket holes on the ends. Apply glue, place in the drawer opening and attach using 1″ pocket screws. Repeat for the other side.
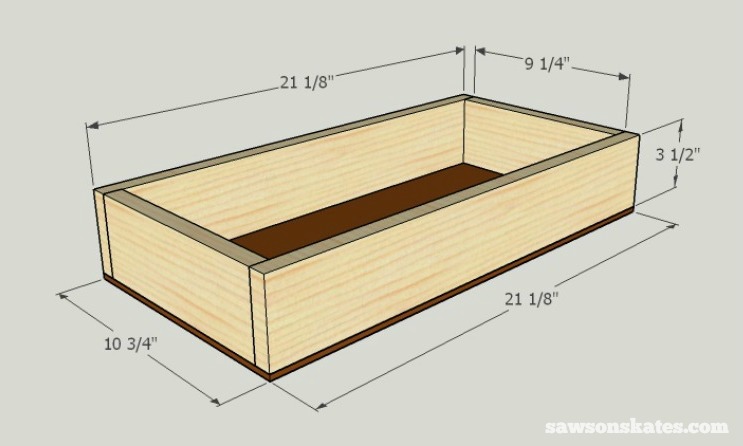
Step 19. Make the Drawers
Measure the drawer opening before cutting any drawer parts. Allow 1/8” on the right and left side of the drawer, so it will move freely. Adjust the dimensions of the drawer if necessary. Cut 4 side pieces from 1×4 to 21-1/8″. Cut 4 front/back pieces from 1×4 to 9-1/4″ and drill pocket holes in each end. Apply glue to the front and back pieces, clamp to the sides and attach using 1-1/4″ pocket hole screws. Cut the bottom from 1/8″ hardboard to 10-3/4″ x 21-1/8″. Apply glue to the bottom of the drawer box, place the bottom on the drawer and attach using 1″ brad nails. Repeat for the other drawer.
Step 20. Install the Drawer Fronts
Cut the drawer front from 1×5 (be sure to allow 1/8″ on each side of the drawer front). Slide the drawer box into the opening and shim the drawer front so it’s evenly spaced in the opening (coins like quarters, nickles, etc. make great shims!). Drill a hole for the knob, remove drawer front, drawer box and install the knob. Reinstall the drawer and adjust spacing around drawer front then tighten the knob screw. From inside the box use two 1-1/4″ wood screws to secure the drawer front to the drawer box.
Step 21. Install the Bottle Dividers
The four pieces that make up the bottle dividers are 1/4″ plywood and are identical. The easiest way to make them is with a router table and a 1/4″ straight cutting bit. Set the fence for 3-1/2″ and make a pass to the halfway point, then flip and make a second pass. Repeat for the remaining dividers.
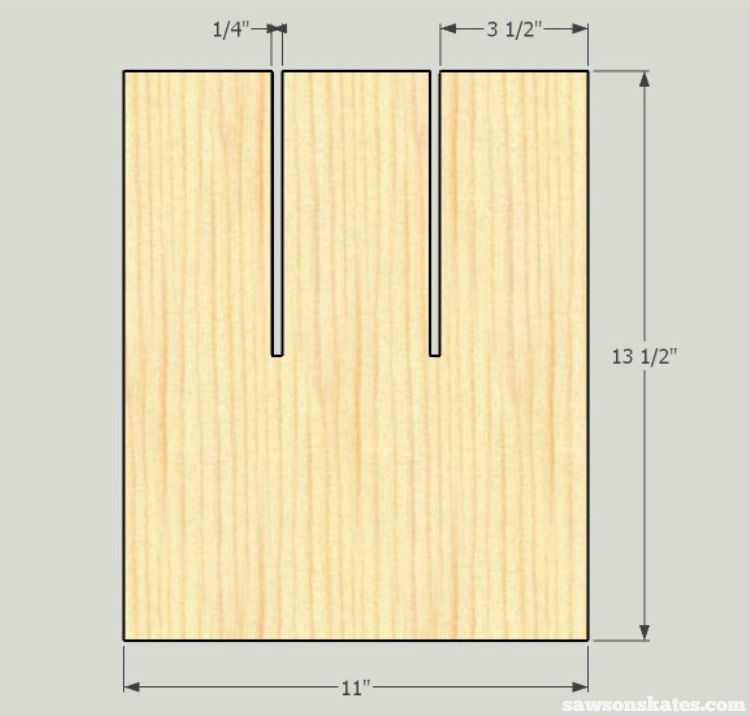
Once cuts are made on all four pieces, assemble (it will be a snug fit, so glue isn’t needed) and install in the bottle divider area. Repeat for the other bottle divider.
Step 22. Sand, Stain and Finish
Sand with 120 grit sandpaper. This piece would look great with a dark chocolate stain and topped with this DIY finish.
Final Thoughts
Use these free plans to build a DIY wine credenza with refrigerator! You’ll have plenty of room for wine glasses and storage for 18 wine bottles.
Thank you for stopping by. If you found this information helpful, would you please pin it to Pinterest? Other DIYers would appreciate it and I would too! Thank you – Scott
More Like This:

Hi there – I’m Scott, a woodworking enthusiast and creator of Saws on Skates, a site I started in 2015 to share easy-to-follow tutorials, space-saving shop tips, and project inspiration for DIYers at any skill level. Learn more about my woodworking journey here.
What type of wood did you use for this project?
Hi Kaitlynn – I’ve designed and created the instructions for this project, but have not actually built it. I used white pine to illustrate the wood grain in the sketches.
Hi! Is it possible to put cabinet doors on this? Any idea about the cuts/plans for two doors covering the wine glasses and wine storage? We have small children and don’t want them to be able to touch our nice stuff 🙂
Hi Sarah – You could definitely add doors to the wine credenza but without modifying the plan the doors would have to be attached to the front of the cabinet. In my opinion this would make the piece look a little “clunky”. I think the better idea would be to slightly redesign the piece so the cabinet is deeper. Then leave the length of the stemware holders and wine bottle racks the same and push them to the back of the cabinet. This would allow for room within the cabinet (in front of the stemware holders and wine bottle racks) for a door.
Do you have the dimensions of the wine cooler that would fit in this. We want to make sure before we build that we can find a wine cooler that will fit.
Hi Emily – Thank you for stopping by. I designed the wine credenza to fit this wine refrigerator.
Is 5/4 lumber readily available at the traditional big box home stores? I’m looking online and can’t seem to source it on their websites
Hi Zak – Thank you for stopping by. I’m able to get 5/4 lumber at my local Lowe’s. It’s at the end of the aisle with the pine 1x material.
I was wondering if you have plans for a 6 ft long wine credenza with barndoors
Hi Alex – I don’t have that plan, but this plan could be adjusted to meet your needs.