How to Cut Wood for Beginners
Learn how to cut wood with confidence! We’ll look at the different types of cuts, the best saws to make those cuts, and tips for making accurate cuts.

What Should I Build Next?
That's the question I help answer.
Every week, I send woodworking ideas to 17,000 DIYers who love building things.
You'd fit right in.
How to Cut Wood
Many beginners are intimidated to start a DIY project because they’ve never cut a piece of wood before. Newbies are often unsure what kind of cuts they need to make, what saw to use, and how to make those cuts. Today we’ll clear up the confusion, and I’ll share important tips for cutting boards to the right length every time.
You may also enjoy the Beginner’s Guide to Wood Sizes
This tutorial contains affiliate links to supplies and tools. Purchases made using these links help support the Saws on Skates website and allows me to share more projects and tips with you. There is no cost to you for using these links. Visit my site policies for more information.
Before we get into how to cut wood, be sure to click the subscribe button at the bottom of this page to sign up for my FREE weekly newsletter loaded with helpful pocket hole tricks, space-saving workshop ideas, clever DIY tips and more!
Table of Contents
- What Kind of Cut Do You Need to Make?
- Types of Cuts
- What Kind of Saw Do You Need to Cut Wood?
- How to Cut Wood
- More Like This
What Kind of Cut Do You Need to Make?
The first step to cutting wood is to determine what type of cut or cuts we need to make. The common types of cuts we’ll make are crosscuts, rip cuts, miter cuts, bevel cuts, and compound miter cuts.
These different types of cuts boil down to just two basic functions. Either cutting a board to length or cutting a board to width. In other words, we’ll make cuts to change the length of a board or make it shorter. Or we’ll make cuts to change the width of a board or make it narrower. Sometimes we’ll need to make a board shorter and narrower.
There are also cuts like resawing that split a board in half like a book. But we’re going to stick to the basic cuts for this tutorial.
Back to Table of ContentsTypes of Cuts
Crosscut
A crosscut is made across the grain of the wood or across the width of the board. A crosscut changes the length of the board or makes the board shorter. A crosscut is often referred to as simply a cut or cuts.
Rip Cut
A rip cut is made with the grain of the wood or along the length of the board. A rip cut changes the width of the board or makes the board narrower.
Miter Cut
A miter cut is made diagonally across the grain of the wood or across the width of the board. A miter cut changes the length of the board or makes the board shorter.
Bevel Cut
A bevel cut is an angled cut made on the edge of a piece of wood. A bevel cut changes the profile of the wood. Bevel cuts can change the length of the board or the width of the board.
Compound Miter Cut
A compound miter cut combines a miter cut and a bevel cut. Compound miter cuts are needed to install crown molding. A compound miter cut changes the length of the board or makes the board shorter.
Back to Table of ContentsWhat Kind of Saw Do You Need to Cut Wood?
Now we understand what kind of cuts we can make. Next, we’ll need to choose a saw to make those cuts. Some saws are better for cutting wood to length and some are better for cutting wood to width. Let’s look at which type of saw works best for each cut.
Miter Saw
- Crosscuts
- Miter Cuts
- Bevel Cuts
- Compound Miter Cuts
- Best for cuts on narrow boards usually up to 12 inches
Crosscuts
The saw we’ll use most often to make crosscuts on narrow boards like a 1×4, 1×6 or 2×4 is a miter saw.
Related: Why is a 2×4 Not 2 Inches by 4 Inches?
Miter saws are typically available with a 10-inch blade or 12-inch blade. Many compound miter saws with a 10-inch blade can make crosscuts on boards up to about 5-½ inches wide by 3-½ inches thick.
Many compound miter saws with a 12-inch blade can make crosscuts on boards up to about 7-½ inches wide by 3-½ inches thick.
A sliding miter saw that slides front to back can increase the length of these cuts.
For boards wider than the cutting capacity of our miter saw we could make two cuts. In other words, we could place one edge of the board against the fence and cut partially through the width of the board. Then we could flip the board placing the opposite edge against the fence and make a second cut. This second pass would complete the cut.
I have used this method in a pinch. It works, but it’s often not accurate. If the edge of the board has a curve or bow it can push the board away from the fence. This means the cut won’t be straight from edge to edge.
To make cuts on wider boards I think it’s better for us to use a different saw like a circular saw, or table saw.
Related: How to Adjust a Miter Saw for Accurate Cuts
Miter Cuts
We’ll also use our miter saw to cut angles. A miter saw is a great tool to make miter cuts on workpieces for projects like picture frames and more.
We’ll use the miter adjustment to change the angle or the degree of the cut. The miter adjustment is usually a knob or lever at the front of the saw.
Related: How to Make Wood Picture Frames (Without Miter Cuts)
Bevel Cuts
A miter saw is a great tool for cutting bevels on the ends of narrow boards. We’ll often need to cut a bevel on trim boards or molding like baseboards.
We’ll use the bevel adjustment to change the bevel or degree of the cut. The bevel adjustment is usually a knob or lever at the back of the saw.
Related: 7 Miter Saw Tricks Every DIYer Should Know
Compound Miter Cuts
A miter saw is also great for making compound miter cuts. Compound miter cuts are needed to install crown molding.
To make compound miter cuts we’ll use the miter adjustment and the bevel adjustment to change the angle or degree of the cut.
Back to Table of ContentsCircular Saw
- Crosscuts
- Rip Cuts
- Miter Cuts
- Bevel Cuts
- Compound Miter Cuts
- Cuts are more accurate with a speed square, crosscut jig, Kreg Rip-Cut, or Kreg Accu-Cut
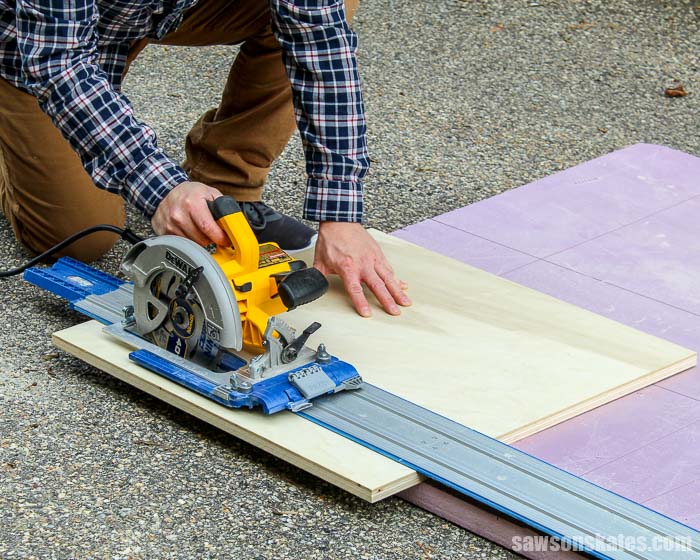
- Great for cutting panels and plywood
TIP: Circular saws generally don’t come with a fence. This means we typically use the saw freehand. It’s difficult to make straight cuts freehand. It’s helpful to use an accessory like a cutting guide or fence when using a circular saw.
Crosscuts
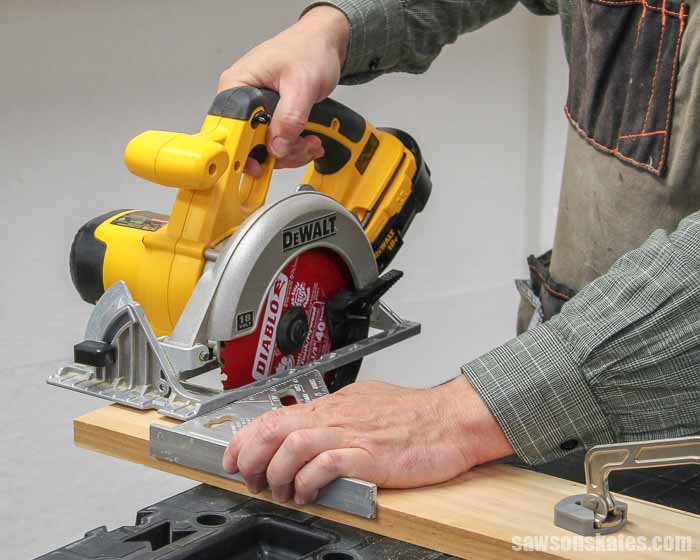
Some boards are just too wide for the cutting capacity of our miter saw. For those cuts, we can use our circular saw to cut the wood to length. Using a speed square is one of the easiest ways to make short, straight cuts with a circular saw.
NOTE: I normally place the speed square on the side of the workpiece closest to me. For clarity, I flipped the speed square to the opposite side so you could see how it fits on the workpiece. For the best results, place the speed square on the same side where you’re starting the cut. This way, you’re pressing the speed square into the workpiece.
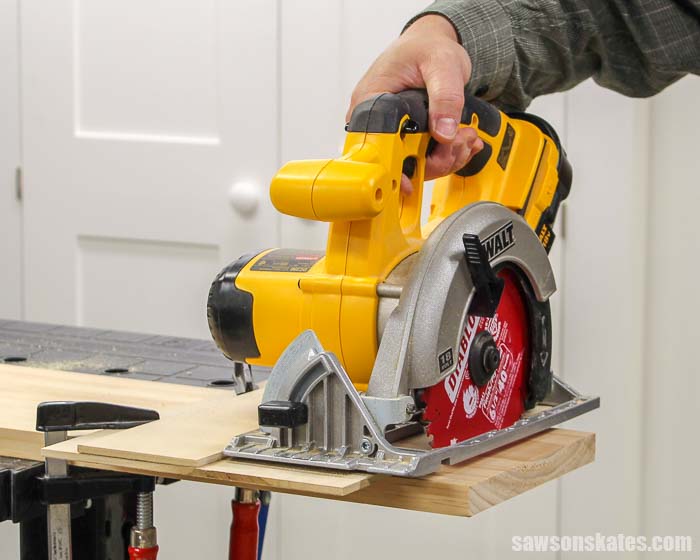
A circular saw cutting guide or a crosscut jig helps us make precise crosscuts. It acts as a fence for our circular saw. The base plate of the saw rides against the fence of the jig. The fence forces the saw to make cuts exactly where we want them. I made my cutting guide about 12” long. We can also make the jig longer for longer cuts.
Related: How to Make a DIY Circular Saw Crosscut Jig
Rip Cuts
We can also use our circular saw to rip boards to width. One way we can make rip cuts is to build a longer version of this DIY crosscut jig.
A second way we can make rip cuts with our circular saw is with a Kreg Rip-Cut. The Rip-Cut allows us to make straight cuts up to 24 inches wide. All we have to do is set the fence to the desired width and make the cut.
Related: 4 Ways to Make Straight Cuts with a Circular Saw
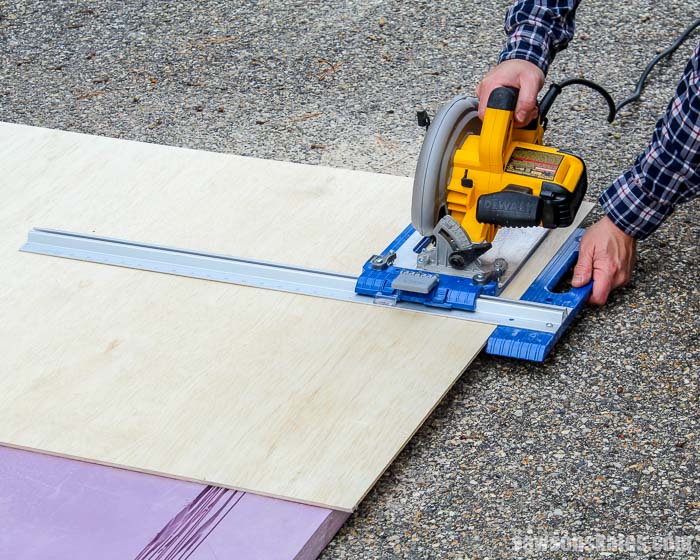
A third way we can make rip cuts with our circular saw is with a Kreg Accu-Cut. The Accu-Cut allows us to make straight cuts up to about 50 inches and the Kreg Accu-Cut XL allows us to make straight cuts up to about 100 inches. All we have to do is place the Accu-Cut on our marks and make the cut.
Miter Cuts
We can use our circular saw to make just about any miter cut. Just like making crosscuts with a circular saw we can use a speed square or a DIY circular saw jig.
We’ll mark the position of the miter, clamp the jig on the marks and make the cut.
We can also make miter cuts with our circular saw and a Kreg Accu-Cut. We’ll mark the position of the miter, place the Accu-Cut on the marks and make the cut.
Bevel Cuts & Compound Miter Cuts
We can adjust the bevel of our circular saw to make beveled rip cuts along the length of a board. We can also use our circular saw to make compound miter cuts on the end of a board.
Back to Table of ContentsTable Saw
- Rip Cuts
- Bevel Cuts
- Crosscuts (best with a table saw sled)
- Miter Cuts (best with a table saw sled)
- Great for cutting panels and plywood
Rip Cuts
One of the tasks I use my table saw for the most is making rip cuts. Sometimes woodworking plans will call for a board that is not a standard dimensional size.
A plan may call for a board that is 5 inches wide. A 1×4 is 3-½ inches wide, so it’s too small. A 1×6 is 5-½ inches wide, so it’s too big.
Related: Beginner’s Guide to Wood Sizes
When this happens, we can use our table saw to make the board narrower or rip the board to width.
First, we’ll set the rip fence to the desired width and then we can make the cut. Be sure to follow all of the instructions for your table saw and work safely.
Related: What is the Narrowest Width to Rip on Table Saw?
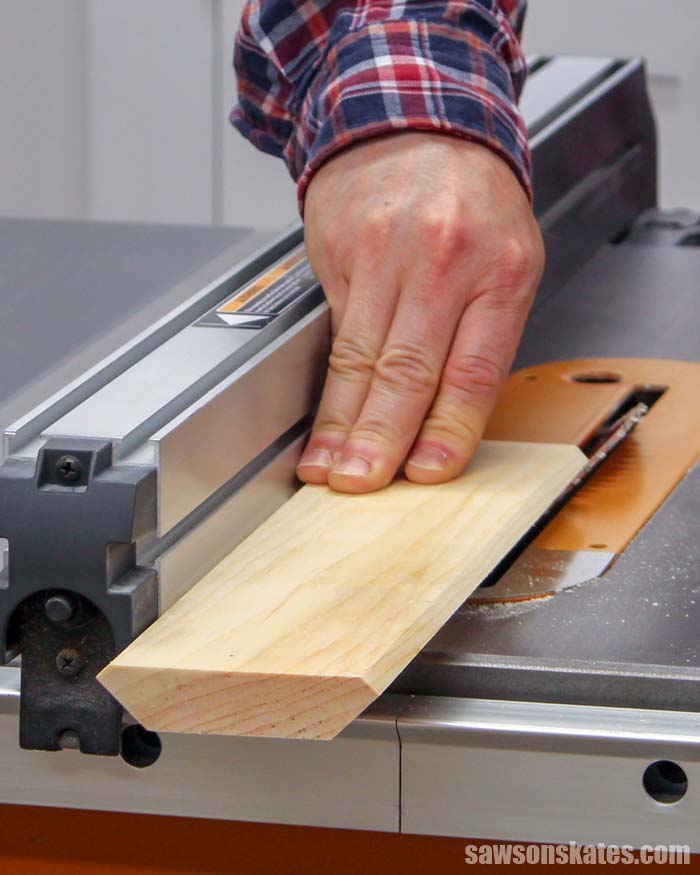
Bevel Cuts
We can also use our table saw to cut bevels on the edge of boards. I used my table saw to cut four bevels on this DIY Shaker-Style Crown Molding.
Related: What’s the Best Height to Set the Table Saw Blade?
Crosscuts
We can use a table saw to make crosscuts on sheet goods like plywood. First, we’ll set the rip fence to the desired width and then we can make the cut. Be sure to follow all of the instructions for your table saw and work safely.
For workpieces larger than the table of our table saw we should set up an outfeed table or outfeed roller stand to support the workpiece as it exits the table saw.
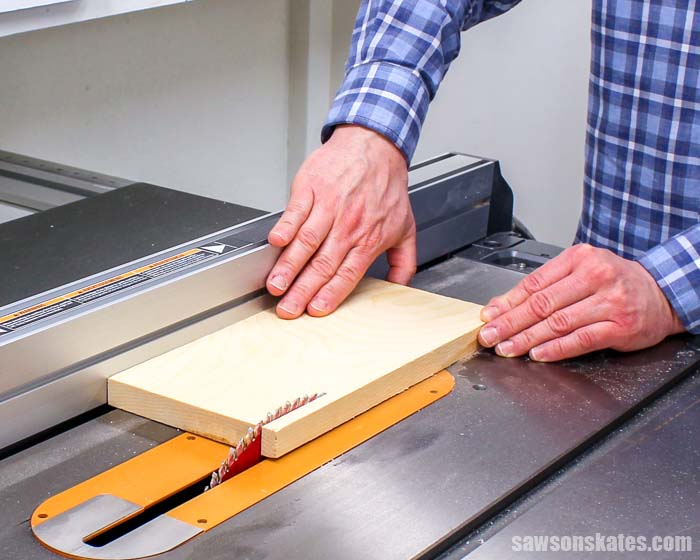
We can also use our table saw to make crosscuts on narrow boards. We shouldn’t use the fence to make crosscuts on narrow boards. The board can bind against the fence and blade. Binding can create a dangerous situation called kickback.
Related: What is Kickback?
It’s best to use a table saw sled or crosscut sled to make crosscuts on narrow boards. The sled slides in the miter gauge slots and allows us to more safely make accurate crosscuts.
Related: Beginner’s Guide to Table Saw Safety
Miter Cuts
We can also make miter cuts with our table saw. The miter gauge that comes with many table saws is often small and not practical for making miter cuts.
It’s best to use a table saw sled for making miter cuts. There are also specialized sleds to make miter cuts on picture frames.
Jigsaw
- Cutting Curves, Circles, and Shapes
- Crosscuts
- Miter Cuts
- Bevel Cuts
- Compound Miter Cuts
I think one of the best uses for a jigsaw is to cut curves, circles, and shapes. We can also use it to make short straight cuts. To improve accuracy, it’s best to use a speed square or rip fence. We can also adjust the bevel of a jigsaw to make bevel cuts and compound miter cuts.
Back to Table of ContentsHow to Cut Wood
Now we’re ready to make some cuts. We know what type of cut we want to make and which saw we should use to make that cut. So we’re ready to cut some wood, right?
Not yet. First, we need to talk about kerf. Merriam-Webster describes kerf as “the width of cut made by a saw”
We need to take the width of the cut or kerf into consideration when making our cuts.
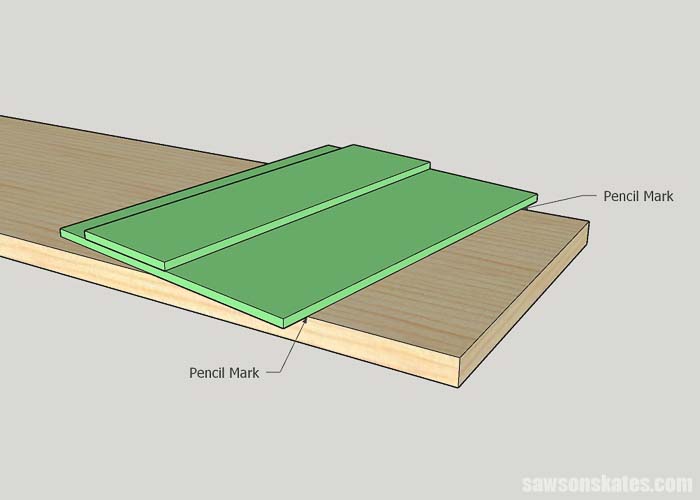
If we measured our board and made a mark and then cut on that mark our board would be too short because the width of the cut or kerf is wider than our pencil mark.
Here’s the way we need to do it. First, we need to measure and make a mark with a pencil. The side we measured on is the side we need for our project. This is the good side of the board. The other side is called the waste side of the board. We need to mark an “x” on the waste side of the board. This is important. The “x” will help us position the blade.
Next, we’ll position the blade on the waste side of the board. We want to leave the line when we make the cut. We can always make the board shorter. We can’t make it longer!
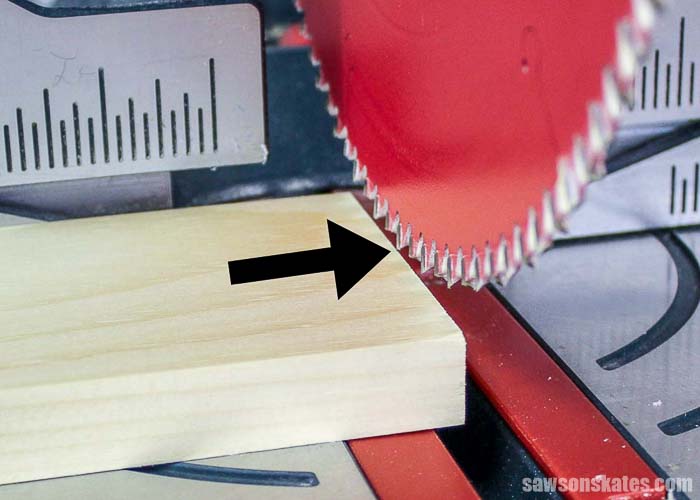
We’ll position the blade so there’s the thickness of a hair between the teeth and the line. Now we can make the cut.
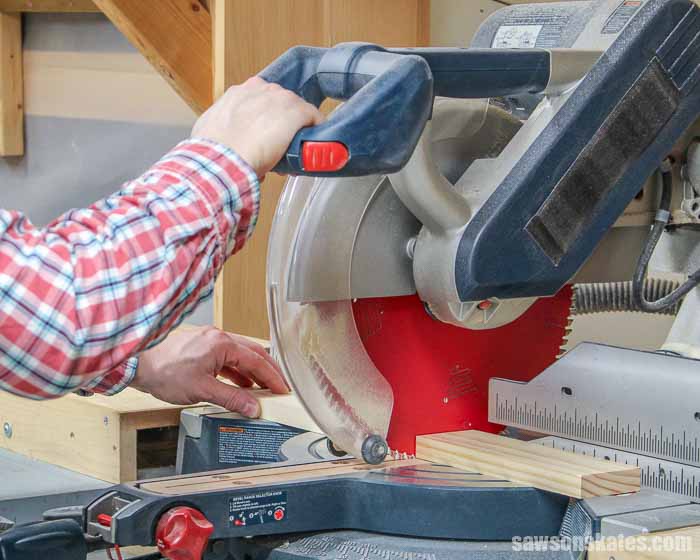
We can use this method for cutting wood with any saw, but let’s see how we can do it with a miter saw. Be sure to follow all of the instructions for your miter saw, work safely, and wear personal protective equipment (safety glasses, dust mask, and ear protection).
Step 1. Trim the End of the Board
First, we’ll use our miter saw to square one end of the board. Wood from the factory isn’t perfect. It’s rare to find a board with ends that are perfectly square. We’ll start by shaving off a small amount of wood to make the end of the board square.
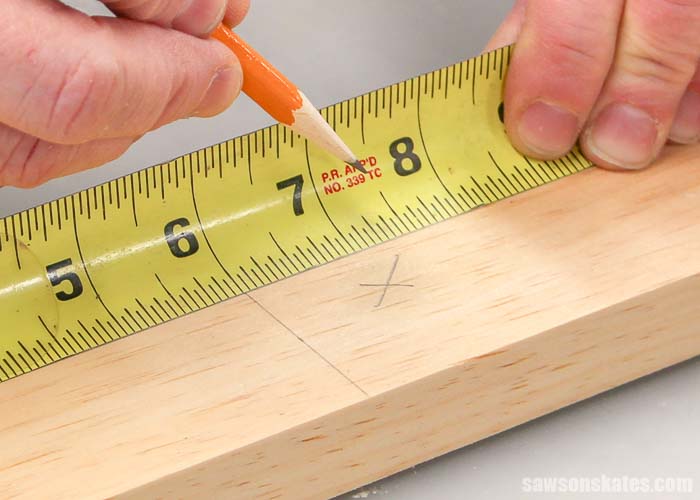
Step 2. Measure and Mark an “X“
Next, we’ll measure the length of our workpiece. We’ll start from the end of the board we just squared, measure the length we need, and make a pencil mark.
The side we measured on is the side we need for our project. This is the good side of the board. The other side is the waste side of the board. We need to mark an “x” on the waste side of the board. This is important. The “x” will help us position the blade.
Step 3. Position the Blade
Next, we’ll position the blade on the waste side of the board. We want to leave the line when we make the cut. We can always make the board shorter. We can’t make it longer!
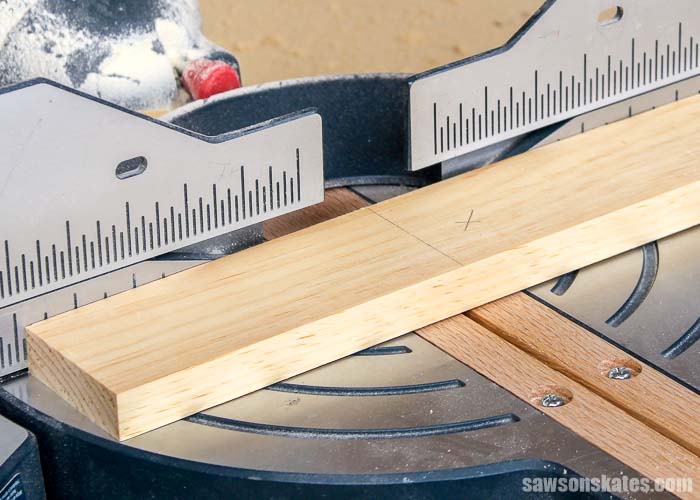
We’ll lower the blade (with the power off) and position it so there’s the thickness of a hair between the teeth and the line.
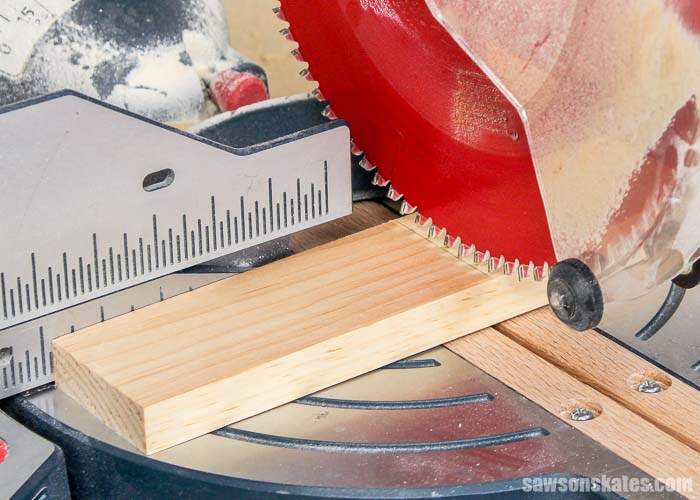
Step 4. Make the Cut
Now, we can make our cut. We’ll switch the power on, lower the blade to make the cut, and let the blade come to a full stop before raising the blade. Raising the blade with it still spinning can remove a small amount of wood which can change the length of our cut.
Now let’s measure the workpiece. We’re good to go if the workpiece is the measurement we needed. We’ll move on to Step 5 if the workpiece is a little too long.
Step 5. Adjust the Cut if Necessary
If our workpiece is a little too long we can use the blade to help us make micro-adjustments and cut the workpiece to the exact length we need.
With the saw turned off, lower the blade as far as it will go into the table, and gently slide the workpiece until it touches the side of the blade.
Keep the board in place and raise the blade. If we lower the blade (with the saw turned off) we’ll notice the teeth will just barely touch the end of our workpiece.
Raise the blade again, start the saw, and lower to make the cut. The blade will cut a micro amount off of the board.
Now we’ll measure the workpiece again. We’re good to go if the workpiece is the measurement we need. We’ll repeat Step 5 if the piece is still a little too long.
Sometimes I may need to do this step a few times, but using this technique allows me to cut my board to the exact length.
Final Thoughts
Many beginners are intimidated to start a DIY project because they’ve never cut a piece of wood before. Newbies are often unsure what kind of cuts they need to make, what saw to use, and how to make those cuts.
Today we cleared up the confusion. We looked at the different types of cuts we can make, the best saws to make those cuts, and learned important tips for cutting boards to the right length every time.
More Like This

Hi there – I’m Scott, a woodworking enthusiast and creator of Saws on Skates, a site I started in 2015 to share easy-to-follow tutorials, space-saving shop tips, and project inspiration for DIYers at any skill level. Learn more about my woodworking journey here.