Modern DIY Bathroom Vanity
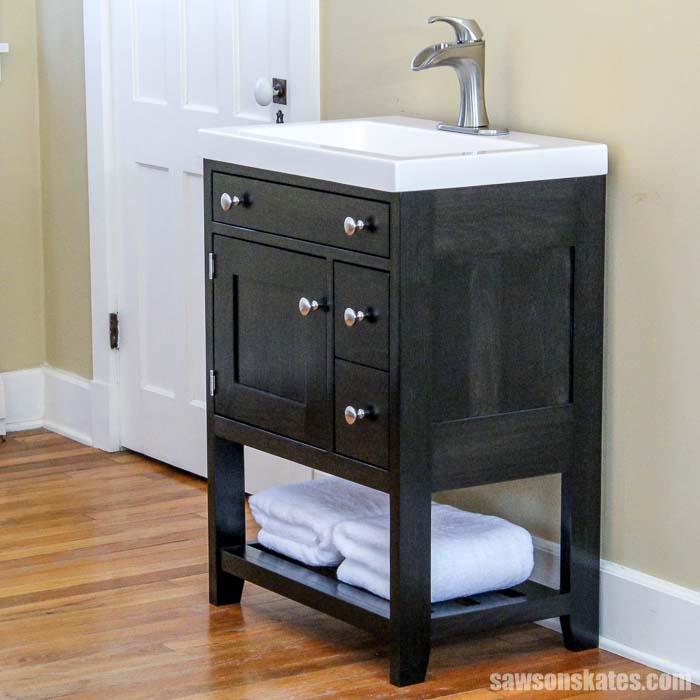
Build a modern DIY bathroom vanity with these step-by-step plans featuring a charred wood finish, a towel shelf, and a hidden toilet paper holder.
What Should I Build Next?
That's the question I help answer.
Every week, I send woodworking ideas to 17,000 DIYers who love building things.
You'd fit right in.
Modern DIY Bathroom Vanity
A friend of mine recently bought a condo that he plans to renovate and use a vacation rental. He wants to fill every square inch of the condo with unique features. Unique features that guests wouldn’t have in their own homes.
Features so unique that his guests will go home raving to their friends and family. Then those friends and family will need to rent the place and check it out for themselves. It’s a smart business plan!
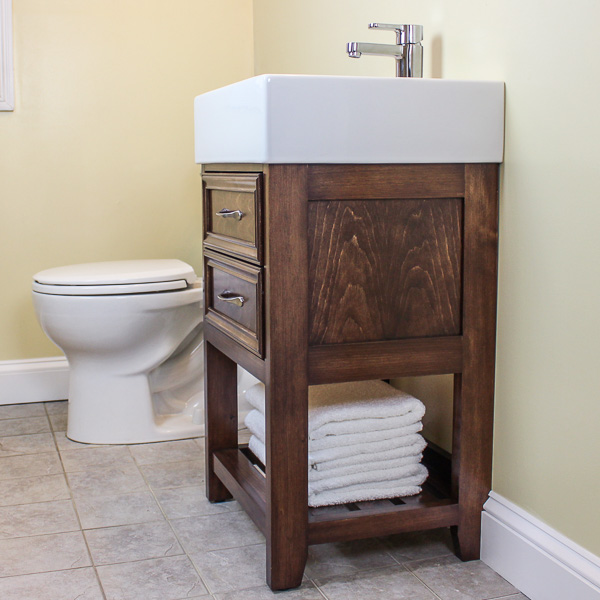
With my marching orders in hand, I designed this custom DIY bathroom vanity. It’s loaded with style and unique features. There’s a shelf at the bottom for displaying guest towels. The top drawer opens to reveal a small table. Which is the perfect place to set makeup or to rest a hairdryer. But the most unique thing is the hidden toilet paper holder!
This tutorial contains affiliate links to supplies and tools. Purchases made using these links help support the Saws on Skates website and allows me to share more projects and tips with you. There is no cost to you for using these links. Visit my site policies for more information.
Table of Contents
- What Makes This DIY Bathroom Vanity Unique?
- What Skills Do You Need to Build This DIY Bathroom Vanity?
- What Tools Do You Need to Build This DIY Bathroom Vanity?
- What Kind of Wood Do You Need to Make a Vanity?
- What Sink Do You Need to Make This Vanity?
- How Do You Finish This Bathroom Vanity?
- How to Make a Modern DIY Bathroom Vanity
- Get the PDF Plan
What Makes This DIY Bathroom Vanity Unique?
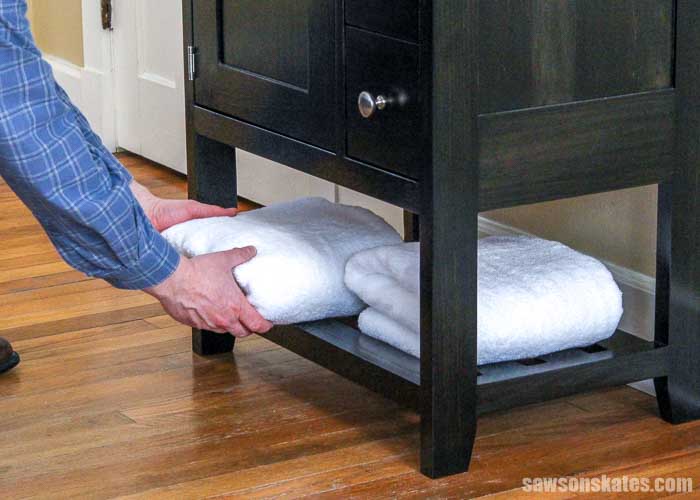
At the bottom of vanity there’s a shelf. It’s a great place to store towels, soaps or a tissue box.
The drawer at the top of the vanity opens to reveal a small table. It provides a flat surface to lay out everything you need to get ready like makeup or a extra space to rest a hairdryer.

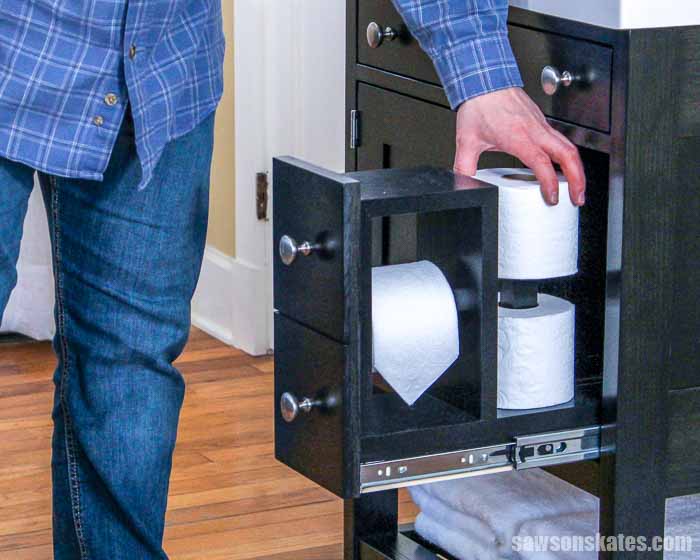
The most unique thing about this vanity is the hidden toilet paper drawer. The drawer has a holder and storage for up to two rolls. Check out the hotel fold on that toilet paper!
What Skills Do You Need to Build This DIY Bathroom Vanity?
The construction of this DIY vanity is fairly straightforward. But there are some parts like the door and drawers that need to fit together properly. For those reasons I would say this is more of a project for DIYers with beginner to intermediate woodworking skills.
What Tools Do You Need?
You’ll need tools like a miter saw, a drill, a Kreg Jig, and a table saw to build this bathroom vanity. It’s also helpful to have an assortment of clamps.
Related: 10 Must-Have Woodworking Tools for Beginners
You may also enjoy these helpful tool tutorials:
- How to Use a Kreg Jig
- Beginner’s Guide to Table Saw Safety
- 7 Miter Saw Tricks Every DIYer Should Know
What Kind of Wood Do You Need to Build a Vanity?
This DIY bathroom vanity can be made with just about any type of wood. I used common pine and a few pieces of plywood to build this vanity. I purchased the pine at my local home improvement store. You could also build a vanity with wood like poplar, oak, maple, etc.
I used 1x material and 5/4 pine for this project. The thickness of a 5/4 board (spoken as five-quarter) can range from about 1” thick to about 1-¼ inches. The 5/4 wood I used for the vanity measured about 1-⅛” thick.
Related: Beginner’s Guide to Wood Sizes (Nominal vs Actual)
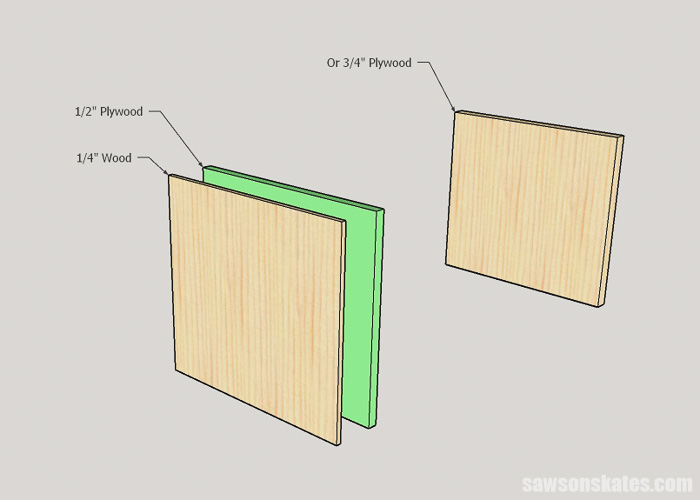
As I mentioned, I used a combination of pine and plywood for this project. I planned to do a charred wood finish on this vanity so it was important to me that all of the wood matched. For the plywood side panels and door panel, I glued or laminated ¼” pine to the plywood. It’s a similar method I used to make book-matched panels. I could have skipped this step if I planned to paint the vanity.
What Sink Do You Need to Make This Vanity?
I bought a vanity combo (sink, cabinet, and mirror) for this project. I used the sink for this DIY vanity. The mirror will be installed in the bathroom and the cabinet will be donated to a charity.
I paid $99 for the combo. The combo must have been on clearance because it looks like it’s no longer available. This vanity combo appears to have a sink similar to the one I bought.
How Do You Finish This Bathroom Vanity?
The DIY bathroom vanity could be painted or stained. I chose to give my vanity a finish that looks like Shou Sugi Ban, a Japanese technique that preserves wood by charring it with flames.
Charring wood with flames might be a tricky technique for the average DIYer. I found a way to get a charred wood finish with a paintbrush! I used this Charred Wood Accelerator and a brush to get this finish.
I applied two coats of the charred wood accelerator. Then I applied a coat of lacquer and three coats of this semi-gloss water-based polyurethane.
Related: Polycrylic vs Polyurethane: Are They The Same?
If I chose to paint the vanity I would have applied a coat of primer and two coats of quality paint. In the past, I would apply the primer and paint with a paintbrush. More recently I started using a paint sprayer to paint my projects. A paint sprayer would make quick work of painting this project.
Related: Shou Sugi Ban Without a Torch (Charred Wood Finish)
How to Make a Modern DIY Vanity
Printed Plan
- Get the PDF plan here (includes detailed instructions, measurements, and bonus tips).
- Wood (per printed plan)
- 1” Pocket Screws
- 1-¼” Pocket Screws
- 1-½” Pocket Screws
- 1-¼” Wood Screws
- 2” Wood Screws
- Wood Glue
- Double-Sided Tape
- Playing Cards
- (2) 12″ Drawer Slides
- Sink
- (2) Hinges
- Knobs
- Tape Measure
- Drill
- Kreg Jig
- Kreg Multi-Mark
- Miter Saw
- Circular Saw
- Table Saw
- 90-Degree Right Angle Drill Attachment
- Countersink Drill Bit Set
- 3/4″ Forstner Bit
- Kreg Cabinet Hardware Jig
Supplies
Tools
Build a modern DIY bathroom vanity with these step-by-step plans featuring a charred wood finish, a towel shelf, and a hidden toilet paper holder.
- Make the Legs
Cut four pieces of wood to length for the legs and use a circular saw to cut an angle at the bottom of the legs.
- Make the Upper Side Rails
Cut four pieces of wood to length for the rails and drill pocket holes in each end.
Related: How to Use a Pocket Hole Jig (& Beginner Pitfalls to Avoid)
Since I couldn’t find the size I needed at my local home improvement store, I bought wider pieces and ripped them to width using my table saw.
Related: 21 Table Saw Safety Rules (& Mistakes to Avoid)
I could’ve also used a circular saw and a Kreg Rip-Cut to rip the boards to the correct width.
Related: 4 Ways to Make Straight Cuts with a Circular Saw - Make the Lower Side Rails
Cut two pieces of wood to length for the lower side rails and drill a pocket hole in each end.
Again, I couldn’t find the size I needed at my local home improvement store, I bought wider pieces and ripped them to width using my table saw. - Make the Side Panels
I planned to stain my vanity, so I wanted to be sure the panels matched the rest of the parts. I cut two pieces of plywood and two pieces of pine, gluing them to make a panel similar to how I made these book-matched panels. I drilled a few pocket holes around the edges when the glue was dry.
However, if you plan to paint your vanity, you can cut two pieces of plywood and drill several pocket holes around the edges.
- Assemble the Sides
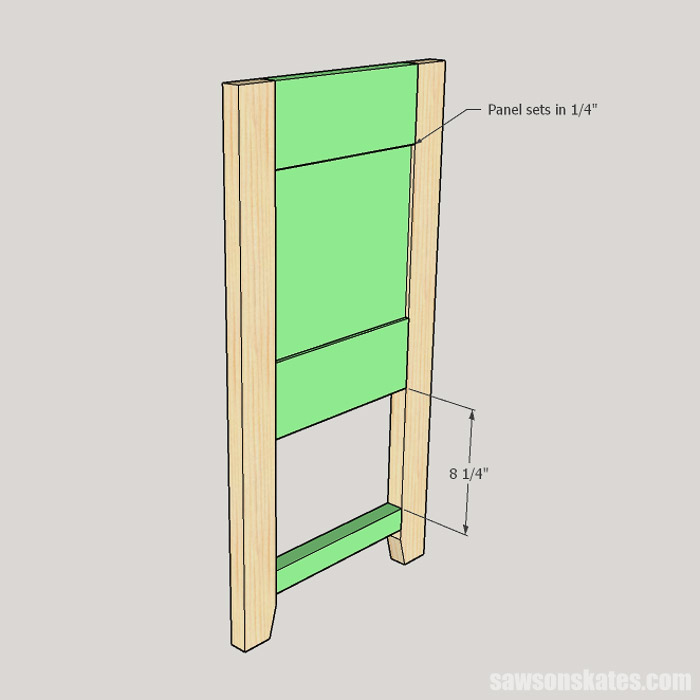
The side panel sets in from the faces of the legs. To help with the spacing, I placed a few pieces of scrap wood on my workbench. Then, I set the side panel on top of the scrap wood.
The bottom rail sets down from the middle rail. To help with the spacing I cut two pieces of scrap wood to length and placed it between the middle rail and bottom rail.
Apply glue to the rails, clamp to the legs, and attach using pocket screws. Then, attach the panel with pocket screws. Repeat for the other side.
- Attach the Sides
Cut three pieces of wood to length for the rails and drill pocket holes on each end.
Apply glue to the rails, clamp to the legs, and attach using pocket screws. - Install the Corner Braces
Cut two pieces of plywood into triangles. Drill a pocket hole in each side. Apply glue to the sides and attach using pocket screws.
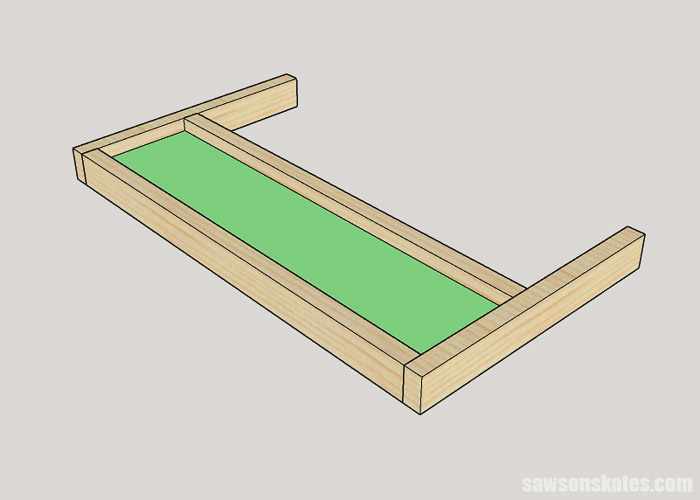
- Make the Bottom
Cut one piece of plywood to size for the bottom and drill pocket holes on each edge. Place in the cabinet and attach using pocket screws.
On the backside. Cut one piece of wood to length and drill pocket holes in each end. Apply glue to the rail, clamp to the legs, and attach using pocket screws. - Install the Drawer Rails
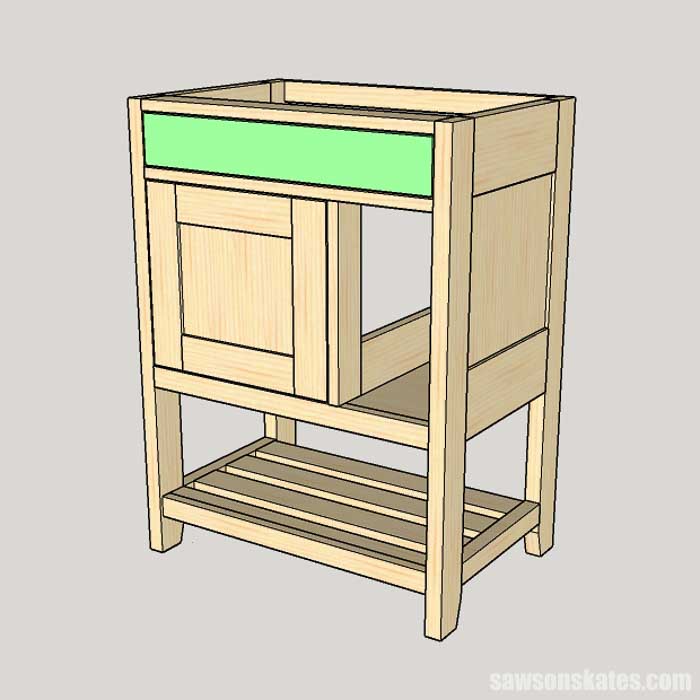
Cut one piece of wood to length for the rail and drill pocket holes in each end. Cut one piece of wood to length for the vertical piece and drill pocket holes in each end.
Apply glue to the bottom of the vertical piece, place on the bottom, clamp in position and attach using pocket screws.
Apply glue to the top of the vertical piece and the ends of the rail. Place in the cabinet, clamp in position and attach using pocket screws.
On the backside. Cut one piece of wood to length. Drill pocket holes in the end and several pocket holes along the bottom edge.
Apply glue, clamp in position and attach using pocket screws. - Install the Slats
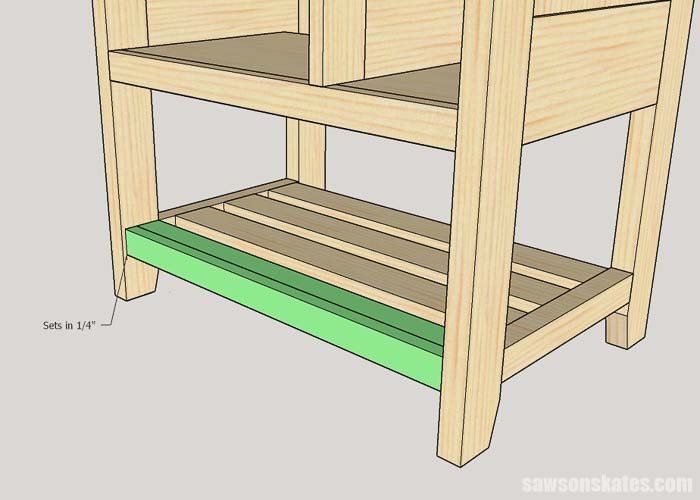
I designed the slats to fit around some existing pipes. You may want to adjust the spacing of the slats or add another slat for your project.
Cut three pieces of wood to length and drill pocket holes in each end. The back slat sets in from the back of the leg.
To help with the spacing of the slats, I cut two pieces of scrap wood to length, attaching one penny to each with painter’s tape.
To space the slats evenly, I placed the scraps between them. Then, I clamped the slats to the rails and attached them with pocket screws.
Cut two pieces of wood to length and drill pocket holes in each end. Apply glue to the edge of one slat and clamp to the other.
When the glue is dry, position in the cabinet, and clamp to the legs. Attach using pocket screws. - Make the Door
Measure the door opening. The door needs to have an ⅛” of clearance on all four sides. Cut two pieces of wood to length for the rails and drill pocket holes in each end. Cut two pieces of wood for the stiles. Adjust these measurements to fit your opening if necessary.
I planned to stain the vanity. So I wanted to be sure the panels matched the rest of the parts. I cut 1 piece of ¼” plywood and 1 piece of ¼” pine panel. I made the pine panels in a similar way to these book-matched panels. I glued the pine panel to the plywood panel. When the glue was I drilled a few pocket holes around the edges.
The door panel sets in a ¼” from the front of the door. To help with the spacing I placed a few pieces of ¼” scrap wood on my workbench. Then I placed the door panel on top of the scrap wood.
Apply glue to the rails, clamp to the stiles and attach using pocket screws. Attach the panel with pocket screws. - Install the Door
I attached a non-mortise hinge on the left side of the door opening near the top and bottom. Then I placed the door in the opening. I used playing cards to adjust the spacing so there was about an ⅛” of clearance at the top, bottom and sides of the door. When I was pleased with the spacing I attached the hinges to the door using the screws that were included with the hinges
- Make the Drawer
Cut two pieces of wood to length for the sides. Cut two pieces of wood to length for the front and back and drill a pocket hole in each end.
Cut a piece of plywood for the bottom and drill a few pocket holes on each side.
Apply glue to the front, clamp to the sides and attach using pocket screws. Position the bottom and the back. Make sure the bottom is flush with the bottom of the sides and attach using pocket screws. - Install the Drawer
Attach the drawer slides to the sides of the cabinet according to the directions for your drawer slides.
Place a piece of scrap wood on the rail of the cabinet. Then place the drawer on top of the scrap wood. Attach the drawer slides to the sides of the drawer according to the directions for your drawer slides.
Measure the opening. The drawer front needs to have an ⅛” of clearance on each side. I cut a piece of wood and ripped to width for my drawer front. Adjust the measurements for your drawer front if necessary.
I applied a few pieces of double-sided tape to the back of the drawer front. I placed the drawer front in the opening. I used playing cards to adjust the spacing so there was about an ⅛” of clearance at the top, bottom and sides of the drawer. When I was pleased with the spacing I clamped the drawer front to the drawer box.
Next, I drilled two countersink holes on the inside of the drawer box and attached with wood screws. - Make the Toilet Paper Drawer
Cut two pieces of wood to length for the sides. Cut one piece of wood to length for the bottom. Apply glue to the sides, position on the bottom, and clamp. Drill several countersink holes in the bottom edge of the sides. Attach the sides to the bottom with wood screws.
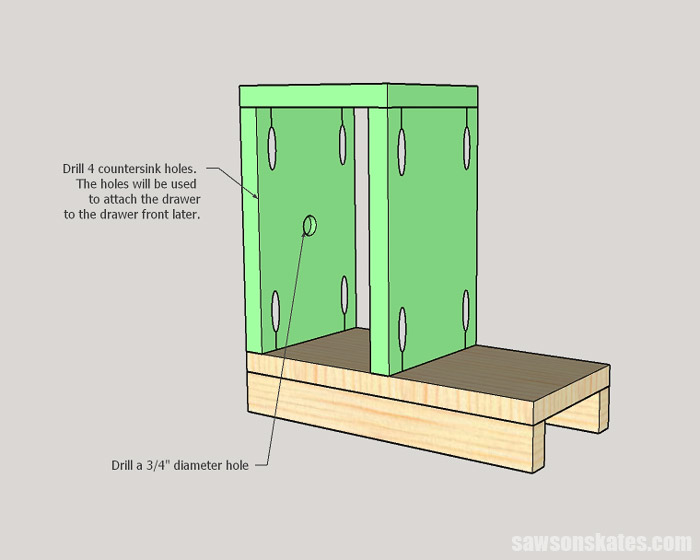
Cut one piece of wood to length for the top. Cut two pieces of wood to length for the front and back. Drill pocket holes in each end. On the front piece, drill four countersink holes. The holes will be used in Step 16 to attach the drawer box to the drawer front.
Related: How to Use a Countersink Bit
On the inside of the front and back pieces, locate the center and make a mark. Use a Forstner bit to drill a hole at each mark. The holes need to be about a ¼” deep. These holes will be used for the toilet paper holder.
Related: What is a Forstner Bit? (& How to Use It)
Apply glue to the ends of the front and back, position on the top, and attach using pocket screws. I needed to use a 90-degree right angle drill attachment to reach the inside pocket screws.
Apply glue to the other ends of the front and back, position on the bottom, and attach using pocket screws. I needed to use a 90-degree right angle drill attachment to reach the inside pocket screws.
Cut a piece of wood to length and rip to width. Drill one pocket hole on the front and back. Apply glue, position on the bottom and attach using pocket screws. I needed to use a 90-degree right angle drill attachment to reach the inside pocket screw.
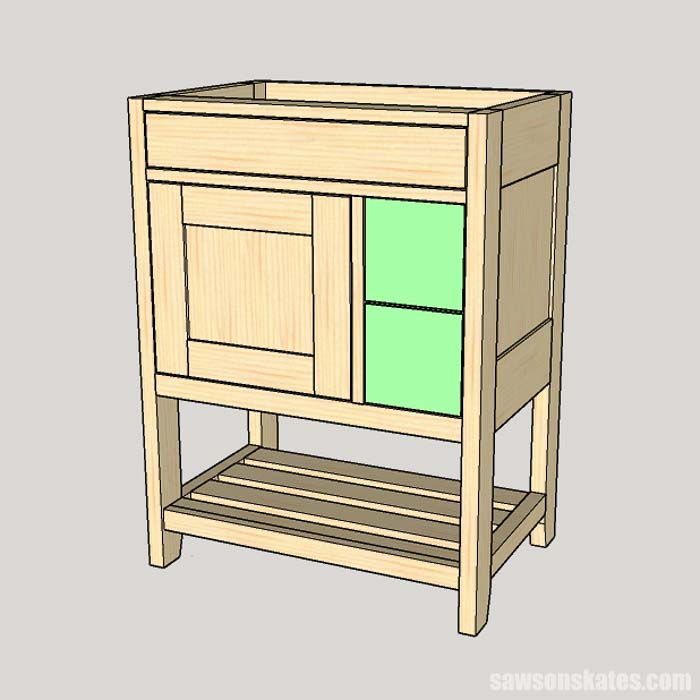
- Install the Toilet Paper Drawer
Attach the drawer slides to the sides of the cabinet according to the directions for your drawer slides.
Place a piece of scrap wood on the rail of the cabinet. Then place the drawer box on top of the scrap wood. Attach the drawer slides to the sides of the drawer according to the directions for your drawer slides.
Measure the opening. The drawer front needs to have an ⅛” of clearance on each side. I cut a piece of plywood for my drawer front. Adjust the measurements for your drawer front if necessary.
Then I cut two pieces of pine to make the single door look like two drawers. I applied glue to the backs of the pine and clamped it to the plywood.
When the glue was dry I applied a few pieces of double-sided tape to the back of the drawer front. I placed the drawer front in the opening. I used playing cards to adjust the spacing so there was about an ⅛” of clearance at the top, bottom and sides of the drawer.
When I was pleased with the spacing I clamped the drawer front to the drawer box. Attach with wood screws (using the countersink holes drilled in Step 15. I needed to use a 90-degree right angle drill attachment to reach the screws. - Finish the Bathroom Vanity
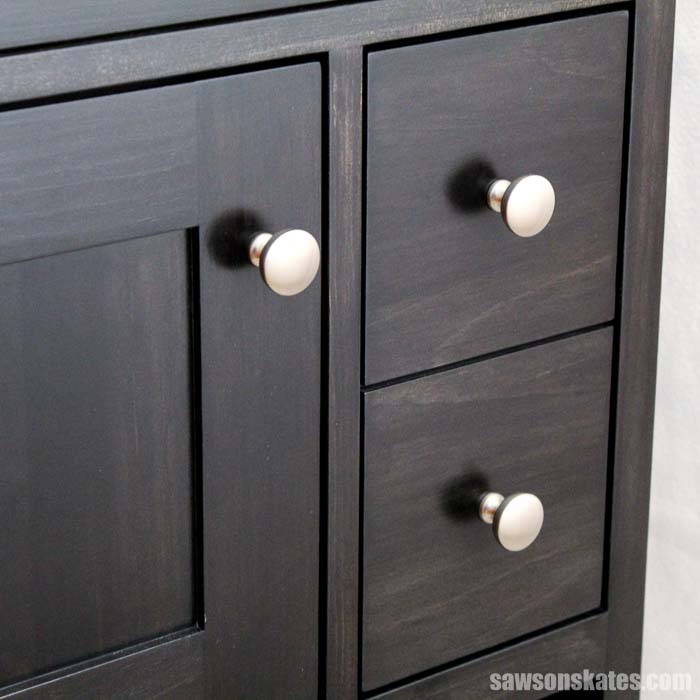
I used the Kreg Hardware Jig to drill holes for the knobs. I sanded the vanity smooth with 150 grit sandpaper. Then I applied a charred wood accelerator. The vanity was sealed with three coats of water-based polyurethane.
Related: Shou Sugi Ban Without a Torch (Charred Wood Finish)

Includes:
- List of tools and materials
- Complete measurements (in inches)
- Easy-to-follow instructions
- Detailed diagrams
Final Thoughts
This DIY vanity is loaded with style and unique features. There’s a rack at the bottom for displaying guest towels. The top drawer opens to reveal a small table. It’s the perfect place to set makeup or to rest a hairdryer. But the most unique thing is the hidden toilet paper holder!
Get the PDF plan (including the detailed instructions and measurements) now!
Thank you for stopping by. If you found this information helpful, would you please pin it to Pinterest? Other DIYers would appreciate it and I would too! Thank you – Scott
Recommended For You
Pin This For Later

Hi there – I’m Scott, a woodworking enthusiast and creator of Saws on Skates, a site I started in 2015 to share easy-to-follow tutorials, space-saving shop tips, and project inspiration for DIYers at any skill level. Learn more about my woodworking journey here.
How difficult would it be to reverse the toilet paper drawer and cabinet (i.e., put the drawers on the left side and the cabinet on the right)?
Hi Karen – That should be fairly easy to do. Just build the drawers on the left and cabinet door on the right. Good luck with your project!