How to Make Shaker Style Crown Molding
Learn how to make Shaker style crown molding! I’ll show you step by step how to use your table saw to turn wood into a simple molding for walls and cabinets.
How to Make Shaker Style Crown Molding for Your Home
Making a simple, flat Shaker style crown molding is an easy DIY project. First, we’ll need some wood like maple, oak, cherry, pine, poplar, etc. Next, we’ll need a table saw with the blade set to 45 degrees. Then with four easy cuts, we can make our own crown molding!
You may also enjoy How to Build DIY Shaker Cabinet Doors and How to Make DIY Tool Storage Cabinets.
This post contains affiliate links to supplies or tools I used to complete this project. Purchases made using these links help support the Saws on Skates website and allow me to share more DIY projects. and DIY tips with you. There is no cost to you for using these links. Click here to visit my site policies.
What is Crown Molding?
Crown molding is the angled decorative trim we sometimes see near the tops of rooms where walls meet the ceiling or at the tops of kitchen cabinets.
Why Install Shaker Style Crown Molding?
Crown molding can add a finishing touch to rooms. It can make a room feel more formal or add a sense of elegance when it’s installed where walls meet ceilings. Crown molding adds height to kitchen cabinets which can make a room feel taller.
Why Make Your Own Shaker Style Crown Molding?
Crown molding can be expensive so we can save a little money by making our own. But there is a tradeoff to saving money and that’s the time it takes to make the molding.
For me, making my own Shaker style crown molding was more about a sense of pride. I handbuilt these tool storage cabinets for my small workshop, so I thought it would be cool if I made the crown molding too.
Making my own crown molding also allowed me to get the exact look I wanted. I was installing this molding in my workshop so I didn’t want it to be overly ornate or highly detailed.
I wanted a simple, flat Shaker-style crown molding that would add height to my small workshop.
Before
Are you ready for the reveal? Here’s a look at my tool cabinets before I added the DIY crown molding.
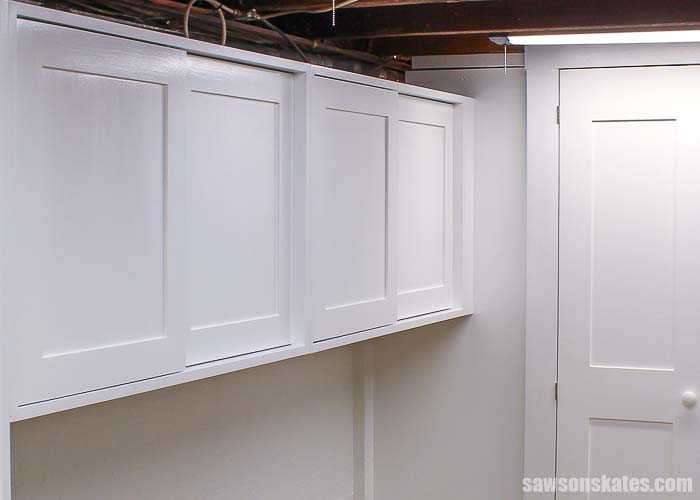
After I Installed Shaker Style Crown Molding
And here’s the after! Adding crown molding to my tool storage cabinets makes my workshop feel taller. Plus it neatens up the look of my shop by hiding the pipes and wires above the cabinets.

Make Shaker Style Crown Molding with a Table Saw
There are several ways we can make Shaker Style crown molding. We could use a router with decorative router bits or we could use our table saw to make a simple crown molding.
We can make this simple crown molding with just four cuts on the table saw. First, we’ll use a digital angle gauge to set the blade to 45 degrees.
Next, we’ll cut a narrow 45-degree bevel on each edge. Then we’ll flip the board and cut a wide 45-degree bevel on each edge. That’s it. We just made our own simple, flat Shaker style crown molding!
Related: 7 Easy Tricks to Tune Up Your Table Saw

Table Saw Safety
- Stop immediately if you see, hear or feel something unusual or if you smell wood burning
- Use a comfortable stance and don’t reach beyond the table saw
- Keep the material tight against the fence to avoid kickback
- Stay out of the path of the blade
- Stay out of the path of the material in the event of kickback
- Push the material all the way through and clear the saw blade completely
What Kind of Wood to Make Crown Molding?
We can use a variety of woods to make our DIY crown molding. If we’re planning to stain the molding we could use maple, oak, cherry, etc. If we’re planning to paint the molding we could use pine or poplar.
I used pine to make my Shaker style crown molding.
There’s something we need to remember if we’re going to paint our crown molding. And that is knots can bleed through the paint which can be unattractive. We’ll need to seal any knots before we paint our molding.
Related: How to Stop Knots from Bleeding Through Paint
Where Can You Use Shaker Style Crown Molding?
- Kitchen Cabinets
- Bookcases
- At the tops of rooms where walls meet the ceiling
Where Can You Buy Crown Molding?
Store-bought crown molding is available if you don’t have the tools or time to DIY your own. We can buy crown molding at big box home improvement stores like Home Depot or Lowe’s.
We can even buy easy to install peel and stick crown molding online and have it shipped to our home!
How to Make Shaker Style Crown Molding
Supplies
- 1x4x8 (I used pine)
Tools
- Table Saw
- Digital Angle Gauge
- Kreg Multi-Mark
Related: See the complete list of Tools I Use in my workshop
Measurements for Shaker Style Crown Molding
I should give you a heads up before we start making the DIY crown molding. I only needed four pieces of molding for my project. But I actually made five pieces in case I made a mistake when installing the molding.
I didn’t need a lot of molding so I was able to make it all at the same time. And I wasn’t concerned about the width of the final piece. But, the width would be important if I was making this for a room or for a bigger project.
The width would be important because I may need to make more molding. The width of the original molding and the new molding would need to be the same measurement in order to match.
In other words, you may want to be more precise if you’re planning to make DIY crown molding for a room or a bigger project.
What you may want to do in Step 1 is make the first 45-degree bevel cut, measure 3-3/16″ across the face and make a mark. Next, make the second 45-degree bevel cut at this mark. Then, move on to Step 2.
Or even easier, you could just use a piece of your original molding as a template to set up the table saw if you needed to make more!
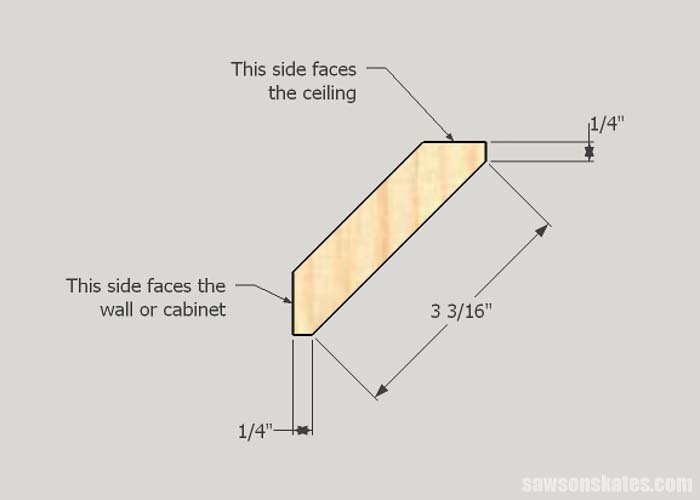
Step 1. Cut the Narrow Bevels
First I used my digital angle gauge to set my table saw blade to 45 degrees.
I set the rip fence to about 3-1/4”. Then I cut the first bevel, flipped the piece and cut the second bevel.
Related: Table Saw Safety Rules
Step 2. Cut the Wide Bevels
I used my Kreg Multi-Mark to measure 1/4” on the 45-degree bevel and made a mark.
I adjusted the rip fence to make a cut at this mark. I cut the third bevel, flipped the piece and cut the fourth bevel. That’s it. We just made our own crown molding!
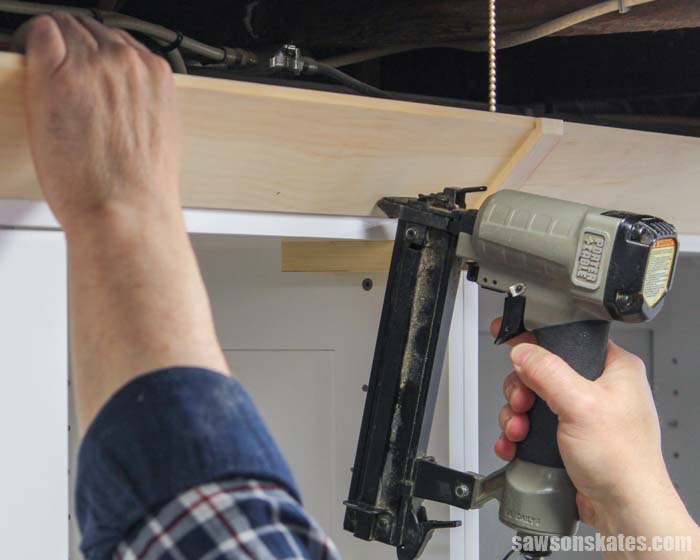
Step 3. Finish the Crown Molding
This Shaker style crown molding can be painted or stained. I finished mine by sanding with 120 grit sandpaper. Next, I cut the pieces to length and attached them to my DIY tool cabinets with 1-1/4″ brad nails.
I filled any holes with Ready Patch and lightly sanded again. Then, I applied a coat of primer and two coats of quality paint.
Final Thoughts
How easy was that? You just learned how to make crown molding! Making a simple, flat Shaker-style crown molding is an easy DIY project. First, we’ll need some wood like maple, oak, cherry, pine, poplar, etc. Next, we’ll need a table saw with the blade set to 45 degrees. Then with four easy cuts, we can make our own crown molding!
Thank you for stopping by. If you found this information helpful, would you please pin it to Pinterest? Other DIYers would appreciate it and I would too! Thank you – Scott

Hi there – I’m Scott, a woodworking enthusiast and creator of Saws on Skates, a site I started in 2015 to share easy-to-follow tutorials, space-saving shop tips, and project inspiration for DIYers at any skill level. Learn more about my woodworking journey here.
There is mention of a video. I did not see it.
Hi Will – Thank you for bringing this to my attention. The video was located below the heading “How to Make Your Own Crown Molding Video”. But I’ve changed it to “VIDEO: How to Make Your Own Crown Molding” so that it’s easier for everyone to find. Below the heading there is an image with an arrow “>”. Just click that arrow and the video will begin to play.
VIDEO: Make Your Own Crown Molding
Watch this quick video to see how to turned pieces of 1×4 into crown molding!
Before
This is what I see just as before.
Thanks
Hey Will – I think I may have figured this out. The video won’t display for you if you have an ad blocker installed in your browser.
Could you show how you made your connection pieces, the ones between, when you installed the crown molding pieces please? They have a different appearance and look like they might have a way to help install the moulding.
This is so convenient because I need to install kitchen cabinet but do not have something to close in the small space above them.
Hi Barry – I was hoping no one noticed those! I’m actually not happy with the way they turned out. I installed them because I need this crown molding to be removable. The crown molding covers pipes and wires I may need to access in the future. The molding butts against those pieces so that I can remove the molding in sections, rather than one continuous piece. In other words, they don’t hold the molding in place. They just serve as a break in between the sections of molding. I was planning to show how I installed the molding, but as I mentioned, I’m not happy with how those pieces turned out. They’re very fragile. I would need to redesign them to make them more durable before I would feel comfortable sharing them.
Hopefully, you are planning on doing that BEFORE I have to install it above my sons’ cabinets. There isn’t going to be a lot of space above them and I don’t think a crown moulding would work (just to little room) but I do have to do something. :o)