How to Make Shaker Cabinet Doors (With a Router)
Looking for an inexpensive way to improve the look of your cabinets? I’ll show you how I built my own DIY Shaker cabinet doors. It’s easier than you think!
What Should I Build Next?
That's the question I help answer.
Every week, I send woodworking ideas to 17,000 DIYers who love building things.
You'd fit right in.
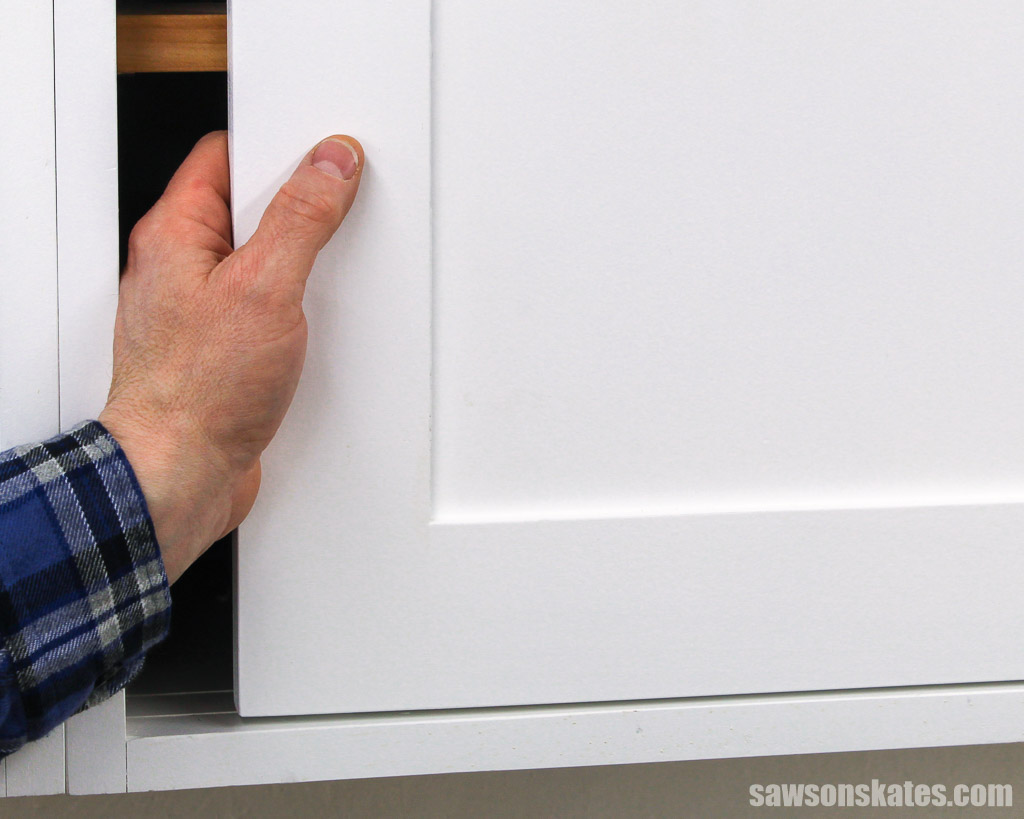
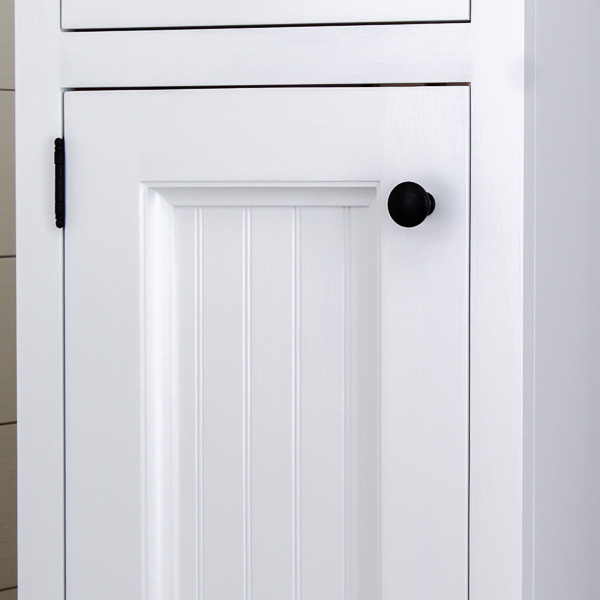
Shaker cabinet doors have an understated yet elegant appearance and are versatile enough to be used in traditional and modern settings, making them a popular choice for many homeowners.
In this step-by-step tutorial, I’ll break down how to make Shaker cabinet doors with a router and other basic tools and supplies. I’ll also provide tips for success so that you can create beautiful, durable Shaker cabinet doors that will last for years!
Originally published March 12, 2019, updated March 14, 2022.
This tutorial contains affiliate links to supplies and tools. Purchases made using these links help support the Saws on Skates website and allows me to share more projects and tips with you. There is no cost to you for using these links. Visit my site policies for more information.
Table of Contents
- What are Shaker Style Cabinets?
- Where Can You Use DIY Shaker Cabinet Doors?
- What are the Parts of a Shaker Cabinet Door?
- What Tools Do You Need?
- What Wood Should You Use?
- What Size Should You Make the Groove?
- How Do You Finish the Shaker-Style Cabinet Doors?
- How to Make Shaker Cabinet Doors with a Router
- Get the Free Printed Plan
What are Shaker Style Cabinets?
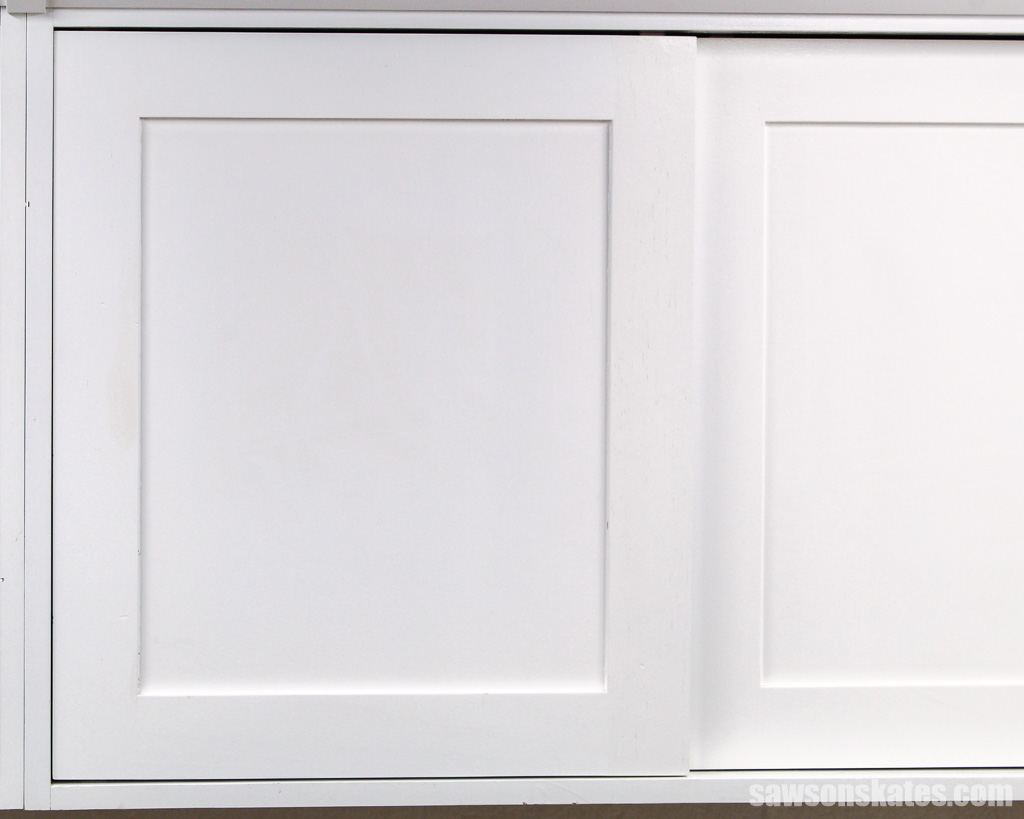
One of the things that make Shaker cabinets unique is their simplicity. The doors have a classic style that features a simple, clean design. They are often plain, without any decorative details.
Shaker cabinet doors are also called frame-and-panel doors because they consist of a wooden frame with a panel in the center. The center panel is typically a flat piece of wood but can also be glass.
Where Can You Use DIY Shaker Cabinet Doors?
- Kitchens
- Bathrooms
- Laundry Room
- Furniture Projects
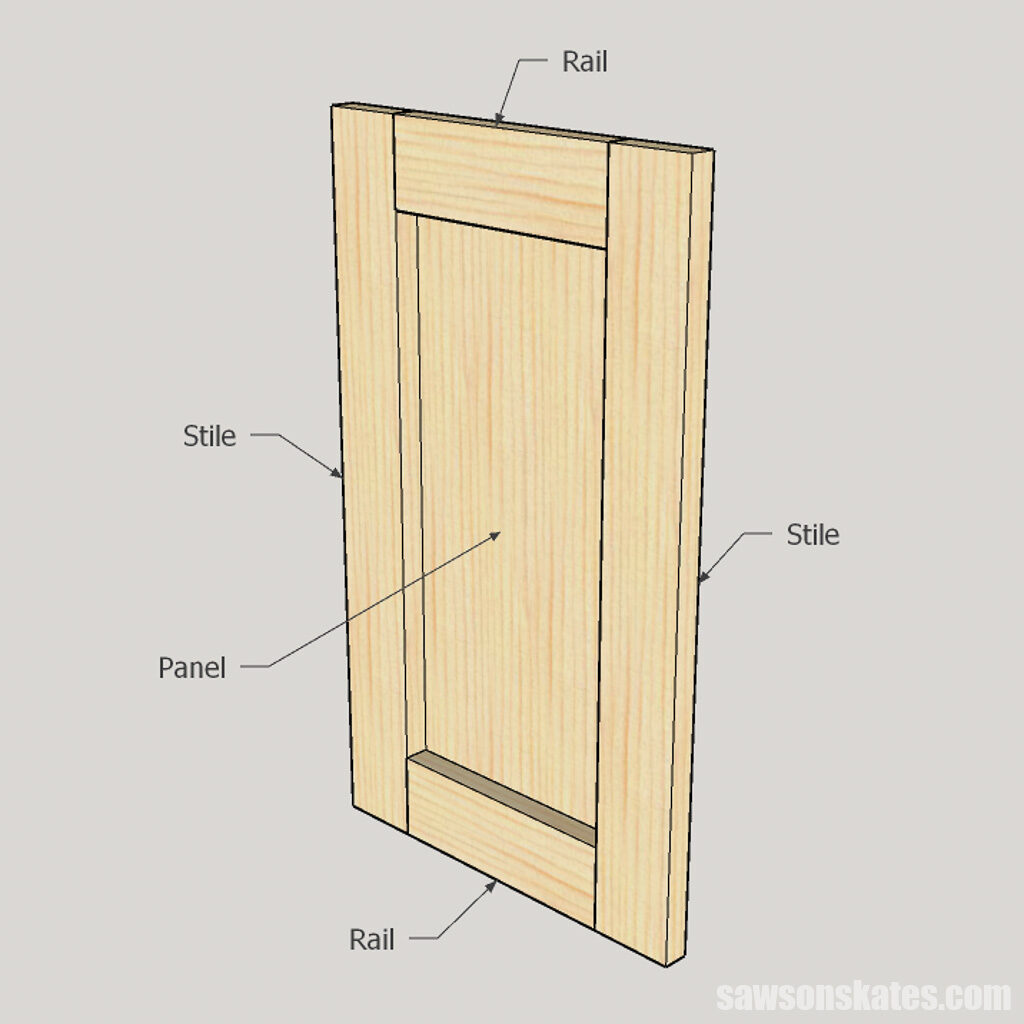
What are the Parts of a Shaker Cabinet Door?
There are two primary components of Shaker-style cabinet doors.
- Frame
Rails (horizontal pieces) and stiles (vertical pieces) are used to make the frame. For the panel to fit into, a groove is cut into the interior edges of the frame. - Panel
The panel is inserted into the grooves in the frame
What Tools Do You Need?
Shaker cabinet doors might look difficult to build, but they’re relatively easy to make with a few basic tools like a miter saw, pocket hole jig, and a drill. You’ll also need a router table to cut the grooves in the frame and an additional saw to cut the center panel.
Miter Saw
I used a miter saw to cut the parts for my Shaker door frames. The doors will not be square if the cuts are not made precisely at 90 degrees, so make sure your saw is tuned up and ready to go before cutting the frame pieces.
Related: How to Adjust a Miter Saw for Accurate Cuts
After your saw is tuned correctly, it’s critical to cut the rails and stiles to the same length. Any differences might result in the doors not being square. I attached a stop on my saw’s fence when making these cuts. The stop guaranteed that the boards were all cut to the same length.
Related: 7 Miter Saw Tricks Every DIYer Should Know
Pocket Hole Jig
For this project, I used pocket hole joinery to assemble the frame. You may drill the pocket holes with any pocket hole jig you have. If you don’t already own a jig and you need to build a lot of doors (and drill a lot of pocket holes), consider buying one that includes a built-in clamp.
Related: Which Kreg Jig Should You Buy?
Pocket holes are how I prefer to join many of my DIY projects, but you could assemble your doors another way. For example, you might use dowels to join the rails and stiles or might use stub tenons and grooves.
Stub tenon and groove joints are similar to mortise and tenon joints, but they are easier to make. Rather than cutting a deep mortise, a shallow groove is cut along the entire length of the stiles. And instead of a long tenon, a short, stubby tenon is cut at the end of the rails. The stub tenon fits into the groove, and glue holds it in place.
Drill
I made the pocket holes and drove the pocket screws that joined the rails and stiles together using a drill.
Related: Impact Driver vs Drill: What’s the Difference?
Router Table
I made the grooves on the inside of the frame parts using a 1/4″ straight router bit in my router table.
Related: How to Use a Router Table for Beginners
Additional Saw
You’ll need to cut some 1/4″ thick material for the center panel of the door. You could cut the panel with a table saw or circular saw and a Kreg Rip-Cut or Kreg Accu-Cut.
Related: 4 Ways to Make Straight Cuts with a Circular Saw
What Wood Should You Use?
When making shaker cabinet doors, it is important to use quality materials. The door frames should be made from solid wood, and the panels should be made from either solid wood or plywood.
Frames
The stiles and rails can be made of almost any wood, but I recommend using hardwood rather than softwood.
Softwoods, like pine, are prone to dents, dings, and scratches, whereas hardwoods are more durable and resistant to this type of damage. Hardwoods include poplar, cherry, oak, maple, and so on.
There are a few more factors to consider when selecting wood for your door frames. If you’re making the doors to match existing cabinetry, use the same wood species as the cabinets. Consider using poplar if you intend to paint your doors since it’s relatively knot-free and accepts paint well.
Related: How to Stop Knots From Bleeding Through Paint
Whatever wood species you choose, be certain the boards are straight, flat, and free of knots.
You may buy the boards from your local home improvement store, but you should also check out your local lumberyard. Lumberyards are typically more expensive than home improvement stores, but the quality is often better.
Related: Beginner’s Guide to Wood Sizes
Panels
You should also think about the material you’ll use for the center panels and how you’ll finish the doors. Solid wood, plywood, beadboard, and even lauan are all options. You may also use glass panels instead of wood.
Make sure whatever material you choose lays flat and isn’t twisted or warped.
Solid Wood
Solid wood center panels are a good option if you want to stain or leave your doors natural. If you make solid wood panels from the same stock you use for your door frames, they will match the frames exactly.
I’m attempting to reduce the amount of plywood that I use in my projects, so for that reason, I went with solid panels for my Shaker doors.
My favorite way to make solid wood panels is to resaw boards with my band saw. The term resawing refers to cutting a board into thinner pieces.
Imagine standing a board like a 1×4 on its edge, cutting it in half lengthwise, and then opening it like a book. Once it’s opened, the edges are glued to form a panel.
I used this technique to make book-matched panels for this DIY bathroom vanity and even the walls for my DIY truck camper.
Plywood
The easiest method to make the center panels is to use plywood sheets because you don’t have to glue pieces of wood together as you would when making solid wood panels. You can simply cut the sheet to the correct size.
If you’re staining or leaving the doors natural, use plywood with a hardwood veneer like oak, maple, etc., to match your door frames.
If you’re painting your doors, use paint-grade plywood.
You could also use lauan, a kind of plywood. However, because lauan has big, open pores, you’ll almost certainly want to use a grain filler to fill them before priming and painting for a smooth finish.
What Size Should You Make the Groove?
A groove must be cut in the door frame to install the door panel, and the width of the groove must match the thickness of the panel. I made the groove for my doors with a router, mounted in a router table.
I’ve heard some DIYers refer to these grooves as dadoes, but there’s a difference between dadoes and grooves.
Both dadoes and grooves are flat-bottomed cuts, but a dado is perpendicular to the wood’s grain, whereas a groove is parallel to it.
The Width of the Groove
The thickness of the door panel is just shy of a 1/4″, so I used a 1/4″ straight cutting router bit which will cut a 1/4″ wide groove.
The Depth of the Groove
The door panel needs to float in the groove so that it can expand and contract with seasonal changes.
I cut my door panel so that it will engage the groove by a 1/4″ on each side. However, I set the depth of the router bit to 7/16”, which will allow the panel to engage the groove by 1/4″ and allow for 3/16” of clearance.
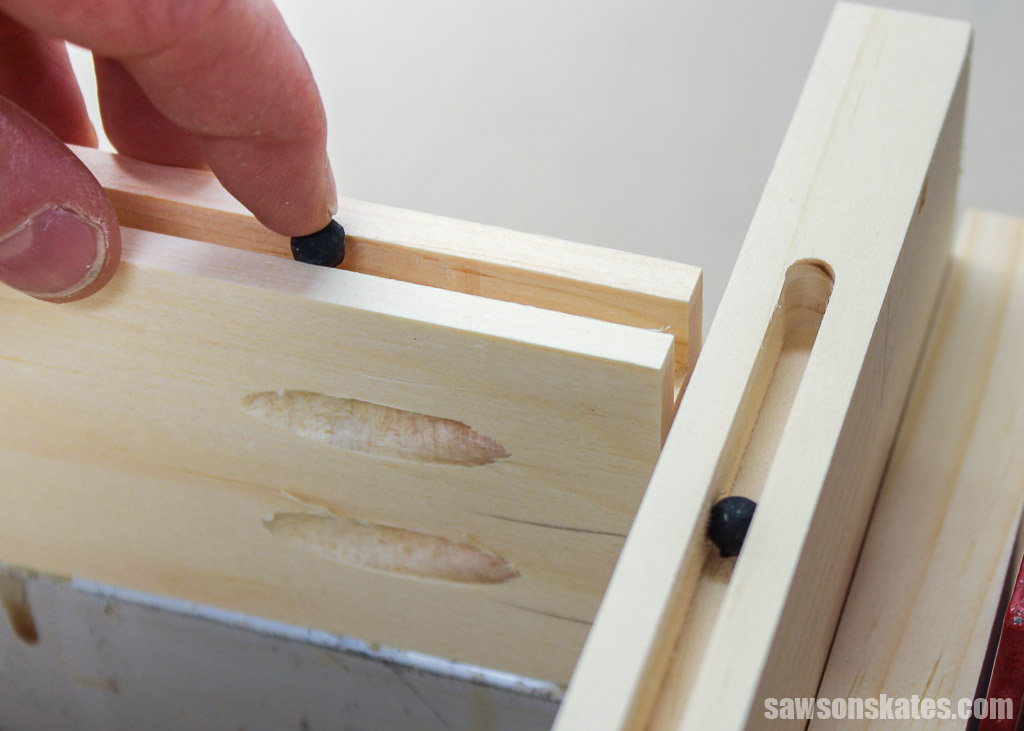
I used Spacer Balls in clearance space. The panel is held in place by the Spacer Balls while the squishy consistency allows it to move with changes in humidity.
How Do You Finish the Shaker-Style Cabinet Doors?
Finishing your doors is entirely up to you. You may stain or leave them natural and then seal them with a clear finish, such as polyurethane.
Related: Polycrylic vs Polyurethane: Are They The Same?
First, I sanded the doors smooth with my random orbital sander. I started with 100 grit sandpaper, then 120, and finished with 150 grit sandpaper.
I used my Super Finish Max sprayer to paint my doors. I set up a spray shelter, placed the doors on painter’s tripods, applied primer, and painted them. Spraying is a quick and easy way to paint cabinet doors. Plus, there are no brush marks.
Related: How to Spray Paint Indoors (Without Making a Mess)
How to Make DIY Shaker Cabinet Doors with a Router
Printed Plan
Supplies
- Wood (per printed plan)
- 1-1/4″ Pocket Screws
- Spacer Balls
- Wood Glue
- 1/2″ Pin Nails
- Paint or Stain to Finish
Tools
- Tape Measure
- Miter Saw
- Kreg Jig
- Router
- Router Table
- 1/4″ Straight Router Bit
- Pin Nailer
- Table Saw or Circular Saw
NOTE: Adjust the dimensions of the cabinet doors to fit your door opening.
Step 1. Cut the Stiles and Rails
Cut two pieces of wood to length for the stiles and cut two pieces of wood to length for the rails. Drill pocket holes in the end of each rail.
Related: How to Use a Kreg Pocket Hole Jig
Step 2. Make the Groove for the Panel
Place the stiles and rails (with the pocket holes facing down) on your workbench. Use a pencil to mark the intersection where each rail meets the stile. I also labeled each joint (A, B, C, D, or 1, 2, 3, 4, etc.) Labeling will help properly position the workpieces when routing the grooves and assembling the doors.
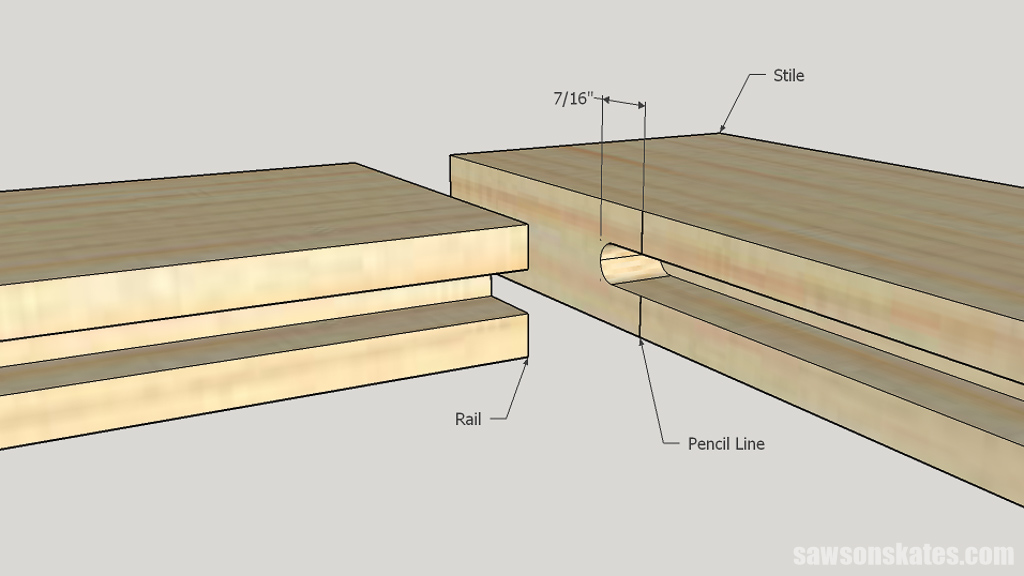
The rails will have grooves cut from end to end. The stiles will have grooves that extend 7/16” past the pencil marks, so they’ll match up with the grooves in the rails. (See What Size Should You Make the Groove? for more information.)
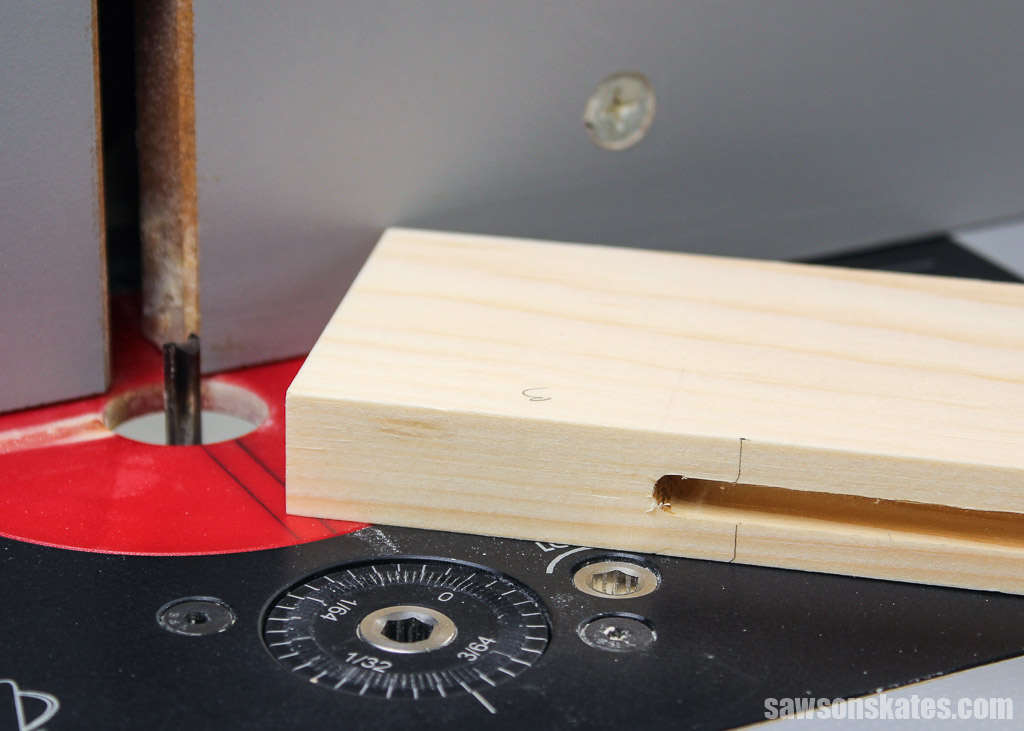
Install a 1/4″ straight cutting bit in the router, and set the depth of the bit to 7/16”. Then adjust the router fence, so the bit is centered from side to side on the edge of the workpieces.
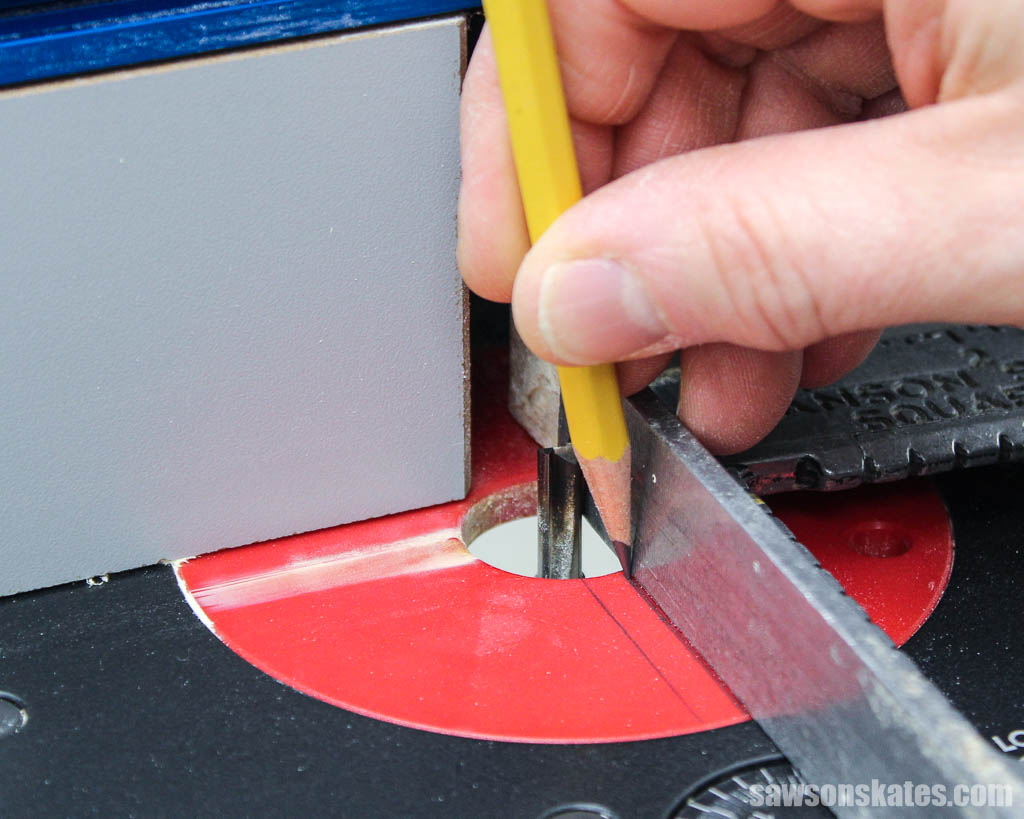
Place a speed square against the fence and draw a straight line on the front and back edge of the router bit. These lines will be used when routing the grooves in the stiles.
Place the workpieces with the joint label (A, B, C, D, or 1, 2, 3, 4, etc.) towards the fence.
📝 NOTE: Placing the label (letter or number) towards the fence will ensure the faces of the door frame and panel are flush to the front of the door. In other words, if the stiles and rails vary in thickness, the front of the door will be flush, and any irregularities will be on the back of the door.
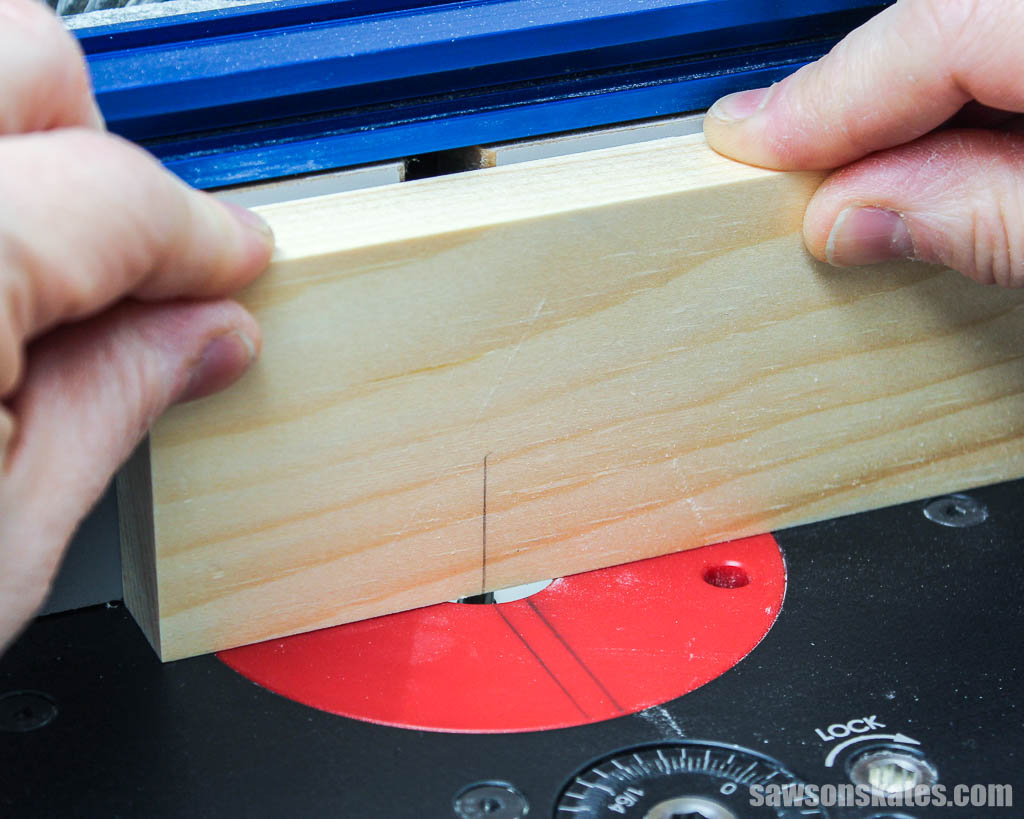
Place the stile against the fence and lower the left mark on the workpiece over the left mark on the router table.
Related: How to Use a Router Table for Beginners
Rout the groove by pushing the workpiece to the left until the right mark on the workpiece meets the right mark on the router table.
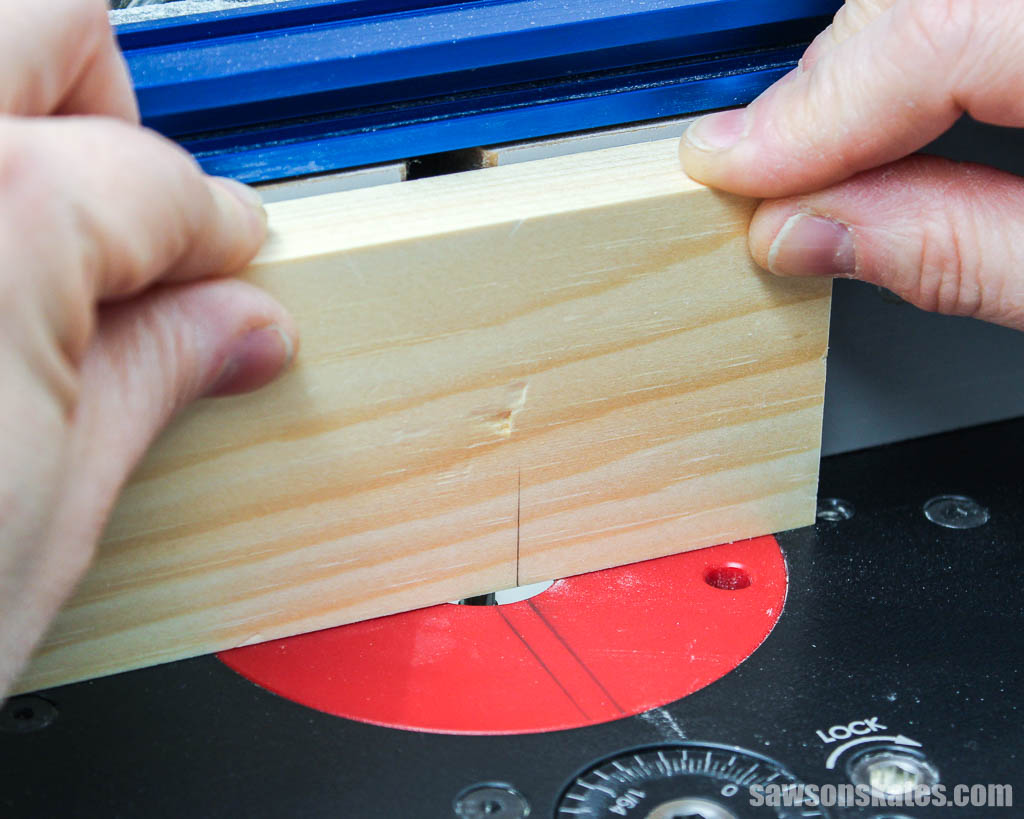
Here’s a look at a finished stile. Notice how the groove does not go to the end of the board.
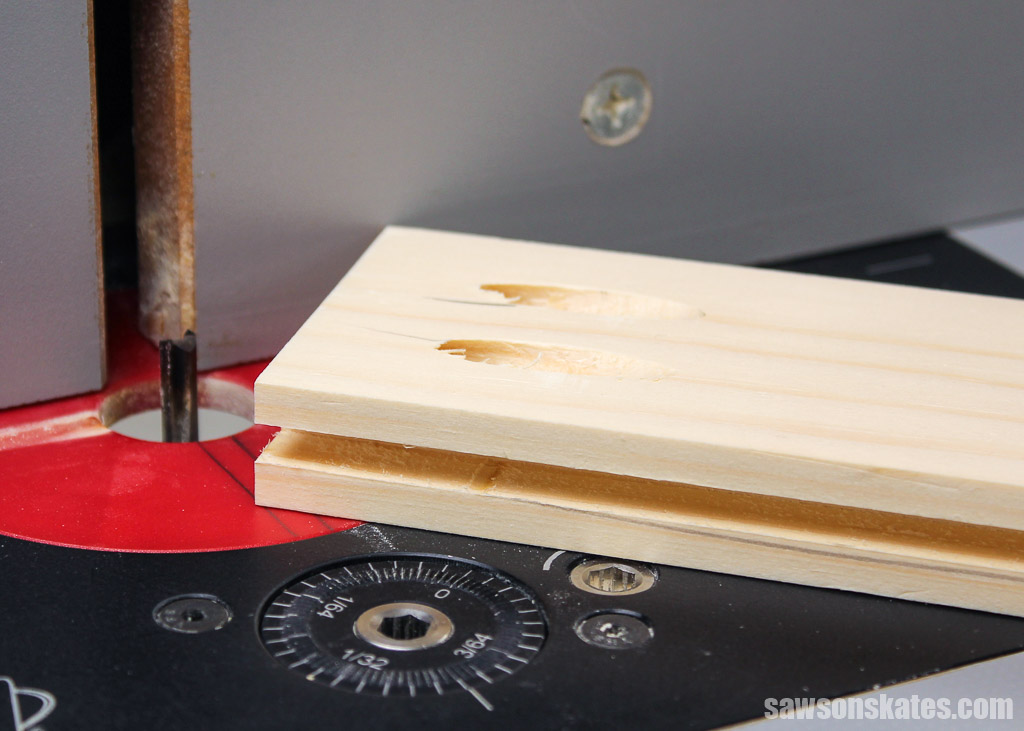
Rout the groove in the rails from end to end.
Step 3. Cut the Center Panel
Use a table saw, or a circular saw to cut a piece of 1/4″ plywood to size.
Related: 4 Ways to Make Straight Cuts with a Circular Saw
Step 4. Assemble the Shaker Doors
This step is probably the trickiest part of making Shaker-style doors. You must keep five pieces aligned while simultaneously clamping everything together.
It never fails when I get one piece correctly positioned, then one of the others shifts out of place. Take your time, and don’t rush through this step. You’ll get it!
First, dry fit (no glue) all of the parts to ensure that they fit correctly. Begin by placing three Spacer Balls in each stile and two Spacer Balls in each rail. Then, clamp the pieces together. If everything fits well, you may begin gluing up the door.
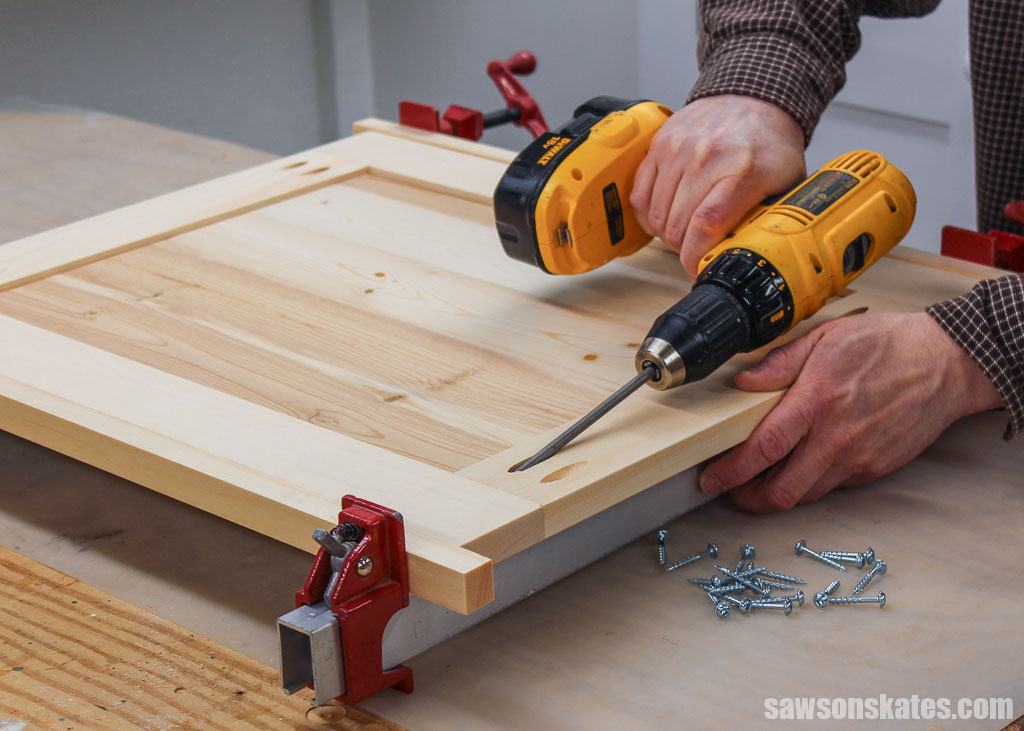
Insert the panel into one of the stiles. Do not apply glue to the panel. Apply glue to the rails, and place the second stile over the panel and rails. Clamp and check that all of the joints are properly aligned. Attach using 1-1/4″ pocket hole screws.
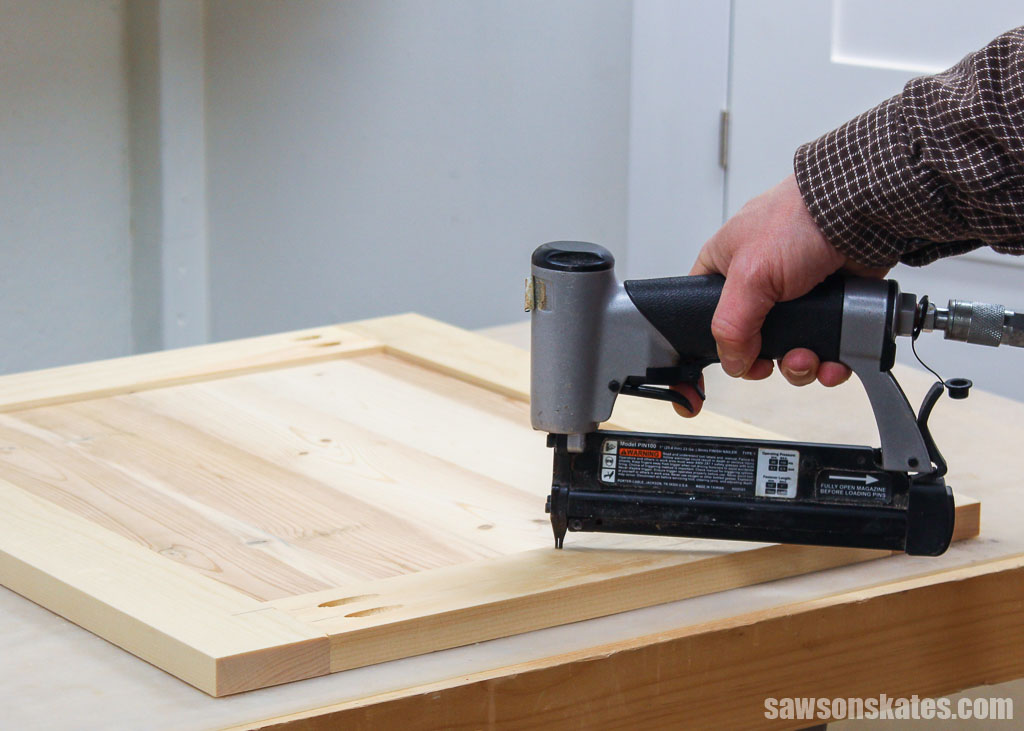
Attach one pin nail at the top rail and another at the bottom rail. This will prevent the panel from shifting. Remember, do not glue the panel in the groove.
Related: Pin Nailer vs Brad Nailer: Differences & Which to Use
These nail holes are tiny, so I didn’t bother to fill them with wood filler.
Related: Does Stainable Wood Filler Work? (Here’s the Answer)
Step 5. Finish the Shaker-Style Doors
Drill any mounting holes for hinges or hardware and sand the door smooth.
See How Do You Finish the Shaker-Style Cabinet Doors for more information.
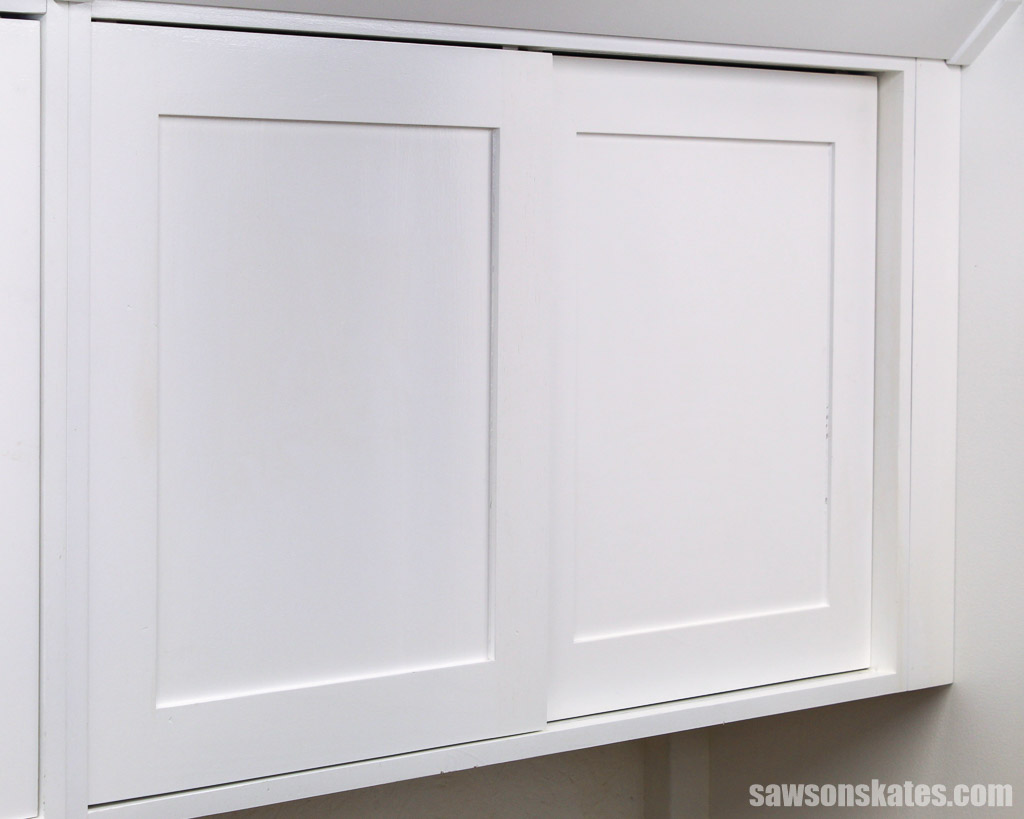
Final Thoughts
So, are you ready to give shaker cabinet doors a try? It’s really not as difficult as it may seem, and the results are well worth the effort. With just a few basic tools and supplies, you can create beautiful, durable shaker cabinet doors that will last for years.
Get the free plan (including the detailed instructions and measurements) now!
Thank you for stopping by. If you found this information helpful, would you please pin it to Pinterest? Other DIYers would appreciate it and I would too! Thank you – Scott
Recommended For You
Pin This For Later

Hi there – I’m Scott, a woodworking enthusiast and creator of Saws on Skates, a site I started in 2015 to share easy-to-follow tutorials, space-saving shop tips, and project inspiration for DIYers at any skill level. Learn more about my woodworking journey here.
How can i make a nice grove without a router?
Hi Alan – Thank you for stopping by. I think the router would be the easiest and quickest way. A groove could be cut by hand with a chisel. A mortise attachment can be purchased for a drill press and that could be used to cut a groove.
Hi Scott, I have not heard of space balls before. Those are the best things since sliced bread! Thank you! cmf
Hi there – Thank you for stopping by. I’m glad you like the space balls! They’re perfect for building frame-and-panel projects!