DIY Electric Fireplace TV Stand
Make a DIY electric fireplace TV stand with these free plans! Build a surround for your fireplace insert then sit beside a cozy faux fire and watch TV!
What Should I Build Next?
That's the question I help answer.
Every week, I send woodworking ideas to 17,000 DIYers who love building things.
You'd fit right in.
DIY Electric Fireplace TV Stand
I always thought electric fireplaces were so 1970’s. But recently I changed my mind. First, a buddy bought one. Next, I went to a party and they had one too. The flames were fake, but the fireplace had a cozy, realistic feel. I couldn’t believe it. I was starting to warm up to the idea of an electric fireplace. Since then I’ve built my own DIY electric fireplace TV stand and I’m sharing the free plans with you!
Originally published February 16, 2016, republished October 1, 2019
This article contains affiliate links. If you purchase from these links, I may earn a small commission at no additional cost to you. Visit my site policies for more information.
Faux Fireplace TV Stand Inspiration
I searched for a store-bought fireplace TV stand and noticed a couple of things. First, many of them were just too big for my small house. Second, many of them had open shelves for the electronic equipment. I wanted my cable boxes to be hidden from sight.
I knew I needed to build a DIY fireplace surround to get the exact look I wanted. I searched for electric fireplace ideas and found Mimi’s Faux Mantle plan on anawhite.com. I liked the overall design and decided to use it as inspiration for my own plan.
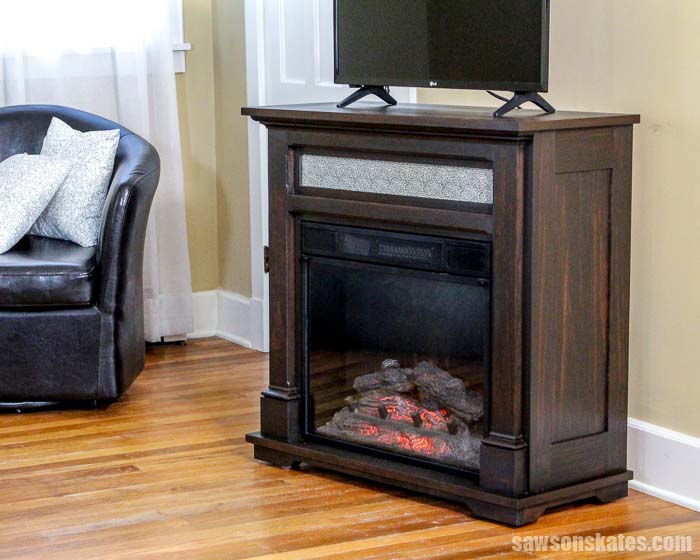
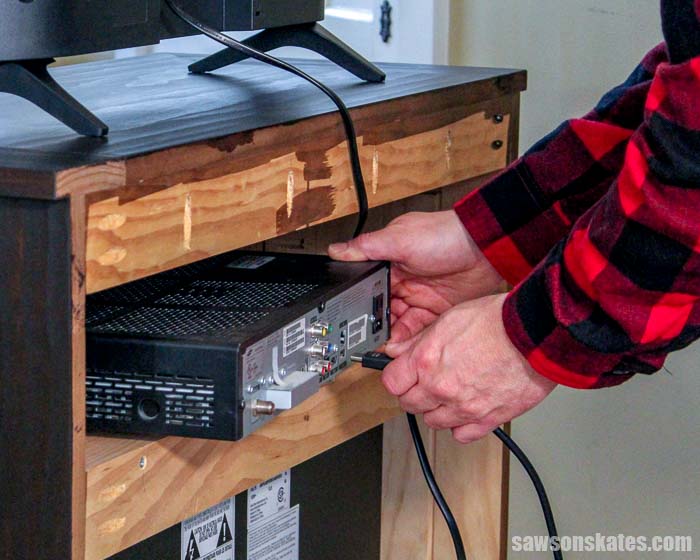
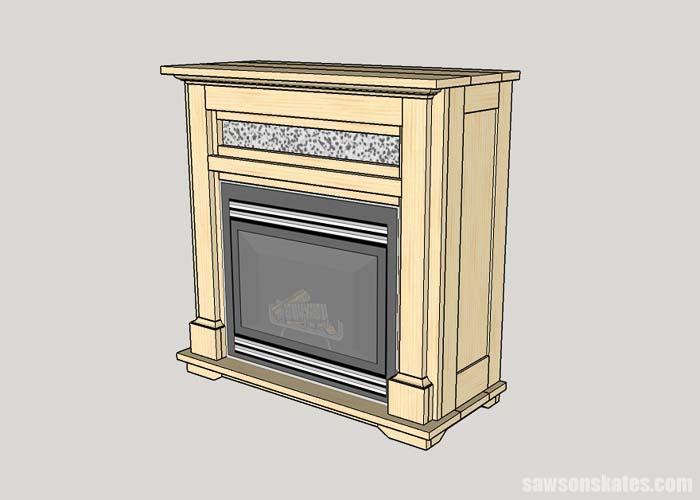
I designed the area above the fireplace insert to hide the cable box, which sits behind a piece of glass. I’m really pleased with how this turned out because it looks more like a built-in fireplace surround than a TV stand.
Oh, you can stop laughing now! Yes, I still have a cable box! And yes, my TV is small! Can you tell I’m not much of a TV watcher?!
Where to Buy an Electric Fireplace Insert?
While researching electric fireplace inserts, I quickly learned they can be expensive. It was actually cheaper for me to buy a store-bought fireplace with a mantel. So that’s what I did.
I got a complete fireplace from my local big-box home improvement store. I removed the fireplace insert and listed the surround on Craigslist, which someone picked up to repurpose for another project.
I wanted to share with you the fireplace mantle that I bought, but it’s been discontinued.
What Tools Do You Need to Build a Fireplace Mantel TV Stand?
The plan I’m sharing here is slightly different from the one I used to build mine. My original stand required ripping several pieces to different widths on a table saw. I adjusted the dimensions so you can build this version without one.
Related: 21 Table Saw Safety Rules (& Mistakes to Avoid)
This updated plan can be made with simple tools like a miter saw, drill and a Kreg Jig. It’s helpful to have a pin nailer to attach the molding, but you can also use a small hammer instead.
Related: Pin Nailer vs Brad Nailer: Differences & Which to Use
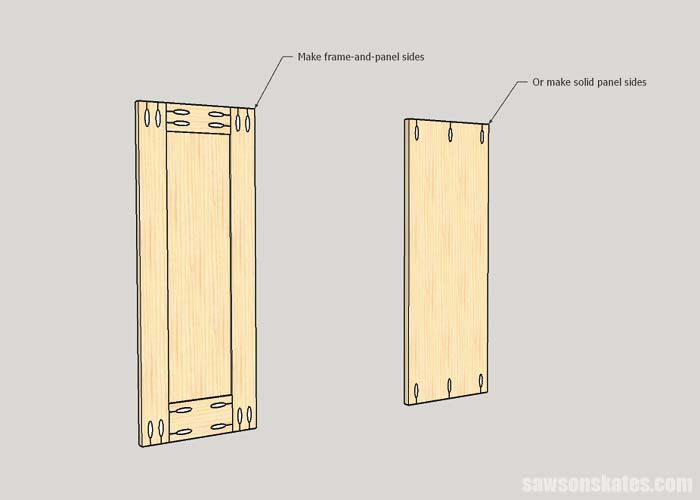
There’s one other thing I should mention. I made the sides of my fireplace mantel with frame-and-panel construction, which is the same method I used to make my Shaker cabinet doors.
Frame-and-panel construction has grooves cut into the sides of the frame, and a panel floats in them. I made the grooves with a straight-cutting bit and my router table.
Related: How to Use a Router Table for Beginners
You can still make this electric fireplace TV stand if you don’t have a router table. Instead of frame-and-panel construction, you could use solid wood panels for the sides.
If you’ve never glued up solid wood panels before, my panel glue-up class walks through the process step by step.
What Kind of Wood Do You Need?
I made my fireplace from select pine, which is clear and knot-free. It costs a little more than common pine, which typically has knots. That said, you could build yours with just about any type of wood. I purchased the wood at my local big-box home improvement store.
Do Electric Fireplaces Really Work?
Yes, electric fireplaces really do produce heat! They have a small electric heater built into the insert. They’re great for chilly mornings or when you need a little extra warmth.
I use mine a lot in early fall and late spring when I haven’t turned the furnace on yet for the season or after I’ve shut it off for the year. I also use it on those sub-zero days when the furnace just can’t keep up.
How to Make a Fake Fireplace Feel Real
Here’s my trick for making the fireplace feel realistic. I use these natural wood incense when the fireplace is on, and it makes my house smell like a real wood fire is burning! The cedar scent is my favorite.
Where to Use an Electric Fireplace Mantle
- Living Room
- Dining Room
- Bedroom
- In the Corner of Any Room
How to Build a DIY Electric Fireplace TV Stand
Printed Plan
- Get the FREE plan here (includes detailed instructions, measurements, and bonus tips).
Supplies
- Wood (per printed plan)
- Glass Door Retainer Clips
- 1-1/4” Pocket Screws
- #8 1-1/4″ Wood Screws
- #8 2″ Wood Screws
- 1″ Pin Nails
- Wood Glue
- Glass – 3-1/4″ x 23-3/8″
- Electric Fireplace Insert
Tools
- Miter Saw
- Drill
- Kreg Jig
- Pin Nailer or Small Hammer
NOTE: Adjust the dimensions of the plan to fit your electric fireplace insert if necessary.
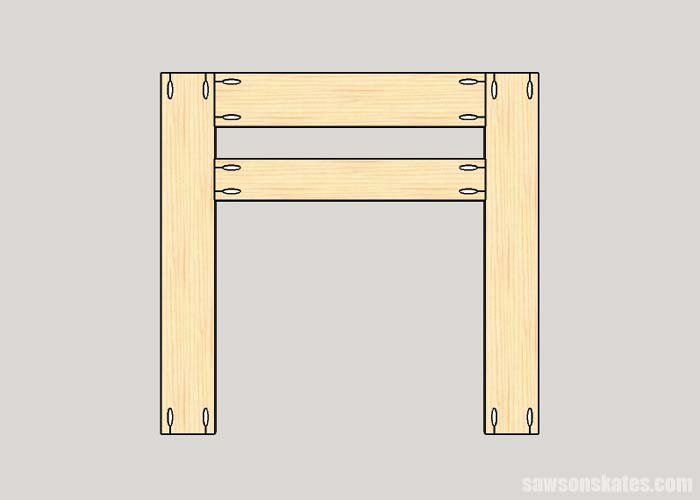
Step 1. Make the Front Subassembly
Cut two pieces of 1×5 for the stiles and drill pocket holes in each end. These pocket holes will be used to attach the top and bottom in Step 10. Cut one piece of 1×5 for the top rail and one piece of 1×4 for the bottom rail. Drill pocket holes in the ends of each rail.
Related: How to Use a Pocket Hole Jig
Cut two pieces of scrap wood to 2-3/4″ and place between the rails to help keep the proper spacing for the top opening. Do not attach the scrap wood. Apply glue to the ends of the rails, clamp to the stiles and attach with 1-1/4″ pocket screws. Remove the pieces of scrap wood.
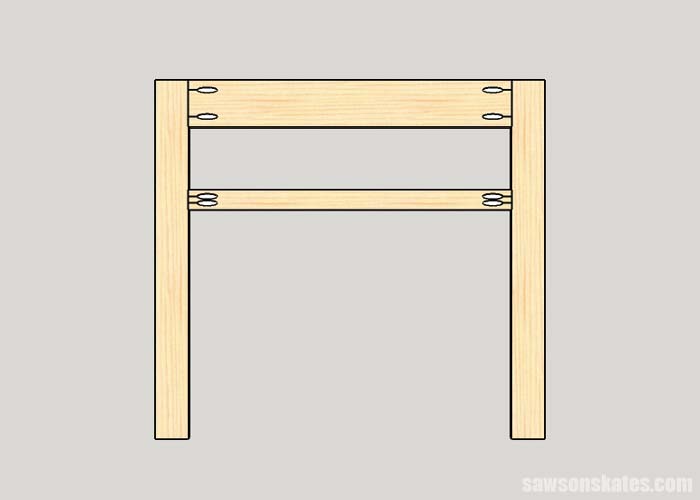
Step 2. Make the Front Appearance Assembly
Cut two pieces of 1×3 for the stiles. Cut one piece of 1×4 for the top rail and cut one piece of 1×4 for the bottom rail. Drill pocket holes in the ends of each rail.
Cut two pieces of scrap wood to 4-3/4″ and place between the rails to help keep the proper spacing for the top opening. Do not attach the scrap wood. Apply glue to the ends of the rails, clamp to the stiles and attach with 1-1/4″ pocket screws. Remove the pieces of scrap wood.
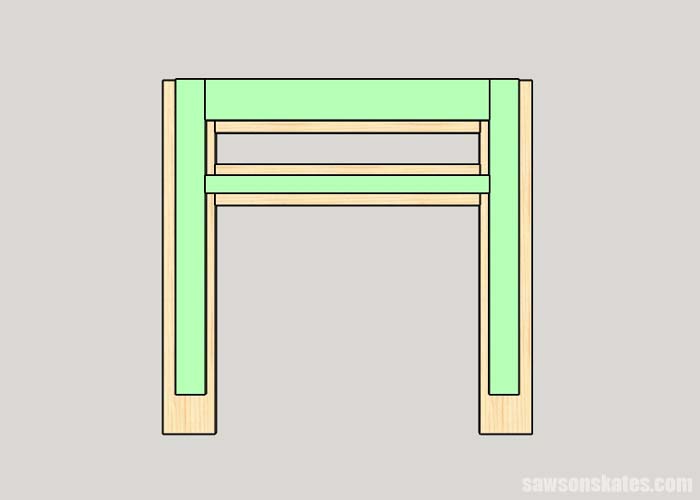
Step 3. Join the Front Assemblies
Apply glue to the Front Appearance Assembly (Step 2) and place on Front Subassembly (Step 1) so the tops are flush. Clamp in position and flip over. Drill countersink holes in the Subassembly and attach to the Appearance Assembly with 1-1/4″ wood screws.
Related: How to Use a Countersink Bit
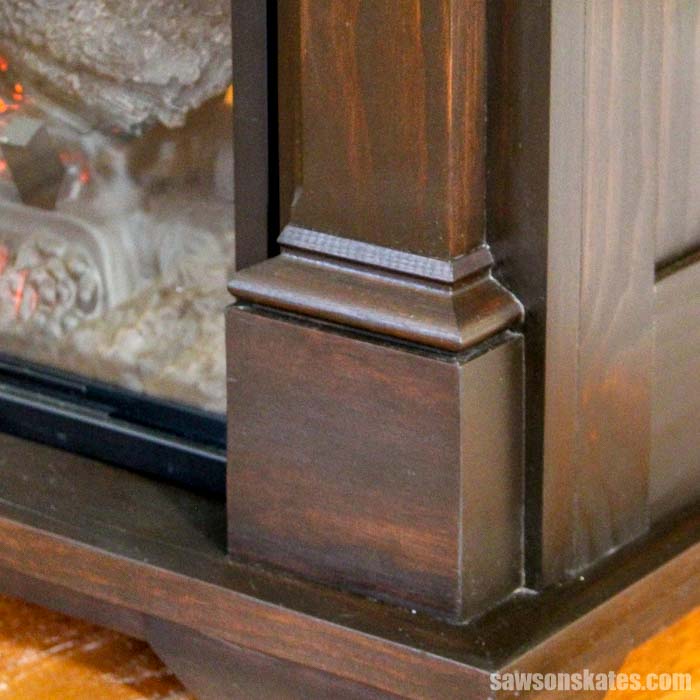
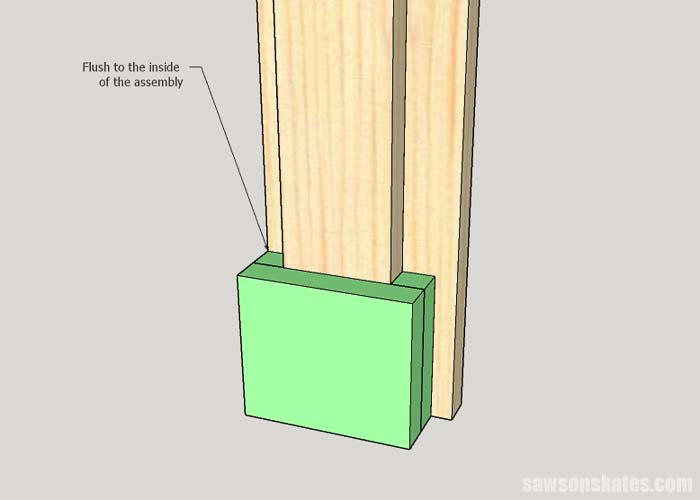
Step 4. Make the Plinth Blocks
Cut four pieces of 1×4. Glue two pieces together to form a block. Then, glue remaining two pieces together to form a second block.
Position the plinth blocks on the front and flush to the inside of the assembly. Clamp and flip over. Drill countersink holes in the Subassembly and attach to the plinth blocks with 2″ wood screws.
Step 5. Assemble the Side Panels
I made the sides of the electric fireplace mantel just like I made my DIY Shaker cabinet doors.
Cut four pieces of 1×3 for the stiles and drill pocket holes in each end. These pocket holes will be used to attach the top and bottom in Step 10.
Cut two pieces of 1×3 for the top rails and cut two pieces of 1×4 for the bottom rails. Drill pocket holes in the ends of each rail.
Cut two pieces of 1/4″ plywood for the panels.
Follow the How to Build DIY Shaker Cabinet Doors instructions to assemble the side panels.
OPTIONAL: An easier way to make the sides is to cut 2 pieces of 1×12 and drill pocket holes in each end.
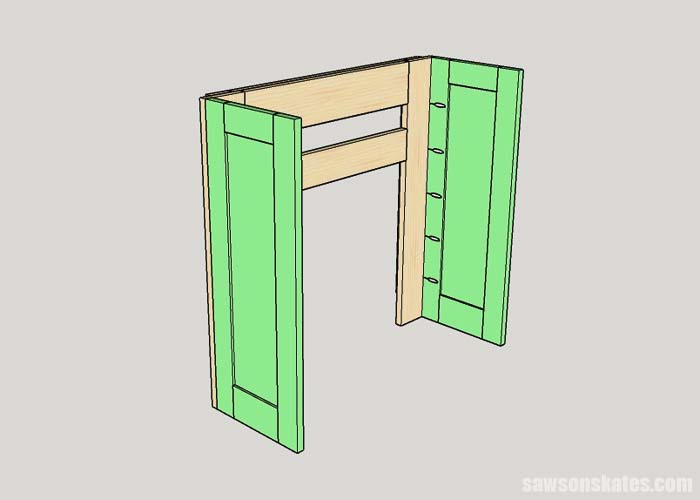
Step 6. Attach the Sides to the Front
Drill pocket holes along one edge of each side. Be sure to make a right and a left. Apply glue to the edges of the sides, clamp to the front and attach with 1-1/4″ pocket screws.
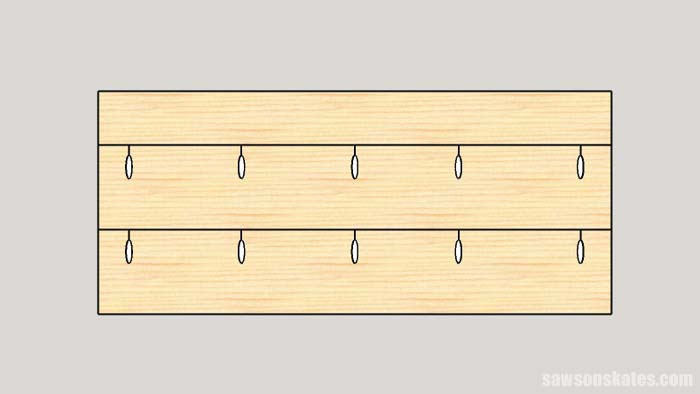
Step 7. Make the Top and Bottom
Cut four pieces of 1×6 and two pieces of 1×4.
Layout a piece of 1×4 and two pieces of 1×6. Drill pocket holes, apply glue to the edges and clamp. Attach with 1-1/4″ pocket screws. Repeat for the remaining pieces.
Related: How to Drill Pocket Holes on Edge Joints
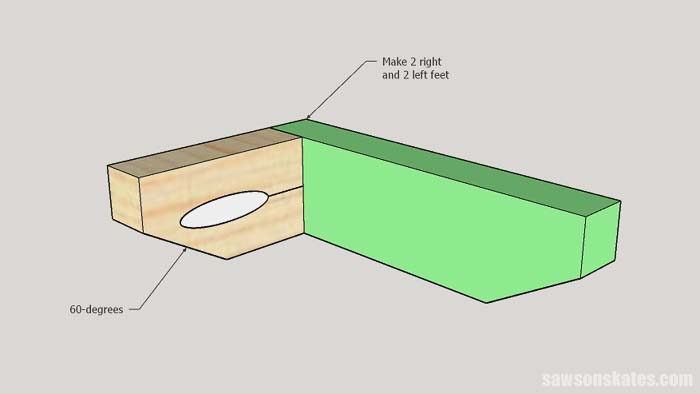
Step 8. Make the Feet
Cut four pieces of 1×2 for the front and back feet. Measure down 3/4″ and make a mark. Cut a 60-degree angle at the mark.
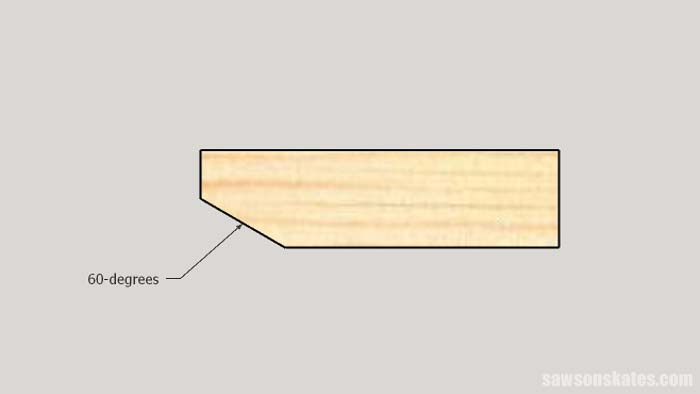
Cut four pieces of 1×2 for the side feet. Measure down 3/4″ and make a mark. Cut a 60-degree angle at the mark. Drill a pocket hole in each end. Be sure to make two right and two left feet.
Apply glue to the end of a side foot, position on a front/back foot and clamp. Attach with 1-1/4” pocket screw. Repeat for the remaining feet.
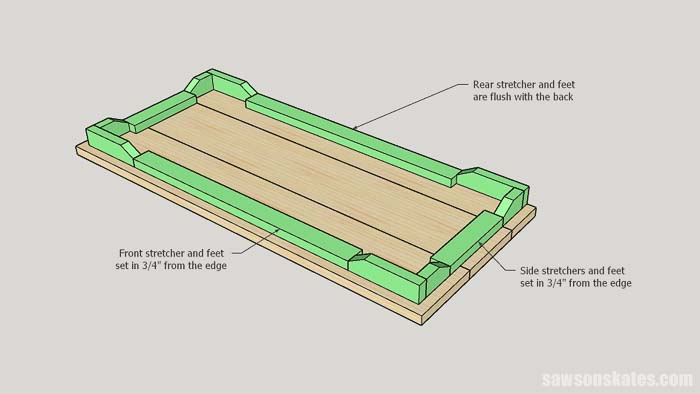
Step 9. Attach the Feet
Cut two pieces of 1×3 for the side stretchers and cut two pieces of 1×3 for the front and back stretchers.
Position the feet and stretchers on the bottom. The front and side pieces set in 3/4″ and the back pieces are flush.
Drill countersink holes in the stretchers and feet. Attach the stretchers with 1-1/4″ wood screws and the feet with 2″ wood screws.
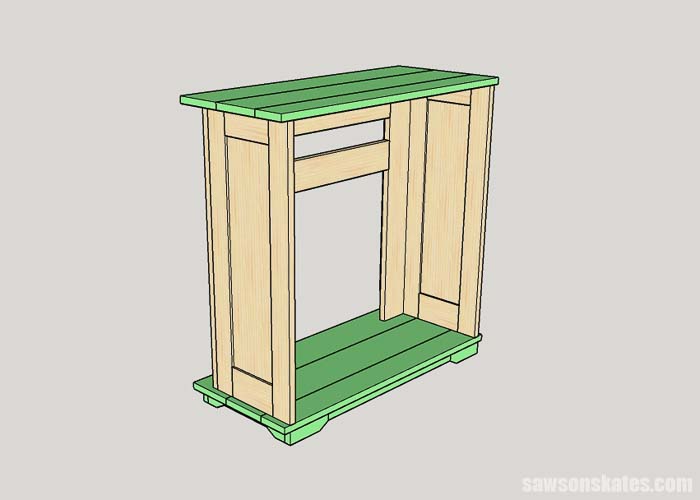
Step 10. Attach the Top and Bottom
The sides set in 3/4″ on the top and bottom. The top and bottom are flush with the back. Clamp the pieces in position and attach with 1-1/4″ pocket screws.
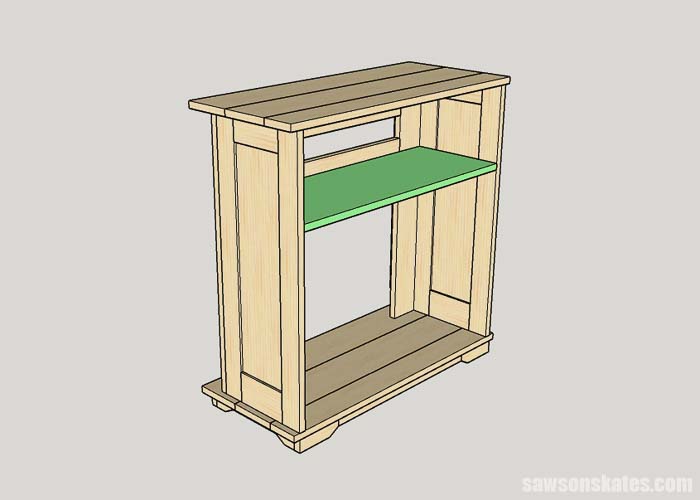
Step 11. Install the Shelf
Cut one piece of 1×12 and drill pocket holes in each end. Position 8-7/8″ down from the top and attach using 1-1/4″ pocket screws.
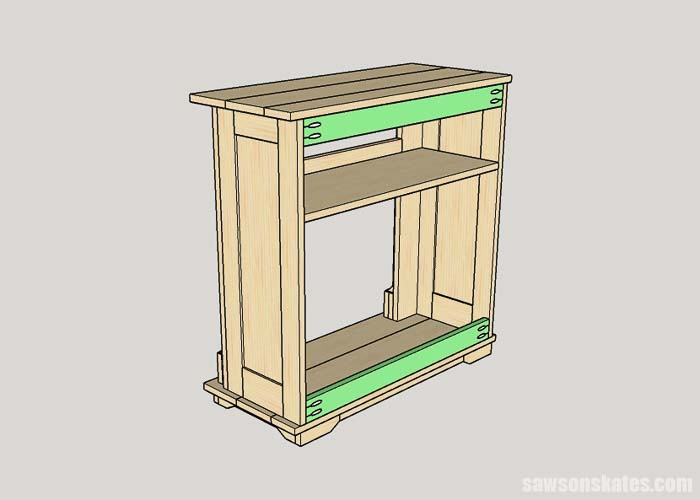
Step 12. Attach the Back Braces
Cut two pieces of 1×4 and drill pocket holes in each end. Place at the top and bottom and clamp in position. Attach with 1-1/4″ pocket screws.
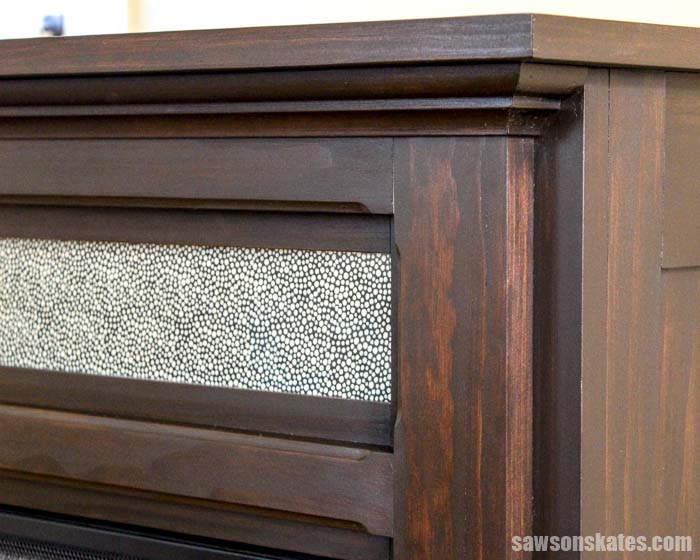
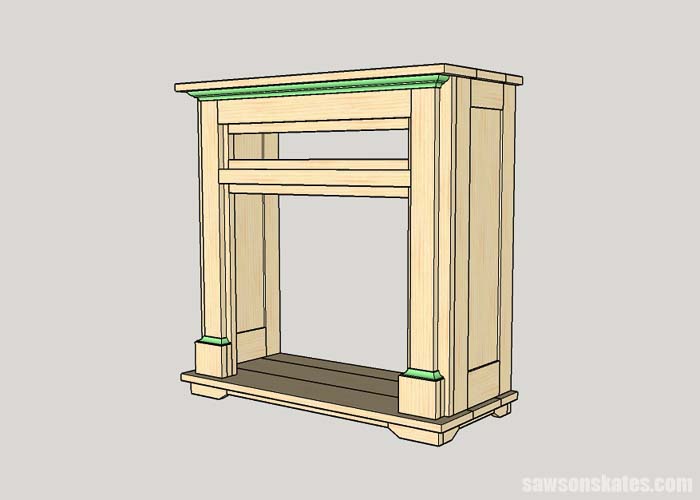
Step 13. Install the Molding
Please be careful when cutting the molding pieces. Some of these pieces are very small. The molding beneath the top is called bed molding. Bed molding is cut just like crown molding. The molding is placed upside down in the miter saw to make the cuts. In other words, the edge that normally faces towards the ceiling is placed on the table of the saw.
I would recommend making the two end pieces first. Place the molding in position, make a mark and cut a 45-degree angle. Attach one end piece using glue and 1″ pin nails. For the center piece, cut a 45-degree angle to match the end piece that was just installed, place against that end piece, make a mark at the other end and cut with a 45-degree angle. Test fit the center piece and the remaining end piece. Make any necessary adjustments. Apply glue and attach the center piece with 1″ pin nails. Install the remaining end piece with glue and 1″ pin nails.
Related: Brad Nailer vs Finish Nailer: Are They The Same?
The molding on top of the plinth blocks is called cove molding. I would recommend making the two end pieces first. Place the molding in position, make a mark and cut a 45-degree angle. Attach one end piece using glue and 1″ pin nails. For the center piece, cut a 45-degree angle to match the end piece that was just installed, place against that end piece, make a mark at the other end and cut with a 45-degree angle. Test fit the center piece and the remaining end piece. Make any necessary adjustments. Apply glue and attach the center piece using 1″ pin nails. Install the remaining end piece with glue and 1″ pin nails.
Step 14. Sand and Finish
Sand the wood smooth. Apply a coat of stain and a clear topcoat or apply a coat of primer and two coats of paint.
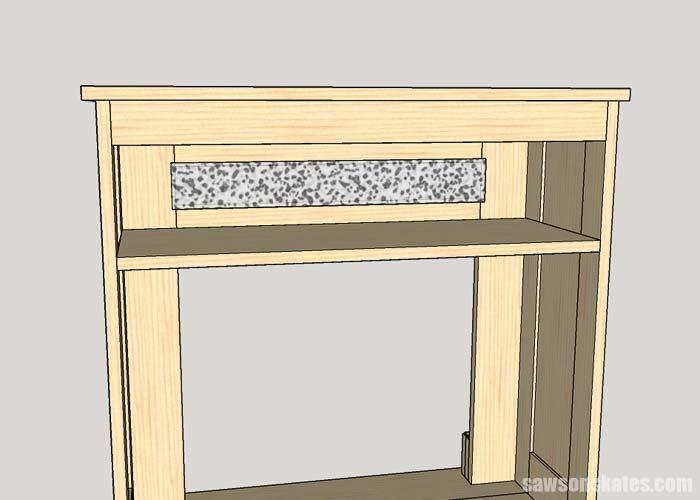
Step 15. Install the Glass
Cut a piece of glass to fit the opening and attach with glass door retainer clips. I used two pieces of glass for my fireplace mantel. Then I sandwiched a piece of fabric in between the two pieces of glass. I also considered spraying the glass with mirror-like spray paint and doing a faux mercury glass technique. I still may give that a try.
TIP: Most big box home improvement stores and local hardware stores have a glass cutting department.
Step 16. Install the Fireplace Insert
Install the fireplace insert according to the manufacturer’s instructions.
Final Thoughts
Use these plans to make a DIY electric fireplace TV stand. Then sit beside a cozy faux fire and watch TV.
Get the free plan (including the detailed instructions and measurements) now!
Thank you for stopping by. If you found this information helpful, would you please pin it to Pinterest? Other DIYers would appreciate it and I would too! Thank you – Scott
Pin This For Later

Hi there – I’m Scott, a woodworking enthusiast and creator of Saws on Skates, a site I started in 2015 to share easy-to-follow tutorials, space-saving shop tips, and project inspiration for DIYers at any skill level. Learn more about my woodworking journey here.
I shouldn’t show this to my wife or ill wind up building one of these.
Hmmm… do you have any maple left over from buidling your hives? This might look pretty cool in maple! A friend sent me a note today about a source for stand alone electric fireplace inserts. I’m not sure if you have one near you, but she thought Ocean State Job Lot sells them for a decent price. Might want to check it out if you decide to build one.
I have tons of maple left. Around 900 board ft.
Wow! That came out AMAZING! Very nice work, Scott.
Do you keep track of the time that goes into each project? I am curious what this particular one required (drawing up plans/building/finish work).
Thank you Bob! I have a really bad habit of starting to track my time, then I get sucked into the project and totally lose track. I can tell you I created five different fireplace sketches before I committed to this design. Depending on the complexity of the design I can have anywhere from just a few hours to many hours invested in drawing up plans. Then between construction and finishing I’m going to guess there was at least 20 hours in this fireplace. I’m really pleased with it, so I think the time was well spent 🙂
Wow
Thank you 🙂
I am going to build one of these fireplace cabinets. Can you tell me how much airspace is required around the insert? My insert is a quartz electric insert
Hi Wayne – I’m glad you’re going to build the DIY mantel. Please share a pic when you make it! As far as the airspace, clearances can vary from manufacturer to manufacturer, so I would defer to the manufacturer recommendations for your insert. If you’re removing an insert from another mantel like I did, I would base the clearances for the new mantel off the mantel from which you’re removing the insert. Hope that helps. Good luck and can’t wait to see your mantel!
I have completed my TV Stand/Mantle project. I sent you a picture from my personal email. If you don’t get it, let me know.