How to Use a Router Table for Beginners
Learn how to use a router table in this beginner’s guide for woodworkers. I’m sharing how to change a router bit, how to set the router table fence, and more.
How to Use a Router Table
Want to learn how to use a router? You’ve come to the right place! We’ll look at what you can do with a router table, how to set it up, which way the wood should be placed on a router table and more.
This tutorial contains affiliate links to supplies and tools. Purchases made using these links help support the Saws on Skates website and allows me to share more projects and tips with you. There is no cost to you for using these links. Visit my site policies for more information.
Before we get into how to use a router table, be sure to click the subscribe button at the bottom of this page to sign up for my FREE weekly newsletter loaded with helpful pocket hole tricks, space-saving workshop ideas, clever DIY tips and more!
Table of Contents
Do You Need a Router Table to Use a Router?
No, a handheld router can be used without a router table. But there are times when it’s quicker, easier and safer to use a router table.
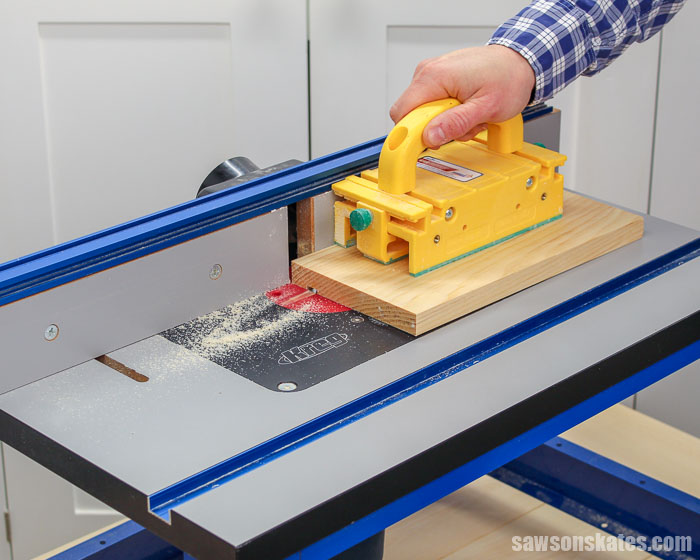
A router table can be safer to use than a handheld router because it gives us better control over workpieces. The table supports the workpiece. The fence acts as a guide to direct the workpiece towards the bit.
Having better control over workpieces is especially important when working with small parts that may be too difficult or dangerous to work with on a handheld router.
Back to Table of ContentsWhat Can You Do With a Router Table?
We can use a router table to make our own moldings, make grooves and slots in workpieces, make raised panel doors, and more.
Related: How to Build DIY Shaker Cabinet Doors
Back to Table of ContentsTypes of Router Tables
There are three common types of router tables. Those include benchtop router tables, floor standing or cabinet style router tables and router tables that fit inside the extension wing of a table saw.
When choosing a router table we’ll want to consider the amount of space in our workshop and if we may want to use it outside of our shop.
Related: 9 Clever Ways to Make Your Small Workshop Feel Bigger
For example, I chose a benchtop router table for my small workshop. It’s compact so it fits well in my 156 sqft shop. Plus, it’s portable. This means I can take it to my backyard or to a friend’s house to work on a project.
Related: My 12×13 Small Woodshop Layout
Benchtop
Benchtop router tables are used on top of a workbench. They are usually small and easy to move. Some can even fold to save space when not in use.

Floor Standing
Floor standing or cabinet style router tables are a good choice for larger workshops. This style usually has legs or cabinet base that sits on the floor. They are typically heavy and not easy to move.
Extension Wing
Some router tables fit in the extension wing of a table saw. This is a great way to save space and to make use of an area that is otherwise not being used.

Parts of a Router Table
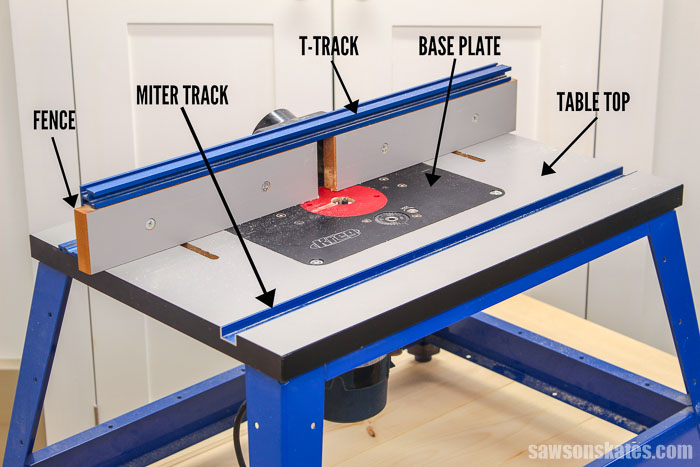
Table Top
The table top provides a flat, stable surface for workpieces. The top of many store-bought router tables is made of MDF (medium-density fiberboard).
TIP: Be careful with MDF. It will swell if it’s exposed to moisture. In other words, don’t get it wet.
Legs or Base
The table top is mounted to legs or a base.
Base Plate
A handheld router is attached to the base plate. The base plate attaches to the table top. The base plate needs to be level with the table top. The table top usually has screws that can be adjusted to level the base plate.
Many store-bought router tables have base plates that fit common brands of routers. Other router tables have blank base plates and holes need to be drilled to attach the router.
Not all router tables fit every brand of router. It’s a good idea to read the manual to see if the router table you’re planning to purchase will fit your router.
Fence
The fence helps us control the workpiece. It guides or directs the workpiece towards the router bit.
Many fences have a dust collection port and t-track. The t-track can be used to attach accessories like featherboards. Some router tables have a split fence that can be used to close the gap around the router bit.
T-Track
The t-track allows us to attach accessories like a featherboard.
Bit Guard
The bit guard protects our hands from coming in contact with the bit.
Starter Pin
Sometimes a fence just won’t work for certain cuts. In those cases, we can use a starter pin. A starter pin is another accessory that gives us better control over a workpiece.
It creates a fixed point. This way we can pivot the workpiece on the pin and ease it into the router bit. Easing the workpiece into the bit helps to reduce the chances of kickback.
The starter pin helps us more safely rout the ends of narrow workpieces. It’s also helpful when working with curved workpieces or patterns and templates.
Back to Table of ContentsHow to Use a Router Table
The first step to using a router table or any tool is to wear personal protective equipment (PPE). This includes eye protection, hearing protection and a quality respirator to protect our lungs.
It’s also important to work safely and follow all of the manufacturer’s instructions for your router and router table.
1. Choose a Router Bit
We’ll need to choose a bit with the profile for the type of cut we want to make. The profile is the shape of the cutting edge.
Bits can range from straight cutting bit used for cutting a groove to decorative bits like cove, and ogee with a pilot bearing or guide bearing. The pilot bearing follows the edge of the workpiece.
It’s important to choose a bit with the right size shank for our router. The shank is the end of the bit that is held in place by the collet. The collet is what holds the bit in the router.
The shank needs to fit in the collet of our router. Router collets either accept a ¼ inch shank or a ½ inch shank. Some routers have removable collets that can accept both ¼ inch shank and ½ inch shank bits.
We should go with a ½ inch bit if we have a choice. ½ inch bits produce less vibration and produce smoother cuts than ¼ inch bits.
2. Change a Router Bit
Always unplug the router before changing a bit.
Insert the bit until the cutting edge touches the collet then pull the bit out about an ⅛ inch and finger tighten the collet. It’s important to allow an ⅛ inch of space between the bit and the collet.
The collet draws the bit in as the locking nut is tightened. The bit may not fully tighten if the cutter is touching the collect. This means the bit could come loose and fly out of the router. This is dangerous.
Router bits heat up quickly. Heat causes expansion. The space between the bit and the collet will also allow for expansion.
Use a wrench to tighten the locking nut on the collet.
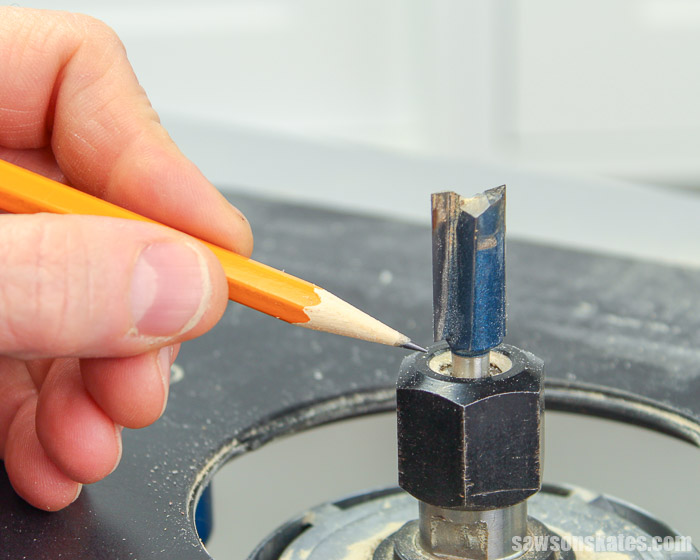
3. Set the Height of the Bit
Next, we’ll set the height of the bit. The height of the bit is the amount of the bit that is exposed or the amount of the bit that will cut the workpiece.
There are several ways we can adjust the height of the bit. We can raise and lower the height of the bit by using the depth adjustments on the router itself or by using a router lift.
- Combination Square – A combination square is one of the easiest and most economical ways to set the height of a router bit. Stand the combination square next to the bit then raise or lower the bit to the desired height.
- Gauge Blocks – The gauge blocks are stacked next to the bit. Then the bit is raised until the bit touches the gauge block.
- Digital Gauge – A digital gauge like the Wixey Mini Digital Height Gauge allows us to set the bit precisely where we want it.

The opening in the table or gap around the bit can catch the edges of workpieces. Some router tables have rings that can be installed to reduce this gap.
The opening in the fence or gap around the bit can also catch the edges of workpieces. Split style fences can be adjusted to reduce this gap. A split style fence should be adjusted so it almost touches the bit.
4. Set the Fence
A while back, I took some furniture-making classes. One of the students in the class asked “how do you square the fence on the router table?” The instructor, Bob said the router fence does not need to be exactly parallel to the bit for most cuts. This sounded crazy! When we use a table saw or miter saw we always want the fence parallel to the blade.
Related: When to Use a Miter Saw vs Table Saw
The difference is flat blade versus a round bit. Bob said the important thing is to set the fence the proper distance away from the bit and the bit will do the rest work.
Setting the fence will depend on the type of bit we’re using.
Straight Cutting Bits
First, adjust the fence from the front. Unplug the router. Place a ruler across the center of the bit. Next, rotate the cutting tip of the bit towards the fence. Adjust the fence so it’s the desired distance. Then tighten the fence and make a cut on a test piece.
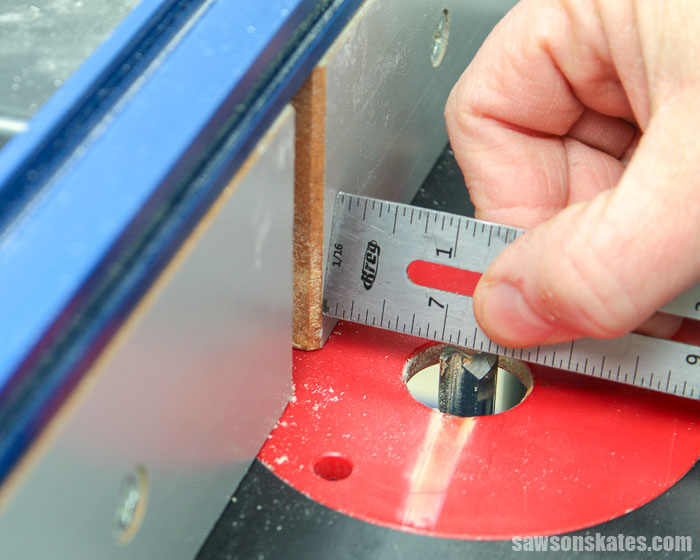
Need to make an adjustment? First, draw a pencil line along the fence on the router table. Then, loosen just the left end of the fence. This allows the fence to pivot either closer to the bit or farther away from the bit. Adjust the fence and tighten the fence. Make another cut on a test piece and adjust again if necessary.
Piloted Bits
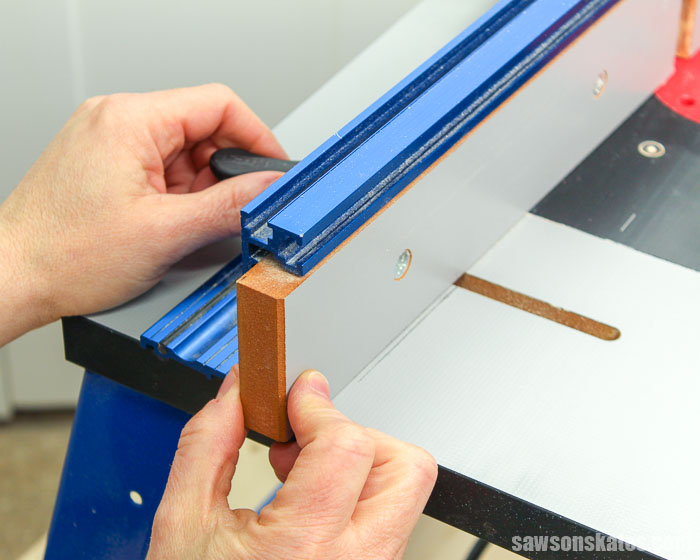
For bits with pilot bearing or guide bearing, we’ll place a straightedge across the fence. Then we’ll adjust the fence until there’s the thickness of a piece of paper between the bearing of the bit and the straightedge. Then tighten the fence and make a cut on a test piece.
5. Test the Setup
We should always test the setup on some pieces of scrap wood before cutting the pieces for our project. This way we are sure everything is set up properly
Related: How Much Should You Cut in One Pass?
Which Direction Do You Feed the Workpieces?
When using the fence, start the workpiece on the right side of the router table and move or feed to the left.
When using a pattern or template with a piloted bit, use a starter pin to ease the workpiece into the bit and move in a counterclockwise direction. A piloted bit has a bearing at the top of the bit.
What is Feed Rate?
Feed rate is how fast the workpiece moves through the router bit. A feed rate that is too fast can cause the surface of the wood to tear out. In other words, the surface of the wood will be rough or chip. A feed rate that is too slow can cause the wood to burn.
Back to Table of ContentsHow Much Should You Cut in One Pass?
We should avoid making cuts deeper than about ⅜” in one pass. Making cuts deeper than ⅜” in one pass can cause a few issues:
- Strains the motor
- Puts pressure on the router bit
- Cause tear out which leaves the surface of the wood rough
Instead, we should make several passes. For the first pass adjust the bit or fence to remove about half of the wood. Use a slow, steady feed rate for the first pass.
For the second pass, adjust the bit or fence to remove the rest of the wood. We can use a faster feed rate for the second pass.
Back to Table of ContentsFinal Thoughts
In this beginner’s guide for woodworkers, we learned how to use a router table. We looked at the parts of a router table, how to change a router bit, how to set the fence, which direction to feed workpieces, and much more.
Thank you for stopping by. If you enjoyed this tutorial, would you please take a moment and pin it to Pinterest? I’d really appreciate it!
Recommended For You
Pin This For Later

Hi there – I’m Scott, a woodworking enthusiast and creator of Saws on Skates, a site I started in 2015 to share easy-to-follow tutorials, space-saving shop tips, and project inspiration for DIYers at any skill level. Learn more about my woodworking journey here.
like your plans i was just reading your bit on using a router table but when i use mine it just wants to pull my work through where i can just barley hold on to it what is my problem
Hi Brent – If the workpieces are being pulled through the router table, it’s possible that they are being fed from the wrong direction. When using the fence, start the workpiece on the right side of the router table, and move or feed to the left.