Need to Know Pocket Hole Tips for Edge Joints
Edge joints are commonly used to create panels and table tops, but what’s the recommended spacing for pocket holes and should you also use wood glue for the joint?
You may also enjoy these 9 Solutions to Common Pocket Hole Problems.
Edge joints are one of the most common joints we use for building our DIY furniture projects, but do you know how far to space the pocket holes from the edge of the board? How far apart should you space pocket holes along the edge? Should you use glue? Should you clamp the joint? We’ll answer all of these questions today.
This tutorial contains affiliate links to supplies and tools. Purchases made using these links help support the Saws on Skates website and allows me to share more projects and tips with you. There is no cost to you for using these links. Visit my site policies for more information.
Recently, I received a comment from Richard on the How to Setup and Use a Kreg Pocket Hole Jig post. Here’s Richard’s question:
Can the Kreg Jig be used to help hold 2×10 lumber together for a kitchen counter top? I bought a Kreg 3 jig in hopes it was the right tool for the job and was planning to use 2-1/2″ screws to do the job. Also how far do the screws need to be apart? Thanks for the tutorial on setup and use of Kreg products.”
A Kreg Jig can be used to build panels and table tops, so I don’t see why you couldn’t use it to assemble a counter top. After I responded to Richard’s comment on the How to Setup and Use a Kreg Pocket Hole Jig post I heard my woodworking class instructor’s voice in my head.
Bob was my instructor for three furniture making classes from “intro to furniture making” to “advanced furniture making”. In the classes, I learned everything from how to make mortise and tenon joints to hand cut dovetails.
Related: 11 Places to Take Beginner Woodworking Classes
Bob is also the inspiration for Bob’s Miracle Finish for Wood. Anyway, Bob’s voice was saying those wide boards are going to cup.
A wide board, like a 2×10, has a greater chance of cupping. OK, what’s cupping? I’m going to share the Wikipedia definition because I think it describes cupping the best. Cupping is a “warp across the width of the face, in which the edges are higher or lower than the center of the wood.” Imagine the end of the wood looking like a banana.
How could Richard reduce cupping on his counter top?
- First, he could use narrower width boards like 2×4s.
- He could rip the 2×10 in half and then join them together which would make two smaller cups rather than one large cup.
- Or he could use a table saw to make relief cuts on the back of the board in an effort to minimize cupping.
Related: Beginner’s Guide to Wood Sizes
Since the counter top is going to see a lot of moisture, he should also seal the counter top really well. Not only just sealing the top and sides, but sealing all exposed edges including the bottom.
In Mistakes with Wood Can Cause Your DIY Furniture to Crack we talked about how wood is constantly absorbing and releasing moisture. Just sealing the top will cause the wood to absorb moisture unevenly and can encourage the board to cup or worse yet, crack.
Need to Know Pocket Hole Tips for Edge Joints
As far as spacing the pocket holes I double-checked with my friends at Kreg Tool. Although there are no hard and fast spacing rules for edge joints, they had some recommendations, and I’ll share those with you below.
Before we look a the spacing recommendations, let’s first look at the technique Richard would use to join the boards.
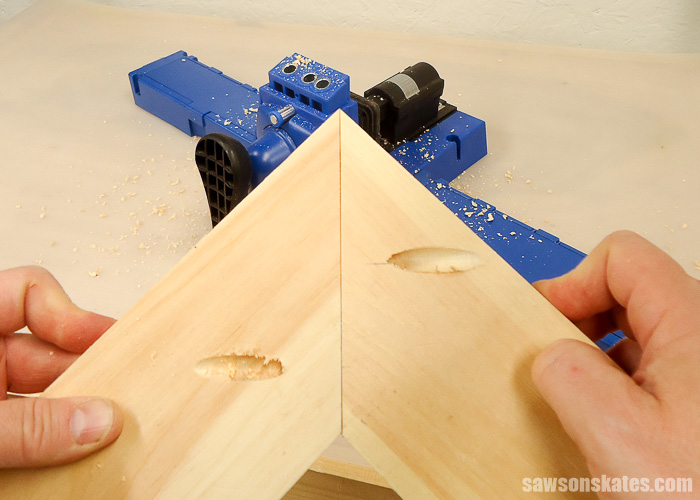
What is an Edge Joint?
Edge joints join the edges of boards to form a wider piece. Common uses for edge joints are to make panels and table tops for DIY furniture projects.
Related: How to Make a DIY Farmhouse Table Top
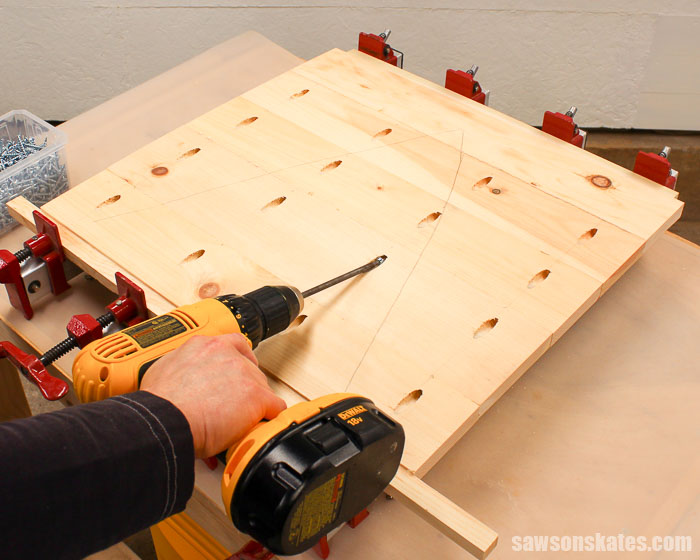
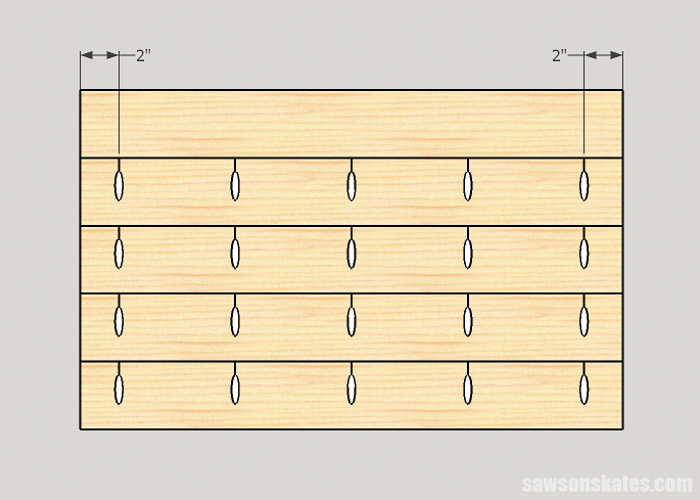
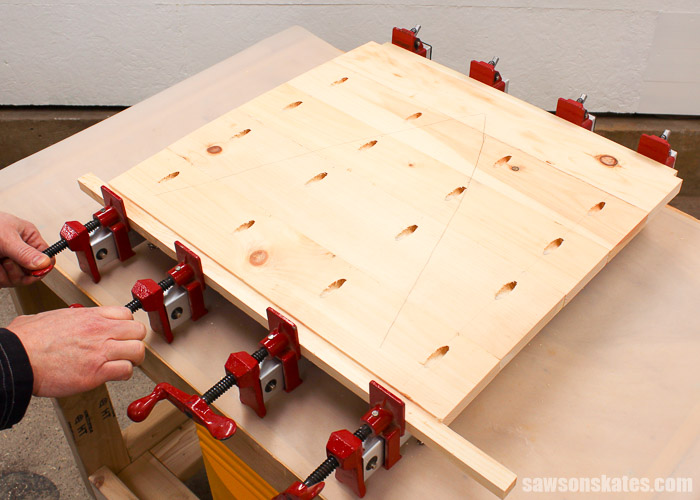
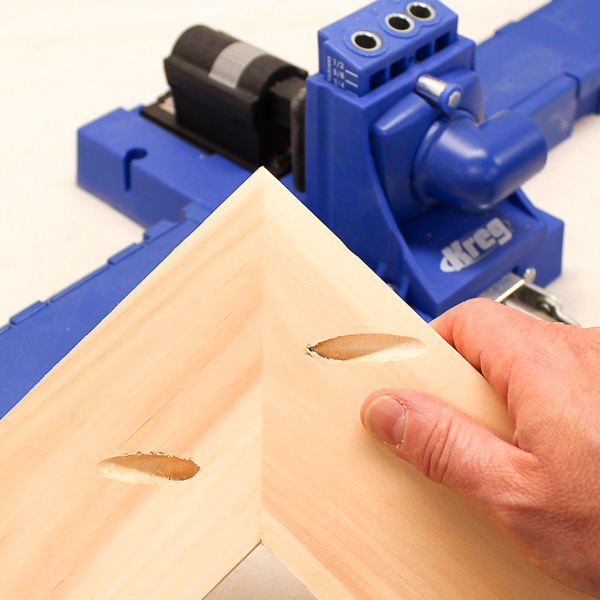
Pocket Hole Spacing from the Ends
My friends at Kreg recommend setting the pocket holes about 2″ from the ends of a board when edge joining. Setting the pocket hole and pocket screw away from the end of the board will help minimize cracking the end of the board.
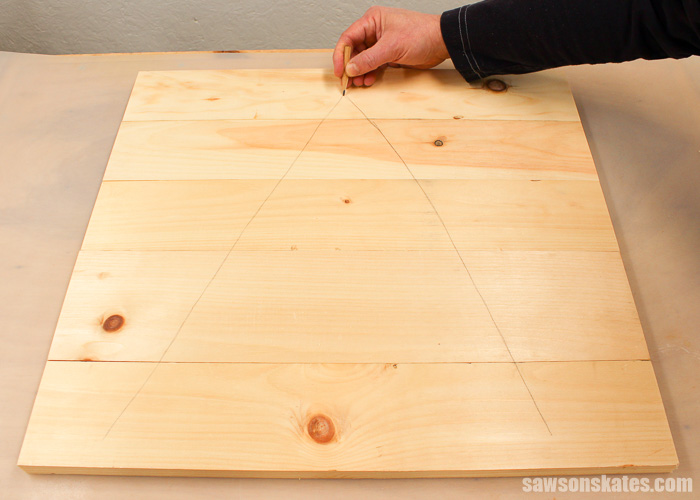
TIP: I’m picky about the direction of the wood grain for my furniture projects, so I lay out all of the boards first and decide on an eye pleasing grain pattern.
Here’s an easy way to keep your panel or table top layout while you drill your pocket holes. Draw a triangle or cabinetmaker’s triangle on the back. This way you can reassemble your panel or table top in your desired order.
Related: How to Attach a Table Top to a Base (The Right Way)
Pocket Hole Spacing on the Edge
My friends at Kreg Tool recommend spacing the pocket holes approximately 6″ apart on the edge of the board. Again, there are no specific guidelines for spacing. 6” is just a good, general rule of thumb.

While we’re talking about spacing, Timber posted this comment on the Drilling Pocket Holes on Miter Joints Requires Careful Planning post:
Another excellent and useful post, thank you! My big question is this: on edge to edge joining like for making table tops, I always see the pocket holes all in a line. Is there a reason for this? Wouldn’t it be better to have the pocket holes in a staggered or offset configuration? I’m brand new to woodworking, so it’s just a thought I’ve been having and would love some input. Thanks!”
This is a great question. I have always drilled my pocket holes in a row when making panels or table tops without giving it a second thought. For the official ruling, I turned again to my friends at Kreg Tool.
Mike at Kreg said, “There really isn’t an inherent benefit or disadvantage to staggering the pocket holes when gluing up a panel. The main reason you see them in line is simply for repetition of measurements from board to board.”
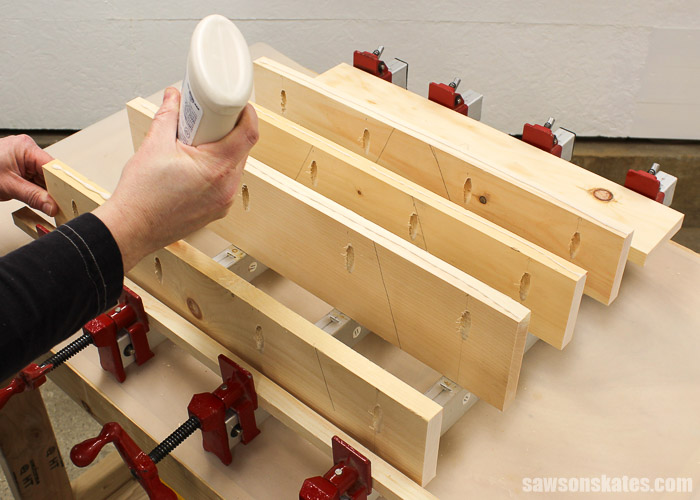
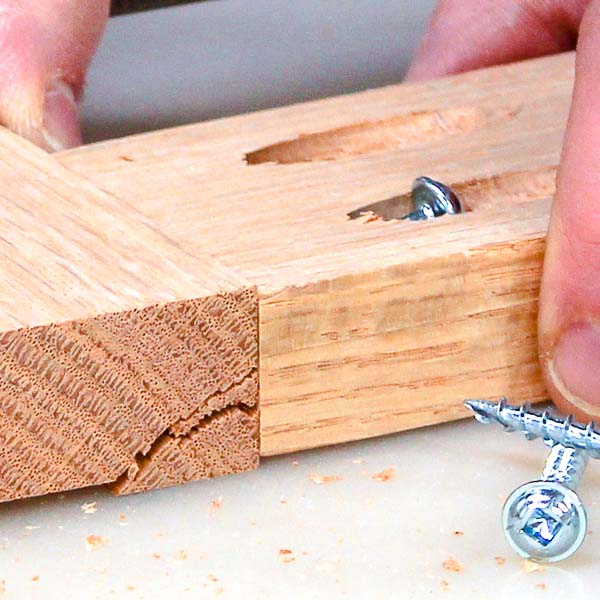
Use Wood Glue
When using pocket holes to make edge joints, I would recommend using a quality wood glue in addition to the pocket screws. Even though pocket hole joints don’t require it, in my opinion, adding glue to a pocket hole joint improves the quality of the joint.
When a pocket screw is driven through the angled pocket hole it draws the two pieces of wood tightly together. This creates a strong joint, but it doesn’t take into account the wood itself.
Wood is always moving due to seasonal changes. Wood is constantly absorbing and releasing moisture, just as it would when it was alive. In Mistakes with Wood Can Cause Your DIY Furniture to Crack I described wood like a box of drinking straws.
When the drinking straws, ummm wood fibers, absorb moisture the wood swells and gets bigger. When it releases moisture the wood shrinks and gets smaller. If you build a project when it’s humid, you may notice when the air is drier that some of the joints don’t fit together as well as when it was more humid.
I’ve noticed this joint issue when edge joining table tops for furniture projects. I built my air conditioner dresser in the summer when it was humid, but I didn’t edge glue the top pieces. The top looked great in the summer, but in the cooler months, the joints of the top just ever so slightly pulled away from each other. And the edge of one of the pieces even started to slightly curl up.
Can you stop wood movement? The short answer is no, but you can help reduce some of these issues by gluing the joints. If I glued the top of the air conditioner dresser it wouldn’t be moving like it does.
Pocket holes create a strong, lasting joint, but in my opinion that joint is made even better by adding a quality wood glue.
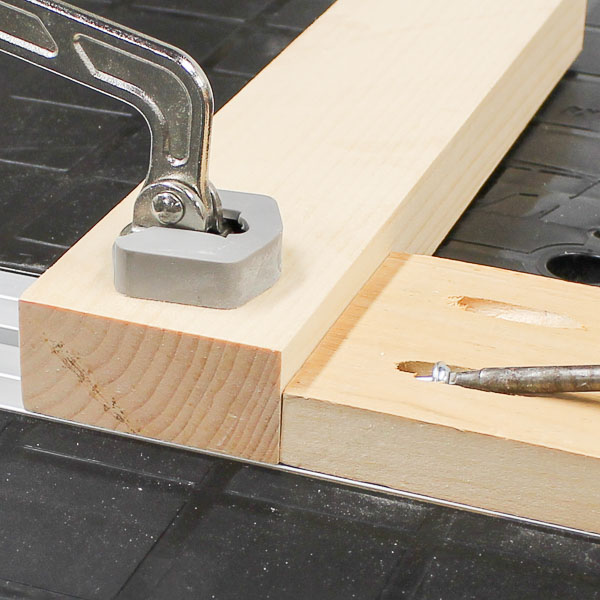
Use Clamps
I’ve seen a lot of DIYers assemble pocket hole projects without using clamps and I just don’t know how they do it. Whenever I’ve tried to attach a pocket screw without using a clamp one of the boards inevitably shifts and the result is a sloppy looking joint.
Using clamps will keep your joints properly aligned while assembling and will produce a professional looking joint. For assembling panels and table tops I like to use an assortment of bar clamps. With a bar clamp I can layout the entire piece, get all of the joints the way I want them, tighten the clamps and attach with pocket screws.
I also use clamping cauls or pieces of scrap wood when clamping to protect the edges of the workpiece and to help exert the force of the clamp equally across the board. Oh, and don’t overtighten the clamp. Overtightening can cause your panel or table top to bow and we want this piece as flat as possible.
Hey, while we’re talking about all of this clamping business, did you know there’s a science to clamping? Skate over to How to Clamp Your Project Like a Pro to learn more and to see how many bar clamps I recommend for a workshop. And if you need a place to store your clamps skate over to see these space-saving clamp storage options perfect for a small workshop.
Pocket Holes on Miter Joints
We talked a lot today about using pocket holes for edge joints, but did you know you can also use pocket holes to attach miter joints? In Drilling Pocket Holes on Miter Joints, I share three ways to use pocket holes for attaching miter joints. Skate over and check it out!
Don’t Make These Pocket Hole Mistakes
Master your pocket hole projects with this FREE ten-page Pocket Hole Mistakes You Don’t Want to Make Guide! The guide is overflowing with useful hints and easy tips to help you avoid time-consuming mistakes. Click below, get your FREE guide, and tackle your next pocket hole project with confidence!
Pocket Hole Questions
Do you have a question about pocket holes? If you didn’t find the answer to your pocket hole question in this post or in the Kreg Jig Tips and Tricks directory you can ask your pocket hole questions here!
Final Thoughts
Edge joints are one of the most common joints we use for building our DIY furniture projects. There are no hard and fast rules for spacing pocket holes on edge joints but typically you should place pocket holes 2″ from the end of a board and then typically space pocket holes 6″ apart along the edge of the board. Use wood glue and clamps to create a quality joint.
Thank you for stopping by. If you found this information helpful, would you please pin it to Pinterest? Other DIYers would appreciate it and I would too! Thank you – Scott
Recommended For You
Pin This For Later

Hi there – I’m Scott, a woodworking enthusiast and creator of Saws on Skates, a site I started in 2015 to share easy-to-follow tutorials, space-saving shop tips, and project inspiration for DIYers at any skill level. Learn more about my woodworking journey here.
Most of the projects that I have used Kreg pocket screws show a staggered for every other board and glue. I agree with you, the idea is to get ample screws for the balanced look. This was an interesting question to get a different opinion.
i think you forgot the glue word in your conclusion area . i did like what you showed and do try to use it that way but i don;t always add the glue first because if i mess up on some thing then i need to go back and fix it and then add the glue
Hey Carl – Thank you for the heads up… it’s fixed now!
First the pictures you used for this example from the wall mounted wine rack? If so by using the bar clamps to hold the back will help from cupping? When I made the project I did get a lot of cupping without using clamps I did use some irwin clamps but they were not long enough I want to build more for some friends the project did come out good. Thanks Frank
Hey Frank – Good eye! This is not the back, but the wall-mounted wine bar was the inspiration for this photo. Which brings me to your next question. I actually wanted to use the assembly pic of the back of the wall-mounted wine bar for this post, but the pocket holes were obscured because of the way I mounted the bar clamps. To assemble the back of the wine bar I mounted two bar clamps on the bottom and two bar clamps on the top. This helps to equalize the clamping pressure and help to prevent the back from bowing.

Thanks for replying I will use it
Thanks so much! This answered a lot of my questions about pocket holes and edge joins, the clear and comprehensive info is much appreciated!
You’re welcome! I’m glad to hear you found it helpful!
Could you glue up the two edges and the put the pocket holes? Great information. Do the pocket holes before the glue is cured. God’s BLESSING to one and all.
It’s easiest to drill the pocket holes first, then apply the glue and clamp. You can remove the pocket screws, but I always leave them in place.
On dimensional lumber, like the 1x stock you mentioned in the article, what depth and what screw length did you use?
Hi Pedro – For 1x material I would use 1-1/4″ pocket screws.
Thanks for the information. I’ve never made a panel before, but I plan on making one for my next project. Here are my questions. When making the panel and using the same thickness boards, what do you do to help make sure the finished panel is flat? And, if it isn’t completely flat, how do you “flatten” it? I’m thinking of buying a belt sander and/or electric hand planer to do this. Suggestions?
Hey Matt – This is a great question. You could use a belt sander or an electric hand planer, but the way I like to flatten a board is with a jointer and a thickness planer. In a nutshell, you would flatten one face and square one edge with the jointer. Then using the thickness planer you would flatten the opposite face. Lastly, you would square the opposite edge with a table saw. This would give you a perfectly flat and perfectly square board.
That said, a jointer and thickness planer can be expensive especially if you won’t be using them very often. If I’m working on a project where it isn’t critical that the panel is completely flat or just needs to look flat to the eye I usually start by selecting the flattest boards I can find. For instance, the boards I used for the back of this wall-mounted wine bar were off the shelf boards from Lowe’s. All I did was a light sanding and the panel looks flat to the eye.
This is a great article, thank you for the very useful information! I am running into cupping every time I go to assemble a table top, I finally know what correct term as to what’s happening. It’s getting very frustrating. Our first three boards (of a 5 panel 2×6 board) go together nicely and every time starting around the 4-5th boards is begins to cup. We are using pocket holes and clamps to hold things in place. Any suggestions? Would alternating grains reduce cupping?
We are beginners and each time this happens it takes the winds out of our sails so to speak. We have plans to build more tables that have 5-panel 2×6 tops so we really want to get this process down. Any advice would be so much appreciated. 🙂 Thank you!
Hi Jackie – In the “Need to Know Pocket Hole Tips for Edge Joints” post I shared some info about cupping. A wider board, like a 2×6, has a greater chance of cupping. To reduce cupping you could use narrower width boards like 2x4s. You could rip the 2×6 in half and then join them together which would make two smaller cups rather than one large cup. Or you could use a table saw to make relief cuts on the back of the board in an effort to minimize cupping. Hope that helps. Good luck!
Thanks for help
Hi Henry – Thank you for stopping by. I’m glad this was helpful for you.
A Huge Thank you for the lessons in this article. I have an old oak chair that split along the grain, from front to back, that someone suggested to use a kreg jig, clamps and glue to repair it. Looks like I have found the confirmation of that advise.