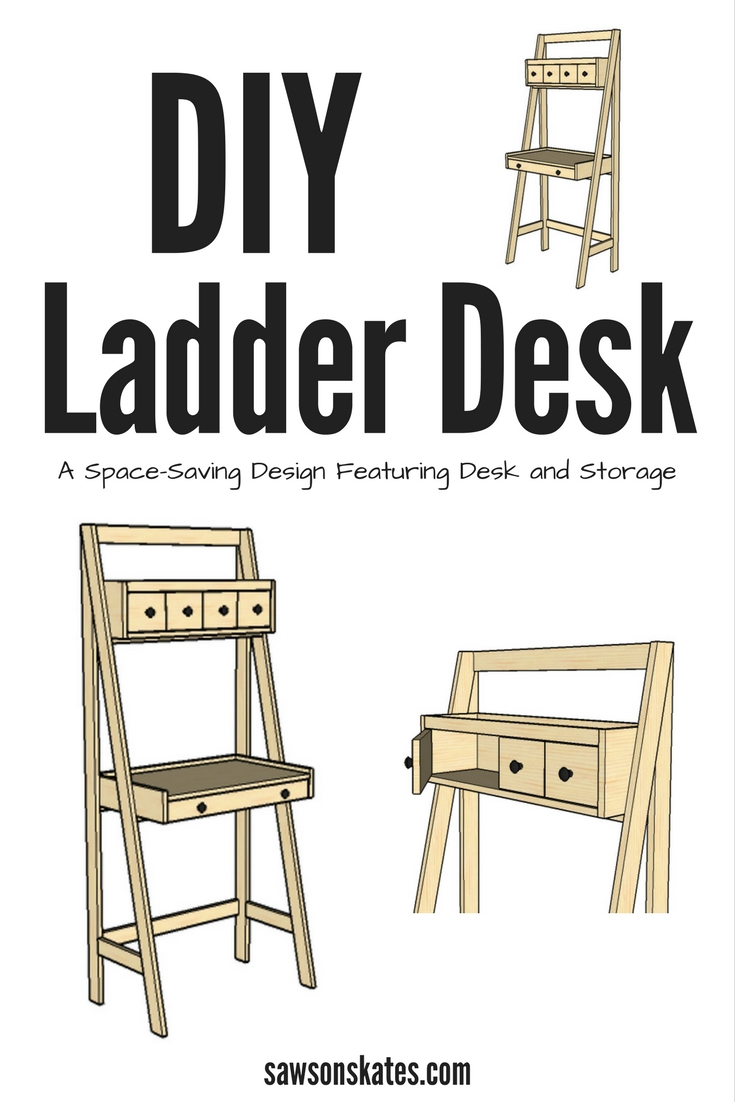
DIY Ladder Desk is a Work and Storage Space-Saver
DIY ladder desk ready for work and storage. Perfect for a home office or doing homework and easy enough to build in a weekend.
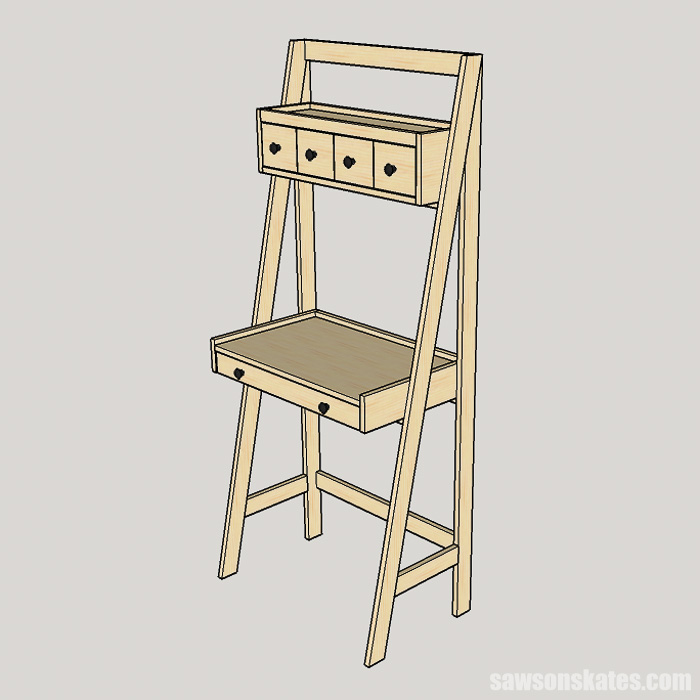
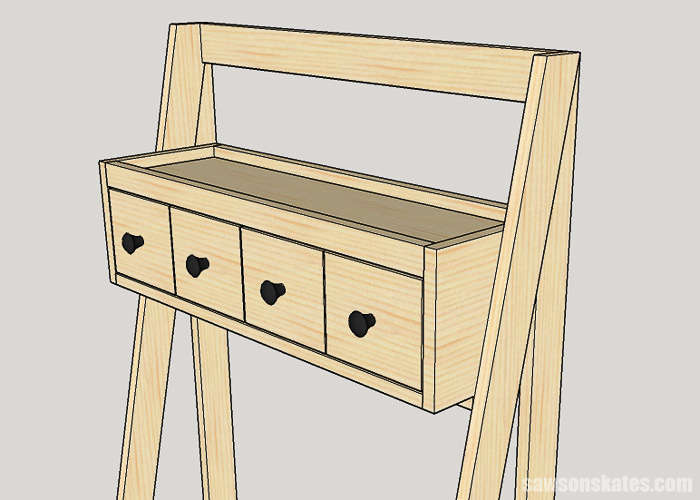
This DIY ladder desk was inspired by a national import retail store. The stylish leaning desk features a storage drawer below the desktop and a storage cabinet above with cabinet doors that were designed to look like drawers. Thanks to easy pocket hole construction it’s an easy build that you should be able to assemble in just a weekend.
For your convenience, this post contains affiliate links to supplies or tools I used to complete this project. Purchases made using these links help support the Saws on Skates website and allow me to share more DIY projects. and DIY tips with you. There is no cost to you for using these links. Click here to visit my site policies.
I stumbled on this desk when I was helping my friend Linda search for a new couch. You’ve probably heard me mention Linda if you’ve been hanging around here for a bit. I’ve built a few outdoor projects for Linda like a DIY raised garden bed, the patio garden cabinet, and the outdoor coffee table. I’ve also built her some furniture projects like the small size-big style DIY bathroom vanity and the DIY kitty litter cabinet. And we’re thinking about building her a variation of the DIY electric fireplace mantel once she finds a new couch.
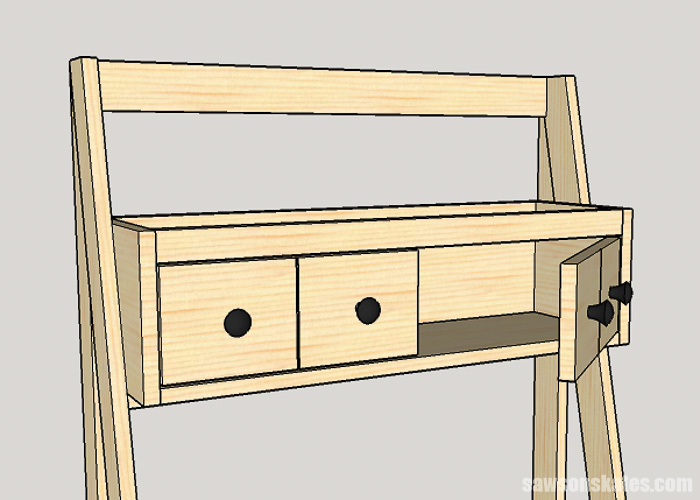
We didn’t find a couch on this trip, but I couldn’t stop thinking about that desk. In fact, I went home and checked it out online. I even read the reviews. After studying it for a bit I designed my own DIY ladder desk. A few of the reviewers mentioned there was nothing to prevent the top drawers from just falling out. I redesigned the drawer area on my DIY version. Instead of drawers, I made the top a cabinet. The cabinet doors are faux drawers. It’s a similar technique I used for the DIY bathroom vanity.
IMPORTANT: I designed this DIY ladder desk in very similar proportions to this desk. Both of these pieces are tall and not very deep, so they could potentially tip over. As a safety precaution, I would use some “L” brackets to anchor the desk to the wall.
Where to Use a Ladder Desk?
- Home Office – Need a place to work from home or just need a place to keep track of family schedules and finances? This easy to build DIY leaner desk is the answer.
- Apartment – This sleek space-saver would compliment a living room, kitchen or just about any room in an apartment.
- Dorm – The compact design would be perfect for a college dorm room where space is at a premium and it’s stylish enough to transition to an apartment or house after college.
- Kids Room – The perfect place for studying and homework. Just a reminder this piece isn’t very deep, so as a safety precaution, I would use some “L” brackets to anchor this to the wall.
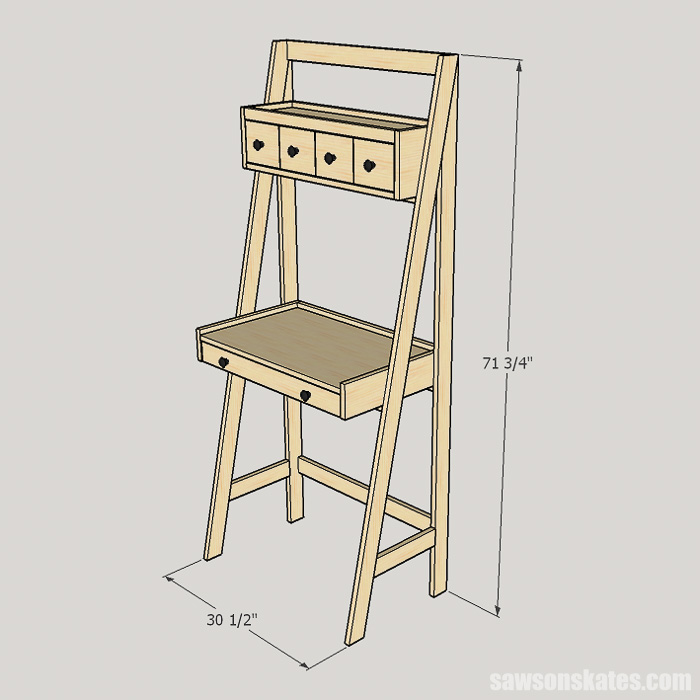
DIY Ladder Desk Plan
Supplies
(1) 1x2x6
(5) 1x3x8
(1) 1x4x6
(1) 1x5x6
(1) 1x6x6
(2) 1x12x8
3/4″ plywood – 2′ x 4′
1/8″ hardboard – 2′ x 4′
1-1/4″ pocket screws
1-1/4″ wood screws
1/2″ brad nails
Wood glue
#10 plate joiner biscuits
(2) Cabinet hinges
16″ drawer slides
5 knobs
“L” bracket or corner brace
Tools
Stanley FatMax Tape Measure
DEWALT Cordless Drill
Kreg Jig
Miter saw
Biscuit plate joiner
Jig saw, circular saw or band saw
Hammer or brad nailer
Countersink drill bit
Printed Plan
Click below to get a PDF of the DIY Ladder Desk plan.

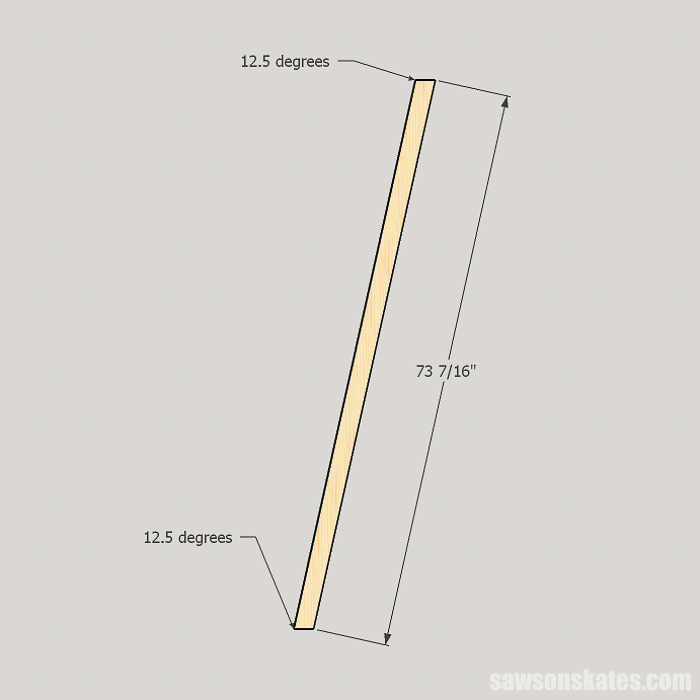
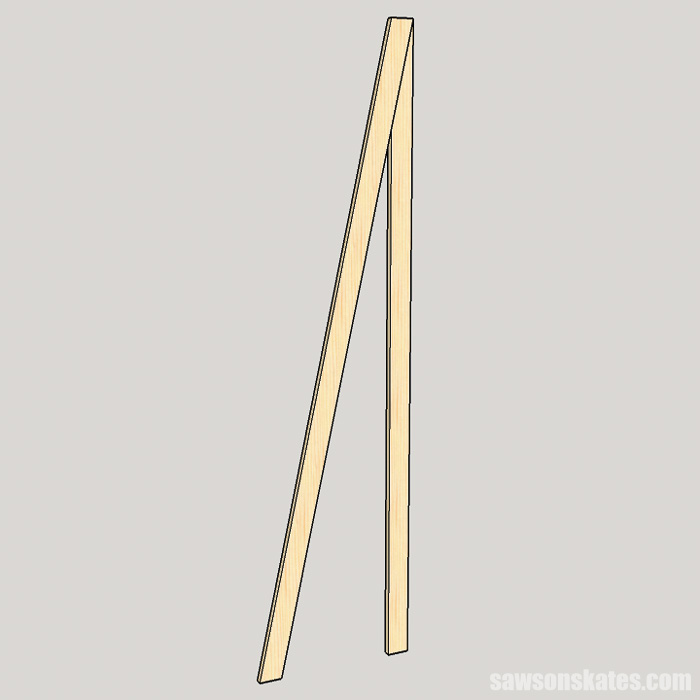
Step 1. Cut the Front Legs. Cut 2 pieces of 1×3 with a 12.5-degree angle on one end. Measure 73-7/16″ and cut a parallel 12.5-degree angle.
Step 2. Cut the Back Legs. Cut 2 pieces of 1×3 to 71-3/4″. Measure 60-1/2″ on one edge and make a mark. Draw a line to connect the mark to the corner. Cut the line using a jig saw, circular saw and crosscut jig or a bandsaw.

Step 3. Assemble the Legs. The legs will be joined using a biscuit joiner and biscuits. Layout the legs, mark locations for biscuits and use a biscuit joiner to cut the biscuit slots. Apply glue to the slots, insert the biscuits and clamp the legs.
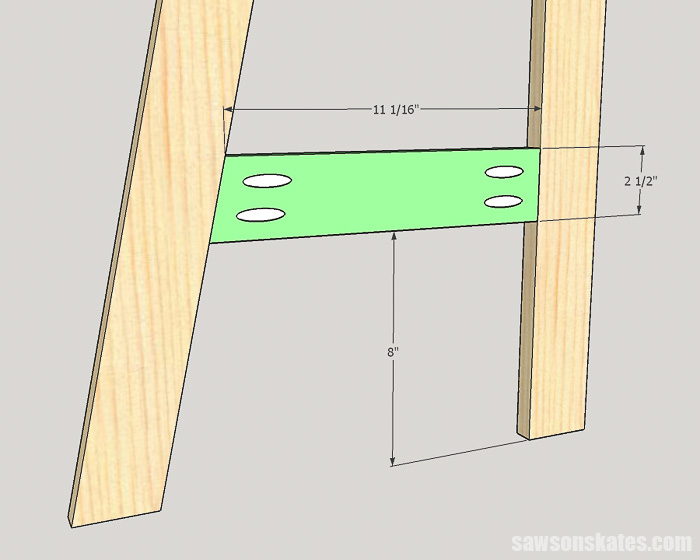
Step 4. Cut and Attach the Side Leg Rails. On 2 pieces of 1×3 measure 11-1/16″ and make a mark. Cut a 12.5-degree angle at this mark. Drill pocket holes in each end.
To help position the rail cut a piece of scrap wood to 8″. Temporarily attach the scrap wood to the inside of the back leg using painter’s tape. Apply glue to the ends of the rails, place on top of the scrap wood, clamp and attach using 1-1/4″ pocket screws.
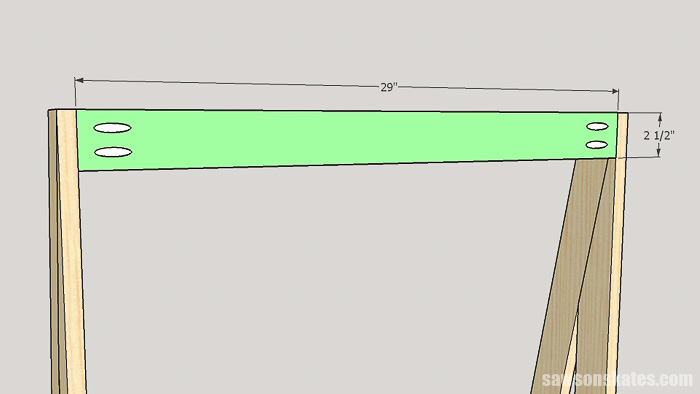
Step 5. Cut and Attach the Back Leg Rails. Cut 6 pieces of 1×3 to 29″. Drill pocket holes in each end. Two of the pieces will be used as back rails and four will be used as stretchers for the cabinet and desk (Step 6).
To help position the rail cut 2 pieces of scrap wood to 8″. Temporarily attach the scrap wood to the back legs using painter’s tape. Apply glue to the ends of the rails, place on top of the scrap wood, clamp and attach using 1-1/4″ pocket screws.

Apply glue to the ends of the rails, place flush with the top of the legs, clamp and attach using 1-1/4″ pocket screws.
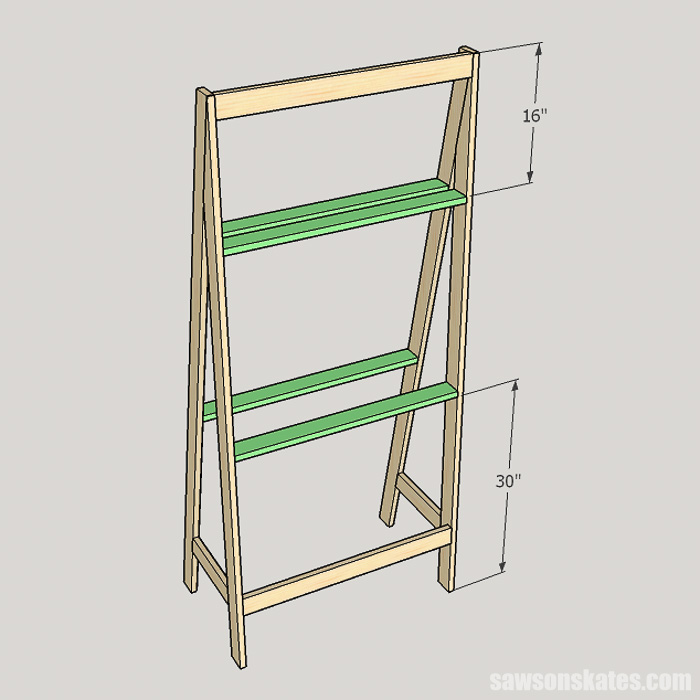
Step 6. Attach the Stretchers. From the top measure down 16″ and make a mark. Place the cabinet stretchers below this mark. Apply glue to the ends of the stretchers (from Step 5), clamp in position and attach using 1-1/4″ pocket screws. Be sure the front and back stretchers are level.
From the bottom measure up 30″ and make a mark. Place the desk stretchers above this mark. Apply glue to the ends of the stretchers (from Step 5), clamp in position and attach using 1-1/4″ pocket screws. Be sure the front and back stretchers are level.
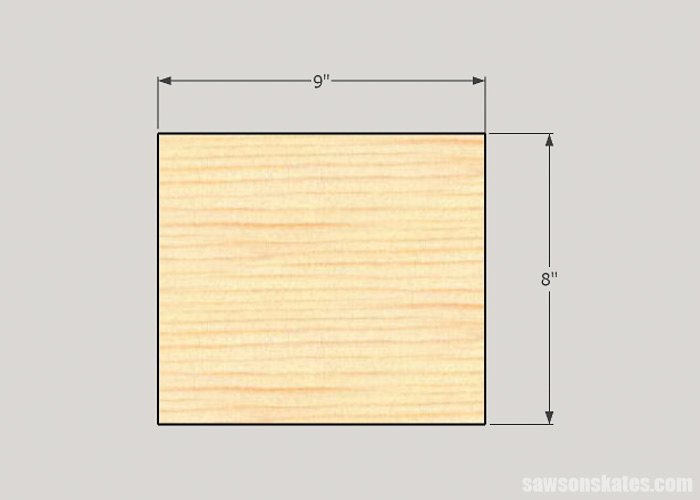
Step 7. Cut the Cabinet Sides. Cut 2 pieces of 1×12 to 9″ and rip to 8″.
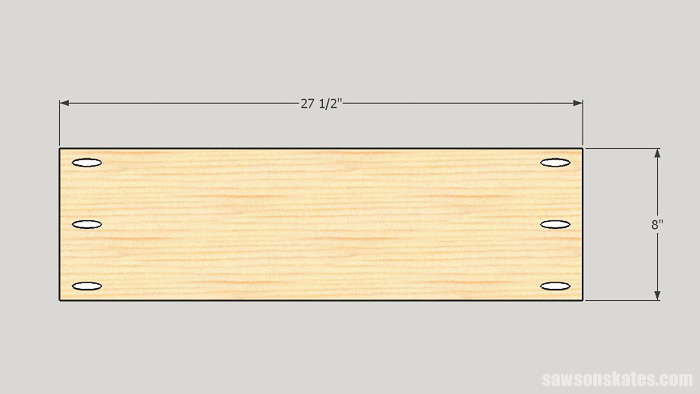
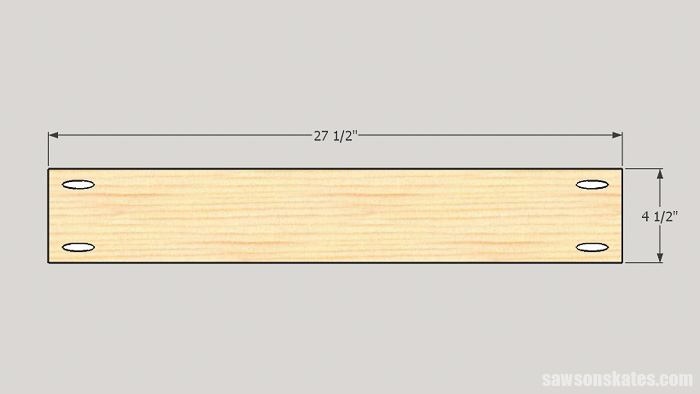
Step 8. Cut the Cabinet Back. Cut a piece of 1×12 to 27-1/2″ and rip to 8″. Drill pocket holes in each end.
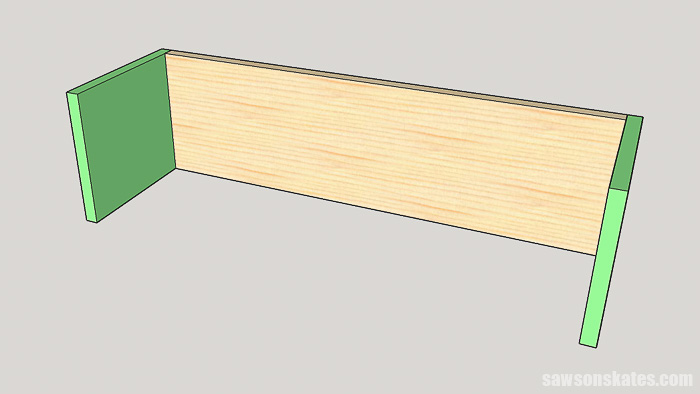
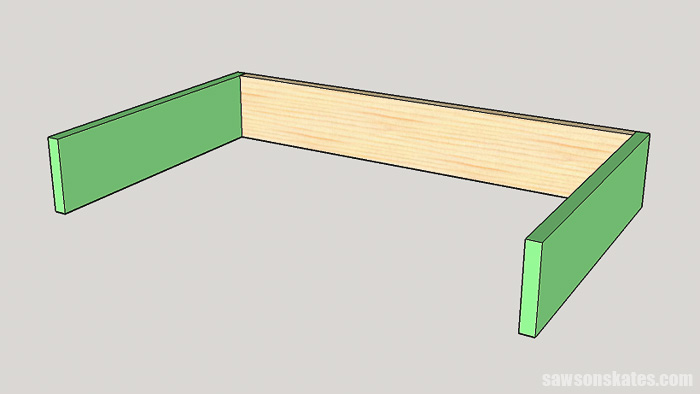
Step 9. Assemble the Cabinet. Apply glue to the ends of the back, clamp to the sides and attach using 1-1/4″ pocket screws.
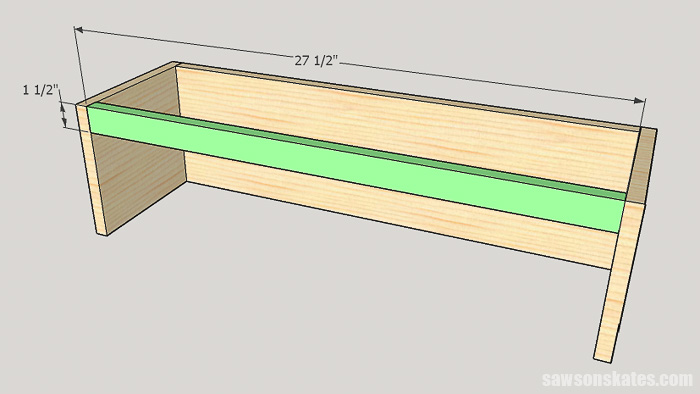
Cut a piece of 1×2 to 27-1/2″ and drill a pocket hole in each end. Apply glue to the ends, place at the top of the cabinet, clamp and attach using 1-1/4″ pocket screws.
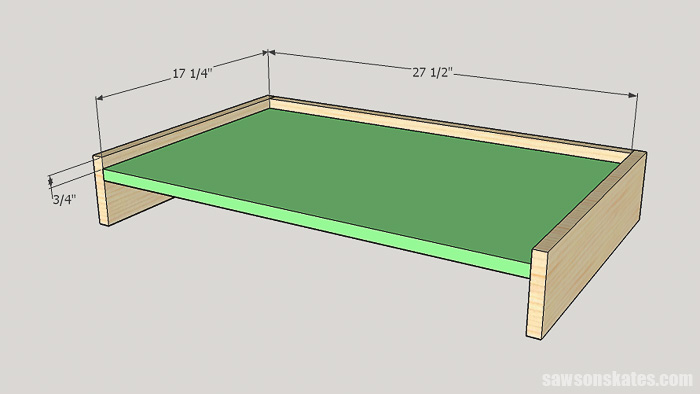
Cut a piece of 1×12 to 27-1/2″ and rip to 7-1/2″. Drill pocket holes in each end. Place 3/4″ below the top edge of the cabinet, clamp in position and attach using 1-1/4″ pocket screws.
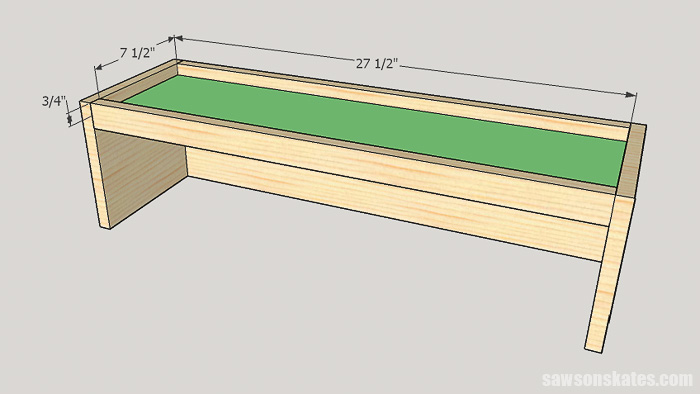
Cut a piece of 1×12 to 27-1/2″ and rip to 8-1/4″. Drill pocket holes in each end. Place flush with the bottom, clamp in position and attach using 1-1/4″ pocket screws.

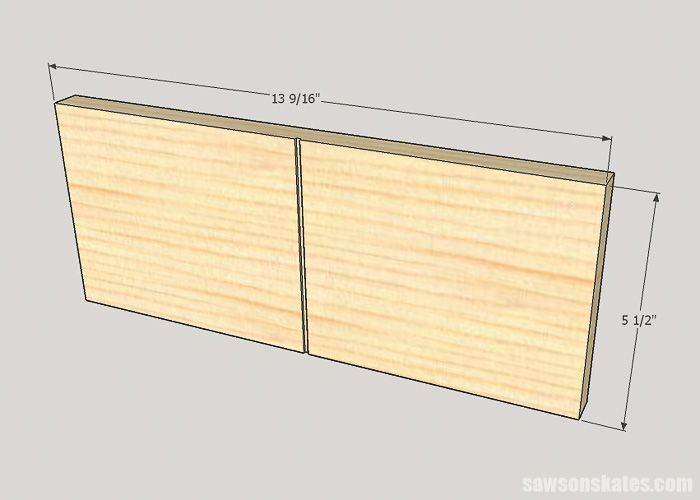
To make the cabinet doors cut two pieces of 1×6 to 13-9/16″. Center the door over the blade of a table saw and use the thickness of the saw blade (kerf) to make a 1/4″ deep cut. The blade will be hidden while making this cut – please use caution. This cut will give the illusion that the cabinet doors are actually two separate drawers. Find the center of each “drawer” by drawing a line from corner to corner. Drill a hole at each location for the knobs. Attach the doors to the cabinet with cabinet hinges according to the manufacturer’s instructions.
Step 10. Install the Cabinet. Place the back of the cabinet flush with the back of the legs. Drill countersink holes from the bottom of the stretchers and attach using 1-1/4″ wood screws. Also, drill countersink holes inside the cabinet into the front legs and attach using 1-1/4″ wood screws.
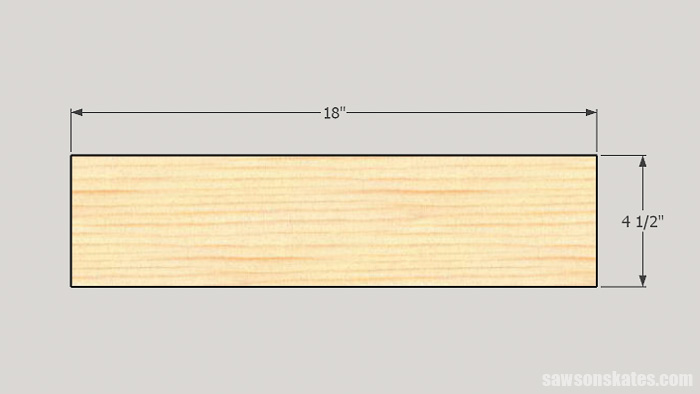
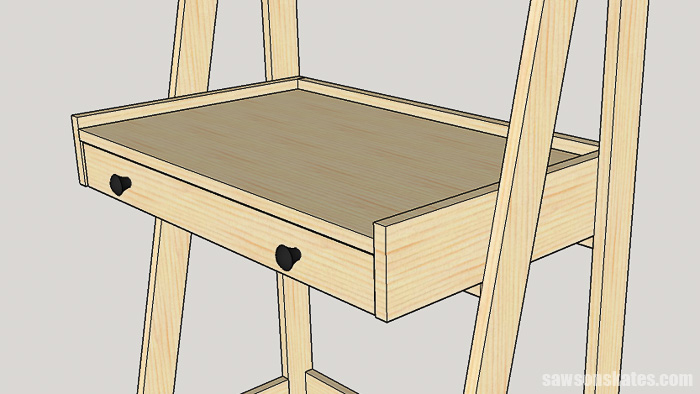
Step 11. Cut the Desk Sides. Cut 2 pieces of 1×5 to 18″.
Step 12. Cut the Desk Back. Cut 2 pieces of 1×5 to 27-1/2″ and drill pocket holes in each end.
Step 13. Assemble the Desk. Apply glue to the ends of the back, clamp to the sides and attach using 1-1/4″ pocket screws.
Cut a piece of 3/4″ plywood to 17-1/4″ x 27-1/2″. Drill pocket holes on the sides and back. Apply glue to the sides and back, place 3/4″ below the top edge of the sides/back, in position and attach using 1-1/4″ pocket screws.
Now is a good time to install the drawer slides. Attach the drawer slides according to the manufacturer’s instructions.
Cut a piece of 3/4″ plywood to 16-1/4″ x 27-1/2″. Drill pocket holes on the sides and back. Apply glue to the sides and back, place flush with the bottom of the sides/back and attach using 1-1/4″ pocket screws.

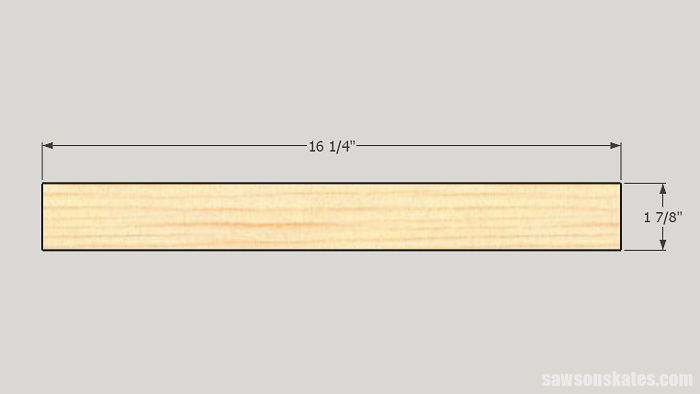
Step 14. Cut the Drawer Box Sides. Cut 2 pieces of 1×3 to 16-1/4″ and rip to 1-7/8″.
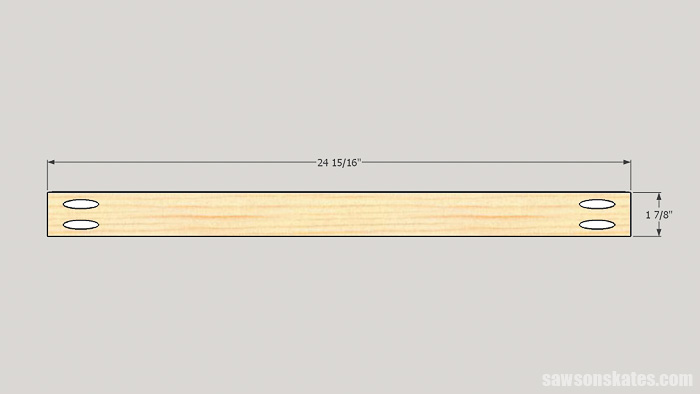
Step 15. Cut the Drawer Box Front/Back. Cut 2 pieces of 1×3 to 24-15/16″ and rip to 1-7/8″. Drill pocket holes in each end.
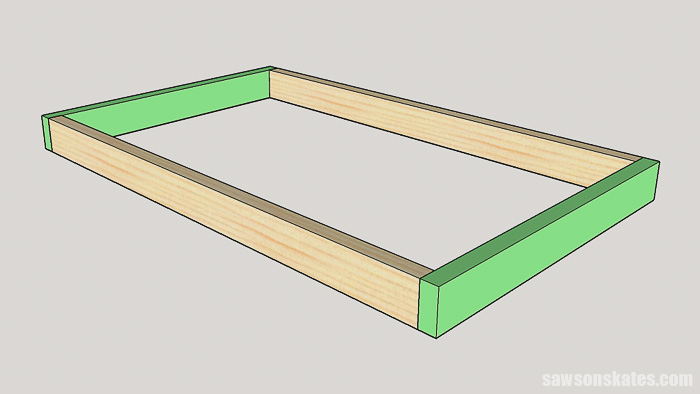
Step 16. Assemble the Drawer Box. Apply glue to the ends of the drawer box front and back, clamp to the sides and attach using 1-1/4″ pocket screws.
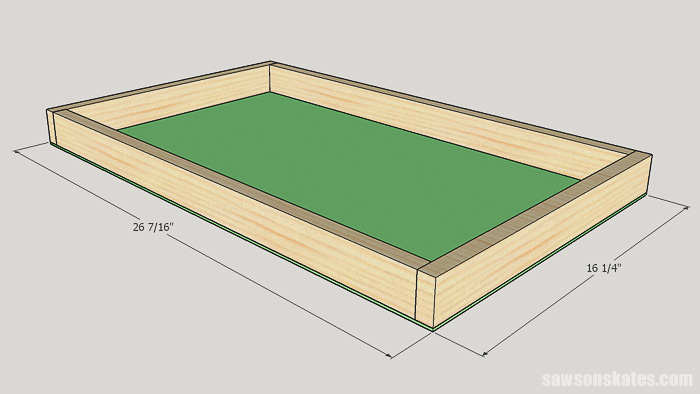
For the drawer bottom cut a piece of 1/8″ hardboard to 26-7/16″ x 16-1/4″. Apply glue to the bottom edges of the drawer box, place the drawer bottom and attach using 1/2″ brad nails.
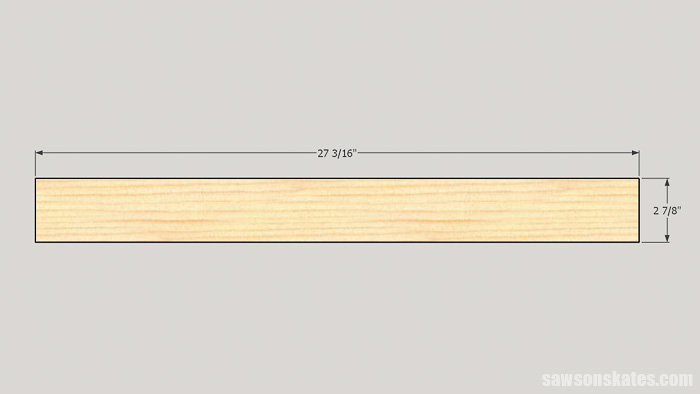
For the drawer front cut a piece of 1×4 to 27-3/16″ and rip to 2-7/8″. Measure in 5-1/2″ on each side and down 1-15/16″ and make a mark. Drill a hole at each mark for a knob.
The drawer front needs to have an 1/8″ gap around the edge. To help install the drawer attach a few pieces of scrap 1/8″ hardboard under the desktop and on each side of the drawer opening with painter’s tape. Place the drawer in position and through the knob holes into the drawer box. Attach the drawer front to the drawer box with the knobs.

Step 17. Install the Desk. Place the back of the desk flush with the back of the legs. Drill countersink holes from the bottom of the stretchers and attach using 1-1/4″ wood screws.
Step 18. Sand and finish. If staining, fill any holes or gaps with a DIY wood filler and apply black tea. Sand the piece. Apply a coat of Rust-Oleum Ultimate Wood Stain and three coats of Bob’s Miracle Finish for Wood. If painting, fill any holes or gaps with Ready Patch, prime, and paint.
Step 19. Attach to Wall with “L” Brackets. I designed this DIY ladder desk in very similar proportions to this desk. Neither of these pieces is very deep and could potentially tip over. As a safety precaution, I would use some “L” brackets to anchor the desk to the wall.
Thank you for stopping by to check out my DIY ladder desk. If you like this furniture plan, would you please pin it to Pinterest? I’d really appreciate it! Thank you – Scott
PIN THIS!

Hi there – I’m Scott, a woodworking enthusiast and creator of Saws on Skates, a site I started in 2015 to share easy-to-follow tutorials, space-saving shop tips, and project inspiration for DIYers at any skill level. Learn more about my woodworking journey here.