DIY Hidden Litter Box Cabinet
Hide that ugly cat litter box with this DIY kitty litter cabinet! These free plans show how to make a stylish wooden enclosure that’s perfect for any room.

What Should I Build Next?
That's the question I help answer.
Every week, I send woodworking ideas to 17,000 DIYers who love building things.
You'd fit right in.
Cat Litter Box Cabinet
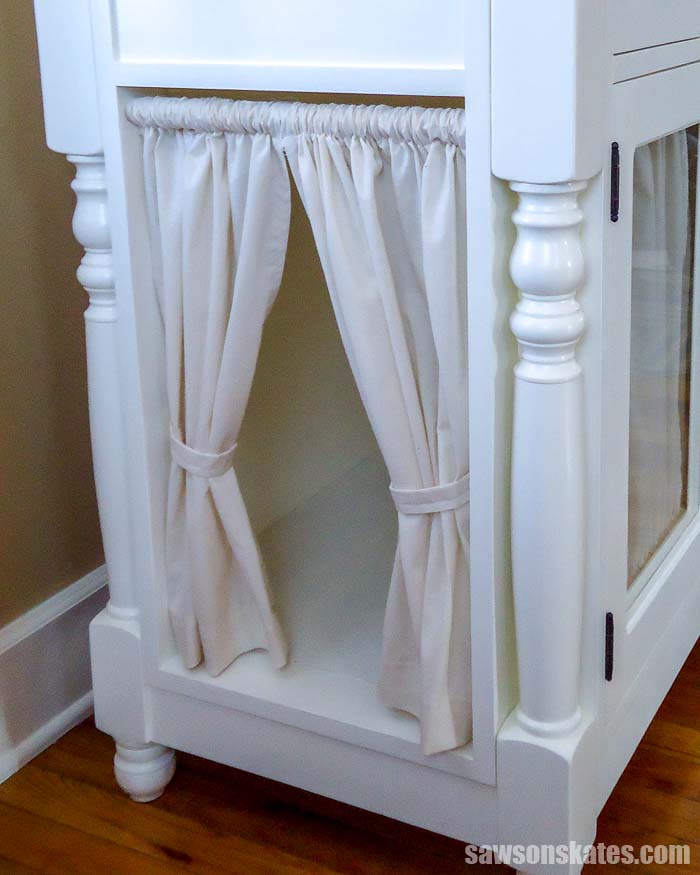
Cats are cute, but litter boxes are ugly! I have the purrrfect solution for you to hide that ugly litter box. This looks like an attractive cabinet but the doors open to reveal a hidden litter box. There’s even space for extra litter. Adorable little curtains welcome kitties on their way to the bathroom.
You may also enjoy this DIY Corner Cabinet and this DIY Wine Cabinet.
Originally published November 1, 2016 updated September 17, 2019
This post contains affiliate links to supplies or tools I used to complete this project. Purchases made using these links help support the Saws on Skates website and allow me to share more DIY projects. and DIY tips with you. There is no cost to you for using these links. Click here to visit my site policies.
Before we get into how to make a hidden litter box cabinet, be sure to click the subscribe button at the bottom of this page to sign up for my FREE weekly newsletter loaded with helpful pocket hole tricks, space-saving workshop ideas, clever DIY tips and more!
Table of Contents
- Where Can I Hide a Cat’s Litter Box?
- What is Kitty Litter Box Furniture?
- Inspiration for This Wooden Litter Box Enclosure
- What Kind of Wood Do I Need to Make a Kitty Litter Cabinet?
- What Tools Do I Need to Build a Litter Box Cabinet?
- Where Should I Put Litter Box Enclosure in My House?
- How to Make a Hidden Litter Box Cabinet
- Get the Free Printed Plan
- More Like This
Where Can I Hide a Cat’s Litter Box?
Many pet parents ask “Where can I hide a cat’s litter box?” It’s a question my friend Linda asked me. Let’s face it. Litter boxes are not attractive. One place we can hide a litter box is inside kitty litter box furniture.
What is Kitty Litter Box Furniture?
Kitty litter box furniture or a litter box cabinet is designed to hide a cat’s litter box. It’s often built to look like an ordinary piece of furniture like an end table, nightstand or cabinet.
Inspiration for This Wooden Litter Box Enclosure
This DIY cat litter box cabinet started life as a butcher block kitchen island. My friend Linda bought the island second hand for her kitchen. The problem is Linda’s house is small. It’s so small that this island looked more like a continent in her tiny kitchen!
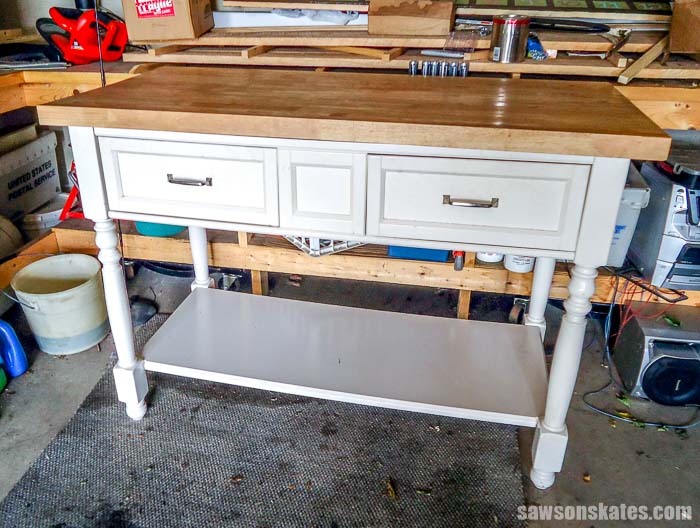
Linda had two problems. A big island that didn’t fit in her kitchen. And the second problem was that she didn’t have a good place to hide her cat’s litter box.
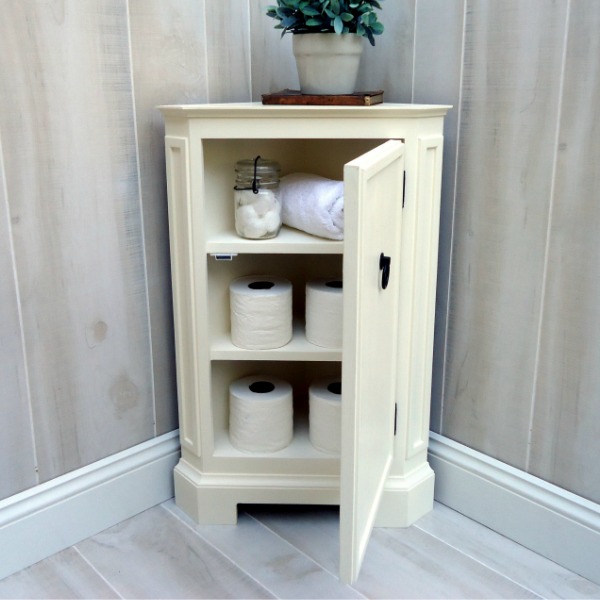
I had an idea to completely transform this oversized island. I redesigned it to fit her space and provide a hidden spot for the litter box. Check out the outdoor plant stand, outdoor coffee table and bathroom vanity that I also built for Linda.
First, I repurposed the legs from the island and built an entirely new frame. The new frame was topped with the repurposed butcher block to create a stylish kitty litter cupboard for her kitchen.
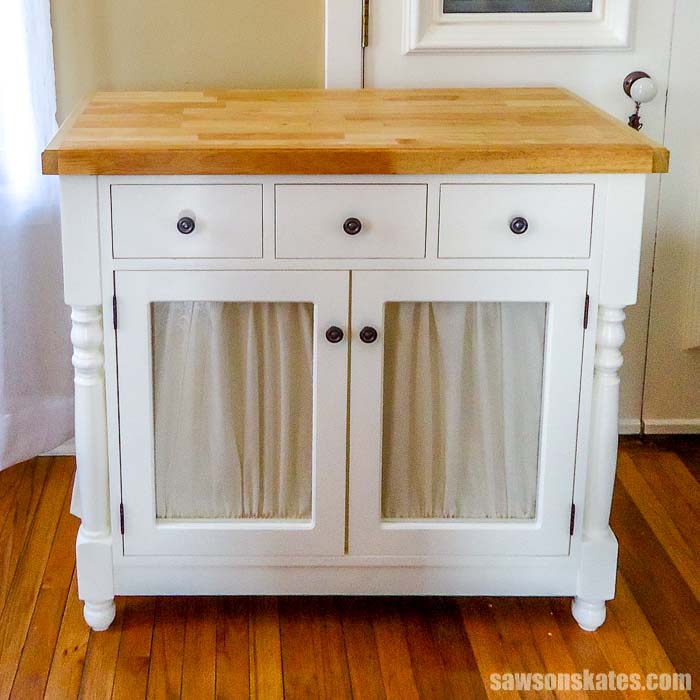
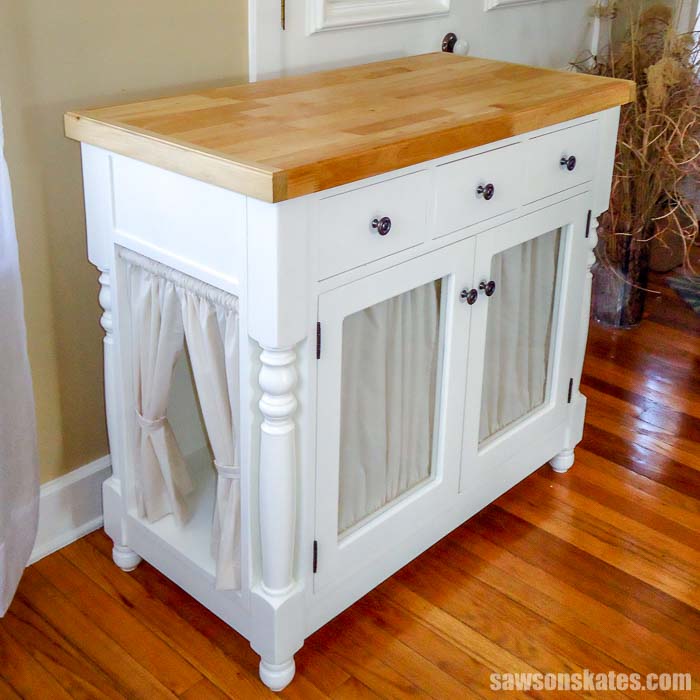
At the top of the cupboard, there are three drawers. Below the drawers are two doors that hide the litter box. There’s also storage for extra litter next to the box.
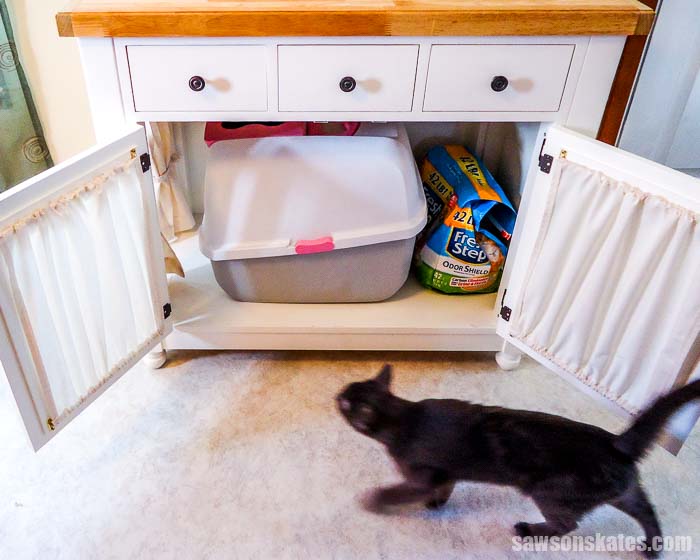
Homemade curtains create an attractive entrance for her kitties on their trip to the bathroom litter box. And yes, I sewed the curtains myself! I’m an amateur when it comes to sewing, but later on, I’ll do my best to explain how I made the curtains.
What Kind of Wood Do I Need to Make a Kitty Litter Cabinet?
Most of this DIY kitty litter cabinet was made with inexpensive common pine. The pine was purchased at my local big box home improvement store.
The legs and butcher block top were repurposed from a secondhand kitchen island. Don’t worry if you don’t have legs and top to repurpose. I’ll share how to make your own later in the cat litter box cabinet tutorial.
What Tools Do I Need to Build a Litter Box Cabinet?
Most of this project was built with miter saw, drill, and a Kreg Jig. There are a few pieces that will need to be cut with either a circular saw or a table saw.
Tools Resource Center
Where Should I Put Litter Box Enclosure in My House?
Linda’s house is small. Her place is only about 700 square feet. She really wanted to put the litter box in the bathroom, but there’s not enough floor space. You can see the small vanity I made for her bathroom here.
She has a small spare bedroom, but again the floor space is limited. She decided the best place for the wooden litter box enclosure was in her kitchen.
The enclosure is close to a garbage can so the box can be scooped regularly. It’s also right next to a window when some fresh air is needed.
How to Make a DIY Hidden Litter Box Cabinet
Printed Plan
- Get the FREE plan here (includes detailed instructions, measurements, and bonus tips).
Supplies
- Wood (per printed plan)
- 3/4″ Brad Nails
- 1-1/4” Pocket Screws
- 1-1/4″ Wood Screws
- 2″ Wood Screws
- 2-1/2″ Pocket Screws
- 1-1/4″ Finish Nails
- 1/4″ Washers
- Wood Glue
- 5 Knobs
- 4 Hinges
- Tension Rod
Tools
- Tape Measure
- Pocket Hole Jig
- Drill
- Miter Saw
- Circular Saw
- Kreg Accu-Cut
- Table Saw
- Brad Nailer or Hammer
- Drill Bits
- Countersink Drill Bit Set
Step 1. Make the Legs
The repurposed legs I used for this project measured 2-1/2″ x 2-1/2″ x 34-5/8″. You can make your own square legs if you don’t have legs to repurpose or can’t find legs in this dimension.
Option 1:
There are several ways to make your own legs. One way would be to use 5/4 wood (spoken as five-quarter). 5/4 wood is approximately 1-1/8” thick. Two pieces of 5/4×3 wood glued together would give you a piece that is 2-¼” x 2-½”.
The leg wouldn’t be square, but I think it would be close enough for this application. For this option cut 8 pieces of 5/4×3 to 34-5/8″. Take 2 pieces, apply glue and clamp together. Repeat for the remaining pieces to form 4 legs.
Related: Beginner’s Guide to Wood Sizes
Option 2:
The second option would be to use 4×4 wood. 4×4 wood measures 3-1/2″ x 3-1/2″. In this case, you could use a table saw to rip the 4×4 to 2-1/2″ x 2-1/2″. For this option rip 4 pieces of 4×4 to 2-1/2″ x 2-1/2″ and cut to 34-5/8″.
Related: Beginner’s Guide to Table Saw Safety
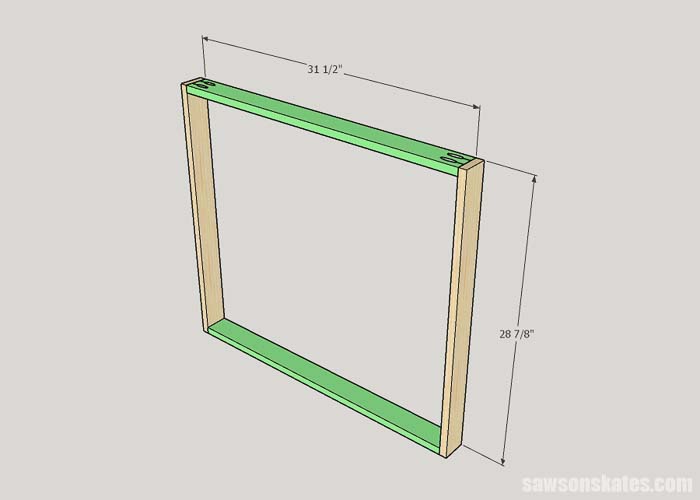
Step 2. Make the Front and Back Stiles
Cut 4 pieces of 1×3 to 28-7/8″.
Step 3. Make the Front and Back Rails
Cut 6 pieces of 1×3 to 31-1/2″. Drill pocket holes in each end of the rails.
Related: How to Use a Kreg Jig
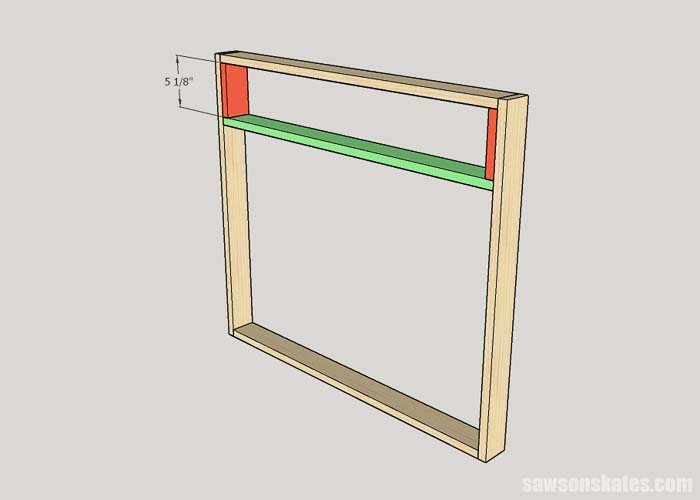
Step 4. Make the Drawer Dividers
Cut 6 pieces of 1×3 to 5-1/8″. 4 pieces will be used as drawer dividers and 2 will be used as spacers to help properly align the drawer opening.
Step 5. Assemble the Front and Back
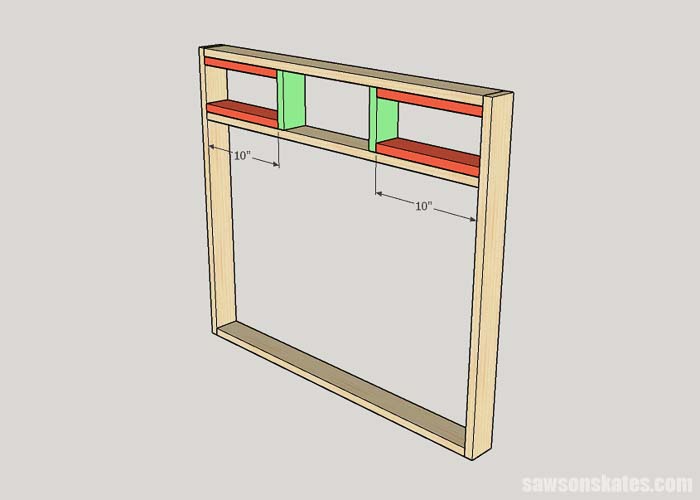
Apply glue to the top and bottom rails, clamp to the stiles and attach with 1-1/4″ pocket screws.
Clamp the 2 spacers from Step 4 to the inside of the stiles. Do not attach. Apply glue to the middle rail, place below the spacers, clamp in position and attach with 1-1/4″ pocket screws. Remove the spacers.
Cut 2 pieces of scrap wood to 10″, clamp to the underside of the top rail and the upper side of the middle rail. Do not attach. Apply glue to a drawer divider, place against the scrap wood and clamp in position. Drill countersink holes in the top and middle rail. Attach with 1-1/4″ wood screws. Repeat Step 5 for remaining side.
Related: How to Use a Countersink Bit
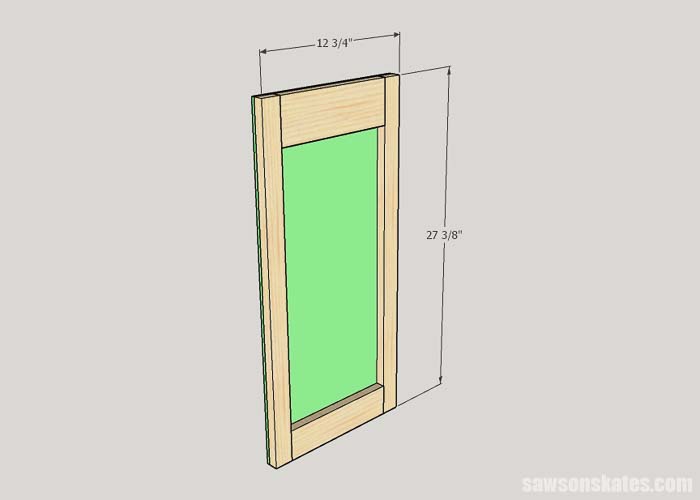
Step 6. Assemble the Side Subframe
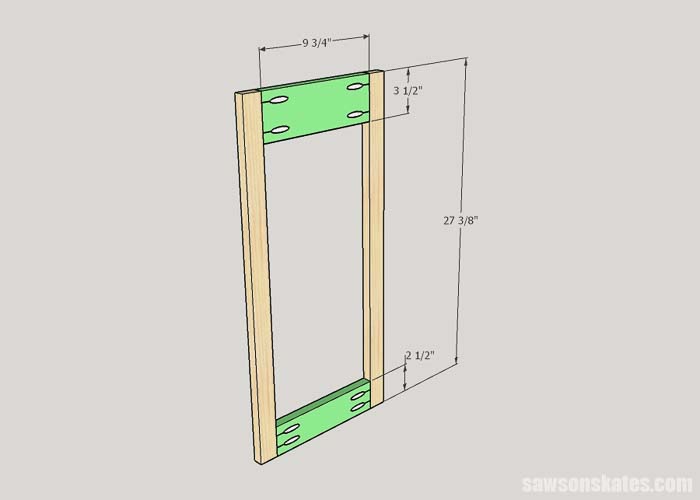
Cut 2 pieces of 1×2 to 27-3/8″ for the stiles. Cut 1 piece of 1×3 to 9-3/4″ for the bottom rail and 1 piece of 1×4 to 9-3/4″ for the top rail. Drill pocket holes in the end of each rail. Apply glue to the rails, clamp to the stiles and attach with 1-1/4″ pocket screws.
Use a circular saw and a Kreg Accu-Cut or a table saw to cut a piece of 1/4″ plywood to 12-3/4″ x 27-3/8″. Apply glue to the panel, clamp to the subframe and attach with 3/4″ brad nails.
Related: 4 Ways to Make Straight Cuts with a Circular Saw
Step 7. Make the Side Frame Parts
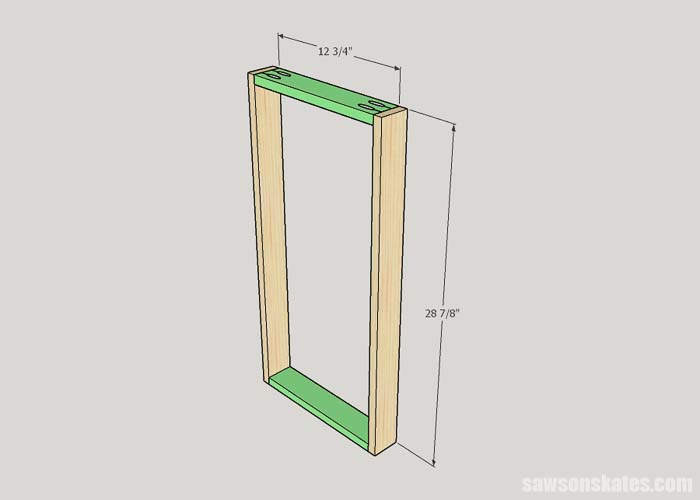
Cut 4 pieces of 1×3 to 28-7/8″ for the stiles. Cut 5 pieces of 1×3 to 12-3/4″ for the rails. Drill pocket holes in the end of each rail.
Two stiles will be used in Step 8 and two stiles will be used in Step 9. Two rails will be used in Step 8 and three rails will be used in Step 9.
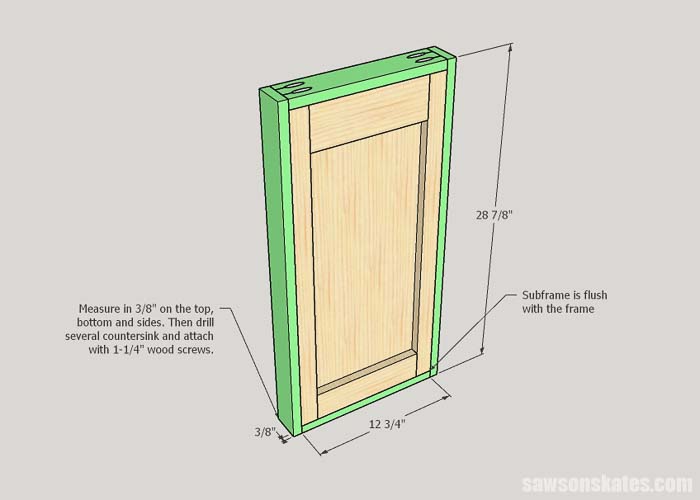
Step 8. Attach the Frame to the Subframe
Apply glue to 2 rails (Step 7), position on the top and bottom of the subframe (Step 6), place a stile (Step 7) on each side of the sub frame and clamp in position. Note: the faces of the frame and subframe are flush. Attach with 1-1/4″ pocket screws.
Next, measure in 3/8″ from the face of the assembly on the top, bottom, and sides. Drill several countersink holes on each side to join the frame to the subframe. Attach with 1-1/4″ wood screws.
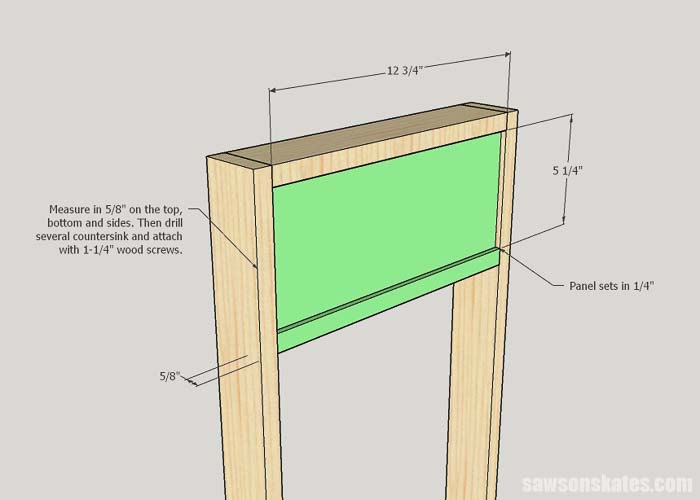
Step 9. Assemble the Kitty Litter Entrance Frame
Apply glue to the frame rails (from Step 7), clamp to the stiles (from Step 7) and attach with 1-1/4″ pocket screws.
Cut 1 piece of 1×6 to 12-3/4″ and use a table saw to rip to 5-1/4″. Place the frame face down on your workbench, place the 5-1/4″ x 12-3/4″ panel at the top of the frame, apply glue to the remaining rail, place below the panel and clamp in position. Attach the rail with 1-1/4″ pocket screws.
Position the panel so it sets in a 1/4″ from the front of the frame. Next, measure in 5/8″ from the face of the assembly on the top, bottom, and sides. Drill several countersink holes on each side to join the frame to the panel. Attach with 1-1/4″ wood screws.
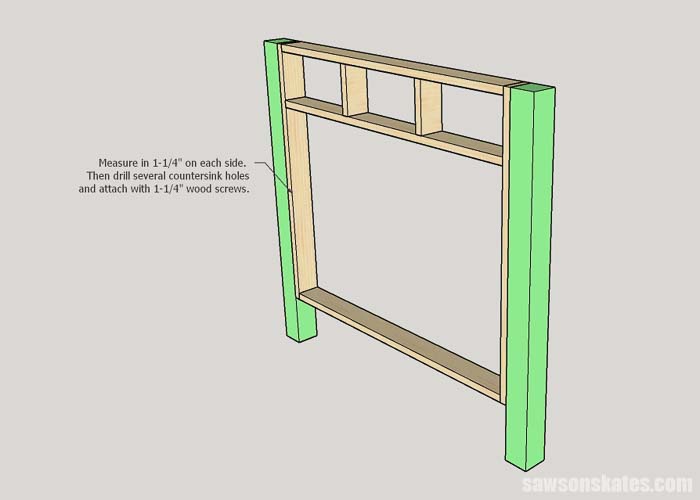
Step 10. Assemble the Carcass
Clamp the front assembly to two legs. Measure in 1-1/4″ on each side of the frame. Then drill several countersink holes and attach with 1-1/4″ screws.
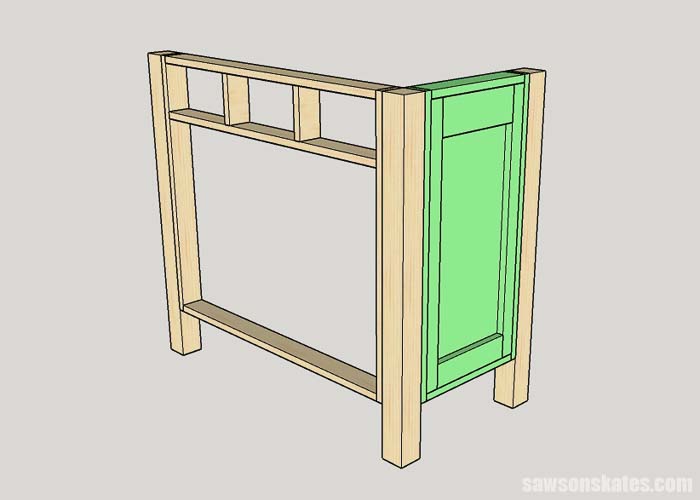
On the right side, position the solid side frame, the third leg and clamp. Measure in 1-1/4″ on each side of the frame. Then drill several countersink holes and attach with 1-1/4″ screws.
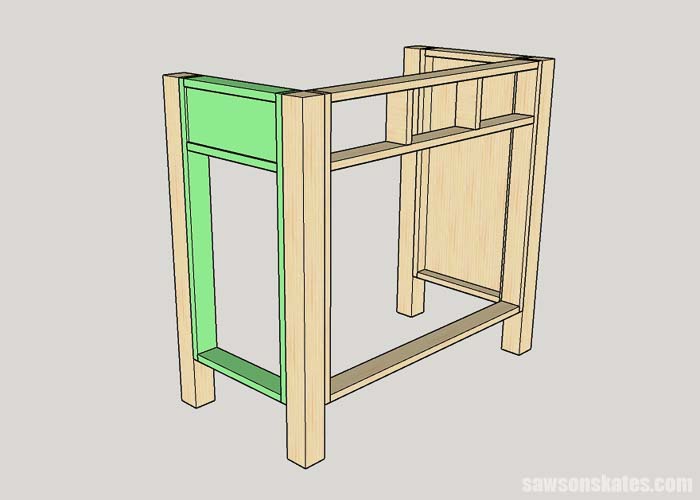
On the left side, position the kitty litter entrance frame, the fourth leg and clamp. Measure in 1-1/4″ on each side of the frame. Then drill several countersink holes and attach with 1-1/4″ screws.
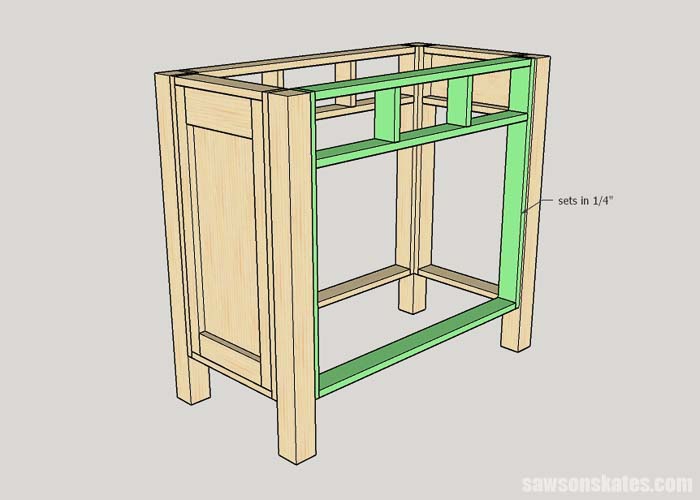
The back frame sets in a 1/4″ from the edge of the back legs. Clamp in position. Measure in 1-1/4″ on each side of the frame. Then drill several countersink holes and attach with 1-1/4″ screws.
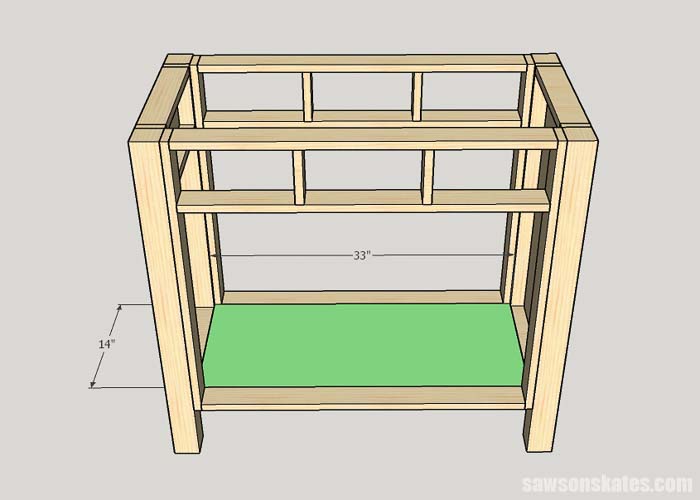
Step 11. Install the Bottom
Use a circular saw and a Kreg Accu-Cut or a table saw to cut 1 piece of 3/4″ plywood to 14″ x 33″. Drill pocket holes on each edge. Place the bottom in position and attach using 1-1/4″ pocket screws.
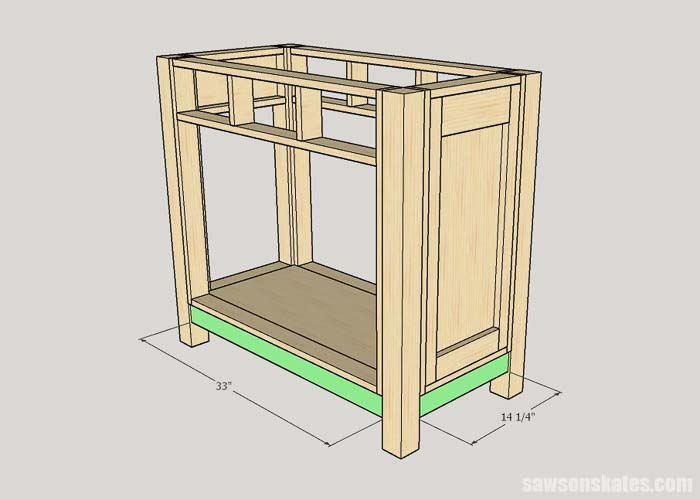
Step 12. Install the Skirts
Cut 1 piece of 1×3 to 33″ and cut 2 pieces of 1×3 to 14-1/4″. Drill pocket holes in each end. Also, drill several pocket holes on the top edge of each skirt.
The skirts set in a 1/4″ from the edge of the legs. Apply glue to the 33″ skirt, clamp on the front and attach with 1-1/4″ pocket screws.
Apply glue to the 14-1/4″ skirts, clamp to the sides and attach with 1-1/4″ pocket screws.
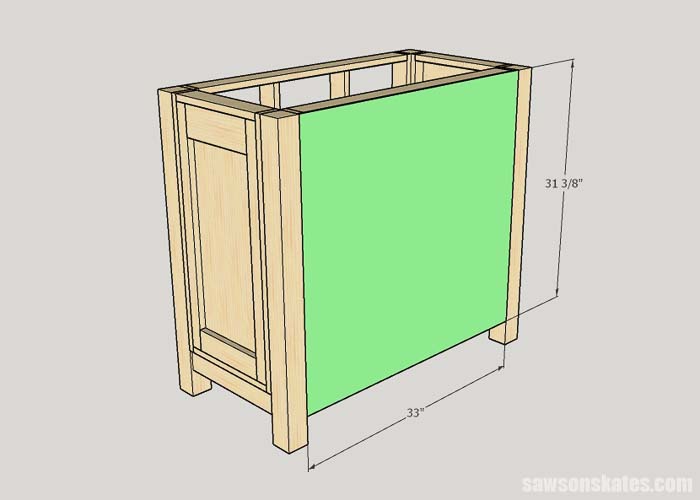
Step 13. Install the Back Panel
Use a circular saw and a Kreg Accu-Cut or a table saw to cut a 1/4″ piece of plywood to 33″ x 31-3/8″. Place the panel on the back and attach using 3/4″ brad nails.
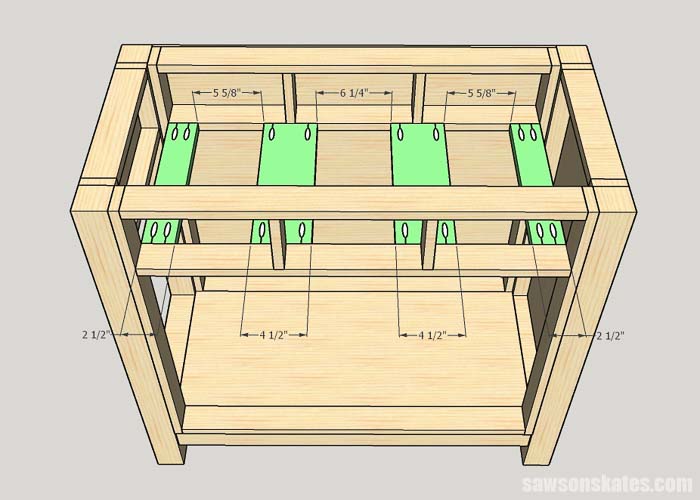
Step 14. Install the Drawer Supports
Cut 2 pieces of 1×3 to 14″ and cut 2 pieces of 1×5 to 14″. Drill pocket holes in the end of each piece.
Apply glue to the ends of each 1×3 drawer support, position at the end of each frame and attach with 1-1/4″ pocket screws.
Measure 5-5/8″ from each 1×3 drawer support, apply glue to the ends of each 1×5 drawer support, and attach with 1-1/4″ pocket screws.
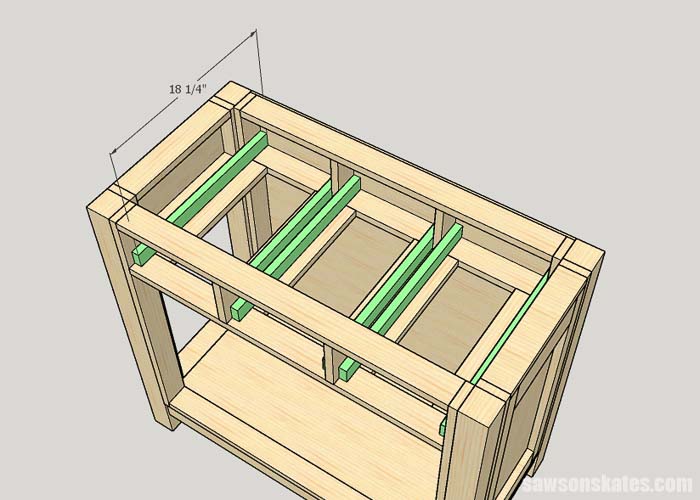
Step 15. Install the Drawer Guides
Cut 6 pieces of 1×2 to 18-1/4″. Position on top of the drawer supports, flush against the back and attach with 1-1/4″ finish nails.
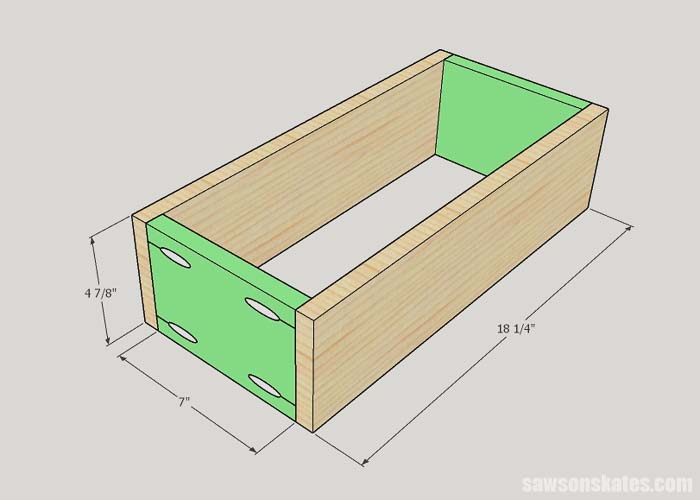
Step 16. Make the Drawer Boxes
Cut 6 pieces of 1×6 to 18-1/4″ and use a table saw to rip to 4-7/8″. Cut 6 pieces of 1×6 to 7″, use a table saw to rip to 4-7/8″ and drill pocket holes in each end.
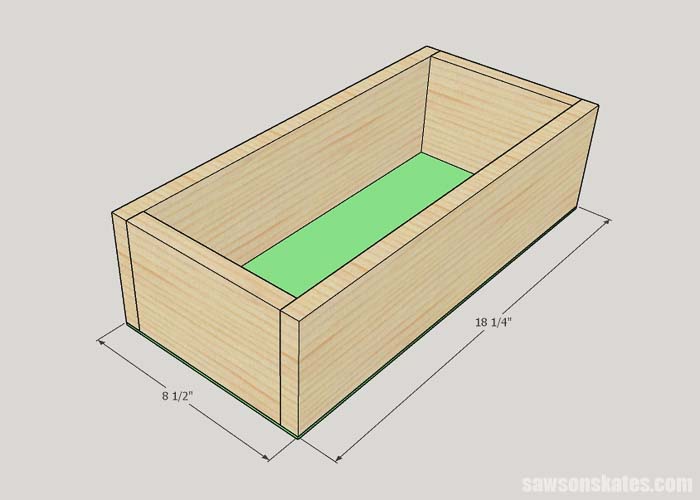
Apply glue to the ends of two 7″ pieces, clamp to two 18-1/4″ pieces and attach with 1-1/4″ pocket screws. Repeat for the remaining pieces.
Use a circular saw and a Kreg Accu-Cut or table saw to cut 3 pieces of 1/8″ hardboard to 8-1/2″ x 18-1/4″. Apply glue to the bottom of a drawer, position a bottom and attach with 3/4″ brad nails. Repeat for the remaining drawers.
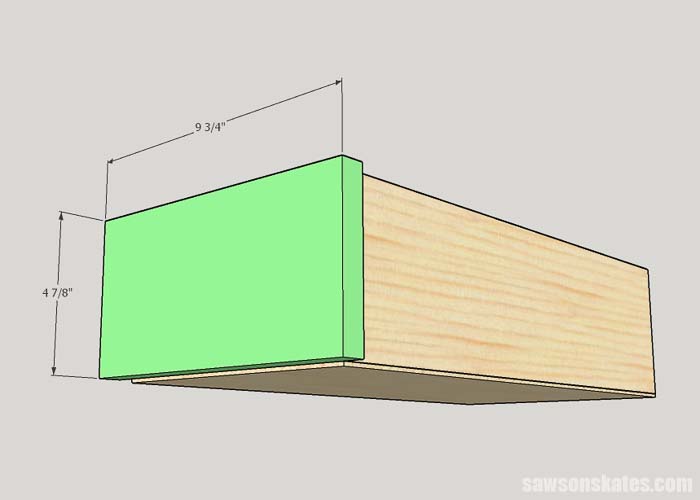
Step 17. Install the Drawer Fronts
Cut 3 pieces of 1×6 to 9-3/4″. Place a straightedge from corner to corner and make a mark to locate the center. Drill a hole in the center of each drawer front.
Place the drawer box in the opening of the cabinet. Then, place the drawer front on the drawer box and position it so there is equal spacing between the drawer front and the drawer opening. There should be about an ⅛” gap on each side of the drawer front. Adjust the measurements of the drawer front if necessary.
Drill a hole through the hole in the drawer front into the drawer. Remove the drawer front and drawer box. Attach the knob to hold the drawer front to the drawer box. From inside the drawer box attach with 1-1/4″ wood screws. Repeat for the remaining drawers.
Related: Beginner’s Guide to Using a Power Drill
Step 18. Make the Doors
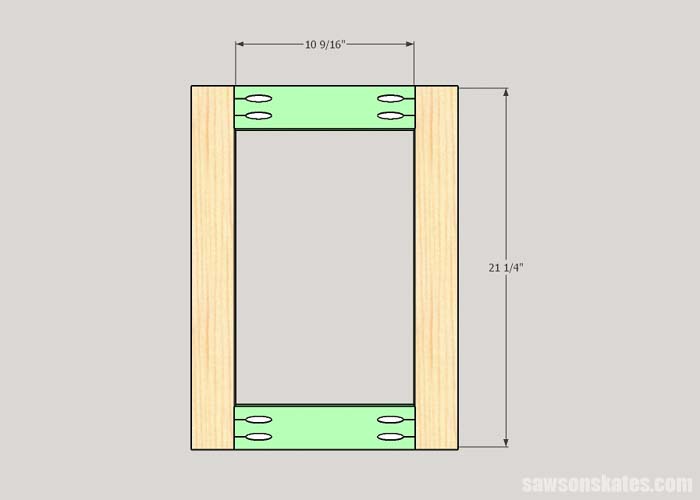
Cut 4 pieces of 1×3 to 21-1/4″ for the stiles. Cut 4 pieces of 1×3 to 10-9/16″ for the rails. Drill pocket holes in each end of the rails.
Apply glue to the ends of two rails, clamp to two stiles and attach with 1-1/4″ pocket screws. Repeat for the other door.
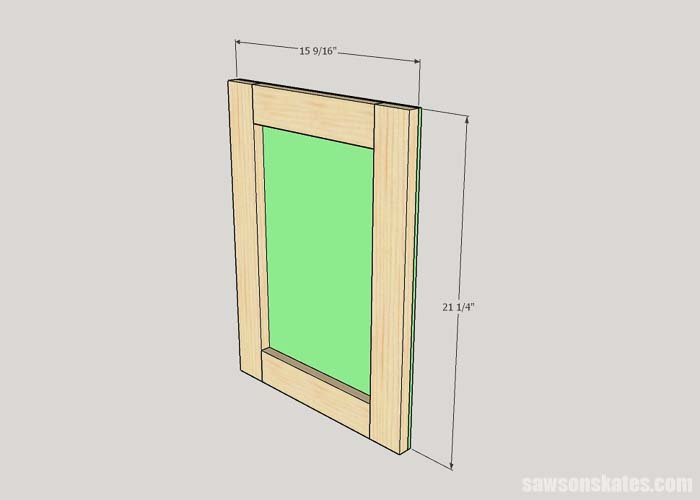
Use a circular saw and a Kreg Accu-Cut or table saw to cut 2 pieces of 1/4″ plywood to 15-9/16″ x 21-1/4″. Apply glue to the back of the door, place door panel in position and attach with 3/4″ brad nails.
Related: How to Make Cabinet Doors (Without Complicated Tools)
NOTE: Instead of wood panels, I installed glass in my doors.
I used a straight cutting router bit to form a rabbet. The glass sits in the rabbet and is held in place with glass clips.
Related: How to Use a Router Table for Beginners
Step 19. Install the Doors
Position the doors in the door opening. There should be about an ⅛” gap on the top and bottom of each door. There should also be an ⅛” gap on the side of each door and in between the doors. If the doors are too large, use a table saw to adjust the size of the doors if necessary.
Attach the doors to the cabinet with hinges according to the manufacturer’s instructions.
Step 20. Make the Top
For my cabinet, I repurposed the butcher block top from the original piece. Here’s how you can make a top if you don’t have a butcher block.
Related: How to Make a Farmhouse Table Top
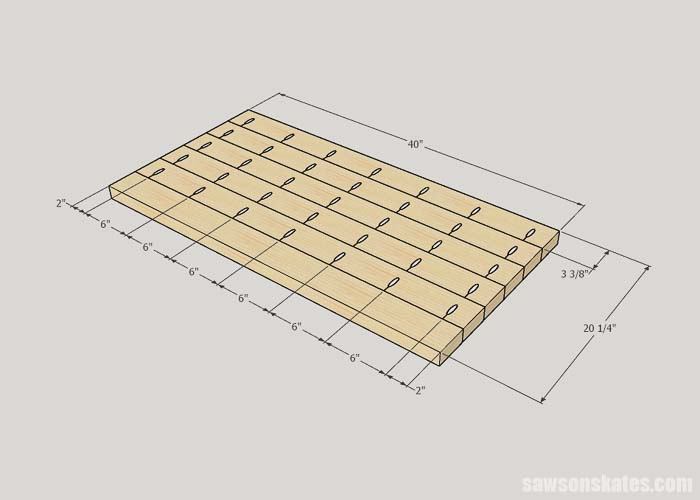
Cut 6 pieces of 2×4 to 40″ and a use table saw to rip to 3-3/8″. Set your Kreg Jig to drill into 1-1/2″ material and drill pocket holes in the pieces to join them to form a solid top. Apply glue to the edges, clamp and attach using 2-1/2″ pocket screws.
Related: How to Edge Join with Pocket Holes
Step 21. Attach the Top
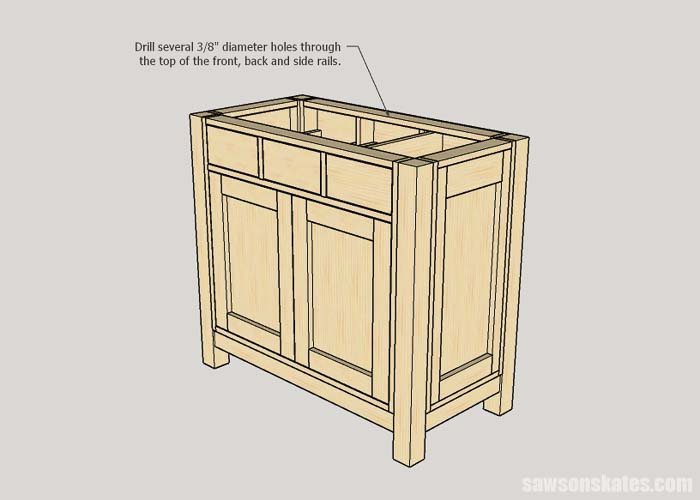
Drill several 3/8″ diameter holes through the top of the front, back and side rails. These oversized holes will allow the top to move during seasonal changes.
Related: How to Join a Table Top to a Base (The Right Way)
Place the top on the cabinet, so the back is flush with the back of the cabinet and centered side to side. Place a washer on a 2” wood screw and attach the top through the holes in the rails.
Step 22. Sand, Prime, and Paint
Sand the cat litter cabinet, apply a quality primer and paint using the color of your choice.
Step 23. Make the Curtains
I’m an amateur when it comes to sewing. I’ll do my best to explain how I made the curtains.
Cut two pieces of fabric to 7-1/2″ x 23-5/8″. On long sides, fold over 1/2″ and stitch along the edge. On one end of each piece, fold over a 1/2″ and stitch.
On the remaining end, fold over 1″ and stitch a 1/4″ from the cut edge, then stitch a 1/4″ from the folded edge.
This will form a pocket for the tension rod. For the tiebacks, fold some remaining material, wrap around curtains and hold in place with push pins. Install the curtains with a tension rod.
Final Thoughts
Cats are cute, but litter boxes are ugly! A cat litter box cabinet is the purrrfect solution for you to hide that ugly litter box. This looks like an attractive cabinet but the doors open to reveal a hidden litter box. There’s even space for extra litter. Adorable little curtains welcome kitties on their way to the bathroom.
Get the free plan (including the detailed instructions and measurements) now!
Thank you for stopping by. If you found this information helpful, would you please pin it to Pinterest? Other DIYers would appreciate it and I would too! Thank you – Scott
Recommended For You

Pin This For Later

Hi there – I’m Scott, a woodworking enthusiast and creator of Saws on Skates, a site I started in 2015 to share easy-to-follow tutorials, space-saving shop tips, and project inspiration for DIYers at any skill level. Learn more about my woodworking journey here.
Clever clever clever!
Thank you Shelly!
Great job……
Thank you Velma!
What a splendid idea,I will definitely have a go and see if I can build it.wish me luck. Karl
Good luck Karl – Please share some pics when you finish it!
Can this be adjusted to have an opening in the front instead of the side?
Hi Kelsey – Yes, you could adjust the plan to move the opening from the side to the front.