DIY Flip Top Workbench Cart
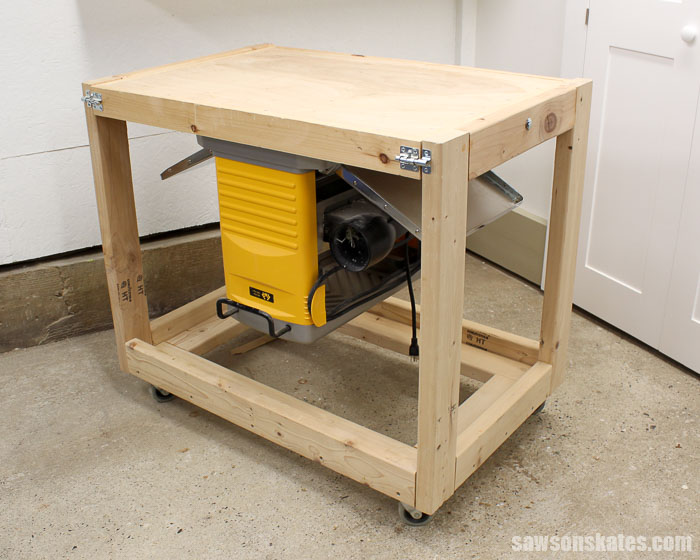
Hey friends! Today I’m sharing new DIY workshop plans for the perfect space saving solution for your small workshop – a DIY Fliptop Workbench Cart. You know space is always at a premium in a small shop and a popular space saving project is a fliptop cart. Oh, you’re not familiar with a fliptop cart? Tools, like a miter saw or small table saw, can be mounted on one side, then the top can be flipped and the cart can be stored out of the way to maximize floor space.
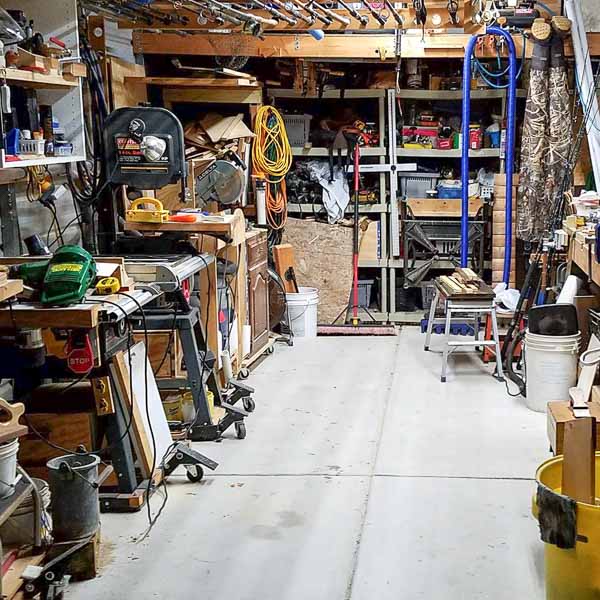
Most fliptop carts are made with plywood. Just like you know space is always at a premium, you also know dealing with plywood in a small workshop is nearly impossible. Not to mention if you have a small vehicle, getting the plywood home can be challenging.
What Should I Build Next?
That's the question I help answer.
Every week, I send woodworking ideas to 17,000 DIYers who love building things.
You'd fit right in.
This tutorial contains affiliate links to supplies and tools. Purchases made using these links help support the Saws on Skates website and allows me to share more projects and tips with you. There is no cost to you for using these links. Visit my site policies for more information.
This easy-to-build DIY 2×4 Fliptop Workbench Cart is not only a space saver, but uses only two small sheets of plywood. Let me tell you about its multi-tasking capabilities before I get into the construction details.
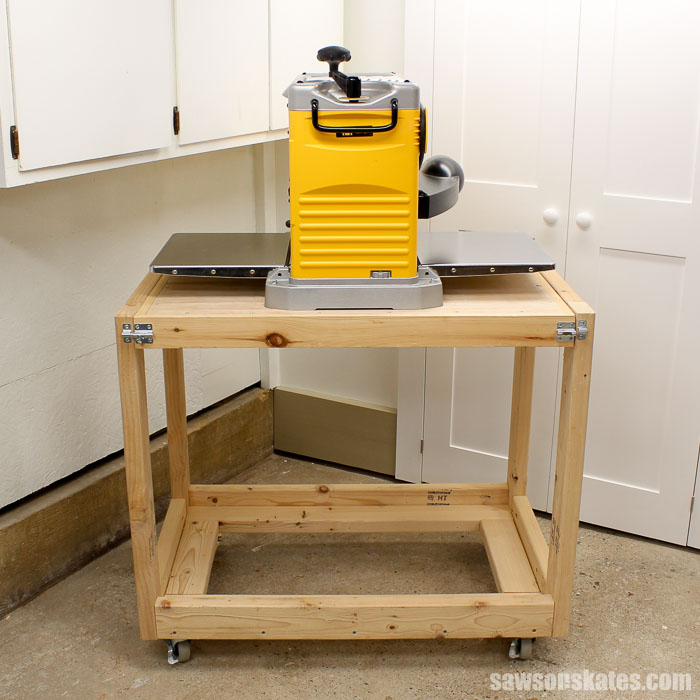
You can mount a tool, like a miter saw on one side, then flip the top and the other side reveals a sturdy workbench. It’s like two pieces of shop furniture in one! And this being Saws on Skates, of course the fliptop workbench is mobile. It’s set on top of four locking casters, so you can move it any where you need it.
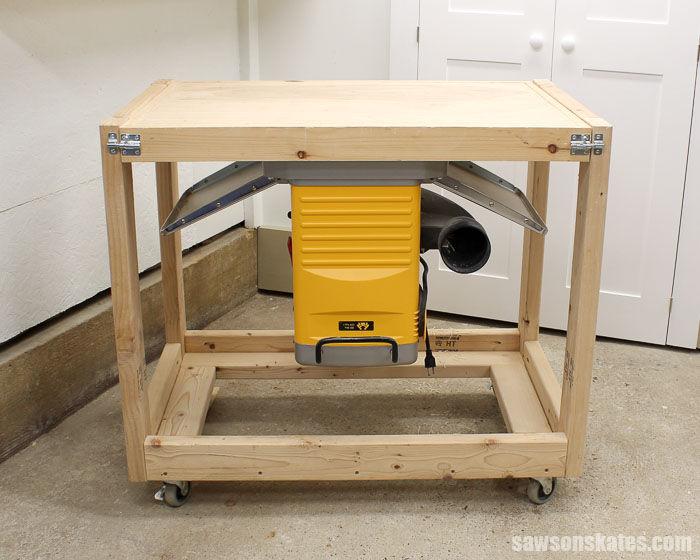
Now some details about the construction. This DIY fliptop workbench cart is made almost entirely with 2x4s which is a little different than most flip carts.
Related: DIY Power Tool Stand (made with 2x4s)
The fliptop is made with two sheets of 2×4 plywood. These small sheets are way more manageable in a small workshop. Sure, you could have your big box home improvement store cut down a sheet of 4×8 plywood, but where do you store the extra plywood in your small shop? That’s another whole problem! For me, I’ll stick with the small sheets.
Related: How to Decide What Scrap Wood to Keep
By now you are thinking of two questions… doesn’t it take longer to build using 2×4’s and won’t it cost more to build if you’re not using plywood? The quick answers, yes and yes. So yes, there are few trade offs for this DIY fliptop workbench cart. But there are always trade offs when working in a small shop.
I’m guessing there is a little more assembly time due to cutting the 2×4’s and joining them together. But the trade off is I can much more easily work with 2×4’s in my small workshop over plywood.
Related: 9 Clever Ways to Make Your Small Workshop Feel Bigger
I didn’t price this out building exclusively with plywood, but my gut tells me this version probably costs a few bucks more than a plywood equivalent. Again, the trade off of is the extra expense far outweighs the aggravation of dealing with big sheets of plywood in my small shop.
Related: My 12×13 Small Woodshop Layout
Question about cart…
I received an email about the Fliptop Workbench Cart and I thought others could benefit, so I’m sharing the question and my response here. Have I told you how much I love your comments and email messages? Well, I do! I always appreciate and answer questions, so keep ’em comin’!
“Thank you for your awesome website. I am particularly interested in your fliptop workbench cart. Will it be able to handle another tool on the other side?”
This is a great question! I would say depending on the weight of your tools, the DIY fliptop workbench cart should be able to handle a tool on both sides.
The tool I have mounted on one side weighs about 80 pounds and the top flips easily. Let’s say you wanted to mount a miter saw and table saw. I did a little research… I found a basic miter saw that weighs 35 pounds and a basic table saw that weighs 50 pounds, for a total of 85 pounds, so that should work on the DIY fliptop workbench cart.
Just a word of caution… if your gut says “this feels unsafe” than it’s probably unsafe. In other words, don’t put a really heavy tool on one side or both sides and then expect the top will flip easily or safely. I don’t want anyone out there getting crushed! Keep your saws on skates, not on your torso!
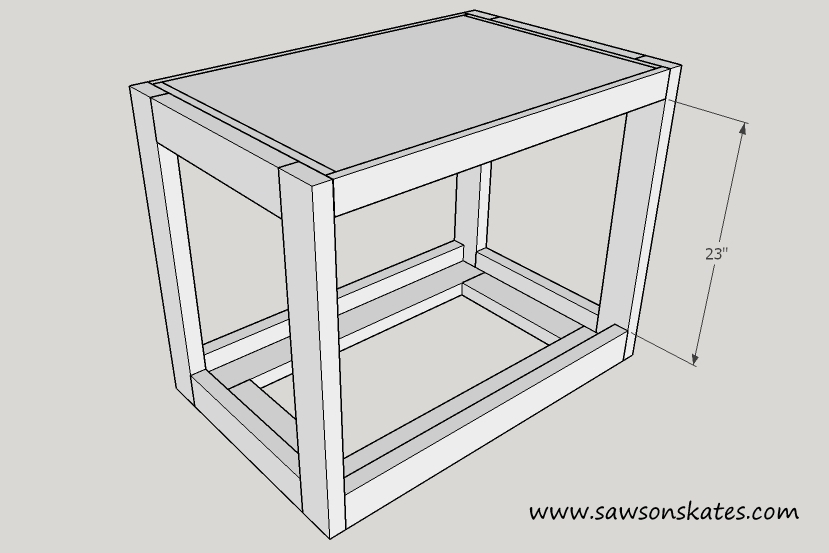
The other thing to consider is the height of your tools. The area inside the cart is 23″, so you want to be sure that your tools are no taller than 23″ or the top won’t be able to flip inside the cart. Below is a pic, so you can see what I’m talking about.
UPDATE: How Did the Fliptop Workbench Cart Hold Up?
It’s been a few years since I built the fliptop workbench cart. How did it hold up? Would I build it again? What would I do differently? Skate over to How the DIY Flip-Top Cart is Holding Up 2 Years Later and I’ll answer all of these questions, plus a few more.
DIY 2×4 Fliptop Workbench Cart Plan
Printed Plan
Click here to get the PDF Plan (including detailed instructions and measurements)
Supplies
Wood (per the printed plan)
Wood Glue
(4) 3″ locking casters
(4) 2″ barrel bolts
#8 3″ wood screws
#8 1-1/4″ wood screws
#8 1″ wood screws
1-1/4″ pocket screws
2-1/2″ pocket screws
(2) 3/8″ 4″ carriage bolts
(2) 3/8″ nylon lock nuts
(6) washers
(4) 1/2″ x .385 x 1″ nylon spacer
Tools
Miter saw
Kreg Jig
Drill
Circular Saw or Jig Saw
Circular Saw jig
Kreg Multi-Mark
Countersink drill bits
1/2″ Forstner Bit
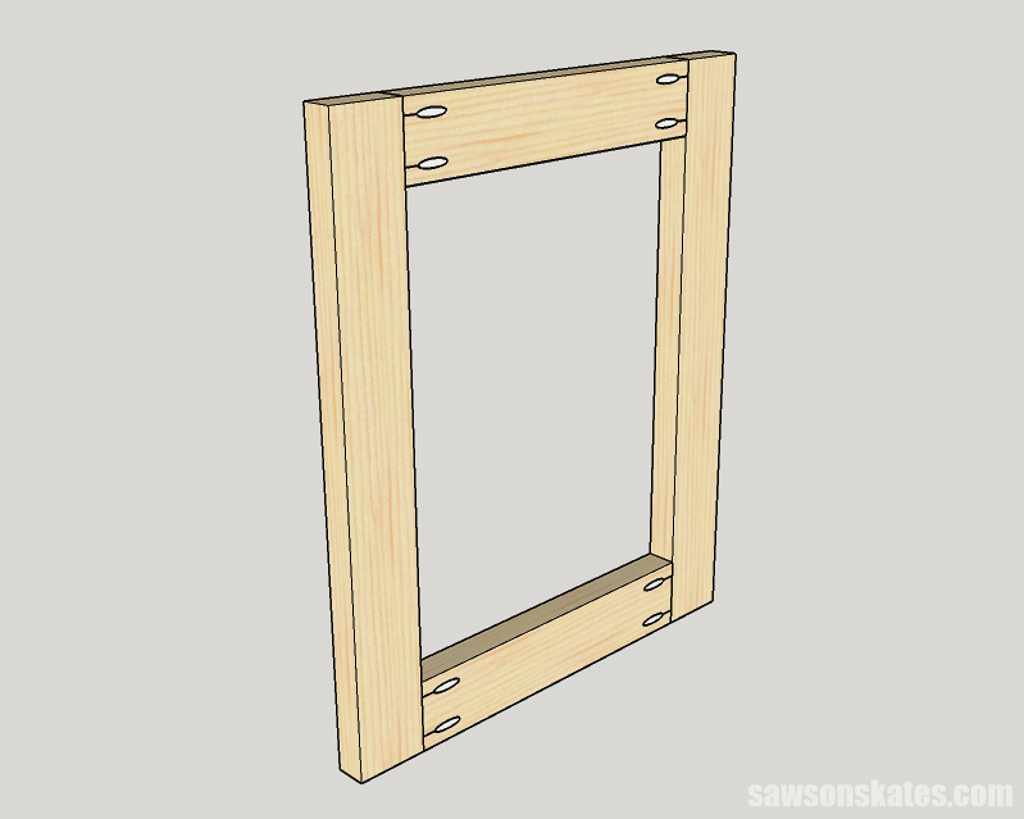
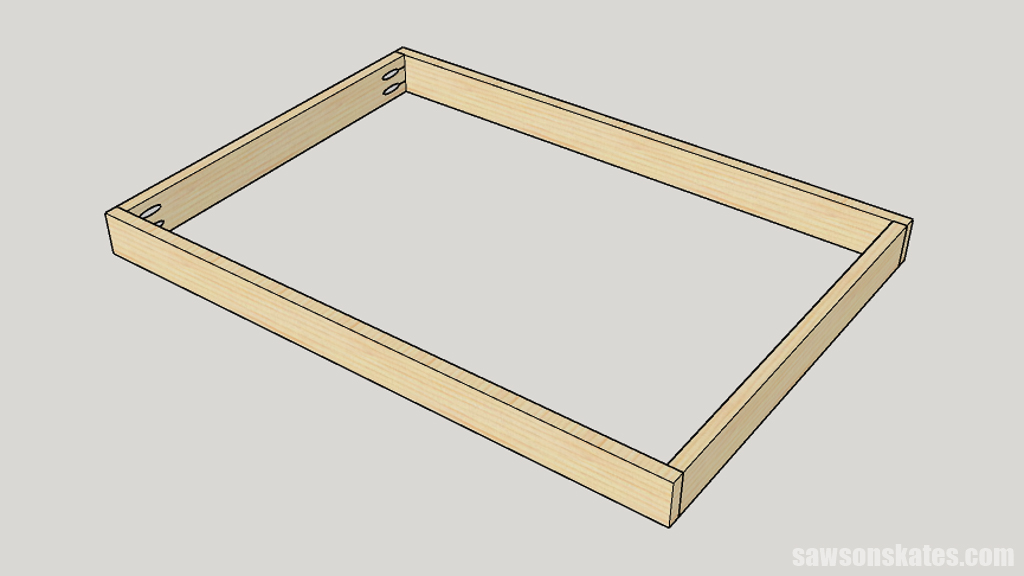
Step 1. Assemble the Sides
Cut the wood for the sides to length and drill pocket holes. Apply glue, clamp, and attach using pocket screws.
Related: How to Use a Pocket Hole Jig
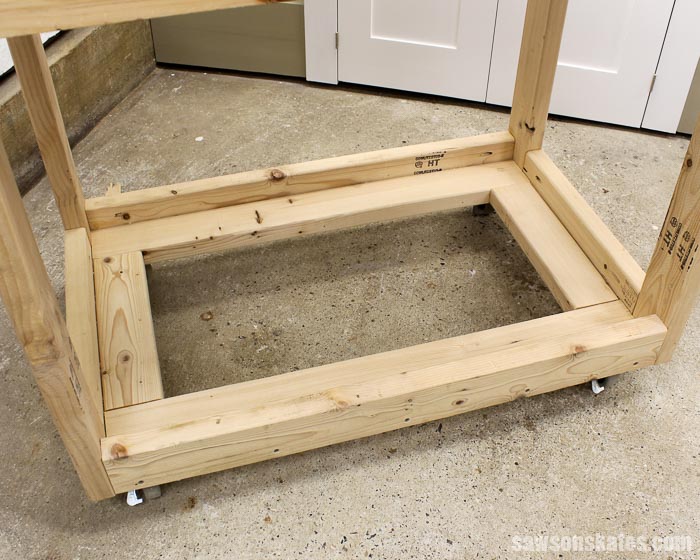
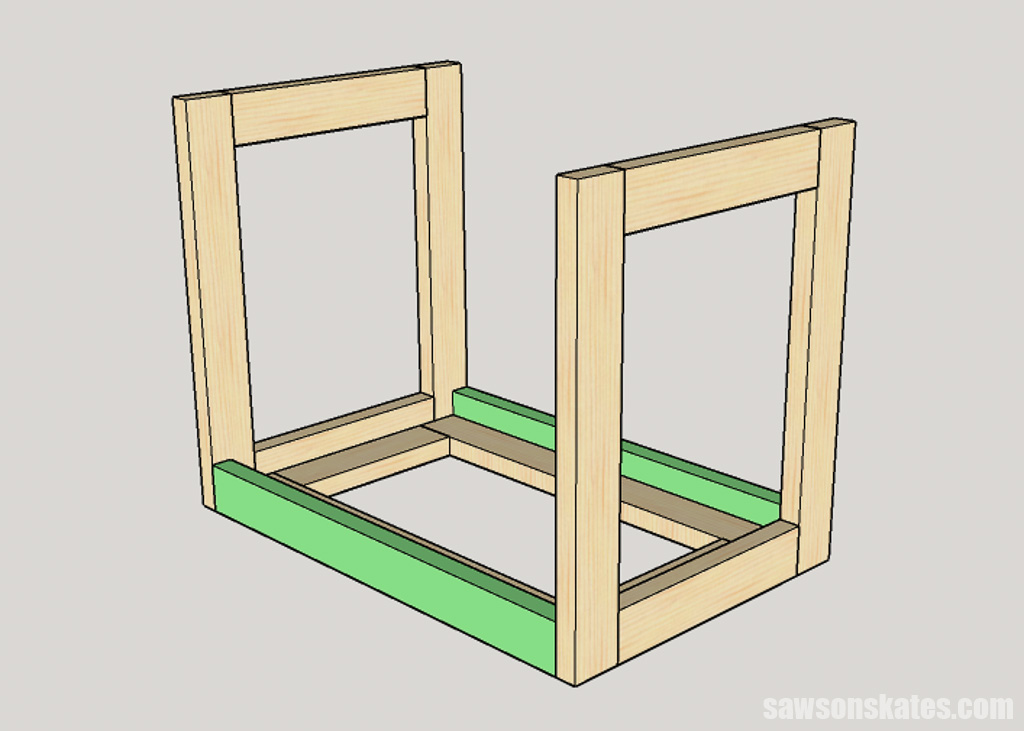
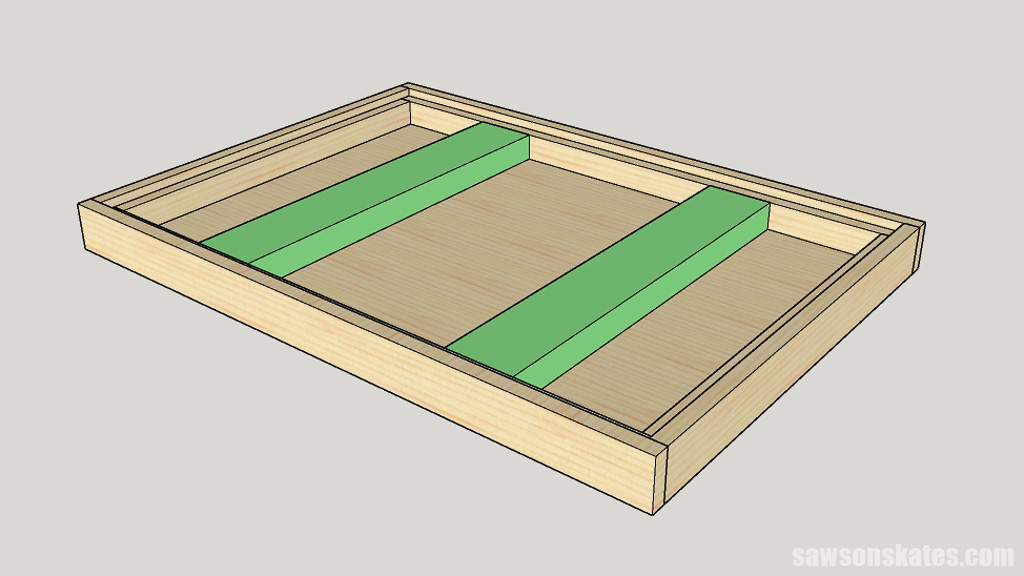
Step 2. Cut the Bottom Pieces and Side Rails
Cut the wood for the bottom to length and drill pocket holes.
NOTE: The bottom assembly (including the side rails) must be the same dimension as the side assembly.
Measure the side assembly (Step 1). Dry fit the bottom pieces and side rails and measure. Adjust the measurements if necessary.
Drill pocket holes in the ends of all of the bottom pieces and side rails:
- The pocket holes in the short bottom pieces will be used to join to the long bottom pieces in Step 3.
- The pocket holes in the side rails will be used in Step 4.
- The pocket holes in the long bottom pieces will be used in Step 5.
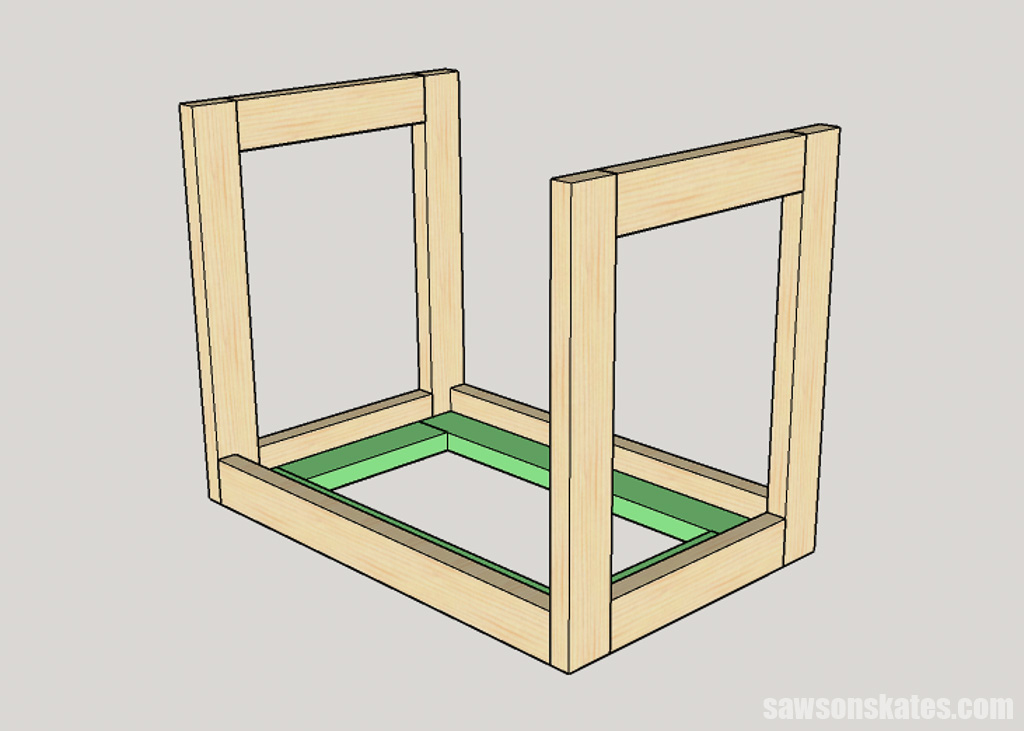
Step 3. Assemble the Bottom
Apply glue, clamp, and attach using pocket screws.

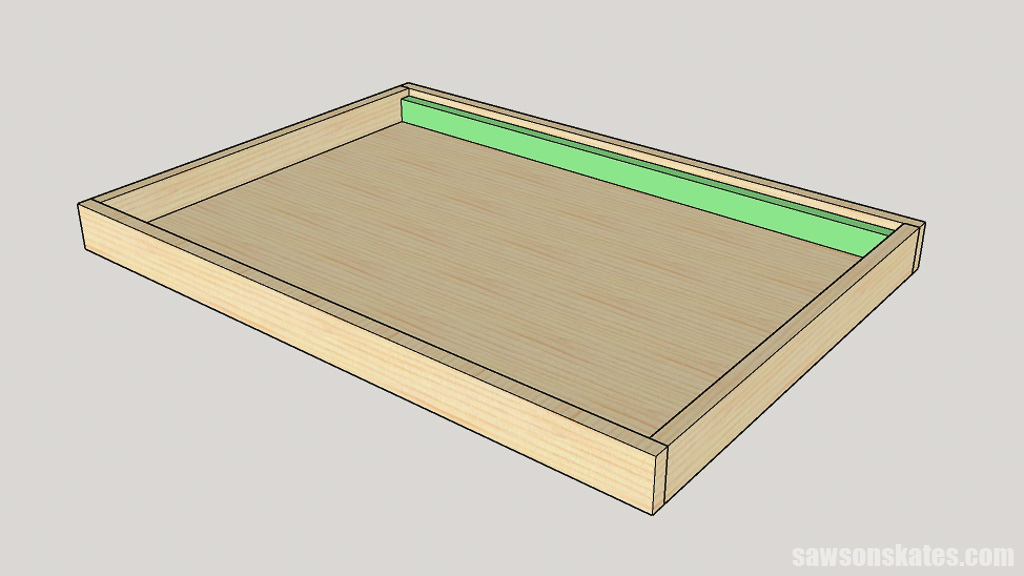
Step 4. Attach the Side Rails
Place the bottom, side rails and side assemblies on your workbench.
NOTE: Do not attach the bottom assembly at this point.
Apply glue only to the ends of the side rails, clamp and attach only the upper pocket screw of the side rail. Gently remove the bottom and attach the lower pocket screws in the side rail.
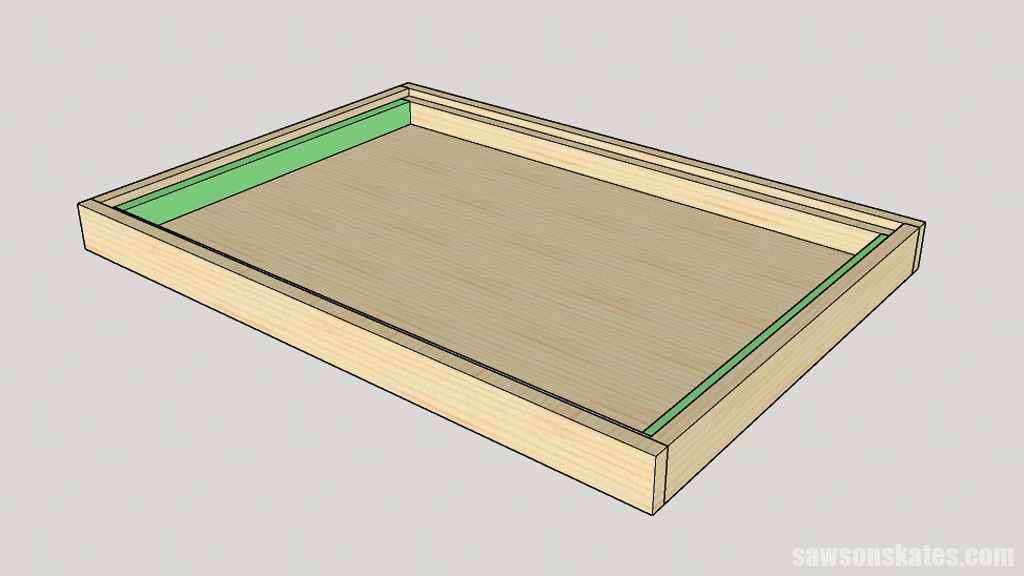
Step 5. Attach the Bottom
Apply glue to the sides of the bottom assembly, place in position and clamp. Be sure the bottom is flush with the bottom of the side assemblies and side rails.
Drill countersink holes in the side assemblies and side rails. Attach to the bottom assembly using wood screws.
Related: How to Use a Countersink Bit
Flip the piece over and attach the long bottom pieces to the side assemblies using pocket screws.
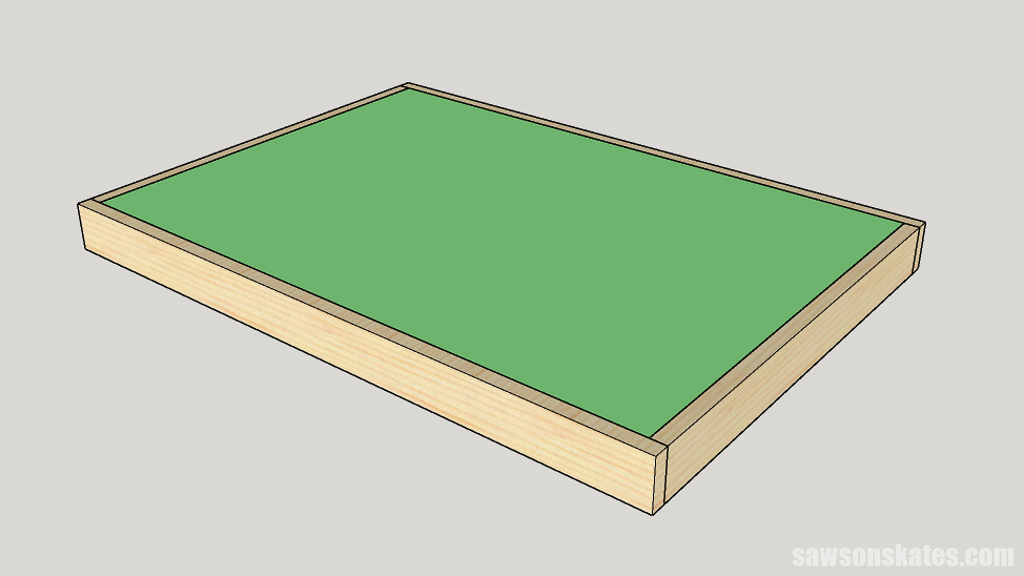
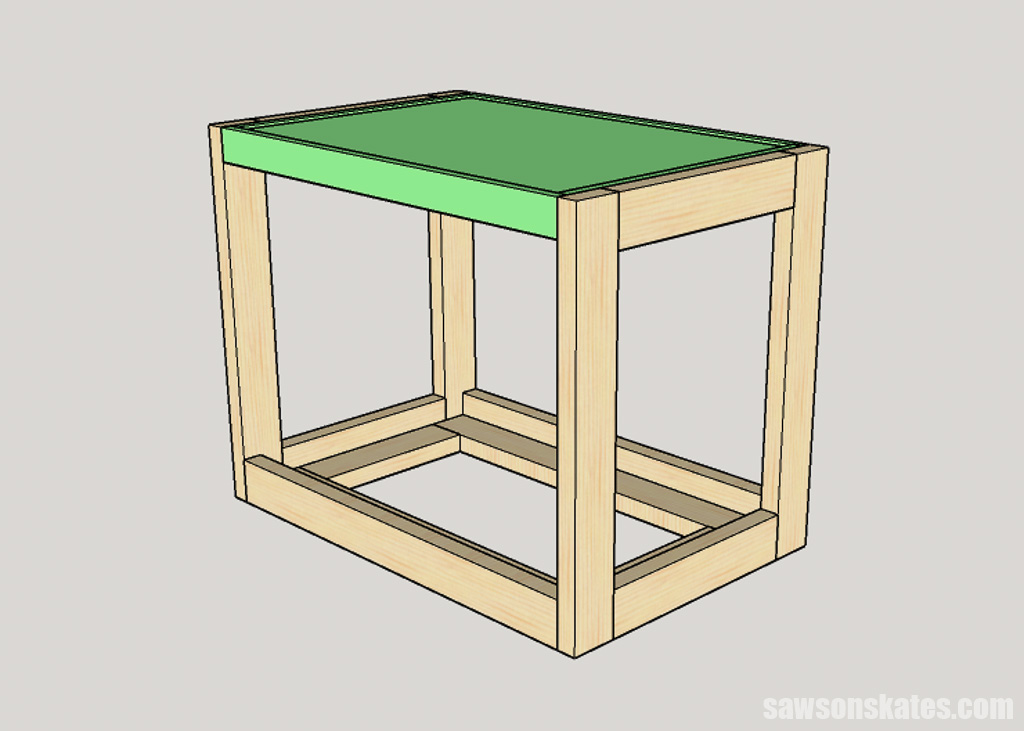
Step 6. Assemble the Table Frame
Cut the wood for the table frame to length and drill pocket holes. Apply glue, clamp, and attach using pocket screws.
Step 7. Cut the Table Top
Cut two pieces of plywood for the table top. Check the inside dimensions of the Table Frame (Step 6) and adjust if necessary.
Step 8. Assemble the Inside of the Table Frame
Place one of the plywood pieces (Step 7) inside the table frame. Cut two pieces of wood to length, apply glue and clamp to frame.
Flip the frame over and adjust the interior frame pieces, so the plywood is flush with the edges of the Table Frame and tighten the clamps.
With the plywood flush with the edges, flip the frame over again. Drill countersink holes in interior frame pieces and attach using wood screws.
NOTE: Do not attach the top at this time.
Cut two pieces of wood to length, apply glue, and clamp to frame. Drill countersink holes and attach using wood screws.
Step 9. Attach the Top
Apply glue to edge of the interior frame, place the plywood on the ledge and clamp. Drill countersink holes around the edge and attach using wood screws.
Step 10. Attach the Table Supports
Cut two pieces of wood to length and drill pocket holes in each end. I positioned these supports to correspond with the mounting holes in the thickness planer I was planning to attach to the cart.
Position the supports to correspond with the mounting holes of your tool, apply glue, and clamp. Attach using pocket screws.
Step 11. Connect the Table to the Sides
Clamp pieces of scrap wood on the inside of each side assembly and flush with the top of the side. Directly below this scrap wood, clamp an additional piece of scrap wood and then remove the first piece of scrap wood. This will serve as a temporary ledge to install the top.
Set the top on the temporary ledge and clamp the top to the sides.
Make a mark in the middle of the side assembly and measure down. Use a Forstner bit to drill through the side and through the table top. Repeat on the other side.
Related: What is a Forstner Bit? (& How to Use It)
Leave the temporary ledge in place. Remove the clamps holding the top to the sides and remove the top. Insert a nylon spacer into each of the holes you just drilled in the sides and in the top.
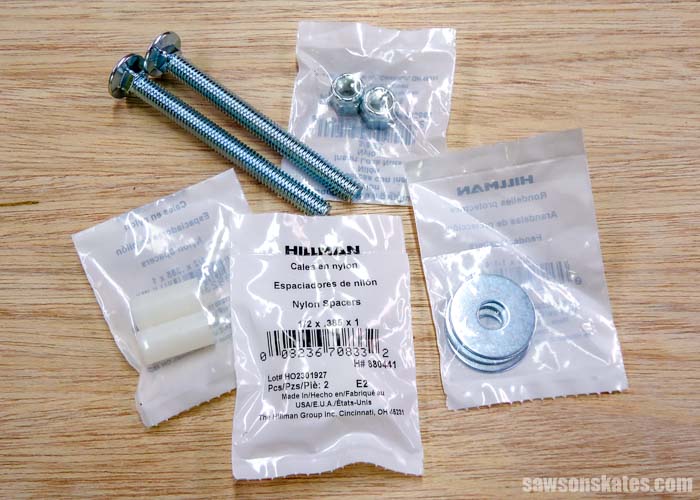
Insert a carriage bolt into the side until it protrudes just enough to insert a washer, replace the top and push the carriage bolt through the top, add two more washers and attach with a lock nut. Repeat on the other side.
Step 12. Attach the Barrel Bolts
With the temporary ledge still in place, attach the barrel bolts to all four corners of the top and then remove the ledge.
TIP: Jeffrey sent me a pic of his flip-top cart, and it’s incredible. He finished it with outlets, a drawer, and used toggle latches (similar to these) instead of barrel bolts. I’m especially loving those toggle clamps – I might have to steal that idea for my cart.
Step 13. Attach the Casters
Follow the manufacturer’s instructions to attach the casters to the bottom of the cart.
Step 14. Attach Your Machine
Follow the manufacturer’s instructions to attach your machine to the table top.
Step 15. Attach the Underside of the Table Top
Place the remaining piece of plywood on the underside of the table top and clamp. Drill countersink holes around the edge and attach using wood screws.
NOTE: Do not use glue in case you need to remove the plywood to access the interior of the table top.
Includes:
- List of tools and materials
- Complete measurements (in inches)
- Easy-to-follow instructions
- Detailed diagrams
Recommended For You
Pin This For Later

Hi there – I’m Scott, a woodworking enthusiast and creator of Saws on Skates, a site I started in 2015 to share easy-to-follow tutorials, space-saving shop tips, and project inspiration for DIYers at any skill level. Learn more about my woodworking journey here.
Love this! This would be a perfect addition to our workshop.
Thank you! Please send some pics when you build it for your shop!
Looks good it will fit into my 10×10 workshop
Thank you Kevin – It works great in my small shop!
In the process of building this now. Smooth sailing so far but it appears I need five (not four) 2 x 4’s. Thank you for sharing.
I’m glad this is going together easily for you – please send some pics when you’re done! And thank for the note about the 2×4’s, I will take a look at that. Good luck with your project!
I like the project and will make one. (or two!) The only change I would make is the pivot & locking system. As shown it could be a little rickety with heavy tools on both sides of the decks. I would still have the little slide locks but I would replace the lock nut on the inside of the table top with a 1/8″ plate 1″ x 2″ with a 3/8″ nut welded to it and bolted in place on the inside side frame. For the 3/8″ bolt that makes the pivoting possible I would weld on a “T” handle so when it is in either up or down position you can tighten up the handle on the pivoting bolt and tighten (squeeze) everything together. I think it would be very stable like that. Thnaks for the design…
Thank you John. Your ideas sound like great upgrades for the Fliptop Workbench cart. Please send some pics of your upgrades… I’d love to share them on the Saws on Skates Facebook page!
Thanks for this, and all your small shop tips. I am just getting started and definitely tripping over all the junk everywhere. I am thinking of trying the flip top as part of a stationary bench, as an alternative to having to store machines and then lift them. I am thinking about my router table and my belt sander. Will send pictures, but don’t hold your breath!
Thank you Susan – yes, please send some pics when you get your workshop set up!
How did you attach your planer to the top? Through the 2×4 supports? Is there room to then put on the other top piece? Thanks!
Great idea and tutorial thanks for posting. This is going to be a really nice addition to my ” micro shop”. I’ve purchased all of the materials and will start building right away. Could you please tell me how you fastened your planer to the 2×4 rails. Did you drill a hole with a Forstner bit to recess the nut & washer? Thanks in advance.
Terry
Hey Terry – I’m kicking myself right now because I just looked through all of my pics and I have everything with the exception of how I attached the planer…. arrrgggh! But yes, I believe you’re right. I must have recessed the nut and washer otherwise the second piece of plywood would not have been able to fit flush.
Scott, no worries thanks for the reply. I’m a beginner so just trying to make sure I build it right. Will be mounting my miter saw on the workbench. I’ll send a pic when it’s finished.
Terry
Hey Terry – Yes, I’d love to see a pic when you’re finished!
oops. Sorry i missed the next comment before sending mine! Duh.
So a heavy thickness planer can be flipped upright without tipping the entire bench? I have a similar sized planer…and it’s about 80 lbs.
I have flipped the workbench top quite often without an issue. I will tell you it does take some muscle to flip the top, but for me, the effort is worth extra workspace.
You say you chose 2×4’s over plywood for ease of use. Without building another one to test, what is your gut feeling of the longevity and durability of your design over this one?
Hi Bill – DIYers like me who have small workshops must to take everything into consideration and that includes the type of type of wood we use for our projects. Maneuvering sheets goods around my small workshop is difficult, so I opted to design my flip-top cart with 2x4s instead. If you can easily maneuver sheet goods around your workshop perhaps a plywood flip-top cart would work best for you.
As far as the longevity and durability of my design I can tell you that I have been using the cart for about 2-1/2 years and it’s still holding strong. No cracks or joint separations and the top still flips easily. One of the barrel bolts broke recently, but that appears to be a manufacturer defect and not related to the flip-top cart itself.
Scott,
This we be our(my best friend) and me beach vacation project. Wives go sit on beach and we build something under house. Do you have a video you could post show just how the flip cart works.
Thanks Mark
Hey Mark – A video is a great idea. Thank you for the suggestion! Unfortunately I have the workbench side of the flip-top cart loaded with wood for a project, so I’m not able to do the video now. But I will definitely do it as soon as I can.
Hi Scott, were you able to make a video on how you built the flip top workbench station or do you have a step by step diagram of the plans? Thanks, Mike
Hi Mike – Thank you for stopping by. I haven’t done a video yet, but it is on my list of things to do. I do have a free step by step printed plan that you can download here.
Hi Scott. I just built this and I love the results. Great plans.
Question: why did you center the bolt on the sides at 1-1/4” down from the top of the 2×4 rails instead of 1-3/4” – or half of the width of the 2×4?
Flipped one way, the top is flush with the legs. Flipped the other way, it sits below the legs.
My 1×3” top pieces were slightly bowed but I think that is not the reason the top doesn’t sit flush with the legs when spun both ways. I think it’s that the placement of the bolt is not exactly centered on the 2×4.
Thanks again!
Dallas
Hi Dallas – Thank you for stopping by and I’m glad you like the Flip-Top Workbench! The reason I set the bolt hole 1-1/4″ down is it’s half the dimension of the 1×3 top (2-1/2″).
There could be a couple of reasons the top does not sit flush. The 1x3s may not be exactly 2-1/2″ thick. The hole may not be square through the 2×4 or may have shifted up or down while drilling. Or it might even be a combo of all of these things.
Good call. I was thinking only about what I could see – the 2”x4” leg with the hole in it. The 1×3” behind it is the real concern. 1-1/4” is half of 2-1/2”. Duh.
I think it is about how precise you are with clamping the top in place, then the marking, then drilling the pilot hole. I think it was my clamp precision (or lack of) that affected mine.
I’m considering making four off these and pushing them togetheri to a 2×2 grid to make one larger pseudo assembly bench that serves as outfeed for my table saw. Only screw one tool to the top so there is a flat work surface when flipped to the non-tool side. Will send a pic if I make it a reality. This ‘Voltron’ set up idea draws from the I Like To Make Stuff YouTube channel that uses magnets to join the modular tables together:
Appreciate the response.
Dallas