How to Spray Paint Doors the Easy Way
Spray paint doors with a paint sprayer for a quick DIY project that’s easier to do than painting with a brush and looks great.
What’s easier to spray paint doors with a sprayer or paint with a brush? Hands down spray painting doors is quicker, easier and the finished product looks professional.
For your convenience, this post contains affiliate links to supplies or tools I used to complete this project. Purchases made using these links help support the Saws on Skates website and allow me to share more DIY projects. and DIY tips with you. There is no cost to you for using these links. Click here to visit my site policies.
Why Spray Paint Doors?
Have you ever painted a door with a paintbrush? It’s a slow process, right? Even before I begin painting I think about the size of that tiny little paintbrush compared to the large surface area of the door and I start feeling a little overwhelmed.
Then I think about how I’ll also need to use that paintbrush to paint the second side of the door. That’s a lot of areas to cover which means it will take a lot of time. Do you have that kind of time to invest in painting doors?
What if I said you could use an affordable sprayer to spray paint doors quickly AND that you can paint both sides at once? You probably think I’ve lost my mind! It’s totally doable and I’ll show you how.
Spray Paint Doors for a Quick and Easy Transformation
There’s no doubt about it painting with a paint sprayer is waaay faster than painting with a paintbrush. But don’t get me wrong. I still use paintbrushes and actually prefer a brush for some painting projects. In fact, recently I shared 7 Simple Paintbrush Tips Guaranteed to Make Your Brush Last Longer.
For some projects painting with a paintbrush can be really time-consuming. For instance, when I built my outdoor coffee table (with four hidden side tables) I used a brush to prime the side tables. After I finished two side tables, I estimated brushing one coat of primer and two coats of paint on this entire project would take me nearly seven hours. SEVEN HOURS!!!
That’s when I decided “I need a sprayer!” I did some research and found the HomeRight Super Finish Max paint sprayer. It was affordable and got great reviews from owners. Thanks to the sprayer I was able to finish applying the primer and two coats of paint in only a few hours. WHAT A TIME-SAVER!
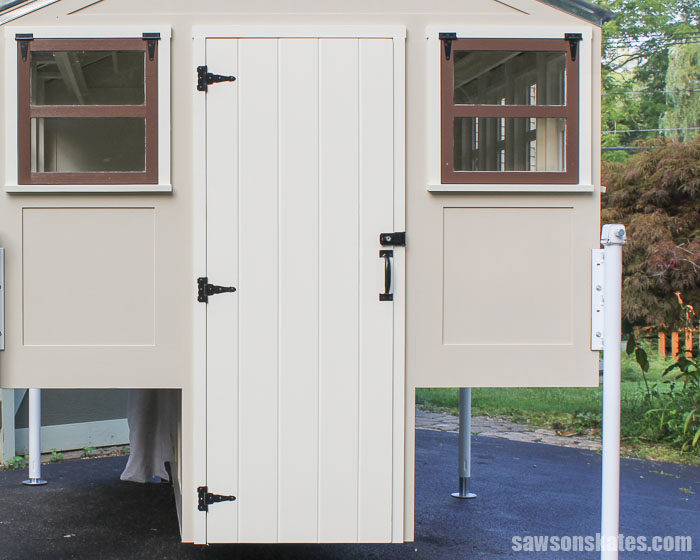
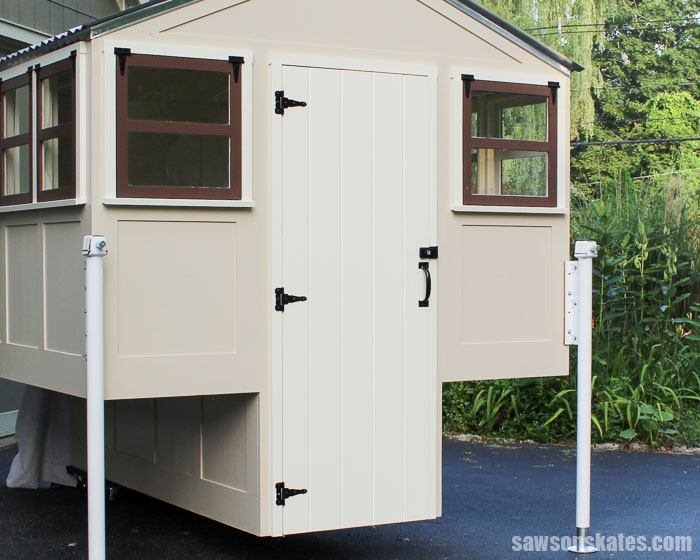
And the paint sprayer works great for painting doors too. Just look at this simple door I made for the Skate-Away Camper. Thanks to my HomeRight Super Finish Max I was able to apply a coat of primer, two coats of paint, and cleaned up the sprayer all in an afternoon. It was quick, easy, and it looks great.
The door turned out great, but it needed a “little something”. Skate over to The Beginner’s Guide to Making a Wood DIY Sign to see the finishing touch I added to the camper door.
Spray Paint Doors for a Professional Look
Brush marks. Some people love ‘em, some people hate ‘em. If you’re in the “hate ‘em” camp you’ll love spray painted doors. When you use a paint sprayer to spray paint doors the finish is smooth. Smooth like the factory finish you would expect from a painted piece of store-bought furniture.
After I built my new workshop doors using pocket hole joinery I sprayed them with my paint sprayer. You would never guess the doors were a DIY project. The paint is smooth and you would think they were store-bought instead of being made in my small workshop.
Paint Sprayer
In order to spray paint doors, you’ll need a paint sprayer. I bought my HomeRight Super Finish Max for my outdoor coffee table project, but since then I’ve sprayed the cedar clapboard siding of my house, sprayed a pair of Adirondack chairs and updated the look of my air conditioner dresser with a coat of paint.
I’ve also primed and painted this DIY ladder chair, the base for my ultimate workbench and my workshop doors. I’ve even used it to spray polyurethane on this DIY wall-mounted wine bar.
I love that the HomeRight Super Finish Max can go from spraying the side of my house to spraying a small piece like the wine bar just by changing the tips. It’s a great sprayer that’s easy to clean up and I’m glad I have this time-saver in my painting arsenal.
Skate over to this post for more tips and tricks about using a paint sprayer.
How to Spray Paint Doors
- Prep your doors for paint
- Set up your work area
- Set up the doors for paint
- Set up the paint sprayer
- Spray paint your doors
Prep Your Doors for Paint
The first step to spray painting is preparing the doors for paint. For this tutorial, I’m painting the door for my Skate-Away Camper. The door was built with new wood, so the only prep I needed to do was sand the bare wood. This is the same way I prepared the doors I built for my small workshop.
If your doors have been previously painted you’ll need to take a slightly different approach. Loose or chipping paint will need to be removed, but you must take proper precautions. Old paint can contain lead and lead can be harmful. If you’re unsure if the paint on your doors contains lead you can use a lead test kit like this to test it.
You’ll also have to take a different approach if your doors are glossy. Paint doesn’t stick very well to glossy paint. You can apply a deglosser or you could sand. If you sand, you must take proper precautions. Old paint can contain lead and lead can be harmful. If you’re unsure if the paint on your doors contains lead you can use a lead test kit like this to test it.
Repair any holes, gouges dents, cracks, etc. I like to use Ready Patch for these types of repairs.
Set up Your Work Area
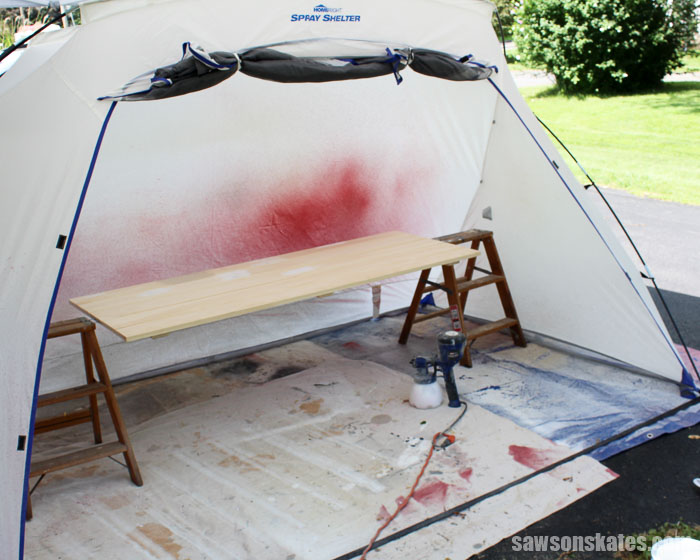
There will be some overspray when you spray paint doors so it’s important to set up a proper work area. If you have a lot of doors to paint you can spray them outside, but be sure the overspray won’t blow onto surrounding objects, homes, cars, etc.
I only had one door to spray, so I set up my HomeRight Large Spray Shelter and covered the ground with a few drop cloths. The shelter protects surrounding objects from overspray and protects your door from debris landing in the paint while it’s drying.
Set up the Doors for Paint
You’ll need something to set your doors on while you’re spraying. You could use some old boxes (we all have some Amazon boxes laying around, right?!) sawhorses, folding tables, etc. You could place the doors on these painting pyramids (I love these things!) and paint one side at a time, but I did something a little different.
I picked up this idea from the Family Handyman article Great Tips for Painting Doors. I set up a little door painting rotisserie. This door rotisserie is nothing fancy. It’s a pair of small step ladders with some scrap wood duct taped to the top.
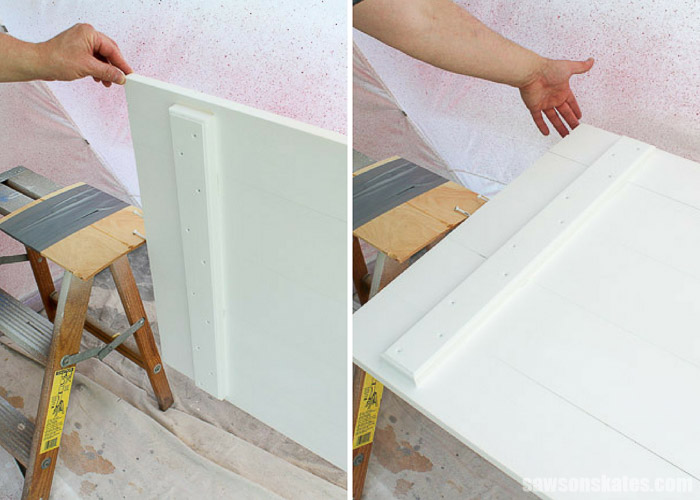
The Family Handyman post suggested using lag bolts, but I didn’t have any on hand, so I used some 3” SPAX screws instead. The screws were centered on each end of the door. On one end of the door, I added a second screw to act as a stop, so the door wouldn’t continue to spin. The screws are thin, so I would use lag bolts if I were going to use this set up again.
Set up Your Paint Sprayer
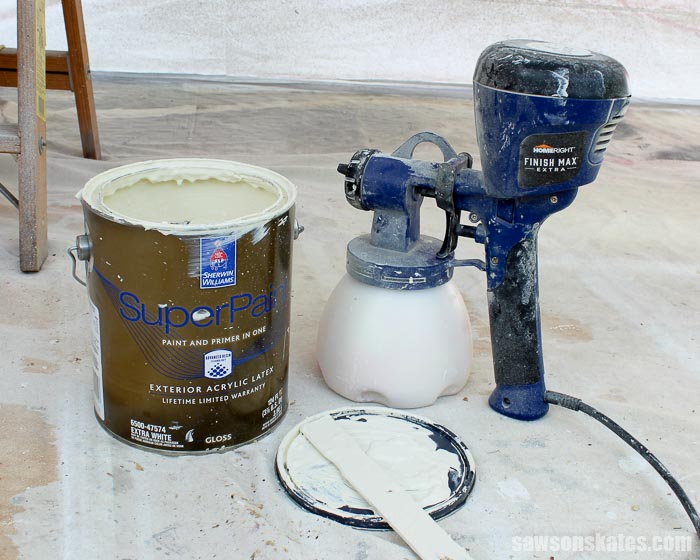
If we’re going to spray paint doors then we’ll need a paint sprayer. I bought a HomeRight Super Finish Max paint sprayer because it got great reviews, it gives a professional finish on both small and large projects, and it’s easy to clean.
Select the Spray Tip
The HomeRight Super Finish Max paint sprayer includes three spray tips. These spray tips are what allows the sprayer to spray both small and large projects. I use the green tip to spray paint doors. The green tip has a 1″-6″ spray pattern and works well for latex paint, chalk paint and milk paint.
Select the Air Cap Nozzle
The HomeRight Super Finish Max paint sprayer also includes two air cap nozzles. The air cap nozzle allows the sprayer to spray a wide or fine spray pattern. The yellow nozzle produces a wide spray pattern and is used for large projects like fences or decks. The black nozzle produces a fine spray pattern and is used for smaller projects like furniture or cabinets. I use the black air cap nozzle to spray paint doors.
Primer and Paint
Next, we’ll need some primer and paint. Don’t skimp on your paint. Choose the best paint your budget will allow. I went with Sherwin Williams Super Paint for the Skate-Away Camper and for the door. I lucked out and got my paint during their 40% off sale!
Mixing or Thinning
Paint sprayers typically require paint to be mixed or thinned. The paint needs to be thinned so the paint will easily flow through the sprayer and the sprayer will work properly.
I created a handy-dandy paint mixing cheat sheet that easily shows how to thin different amounts of paint and I’m giving it to you for FREE! Just click below to download your cheat sheet.

Adjust the Amount of Paint
Spraying the “right” amount of paint is critical. Spraying too much paint will produce runs or drips. The instructions for my HomeRight Super Finish Max sprayer recommends overlapping each stroke or pass by a third. So we want just enough paint to flow through the sprayer to coat the doors AND be able to overlap each stroke or pass by a third without spraying too much which would produce runs.
Adjusting the amount of paint is easy with the HomeRight Super Finish Max. The volume control knob controls the amount of paint allowed to flow through the sprayer. Rotate the volume control knob towards the “+” to allow more product to flow and rotate towards the “-” to reduce the amount of product flowing through the sprayer.
Spray Paint Your Doors
There are a few important things to remember when you spray paint doors. Switch the trigger on as you approach the door, follow through with a long, continuous movement and switch the trigger off when the sprayer is beyond the door.
Following through with a long, continuous movement is really important. If you start and stop while spraying the piece you’ll end up with more paint in some areas and less in others. For proper paint coverage, you’ll want to overlap each stroke or pass by one third. Also, keep your wrist stiff and keep the sprayer 10″ to 12″ away from the surface you’re spraying.
Troubleshooting
Sometimes when you spray paint doors the surface of paint ends up being bumpy instead of being smooth. This unwanted texture is called orange peel. It can happen to any DIYer and it happened to me recently.
I reached out to my friends at HomeRight for some help about how to avoid orange peel on my painted projects. They shared some great advice with me and now I want to share it with you. Please skate over 7 Ways to Prevent Orange Peel Texture When Using a Paint Sprayer for some helpful tips and tricks to keep your paint smooth.
Conclusion
Using a sprayer to spray paint doors is quick, easy and the result is professional. Choose a versatile paint sprayer like the HomeRight Super Finish Max that can be used for small and large projects. Prepare your doors for paint making sure to take precautions for lead paint. Set up your work area to control overspray. Set up a “door rotisserie” to easily paint both sides of the door. Choose quality paint for a quality finish. Finally, spray paint doors with long, continuous strokes.
Thank you for stopping by. If you found this information helpful, would you please pin it to Pinterest? Other DIYers would appreciate it and I would too! Thank you – Scott

Hi there – I’m Scott, a woodworking enthusiast and creator of Saws on Skates, a site I started in 2015 to share easy-to-follow tutorials, space-saving shop tips, and project inspiration for DIYers at any skill level. Learn more about my woodworking journey here.