DIY Freestanding Dog Gate (3 Easy Steps)
Keep your pup secure with this easy-to-make, freestanding DIY dog gate. Block off stairs or doorways without drilling holes in your walls!
What Should I Build Next?
That's the question I help answer.
Every week, I send woodworking ideas to 17,000 DIYers who love building things.
You'd fit right in.
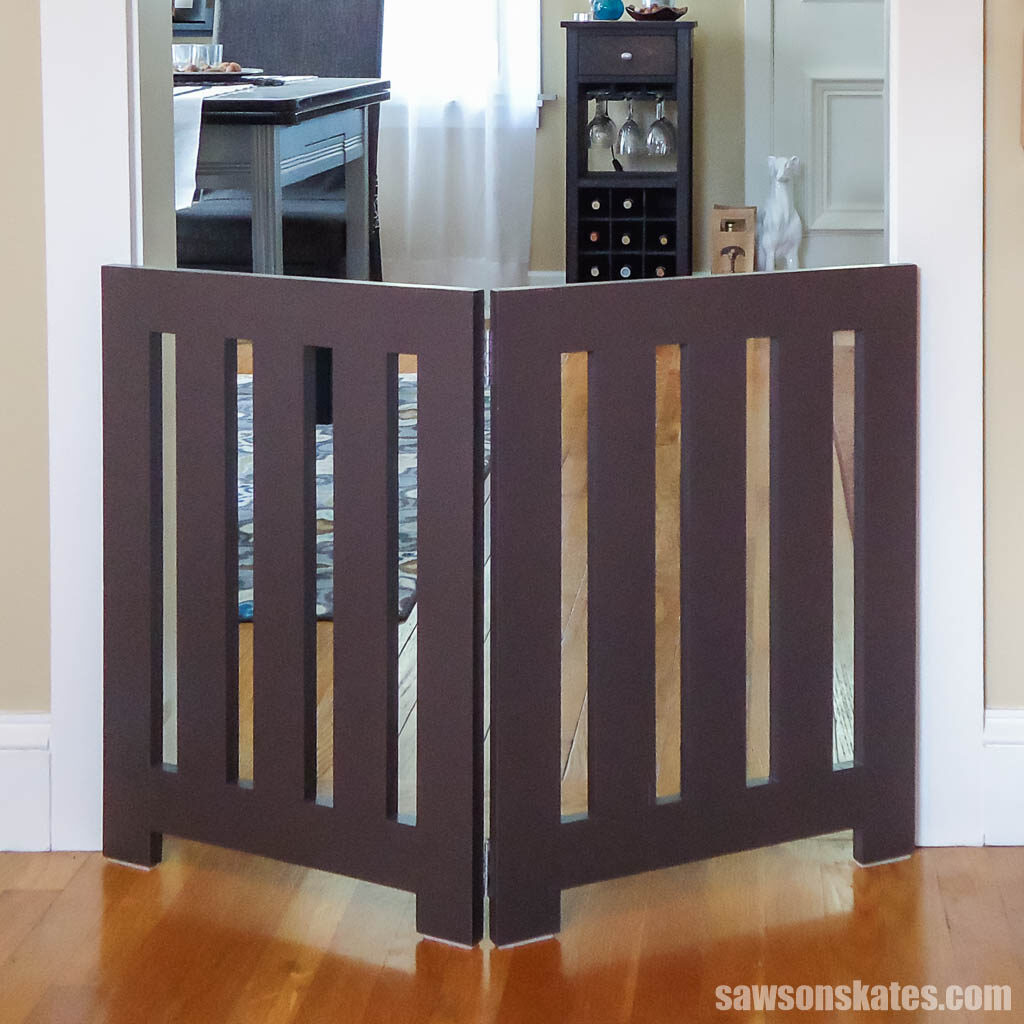
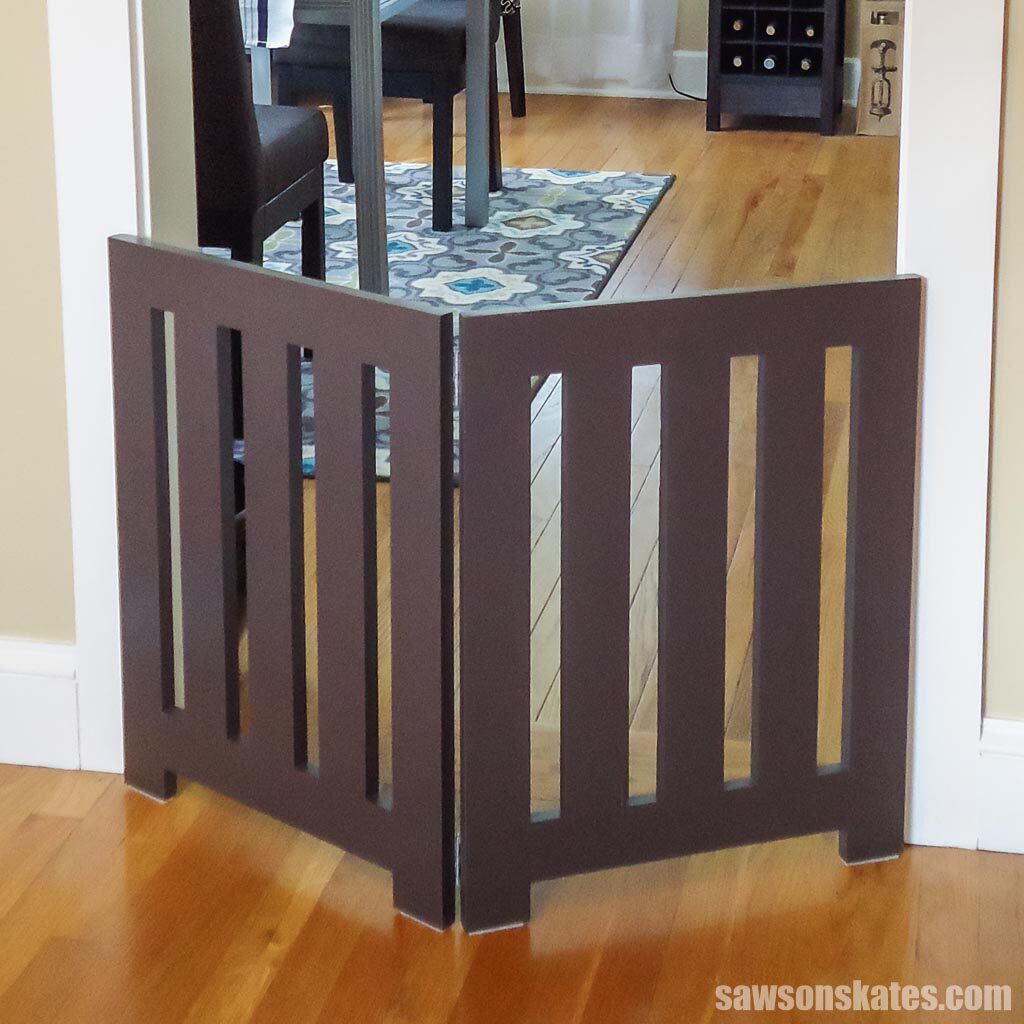
Do you have a dog who gets into places they shouldn’t when you’re not home? Are you training a new puppy and need a way to keep them in one spot? Whatever the reason, a freestanding DIY dog gate is the perfect solution for pooch-proofing your home without damaging your walls.
You can make this portable pet barrier in just three simple steps, and it’s so easy that nearly anyone can do it. Keep reading for the step-by-step plans.
Originally published September 30, 2015, republished November 26, 2019 and April 4, 2023.
Table of Contents
- What is a Freestanding Dog Gate?
- Are Freestanding Dog Gates Safe?
- What Tools Do You Need to Make a DIY Pet Barrier?
- What Wood Should You Use?
- How Do You Gate Off a Large Area?
- How Do You Finish the Dog Gate?
- How to Make a DIY Freestanding Dog Gate
- Get the PDF Plan
This article contains affiliate links. If you purchase from these links, I may earn a small commission at no additional cost to you. Visit my site policies for more information.
What is a Freestanding Dog Gate?
A freestanding dog gate is a movable barrier that prevents your pup from entering certain areas of your home. Unlike traditional gates, freestanding gates don’t require installation, so you can easily move them to block off different spaces as needed, such as stairs and doorways.
Freestanding gates are an excellent solution for renters or homeowners who don’t want to drill holes in their walls but need a safe space to contain their pets.
Are Freestanding Dog Gates Safe?
The advantage of freestanding pet gates is they are portable and won’t damage your walls like a traditional gate, but the drawback is they are prone to tipping. They are best suited for dogs who are respectful of barriers.
Because freestanding gates can tip, causing an injury, I don’t recommend them if your dog is a jumper or climber or for families with babies or toddlers. Instead, look into wall-mounted gates that offer greater stability.
What Tools Do You Need to Make a DIY Pet Barrier?
You’ll only need three basic tools to make your freestanding dog gate: a miter saw, a drill, and a pocket hole jig. It’s also helpful to have an assortment of bar clamps.
Miter Saw
I cut all of the gate’s parts to their required lengths using my miter saw; however, if you don’t have one, or prefer not to use power tools, then a handsaw and miter box will work.
Drill
You’ll need a drill to make the pocket holes and drive the pocket screws to connect the gate’s components.
Related: Impact Driver vs Drill (Which to Use & Why)
Pocket Hole Jig
A pocket hole jig is essential for building this DIY gate, creating strong joints without complicated joinery techniques. I used a Kreg Jig, but you can use any brand pocket hole jig you have. Alternatively, you can join the parts with a doweling jig and dowels if you don’t have a pocket hole jig.
Related: Which Kreg Jig Should You Buy? (Here’s the Answer)
What Wood Should You Use?
I used common pine boards to build my gate, but you could use almost any wood type, such as poplar, oak, or maple.
How Do You Gate Off a Large Area?
I designed this dog gate for an opening that measures about 30″ wide. You could easily customize this project for larger areas by adjusting the dimensions of the gate’s panels or building more panels and attaching them with hinges.
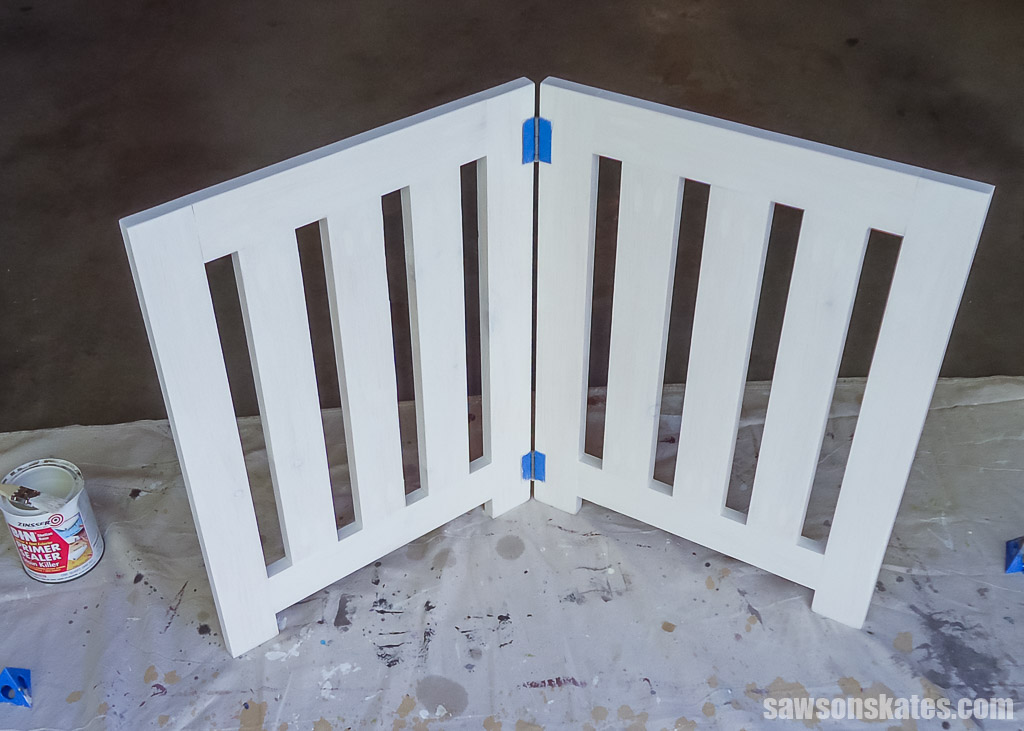
How Do You Finish the Dog Gate?
You can paint, stain or leave your gate natural, but whatever option you choose, I recommend filling the pocket holes with either store-bought plugs or making your own.
Related: How to Make Pocket Hole Plugs
After filling the pocket holes, I applied several coats of shellac-based primer and then two coats of Behr “Dark Cavern” paint. I used a brush, but a paint sprayer would make quick work of finishing this project’s nooks and crannies.
I attached furniture pads to the bottom of the legs when the paint was dry, which protects the floor from being scratched when moving the gate.
How to Make a DIY Freestanding Dog Gate
Printed Plan
Get the PDF plan here (includes detailed instructions, measurements, and bonus tips)
Supplies
- Wood (per the printed plan)
- Wood Glue
- 1-¼” Pocket Screws
- (2) Hinges 2″ × 1-⅜”
Tools
- Tape Measure
- Miter Saw
- Drill
- Kreg Jig
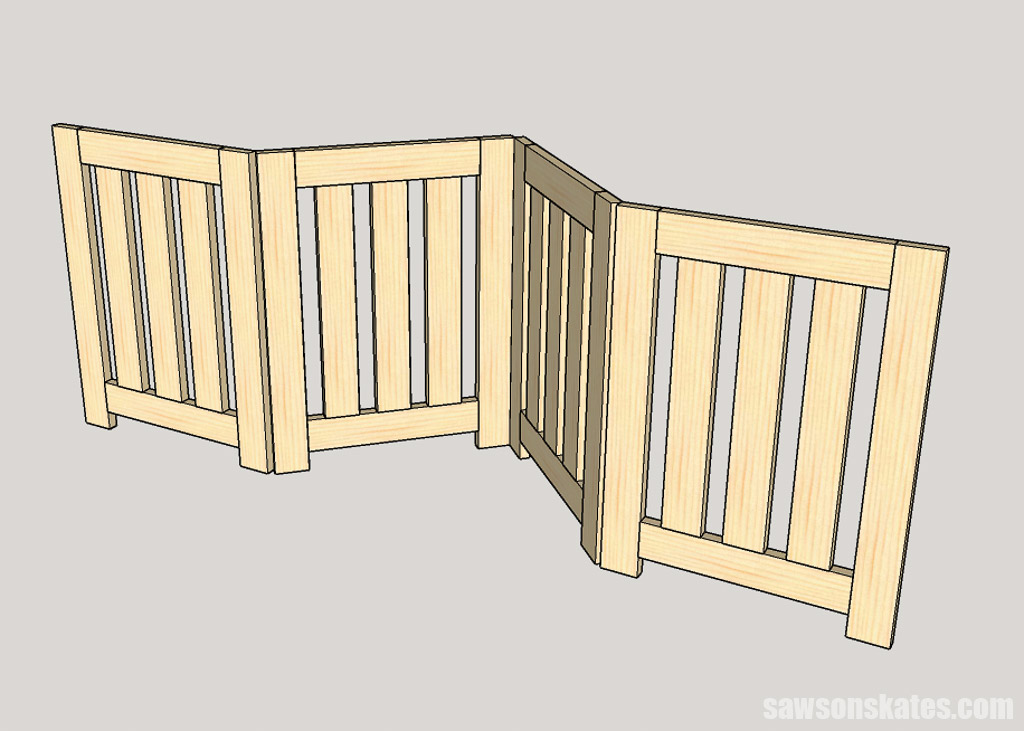
Step 1. Assemble the Gate Panels
Cut four pieces of wood to length for the legs.
Cut four pieces of wood to length for the rails and drill pocket holes in each end.
Related: How to Use a Pocket Hole Jig (& Beginner Pitfalls to Avoid)
Cut six pieces of wood to length for the slats and drill pocket holes in each end.
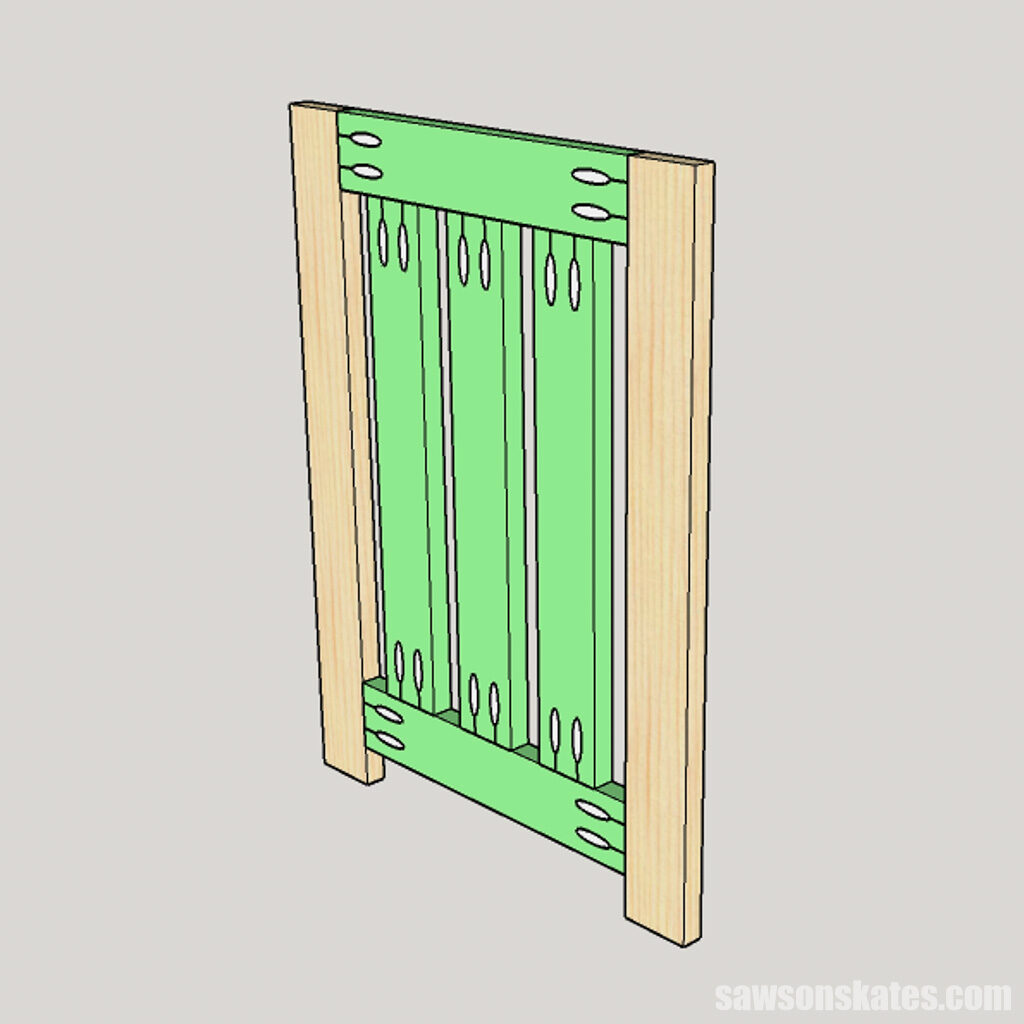
Layout two legs, two rails, and three slats on your workbench.
I cut eight pieces of scrap wood to length and placed them between the slats to help keep the correct spacing.
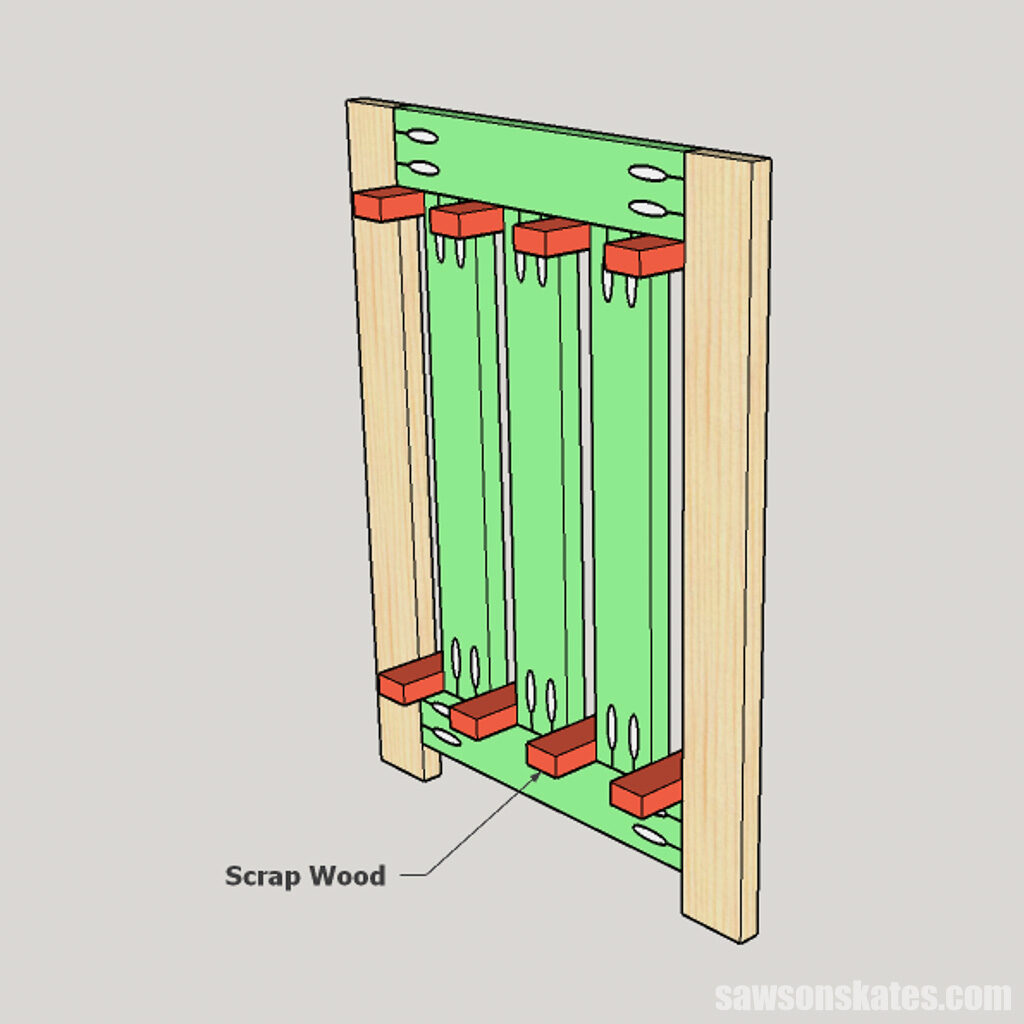
Apply glue to the ends of the slats and the rails, clamp, and attach using pocket screws.
Repeat for the other panel.
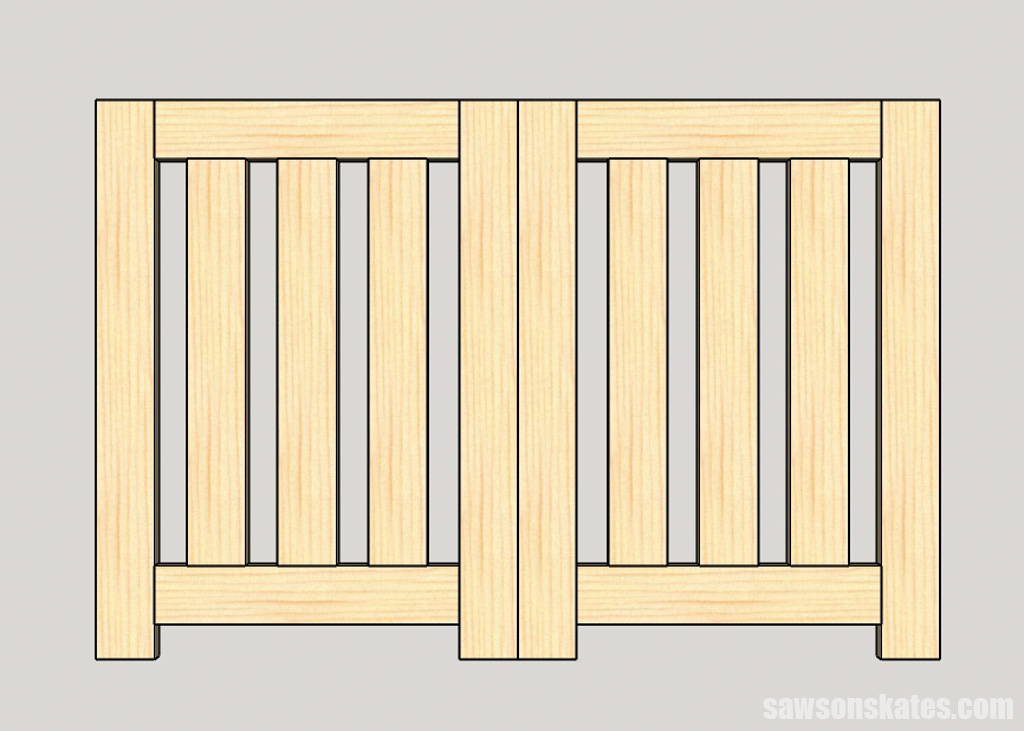
Step 2. Attach the Hinges
Layout the panels side by side. Place one hinge near the top of the gate and the other near the bottom.
Then use the wood screws included with the hinges to attach them to the panels.
Step 3. Finish the Dog Gate
See How Do You Finish the Dog Gate for more information.

Includes:
- List of tools and materials
- Complete measurements (in inches)
- Easy-to-follow instructions
- Step-by-step photos
- Detailed diagrams
Frequently Asked Questions
Can I use this freestanding dog gate as a baby gate?
No, I don’t recommend using this barrier as a baby gate because toddlers or babies can easily tip it over. For safety, look into using a wall-mounted gate instead.
What prevents this freestanding dog gate from tipping over?
Nothing, really. That’s why it best suits pet parents with dogs who respect boundaries. If your dog jumps or climbs, or you have a baby or toddler, I don’t recommend using this freestanding barrier. Look into using wall-mounted gates instead.
Final Thoughts
This freestanding dog gate is an easy weekend project. With a few basic tools and supplies, you can make an attractive, functional barrier that will keep your pup safely in their space. Plus, you can customize it to fit nearly any size doorway or opening.
Don’t wait. Get your PDF plan (including the detailed instructions and measurements) now!
Thank you for stopping by. If you enjoyed this tutorial, would you please take a moment and pin it to Pinterest? I’d really appreciate it!
Recommended For You
Pin This For Later

Hi there – I’m Scott, a woodworking enthusiast and creator of Saws on Skates, a site I started in 2015 to share easy-to-follow tutorials, space-saving shop tips, and project inspiration for DIYers at any skill level. Learn more about my woodworking journey here.
Thanks!
I had trouble with the 1-1/4″ pocket screws and had to resort to 1-1/2″. All turned out well in the end. Liked it so much, made another one this weekend. (I made both four panels wide). Thank you for the plans. I have my eye on a couple of your other plans. Thanks so much.
Thank you for stopping by Debi! I’m glad you were able to work out the issue with the pocket screws. Do you have any pics of your project? I’d love to see them and share them on the Saws on Skates Facebook page 🙂
Thank you for this plan. We have a beagle who likes to explore. I was tired of marking up door trim with our purchased gate, if we secured it, or having it fall and make a racket if we didn’t. This is just what I was looking for. Even as a first time builder, I was able to follow the plans and make a decent looking gate for much less than current online offerings.
Hi Eric – Thank you for stopping by. I’m glad this plan worked out for you and your beagle!
Just wondering: what prevents the gate from falling over if the dog jumps up on it? Thinking about making this for my parents who babysit a toddler and don’t want it to fall over.
Hi Gina – Thank you for stopping by. This would be best for dogs that don’t jump on barriers. It’s not recommended to be used with children or toddlers. It will tip over if it’s pushed or jumped on. I made this for my dog, who does not jump.