How to Prevent Workpiece Movement in Pocket Hole Assemblies
Is workpiece movement ruining your pocket hole projects? Learn how to eliminate shifting and create perfectly aligned joints every time.
Tired of wobbly, misaligned pocket hole joints? Frustrated by boards shifting as you drive those screws? I’m sharing proven techniques to eliminate workpiece movement, ensuring your projects are sturdy, professional, and built to last.
Originally published January 8, 2019, republished September 11, 2024.
Table of Contents
- Why Workpieces Shift During Assembly
- How to Prevent Misaligned Pocket Hole Joints
- Tips for Clamping Pocket Hole Joints
This article contains affiliate links. If you purchase from these links, I may earn a small commission at no additional cost to you. Visit my site policies for more information.
The Challenge of Workpiece Movement
I’ve been getting messages from DIYers struggling with a common problem: their pocket hole joints shift during assembly.
Daniel: How do I stop parts [from] creeping out of alignment when assembling?”
Marek: My biggest problem is that when I tighten, one of the two pieces moves up a bit.”
Orhan: I have difficulty keeping the pieces to be joined by pocket screws in alignment. The torque that the screw conveys to the wood makes it difficult to maintain my initial alignment. Using glue makes the surfaces further slippery.”
I completely understand what these do-it-yourselfers are going through. I’ve been there myself when I first started using pocket hole joinery. Let’s explore why workpieces can shift during assembly and how to prevent it.
Why Workpieces Shift During Assembly
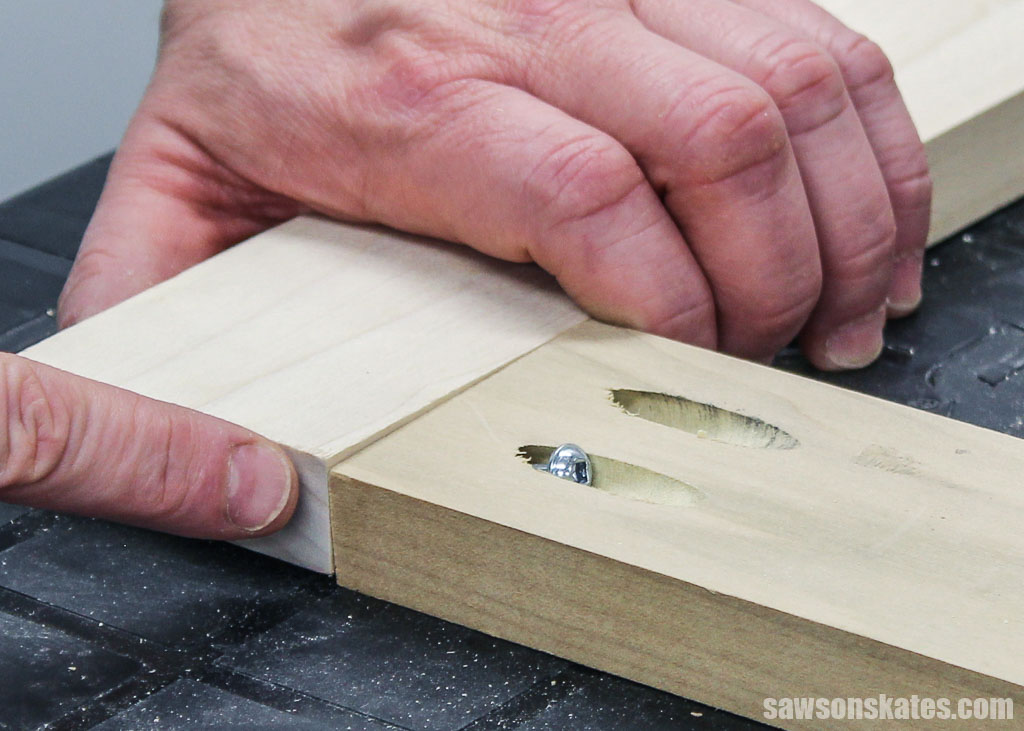
Woodworkers often use pocket holes to join two pieces of wood. The connection is made by drilling an angled hole using a pocket hole jig (sometimes called a Kreg Jig) into one workpiece.
Related: How to Use a Pocket Hole Jig (& Beginner Pitfalls to Avoid)
The first workpiece is connected to a second with a pocket hole screw. However, the force from driving the screw against the second workpiece’s edge can push the joint out of alignment.
Misaligned pocket hole joints are frustrating and look unprofessional. Now that we understand why they move, how can you prevent it from happening? In the next section, I’ll discuss some solutions.
How to Prevent Misaligned Pocket Hole Joints
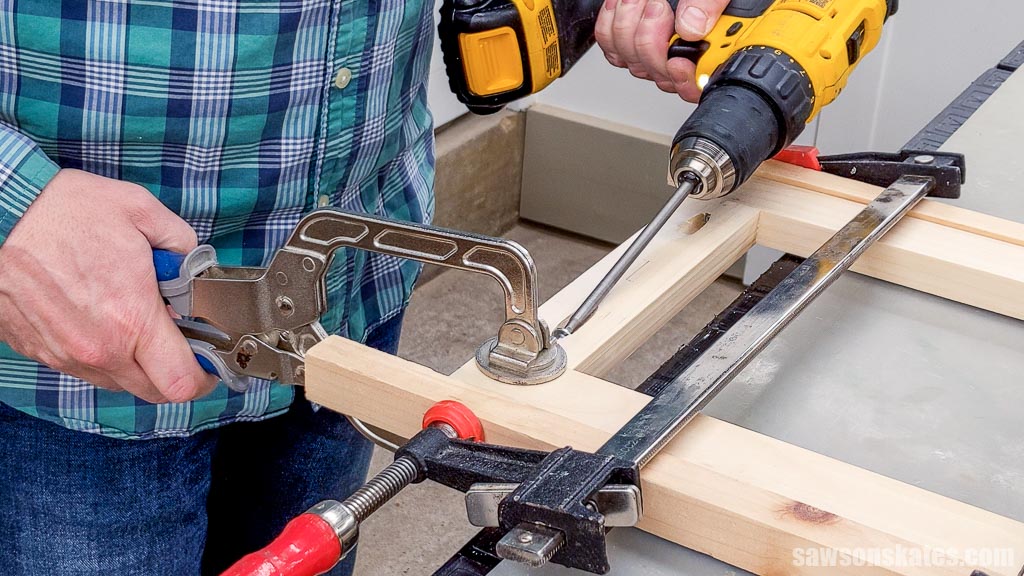
One of the biggest challenges when using pocket hole joinery is keeping the boards aligned during assembly. But I’ve got a simple solution: leverage the power of clamps. By securely clamping your workpieces before driving the screws, you can prevent any shifting or movement, resulting in precise, sturdy joints.
But first, I’ll answer whether you can hold the joint with your hands instead of clamps.
Can You Hold Pocket Hole Joints with Your Hands?
I know what you’re thinking:
- Do you really need to use clamps?
- Can’t you just hold the joint with your hands?
I get it. Clamps are expensive, and it feels like there’s never enough to go around. Plus, clamping everything seems like an extra hassle. But trust me, clamps are a game-changer for my pocket hole projects. They help prevent accidents and are essential for achieving professional-looking results.
Holding Pocket Hole Joints is a Safety Risk
One reason you’ll want to avoid holding a pocket hole joint with your hands is that it could be dangerous. Don’t believe me? Check out Scott C’s comment in my “9 Pocket Hole Mistakes You Don’t Want to Make” article.
Here is a mistake I don’t want to make again. Never hold the joint with your hand as you drive in the screws. The driver’s tip slipped and drove into the palm of my hand. It hurt, and I went to the doctor, and after an x-ray, they cleared me of any broken bones, but this is very easy to do. Use a clamp to hold it together for safety.”
Clamps securely hold workpieces in place while keeping your hands a safe distance from the joint.
Handheld Pocket Hole Joints Can Become Misaligned
I know some will disagree with me because I’ve watched YouTubers assemble pocket hole projects without using clamps, but any time I’ve tried it, the joints always come out of alignment, and the board’s faces are never flush.
Sure, you can assemble without clamps, but those misaligned joints will require more sanding to flush the faces. I believe it’s much easier to clamp the joint properly in the first place and avoid all of that extra work.
The bottom line is that your hands can’t match a clamp’s force and gripping power. Using clamps to assemble your pocket holes ensures that your joints stay properly aligned and that your DIY projects look professional.
Next, let’s explore what kind of clamps to use.
Face Clamp: Controls Outward Force
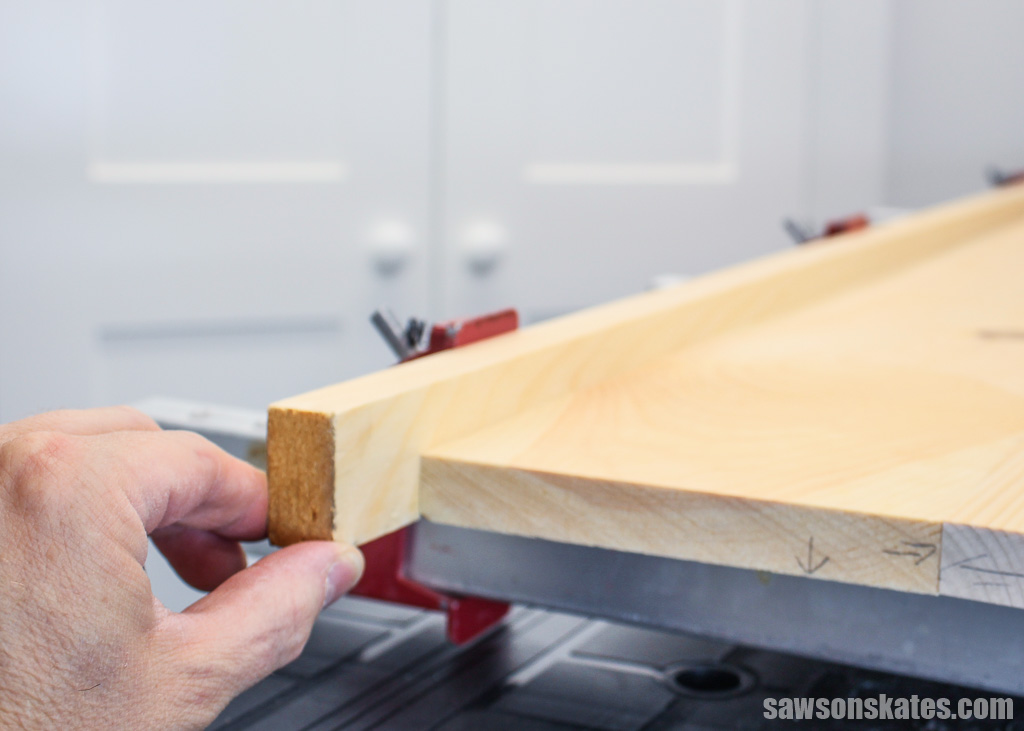
One way you can prevent workpieces from shifting is with a face clamp, which attaches to the faces of both workpieces, holding them in place while you drive in the pocket hole screws.
I often pair face clamps with bar clamps for extra control, especially when working with narrow boards like 1×2s or hardwoods like oak. Driving pocket hole screws into the second workpiece creates an outward force, which can cause it to split. Face clamps help counteract that pressure.
One downside I’ve found with face clamps is when there’s a slight variance in the workpieces’ thicknesses. The clamp may not grip the thinner board as tightly, and it can cause the surfaces to be uneven. That’s why I prefer to use bar clamps first, ensuring the faces I want to show on the finished side of my project are flush. Then, if I’m working with narrow boards or hardwoods, I add the face clamp to control the pocket hole screws outward force.
While I recommend having a face clamp on hand, it’s one of the least used clamps in my shop. I only reach for it when joining narrow boards or hardwoods or when I can’t hold the joint with another type of clamp.
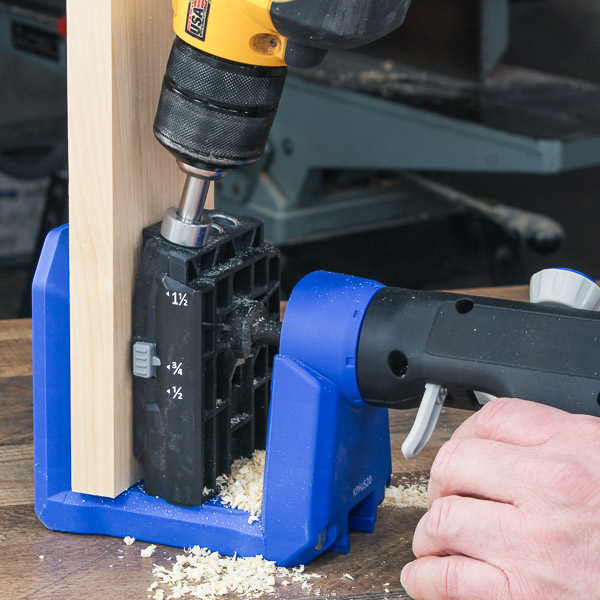
Right Angle Clamp: Limited Use Tool
Another option for holding workpieces when assembling pocket hole joints is a pocket hole clamp, or a right angle clamp. The clamp’s pin fits into the pocket hole while its pad rests against the second workpiece, creating pressure on the joint and pulling the boards together.
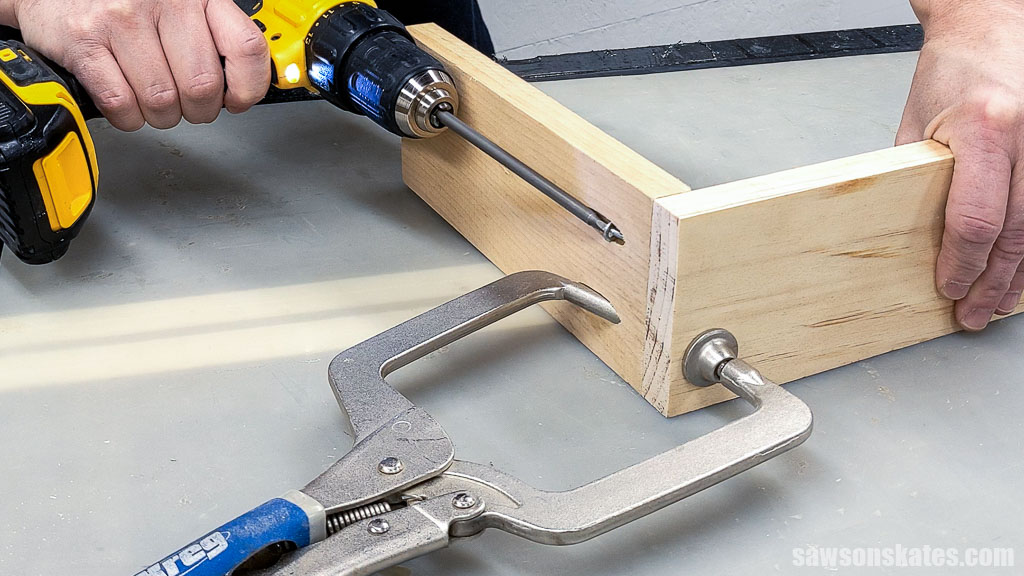
Honestly, I don’t use my right angle clamp very often. Sometimes, the pin can chip the pocket hole. And, if it’s the only clamp I’m using, the workpieces can still shift once I remove the clamp. That’s why I only reach for it when assembling those tricky joints that I can’t clamp any other way.
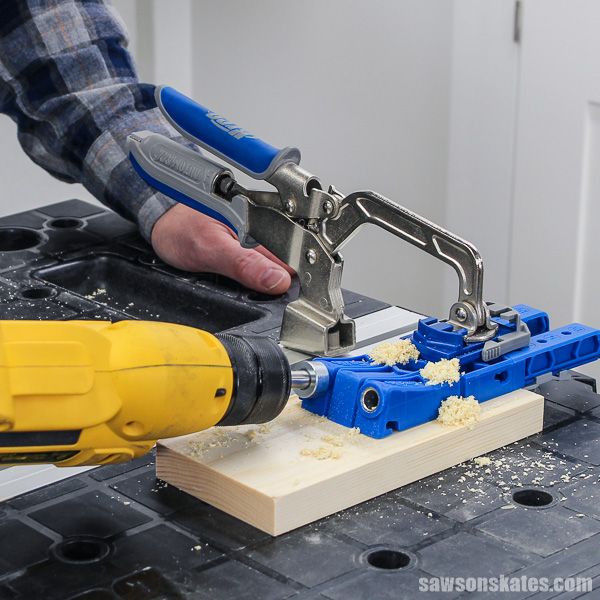
Bar Clamps: My Go-To Clamping Method
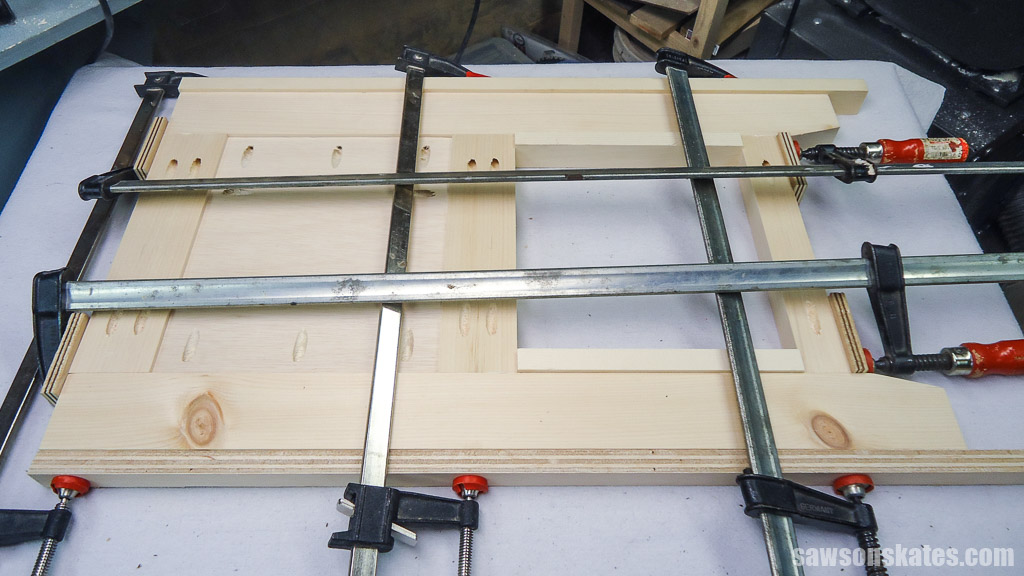
Face clamps and right angle clamps are great for holding one joint at a time. However, when assembling my projects, I prefer to clamp the entire assembly while I work. That’s where bar clamps come in.
I love using an assortment of bar clamps to hold my entire project, ensuring everything stays aligned when I’m driving the pocket hole screws. It’s like building a sturdy framework for my project before I dive in.
For example, when building this bathroom vanity, I secured its side assembly with bar clamps, preventing those frustrating moments when workpieces shift out of place.
Also, by clamping the whole assembly, I know that every joint is lined up perfectly with the others. It’s a simple trick but a game-changer for getting accurate results.
Tips for Clamping Pocket Hole Joints
In my Tips to Clamp Your DIY Project Like a Pro article, I talked about how there’s a science to clamping. Let’s say you want to join some boards to make a tabletop, and you want to hold the workpieces in place with bar clamps while you drive the pocket hole screws.
Related: How to Make a Farmhouse Table Top
When you use a bar clamp, it applies force on the wood at a 45-degree angle on either side, meaning you need to position the clamps so the same amount of pressure is applied along the entire length of the workpiece.
But there’s more to it than that. You’ll also want to alternate the position of your clamps from the top and bottom of the workpiece, ensuring the same amount of pressure is applied from side to side and top to bottom.
Use Clamping Cauls
In my How to Decide What Scrap Wood to Keep article, I mentioned that I like to keep some scrap wood on hand for clamping cauls.
Cauls go between the clamps and the workpiece, helping distribute the clamping pressure evenly and acting as a buffer, preventing the clamp from denting my project.
Use Wood Glue
I’ve said it in other pocket hole posts: I’m a huge fan of using wood glue with pocket hole joinery. I find that it makes a strong joint even stronger.
Orhan said at the beginning of this article that using glue makes surfaces more slippery, and that’s true. Too much glue can cause joints to slide out of alignment. The key is applying the right amount, which can help hold the joint together while you’re working.
How Much Glue Should You Use?
You want to apply just enough glue so that a little bit squeezes out when you clamp the workpieces. I know it sounds weird aiming for glue squeezing out, but that’s actually a good sign. Woodworkers call it “squeeze out.”
If no glue squeezes out, you might have a dry joint, meaning there isn’t enough glue to create a proper bond. On the other hand, too much glue will erupt from the joint like a volcano. What you’re looking for is enough to prevent a dry joint without making a mess.
First, I apply a thin layer of glue to the joint. I prefer a spreader, but your finger can also work. Next, I bring the pieces together and rub them back and forth, like you’re rubbing your hands together, which helps spread the glue along the joint.
If you’ve used just the right amount of glue, the boards will stick together with an almost suction-like pull. Then, when you clamp the joint, you should see tiny beads of glue along the seam.
Woodworkers disagree on the best method for removing squeeze out. Some prefer a damp rag, but I’ve found that it pushes the glue deeper into the wood, preventing absorption if you plan to stain your project.
Instead, I prefer to wait for the glue to form a skin, usually about 20 to 30 minutes, then remove it carefully with a putty knife or paint scraper.
Then, I use sandpaper or my random orbital sander to remove any remaining glue residue.
That’s it. You’ve just created a perfect joint. Finding the sweet spot for the glue amount takes practice, but trust me, you can do it.
Use Pocket Hole Screws
The last tip I want to share with you is always to use pocket hole screws when assembling pocket hole joints. These screws are specially designed with threads only on the lower part of the shank, unlike wood screws that are threaded almost all the way up.
This unique design lets the pocket hole screw slide smoothly through the pocket hole and pull the workpieces together tightly. If you use a regular wood screw, it won’t slide through, which can lead to loose joints or even cracks in the wood.
Related: 7 Ways to Prevent Pocket Screws from Splitting Wood
For the best results:
- Use coarse-thread pocket hole screws for softwoods like pine
- Use fine-thread screws for hardwoods like oak
Final Thoughts
Driving pocket screws can cause workpieces to shift, but using clamps prevents this movement and keeps the joint aligned. I prefer bar clamps, but you can also use face and right angle clamps.
Thank you for stopping by. If you enjoyed this tutorial, would you please take a moment and pin it to Pinterest? I’d really appreciate it!
Recommended For You

Pin This For Later

Hi there – I’m Scott, a woodworking enthusiast and creator of Saws on Skates, a site I started in 2015 to share easy-to-follow tutorials, space-saving shop tips, and project inspiration for DIYers at any skill level. Learn more about my woodworking journey here.
I almost always use face clamps or right angle clamps when I’m joining wood; occasionally when I have someone else there (with strong hands) we’ll skip the clamp … it’s hard and doesn’t always work and I usually end up getting the clamp and redoing the join (if possible). Great article. I really appreciate your site; I am an avid user of what I simply call “kregging”, it’s my goto method of joining wood.
Hi Miriam – Thank you for stopping by. I’m glad this was helpful for you!
Assembling face frames using 1X2 stock (usually pine) and pocket holes – several times the wood on the receiving piece would crack. I guess I could try to drill a pilot hole for the screw in the receiving piece but that isn’t very convenient and not an easy fix as far as I can see. I’ve tried drilling holes more carefully but the best practice seems to use glue and just one pocket hole. Also about movement – I normally use a face clamp but find the wood moves apart as the screw hits the receiving piece – even when I clamp tightly. It usually seems to get back together but seeing the joint move doesn’t inspire confidence. I now counter this now by using a bar clamp perpendicular to the face clamp. Clumsy but it appears to work. And, of course, one joint at a time.
Is there a recall on the 6″ clamps ???????
Hi Peter – Thank you for stopping by. I haven’t heard about a recall the 6″ clamps and I wasn’t able to find anything about it on the web.
Thanks for your concise and easily understood hints. I’ve been using Kreg systems for years and haven’t found a better way to joint facing to cabinet boxes. It’s always good to be reminded of the basics and why they’re important- well done!
Hi Dave – Thank you for stopping by and for the compliments. I appreciate it!
The pin on my Kreg right angle clamp is too large to fit into the holes I have made using my Kreg jig. Is there a right angle clamp available that has a smaller pin?
Hi Carole – Thank you for stopping by. There is only one pin size available with the right angle clamp. Which Kreg Jig are you using? The Micro-Pocket Drill Guide (or micro-jig) produces a smaller hole than the other Kreg Jigs, so the right angle clamp isn’t going to work. Could you use a bar clamp or face clamp instead?
I really appreciate all the information here. I’m still doing battle with getting everything to hold still when I’m joining the end pieces of bookcases. I have yet to find a way to get them set precisely and then to stay that way.
Hi John – Thank you for stopping by. I’m sorry you’re having trouble joining your bookcase. Have you tried using corner clamps? They can be helpful when joining pieces like bookcases.
I did buy a couple of corner clamps on Amazon. They helped but not perfectly. I wish that I had bought a Kreg corner clamp. I suspect that might have worked better. Thanks.
I have of late seen some clamps sold by Rockler I believe. The go into the drilled holes. So if using the three hold Kreg Jig, two of the clamps are inserted. It kind of reminded me of the right angle clamp. I am sorry I do not have the number of the clamps I have seen.. Has anyone else used these and if so how did they work for you?
Hi Frank – I have seen the clamps you’re talking about. I haven’t tried them yet, but I want to. They look really handy!