7 Ways to Prevent Pocket Screws from Splitting Wood
Driving a pocket screw into a pocket hole can sometimes crack the wood. Use these 7 tips and tricks to prevent splitting the wood when using your Kreg Jig.
You may also enjoy 9 Pocket Hole Mistakes You Don’t Want to Make and How to Prevent Pieces from Moving When Assembling Pocket Hole Joints.
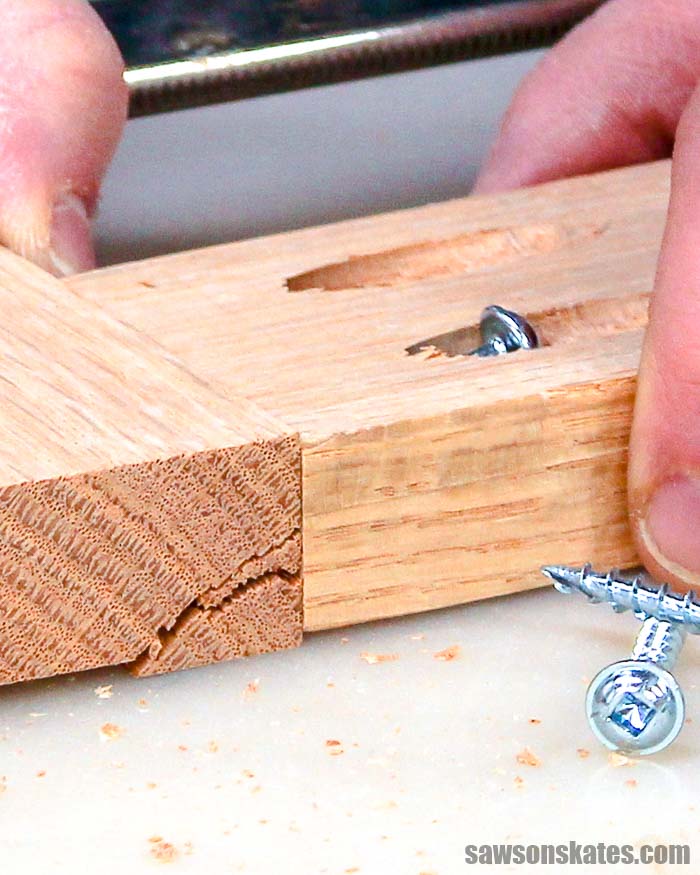
Has a pocket screw ever split the wood of your DIY project? It’s happened to me. There are a few things we need to think about when using pocket holes to join our DIY projects.
Some woods, like oak, are more likely to split when driving a pocket screw. Dry wood or wood with a low moisture content can also split more easily.
These 7 tips and tricks will help us understand why wood sometimes splits when driving pocket screws and how to prevent it.
This post contains affiliate links to supplies or tools I used to complete this project. Purchases made using these links help support the Saws on Skates website and allow me to share more DIY projects. and DIY tips with you. There is no cost to you for using these links. Click here to visit my site policies.
Before we get into how to prevent pocket screws from splitting wood, be sure to click the subscribe button at the bottom of this page to sign up for my FREE weekly newsletter loaded with helpful pocket hole tricks, space-saving workshop ideas, clever DIY tips and more!
7 Ways to Prevent Splitting Wood When Using Pocket Screws
- Make Test Pieces with Scrap Wood
- Only Pocket Screws with Pocket Hole Joints
- Use the Right Pocket Screw Threads for Softwoods and Hardwoods
- Drive Pocket Screws Slowly
- Avoid Overtightening Pocket Screws
- Lubricate Pocket Screws to Reduce Friction
- Use Clamps when Driving Pocket Screws
1. Test if Pocket Screws Will Split the Wood
My number one tip for any woodworking project and the best way to check if pocket screws will cause our wood to split is to make a test piece. Not sure if you can join a ½” piece of plywood with pocket screws? Make a test piece.
Using pocket screws with a hardwood like oak for the first time? Make a test piece.
Don’t know if you can join a 1×3 to a 2×4 with pocket screws? Make a test piece.
Oh, by the way, you can join different thicknesses (like 1×3 to a 2×4) with pocket screws. Skate over to The Simple Rule for Joining Different Thicknesses with Pocket Holes for the details.
The best way we’ll know if the wood we’re working with might split is to do a few tests. But we’re not going to do those tests on the final pieces for our project.
Instead, we’ll use scrap wood from the project we’re building to make our test pieces. Making test pieces is especially important to do when we’re using a type of wood that we’ve never worked with before.
Is there anything we can do if we find the pocket screws in our test pieces split the wood? Yes! Below are tips and tricks to prevent splitting wood when driving pocket screws.
2. Use Pocket Screws to Prevent Splitting the Wood
All screws are not created equally. There a few key differences between pocket screws and wood screws.
The first difference between pocket screws (left) and wood screws (right) is the shank. Pocket screws only have threads on the lower portion of the shank and wood screws usually have threads along most of the shank.
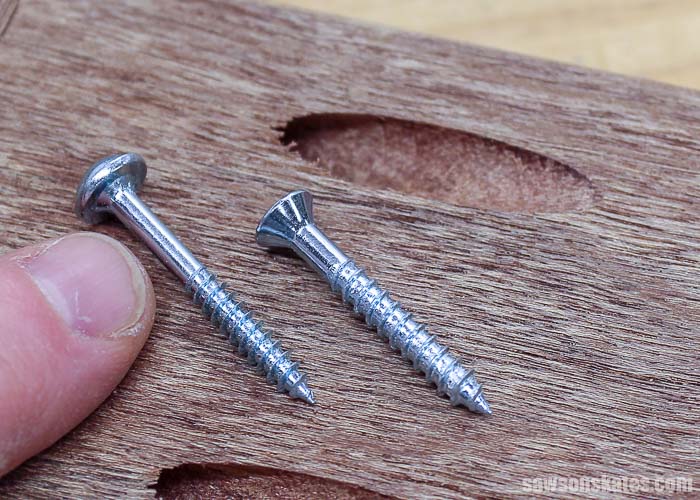
The smooth upper shank of a pocket screw allows it to slide through the pocket hole. The threaded shank of a wood screw won’t slide through the pocket hole. The threads of a wood screw could bind in the pocket hole which may split the board.
The next difference between pocket screws and wood screws is the head. The stepped drill bit we use to drill pocket holes makes a flat area in the bottom of the pocket hole.
The flat washer head design of a pocket screw seats perfectly against the flat bottom of the pocket hole and pulls the two workpieces together.
The countersunk head of a wood screw will crush the flat bottom of the pocket hole which can split the wood.
One of the best ways to prevent splitting the wood is to only use pocket screws with pocket hole joints.
3. Use the Right Pocket Screw Threads to Prevent Splitting
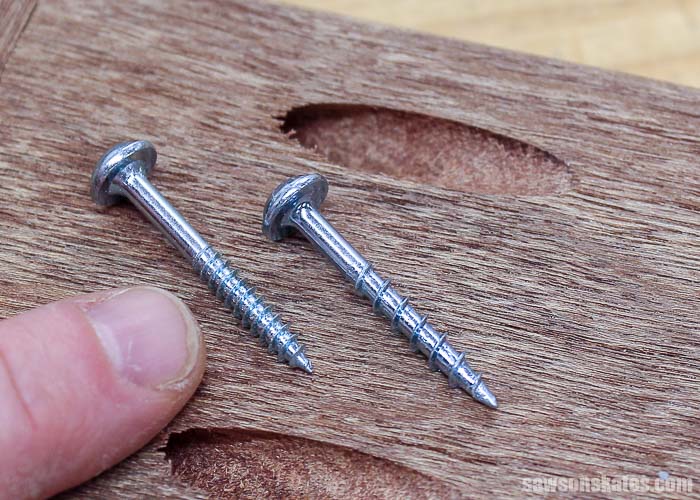
Pocket screws are available in two thread patterns. It’s important we choose the right thread pattern for the type of wood we’re working with.
Fine-thread pocket screws (left) are designed to be used with hardwoods like oak, maple, and poplar.
Coarse-thread pocket screws (right) are designed to be used with softwoods like pine, plywood, and MDF.
4. Drive Pocket Screws Slowly to Prevent Splitting the Wood
One of the things I love about pocket hole joinery is how quickly I’m able to build a project. Many times I can cut the parts, drill the pocket holes, attach the joints and have a project built in a weekend.
But we need to slow down when it comes to driving our pocket screws. Driving pocket screws too quickly can split the wood.
Plus, slowly driving pocket screws allows us to listen to the wood. We can prevent damaging our project when we drive pocket screws slowly because we can stop our drill if we begin to hear the wood cracking.
5. Overtightening Pocket Screws can Cause Wood to Split
Overtightening is another way pocket screws can split the wood of our project. Pocket screws are not like wood screws that need to be driven as tight as we can get them. We only need to tighten pocket screws until they’re just snug.
The way I avoid overtightening pocket screws is by setting the clutch on my drill. Setting the clutch stops the drill from driving the screw when it meets a certain amount of resistance.
Skate over to 9 Pocket Hole Mistakes You Don’t Want to Make to see how I set the clutch on my drill.
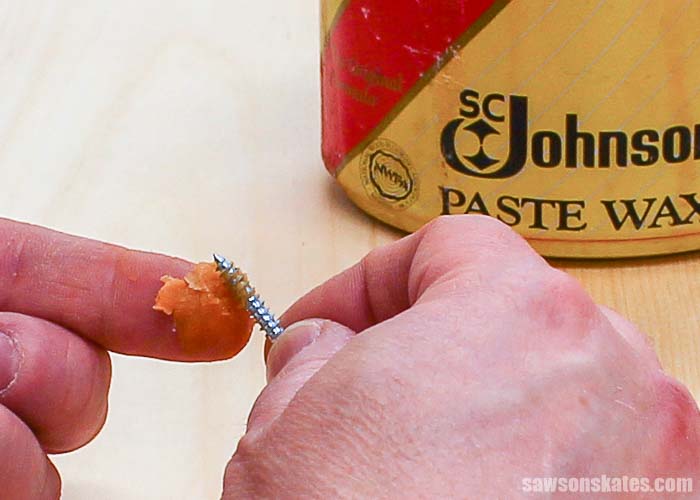
6. Friction from Pocket Screws Can Split the Wood
Pocket hole screws slice through the wood as we drive them into our workpiece. But there is a certain amount of heat and friction created as we drive those screws.
We can lubricate pocket screws to help reduce friction. Lubricating makes driving pocket screws easier, reduces heat and helps to prevent splitting the wood.
There are a few ways we can lubricate our pocket screws. I keep a few old candles in my workshop just for lubricating screws. The Johnson Paste Wax I use to reduce friction on my table saw can also be used on our pocket screws. Some DIYers use beeswax for lubricating screws.
7. Clamp Pocket Hole Joints to Prevent Splitting Wood
Driving a pocket screw into a workpiece creates an outward force on that workpiece. This outward force can split the wood.
One of the ways we can control the outward force is by using face clamps. The manual for my Kreg K5 says “Firm clamping pressure forces the screw to slice through the wood instead of splitting it apart.”
I ran into this issue recently when I was joining some Douglas Fir. I had never worked with Douglas Fir so I first made a couple of test pieces. The wood was splitting even though I was using the right pocket screws and driving the screws slowly.
On my next round of test pieces, I lubricated the screws and placed a face clamp on the joint line. This time I drove the pocket screws and the wood did not split.
FREE Pocket Hole Mistakes Guide
Master your pocket hole projects with this FREE ten-page Pocket Hole Mistakes You Don’t Want to Make Guide! The guide is overflowing with useful hints and easy tips to help you avoid time-consuming mistakes. Click below, get your FREE guide, and tackle your next pocket hole project with confidence!

Final Thoughts
Pocket screws can sometimes split the wood of our DIY projects. There are a few things we need to remember when using pocket holes and pocket screws.
Some woods, like oak, are more likely to split when driving a pocket screw. Dry wood or wood with a low moisture content can also split more easily. These 7 tips and tricks will help us prevent splitting wood when driving pocket screws.
Thank you for stopping by. If you found this information helpful, would you please pin it to Pinterest? Other DIYers would appreciate it and I would too! Thank you – Scott

Hi there – I’m Scott, a woodworking enthusiast and creator of Saws on Skates, a site I started in 2015 to share easy-to-follow tutorials, space-saving shop tips, and project inspiration for DIYers at any skill level. Learn more about my woodworking journey here.
My biggest problem in using pocket screws is holding and keeping the driving bit at the right angle when driving the screws into the pocket. Do you have any tips for keeping your driver at the correct angle?
Hi Larry – Thank you for stopping by. I’ve noticed that I have an issue keeping the bit at the correct angle when I use a 3” driver bit. The bit is short and sometimes the drill rubs against the workpiece.
I like to use a 6” driver bit when driving pocket screws. This longer bit allows me to keep the bit at the correct angle and the drill doesn’t rub against the workpiece.
6” square driver bits are available at big box home improvement stores and online.
I use the 6″ bits exclusively but I still have the problem. Thinking of cutting a guide from a 2x scrap at the proper angle (15° I believe) with a groove routed in the angled edge for the shaft of the bit to ride in. Will give that a try a report back.
This is an interesting problem. I’ve driven literally thousands of pocket screws with the 6″ driver and not had an issue with keeping the bit at the correct angle. I’d like to figure this out because you shouldn’t need an auxiliary guide to drive the pocket screws.
Are you able to drive the screw, but the bit is just not at the correct angle? Or are you not able to drive the screw at all? Which pocket hole jig are you using and what thickness material are you working with?
Also, can you send me some pics of the way you set up the drill guide, the way set up the drill bit stop collar and pic of the way the drill bit is not at the correct angle in the pocket hole?
When driving the screw into the pocket hole, the bit has to be held at both the more-or-less correct angle as well as held straight in line in relation to the screw’s pre-drilled hole. Holding the driver so both of these two factors can be maintained can sometimes be a little difficult to achieve. Since my original post I have found several DIY pocket hole jig videos on YouTube (particularly this one below). The driver bit will fit perfectly If the guide hole that is drilled in this DIY jig is reduced to 1/4″ (or 6.35mm). Slide this DIY jig over the bit’s shaft and firmly seat the bit in the screw’s head. Now slide the jig down to the work piece and hold it in place either by hand or preferably with a clamp and drive the screw home. I have made one of these and it works great!
BTW, I glued some sandpaper to bottom to help keep it from sliding around.
Sorry to keep adding to this, but there are two more things to point out. The tube sleeve shown in the video is not needed if you are making this as a drill guide,and the exit hole on the bottom will have to be a scootch larger to accommodate the screw’s head.