How to Attach a Table Top to a Base (The Right Way)
Wood table tops can crack if they’re attached the wrong way. Learn how to attach a table top the right way to a base with table top fasteners.
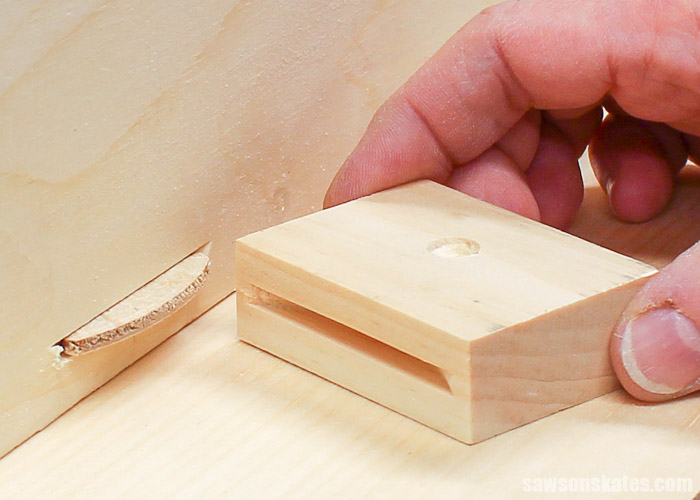
Table top fasteners are an easy way to attach a top to a table. But there’s another reason to use figure 8 fasteners, kerf fasteners, expansion brackets, or DIY table top fasteners. They allow for movement caused by seasonal changes.
A wood table top attached without allowing for movement can cause the wood to crack or split over time. Table top fasteners will enable the top to move throughout the seasons. Allowing the top to move will help prevent cracking and ensure your DIY table top will be beautiful for years to come.
Related: DIY Farmhouse Table Top Plans (with Breadboard Ends)
This tutorial contains affiliate links to supplies and tools. Purchases made using these links help support the Saws on Skates website and allows me to share more projects and tips with you. There is no cost to you for using these links. Visit my site policies for more information.
It’s important to have an understanding of wood when building DIY furniture projects. Not just how to cut and assemble with wood but also to understand how it works. In Mistakes with Wood Can Cause Your DIY Furniture to Crack, we talked about how wood is hygroscopic. Simply put, hygroscopic means it absorbs moisture from the air. Seasonal changes cause wood to absorb and release moisture.
This continuous absorption and release of moisture causes the wood to swell and shrink. This swelling and shrinking causes the wood to move, and this movement causes issues. When it’s more humid, the moisture in the air is absorbed, and the wood swells. The swelling actually has enough force to push and pull joints apart. Worse yet, if the wood is joined incorrectly, it can cause the wood to crack and split.
One of the most common projects to crack is a wood table top. Many times when building a table, the top is attached without taking wood movement into consideration. Recently I received a message from June, who wanted to learn more about the correct way to attach a table top:
Thank you so much for this great article! I would love if you could explain more in depth how to attach table tops and add illustrations – I had a hard time visualizing what you meant in your post about your apothecary cabinet and the screws/washers. I don’t have a router or biscuit joiner. Is it a lost cause until I have one of those?”
Thank you so much for reaching out and for the questions. I love hearing from you guys! And yes, absolutely, let’s look more closely at ways to attach a wood table top properly.
What Causes a Wood Table Top to Crack?
Before we look at the correct way to attach a wood table top, let’s look at the incorrect way to attach a table top. I’ve been guilty of incorrectly attaching a table top when building a table or even a stool.
Related: How to Make a DIY Step Stool
First, let me say I LOVE pocket hole joinery! There’s an entire resource center dedicated to Kreg Jig Tips and Tricks, and there’s even a page where you can ask your pocket hole questions. But pocket hole joinery is not the best solution to attach a table top.
Using pocket holes to attach a top to a base prevents the top from moving during seasonal changes. It’s also not a good idea to drive screws through the edge of the apron into the table top. Over time the top could crack, or the top could have enough force to push or pull the joints of the base apart.
Related: Mistakes with Wood Can Cause Your DIY Furniture to Crack
Table Top Fasteners Prevent Cracking
A better option for attaching a table top when building a table is to use store-bought table top fasteners or DIY table top fasteners. Table top fasteners securely attach a table top to a base but allows the top to move freely during seasonal changes.
Figure 8 Table Top Fasteners
One of the easiest options for attaching a table top to a furniture project is a figure 8 fastener. A Forstner bit is used to drill holes in the apron, and the figure 8 fastener is screwed to the apron. The top is then placed on the DIY table, and the top is attached with screws through the figure 8 fastener.
Need help installing figure 8 fasteners? My friend Vineta at The Handyman’s Daughter has you covered! Check out her step by step tutorial that explains exactly how to install a table top using these fasteners.

What Should I Build Next?
That's the question I help answer.
Every week, I send woodworking ideas to 17,000 DIYers who love building things.
You'd fit right in.
Photo credit: Amazon
Kerf Table Top Fasteners
Another option for attaching a table top to a furniture project is a “Z” fastener or kerf fastener. With this option, a groove is cut in the apron using the kerf or width of a table saw blade. Then the table top fastener is inserted into the groove and attached to the table top with a screw.

Photo credit: Amazon
Expansion Brackets
Expansion brackets are even simpler to install than figure 8 fasteners or kerf fasteners because you don’t need to drill a hole or cut a slot.
All you have to do is position the top on the base. Then use screws to attach the expansion bracket to the top and aprons.
I used expansion brackets to attach the top to the base of this nightstand.

Photo credit: Amazon
DIY Table Top Fasteners
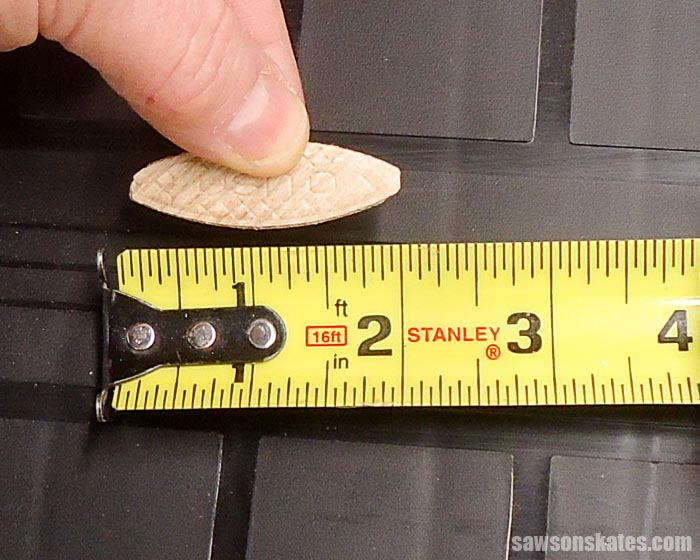
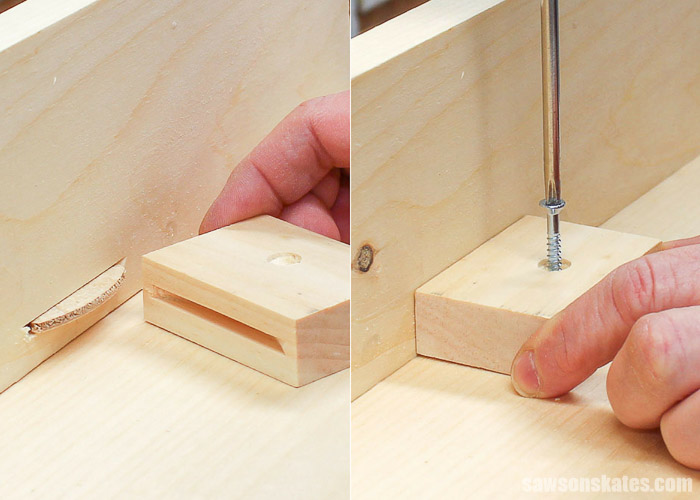
Using scrap wood and a plate joiner or biscuit joiner, you can make your own DIY table top fasteners. For this example, I used “0” biscuits. “0” biscuits are about 2” long.
The DIY fasteners need to be wider than the biscuit, so I made marks every 2-½” on a scrap piece of 1×2. Then drew lines using a Kreg Multi-Mark to make sections.
Related: Beginner’s Guide to Wood Sizes
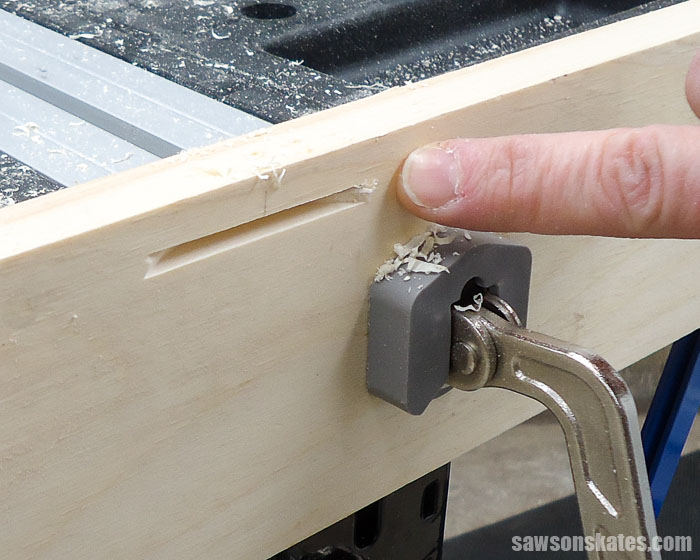
I placed the board on the Kreg Mobile Project Center and against the bench dogs. I used the biscuit joiner to cut slots in the middle of each section.
Using a miter saw, I cut the sections apart. It’s not critical that the DIY fasteners are the same width, so just use the lines you drew as a guide for cutting.
Related: 7 Miter Saw Tricks Every DIYer Should Know

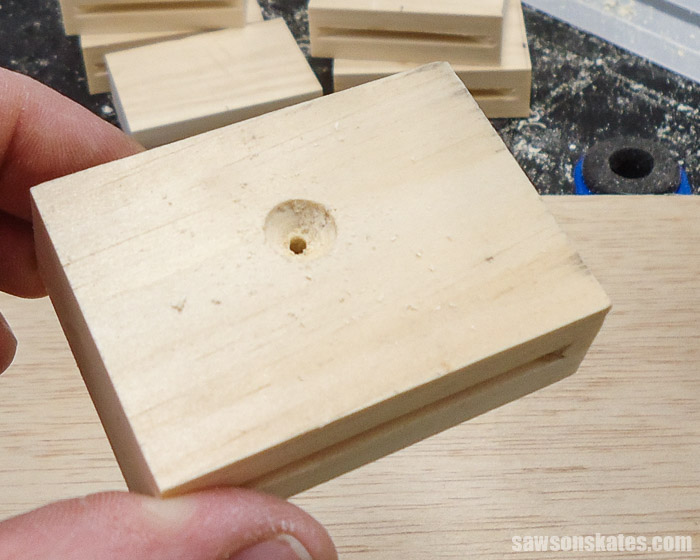
Use a countersink bit to drill a hole in each DIY fastener. Make sure not to drill through the biscuit slot.
Related: How to Use a Countersink Bit
Next, cut biscuit slots around the inside edge of the apron.
Place the apron on the table top, insert a biscuit and slide the DIY fastener over the biscuit. Do not apply glue to the biscuit. The biscuit is what allows the table top to move during seasonal changes. Attach the fastener with a wood screw.
How to Attach Tabletop with Screws
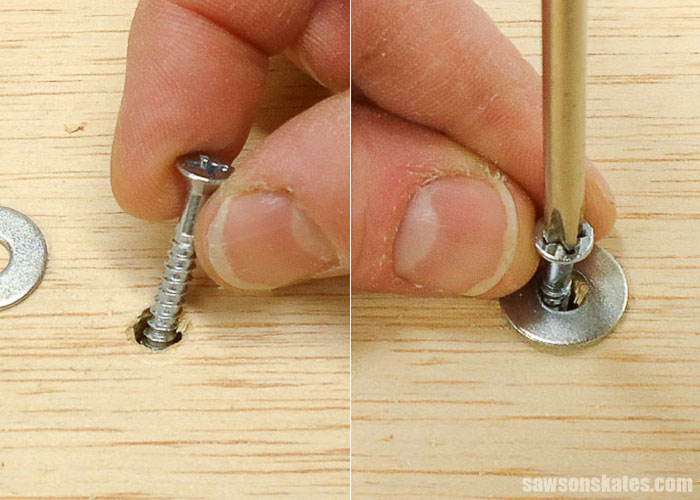
If it isn’t feasible to attach your table top to the base by the aprons, you can do what I did for the wine cabinet and apothecary cabinet. I drilled oversized holes in the top braces.
Then attached the table top to the base with washers and screws. The oversized holes allow the top to move freely, and the washers keep the screws from falling into the holes.
Where to Buy Table Top Fastners
Figure 8
Photo Credit: Amazon
Kerf Fasteners
Photo Credit: Amazon
Expansion Brackets
Photo Credit: Amazon
Final Thoughts
Attaching a wood table top without allowing for movement due to seasonal changes can cause the wood to crack over time. The best way to attach a table top is with table top fasteners. The fasteners allow the top to move throughout the seasons, help to prevent cracking and ensure your DIY table top will be beautiful for years to come.
Thank you for stopping by. If you found this information helpful, would you please pin it to Pinterest? Other DIYers would appreciate it and I would too! Thank you – Scott
Pin This For Later

Hi there – I’m Scott, a woodworking enthusiast and creator of Saws on Skates, a site I started in 2015 to share easy-to-follow tutorials, space-saving shop tips, and project inspiration for DIYers at any skill level. Learn more about my woodworking journey here.
Liked you ideas of a biscuit or figure “8” fastner The idea is that you want the table top to float on the apron or cabinet body. The above methods require a good amount of equipment and investment What about installing angle brackets with screws, it’s less costly.
I’m a semi-retired sheet metal fabricator who acquired my father’s wood shop including Delta Industrial Machinery from the early ’50’s
Hey Mark – The issue I see with angle brackets is they would still “lock” the table top in a fixed position on the apron. This would limit or restrict the top from expanding/shrinking during seasonal changes which could cause the top to crack.
I love vintage woodworking machines! Your dad’s workshop sounds awesome!
If you stick that block beside the apron are you not allowing the top to expand width wise at that point? Should there not be a gap between the block and the side rail/apron?
Hi Mitchell – Thank you for the heads up… I thought I mentioned that in that in the post, but you’re right, I didn’t. Yes, wood expands across its width, so in order to allow for expansion/contraction there should be a small gap where the edges of the boards meet the apron. You don’t need a gap where the ends of the board meet the apron because wood doesn’t really expand/contract in this direction.
Thanks for your extensive coverage on this topic. The follow up article could be allowing for movement when building plank doors
SO you say to leave a small gap between the small board with the biscuit slot and the apron. What is a small gap? 1/16″, 1/4″ or does that depend on the width of the boards used to make the table top and how many boards are in the table top.
Hi Kelly – Thank you for stopping by. I usually leave about 1/16″ to 1/8″ gap.
Will installing a fastener on each board prevent them from cupping?
Hi Linwood – Thank you for stopping by. Installing table top fasteners won’t prevent boards from cupping. You may want to check out my Need to Know Pocket Hole Tips for Edge Joints because there are few tips for dealing with cupping in that post.
Why not just seal all sides/edges of the top to reduce expansion/contraction? I’m building a console cabinet and I have stained the top on all sides and put poly on all sides/edges. I’ve always heard that doors would not swell up if contractors painted/sealed the top and bottom edges. What are your thoughts on this, or experience with this? Thanks!
Hi Sue – Sealing all sides will help reduce the movement, but it will not stop the wood from moving altogether.