7 Tips for Using a Pocket Hole Jig with Hardwoods
Sometimes hardwoods can crack when using a pocket hole jig. Proper spacing, using the correct pocket screws, and lubricating the screws can prevent cracking.
You may also enjoy these 9 Solutions to Common Pocket Hole Problems.
Recently I received a few questions about joining hardwoods with pocket hole joinery. Using pocket holes with hardwoods requires a little different approach because sometimes the wood can crack.
Paul: I have two pieces of 2″ thick x 12” wide x 32″ long maple that I want to attach together to make a 24″ [wide] board. I do not know what… type of screw to use. I would appreciate any help.”
Sean: I’ve been using the micro pocket hole jig to drill into 1/2″ oak. These pieces tie into another 1/2″ oak piece but every time the screws have either cracked the second piece or not gone in far enough and wobbled to the point where the two boards aren’t even attached. I set both the guide and drill depth to 1/2″ and am using 1″ fine thread pan head pocket hole screws. Not really sure what I’m doing wrong here. Any advice would be greatly appreciated!”
I checked in with my friend Mike from Kreg Tool for some advice about using a pocket jig with hardwoods. Today we’re sharing some helpful tips for working with pocket holes and hardwoods.
This post contains affiliate links to supplies or tools I used to complete this project. Purchases made using these links help support the Saws on Skates website and allow me to share more DIY projects. and DIY tips with you. There is no cost to you for using these links. Click here to visit my site policies.
Softwoods vs Hardwoods
Let’s look at the differences between softwoods and hardwoods before we look at some pocket hole tips for working with hardwoods. For the official definition of hardwoods and softwoods, I skated over to the Types of Wood page of the Hardwood Manufacturers Association website.
Softwoods
The Hardwood Manufacturers Association website defines softwoods as “cone-bearing” trees that have needles rather than leaves. Softwoods we may commonly work with are pine and cedar.
Softwoods are, well, soft. They are easily dented. In fact, a softwood will actually dent if we push our fingernail into it.
Hardwoods
The Hardwood Manufacturers Association website defines hardwoods as “deciduous trees that have broad leaves, produce a fruit or nut and generally go dormant in the winter.” Hardwoods we may normally work with are oak, maple, and poplar.
As we might expect hardwoods are much harder than softwoods. They are not easily dented. It would be difficult to make a dent in the surface if we tried to push our fingernail into a hardwood.
7 Tips for Using a Pocket Hole Jig with Hardwoods
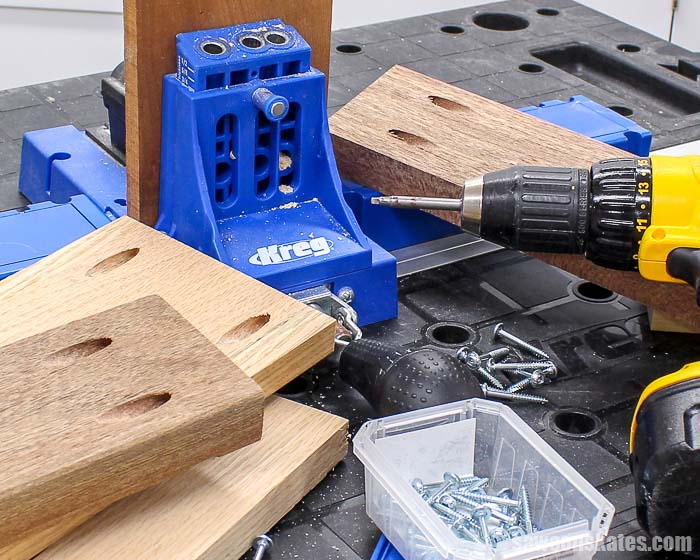
1. Use Proper Spacing for Pocket Holes
When joining hardwoods or even softwoods we need to properly position the pocket holes on the workpiece otherwise we could crack the wood.
Mike at Kreg Tool says hardwoods like oak are “notorious for cracking near the edges and ends of boards.” Oak is hard and strong, but Mike says “the grain structure is very large and open so when you penetrate it with a screw it can easily crack.”
Butt Joints
A butt joint joins the end of one piece of wood to the edge of another piece of wood. Common uses for butt joints are frames for side assemblies and doors.
I like to position pocket holes at least ¾” from the edge of the board when making butt joints.
Edge Joints
An edge joint joins the edge of one piece of wood to the edge of another piece of wood.
When we talked to Mike in a previous post about edge joining he recommended setting the pocket holes about 2″ from the ends of a board. Mike also recommends spacing pocket holes approximately 6″ apart along the edge of a board.
Skate over to Need to Know Pocket Hole Tips for Edge Joints for more edge joining tips and tricks.
2. Use Glue for Assembling Pocket Hole Joints
Pocket hole joints don’t require glue, but one of the recommendations I shared in the 9 Pocket Hole Mistakes You Don’t Want to Make post is to use glue when assembling pocket hole joints.
When a pocket screw is driven through the angled pocket hole it draws the two workpieces tightly together. The pocket holes make a strong joint, but it doesn’t take into account the wood itself.
Seasonal Changes
One reason I use wood glue when assembling pocket hole joints is because of seasonal changes. Seasonal changes can cause wood to swell and shrink depending on the amount of humidity in the air.
I noticed an issue with the edge joints on the top of my DIY air conditioner dresser. I built the dresser in the summer when it was humid, but I didn’t edge glue the top pieces. The top looked great in the summer, but in the cooler months, the joints of the top just ever so slightly pulled away from each other. Also, the edge of one of the pieces even started to slightly curl up.
Adding glue to these joints would have locked the pieces of the wood together and prevented the edges from curling up.
Stronger Joint
The second reason I add glue to pocket hole joints is that in my opinion, it creates an even stronger joint. Try this experiment. Drill a pocket hole in two different pieces of wood. Attach one pocket hole to another workpiece without using glue and the other pocket hole to another workpiece using glue then wait for the glue to dry.
Now let’s take the joints apart. The joint assembled without glue comes right apart. The joint assembled with glue actually needs to be broken apart. I don’t have any hard science to back this up, but my observation is pocket hole joints assembled with glue appear to be stronger than those assembled without glue.
3. Use Pocket Screws for Assembling Pocket Hole Joints
Pocket screws![]() are designed differently than a typical wood screw. Pocket screws (left) have threads only on the lower portion of the shank and the upper portion is not threaded. Wood screws (right) have threads along almost the entire length of the shank.
are designed differently than a typical wood screw. Pocket screws (left) have threads only on the lower portion of the shank and the upper portion is not threaded. Wood screws (right) have threads along almost the entire length of the shank.
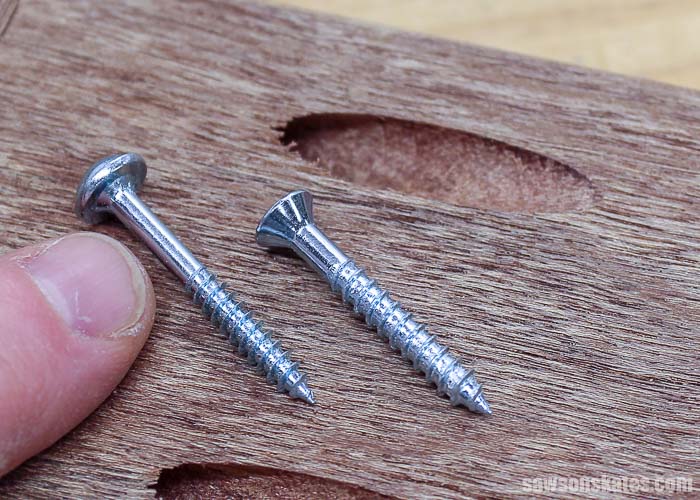
The design of a pocket screw allows it to slide through the pocket hole and drive into the other workpiece which pulls the joint tightly together.
The threads of a wood screw won’t allow the screw to slide through the pocket hole which may not pull the workpieces tightly together. Using a wood screw in a pocket hole could cause loose-fitting joints or even worse a wood screw could crack the board.
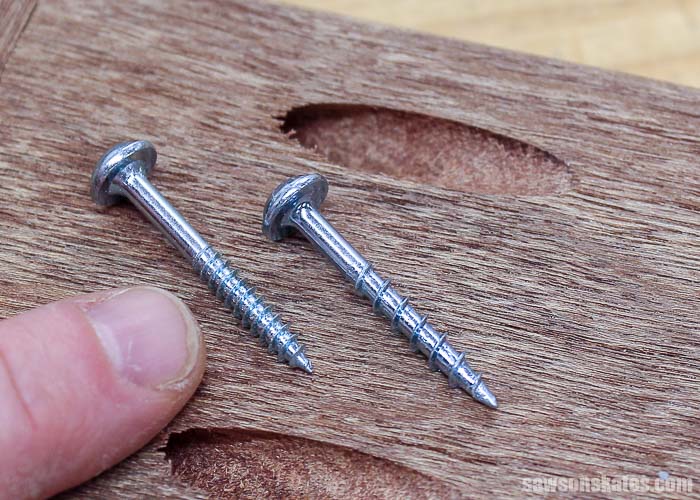
Fine-Thread vs Coarse-Thread Pocket Screws
Pocket screws are available in fine-thread (left) and coarse-thread (right). Fine-thread pocket screws are designed to be used with hardwoods like oak, maple, and poplar. Coarse-thread pocket screws are designed to be used with softwoods like pine and cedar.
I asked Mike at Kreg Tool for his thoughts about Sean’s problem with his loose-fitting joints and cracked oak. Mike said: “My first thought is to make sure [he] is using fine-thread screws and the appropriate size.”
4. Some Pocket Hole Assemblies May Require Predrilling
Speaking off the record Mike said that it could be helpful to predrill some pocket hole assemblies in hardwoods. He said we may want to “drill the pocket hole and then drill a pilot hole with a long [drill] bit” into the second workpiece.
Mike says drilling a pilot hole in the second workpiece “will remove just enough material to help alleviate some of the outward force of driving a screw” and help to prevent cracking the hardwood.
Related: How to Drill Pilot Holes (Why, When & Correct Size)
Thick Hardwoods
One assembly Mike tells me could benefit from predrilling is when joining thick material like Paul’s project. Paul wants to edge join 2” thick maple. We need to use a 2-½” pocket screw to join projects thicker than 1-½”.
Mike said all of the Kreg pocket screws 2” and longer are only available in coarse-thread. Using a coarse-thread screw in a hardwood pocket hole could crack the board.
Following Mike’s suggestion, we could predrill the second workpiece. With the second workpiece predrilled we can use a 2-½” coarse-thread pocket screw to join the hardwoods.
Thin Hardwoods
Mike tells me thin hardwoods, like Sean’s project, could benefit from predrilling too. Sean is trying to join ½” oak but he either ends up with loose-fitting joints or the wood cracks. Mike says when working with delicate joints like ½” oak that “it’s good to pilot the hole as well.”
For Sean’s project, Mike suggested using a 1/16” or 3/32” drill bit to predrill the second workpiece. Mike cautioned us when using these small bits. He said, “You do need to be careful drilling with such a thin bit while holding the pocket hole angle because you can easily break those bits off in the hole.”
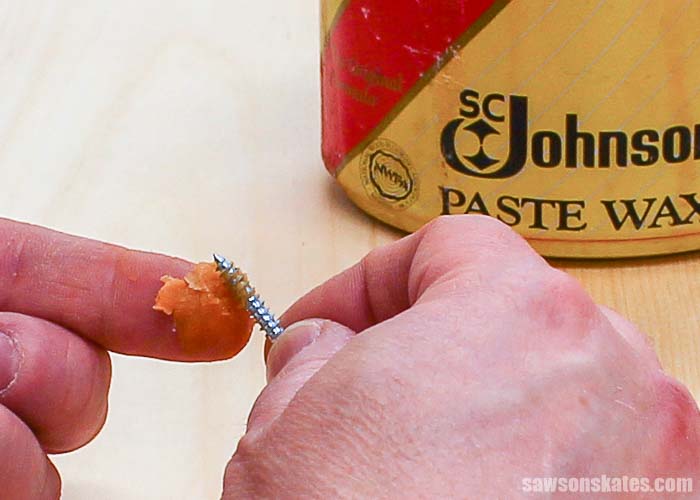
5. Lubricate Pocket Screws When Assembling Hardwood Projects
Predrilling is one way to help prevent cracking when using pocket holes with hardwoods. Lubricating pocket screws is another way to prevent cracking hardwoods.
Lubricating makes driving pocket screws easier and reduces heat. Mike says using “wax is always a good technique” to help prevent cracking.
What can we use to lubricate pocket screws? I keep a few old candles in my workshop just for lubricating screws. Mike told me he uses Johnson Paste Wax to lubricate screws for his projects. Johnson Paste Wax is the wax I use on my table saw.
6. Go Slow When Driving Pocket Screws
Mike said “It’s not a guarantee” but it can help if you “slow down and do a little prep on each pocket hole.”
Remembering to slow down is a really important point when joining hardwoods or softwoods with pocket holes. DIY is not a race. We don’t need to drive the screws into the wood like we’re a pit crew changing a tire in a NASCAR race!
All we need to do is drive the screw into the wood at a moderate speed. By driving the pocket screw slowly we can listen and stop if we begin to hear a cracking noise.
7. Don’t Overtighten Pocket Screws
Overtightening pocket screws can strip the pocket hole which can create a loose joint. Overtightening pocket screws could even drive the screw through the other workpiece. Or worse yet, overtightening pocket screws could even crack the wood.
I set the clutch on my drill to avoid overtightening pocket screws. Setting the clutch prevents the drill from driving the screws any further when the drill meets a certain amount of resistance. This prevents overtightening which helps to avoid cracking the wood.
FREE Pocket Hole Mistakes Guide
Master your pocket hole projects with this FREE ten-page Pocket Hole Mistakes You Don’t Want to Make Guide! The guide is overflowing with useful hints and easy tips to help you avoid time-consuming mistakes. Click below, get your FREE guide, and tackle your next pocket hole project with confidence!

Final Thoughts
Sometimes hardwoods can crack when using a pocket hole jig. Properly spacing the pocket holes from the end of the board, using fine-thread pocket screws, predrilling and lubricating the screws can all help to prevent cracking the wood.
Thank you for stopping by. If you found this information helpful, would you please pin it to Pinterest? Other DIYers would appreciate it and I would too! Thank you – Scott

Hi there – I’m Scott, a woodworking enthusiast and creator of Saws on Skates, a site I started in 2015 to share easy-to-follow tutorials, space-saving shop tips, and project inspiration for DIYers at any skill level. Learn more about my woodworking journey here.
Scott,
Great tips. What clutch setting would you recommend to avoid overtightening pocket hole screws.
Thanks,
Ted
Hi Ted – My DeWALT cordless drill works well on “3” for driving pocket screws. I would recommend trying your drill on some test pieces to be sure this setting works well for your drill.
Scott, I have really enjoyed multiple of your pocket hole postings. I am repurposing an entertainment center from the 70’s into a table. The shelves (3x ~60″x15″) are going to be the table top that I am trying to edge join. The wood is believed to be pine and I’m running into two problems 1) the thickness is 1 1/4″ making my mini keg jig somewhat difficult to use. I’ve ended up spacing 5/8″ from edge with ~ 4 1/8″ on the stop. 2)The larger problem is that the wood seems to be too hard for the drill bit. I’ve tried it one regular 2×4 and it all works so I’m wondering what I can do to get these pocket holes. Any guidance would be appreciated
P.s. all other parts of the entertainment center (support struts, other shelves) have been used to make a couple bedside tables without problems.
Hi Adam – Thank you for stopping by. It’s really strange that the bit is struggling to drill through the top piece. Especially since you mention that the bit drills easily through other types of wood. This is probably a silly question but are you positive that the top is made of wood? I’ve often seen furniture where the top is made out of some type of composite. Some pieces of furniture have a Formica top with a very realistic looking wood grain pattern. I’m wondering if that might be the case with your top?
Another tip for hardwoods: Drill the screw in BY HAND, nice and slowly. Use a Robertson Red Handle screwdriver (on which the Kreg screws are based and any Canadian woodworker has) or use a handle that fits onto the hexagonal end of the Kreg scredriver.