How to Build DIY Interior Doors
Learn how to make DIY interior doors! These free plans show how to build an interior door with your Kreg Jig. Easy to customize for any size door opening.
DIY Interior Doors
Can you make your own DIY interior doors? Yes, and it’s simpler than you think! This easy to follow tutorial shows how to build a solid wood interior door. The construction is straightforward thanks to pocket hole joinery.
For your convenience, this post contains affiliate links to supplies or tools I used to complete this project. Purchases made using these links help support the Saws on Skates website and allow me to share more DIY projects. and DIY tips with you. There is no cost to you for using these links. Click here to visit my site policies.
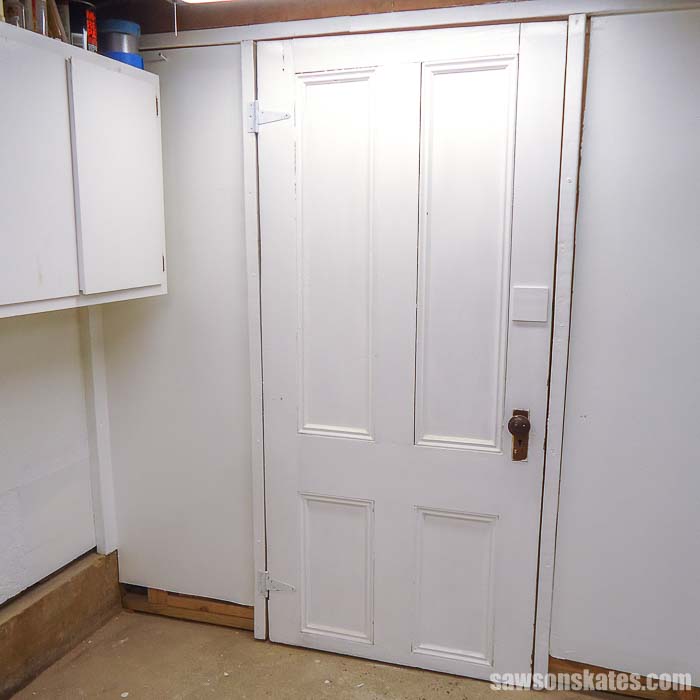
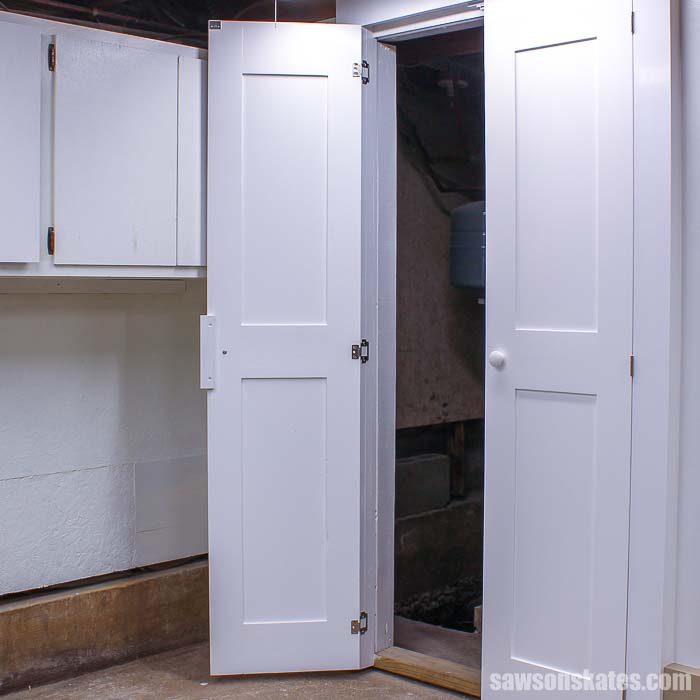
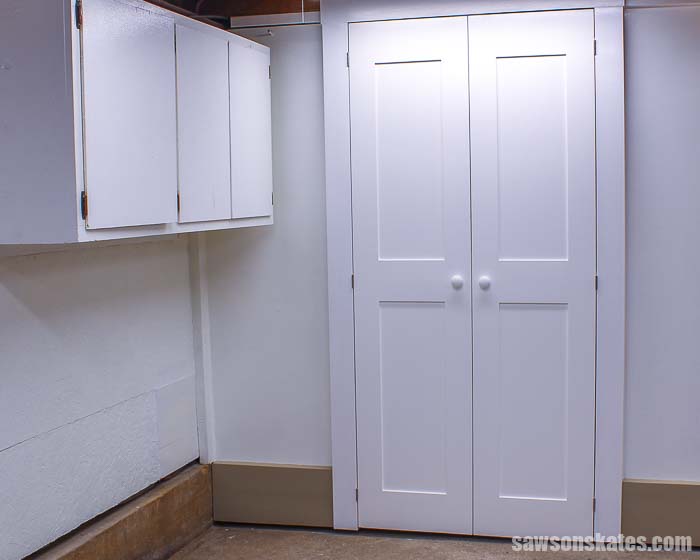
The door in my workshop was a DISASTER. It was difficult to close and it scraped against the floor as it was opening. Plus, it took up a lot of space in my shop when it was opened. But worst of all the design of the door made my small workshop feel even smaller than necessary. I’ve wanted to make a door for my shop ever since I published the 9 Ways to Make Your Small Workshop Feel Bigger post.
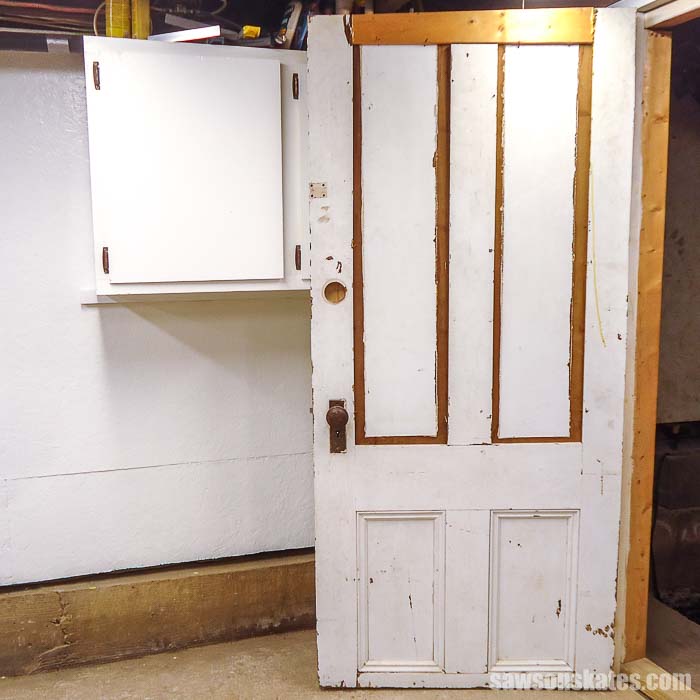
Just look at what that clunky door was doing to my small workshop. The design of the panels made the door feel short and squatty which made the already low workshop ceiling feel like it was crashing on my head. And the trim felt skimpy and like it could barely frame the door.
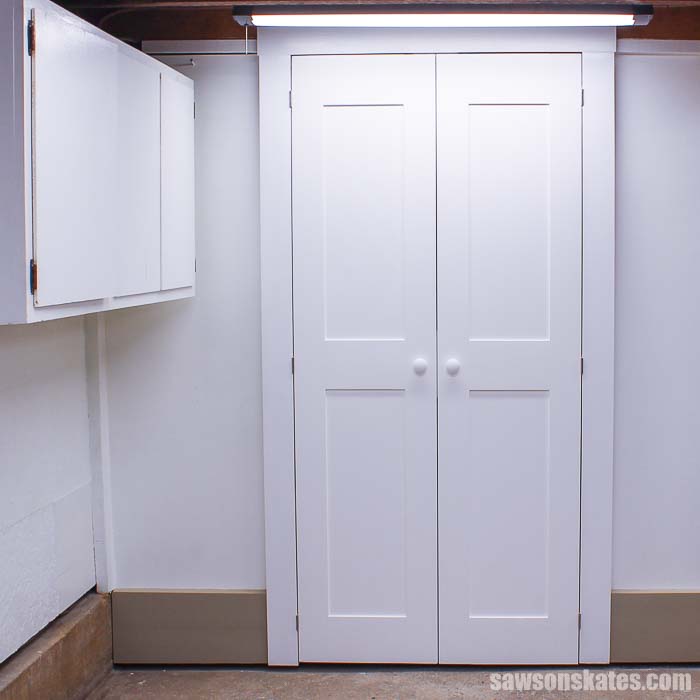
I wanted to make my own DIY interior doors that would address all of these problems. First, instead of one single door, my new design would feature two narrower doors. This means the doors would take up less space when they were in the open position.
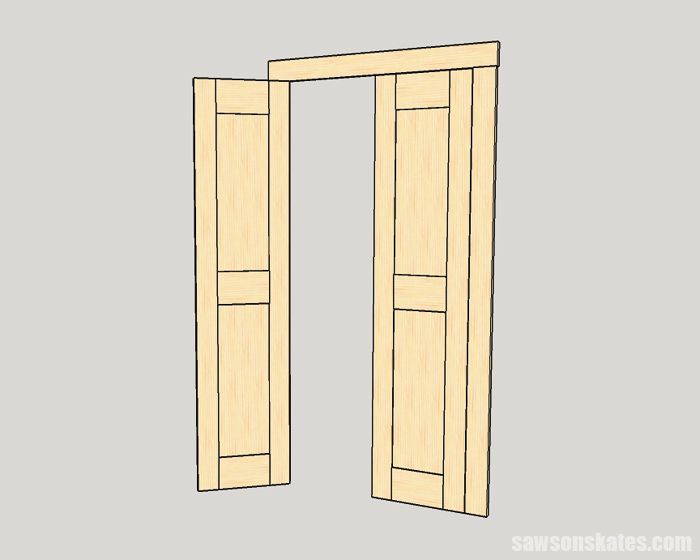
Second, I wanted to make a door with two long vertical panels. These tall DIY paneled doors would give the illusion of height and make the short wall (and low ceiling) feel taller.
Third, the skimpy trim would be replaced with appropriate sized trim. The trim would properly frame the doors and make my space feel finished. All of these design elements would contribute to making the small workshop feel bigger.
Frame-and-Panel Style DIY Interior Doors
I wanted my interior doors to have the classic look of frame-and-panel construction. I’m a HUGE FAN of this style. This bathroom vanity, air conditioner dresser, and fireplace mantel were all designed with this look.
Recently I built tool storage cabinets with Shaker style cabinet doors that match the look of these DIY paneled doors.
Just as the name suggests a frame-and-panel is, well, a panel surrounded by a frame. The panel floats in a groove routed into the frame which allows the panel to swell and shrink with seasonal changes.
Typically the frame would be constructed with mortise and tenon joinery. In the How to Setup and Use a Kreg Jig for DIY Projects post we talked about the definition of a mortise and tenon joinery. “A tenon, or tongue, would be cut at the end of a piece of wood (usually called a rail). The tenon would fit inside a mortise, a hole cut inside a piece of wood (usually called a stile) that matched the profile of the tenon. Add a little glue and mortise and tenon joint formed a very strong connection. While this joint provides for a strong joint, it does take some time to form the mortise and tenon before assembly.”
In addition to being a big fan of the frame-and-panel look, I’m also a HUGE FAN of my Kreg Jig. So, these DIY paneled doors look like a typical frame-and-panel style door but instead of using mortise and tenon joints I used pocket hole joinery to build the door. Pocket holes make this a relatively quick project and fairly easy to build for most DIYers.
The DIY Paneled Doors Need a Groove
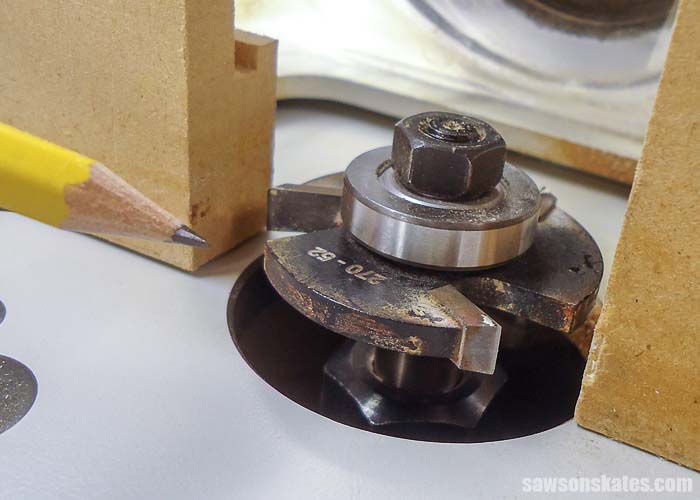
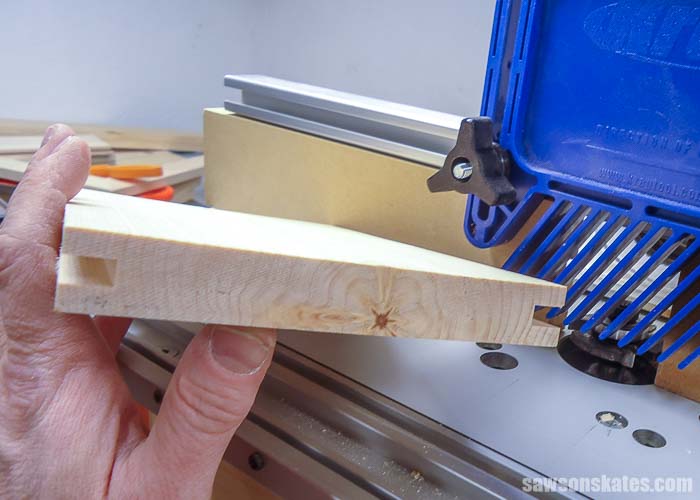
Just like a typical frame-and-panel style door these DIY paneled doors have a groove routed into the frame to receive the panel. The groove was made using a router, mounted in a router table and a slot cutting bit. The bit cuts a 1/4” wide slot and I selected a bearing that allows the bit to cut a 7/16” deep slot.
Related: How to Use a Router Table for Beginners
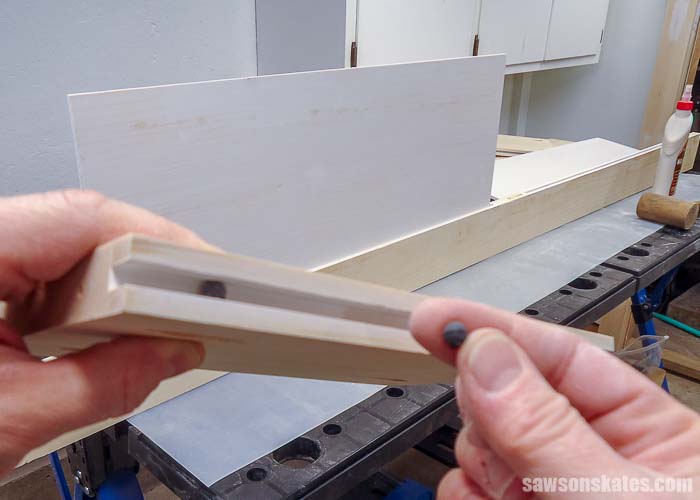
The panel is just shy of 1/4” thick so it can move or float with seasonal changes. The panel will be cut so that it will engage the groove by a 1/4”. If you’re doing some quick math you probably have figured out that leaves 3/16” of space remaining in the dado (7/16” deep dado less 1/4” of engagement from the panel leaves 3/16” of space remaining in the groove).
What will occupy the remaining space? Spacer balls! Spacer balls will hold the panel in place and the squishy consistency of the balls will allow the panel to expand and shrink with seasonal changes.
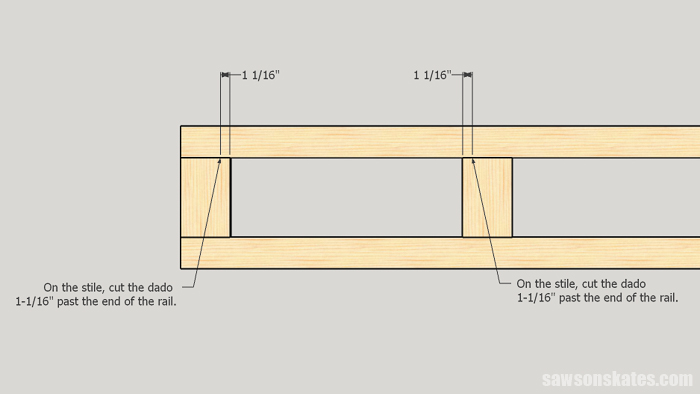
There is one drawback to the slot cutting bit and that is the bit leaves the end of the groove curved. This isn’t an issue on the rails because on the rails the groove goes all the way to each end.
But this is an issue on the stile where the stile meets the rail. I could have stopped the groove right at the intersection of the rail and stile and used a chisel to square the end of the groove. But instead, I chose to rout the grooves just slightly beyond the intersection of the rail, but not far enough to interfere with attaching the pocket hole screws.
Related: How to Build Shaker Cabinet Doors
These DIY Interior Doors Have Solid Wood Panels
I’m trying to reduce the amount of plywood I use in my DIY projects, so I didn’t want to use any plywood to make my doors. Instead of using plywood for the panels I made some solid wood book-matched panels just like I did for the DIY bathroom vanity.
To make the panels I used my bandsaw to resaw some pieces of 1×6. Think of resawing as splitting a piece of wood lengthwise and then opening it like a book. After resawing I was left with pieces that were about 3/8” thick.
I used my thickness planer mounted in my flip-top workbench cart to plane the panel sections until they easily fit in the grooves. Then I glued two sections to form the panels. When the glue was dry I cut the panels to fit the openings in the frames.
Skate over to How to Make a Book-Matched Panel for more details about making the panels.
Finishing the DIY Interior Doors
To help minimize the expanding and shrinking that happen with seasonal changes I primed the grooves and panels before assembling the DIY paneled doors. Once the doors were assembled I filled the pocket holes with pocket hole plugs, filled any holes with Ready Patch and sanded the doors smooth.
Next, I set up my HomeRight Spray Shelter and used my HomeRight Super Finish Max to spray the doors with primer. Then, to match the paint color of my small workshop I sprayed the doors with high gloss white. Skate over to How to Spray Paint Doors the Easy Way for door painting tips and tricks.
Skate over to see why I painted my workshop high gloss white and skate over to 9 Paint Sprayer Mistakes You Don’t Want to Make for more info about paint spraying and to grab your FREE paint mixing cheat sheet!
No Router? No Problem!
What if you want to make some doors, but you don’t have a router? I have an easy solution for you!
Recently, I collaborated with my friend Wendi from H2O Bungalow. We built two closet doors for one of her vacation rental properties.
Here’s what we did. We made the rails and stiles just as I described in this post, but we didn’t use a router to make any grooves. In other words, we left the rails and stiles solid.
And instead of ¼” panels, we made the panels from ½” plywood. Next, we drilled pocket holes around the edges of the panels. Then, we attached the panels to the frames with pocket screws.
Want to learn more? Watch Wendi’s video to see how we did it!
How to Make DIY Interior Doors
Printed Plan
- Click here to download the FREE plan (includes detailed instructions, measurements, and bonus tips)
Supplies
- (4) 1x4x8
- (2) 1x6x8
- 1/4″ Plywood (optional)
- Spacer Balls
- 1-1/4″ Pocket Screws
- Wood Glue
- Hinges
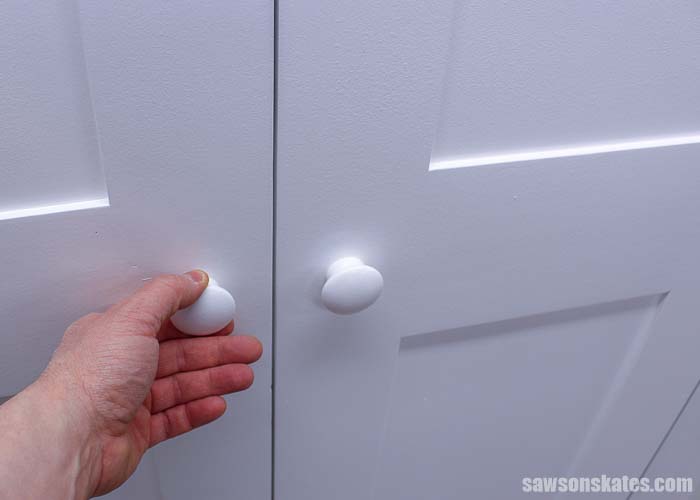
- Knobs
Tools
- Stanley FatMax Tape Measure
- Miter Saw
- Drill
- Kreg Jig
- Table Saw
- Bandsaw (optional)
- Thickness Planer (optional)
- Router
- Router Table
- Slot Cutting Router Bit
Step 1. Measure the Door Opening
Measure from side to side at the top and bottom of the door opening.
Measure from top to bottom on the left side and right side of the door opening.
Next, subtract 3/8” from the smallest side to side dimension. This will allow for a 1/8” clearance between the side of each door and the door opening. It will also allow for 1/8” clearance between the doors. Now, divide this measurement by 2. This will be the width of each door.
Next, subtract a 7/8” from the smallest top to bottom dimension. This will allow for 1/8” clearance at the top of the door and 3/4″ clearance at the bottom of the door.
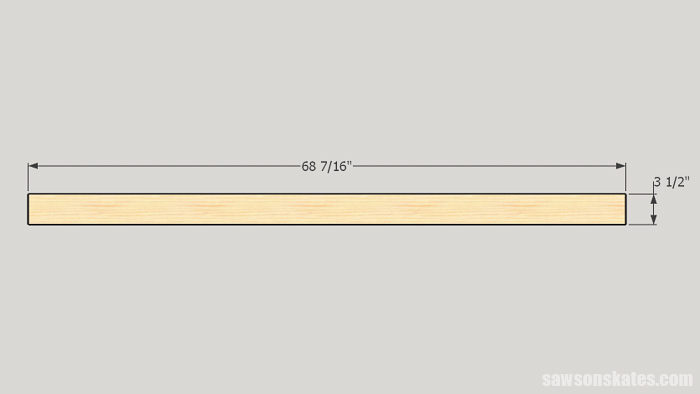
Step 2. Cut the Stiles
Cut 4 pieces of 1×4 to 68-7/16”.
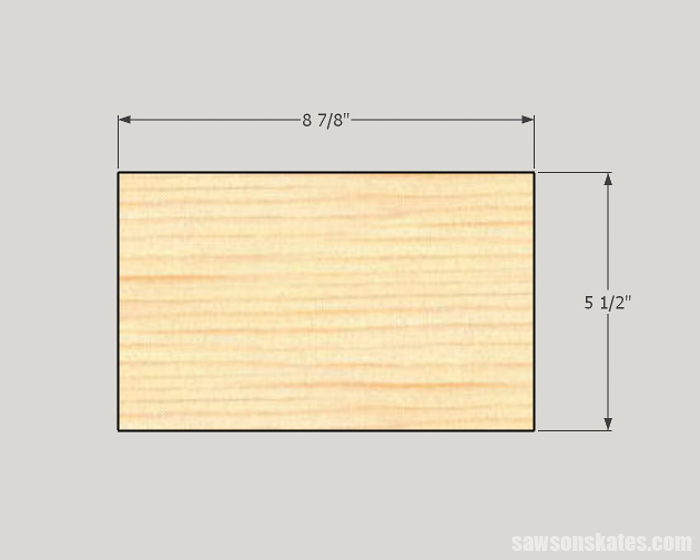
Step 3. Cut the Rails
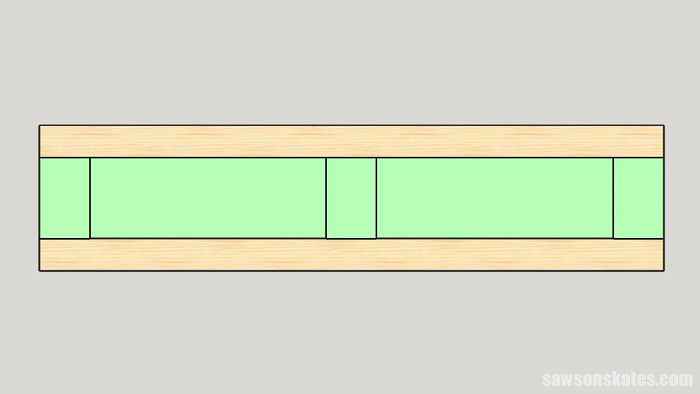
Cut 6 pieces of 1×6 to 8-7/8”.
Step 4. Layout the Location of the Grooves
Place the stiles and rails on your workbench.
Use a pencil to mark the intersection where each rail meets the stile.

The slot cutting bit leaves the end of the groove curved. The curve would prevent the dado from receiving the panel. In order for the groove to fully receive the panel, I continued the groove into the rail area 1-1/16″ (7/16″ for the dado plus 5/8″ to account for the curve = 1-1/16″). This will make the entire dado area square. From the mark, you made on the stiles measure 1-1/16″ into the rail area and make a mark. Rout the groove to this mark. The groove on the rails will be routed from end to end, so no additional marks are needed.
Step 5. Rout the Grooves
I set up a 1/4” slot cutting bit with a bearing that will allow the bit to make a 7/16” deep cut. Install the slot cutting bit in the router, and install the router in the router table. Adjust the bit so it’s centered from top to bottom on the edge of the workpieces and rout the grooves.
Related: How to Use a Router Table for Beginners
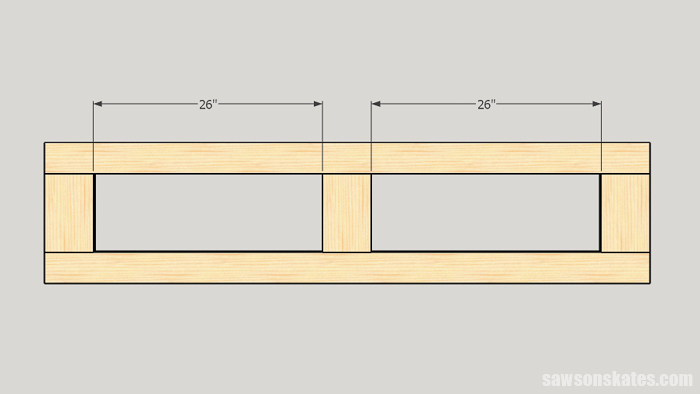
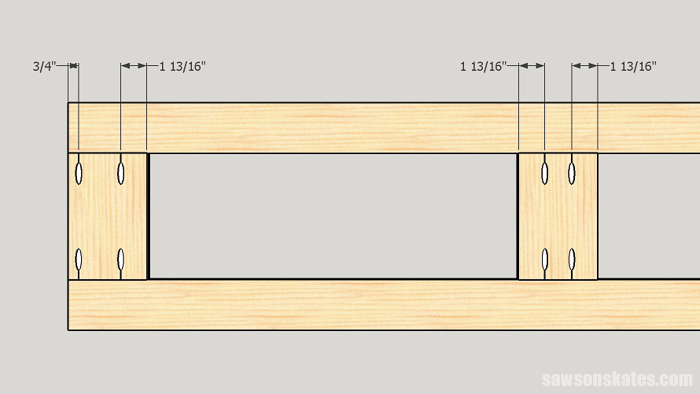
Step 6. Drill the Pocket Holes
Layout the locations of the pocket holes according to the sketch and drill the pocket holes.
Step 7. Make the Panels
Cut 4 pieces of 1×6 to 32”. Next, I used my bandsaw to resaw the 1x6s. Then, I planed the boards on the thickness planer until they fit easily in the grooves. Two pieces were glued and clamped to form a panel. Repeat for the remaining panels.
Optional: Use 1/4″ plywood instead of making your own panels.
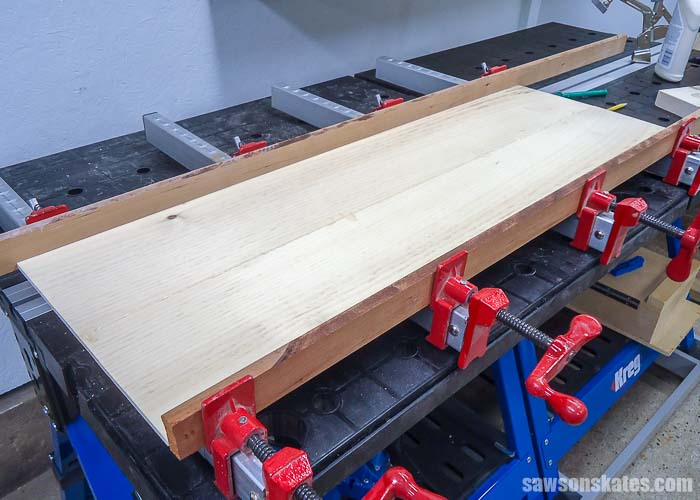
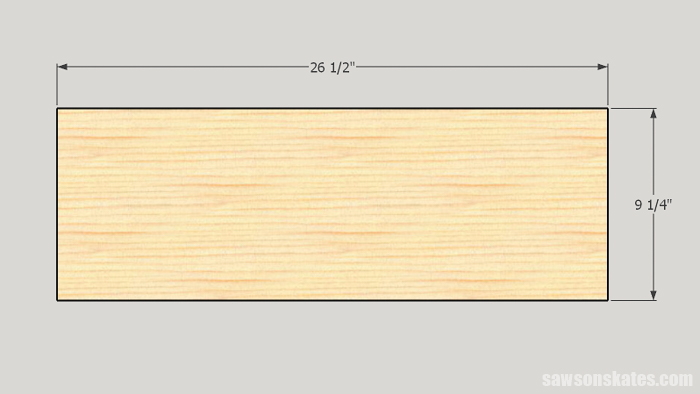
Once the glue was dry I ripped the panels to 9-1/4” and cut to 26-1/2”.
To help minimize the expanding and shrinking caused by seasonal changes I primed all of the edges and the faces of the panels and the grooves.
Step 8. Assemble the Doors
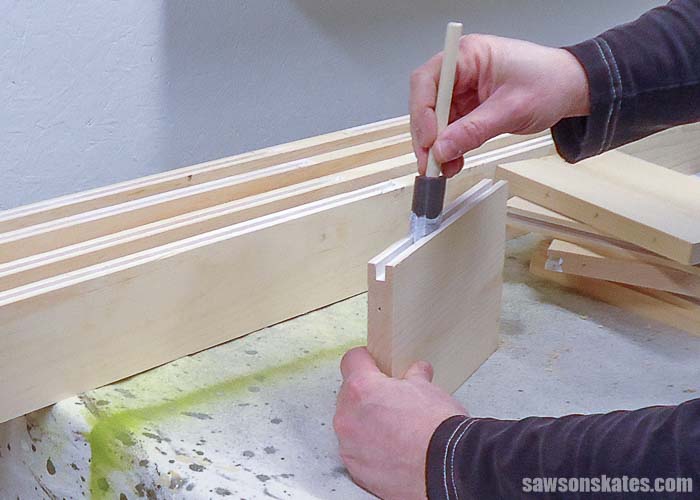
I installed two spacer balls in the rails and three spacer balls in each stile. Apply glue to the ends of the rails (do not apply glue in the grooves), insert the panels, clamp and attach using 1-1/4” pocket screws.
I used one pin nail at the top and bottom of each panel to keep the panel from shifting.
Step 9. Fill the Pocket Holes
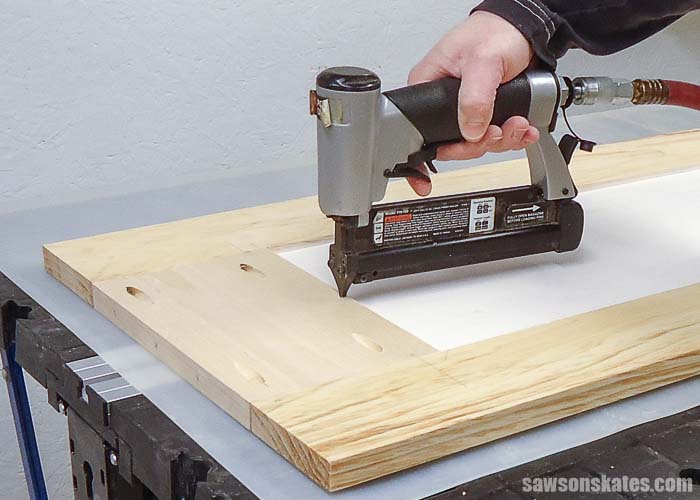
I used my pocket hole plug cutter to make pocket hole plugs. Apply glue to the pocket hole and insert the plug. Once the glue was dry I trimmed the plugs flush with a chisel.
Step 10. Finish the Doors
I filled any holes or gaps with Ready Patch and used my random orbit sander to sand the doors smooth. I used my HomeRight Super Finish Max to spray primer on the doors. Once the primer was dry I lightly sanded with 220 sandpaper.
To match the paint of my small workshop I used my HomeRight Super Finish Max to spray the doors with high gloss white paint.
When the paint was dry I attached the hinges and knobs according to the manufacturer’s directions and installed the doors in the door frame.
Related: How to Spray Paint Indoors Without Making a Mess
Final Thoughts
Can you make a DIY interior doors? Absolutely! And it’s simpler than you think! Plus, you can adjust the dimensions of this plan to make a door for just about any size door opening.
Thank you for stopping by. If you found this information helpful, would you please pin it to Pinterest? Other DIYers would appreciate it and I would too! Thank you – Scott
More Like This

Hi there – I’m Scott, a woodworking enthusiast and creator of Saws on Skates, a site I started in 2015 to share easy-to-follow tutorials, space-saving shop tips, and project inspiration for DIYers at any skill level. Learn more about my woodworking journey here.