How to Sand DIY Wood Furniture (Faster, Easier & Better Results)
Tired of endless sanding and swirl marks? Learn how to sand wood projects faster, easier, and with better results using these proven techniques.
Are you ready to take your sanding skills to the next level? Look no further. I’m sharing tips and techniques that will revolutionize your woodworking game, allowing you to sand wood faster, easier, and achieve better results. Say goodbye to frustrating swirl marks and never-ending sanding sessions, and hello to smooth, flawless results.
Originally published June 7, 2016, updated February, 12, 2024.
Table of Contents
- Before You Begin
- Sand as You Build
- Choosing the Right Sanding Tools
- Choosing the Right Sandpaper
- Prepare Your Workspace
- Sand With the Grain
- Light Your Workspace
- Don’t Play the Chase Game
- Don’t Skip a Grit
- Vacuum Between Grits
- Power Sanding
- Hand Sanding
This article contains affiliate links. If you purchase from these links, I may earn a small commission at no additional cost to you. Visit my site policies for more information.
Why is Sanding Wood Important?
Sanding wood might seem like a tedious step in the DIY furniture-making process, but it’s crucial for achieving long-lasting, professional-looking results. Skipping this step can lead to several problems, so let’s dive into why sanding wood is essential.
Related: Getting Started with Furniture Making (Tips for Success)
Creates a Smooth Surface:
Imagine trying to paint a bumpy wall – the texture would show through, and the finish wouldn’t be smooth. The same goes for wood. Sanding removes scratches, saw marks, and defects, creating a smooth canvas perfect for paint, stain, and top coats.
Sanding also helps you correct mistakes. Did you accidentally glue two pieces of wood slightly off-kilter? Sanding can help even out those imperfections, leaving behind a smooth surface.
Improves Adhesion:
Think of sanding as creating microscopic scratches on the wood’s surface. These tiny scratches provide:
- More “grip” for paint or sealer.
- Allowing them to bond better.
- Resulting in a durable finish that’s less likely to chip, peel, or crack.
Sanding also prepares wood for stain, opening its pores and allowing the wood stain to soak in.
Sanding Woes: Conquering Common Frustrations
While sanding is the gateway to a stunning finished woodworking project, it can also be a source of major frustration, such as swirls and uneven surfaces.
But fear not fellow do-it-yourselfers. I’m here to help you overcome the common sanding pitfalls, sharing techniques for a smoother, faster, and more enjoyable experience.
- What tools to use
- What sandpaper grit to use
- How to avoid swirl marks
Before You Begin
Sanding might seem like a simple task, but it can pose potential health risks, so it’s crucial to prioritize your safety and well-being:
- Fine dust: Wood dust can irritate lungs and trigger respiratory issues.
- Noise: Power sanders generate considerable noise, potentially damaging your hearing.
- Flying debris: Sawdust can be surprisingly painful when it gets in your eyes.
Wearing Personal Protective Equipment (PPE) is non-negotiable. Think of it as your superhero suit, giving you the power to conquer the wood without compromising your health.
1. Safety Glasses: Sanding throws up a whirlwind of tiny dust particles, posing a risk to your eyes. Wraparound safety glasses like these offer extra side protection.
2. Hearing Protection: Power sanders are loud and can damage your hearing over time. Earmuffs or earplugs are your best bet to protect against the noise
3. Dust Mask: This is the MVP of your PPE kit. Microscopic wood particles can damage your lungs, and dust from certain wood types can irritate them, causing respiratory problems. (For example, I’m allergic to cedar dust.) A proper dust mask or respirator (I use this one) is your defense against these invisible threats.
Wearing PPE might seem inconvenient (it’s my second least favorite part of sanding), but it’s a vital step in ensuring a safe experience. Remember, your health and well-being are your most valuable tools, so treat them with the respect they deserve.
1. Sand as You Build
Forget marathon sanding sessions at the end. My ultimate insider tip for achieving faster, easier, and better results in your DIY furniture projects is to sand as you build. It might sound counterintuitive, but trust me, this simple shift in approach can revolutionize your woodworking experience.
“Sand as you build” is a game-changer for any woodworker:
- Accessibility: Reaching tight corners is never an issue when pieces are separate. Sanding individual components allows you to focus on each surface effectively.
- Efficiency: It saves time in the long run. Tackling sanding throughout the construction process avoids the need for a dedicated sanding marathon at the end, which can be tedious and time-consuming.
- Precision: Sanding individual pieces increases accuracy, especially on complex shapes or areas with intricate joinery.
- Quality control: Addressing imperfections as they arise prevents them from compounding and causing bigger problems later.
Additional benefit:
- Mental satisfaction: Seeing progress throughout the build motivates you, allowing you to appreciate the details as they come together.
2. Choosing the Right Sanding Tools
Before diving into the gritty sanding world, let’s ensure you’re equipped for success. Here’s the checklist of essential tools I use to get my DIY furniture project off to a smooth start:
Random Orbital Sander
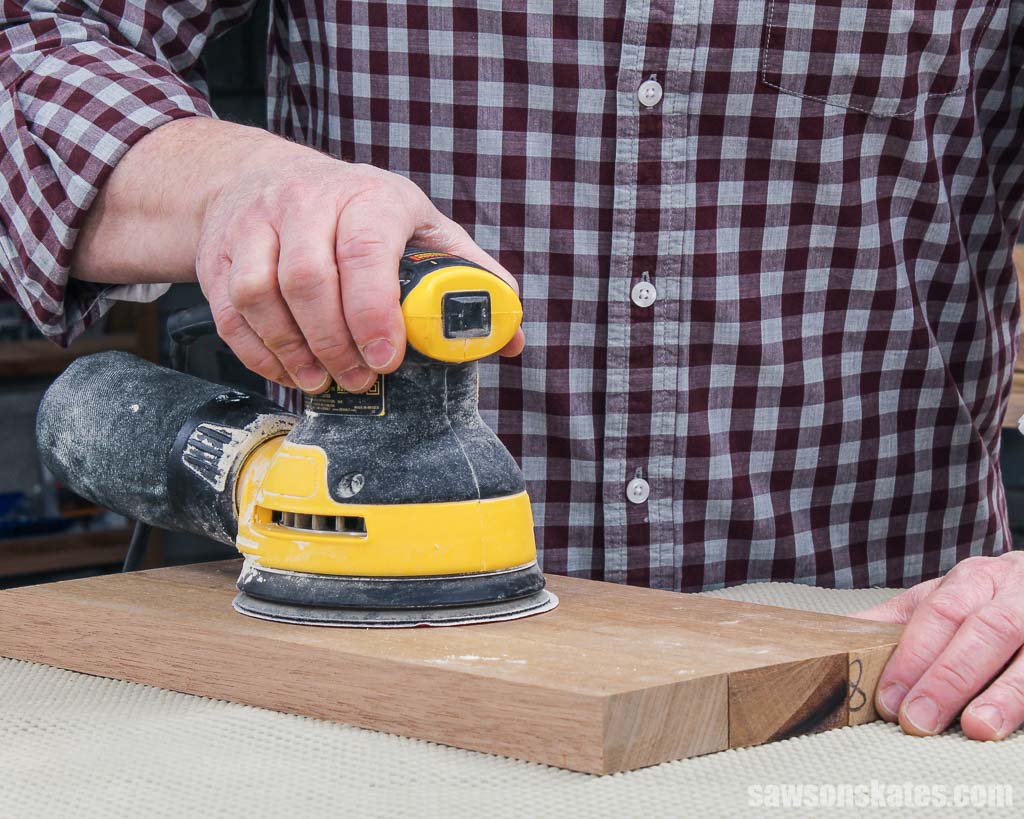
A random orbital sander is my go-to tool for tackling DIY furniture projects. I remember the days I wrestled with a palm sander that vibrated like a jackhammer, leaving behind a trail of swirls and sore arms. But then I discovered the magic of the random orbital sander, and let me tell you, it was a game-changer.
Here’s why I wouldn’t dream of sanding without it:
1. Swirl-free finish:
- Traditional sanders, like square palm sanders, often leave noticeable swirl marks due to their repetitive sanding pattern.
- Random orbital sanders; however, move their pad in a random orbital motion, meaning abrasive particles don’t follow the same path, eliminating swirl marks and delivering a smoother, professional-looking finish.
2. Speed and efficiency:
- Unlike hand sanding or palm sanders, random orbital sanders, with their larger sanding pads and random pattern, allow them to cover larger areas and remove material quickly, saving you time and effort.
3. Reduced fatigue:
- Random orbital sanders are easier to operate than palm sanders with heavy vibration.
- Their random motion distributes vibration throughout the pad, reducing the force needed to hold and maneuver the sander. Less vibration minimizes fatigue and arm strain, making sanding sessions more comfortable and sustainable.
- Less vibration is also beneficial for users with weaker grip or for longer sanding tasks.
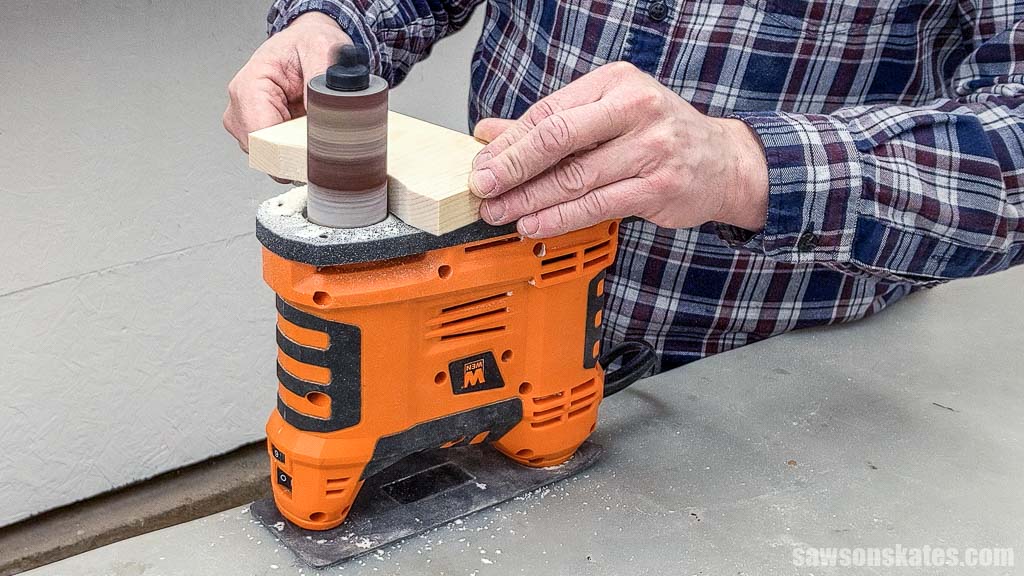
Portable Spindle Sander
Sanding curves, those graceful shapes that add personality to your furniture projects, can be tricky, but with the right tool, it’s a breeze.
Sure, you can sand them by hand, but it’s slow, tedious, and often leads to uneven results. I’ve found smoothing interior curved edges is the fastest, easiest, and most precise with a portable spindle sander. Plus, its compact size is ideal for small workshops.
Related: My 12×13 Small Woodshop Layout
I’ve used my spindle sander for smoothing curved projects like this boot jack, paper towel holder, and spice shelf.
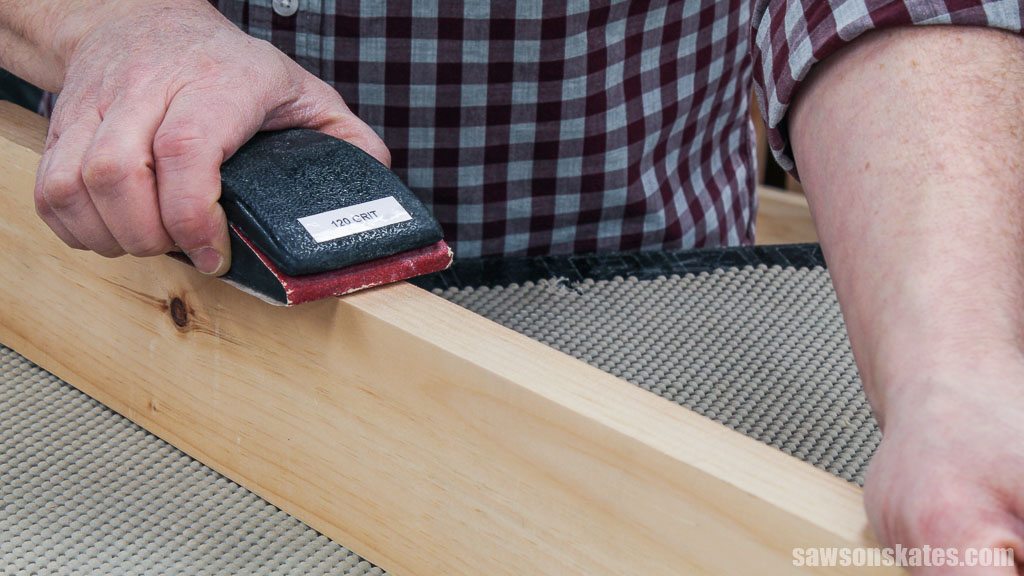
Sanding Blocks
Sanding blocks are classics when smoothing wood. Here’s how I use them:
Touch ups after assembly: Sanding blocks help touch up any imperfections that may have happened during the assembly process.
Targeting edges of boards: Unlike power sanders that can be a bit aggressive, sanding blocks offer a gentle, controlled touch, allowing you to target specific areas, like those pesky saw marks on the edges of boards.
Ease sharp edges: The finishing touch on any woodworking project is often overlooked: the edges. While sanding smooths the surface, it leaves a sharp edge. Take a cue from store-bought furniture, which is gently “eased,” creating a polished look and preventing dents and chips. Simply grab a sanding block and give the edges a few light passes.
While sanding sponges are also available, I prefer the firmness of sanding blocks.
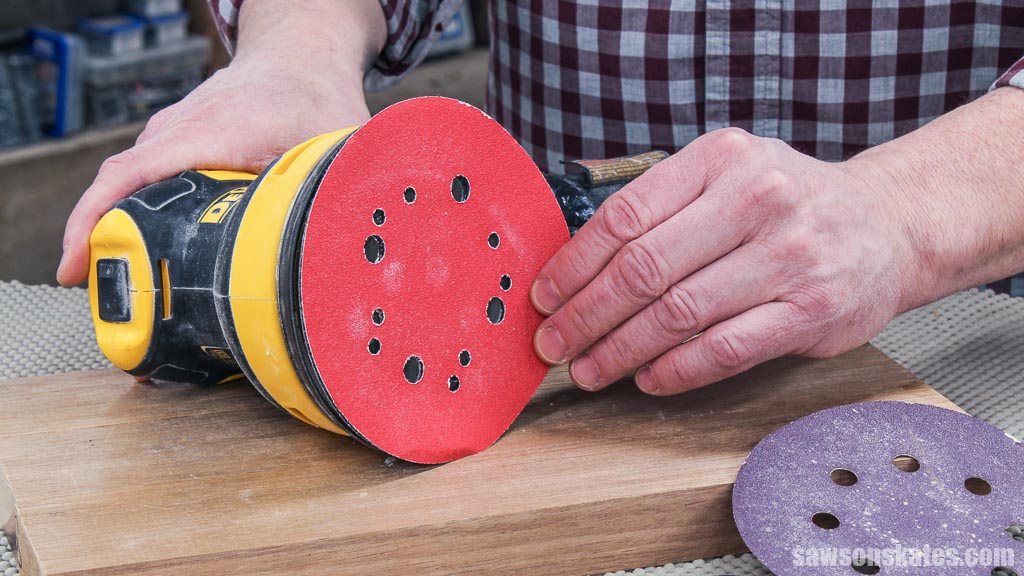
3. Choosing the Right Sandpaper
Sanding isn’t the most glamorous part of building furniture, but it creates the foundation for a stunning finish. Choosing the right sandpaper is like picking the right brush for painting – it makes all the difference in the final result. And the key to picking the right sandpaper lies in understanding grit.

In sandpaper terms, grit is the number that tells you the size of the abrasive particles glued onto the paper. The lower the number, the coarser the grit, meaning bigger, sharper particles that chew through wood like a hungry beaver. Higher grit numbers, on the other hand, have smaller, finer particles that leave a smoother, more polished surface.
So, how do you choose the correct grit for your DIY furniture? It’s a journey of progressive refinement:
Coarse Grit (60-80)
Coarse grit is the demolition crew of the sandpaper world. Think rough-sawn lumber, misaligned board, or severe scratches. Coarse grit quickly removes large amounts of material, leveling uneven surfaces. It leaves a rough, almost furry finish, but hey, you’re laying the groundwork for greatness.
I keep a stash of 80-grit sandpaper sheets and discs on hand.
Medium Grit (100-150)
Stepping it up a notch, medium grit is the workhorse for most DIY furniture projects. It smooths out the rough surfaces left by coarse grit, removes minor imperfections, and preps the surface for paints, stains, and top coats. Think of it as the “Goldilocks” grit – just right for most tasks.
I maintain a stock of 100, 120, and 150 grit sandpaper sheets and discs.
Fine (180-220)
Fine grits are like a gentle touch for your furniture. They remove dust nibs, sanding between coats of sealer, leaving behind a smooth surface.
I typically hand sand with 180 and 220 grit, so I stick to sheets for those grits.
My Sanding Process
I frequently build my DIY furniture projects with softwoods like pine. Here’s my sanding routine:
- If the surface is uneven or has misaligned boards, I begin with 80 grit.
- Otherwise, I usually start with 100 grit. Then, it’s on to 120 and maybe 150 grit, depending on the project.
- Finally, I hand sand with 220 grit between applying top coats to achieve a perfectly smooth surface.
4. Prepare Your Workspace
Sanding generates a surprising amount of dust, so choosing the proper workspace is crucial.
Choose a well-ventilated area: Dust is the inevitable companion of sanding. Opt for a well-ventilated space with good airflow, ideally outdoors. If working outside isn’t feasible, open the windows and doors.
IMPORTANT: Always wear a dust mask or respirator, whether sanding indoors or outdoors.
Use a stable work surface: Wherever you choose to sand, ensure you have a flat, stable work surface, preventing your workpieces from wobbling.
To minimize sawdust in my workshop, I frequently take my DIY folding workbench outside for sanding whenever the weather cooperates. The bonus? A quick blast with my leaf blower sends the sawdust straight to the grass.
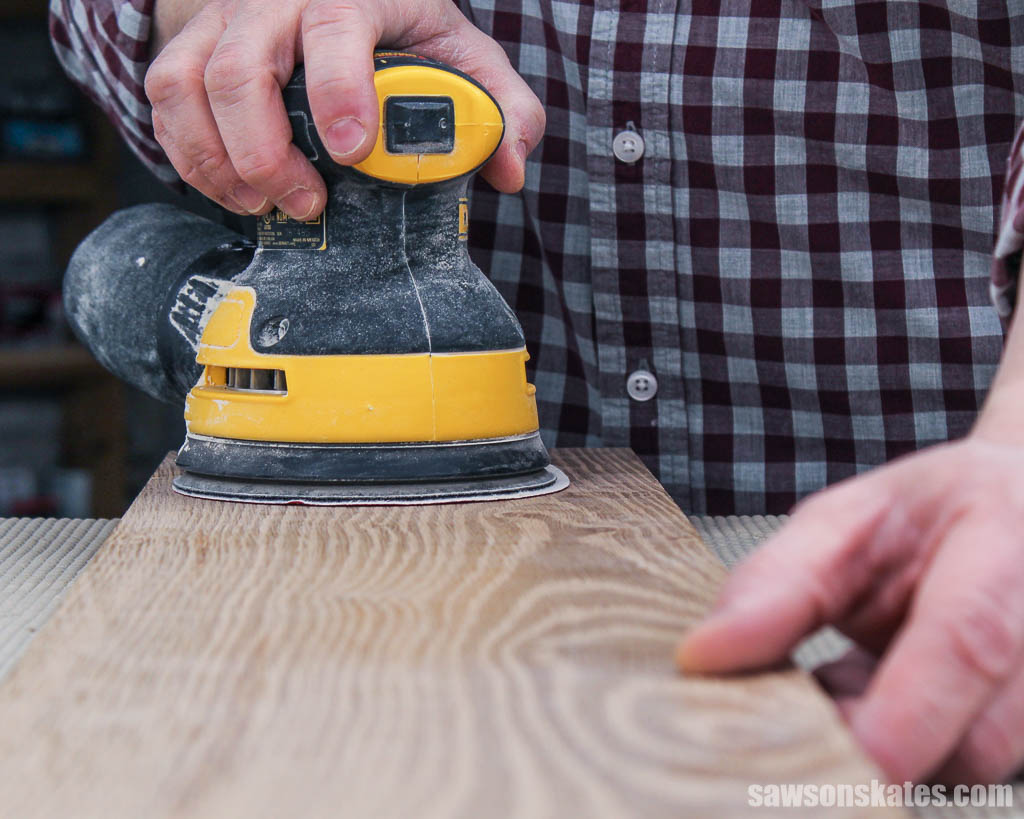
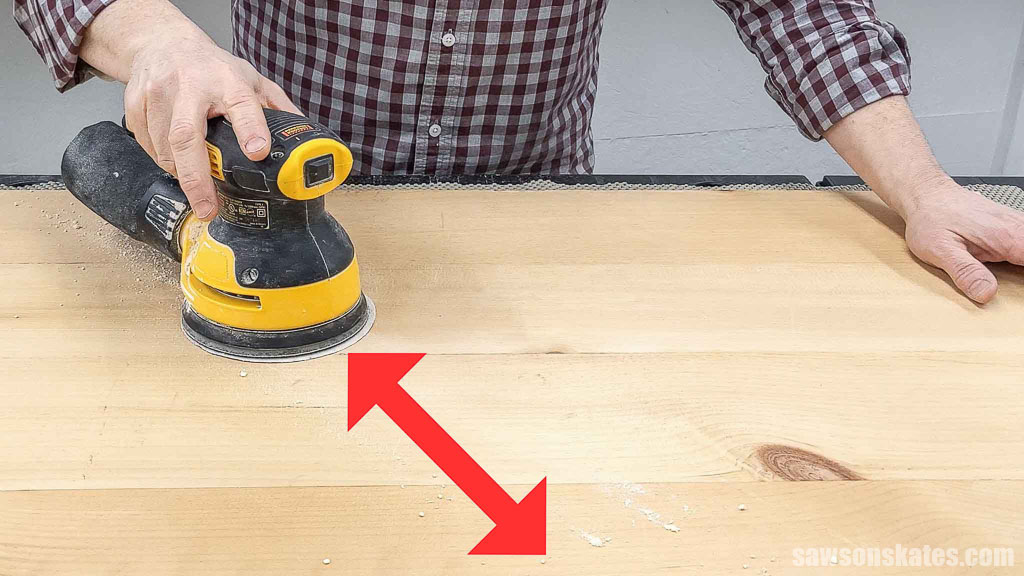
5. Sand With the Grain
One of the golden rules of woodworking is to sand with the grain. But with power tools like random orbit sanders, does this age-old advice still hold true? Let’s break it down:
What is sanding with the grain?
Imagine wood as a bundle of tiny fibers running lengthwise. Sanding with the grain means moving your sandpaper parallel to these fibers, like petting a dog’s fur, creating a smooth surface.
Why is it important?
Sanding against the grain scratches and tears the wood fibers, leaving a rough, uneven surface that will be visible on your finished furniture project.
But wait, random orbit sanders
Random orbit sanders move in a small, random pattern, sanding in all directions. So, can you ditch the grain-following rule when using this tool?
Here’s the catch:
- While random orbit sanders can remove material faster, they can also leave swirl marks if not used carefully.
- Sanding with the grain with a random orbit sander minimizes tear-out and produces a smoother finish.
- Going against or across the grain with a random orbit sander can be useful for quickly removing heavy material; however, it requires more skill and control to avoid damaging the surface.
The Verdict:
Sanding with the grain remains valuable, ensuring a smooth, professional-looking finish and minimizing the risk of damaging the wood. I always sand with the grain when sanding by hand with a sanding block or folded piece of sandpaper.
However, while I always finish sanding with the grain, there are times I use my random orbit sander across or against the grain.
- Butt joints: Sanding against the grain is an effective technique for removing stubborn glue residue or smoothing unevenness between butt joints, where the end of one board connects to the side of another, such as cabinet doors.
- Uneven surfaces: Sanding diagonally can be an effective way to level out inconsistencies between boards quickly; however, follow up by sanding with the grain to avoid scratches.
TIP: Resist the urge to focus on one area, which can create ruts. Instead, Make long, light strokes, gradually feathering out the imperfections.
6. Light Your Workspace
Have you ever sanded your project thinking it was smooth, only to apply a stain or top coat revealing a nightmare of scratches?
Forget daylight or overhead lights – those won’t save you. A simple utility light, glowing across the surface, catches even the tiniest imperfections so you can fix them before disaster strikes.
Don’t sand in the dark – invest in a cheap utility light and watch your projects shine.

7. Don’t Play the Chase Game
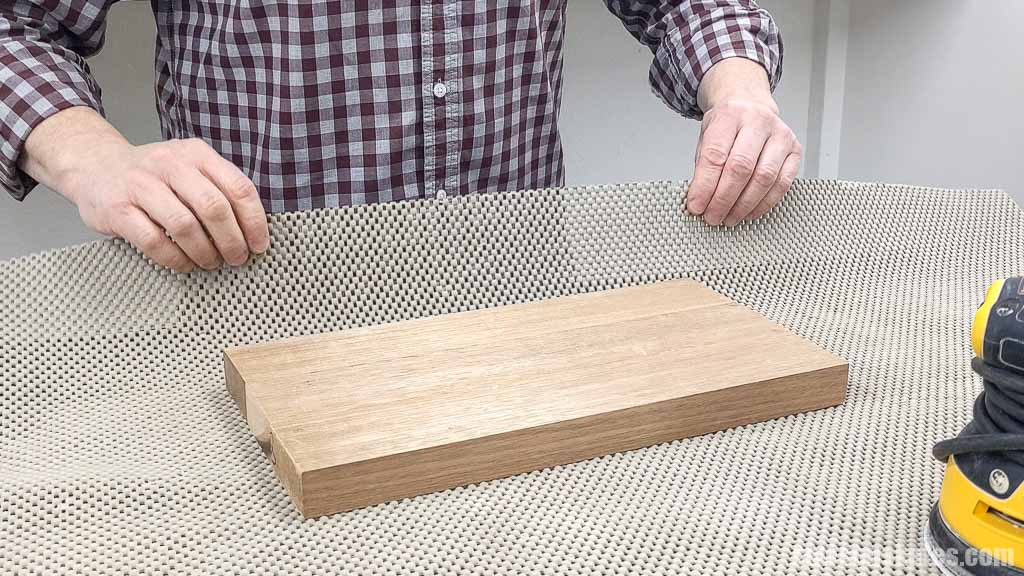
Do you ever feel like you’re playing hide-and-seek with your sander? Forget the days of chasing your projects across your workbench with a non-slip router pad.
This rubber wonder grips your workpiece and bench like a champion, turning sanding chores into a controlled (and, dare I say, more enjoyable) experience. Sure, workpieces still wiggle, but not like they do when you don’t use a pad.
Plus, it shields your project from debris, such as dried glue on your workbench, and it doubles as a router mat.
8. Don’t Skip a Grit
Your sanding success hinges on taking it one grit at a time. Think of it like climbing a ladder: each grit is a rung, building on the previous, smoothing and preparing the wood, taking you steadily up to a professional-looking result.
Skipping sandpaper grits might seem like a shortcut, but it leaves the surface rough and unprepared for that higher grit.
If necessary, start with a coarse grit (like 80) to remove any major imperfections and flatten uneven surfaces. Then, gradually work your way up to finer grits, like 100, 120, and so on, allowing each grit to do its job.
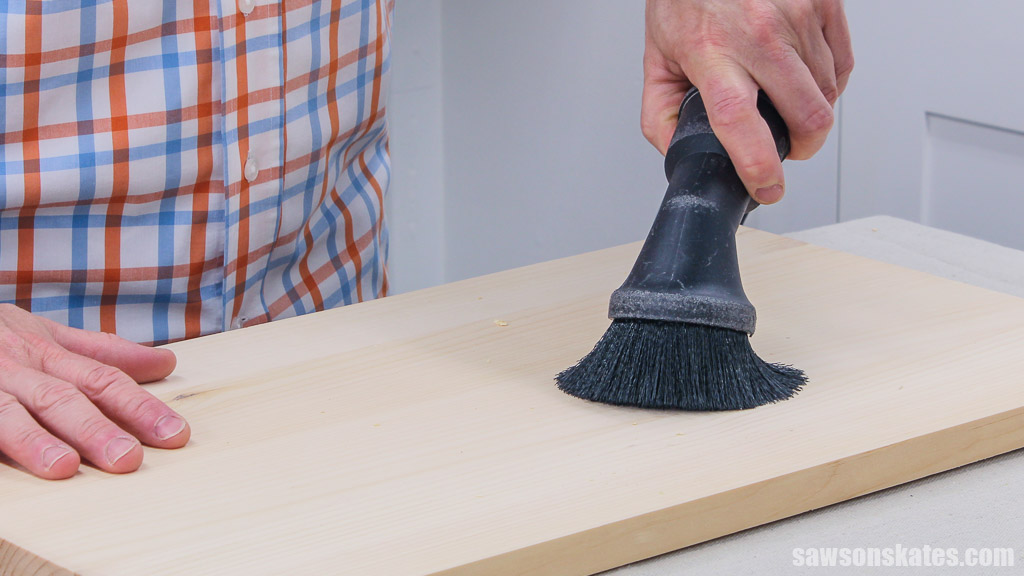
9. Vacuum Between Grits
Don’t let leftover dust sabotage your hard work. As you progress through sandpaper grits, vacuuming the dust between each step removes abrasive particles that could scratch your workpieces during finer sanding. This simple step ensures a smooth and professional-looking finish.
10. Power Sanding
So, let’s put all we learned in an easy-to-follow list. Here’s how I begin sanding my DIY furniture projects:
Protect yourself: Gather your dust mask, safety glasses, and ear protection.
Gather your tools: Random orbit sander, sanding blocks, and a portable spindle sander if your project has curves.
Prepare your workspace: Set up a flat, stable work surface with a router mat and utility light in a well-ventilated area.
Begin sanding: The key to a smooth, swirl-free finish with a random orbital sander is letting the tool do the work. Applying heavy pressure might seem like the way to power through sanding, but it actually hinders the sander’s effectiveness and can leave gouges or uneven marks.
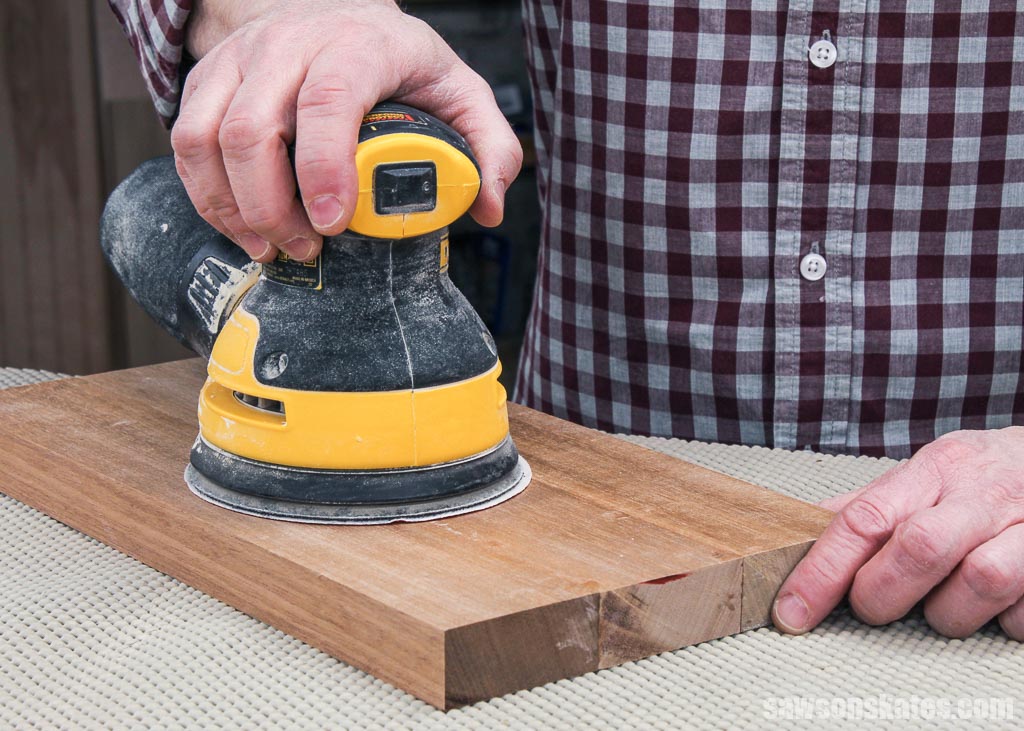
Instead, maintain a light touch and steady pace, guiding the sander across the surface with minimal downward force, overlapping each pass. The sander will handle the heavy lifting, leaving behind a beautifully sanded surface ready for your next finishing touch.
IMPORTANT: Hand sand workpieces that are too small to hold with your hands safely.
If the surface is uneven, has misaligned boards, or I’m working with hardwood like oak, I begin with 80 grit. Otherwise, I usually start with 100 grit. Then, it’s on to 120 and maybe 150 grit, depending on the project.
TIP: Over-sanding can close the wood’s pores, preventing stain from soaking in. I stick with 120 or 150 grit for projects I plan to stain.
Remove the dust: Use a ShopVac to remove the sanding dust before moving on to the next grit.
11. Hand Sanding
I reserve hand sanding for:
- Workpieces that are too small to hold while using a random orbit sander safely
- Sanding a board’s edge
- Easing sharp edges
- Touch-ups after the project is assembled
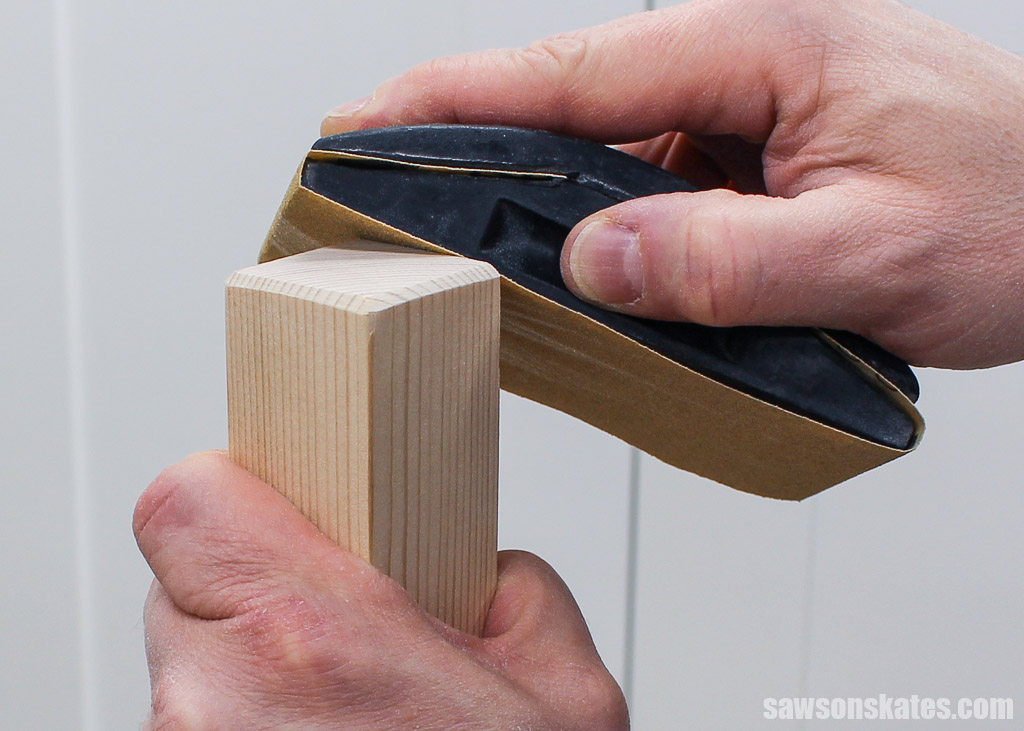
Smoothing a Board’s Edge: Using a power sander to smooth saw marks on narrow edges, like those left by a table saw, can be tricky. The small surface area doesn’t provide enough stability for the random orbital sander’s pad, causing it to round the edge, called “bullnosing,” rather than maintaining it square to the board’s face.
Sanding blocks offer a gentle, controlled touch, allowing you to target specific areas while retaining the edge’s shape.
Easing Edges: As I mentioned earlier, the finishing touch on any woodworking project is often overlooked: the edges. While sanding smooths the surface, it leaves a sharp edge.
Borrowing a technique I learned in a furniture-making class, I gently knock off the sharp edges with a sanding block. This method creates a refined appearance and enhances durability, reducing the risk of dings and chips.
Related: 16 Beginner Woodworking Classes (Online + In-Person)

Bevel Furniture Legs: Avoid snags. Sharp edges on furniture legs are prone to chipping and tearing when moved. To protect your project and give it a professional look, sand a gentle bevel onto the ends, creating a finished edge that glides gracefully across any surface.
Final Thoughts
Whether you’re new to sanding or a seasoned pro, these techniques will help you achieve faster, easier, and better results. Remember to take your time, use the right tools for the job, and don’t skip any steps between grits. Your projects will thank you with a smooth and professional-looking result.
Interested in woodworking but need help figuring out where to start? Join the FREE Saws on Skates® Beginner Woodworking VIP list and gain instant access to top-notch tool comparisons, tool tutorials, and free woodworking plans. Join for FREE now!
Recommended For You


Pin This For Later

Hi there – I’m Scott, a woodworking enthusiast and creator of Saws on Skates, a site I started in 2015 to share easy-to-follow tutorials, space-saving shop tips, and project inspiration for DIYers at any skill level. Learn more about my woodworking journey here.
Love your extra tip!!!
Thank you! It works well to avoid those nasty chips in furniture legs!
Hello Scott,
These tips will greatly help me. I always thought my palm sander was doing a good job but I was just doing it wrong. I sold all my electrical tools when I moved to Spain and will look for a random orbit sander when I go to pick up one. Great info. Thanks a lot.
Michael
Thank you, Michael. Hope you can get a workshop up an running in your new hometown soon.
Another great article Scott!
Here’s something I use occasionally on soft Woods to get a slight dent out, rather than trying to over sand it out. I apply some water to the dent, let it soak in a little while, then use an iron or heat gun on it to raise the grain. After making sure it’s dry, I finish sand it leaving it smooth and ready to stain.
Good day and keep the tips coming.
Hi John – That’s a great tip! I’ve used the iron trick on a few dents and it works really well. I haven’t done it with a heat gun, so I’ll have to give that a try!
There must be over a dozen paint sprayers on Amazon.com. As a first time adventurer with spray painting, I want the best bang for my buck. Why do you recommend the HomeRight Super Finish Max Sprayer from all the others?
Hi Greg – Thank you for stopping by. I like the HomeRight Super Finish Max sprayer because it gives professional quality results, it can be used on projects ranging in size from furniture to the siding of a house, and it’s easy to clean.
Thank you for posting these items being new to wood working this is going to be very helpful
Hi Leonard – Thank you for stopping by. I’m glad this was helpful for you!
I’m recently retired and new to woodworking. I’m excited about learning and applying all the tips you can give me. Thank you so much for making this and additional information available for us.
Knowledge is Power…..
Respectfully,
John
Hi John – Thank you for stopping by and for the compliments. Good luck with your woodworking journey. You’re going to love it!
Hi,I am new in woodworking,I work on my first project,a table.I have a problem,when I am sanding I press the dust into the surface.I have to start sanding again.It looks worst than before sanding.I tried to find out what I did wrong but when I tried to corrwct it got worst.Thanks!
Hajni
Hi Hajni – Have you tried using a ShopVac to remove the sanding dust? I would give it a try and see if that improves the situation for you.
Muchas gracias por publicar estos artículos
Hola Joan – De nada!
Thanks for all your tips and articles! One thing I’ve found to be really helpful (thanks to a friend for the tip) is to wipe with a wet cloth after fine-grit sanding, letting it dry, and then sanding with fine grit again. The water makes the little loose fibers in the wood expand and stick up like stubble (the wood feels a little fuzzy afterward), and then the extra pass with a fine grit knocks them off and leaves a glassy-smooth finish. Works especially well on hardwoods like oak!