5 Easy Fixes Guaranteed to Prevent Rough Pocket Holes
Rough pocket holes are easy to prevent with these 5 simple solutions that will create the best-looking pocket holes you’ve ever drilled.
You may also enjoy these 9 Solutions to Common Pocket Hole Problems.
Rough pocket holes can happen to any DIYer, but there are easy fixes to prevent jagged looking pocket holes. Solutions like using a corded drill, using the dust collection port, paying attention to the wood grain and more.
For your convenience, this post contains affiliate links to supplies or tools I used to complete this project. Purchases made using these links help support the Saws on Skates website and allow me to share more DIY projects. and DIY tips with you. There is no cost to you for using these links. Click here to visit my site policies.
I have a page on the site where DIYers like you can submit your pocket hole questions. It’s like the Butterball Turkey Talk-Line but instead of asking how to roast your holiday turkey you can ask your pocket hole questions! And you guys ask the best questions. Questions like how to make the best pocket hole plugs? What’s the best way to make edge joints with pocket holes? And how to join different thickness workpieces with pocket holes?
Recently I received a new pocket hole question from Anthony. Anthony asks:
Why do I always get rough cuts on the top edge of [my] pocket hole[s] every time I drill them? I am using a Dewalt electric drill that turns 2500 rpm, the drill bit is not worn and only used less than 20 times.”
This is another great question! Let’s dive in and figure out what could be causing Anthony’s rough pocket holes and how we can drill the best looking pocket holes for our DIY projects.
5 Easy Fixes Guaranteed to Prevent Rough Pocket Holes
Before we look at how to prevent rough pocket holes we first need to properly set up our pocket hole jig.
Set the Drill Guide
For the Kreg Jig Mini, Kreg Jig R3, Kreg Jig K4, Kreg Jig K5 set the drill guide for the thickness of your workpiece. If your workpiece measures 3/4″ thick, set the jig for 3/4″.
For this example we are setting the drill guide on a Kreg Jig K5 for a 3/4″ workpiece.

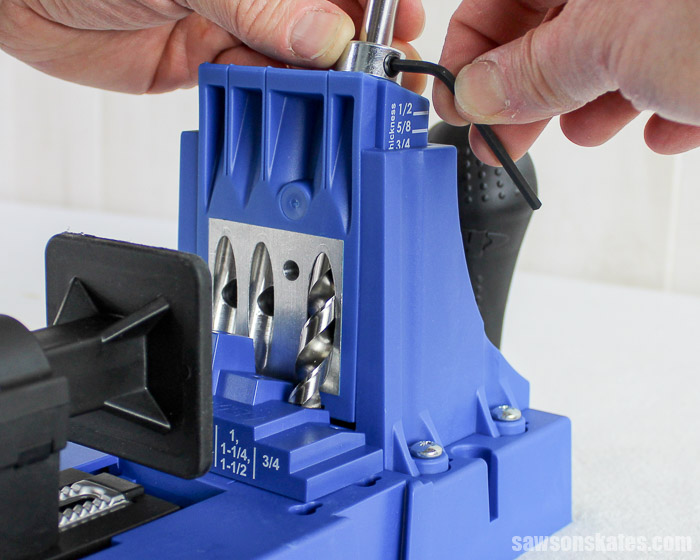
Position the Depth Collar
For the Kreg Jig Mini, Kreg Jig R3 and Kreg Jig K4 we’ll set the depth collar for the thickness of our workpiece.
For the Kreg Jig K5 we’ll set the depth collar for the length of the screw we’ll be using to attach our workpieces.
For this example we are using a Kreg Jig K5. To set the drill bit depth collar, first place the depth collar setting block behind the drill guide.

Lower the bit through the drill guide into the corresponding hole in the depth collar setting block and tighten the set screw with an Allen wrench. We’ll set the depth collar to 1-1/4” which is the length of the screw we’ll use to attach our 3/4” workpiece.
Choose Your Screws
The last step is choosing the correct length screw for our project.
- If your material is 1/2” to 5/8” use 1” screws
- If your material is 3/4” use 1-1/4” screws
- If your material is 7/8” to 1-1/8” use 1-1/2” screws
- If your material is 1-1/4” to 1-3/8” use 2” screws
- If your material is 1-1/2” use 2-1/2” screws
Full Speed Ahead
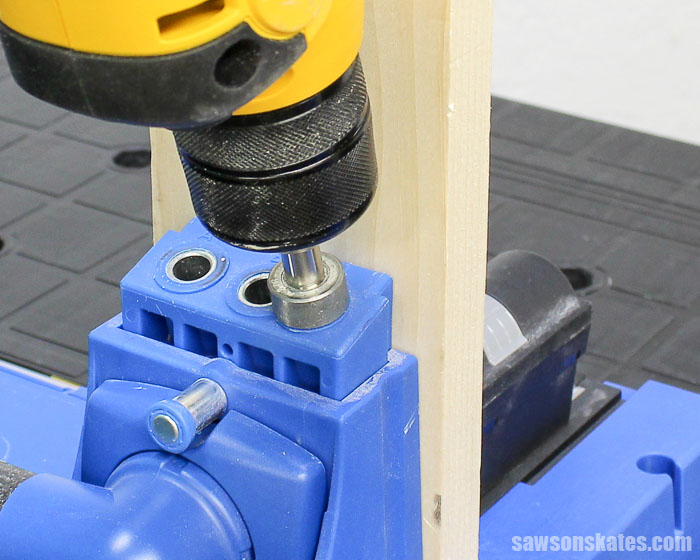
Once we have the guide block set, the drill bit depth collar set and our workpieces clamped in the jig it’s time to start drilling our pocket holes.
First, place the drill bit in the drill guide, bring the drill up to full speed and then gently lower it into the wood. Don’t push the drill. Allow the drill to pull itself through the wood.

Continue drilling until the depth collar contacts the drill guide. Slightly raise the drill if the drill bit is having difficulty advancing through the pocket hole. This will clear any wood chips that may have collected in the guide block. Then lower the drill bit and continue drilling the pocket hole.
Corded vs. Cordless
The difference between a corded drill and a cordless or battery operated drill is, well, a cord. A corded drill needs to be connected to an electrical outlet and has a distinct advantage over a cordless drill. That advantage is a constant speed.
As the battery of a cordless drill begins to lose its charge the drill begins to slow down. A corded drill has a constant supply of power so from drilling our first pocket hole to our hundredth pocket hole a corded drill will keep a constant speed.
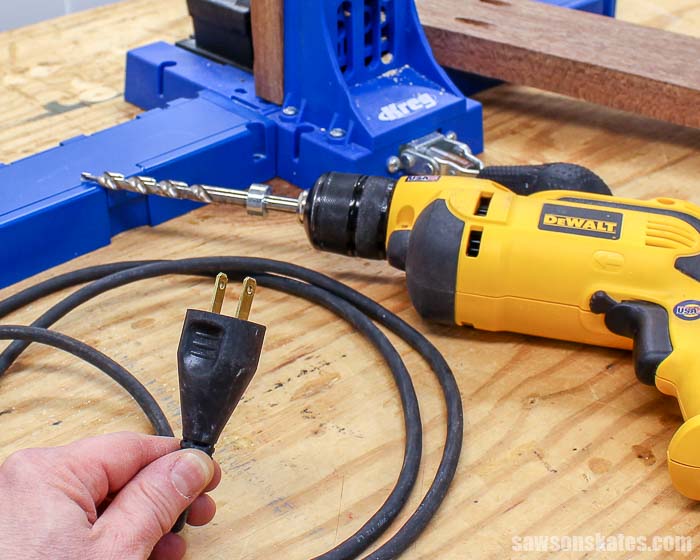
What does all of this mean for preventing rough pocket holes? In my experience, as my cordless drill battery starts to lose its charge and the drill begins to slow down it appears the drill bit tears at the wood rather than slicing through it. This tearing produces jagged or rough pocket holes. For the best looking pocket holes go with a corded drill.
Fully Charged
We’ve already discussed the advantages of using a corded drill for drilling pocket holes but if you drill your pocket holes with a cordless drill be sure the battery is fully charged.
As I mentioned earlier, in my experience, as my cordless drill battery starts to lose its charge and the drill begins to slow down it appears the drill bit tears at the wood rather than slicing through it. This tearing produces jagged or rough pocket holes.
If we have a lot of pocket holes to drill we should be sure to have a second battery charged or charging. On several occasions when working on a project like the DIY outdoor coffee table that requires a lot of pocket holes, I’ve run out of “juice” on my first battery. There’s nothing worse than having to wait for a battery to charge when you’re on a roll with a project!
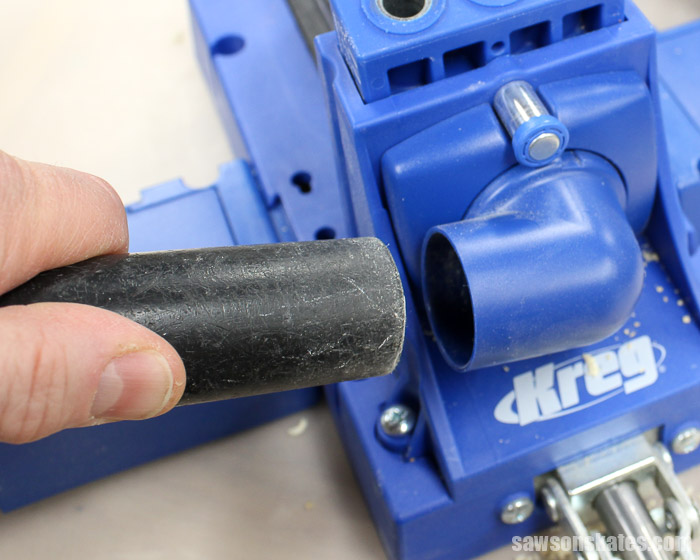
This Tip Sucks
If your Kreg Jig has a dust collection port then this tip is really going to suck. Literally. I’ve noticed pocket holes drilled with a ShopVac connected to the dust collection port appear to look cleaner than those drilled without using the dust collection port.
It also appears to me the drill bit has an easier time drilling pocket holes when the ShopVac is running and connected to the dust collection port on the jig. When I drill pocket holes without using a ShopVac it feels to me like wood chips build up in the drill guide and then the drill bit has to “fight” to get through those chips.
Another benefit of using a ShopVac and the dust collection port is the clean up is sooo much easier. Wood chips pile up all over my workbench and spill onto the floor when I don’t use the dust collection port. Using the dust collection port keeps our workshop tidy and saves time when cleaning up.
My recommendation is to use a ShopVac and the dust collection port to prevent rough pocket holes, produce pocket holes that are easier to drill and to make cleanup easier.
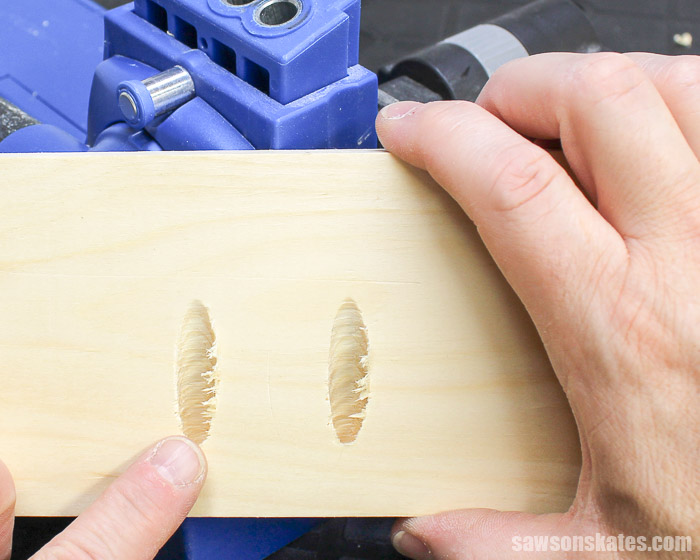
Go With the Grain
Another consideration for preventing rough pocket holes is the grain of the wood. Pocket holes drilled with the grain or on the length of a workpiece will always look cleaner.
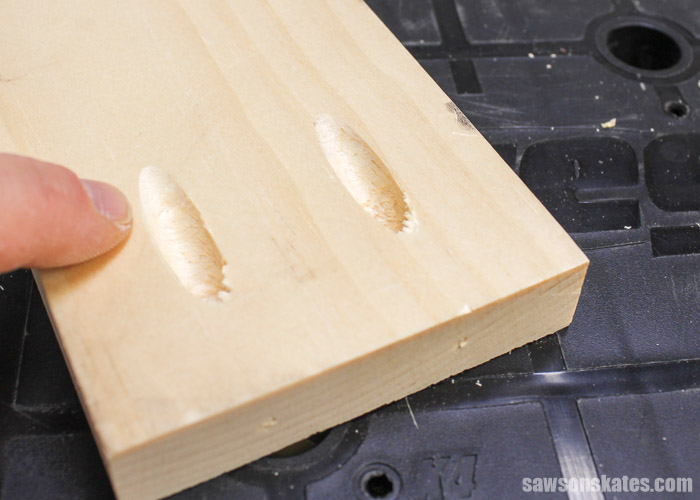
Pocket holes drilled across the grain or on the width of a workpiece will always look rough or jagged compared to pocket holes drill with the grain of the wood. Sometimes we can’t avoid making cross grain pocket holes like when we’re joining workpieces with edge joints.
FREE Pocket Hole Mistakes Guide
Master your pocket hole projects with this FREE ten-page Pocket Hole Mistakes You Don’t Want to Make Guide! The guide is overflowing with useful hints and easy tips to help you avoid time-consuming mistakes. Click below, get your FREE guide, and tackle your next pocket hole project with confidence!

Final Thoughts
Rough pocket holes can happen to any DIYer, but there are easy fixes to prevent jagged looking pocket holes. We’ll start by properly setting up our pocket hole jig. Then we’ll bring the drill up to full speed and allow the drill to pull itself through the pocket hole. We’ll use a corded drill or be sure our cordless drill is fully charged. We’ll use the dust collection port and pay attention to the grain of the wood.
Thank you for stopping by. If you found this information helpful, would you please pin it to Pinterest? Other DIYers would appreciate it and I would too! Thank you – Scott

Hi there – I’m Scott, a woodworking enthusiast and creator of Saws on Skates, a site I started in 2015 to share easy-to-follow tutorials, space-saving shop tips, and project inspiration for DIYers at any skill level. Learn more about my woodworking journey here.
I find that a sharp drill bit makes all the difference. When the pocket holes start to go rough it might be time to sharpen the bit or replace it with a new one.
Your skates are often helpful. Keep the tips coming.
Cheers, Gary, Whyalla, South Australia
Hey Gary – That’s a great tip. Anthony mentioned his bit was used less than 20 times so I didn’t discuss bits in this post, but I agree with you that a sharp bit makes all the difference.
i just bought new drill bit and still holes are rough. hiw to fix them?
Hi Imie – I apologize for the delayed response. Have you tried all of the tips in this post and your pocket holes are still rough?