How to Make Pocket Hole Plugs (Step-by-Step Guide)
Get a seamless look for your woodworking projects! Learn how to make pocket hole plugs with this simple step-by-step tutorial.
Are you looking for an easy way to conceal the pocket holes in your woodworking projects? Pocket hole plugs are the perfect solution. In this guide, I’ll walk you through how to make pocket hole plugs step-by-step and provide tips on getting the best results.
Originally published January 10, 2018, updated May 3, 2023.
Table of Contents
- What are Pocket Hole Plugs?
- What Tools Do You Need to Make Pocket Hole Plugs?
- What Wood Should You Use to Make Pocket Hole Plugs?
- How Do You Use Pocket Hole Plugs?
- How to Make Pocket Hole Plugs
This article contains affiliate links. If you purchase from these links, I may earn a small commission at no additional cost to you. Visit my site policies for more information.
What are Pocket Hole Plugs?
Pocket hole plugs fill the holes created by pocket hole joinery, a technique used to connect two pieces of wood by drilling an angled hole into one workpiece and attaching it to another with a pocket hole screw.
Related: How to Use a Pocket Hole Jig (& Beginner Pitfalls to Avoid)
The plugs are frequently made of wood or plastic and fit snugly into the pocket holes giving your project a cleaner and more professional look.
What Can You Use to Plug Pocket Holes?
You can fill pocket holes with plastic or wooden plugs.
Plastic plugs are available in several colors, such as white and light and dark wood tones.
Wooden plugs are the most common method of filling pocket holes. Store-bought plugs are available in several wood species, or you can also make your own pocket hole plugs.
Wooden plugs are inserted into the pocket hole with glue and then trimmed flush with the wood’s surface.
What Are the Benefits of Making Your Own Pocket Hole Plugs?
Making your own pocket hole plugs has several benefits.
First, it allows you to use the same wood type as your project, enabling you to perfectly match your project’s wood color and grain pattern. This is essential if you are working with a special or rare wood species that you cannot match with store-bought pocket hole plugs.
Second, making your own pocket hole plugs saves money. Buying store-bought pocket hole plugs can add up if you are working on a large project with many pocket holes. By using scrap wood to make your own plugs, you’ll reduce waste while keeping costs down.
Related: 71 Scrap Wood Projects (Clever Ways to Reuse Old Wood)
Finally, making your own plugs saves you time from driving to the store to buy them or waiting for them to arrive from an online retailer.
What Tools Do You Need to Make Pocket Hole Plugs?
Making pocket hole plugs requires a few basic woodworking tools:
- Pocket Hole Plug Cutter Kit
- Kreg Jig
- Drill
- Table Saw, Bandsaw, Jigsaw, or Handsaw
Pocket Hole Plug Cutter Kit
A plug cutter kit contains a plug-cutting drill guide and a hollow drill bit used in combination with your Kreg Jig. The plug-cutting drill guide replaces your jig’s traditional pocket hole drill guide, and the hollow bit creates the plug which fits into your pocket holes.
Kreg Jig
The plug-cutting drill guide requires a Kreg Pocket Hole Jig. Currently, the 720 is the only Kreg Jig on the market that can accommodate a plug cutter; however, discontinued models such as the Kreg Jig K3, K4, and K5 also have a compatible plug-cutting drill guide.
Related: Which Kreg Jig Should You Buy? (Here’s the Answer)
Drill
You’ll need a drill to drive your plug-cutting drill bit. While you can use a cordless drill, I recommend a corded one.
It takes considerable energy for the drill bit to cut through the wood, which can quickly drain a cordless drill’s battery. If you don’t have a corded drill, make sure your cordless drill’s battery is fully charged, and if you have a second battery, make sure it’s fully charged too.
Table Saw, Bandsaw, Jigsaw, or Handsaw
You’ll need a table saw, bandsaw, jigsaw, or handsaw to release your pocket hole plugs from the wood.
What Wood Should You Use to Make Pocket Hole Plugs?
When choosing the wood to make pocket hole plugs, called a plug blank, ideally, you’ll want to use scraps of the same wood species you used to build your project. This ensures the plugs match your project’s wood color and grain pattern. However, using the same wood is not as critical if you plan to paint your project.
If you plan to stain your project, select plug blanks with grain patterns that closely match the wood where your pocket holes are located.
How Do You Use Pocket Hole Plugs?
Using pocket hole plugs is a relatively simple process. To use them, follow these steps:
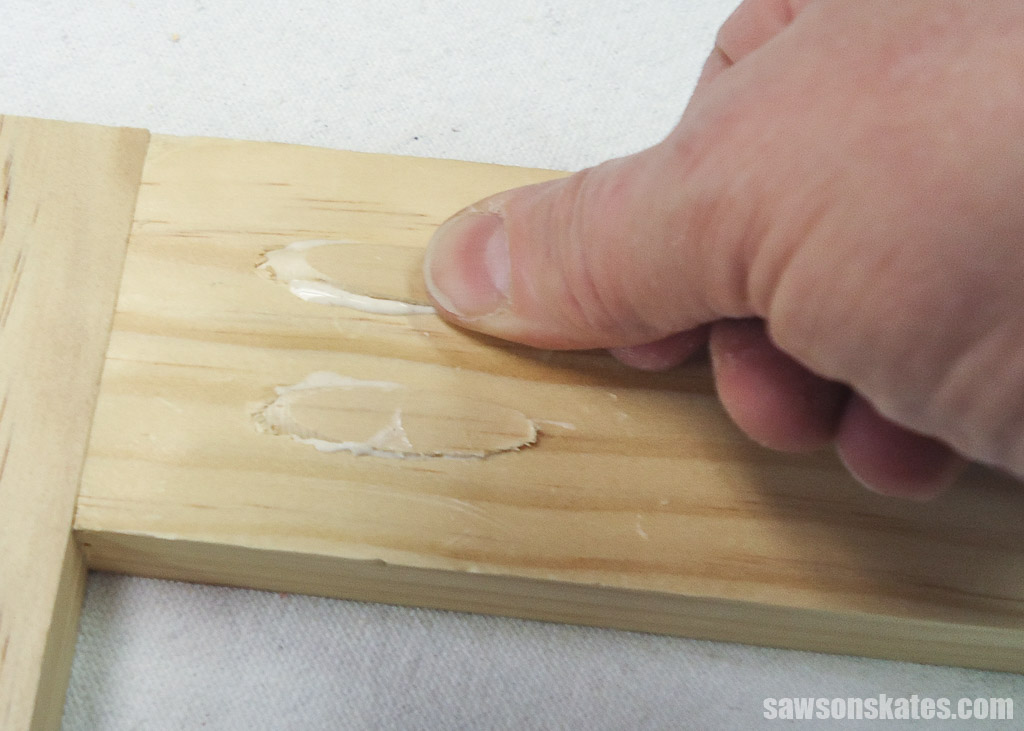
- Drill the pocket holes – Use a pocket hole jig to drill the pocket holes where you want to join two pieces of wood.
- Apply glue – Apply a small amount of wood glue to the inside of the pocket hole.
- Insert the plug – Slide the wooden plug into the hole. Move it back and forth and rotate it side to side to cover it with glue, then push it until firmly seated.
- Let the glue dry – Allow the glue to dry completely before sanding or trimming the plug to match the surrounding surface.
- Flush the plug – Once the glue is dry, use a block plane, orbital sander, chisel, or Japanese saw to flush the plug with the surrounding surface.
- Fill if necessary – If you have gaps around the plug, you can fill them with wood filler.
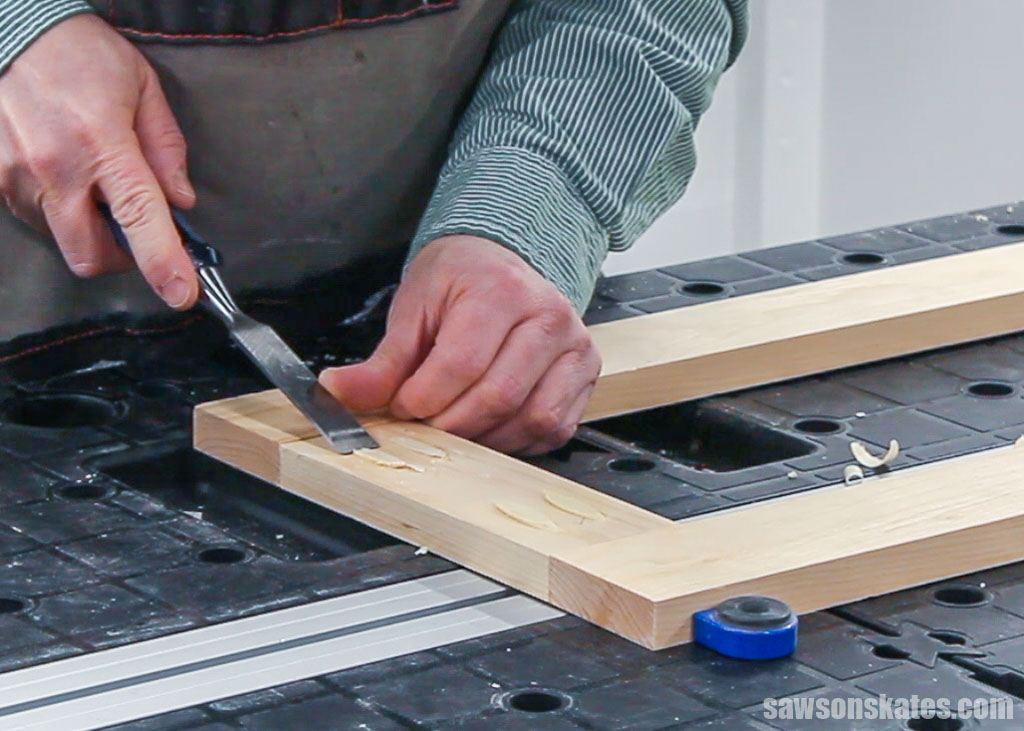
How Do You Make Pocket Hole Plugs Flush?
Your pocket hole plugs will be raised or proud of the wood’s surface after you’ve inserted them into the pocket holes. Once you’ve allowed the glue to dry, the next step is to flush the plugs with the surface, and there are several ways to do it.
However, if your plugs sink below the surface of the wood, you might be drilling your pocket holes too deep, and you’ll want to check your jig’s settings.
Block Plane
One of my go-to methods for flushing pocket hole plugs is using a small block plane, removing thin slices until it’s almost level with the surface.
Planing from the end where you inserted the plug risks tearing the plug’s wood grain, so I recommend working from the opposite end, which minimizes this risk.
Once the plug is close to flush, I switch to my random orbital sander, smoothing until it’s perfectly level with the surface.
Orbital Sander
You can use an orbital sander to flush your plugs if you don’t have a block plane. Start with 80-grit sandpaper and sand until the plug is almost flush with the surface. Then switch to a finer grit, such as 100 or 120-grit, and continue sanding until it’s perfectly level with the surface.
Related: Best Sanders for Furniture (Which One to Buy & Why)
Chisel
Similar to a block plane, you can use a sharp chisel to flush the pocket hole plugs, removing thin slices until it’s almost level with the surface, then switching to a random orbital sander.
One drawback I’ve noticed is if my chisel’s angle is not perfectly aligned, it can cause the plug to tearout, which is why I prefer using a block plane.
Flush Cut Saw
While using a flush cut or Japanese Pull Saw is one of the quickest ways to flush pocket hole plugs, it’s also my least favorite method because I frequently gouge the surface of my project with the saw’s teeth.
How to Make Pocket Hole Plugs
Supplies
- Scrap Wood (same species you used to build your project)
- Wood Glue
Tools
- Kreg Jig 720
- Plug Cutter Kit
- Drill
- Table Saw, Bandsaw, Jigsaw, or Handsaw
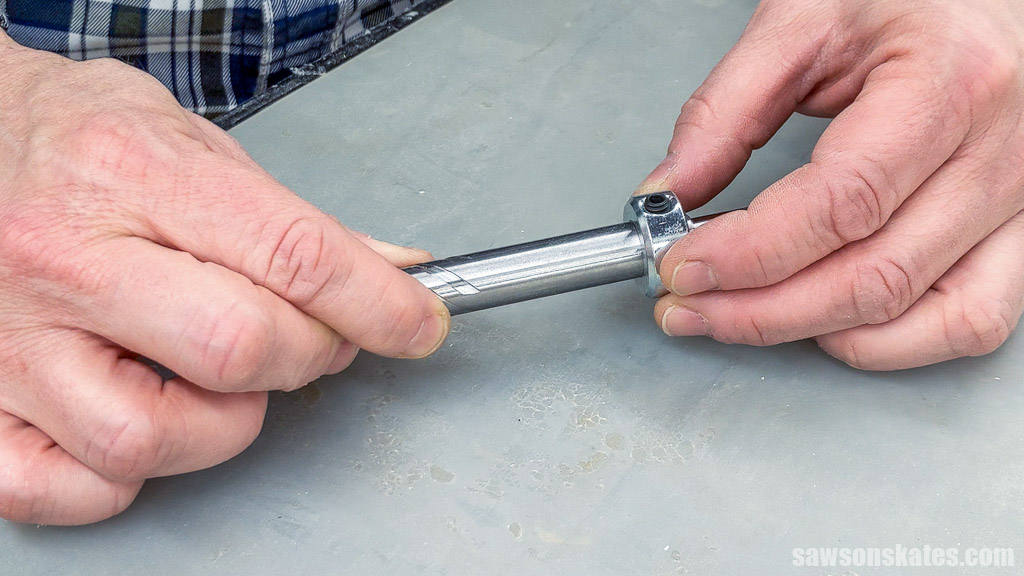
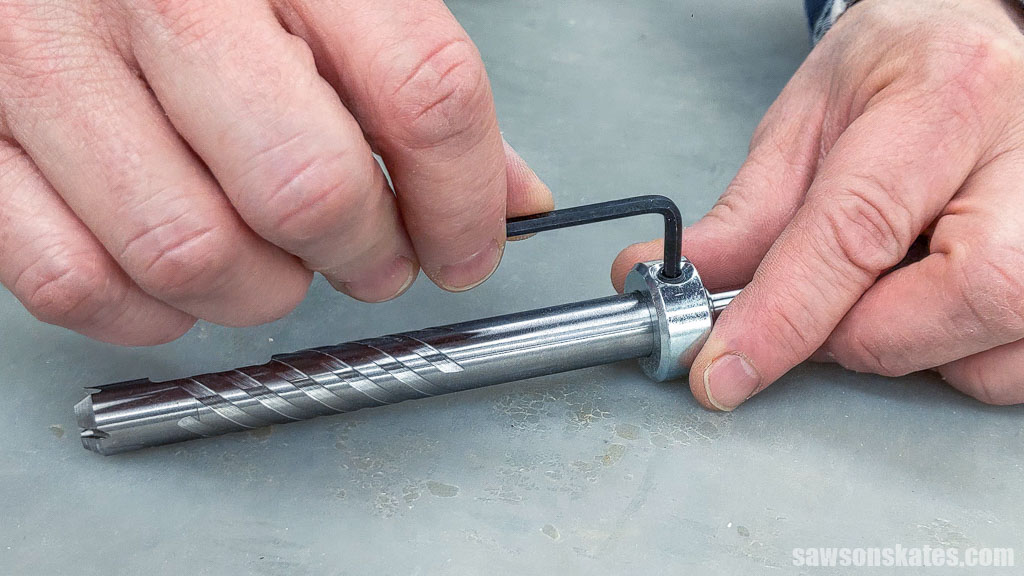
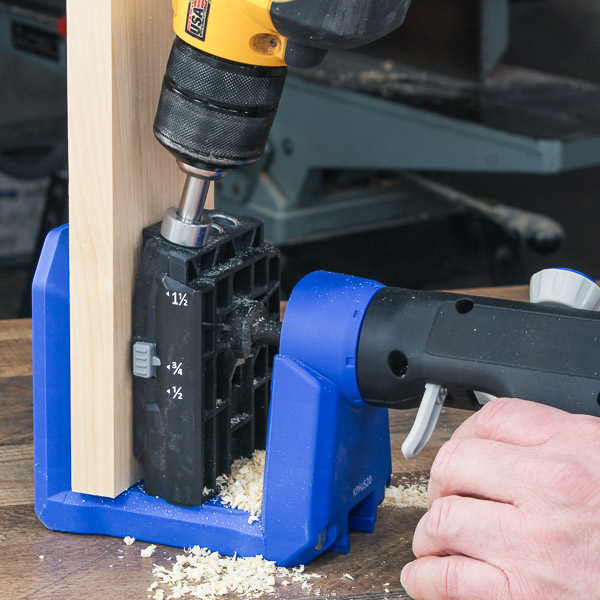
Step 1. Assemble the Plug-Cutting Bit
Place the stop collar over the plug-cutting bit and position it against the bit’s shoulder.
Tighten the set screw using the hex wrench included with your plug-cutting kit.
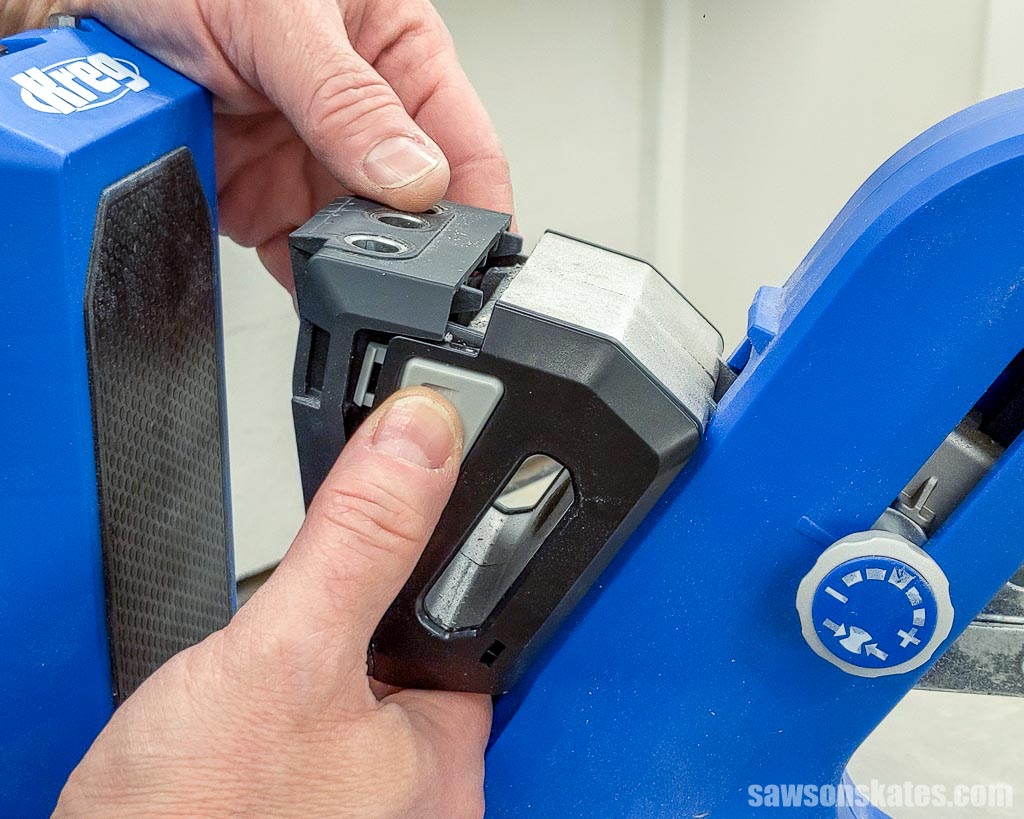
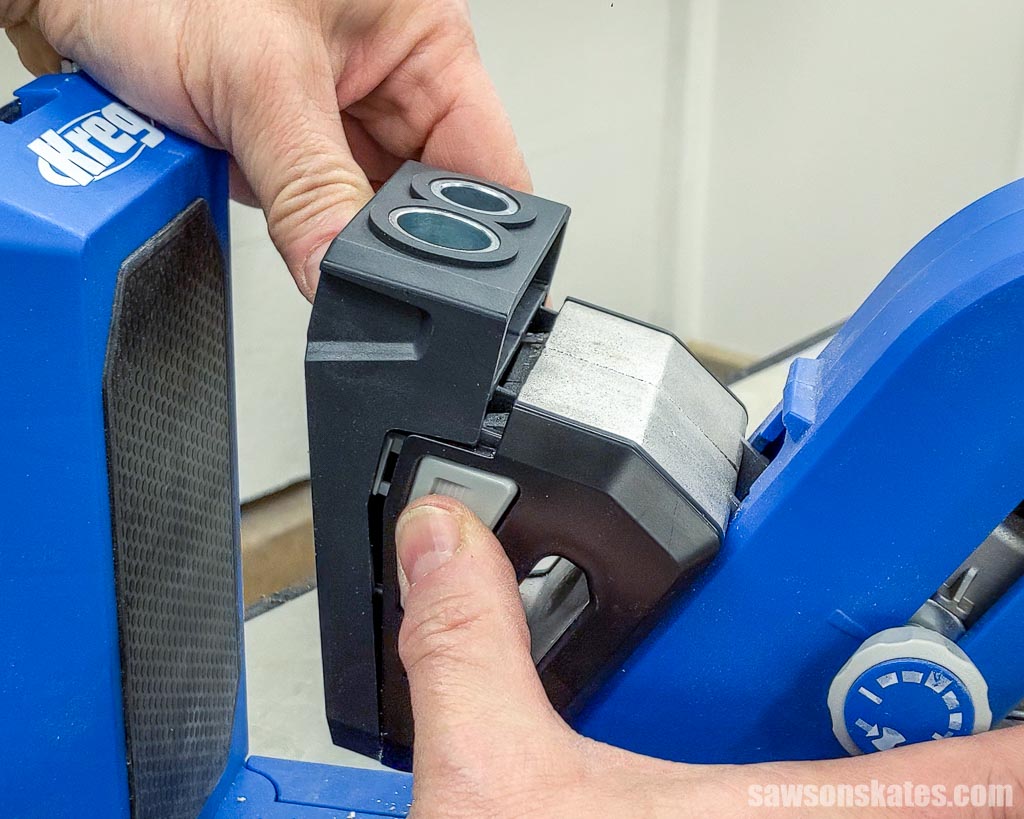
Step 2. Install the Plug-Cutting Drill Guide
Squeeze the tabs on each side of your 720’s drill guide, pull it forward, then lift it to remove it from the jig.
Related: How to Use a Kreg Jig 720
Squeeze the tabs on each side of your 720, place the plug-cutting drill guide’s slot into the jig’s tab, and press it into position.
Step 3. Clamp the Plug Blank
For the best results, I suggest using scrap wood from your project for the plug blank, the workpiece you will cut from, ensuring the plug’s color and grain matches your finished project.
I recommend cutting plugs in the same direction as the board’s grain because cutting them across the grain often results in plugs with jagged edges that easily split in half.
The plug-cutting kit’s instruction manual suggests cutting the blank to 3-¼”; however, I don’t usually cut mine because it makes them small and tricky to handle when using a saw to release them in Step 4. Instead, I choose at least 4″ or 5″ blanks or use longer blanks and cut plugs on both ends.
Once you’ve selected your plug blank, place it in your jig and clamp it in position.

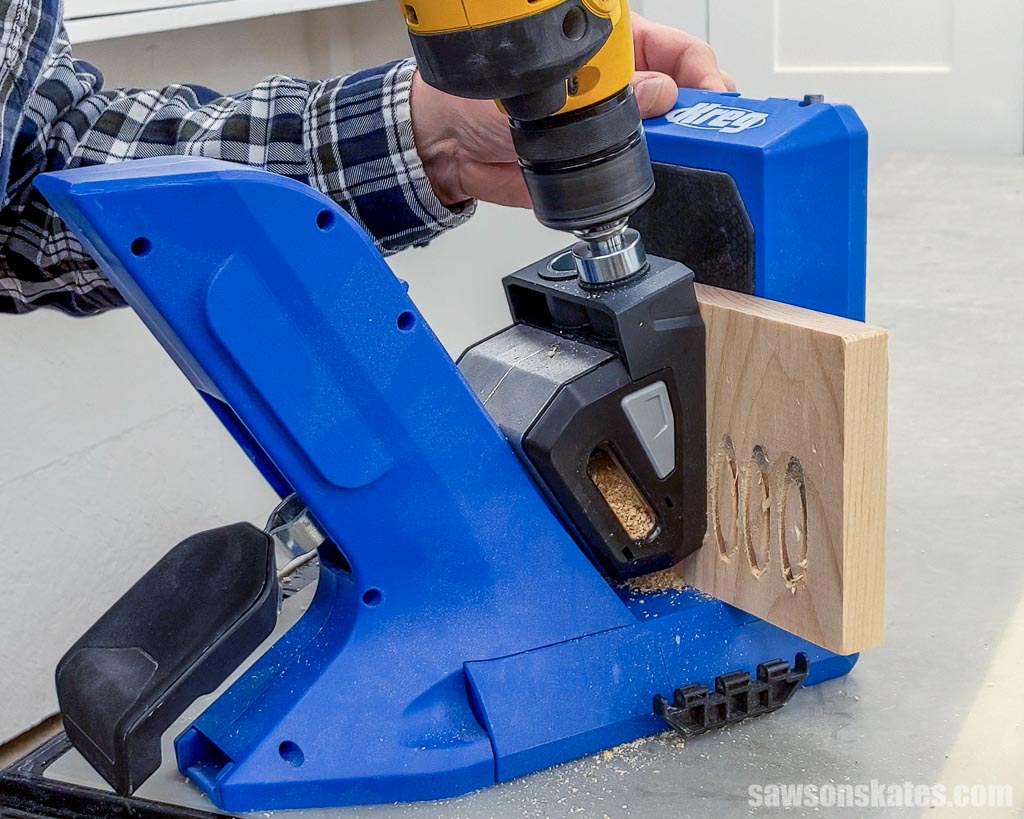
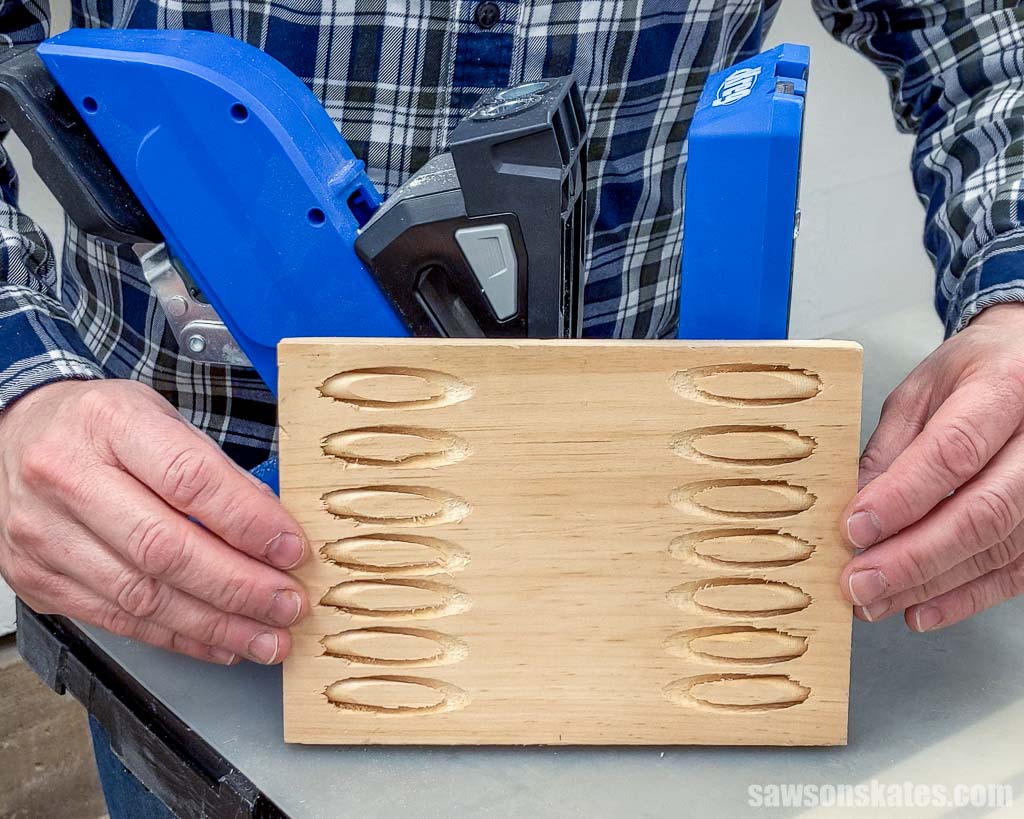
Step 4. Cut the Pocket Hole Plugs
Although cutting pocket hole plugs with a cordless drill is possible, I suggest using a corded one.
The plug-cutting bit requires considerable energy to slice through the wood, which can quickly drain a cordless drill’s battery.
If you don’t own a corded drill, ensure your cordless drill’s battery is fully charged. If you have a spare battery, ensure it’s charged as well.
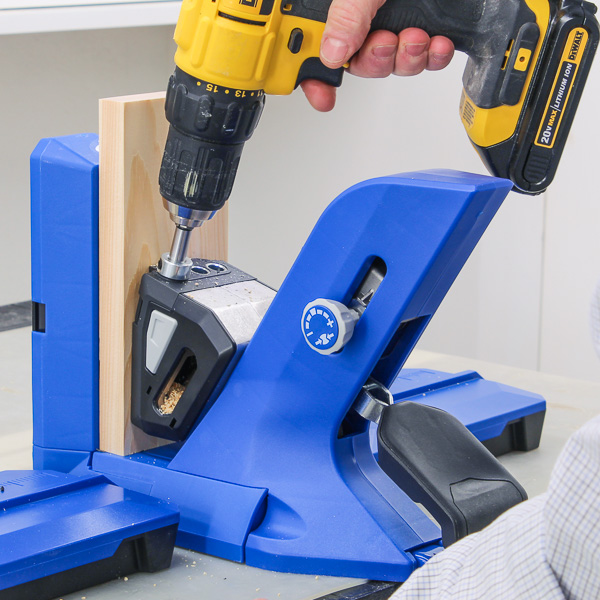
To begin, insert the plug-cutting bit into your drill.
Related: How to Change a Drill Bit (Step-by-Step)
Next, you’ll need to make some adjustments to your drill’s settings:
- Change the direction to forward, indicated by an arrow pointing toward the tool’s front.
- Switch the speed to the highest setting.
- If your drill has a torque adjustment, turn it to the “drill” setting, usually represented by an image of a drill bit.
Related: How to Use a Drill (Tips & Techniques)
Insert the plug-cutting bit in the guide block until it touches the plug blank. Then, lift the bit away from the blank, start the drill, and bring it up to full speed.
Lower the bit gently and begin cutting the plug. Apply only light pressure to the drill, allowing the bit to pull itself through the wood. Using excessive force may result in tearing the plug’s edges.
Keep drilling until the bit’s stop collar contacts the drill guide, then remove the bit. Be careful. The drill bit will be hot!

Release the clamp and reposition the blank. Wood chips can accumulate on the bottom of the jig, preventing the blank from seating correctly. Be sure to remove any chips when repositioning the blank.

Repeat this process until you reach the end of the blank.
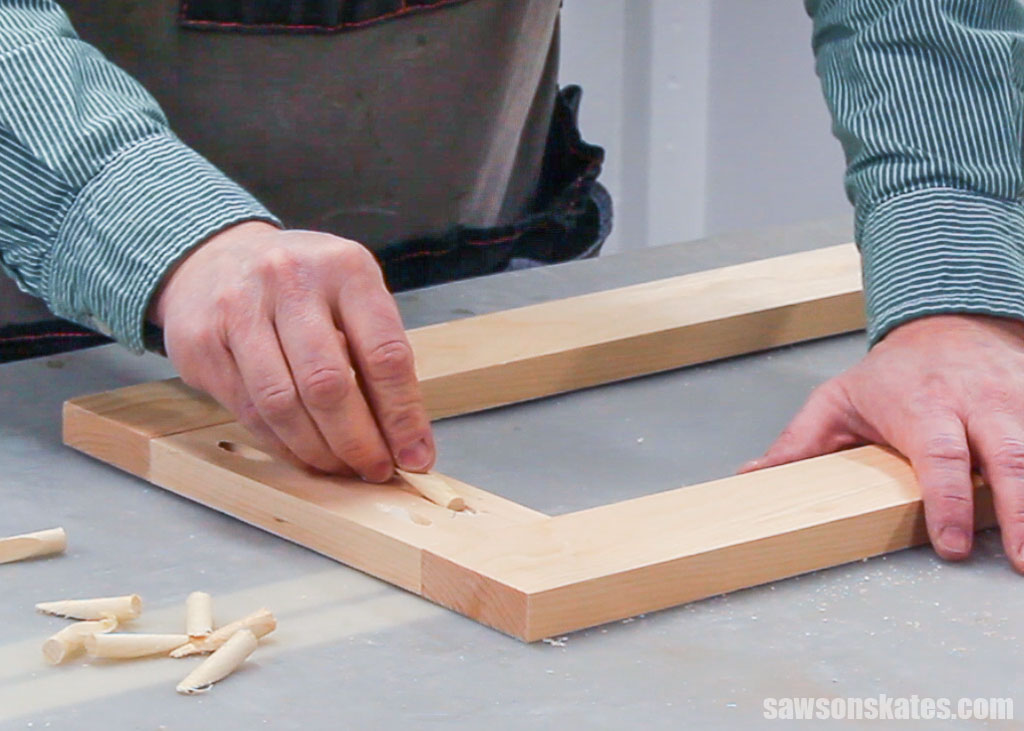
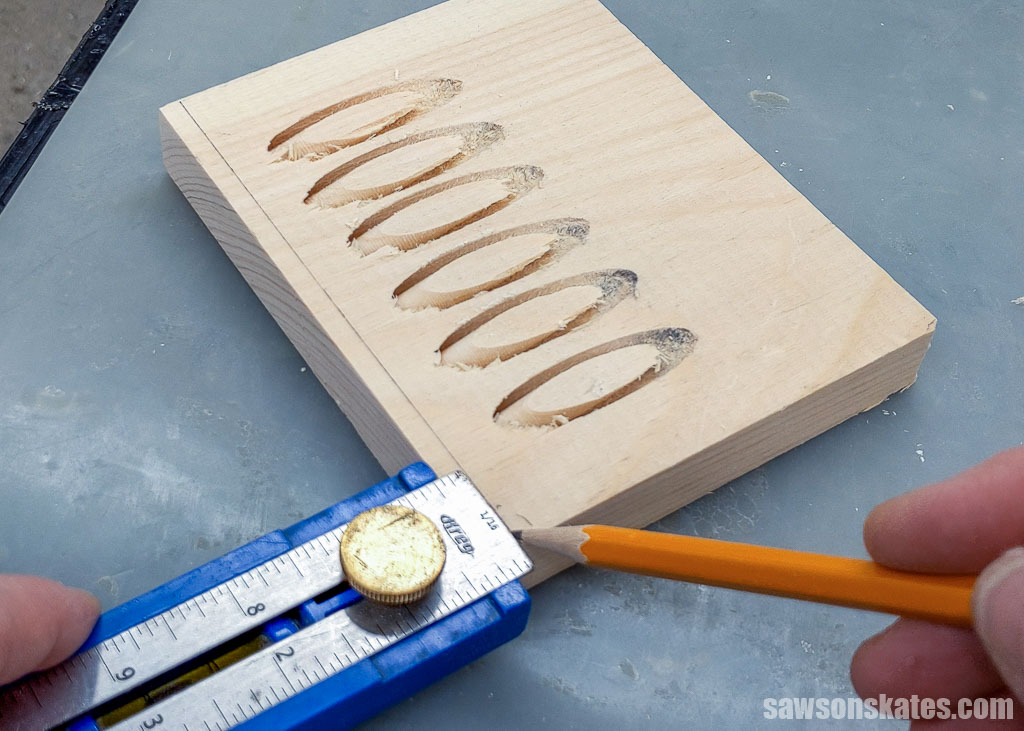
Step 5. Release the Plugs From the Blank
After you’ve cut the plugs, you’ll need to release them from the blank.
The plug-cutting kit’s instructions suggest drawing a line ³/₁₆” in from the edge. While this measurement worked when I made plugs with my Kreg Jig K3, I found this distance wasn’t enough to release plugs made with my Kreg Jig 720.
Instead, I needed to measure about ⅜” from the edge to remove the plugs from my blank. However, keep in mind that the 720 automatically adjusts to the thickness of your material, skewing how far away the bit cuts from the blank’s bottom. So, depending on your blank’s thickness, you may need to measure more or less to release your plugs.
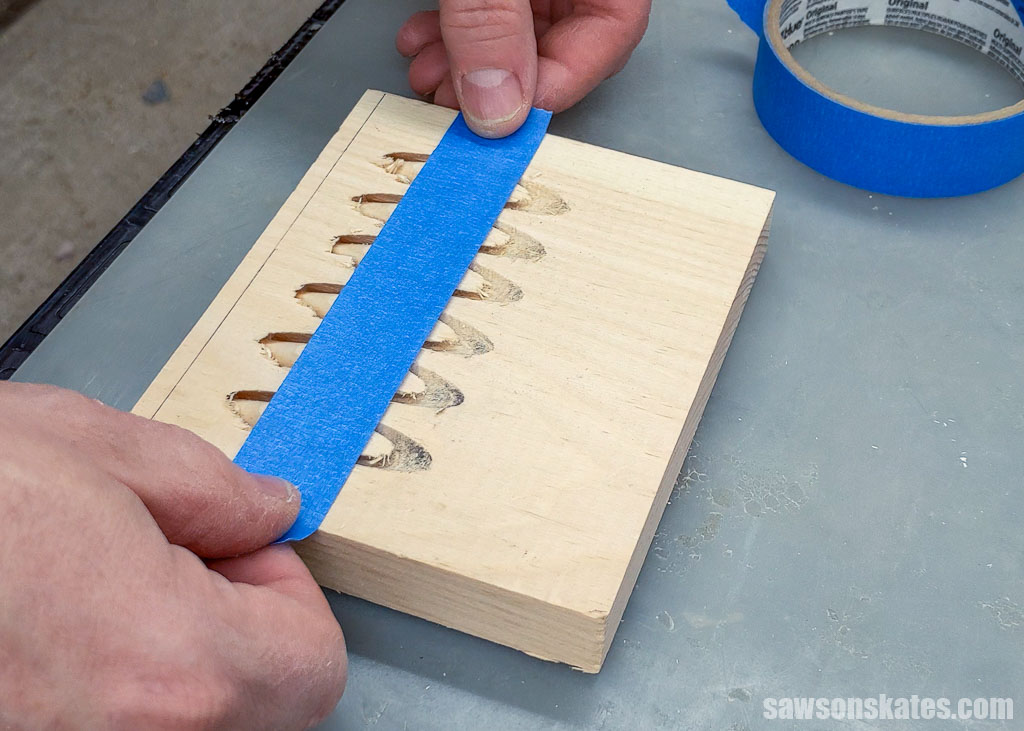
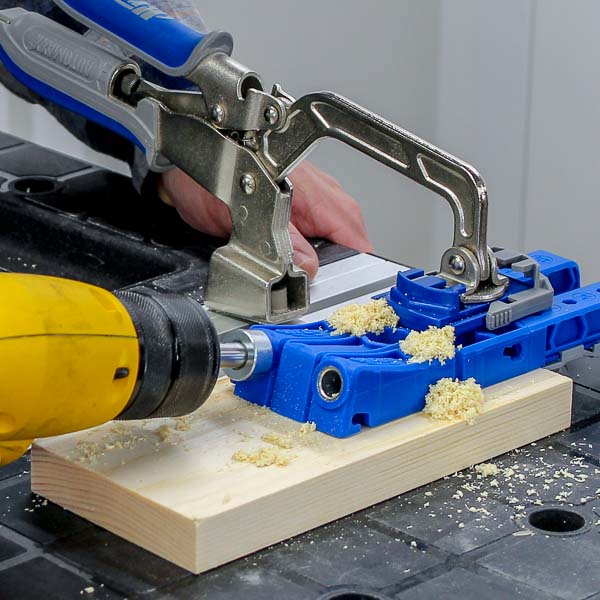
Use painter’s tape to hold the plugs in place while cutting them.
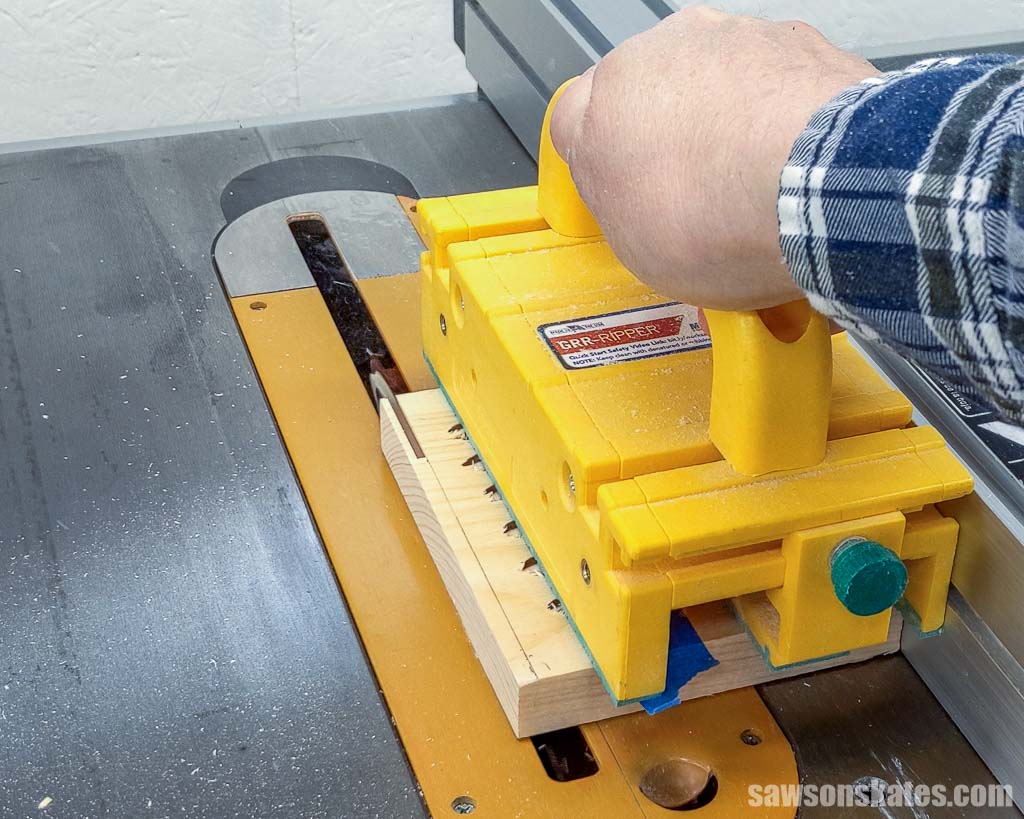
You can release the plugs from the blank using a table saw, bandsaw, jigsaw, or handsaw. I chose to use my table saw. First, I set the blade’s angle to 15 degrees.
Related: 21 Table Saw Safety Rules (& Mistakes to Avoid)

I positioned the pencil line on the blade and set the table saw’s fence. Then I used a push block to guide the blank through the blade. The plugs are now free from the blank and ready to use.
Step 6. Use the Pocket Hole Plugs
See How to Use Pocket Hole Plugs for more information.
Final Thoughts
Making pocket hole plugs is a simple process. With a few tools and scrap wood, you can create plugs that perfectly match your projects!
Thank you for stopping by. If you enjoyed this tutorial, would you please take a moment and pin it to Pinterest? I’d really appreciate it!
Recommended For You
Pin This For Later

Hi there – I’m Scott, a woodworking enthusiast and creator of Saws on Skates, a site I started in 2015 to share easy-to-follow tutorials, space-saving shop tips, and project inspiration for DIYers at any skill level. Learn more about my woodworking journey here.