DIY Wood Window Screens
I’ll show you how to build a DIY window screen that fits your home perfectly with just a few pieces of wood and some basic tools.
What Should I Build Next?
That's the question I help answer.
Every week, I send woodworking ideas to 17,000 DIYers who love building things.
You'd fit right in.
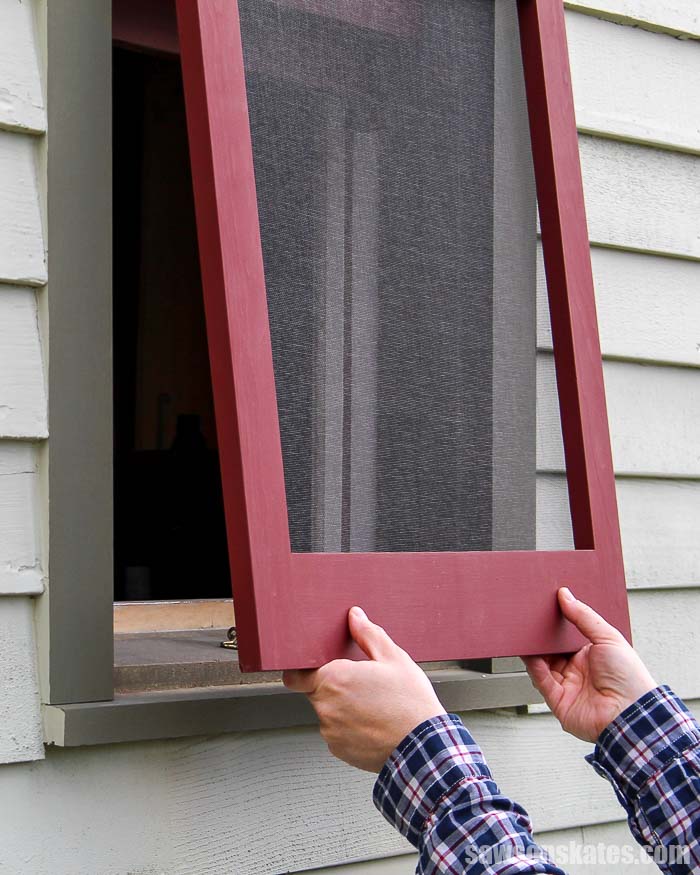
I’m ready to open my windows and let some fresh air in. The trouble is I need to make a new wood window screen for one of my windows. Do you have a broken or missing screen? No worries, because today I’m going to show you how to make a window screen, so you can let some fresh air into your home!
Originally published May 10, 2016, republished May 28, 2019
This article contains affiliate links. If you purchase from these links, I may earn a small commission at no additional cost to you. Visit my site policies for more information.
Timeless Style: Wood Window Screens for a Classic Look
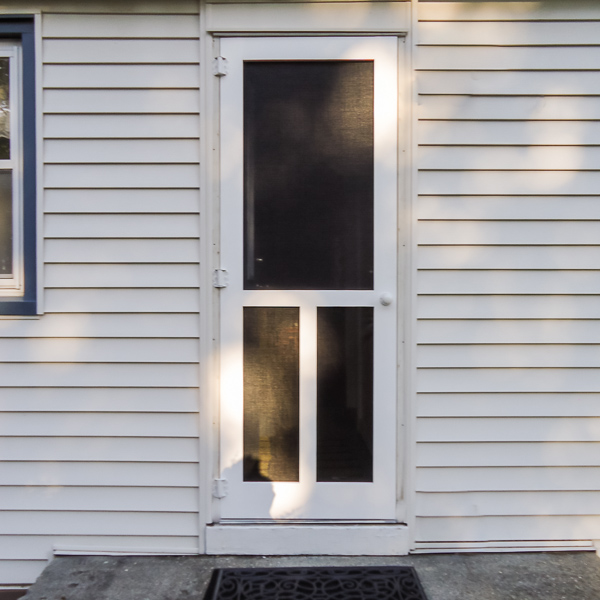
I was lucky when I bought my 1850s house; the previous owners had taken great care of it. They restored the wood siding, brought the front porch back to life, and added a beautiful reclaimed antique front door.
But one thing they hadn’t touched was the aluminum storm windows. At some point, those had been added, and while they served a purpose, they looked completely out of place, like they belonged in the 1950s, not the 1850s.
They clashed with the house’s historic character and were also missing all of their screens. So, every time I opened a window, insects and bees found their way inside.
One of my first projects was to remove those aluminum storm windows and build my own wooden window screens and storm windows. The result? A much more period-appropriate look and a bug-free home.
TIP: I’m making these frames for my windows, but you can use the same method to enclose a porch.
Measuring Different Window Sizes for a Proper Fit
Before building my window screens, I started by carefully measuring the window opening.
First, I measured the width from side to side (between the exterior window trim) at both the top and bottom of the window. Then, I measured the height from top to bottom (between the exterior trim and the window sill) on both the left and right sides.
Related: How to Use a Tape Measure Correctly (Tips for Success)
Since window openings aren’t always perfectly square, I used the smallest width and height measurements and subtracted ¼” from each. This small gap, about ⅛” on all sides, allows for seasonal wood movement and ensures the screen fits without being too tight.
If you prefer a visual guide, my printed plan includes a section on measuring, complete with a diagram to help you take accurate dimensions for a perfect fit.
Choosing the Right Wood for Your Window Screens
I used common pine for my window screens because I already had some on hand. While pine works, it’s not the best choice for exterior projects since it isn’t naturally rot- or insect-resistant.
For a more durable, longer-lasting option, consider Douglas fir, southern yellow pine, or another rot-resistant wood. These woods hold up better against the elements, making them a smarter choice for outdoor use.
Attaching the Mesh Screen to the Frame
There are a couple ways to attach the window mesh to the wooden frame.
The traditional method involves stapling the screen material to the frame and covering the staples with window screen molding, creating a classic look often found on old homes.
The modern method uses a rubber spline set into a groove in the frame to hold the screen material in place. This method provides a cleaner, more minimal appearance. However, cutting the groove for the spline requires a router and a straight-cutting bit. If you don’t have those tools, stapling the screen and adding wood molding may be the easier option.
Since my 1850s home has a simple farmhouse style, I felt the spline method was better suited for its design, so that’s the option I went with.
If you want to see step-by-step instructions for both methods, my printed plan includes details for each installation option.
How to Install a Wood Window Screen
Traditional Installation
The most common way to install a wood DIY window screen is with window screen hangers. Two hangers are attached to the window trim and two corresponding clips are attached to the window screen. The clips slide over the hanger and keep the screen in place.
DIY Installation
My aunt is also an old house fanatic, so of course, I shared with her how I planned to install my wood window screens. She had another idea that would give the windows a cleaner look.
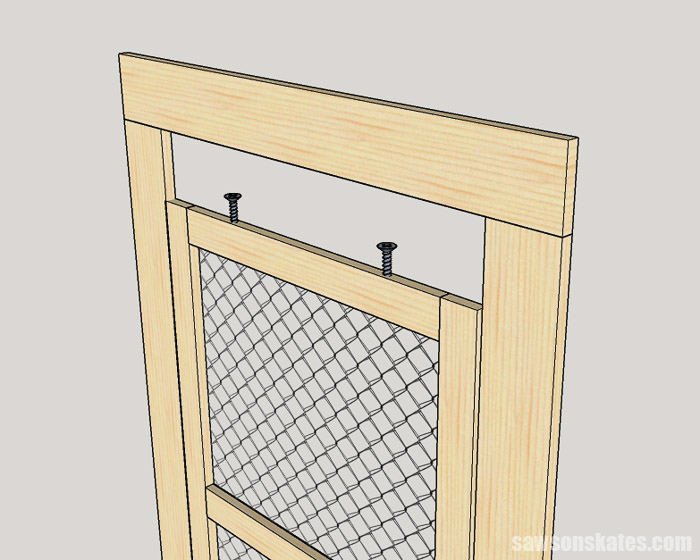
Her suggestion was to drive two screws in the top of the window screen and drill corresponding holes in the underside of the window trim.
The screws are left proud about a ½” and act like pins. The holes in the underside of the trim are drilled about ⅜” deep. The pins are inserted into the holes and lock the top of the screen in place. Think of it like adding a leaf to an expandable table where the pins of the leaf fit into the holes in the table.
A hook and eye at the bottom locks the screen in place.
I’ve received many questions about this installation method. I’ve tried taking photos, but it was tricky to properly photograph so that you could see what I was doing.
Instead, I created a 3D model in SketchUp to help explain it. I use it to design most of my projects before I build them. Want to learn how to model your own projects in SketchUp? You can check out my beginner class here.
Related: Is SketchUp Free Good for Woodworking Projects?
I’ll preface this by saying this is still not as clear as I would like it to be. So please bear with me. If you’re still unsure, I suggest making a jig with some scrap wood and testing it out. I think it may become easier to understand that way.
Make a Jig
I started by making a jig from scrap wood.
In this sketch, the jig is placed on the outside of the window screen. But in this view, we are looking down and from the inside of the house.
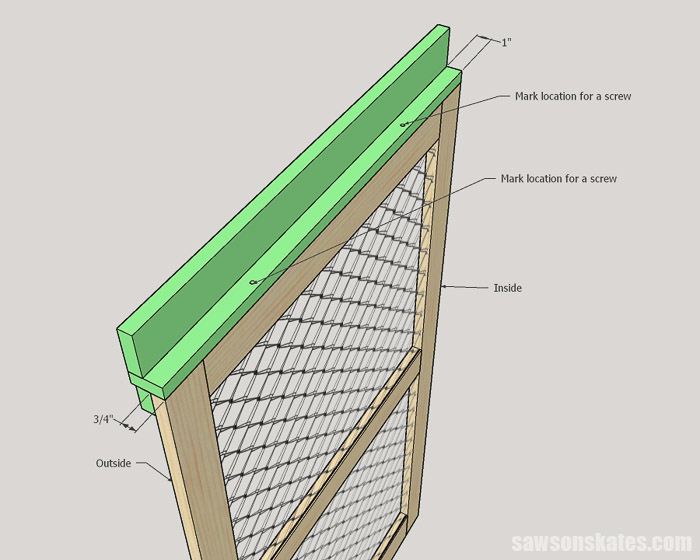
The bottom of the jig is set for ¾”, the thickness of the storm window. The top of the jig is set for 1″, the distance I needed to set the storm window in the opening correctly. Your measurement may be different.
Two holes were drilled through the top of the jig. These holes will be used to mark the location of the screws that will act like pins. Later, they will be used to mark the location for holes on the underside of the trim.
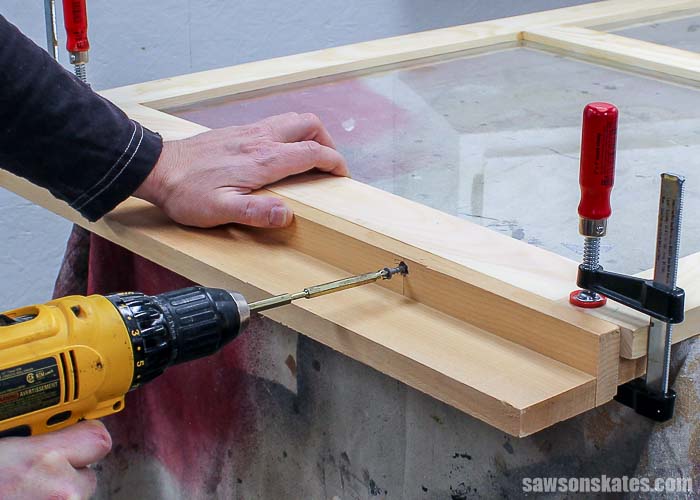
In this photo, the jig is clamped in place, and I am driving a screw that will act as a pin.
Then the jig is placed on the window trim. In this sketch, we are standing in the yard on the outside of the house.
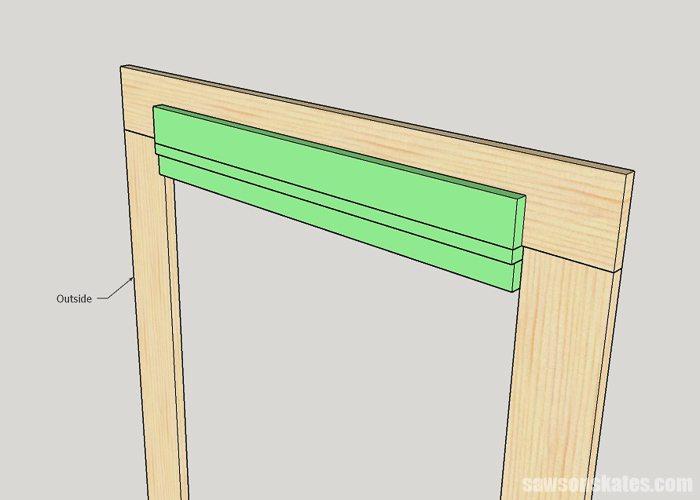
To see the next step, we have to look from inside the house. You can do this step outside, but we need to look up, and from the inside, so you see what to do.
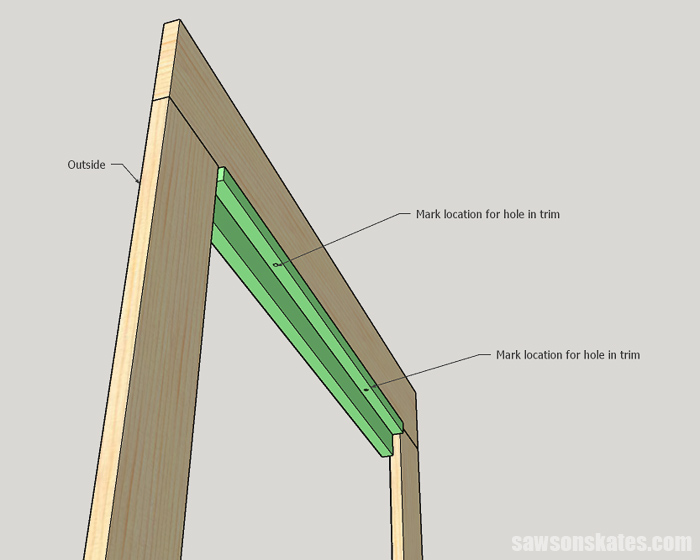
Use an awl to mark the center of each hole in the jig on the underside of the trim.
Related: What is an Awl (+ How to Use it)
Then, use a ¼” Forstner bit (or whatever size bit will fit the screws you are using) to drill a hole ⅜” deep at each location.
Related: What is a Forstner Bit? (& How to Use It)
Now, the pins (screws) can be inserted into the holes. All that is left is to add a hook and eye to the bottom of the screen.
How to Make a Window Screen Frame
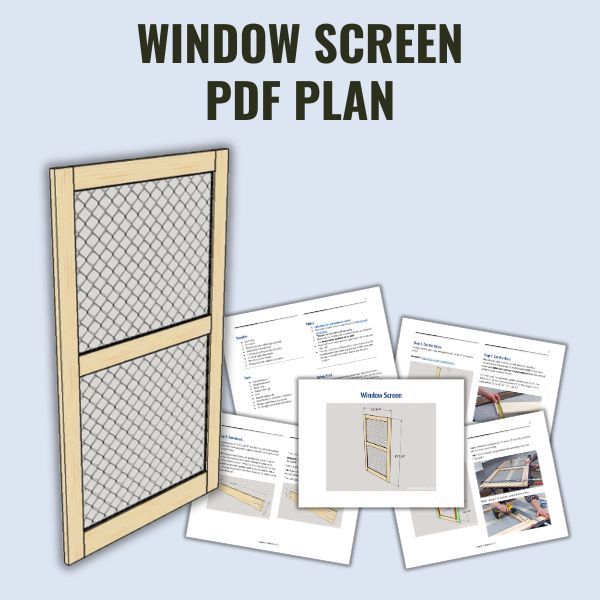
Printed Plan
Get the PDF plan here (includes detailed instructions, measurements, and bonus tips)
Materials
- Wood (per the printed plan)
- Waterproof Wood Glue
- 1-¼” Exterior Pocket Hole Screws
- ½” Brad Nails (optional)
- Window Mesh
- Window Screen Spline (optional)
Tools
- Tape Measure
- Kreg Multi-Mark
- Miter Saw
- Pocket Hole Jig
- Drill
- Stapler (optional)
- Brad Nailer or Hammer (optional)
- Router with Fence (optional)
- ⅛” Straight Router Bit (optional)
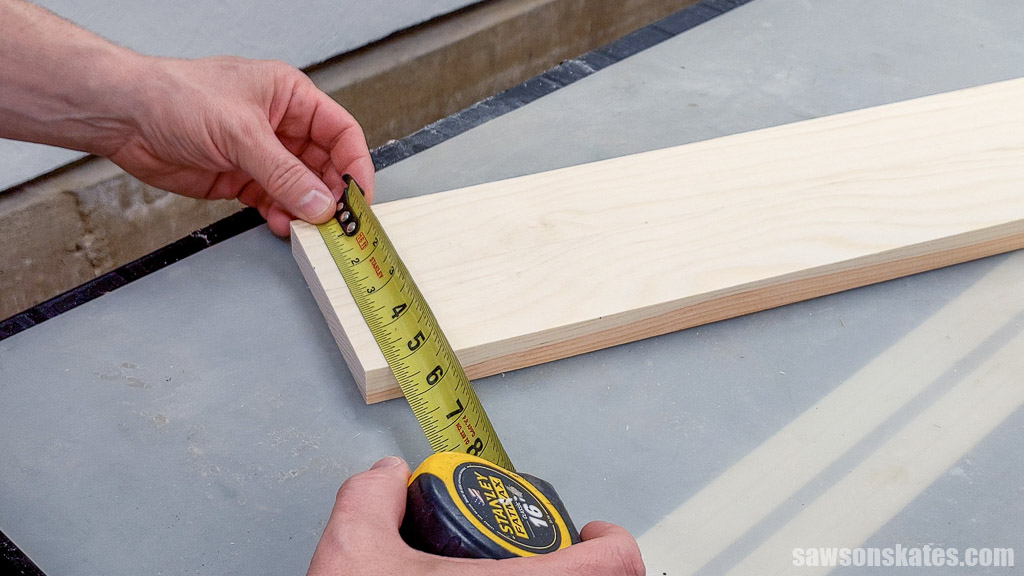
Step 1. Measure the Opening
I first took measurements from side to side (between the exterior window trim) at the top and bottom of the window.
Next, I took measurements from top to bottom (between the exterior window trim and the window sill) on the left side and right side of the window.
I subtracted a ¼” from the smallest side to side dimension, and I subtracted a ¼” from the smallest top to bottom dimension.
These were the dimensions I used to build my window screen. Subtracting a ¼” will allow for ⅛” of movement around each side of the window frame.
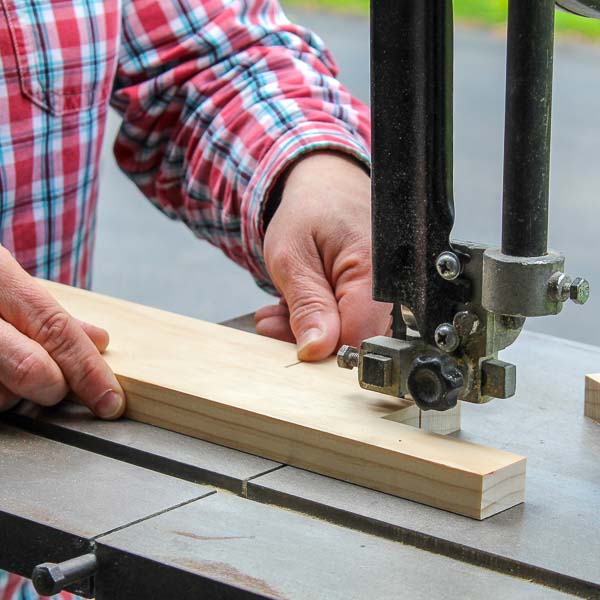
Step 2. Cut the Stiles
I cut two pieces of wood to length for the stiles.
Step 3. Cut the Rails
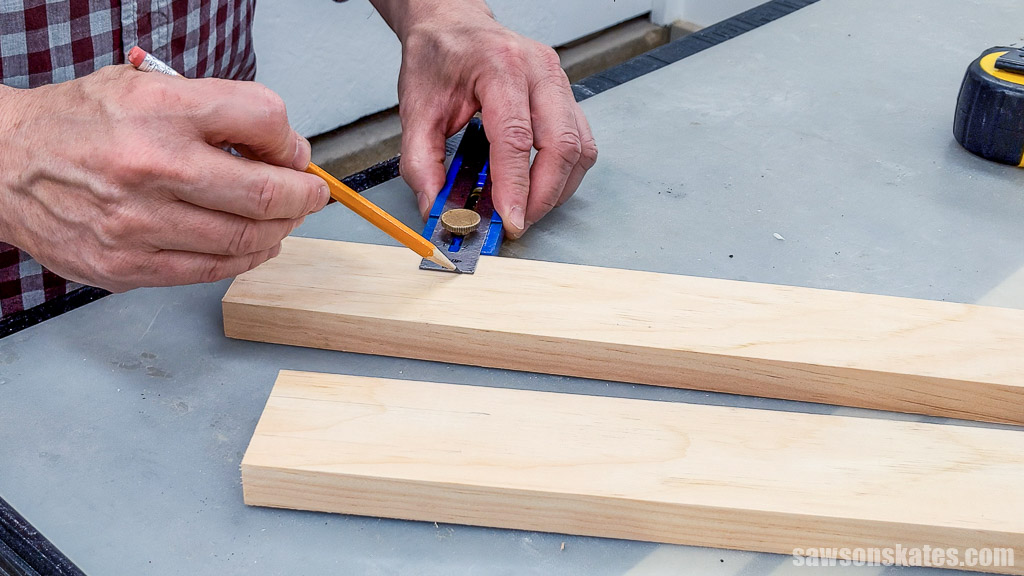
Boards can vary in width, so for the best results, I recommend placing the stiles side-by-side, measuring their total width, and subtracting it from your window’s required width to arrive at the length for your rails.
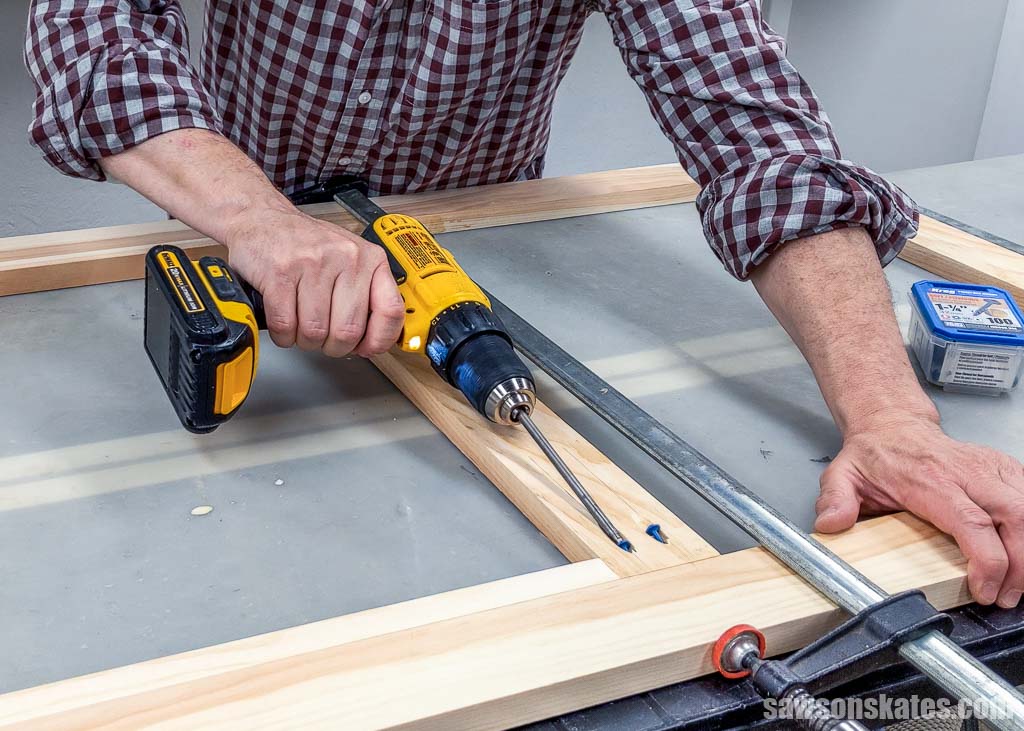
Cut two pieces of wood to length the top rail and mullion (middle rail). Following the diagram in the printed plan, mark the location for pocket holes.
NOTE: These pocket holes are positioned closer than I’d prefer, but it’s important to allow enough clearance to install the window screen. Whether you secure the screen with staples or create a groove with a router and bit for a spline, moving the pocket holes too close to the edge could cause interference.
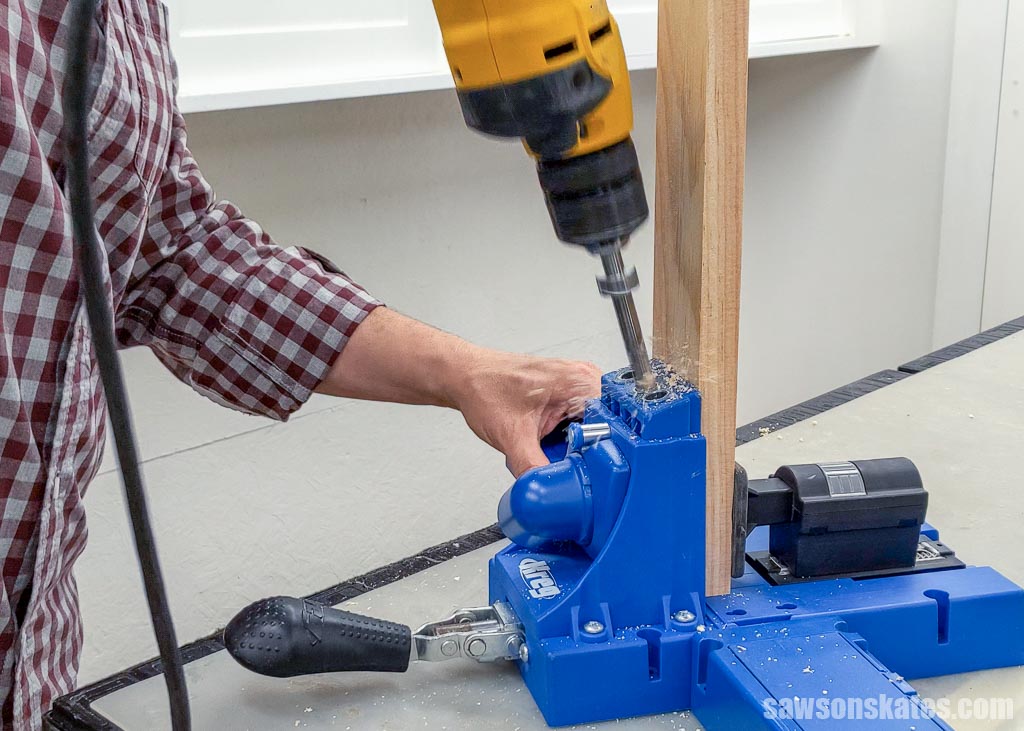
Then, drill pocket holes at each mark.
Related: How to Use a Pocket Hole Jig (& Beginner Pitfalls to Avoid)
Cut one piece of wood to length for the bottom rail.
TIP: Again, follow the diagram in the printed plan to position the pocket holes to avoid interference when installing the screen.
Then, drill pocket holes at each mark.
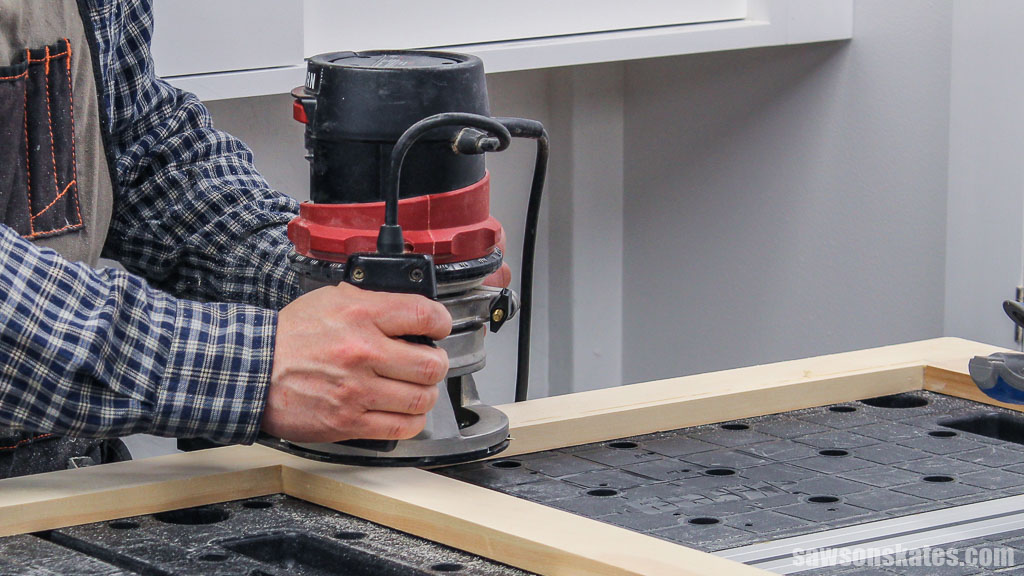
Step 4. Assemble the Window Screen Frame
I cut two pieces of scrap wood to help with the spacing between the bottom rail and mullion (middle rail).
Apply exterior wood glue to the ends of the rails, position on the stiles, and clamp.
TIP: I recommend using waterproof wood glue such as Titebond 3.
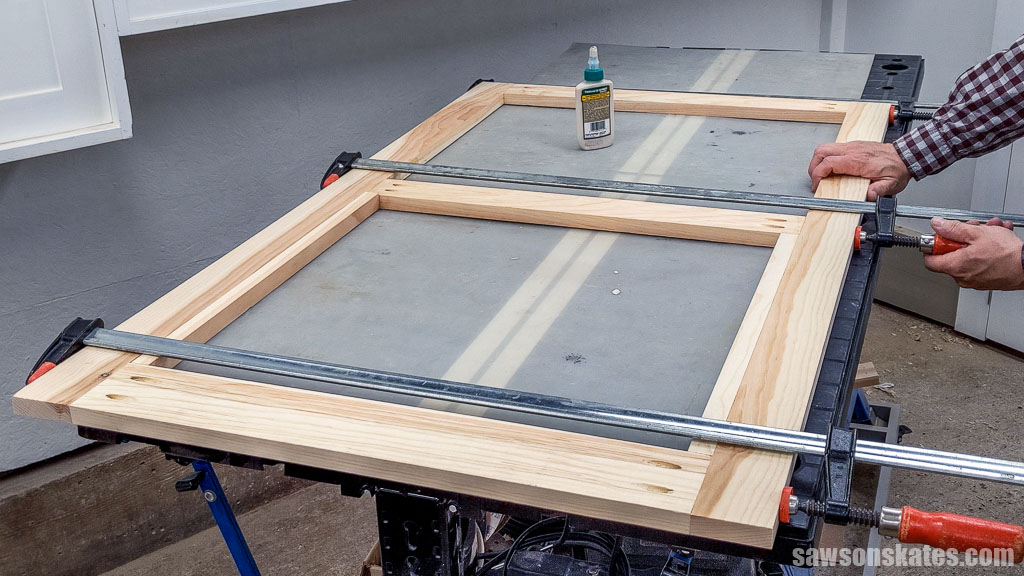
Attach using 1-¼” exterior pocket hole screws.
To hide the pocket holes and give your project a more polished appearance, I recommend filling them with store-bought pocket hole plugs or making your own.
Related: How to Make Pocket Hole Plugs

Step 5. Attach the Window Screen Mesh
You can install the window screen in two ways: either attaching it to the frame with staples or using a router with a straight-cutting bit to create a groove for a spline.
My printed plan covers both installation methods, but I’ll walk you through an overview of the spline method here.
To make a groove for the spline you’ll need:
- A router with a fence
- An ⅛” straight-cutting bit
Following the diagram in the printed plan, I used a Kreg Multi-Mark to layout the grooves. I marked the corners so I’ll know where to start and end the cut.
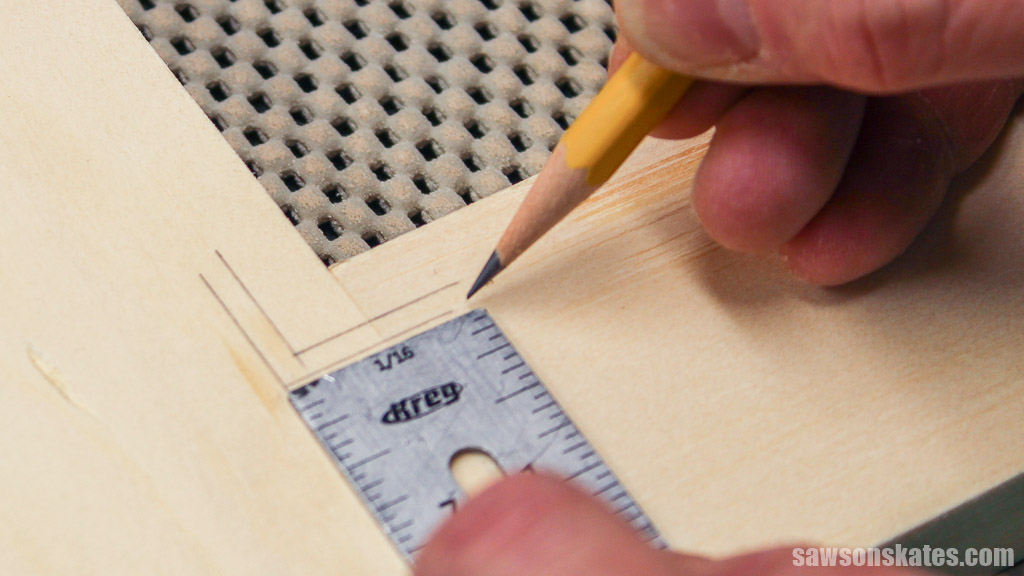
I installed the ⅛” straight bit in my router and used the Kreg Multi-Mark to set the depth of the bit to ¼”. Then I used the marks on the frame to set the router fence.
I routed the sides and top first as they are the same width. I started at the corner, plunged the router bit into the layout line and worked towards the opposite corner
I stopped the router at the opposite corner, repositioned it on the next side and cut the next groove.
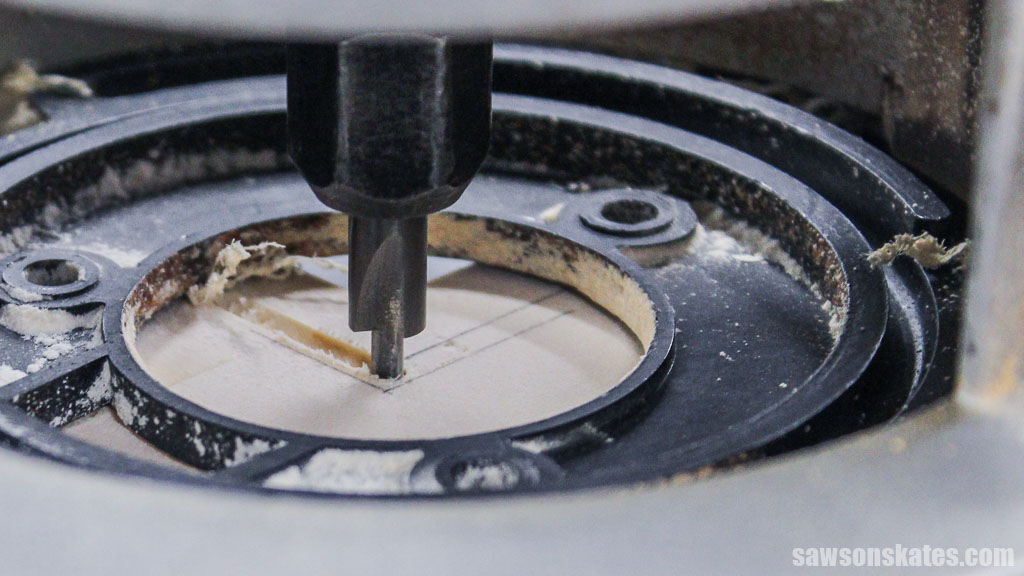
Then I adjusted the fence to the proper depth for the bottom rail and cut the last groove.
Check out my Replacing Window Screen tutorial for a step-by-step guide on installing the mesh and spline.
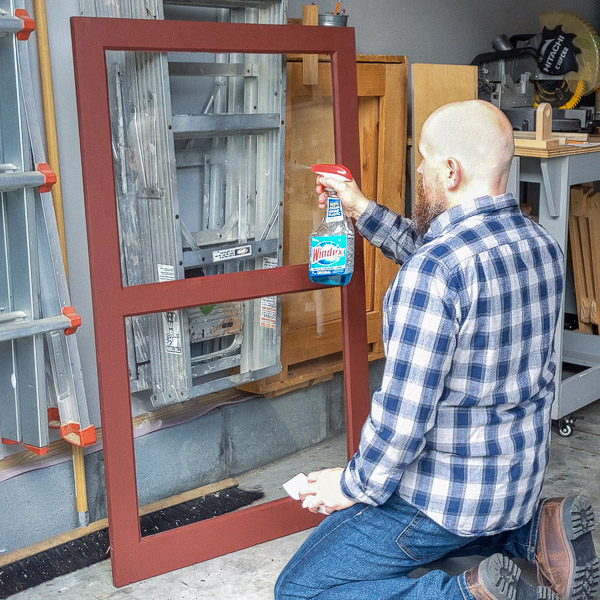
Step 6. Protect the Wood
I used a paintbrush to apply two coats of exterior stain to my window screen.
Related: How to Clean Paintbrushes (Save Money & Better Results!)
Includes:
- List of tools and materials
- Complete measurements (in inches)
- Easy-to-follow instructions
- Step-by-step photos
- Detailed diagrams
Final Thoughts
Now you know how to make windows screens! Grab a few pieces of wood gather some simple tools, and follow this step by step tutorial to build your own DIY window screen frame!
Get the plan (including the detailed instructions and measurements) now!
Thank you for stopping by. If you found this information helpful, would you please pin it to Pinterest? Other DIYers would appreciate it and I would too! Thank you – Scott
Recommended For You
Pin This For Later

Hi there – I’m Scott, a woodworking enthusiast and creator of Saws on Skates, a site I started in 2015 to share easy-to-follow tutorials, space-saving shop tips, and project inspiration for DIYers at any skill level. Learn more about my woodworking journey here.
I have been looking for a plan to build wooden screens for about 2 years. Thank you for fulfilling my needs. We have a house that was built in the early 1950s and we have replaced some of the windows, but we have a couple that we need to put solar screens on due to the heat that comes through the single paned old windows. Do you have any plans for kitchen cabinets that tell how to build that have drawers? I think that will be a project for this next winter.
Thank you
Jean
Hi Jean – Thank you for stopping by. I’m glad the window screen plan is going to work for you. I have a plan for DIY Tool Storage Cabinets and DIY Shaker Cabinet Doors, but I haven’t created any plans for kitchen cabinets yet.
Thanks for the how-to. I’ve used the crummy aluminum screens from Home Depot and while they are easy, they warp with the tension in the screen and don’t look good. Our old house deserves some nice wood screens like these. In the online version you don’t show your Aunt’s solution nor how to install the mesh.
Hi Nate – Thank you for stopping by. I’ve tried taking pics several times of my aunt’s installation idea, but I never felt like the pics accurately captured what I was doing. Now that I’m thinking about it, I may be able to develop some sketches that would properly show the process. There’s a link in “Step 7. Install the Screen” that shows how to install the screen. I’m also including the link here ==> How to Replace a Window Screen
I have looked at few plans for these and yours is one of the simper options. I don’t have a biscuit joiner but may considering getting one. I have 10+ windows to make. That may be a bit more forgiving than using my Beadlock jig.
What wood species did you use?
I also may cut an ogee on the outside. I have a 1899 limestone house in St. Louis. Not only are their terrible aluminum windows but the are even the wrong color — brown over white. Looks terrible.
Hi Huck – I used common pine to build mine. Pine is not the best wood for exterior projects because it’s not rot-resistant. I keep them sealed with exterior stain and they have lasted for years. That said, I made a screen door with pine for a friend and it didn’t last very long.