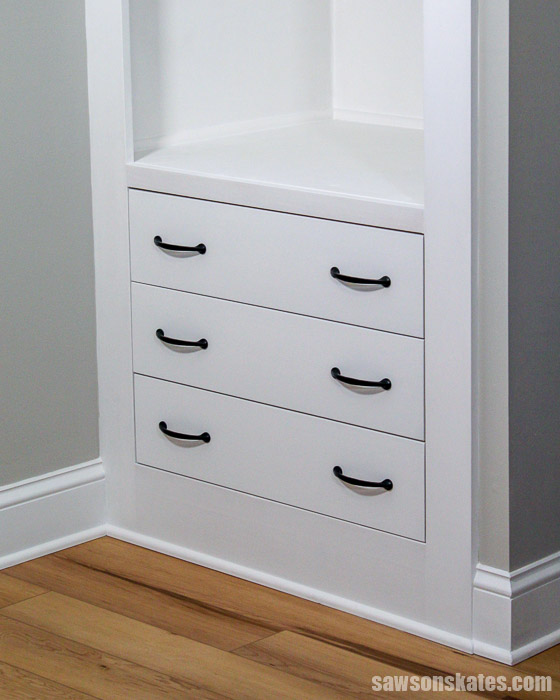
How to Build DIY Drawers
Build DIY drawers with confidence! Learn the foolproof way to measure, build, and install drawers. It’s easy for anyone to do with some simple tools.
How to Build DIY Drawers
Many DIYers cringe at the thought of building drawers. If you make one tiny mistake the drawer won’t slide properly. Now you just wasted time, money and materials. Today I’m sharing the easy way to build a sturdy drawer box that will fit precisely every time. And you don’t need any complicated tools. You can build DIY drawers without a table saw or a router. All you need is some simple tools like a miter saw, a circular saw and a pocket hole jig.
A few of the tools I used for this project were provided to me by my friends at Kreg Tool in exchange for my honest review. All thoughts and opinions are my own.
You may also enjoy How to Make DIY Cabinet Doors (Without a Router).
This post contains affiliate links to supplies or tools I used to complete this project. Purchases made using these links help support the Saws on Skates website and allow me to share more DIY projects. and DIY tips with you. There is no cost to you for using these links. Click here to visit my site policies.
Before we get into how to make DIY drawers, be sure to click the subscribe button at the bottom of this page to sign up for my FREE weekly newsletter loaded with helpful pocket hole tricks, space-saving workshop ideas, clever DIY tips and more!
Table of Contents
- Types of Drawer Construction
- Types of Drawer Fronts
- What Kind of Wood Should I Use to Build Drawer Boxes?
- How to Measure for DIY Drawers
- Types of Drawer Slides
- Quick Steps to Building DIY Drawers
- How to Build DIY Drawers: Video
- How to Build DIY Drawers: Tutorial
- How to Install Drawers
- How to Install Drawer Hardware
- Get the Free Drawer Building Handbook
- More Like This
Types of Drawer Construction
Years ago, I enrolled in some woodworking classes at my local arts center. We learned how to make book-matched panels, how to steam bend wood, proper clamping techniques, and more. We also learned several ways to build drawer boxes.
We learned how to build a cabinet drawer with box joints, rabbets, and dados. We also learned how to build a drawer using hand-cut dovetails. These techniques are all great ways to build strong, sturdy drawer boxes. The thing is, these techniques take time and precision to master.
Related: How to Make Box Joints (3 Easy Ways)
DIY drawers can also be made with power tools like a table saw or router. These tools can often be intimidating to some DIYers especially to beginners.
Related: Beginner’s Guide to Table Saw Safety
But the good news is that there’s a quick, easy, foolproof way to build drawer boxes without using dovetails, a table saw or a router.
We can use simple tools like a Kreg Jig, a miter saw and a circular saw to build cabinet drawers that fit precisely every time.
Types of Drawer Fronts
There are two types of drawer fronts we can choose to make for our DIY drawers. We can build inset drawers or overlay drawers.
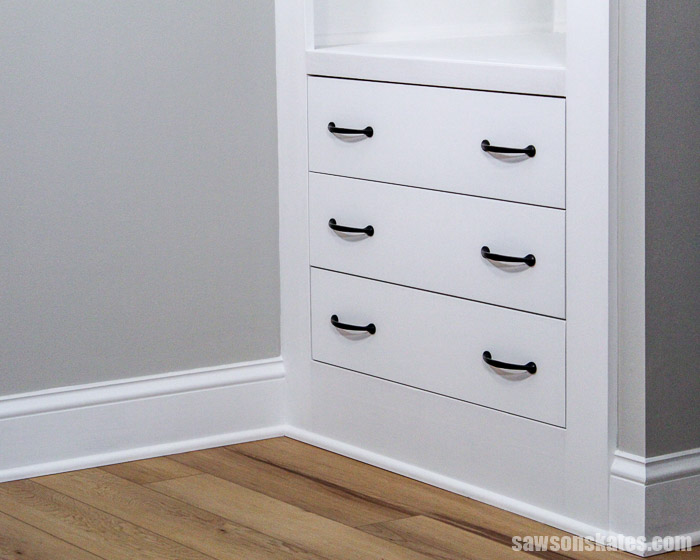
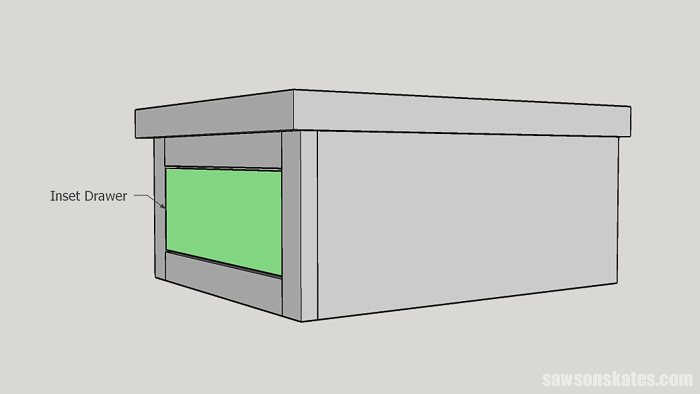
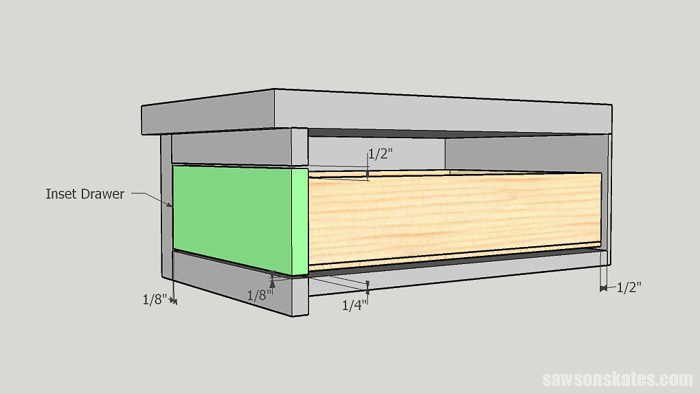
Inset Drawers
Inset drawers fit inside the face frame of the cabinet or dresser. In my opinion inset drawers give a piece of furniture a cleaner, more polished look. This look comes at a price though. Inset drawers are more fussy to make.
Inset drawers need to fit precisely inside the drawer opening. There should be an ⅛” gap for clearance around the top, bottom, and sides. A perfectly spaced gap makes the piece look professional. The drawer can look amateur if there’s an inconsistent gap in between the opening and the drawer front.
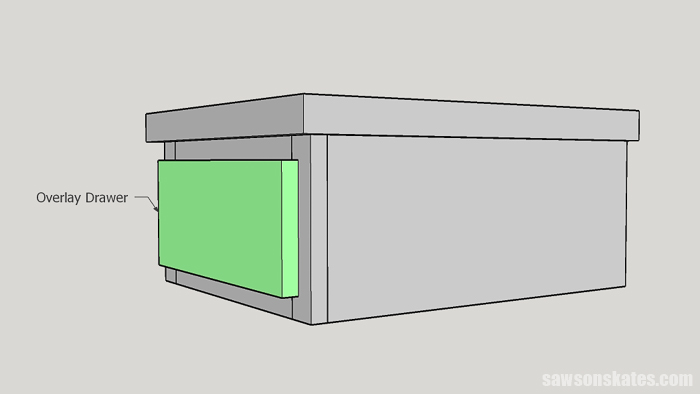
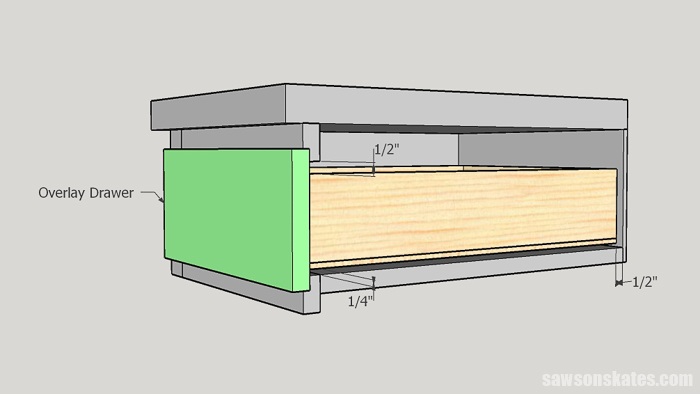
Overlay Drawers
Overlay drawers extend over the face frame of the cabinet or dresser. Overlay drawers are more forgiving to make.
Overlay drawers typically extend a ½” over the top, bottom, and sides of the face frame. Unlike inset drawer fronts they don’t need to fit precisely in an opening. All we have to do is center the overlay drawer front on the opening and it will look perfect every time.
What Kind of Wood Should I Use to Build Drawer Boxes?
We can use boards like a 1×4 or plywood to make drawer boxes. Personally, I think it’s easier to make the sides of drawer boxes with boards rather than plywood.
If we use boards to make the sides of drawer boxes all we need to do is cut them to length. There are a few extra steps we need to do if we use plywood to make the sides of the drawer.
First, we need to rip the pieces to width and then cut them to length. We can rip the plywood to width with a circular saw and a Kreg Accu-Cut or Kreg Rip-Cut. Or we could use a table saw.
Related: 4 Ways to Make Straight Cuts with a Circular Saw
Second, the layers of plywood will be seen from the top of the drawer. This could make the drawer look unfinished. We could use edge banding to cover the edges of the plywood. This would give the drawer a more finished look.
Using plywood to build drawers isn’t difficult. It just means some extra steps need to be taken. In my opinion, it’s easier to build drawers with boards.
I planned to paint the drawer fronts of my DIY drawers. I chose primed wood for my drawer fronts. Primed wood is usually made from smaller pieces of wood that have been glued together to form a longer board. Primed boards tend to be straighter than solid wood boards.
Knots can bleed through paint so these primed boards are typically knot-free. And since they’re already primed it saves a step when it’s time to paint.
How to Measure for DIY Drawers
There are few measurements we need to make before we can begin building our DIY drawers. We need to know the height, width, and length to make the drawer box. We also need to decide if we want inset drawers or overlay drawers.
Height
As a general rule, we should allow a minimum clearance of a ¼” at the bottom and a ½” at the top of the drawer box. We also need to allow for the drawer bottom which is a piece of ¼” plywood.
As I mentioned earlier, I think it’s easier to build a drawer box with boards rather than plywood. Once I know the size of the opening I compare those measurements to the standard sizes of boards. For example, a 1×2 would make a drawer that is 1-½” tall. A 1×3 = 2-½”, 1×4 = 3-½”, 1×6 = 5-½”, etc. I’ll use a board that fits the opening the best.
If we use plywood rather than boards we can rip the plywood to any height we need.
Width
We need to allow a ½” of clearance on each side of the drawer box. This clearance is for the drawer slides. Drawer slides are usually a ½” thick. (Check the instructions of your drawer slides to be sure).
Length
The length of the drawer box will be based on the type of drawer front we plan to use. For inset drawers, we need to allow for the thickness of the drawer front. In this case, the drawer front will be ¾” thick so we’ll allow for ¾” at the front of the drawer. We need to allow for ½” clearance between the back of the drawer box and the back of the cabinet or dresser.
An overlay drawer seats against the face frame of the cabinet or dresser. This means we don’t need to allow for any clearance at the front of the drawer box for overlay drawers. We need to allow for ½” clearance between the back of the drawer box and the back of the cabinet or dresser.
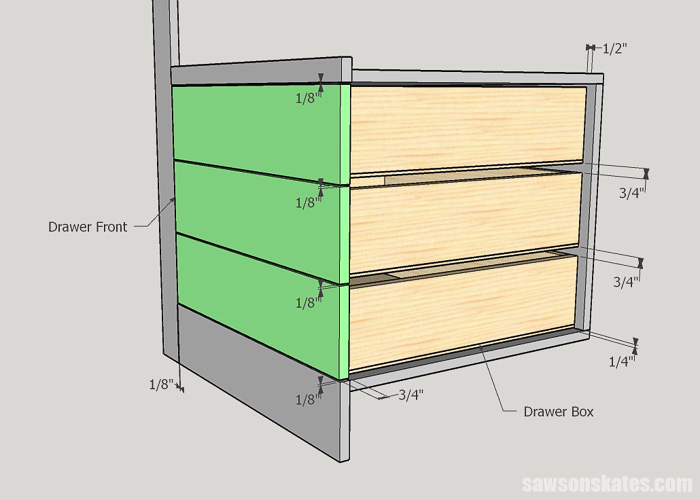
Multiple Drawers
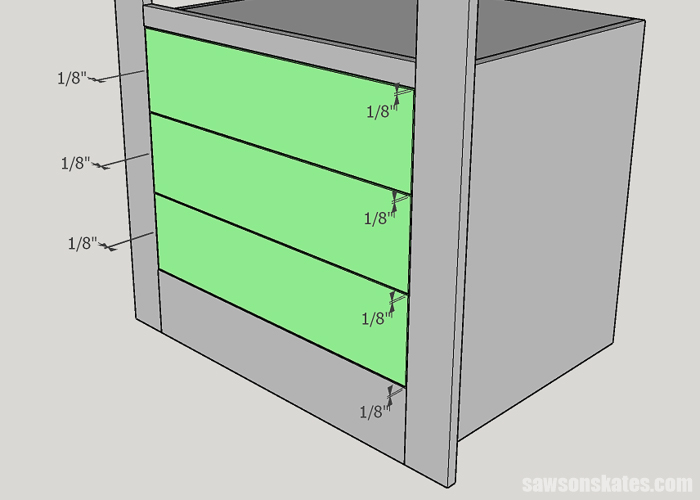
My project had multiple drawers so I needed to measure a little differently. I wanted three drawers with inset drawer fronts for this project. Here’s how I calculated the measurements for my drawers.
First, I divided the size of the opening into thirds and I allowed an ⅛” of clearance between each drawer front.
Next, I figured the size of the drawer boxes. I allowed for ½” at the back of the drawer and ¾” at the front for the inset drawer front.
I allowed for a ¼” of clearance below the bottom drawer box. I allowed for ¾” of clearance between the bottom and middle drawer boxes, and the middle and top drawer boxes.
Types of Drawer Slides
We also need to consider what type of drawer slide we’ll use to install our DIY drawers. There are several types of drawer slides but there are two common types that we’ll often see. These are roller slides and ball-bearing or full extension slides.
Roller Slides
Roller slides are usually less expensive and used for light-duty applications. I have roller slides in my kitchen cabinets. They work but they tend to fall off the tracks over time.

![]()
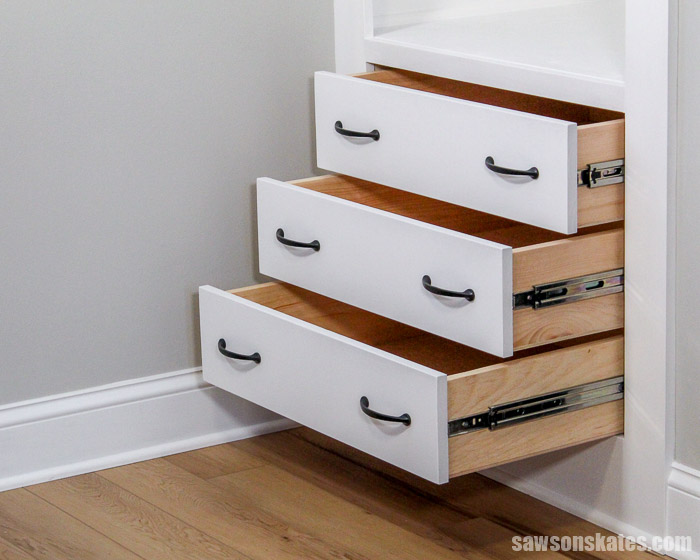
Ball-Bearing Slides
Ball-bearing slides are usually more expensive and used for heavy-duty applications. They feel sturdier and slide more smoothly. In my opinion, they give a piece a more upscale feel. I usually use ball-bearing slides for my projects.

![]()
Where to Use DIY Drawers
- Kitchen Cabinets
- Bathroom Vanity
- Dresser
- Workbench
Quick Steps to Building DIY Drawers
- Choose a Drawer Front Style (either Inset or Overlay)
- Measure the Opening
- Cut the Parts and Drill Pocket Holes
- Assemble the Drawer Box
- Install the Drawer Slides
- Install the Drawer Box
- Attach the Drawer Front
- Attach a Knob or Pull
How to Build DIY Drawers: Video
How to Build DIY Drawers
Printed Plan
Supplies
- 1×6 (This may differ for the size of your drawer box)
- 1×8 (This may differ for the size of your drawer box)
- ¼” Plywood
- 1-¼” Pocket Screws
- ½” Brad Nails
- Wood Glue
- Double-Sided Tape
- Playing Cards
- Drawer Slides
- Drawer Knobs or Handles
Tools
- Tape Measure
- Drill
- Kreg Jig
- Miter Saw
- Circular Saw (it’s helpful to have a Kreg Rip-Cut. or Kreg Accu-Cut)
- Table Saw (optional)
- Brad Nailer or Hammer
- Countersink Drill Bit Set
- Drawer Slide Jig
- Cabinet Hardware Jig
Step 1. Measure the Opening
See the How to Measure DIY Drawers section above about how to measure for the drawer boxes.
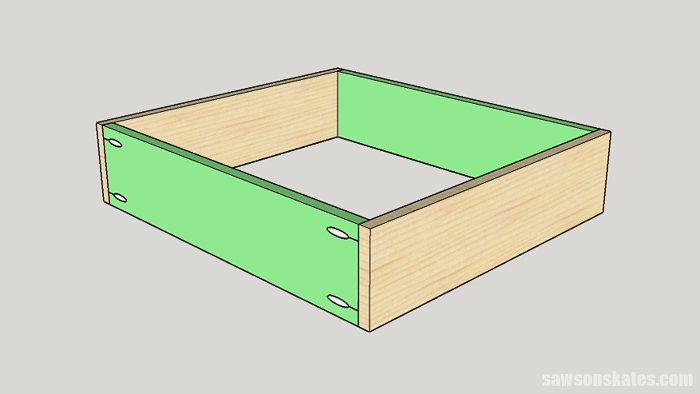
Step 2. Make the Drawer Box
Cut the front and back of the drawer box using your measurements from Step 1. The front and back of my drawer box measured 23-¼”. I cut 2 pieces of 1×6 to 23-¼” and drilled pocket holes in each end.
Related: How to Use a Kreg Jig

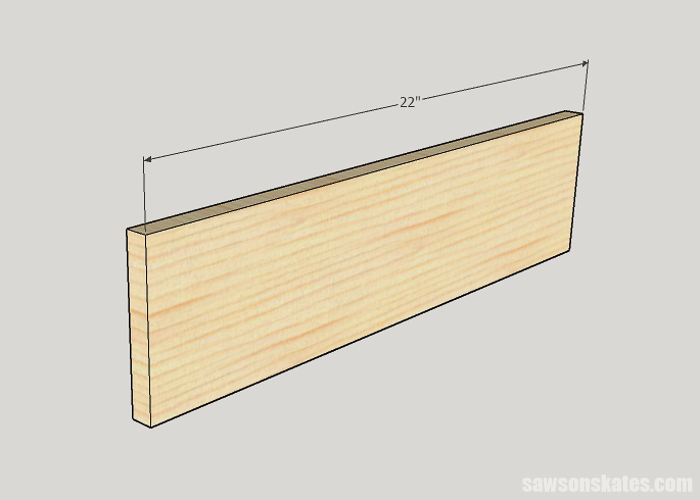
Cut the drawer box sides using your measurements from Step 1. My drawer box sides measured 22″. I cut 2 pieces of 1×6 to 22″.
Apply glue to the ends of the front and back, position on the sides, clamp and attach using 1-¼” pocket screws.
Step 3. Attach the Bottom
Measure the drawer box. My drawer box measured 22″ × 24-¾”. Use a circular saw and a Kreg Rip-Cut or a Kreg Accu-Cut to cut a 1/4″ piece of plywood for the bottom.
My Accu-Cut was at a buddy’s house and my drawer bottom was larger than the rip capacity of the Rip-Cut. I used a table saw to cut the bottom for my drawer box.
Related: 4 Ways to Make Straight Cuts With a Circular Saw
I applied glue to the bottom of the box and attached the drawer bottom with a brad nailer and ⅝” brad nails.
Related: Brad Nailer vs Finish Nailer: Are They the Same?

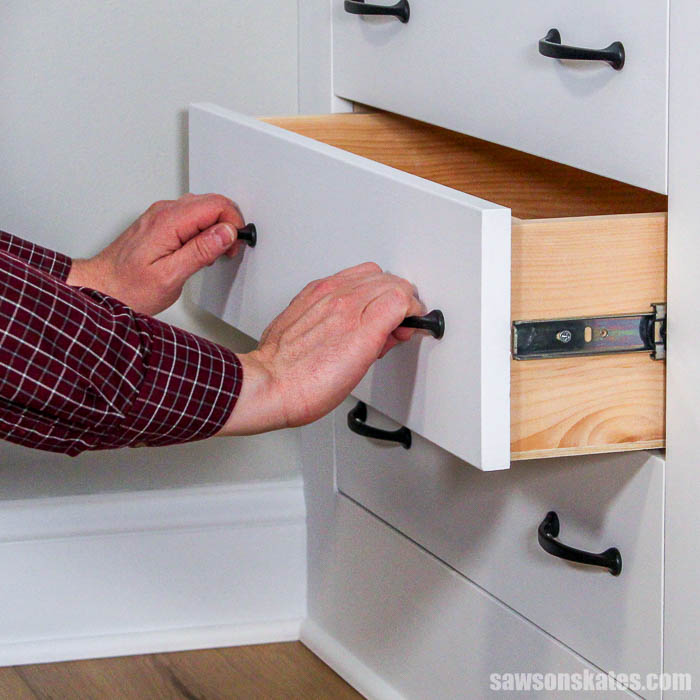
Step 4. Install the Drawer Box
See How to Install DIY Drawers below.
Step 5. Attach the Drawer Front
I’m using inset drawer fronts for my project. Inset drawers need an ⅛” of clearance around each side of the drawer front. See How to Measure DIY Drawers for more information.
My drawer fronts measured 6-¼” × 25-½”. I used a table saw to rip a 1×8 to 6-¼” and cut them to length. I could have also used a circular saw and a Kreg Rip-Cut to rip these pieces to width.
I test fit all of the drawer fronts in the opening. I used playing cards as spacers in between the drawer fronts. Adjust the dimensions of the drawer fronts if necessary.
When I was happy with the spacing I applied a few pieces of double-sided tape to the back of the drawer front. I placed the drawer front in the opening and used the playing cards again as spacers. Then, I clamped the drawer front to the drawer box.
Next, I drilled two countersink holes on the inside of the drawer box and attached with 1-¼” wood screws. It’s a good idea to test fit where you want to install the knobs or pulls. Then position the countersink holes to avoid these areas.
Step 6. Install the Hardware
See How to Install Drawer Hardware below.
How to Install DIY Drawers
There are two ways we can install our DIY drawers. We can install the drawers with a jig or without a jig. The easiest way to install drawers is with a Kreg Drawer Slide Jig. The jig clamps to the sides of the cabinet to install the drawer slides and the drawer. I was installing my drawers in a built-in cabinet so I didn’t have a place where I could clamp the jig.
How to Install Drawer Slides with a Jig
How to Install Drawer Slides Without a Jig
As I mentioned, I wasn’t able to use the drawer jig to install the drawers in my built-in dresser. Instead, I made my own DIY jigs or spacers.
First, I used my sketch to locate the center of each drawer. Then, I measured the height of my drawer slides and divided the measurement in half. From the centerline, I measured down half the height of the drawer slide. This told me the width to rip the pieces of wood to use as spacers
Use a circular saw and a Kreg Rip-Cut to rip pieces of wood to these widths. I used a table saw to rip my pieces.
I placed the spacers and drawer slides in the cabinet. The drawer slides were attached with the screws that came with the slides.
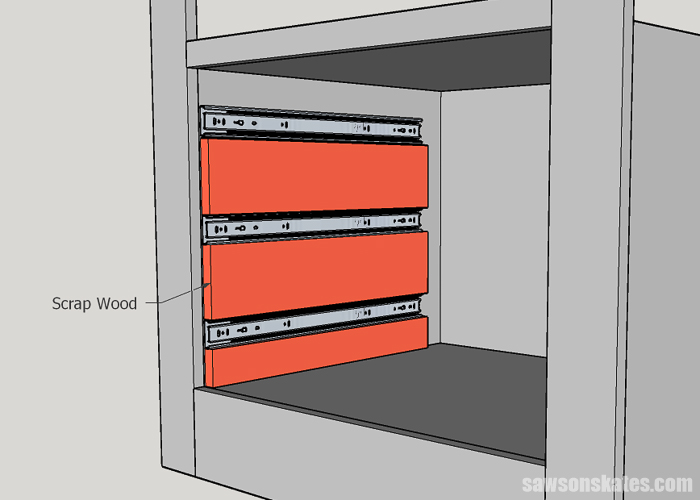
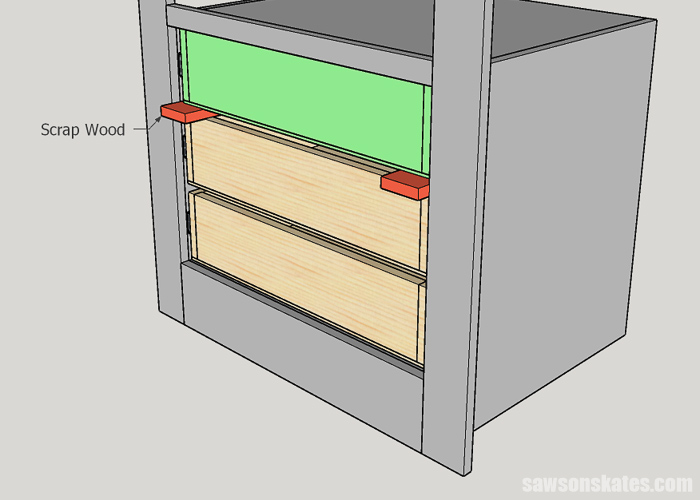
Next, I installed the bottom drawer. I placed some scrap ¼” plywood on the bottom of the cabinet and extended the drawer slides. I placed the drawer box on top of the scrap wood and in between the drawer slides.
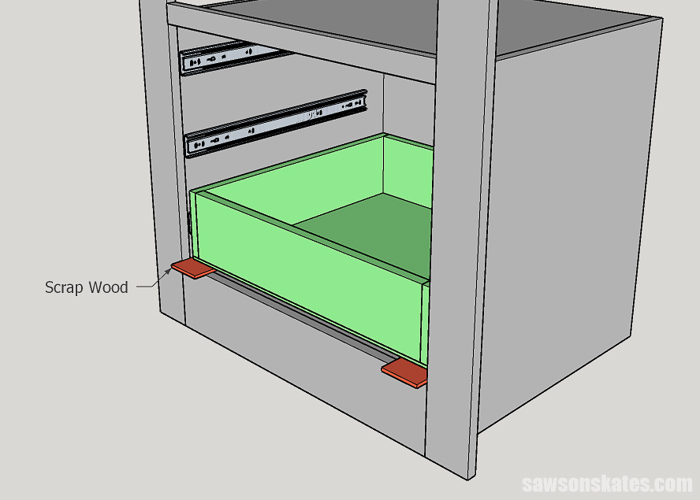
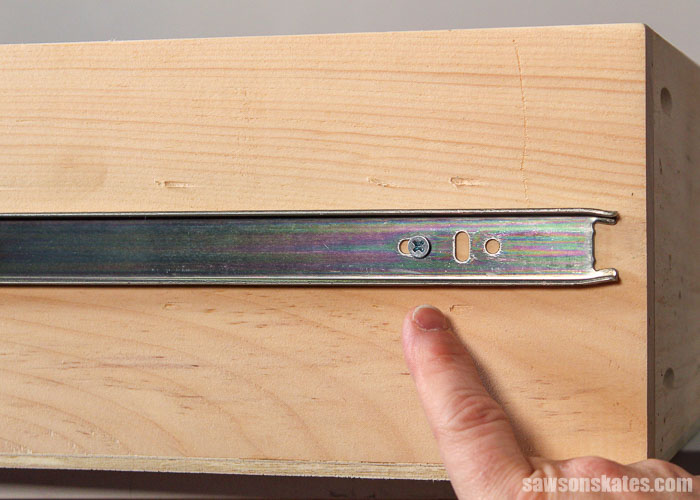
I usually attach the screws in the horizontal slots. This allows me to adjust the drawer from front to back so I can position the drawer fronts flush with the face of the cabinet.
For the middle drawer, I placed some scrap 1x material on top of the bottom drawer box and attached the drawer slide the same way I attached the bottom drawer.
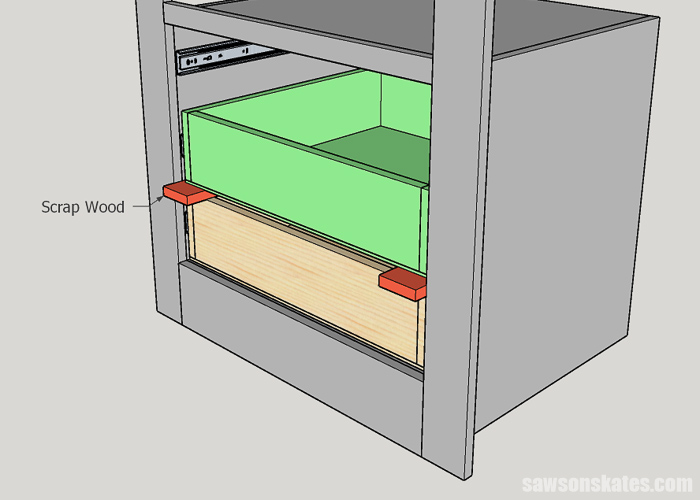
I repeated this process for the top drawer.
How to Install Drawer Hardware
I used the Kreg Cabinet Hardware Jig to install the drawer pulls on my DIY drawers. First, I set the jig for the length of my pulls. Next, I adjusted the jig so the pull would be centered from top to bottom on the drawer front.
When the holes were drilled I attached the pulls with the screws included with the pulls.
Final Thoughts
Many DIYers cringe at the thought of building drawers. The good news is there’s an easy way to build a sturdy drawer box that will fit precisely every time without using complicated tools. All you need is a miter saw, a circular saw, and a pocket hole jig.
Thank you for stopping by. If you found this information helpful, would you please pin it to Pinterest? Other DIYers would appreciate it and I would too! Thank you – Scott
More Like This

Hi there – I’m Scott, a woodworking enthusiast and creator of Saws on Skates, a site I started in 2015 to share easy-to-follow tutorials, space-saving shop tips, and project inspiration for DIYers at any skill level. Learn more about my woodworking journey here.
Thank you for all your info on multiple items of wood working. It has been very helpful. I am really glad that you are not one of those people tat are out just for the money only. I am a senior disabled person that still enjoys wood working when I can.
your friend
William Hare
Very helpful and perfect presentation 👍
Hi Van – Thank you for the compliments. I’m glad this was helpful for you.
Excellent article. Appreciate the time and effort that went into make this available.
You’re welcome, Steve. I’m glad you enjoyed it.
I want to build some kitchen draws, your article and guidance is so helpful. Thanks very much.