DIY Truck Camper (Cabin on Wheels) Cost + Build Tips
I’m answering the FAQs about my “tiny house” DIY truck camper: design, construction, how I load it, cost, pros and cons, and what I would do differently.
What Should I Build Next?
That's the question I help answer.
Every week, I send woodworking ideas to 17,000 DIYers who love building things.
You'd fit right in.
Tent camping is a lot of fun unless it’s raining. Sleeping in a soggy tent, packing up wet camping gear, and hanging it out to dry when you get home is anything but fun.
The last time I went camping in the rain, a light bulb went off in my head. I need a truck camper! I’m breaking down the most asked questions about my DIY truck camper including, the inspiration for the tiny cabin design, how it was constructed, how long it took to build, how I load it on and off the truck, costs, pros and cons, plus much more valuable information.
Originally published May 30, 2018, updated February 21, 2022.
This tutorial contains affiliate links to supplies and tools. Purchases made using these links help support the Saws on Skates website and allows me to share more projects and tips with you. There is no cost to you for using these links. Visit my site policies for more information.
Table of Contents
- What is a Truck Camper?
- Types of DIY Truck Campers
- Why Build a Homemade Truck Camper?
- DIY Truck Bed Camper Design Concept
- How Was it Constructed?
- How Long Did it Take to Build
- Is it Insulated?
- Does it Have an Electrical System?
- How Do You Load the Camper into the Truck?
- How Do You Attach the Camper to the Truck
- How Does it Drive?
- DIY Truck Camper Video
- How Much Does it Cost to Build a Truck Camper
- Pros and Cons of a DIY Truck Camper
- What Would I Do Differently?
What is a Truck Camper?
A truck camper is a recreational vehicle (RV) that attaches to the back of a pickup truck. Many times it provides the amenities of a full-sized RV but in a much smaller package. Truck campers are ideal for people who want the flexibility and convenience of camping without investing in a large, expensive RV.
Types of DIY Truck Campers
There are two common types of DIY truck campers: a truck topper and a full build-out.
DIY Truck Topper Camper
A truck topper, truck cap, or camper shell sits in the bed of a pickup and attaches to the truck’s rails with clamps. Toppers usually have fewer features than a full build-out, but they provide dry shelter for essentials like bedding, food, water, and other camping gear.
Toppers are typically lighter in weight than a full build-out, which can be important if you have a smaller truck.
Many DIYers choose to make a topper because they are easy to build and requires fewer materials, making them relatively affordable.
If you’re going to build one, consider making the topper tall enough for you to stand up. Also, consider where you’ll store the topper if you need to remove it from your truck.
If you’re looking for the least expensive and easiest to build option, a truck topper is the way to go.
Full Build-Out
A full build-out truck camper is a self-contained structure that can be different shapes and sizes, tall or long, and can even extend over the cab of your truck with space for a sleeping bunk. Full build-out truck campers attach to a truck’s frame with tie-downs and chains.
Full build-outs provide more space and features than a truck topper. Some even include a small kitchen area with a sink and stove. But the downside is they are usually heavier too.
Making a full build-out camper is more work than a truck topper, requires more material, is more complex, and is generally more expensive.
If you’re considering building a truck camper, make sure it’s strong and can handle the stress of being loaded/unloaded and attached to your truck driving at highway speeds. You don’t want it to break apart and fly off while you are driving down the road!
Why Build a Homemade Truck Camper?
There are several reasons I decided to build my own DIY truck camper.
To begin, I wanted a completely waterproof alternative to tent camping. If the weather wasn’t cooperating, a truck camper would be an ideal place to spend some time either sleeping, playing cards, or just hanging out until the rain passed. Plus, it would save me the trouble of packing up and driving wet gear back to my house after a camping trip.
I also liked the idea that a truck camper is self-contained so that all of my camping gear would be in one spot. This would make it easy for me to take off for the weekend if the mood struck.
I considered buying a manufactured truck camper, but my truck is small, just like my workshop. My truck is actually considered mid-size, but even still, many of the new truck campers were too big and would not fit in my pickup truck.
Related: My 12×13 Small Woodshop Layout
Not only that, but I wanted to customize the features of my camper to fit my needs. Plus, I enjoy the process of designing and building things myself. That’s when I decided to build the “Skate-Away” DIY truck camper!
If you want to personalize your camper and take pride in making things yourself, building your own truck camper is an excellent alternative to buying a manufactured one.
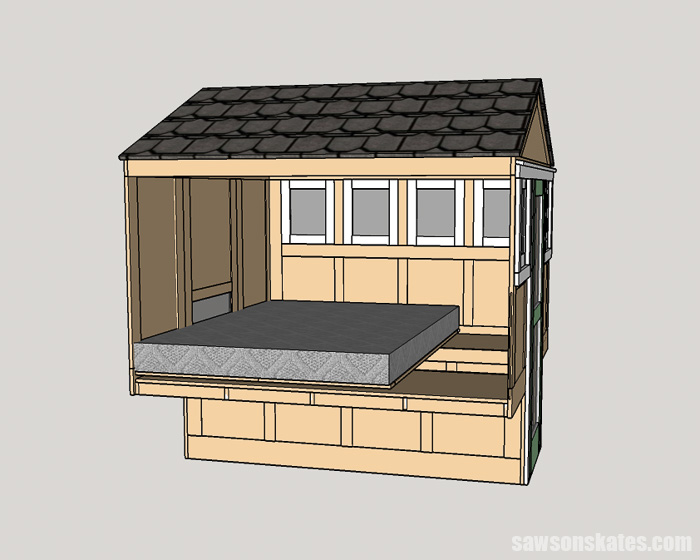
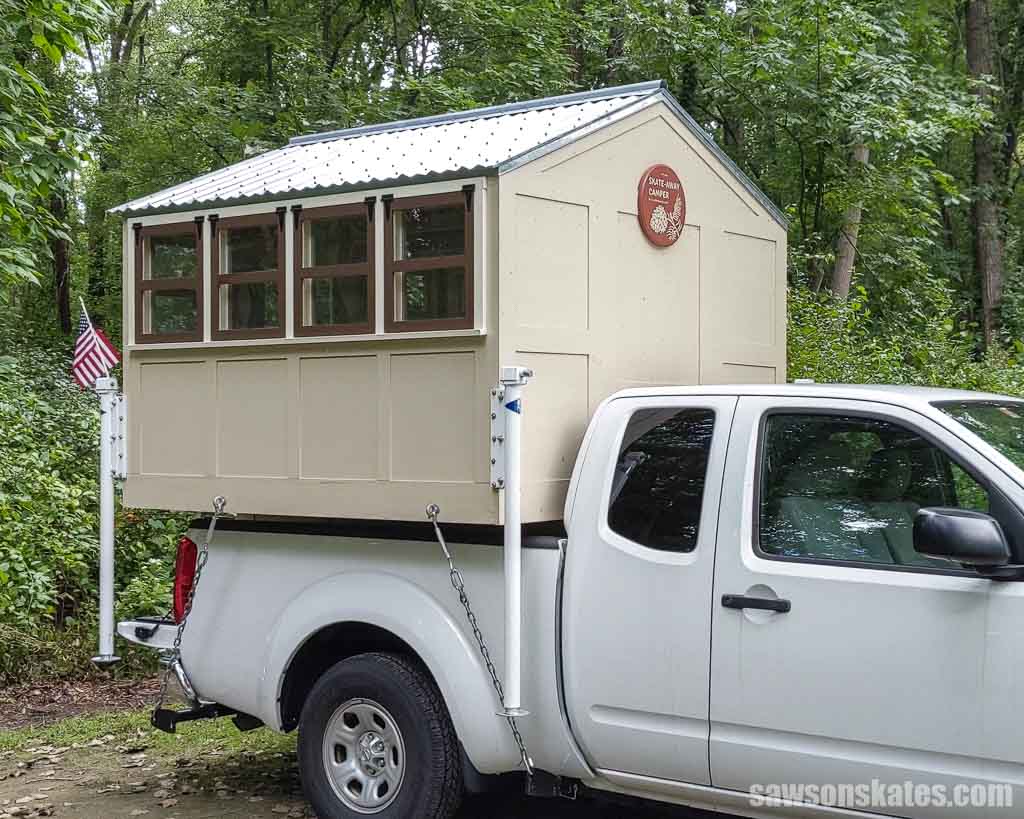
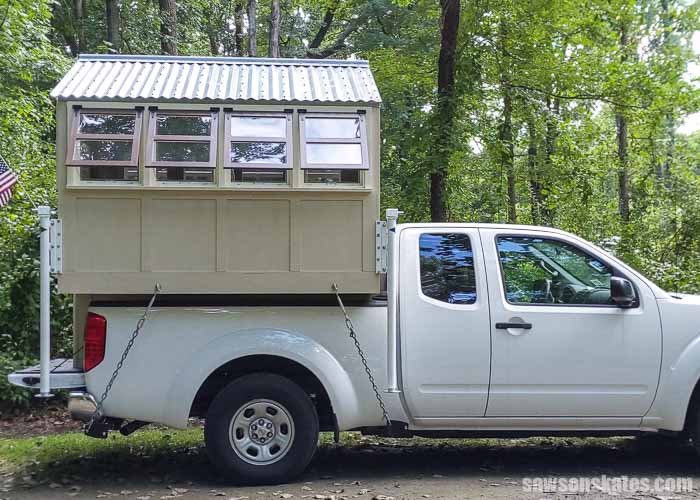
DIY Truck Bed Camper Design Concept
I’ve always been a fan of campers. I love VW campers and even DIYed this flower power bus planter.
I also love those “canned ham” campers, which inspired these vintage-style camper napkin holders.
I really like the distinctive designs associated with the 50s, 60s, and 70s, but I wanted a different look for my DIY camper.
Exterior Concept
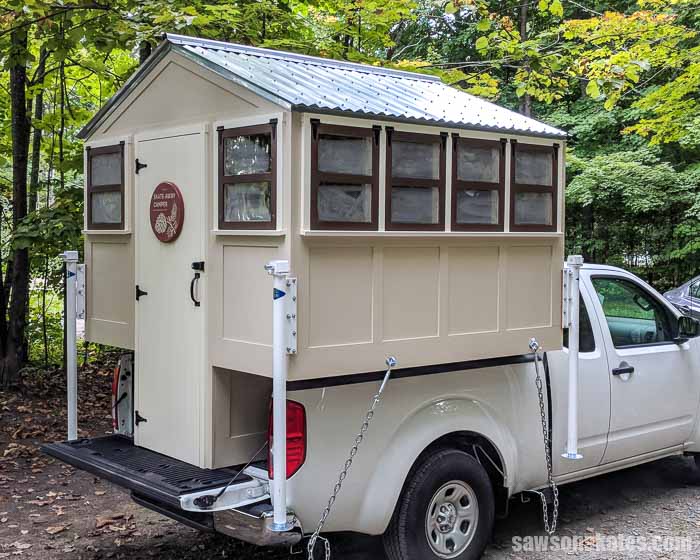
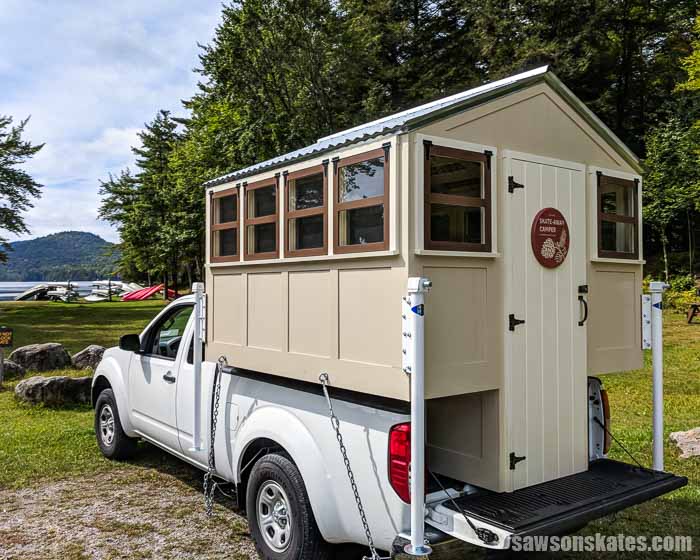
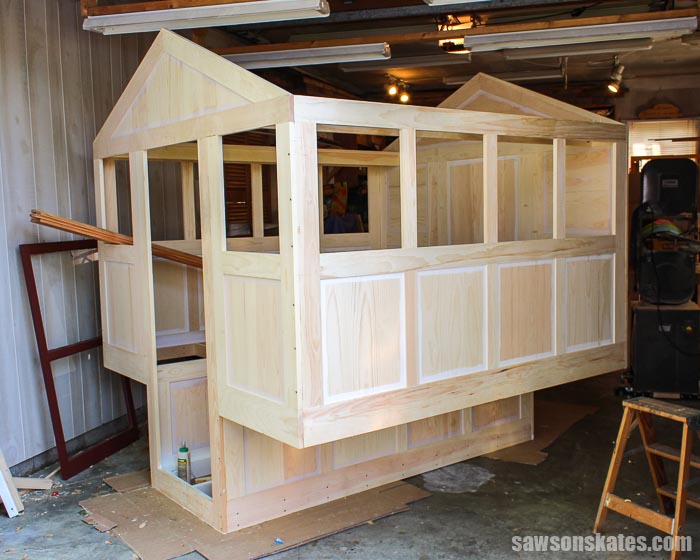
I wanted my homemade truck camper to blend in with the landscape, similar to a rustic cabin you might find in the woods.
For the cabin’s design, I drew inspiration from another one of my passions: tiny houses. I’m crazy about tiny houses, and a cabin small enough to fit in the bed of my mid-size truck would be tiny, without a doubt!
To give the small cabin a spacious feel, I designed it with more windows than you would find in a manufactured truck camper. The numerous windows would flood the tiny interior with sunlight and provide plenty of ventilation.
The exterior of the homemade truck camper I imagined finished in earthy tones inspired by nature.
Interior Concept
The interior of the homemade truck camper would be small but functional and tall enough for a 6′ person to comfortably stand and change their clothes.
For the sleeping space, I plan to use two folding mattresses. The mattresses could be positioned on either side of the camper for singles or across the back for a couple.
During the day, the mattresses could be converted to a couch for seating.
How Was the Lightweight Truck Camper Constructed?
As I mentioned, my truck is small, so I wanted to keep the weight of this DIY camper to a minimum. My goal was less than 800 pounds. To keep the weight down, I took a different approach to construct the camper’s walls.
💡 TIP: Make sure your homemade camper is small enough to pass through the garage door opening if you build it in a garage!
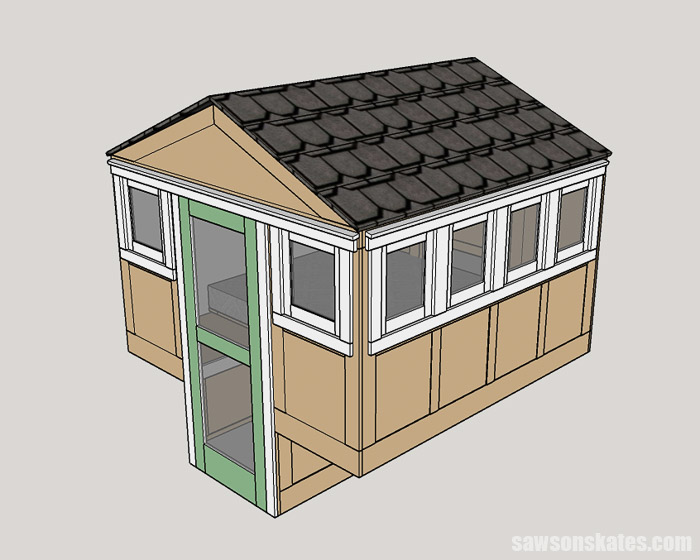
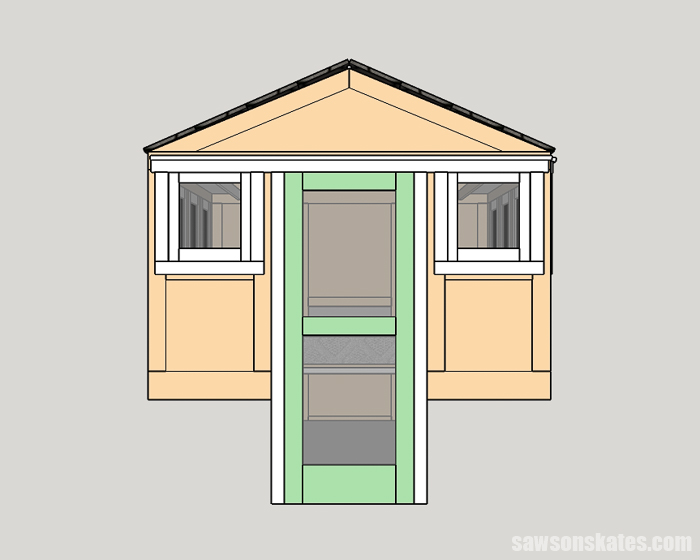
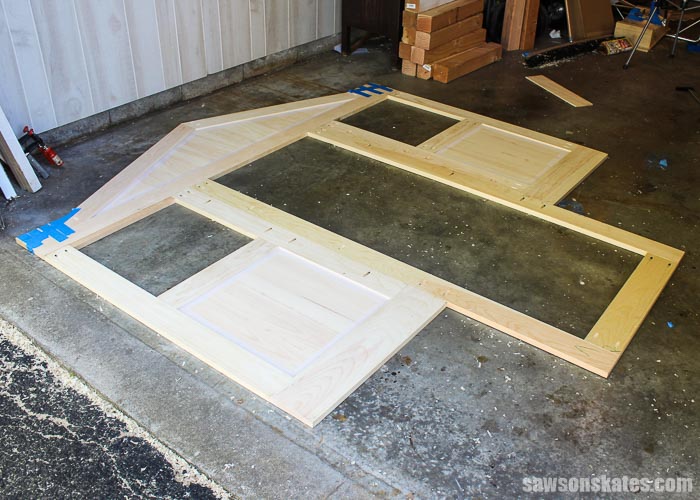
Frame-and-Panel Construction
I drew inspiration from my frame-and-panel DIY Shaker cabinet doors to create the camper’s walls. Frame-and-panel construction is a popular way to build cabinets and furniture and consists of a wooden frame with a panel of wood in the center. The panel floats in a groove routed into the frame, which allows the panel to swell and shrink with seasonal changes.
Related: Mistakes with Wood Can Cause Your DIY Furniture to Crack
I could have designed my homemade truck camper with a conventional wood frame or skeleton and then attached an exterior plywood shell, but this method would have increased the weight considerably.
Instead, the frame-and-panel design will allow me to use thin ¼” panels within the 1× frames. This method of construction will help me in keeping the weight down.
Related: Beginner’s Guide to Wood Sizes
The frame-and-panel walls have two main parts:
- The frame is constructed of rails (horizontal pieces) and stiles (vertical pieces). A groove is made on the interior edges of the frame for the panel to fit into.
- The panel fits into grooves in the frame
How to Make the Panels
Because I’m trying to cut down on the amount of plywood I use in my DIY projects, I didn’t want to include any in my truck camper.
Instead of using plywood, I made my own panels. I’ve made panels for a number of projects like this bathroom vanity and these cabinet doors using the same method.
To make the panels, I used my band saw to resaw pieces of 1×6 lumber. Think of resawing as splitting a piece of wood lengthwise and then opening it like a book.
I was left with pieces that were about 3/8″ thick after resawing. Those pieces were edge-glued to form wide panels.
Related: How to Make a Book-Matched Panel
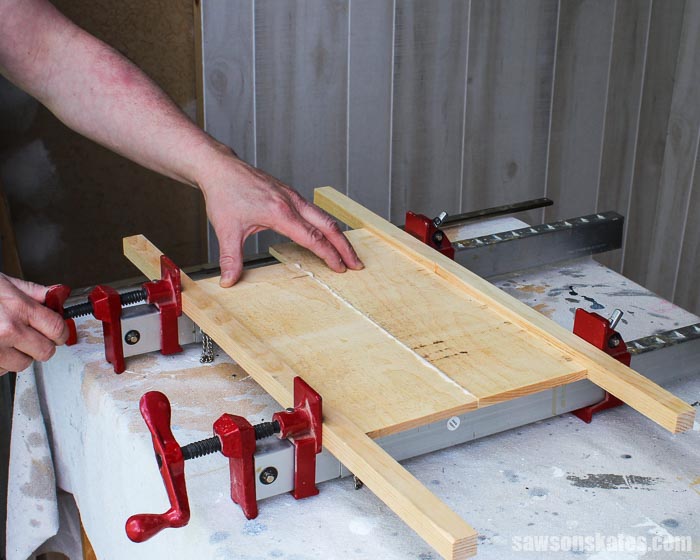
I used my thickness planer (mounted on my flip-top workbench cart) to smooth the panel sections until they fit in the grooves after the glue had dried.
Related: Jointer vs Planer: Differences & Which to Buy First
If you don’t have a bandsaw or thickness planer and want to make a DIY truck camper, you may use 1/4″ plywood instead of making your own panels. For me, not using plywood is just a personal preference.
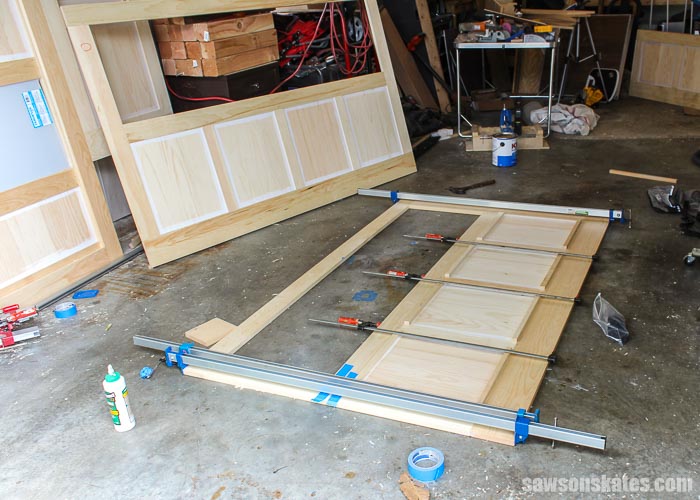
Assembly Method
Once the panels were made, I cut the parts for the frames and followed the instructions for the shaker cabinet door to construct each sub-assembly.
Related: How to Make Shaker Cabinet Doors
There were six frame-and-panel sub-assemblies: a front, back, two upper sides, and two lower sides.
There was also a bottom frame and two frames that extended over the truck’s bed rails which serve as the sleeping platform on either side of the camper.
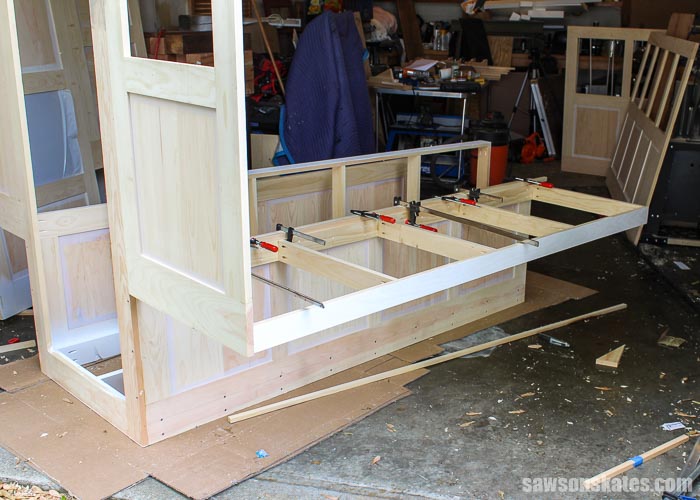
The sub-assemblies were joined from the inside using pocket hole joinery. I reinforced the corners by driving 2″ screws from the outside of the camper.
Related: 9 Pocket Hole Mistakes You Don’t Want to Make
How Long Did it Take to Build?
I’m guessing I have about 300-400 hours into building the camper. This was one of the largest projects I’d ever undertaken, and I ran into some design challenges along the way. Solving those issues only added to the time it took to complete the project.
I began building the camper at the start of May 2018, after months of planning. I went on my first truck camping adventure the weekend following Labor Day that same year.
I worked on the camper nearly every weekend, and occasionally I worked for seven days in a row. On average, I worked about eight hours each day.
Is it Insulated?
I’ve been asked several times whether or not I insulated the camper. The answer is no. I did not use insulation.
The main reason I didn’t insulate it is because of the way I constructed the walls.
When you insulate the walls of your house, the insulation is sandwiched between the studs, but because the camper does not have studs, there is nowhere for the insulation to go.
Another reason is that I don’t camp in cold weather very often. The camper will be used mostly in the late spring, summer, and early fall when the temperatures are milder.
Does it Have an Electrical System?
No, the camper does not have an electrical system at this time. I’ve considered adding solar panels, but adding them would increase the weight.
In the meantime, I use four battery-operated tea lights to light the camper’s interior at night. The light reflects off the metal roof and provides enough light to see inside. Plus, the faux flickering flames add a bit of ambiance.
How Do You Load the Camper Into the Pickup Truck Bed?
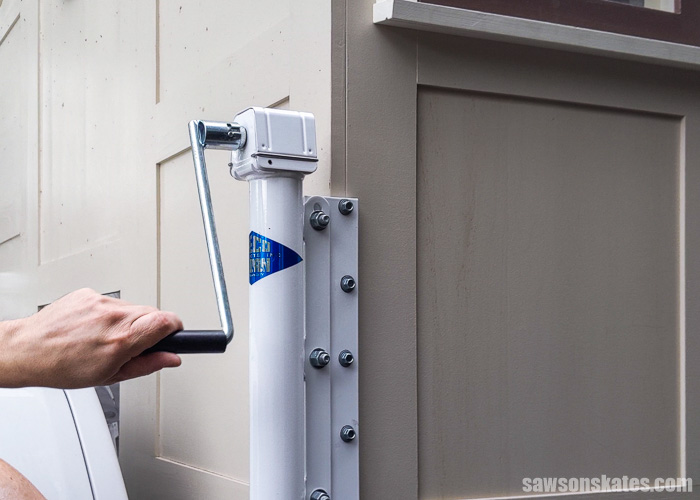
I use four Rieco-Titan camper jacks mounted on each corner to load the camper onto and off the truck.
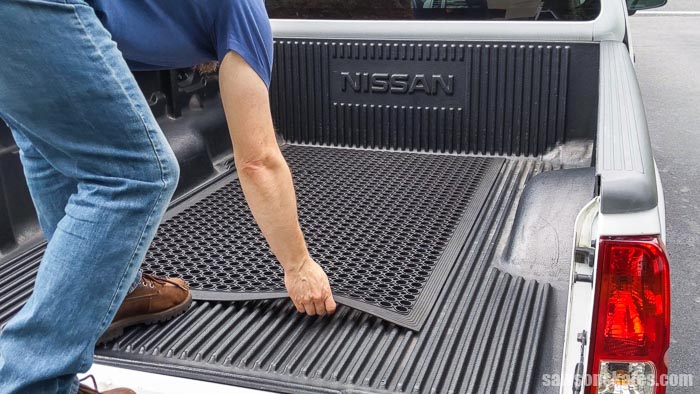
I do a few things before loading the camper into my vehicle. My truck has a bed liner, and I was concerned the wooden base of the camper might slide on the plastic liner. As a result, placing a rubber mat in the truck’s bed is my first step when loading it.
When I’m not using the camper, it’s parked in my garage on two 1000-pound Harbor Freight moving dollies. When I’m ready to go camping, I push the camper out of the garage into the driveway. Yes, it’s light enough that I can push it by myself.
The camper jacks can be raised or lowered using a hand crank or a drill. The trick is raising (or lowering) the jacks at the same time; otherwise, you risk tipping the camper over.
To raise and lower the camper, I use my corded drill. It’s far quicker and simpler than hand-cranking. To begin, I slightly raise the jack in one corner before moving on to the other corners, raising each corner a little at a time until the camper is high enough to clear the bed of my truck.

When the camper is raised to the proper height, I lower my truck’s tailgate, back the truck under the camper, making sure to keep it centered from side to side within the truck bed.
To lower the camper into the truck bed, I repeat the process. I work my way around the corners of the camper, lowering each a little at a time.
It’s critical to lower the camper on all sides at about the same time. If I lower one side too much, the camper may drift out of alignment with the truck’s bed. If I see that it is starting to stray off course, I adjust by lowering the other side a little more to coax it towards the center of the truck’s bed.
When the camper is within an inch or two of the truck bed, I switch to the hand crank to give me more control and ease it into the truck bed.
To remove the camper from my truck, I reverse this process.
It takes me about 15 minutes or so to load and secure the truck camper.
How Do You Attach the Camper to the Truck?
To secure the camper to my truck, I mounted Tork Lift frame-mounted camper tie-downs to my truck’s chassis.
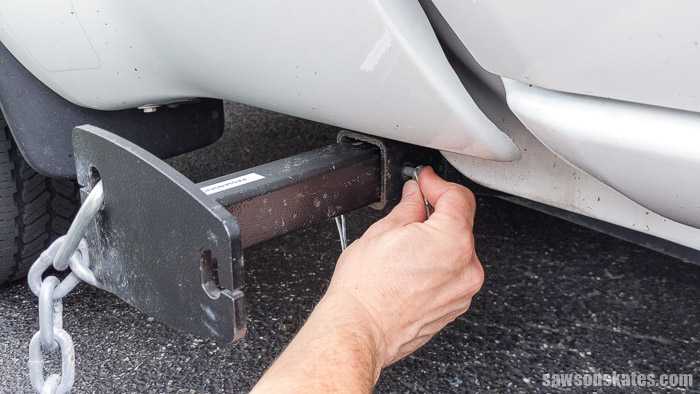
Near each corner of the camper, I mounted a large eye bolt. The tie-downs are connected with chains to eye bolts. There is a turnbuckle near the end of each chain, which is used to tighten it.
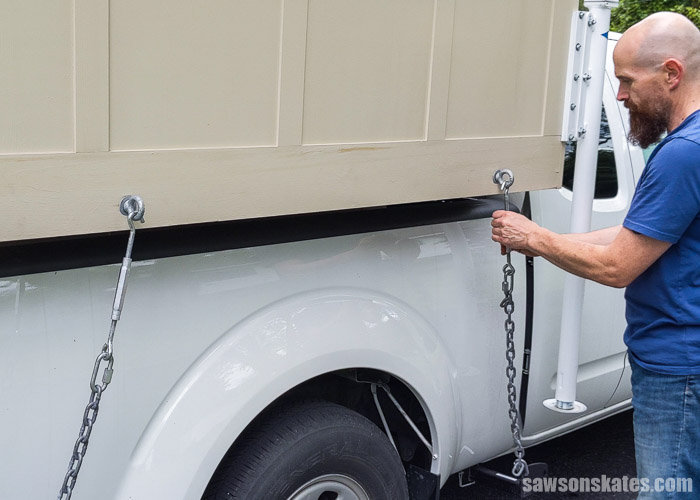
I use the same technique for tightening the chains as I would for the lugs nuts on a wheel. For example, if I start with the left rear chain, then I would snug the right front, left front, and right rear. I work my way around using this crisscross pattern until the chains were fully tightened.
How Does it Drive?
Overall, the truck camper drives well. It doesn’t feel top-heavy or as if it’s going to tip over. It cruises comfortably at 60-65 mph on flat roads. I’ve driven about 100 miles at once, and it has yet to let me down.
However, the tall, flat surface area creates a significant amount of wind resistance. It’s like driving a billboard on wheels. Climbing hills is slow due to the camper’s weight and wind resistance.
The camper’s biggest drawback is its poor aerodynamics. Drag would be significantly reduced if the aerodynamics were improved.
One of the things I’ve noticed most about driving with a tiny house truck camper is the amount of head-turning and pointing from other motorists. If you don’t like attention, a custom truck camper might not be for you!
DIY Truck Camper Video
Here’s a quick video showing how I lift the camper and attach it to the truck. I also take you on a quick tour of the interior, and yes, I know I’m not an interior decorator!
And before you ask, “What’s that round thing on your wrist?” It WAS a Celtic knot tattoo. Here’s a lesson if you’re thinking about getting a tattoo. If you talk to five artists, and they say they won’t do a design because it’s too intricate and will look awful in a few years, and then you go to a sixth artist, and they say “no problem,” believe the first five artists!
How Much Does it Cost to Build a Truck Camper?
Below is the breakdown of costs to build my camper. Keep in mind that all of the materials for this project were purchased in 2018.
| DESCRIPTION | COST |
|---|---|
| Lumber (Select Pine) | $1292 |
| Hardware (fasteners, hinges, etc.) | $175 |
| Roof and related supplies | $234 |
| Paint and related supplies | $195 |
| Rieco-Titan Camper Jacks/Mounting Brackets | $1067 |
| Tork Lift Tie-Downs | $800 |
| Chains, turnbuckles, and related hardware | $132 |
| TOTAL | $3895 |
Pros and Cons of a DIY Truck Camper
I’m not sure if it’s a pro or a con, but don’t build a DIY truck camper shaped like a tiny house if you don’t like attention. You’ll make fast friends at the campground. From the moment I check in to the moment I check out, people want to talk about it, look at it, and even get inside.
Pros
- Camper jacks make it easy to lift
- It’s light enough for one person to push on moving dollies
- The window in the front of the camper and the door makes it easy to see when driving and backing into a camping space
- Windows make the interior bright and allow for lots of fresh air
- The beds can be used individually or for a couple
- It’s tall enough to stand up inside
Cons
- The camper jacks are heavy and add a considerable amount of weight
- A design flaw has made it tricky to build screens for the rear windows
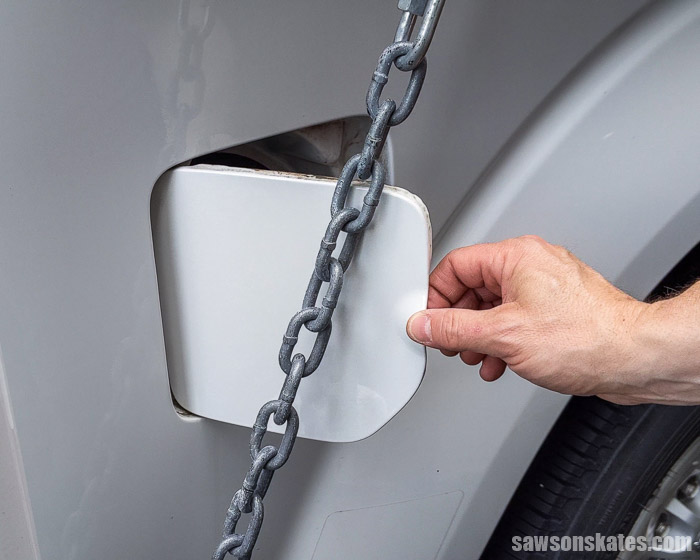
- One of the chains crosses over the gas tank door and needs to be loosened to fill the tank
- Poor aerodynamics
- Interior lacks dedicated storage space for camping essentials
What Would I Do Differently?
Camper Jacks
The camper jacks add a lot of weight to the truck camper. I’ve considered making them removable by mounting them with wingnuts. Then, once the camper is loaded on the truck, I could remove the jacks and leave them at home. The drawback is I wouldn’t be able to remove the camper from the truck anywhere but at home.
Windows
The windows are mounted on the exterior of the camper with hinges at the top and latches to keep them closed at the bottom. The side windows have screens mounted inside the camper, which are also hinged at the top. The screens lift upwards to release the latch and allow the windows to tilt outwards.
The rear windows cannot be hinged at the top because of a design flaw with the roof. I’ve considered mounting the hinges at the bottom and having the screens snap into place with magnets.
Eye Bolt Placement
The front driver’s side chain must be loosened to open the gas tank door to fill the gas tank. I’d pay attention to the gas tank door and position the eye bolts appropriately if I were to build another camper.
I could relocate the eye bolts, but doing so would result in holes in the sides of the camper.
Aerodynamics
The camper’s poor aerodynamics, as I mentioned previously, is one of its major drawbacks. One idea is to add a folding deflector to the front of the camper. When driving, the deflector may be extended and folded flat for storage.
Design
I designed the camper base so that it would easily fit in between the wheel wells of the truck bed. In retrospect, I made the base too narrow and left wasted space between the camper and the wheels. If I were to make another one, I would increase width of the base.

Storage
There’s no place to store anything inside the camper. When I go camping, I fill the floor and beds with camping gear. Which means all of the gear has to come out of the camper in order to sleep. It’s really frustrating! One thought is to add a floor-to-ceiling storage area with shelves at the front of the camper.
Final Thoughts
I hope you enjoyed the story of my DIY truck camper, that it answered your questions and inspired you to build your own camper!
Thank you for stopping by. If you enjoyed this tutorial, would you please take a moment and pin it to Pinterest? I’d really appreciate it!
Pin This For Later

Hi there – I’m Scott, a woodworking enthusiast and creator of Saws on Skates, a site I started in 2015 to share easy-to-follow tutorials, space-saving shop tips, and project inspiration for DIYers at any skill level. Learn more about my woodworking journey here.
In your search for additional storage I would look into where you saw to widen the base. You could add pods as a quick fix. Depending on the shape it might also add to the stability while driving.
Hi Andre – Yes, I agree with you. I have considered adding a slide-out “pod” on either side that would essentially be a cooking area with a grill, utensils, etc.
First I’d like to congratulate on your very well thought out website. Your advice is very well thorough and you show exactly how to complete the task simply. I really like your idea to put every tool on casters.
I’ve never owned a truck top canopy or camper but have had a pull along camper with canvas sides and fibreglass hard top. Space is always a problem in a camper or trailer and careful consideration of weight placement is important as well.
You could of course make an extension on either side of the door, between the side of the camper and the wall of the camper forward of the wheel well and all the way to the back and insert access doors inside the camper. That would allow you to store a double burner gas cooker, cylinders of gas and utensils, pots etc plus extra clothing, bedding etc. So literally a pair of boxes attached, one on either side. That would give you several extra square feet of storage. It would mean you would have to be extra careful when reversing in as there will be less wiggle room with the wider sides attached. Perhaps you could install braces overhead between the rafters and install a shelf there towards the front. That could give added stiffness too and a spot for a book, flashlight radio etc.
You could also consider building a small cabinet between the “beds” under the window at the back. It could be used for putting your glasses, phone or tablet on while you sleep. A drawer or two could add more flexible storage for small items. All in all these additions should not add a significant amount of weight or cost to your project but could add security and extra storage out of sight from prying eyes as well as the ability to carry extras without getting in the way
You could consider fitting a solar charging unit and an interior light and perhaps a usb charger for a phone or tablet that is separate from your truck so you don’t inadvertently run that battery down when boondocking.
Just a few thoughts and thanks again for your great advice in your woodworking endeavours.
Hi Colm – Thank you for the compliments. Yes, we are on the same page. I’ve considered adding slide-outs on either side that would essentially be a cooking area with a grill, utensils, etc. I also have thought about a floor-to-ceiling “bookshelf” area between the two beds. In fact, I wrote about the bookcase idea in my first draft of the article but ended up deleting it. And I’ve also considered solar. Although I’m much better with a miter saw, so I would have to do lots of research on solar before attempting that project!
To assist with the aerodynamics (and protect the front of the camper) one could install a removable wind deflector over the cab. It would add more overall weight but would likely reduce your fuel consumption.
Hi. I must to confest, did it well. but it’s so expensive! 3800$ is so much. and if you want to buy a new one, you can do it with lower price. there is no justification. and I don’t know how did you exept to pay this much money for your project? but say again, did it well and despite the one or two little objections, final result of your project is professional and beautiful. I sure that, you and your familly will have many rememorative times with your camper….
Where can you buy a new one for less than 3800$??? You can stand up in this. This is not the same as an ARE, Leer or other truck cap, It is much taller. These are more like 13,000$ for an empty shell, from what I am finding on the web.
I’m 72…that giant step you made from the ground onto the tailgate to reach the door…!…!
Well done I see you didn’t need to make the front of the camper as narrow as the back to fit between the wheel wells. You could always add one either side now and tap into them them from inside
Mick UK