Easy DIY Picture Frame
No complicated cuts here! These attractive DIY picture frames are easy for anyone to make with inexpensive wood, some basic tools, and only 8 straight cuts.
What Should I Build Next?
That's the question I help answer.
Every week, I send woodworking ideas to 17,000 DIYers who love building things.
You'd fit right in.
DIY Picture Frames
Store-bought frames can be expensive. Save money and make your own DIY picture frames with these plans. Forget about those complicated cuts. These frames are an easy afternoon project, made with basic woodworking tools and only eight straight cuts.
Originally published June 12, 2015, republished September 3, 2019
This tutorial contains affiliate links to supplies and tools. Purchases made using these links help support the Saws on Skates website and allows me to share more projects and tips with you. There is no cost to you for using these links. Visit my site policies for more information.
Table of Contents
- These DIY Picture Frames are Easy to Make
- What Tools Do You Need to Make DIY Picture Frames?
- Make These DIY Picture Frames Any Size You Need
- Quick Tips for Sizing DIY Pictures Frames
- How to Measure for Custom Size Artwork
- Helpful Tips for Making DIY Picture Frames
- How to Make DIY Picture Frames
- Get the PDF Plan
- More Like This
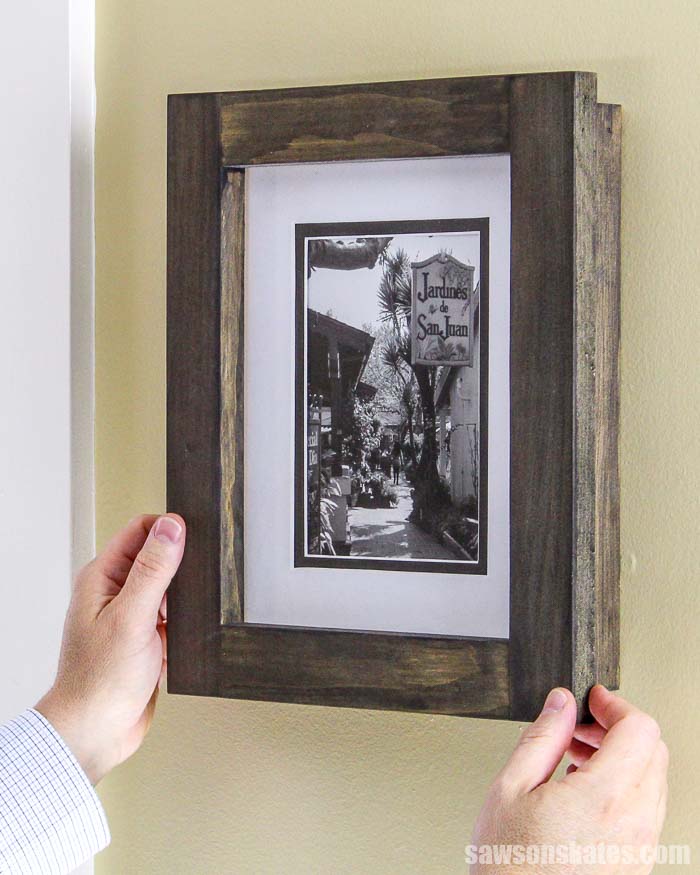
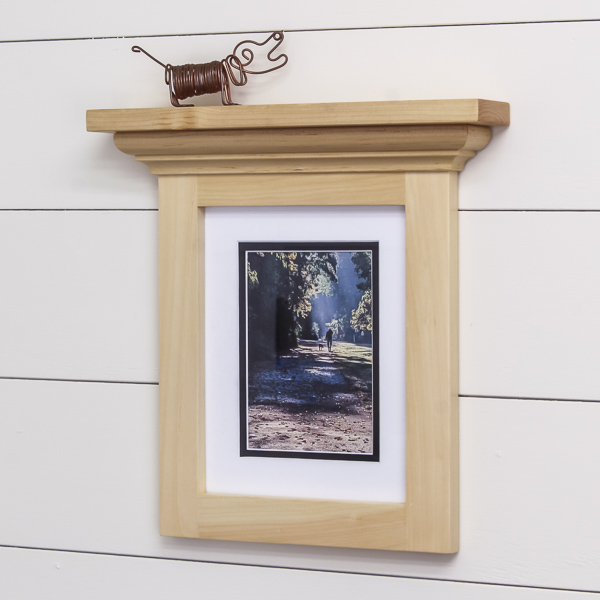
These DIY Picture Frames are Easy to Make
Have you ever seen the price of store-bought picture frames? They’re so expensive! Today, I’m sharing an easy way to make your own DIY picture frames.
And don’t worry. You don’t need to make any complicated angle cuts. These wood picture frames are made with only eight straight cuts!
These frames can be assembled quickly so they’re an easy afternoon project, making them perfect for when you need to update your home decor in a hurry. They also make a great gift.
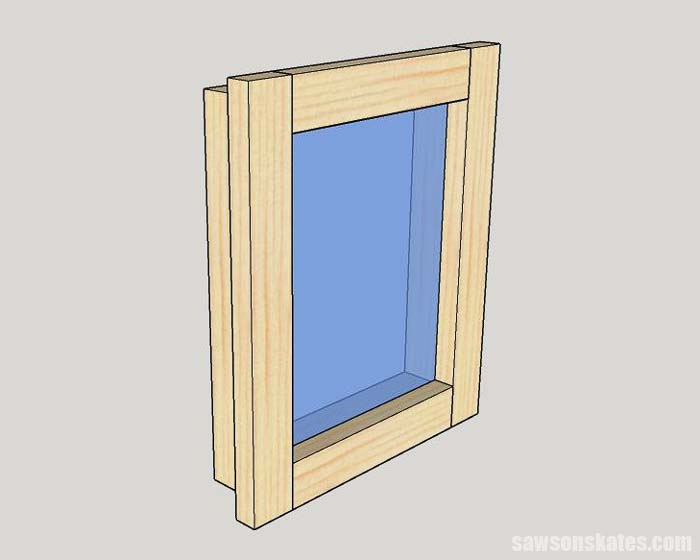
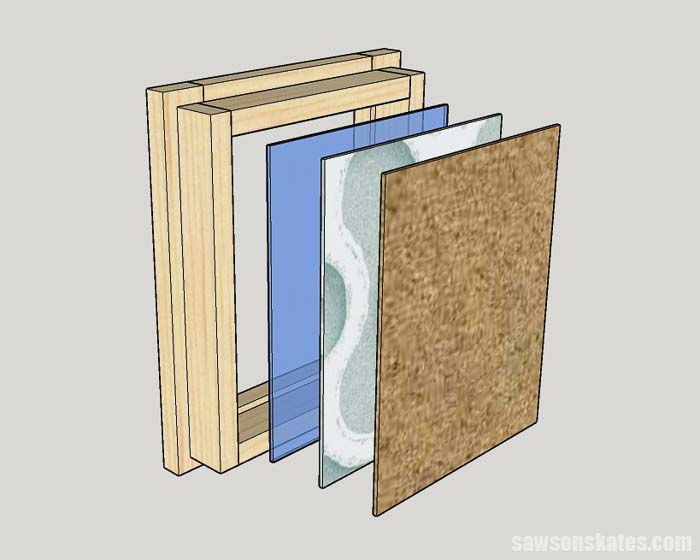
Here’s how the frames are made. There are two main parts. The front piece or face frame is where you see your picture or artwork.
The second part is the glass frame, which attaches to the face frame, housing the glass, photo, or artwork and providing a place to hang the frame.
What Tools Do You Need to Make DIY Picture Frames?
These frames can be made with basic woodworking tools that you may already have in your workshop. The eight straight cuts can be made with an inexpensive miter box and hand saw or a power miter saw.
Related: 7 Miter Saw Tricks Every DIYer Should Know

The face frame and glass frame are assembled with a Kreg Jig. A Kreg Jig or pocket hole jig is an easy way for DIYers to join pieces of wood together.
A Kreg Jig uses a guide block with preset holes to drill angled pocket holes into a workpiece. A pocket screw, specifically designed to be used with pocket holes draws the two workpieces together to form a strong joint.
You can use any pocket hole jig, but this would be the perfect project for the Kreg Jig Mini or Kreg Jig R3. They’re both easy to use and affordable.
Related: How to Use a Kreg Jig Mini and How to Use a Kreg Jig R3
Make These DIY Photo Frames Any Size You Need
Here’s the best part about these wood picture frames. You can customize them for any size you need. The plan I’m sharing today makes an 8×10 frame, but you can increase or decrease the measurements to make standard size frames or custom size frames. This means you can frame almost any piece of artwork, photo or poster.
Quick Tips for Sizing DIY Picture Frames
- Measure the photo or artwork and subtract a 1/2″ from the width and height. (ex. 8” × 10” = 7-1/2” × 9-1/2”)
- The top and bottom pieces or rails of the face frame will be cut to the width (7-1/2”).
- The side pieces or stiles of the face frame will be cut 3″ longer than the height (9-1/2” + 3” = 12-1/2”).
- The top and bottom pieces or rails of the glass frame will be cut to the width of the artwork (8”).
- The side pieces or stiles of the glass frame will be cut 1-1/2″ longer than the height of the artwork (11-1/2”)
How to Measure for Custom Size Artwork
The plan I’m sharing makes an 8×10 frame, but you can use the simple guidelines below to build custom frames in any size you need. You’ll start by taking measurements.
Related: How to Use a Tape Measure Correctly (Tips for Success)
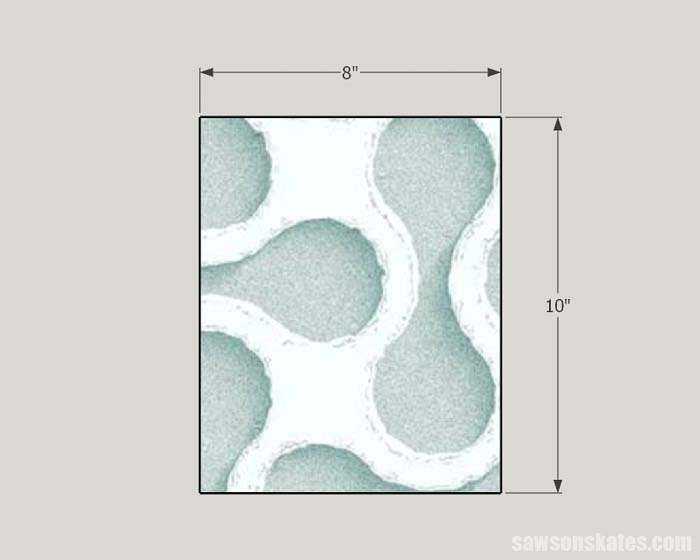
In this example, we have a piece of artwork that measures 8 inches x 10 inches.
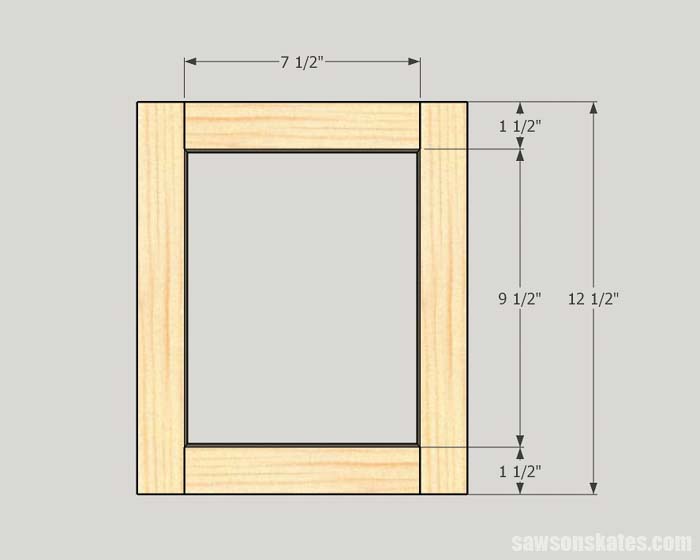
Face Frame
You’ll want to ensure your artwork’s edges aren’t visible when mounted in the frame. So, the frame’s opening should be slightly smaller than your artwork to achieve this.
In this case, subtracting ½ inch from each dimension (7-½” x 9-½”) will provide the appropriate interior dimensions for the frame.
The wood used in this plan is 1×2 lumber, which measures ¾” thick by 1-½” wide. Your frame’s top and bottom horizontal pieces or rails will be cut to 7-½”.
Related: Beginner’s Guide to Wood Sizes
You’ll need to add 3” to your vertical measurement of 9-½” for a total of 12-½”, making the ends of the vertical pieces or stiles meet the outside edges of the rails.
Glass Frame for Standard Sized Artwork
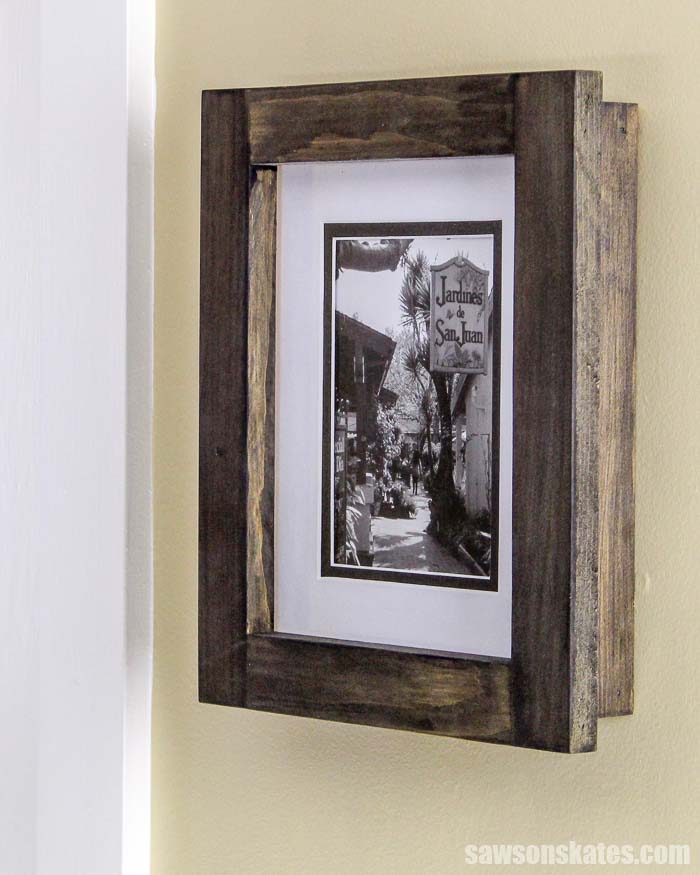
Next, you’ll determine the dimensions for the glass frame, which attaches to the face frame. It houses the glass and the photo and features a large lip that serves as a convenient hanger for the frame.
Again, you’ll use your artwork’s dimensions (8” × 10”) to determine your glass frame’s size.
IMPORTANT: If you’re using store-bought picture frame glass be sure to measure the glass before building the glass frame. Adjust the measurements of the glass frame if necessary. The glass needs to easily fit in the glass frame opening.
To ensure the glass fits smoothly into the frame without the risk of breaking, allow for ⅛-inch clearance in each direction.
The store-bought glass I used for my frames measured 7-⅞ inches by 9-⅞ inches, so I adjusted the opening to 8 inches by 10 inches.
TIP: Since store-bought picture frame glass can be costly, I bought inexpensive picture frames from a dollar store and removed the glass for my project.
Glass Frame for Custom Sized Artwork
Here’s what I would do if I was building a custom frame. I would build the glass frame so the opening measured 8” × 10” (the size of our artwork). Then, I would have a piece of glass cut to fit the opening. Remember, we need to allow for an 1/8” clearance for the glass. This means I would have a piece of glass cut to 7-7/8” × 9-7/8”.
TIP: Most big box home improvement stores and local hardware stores have a glass cutting department. You can also use plexiglass instead.
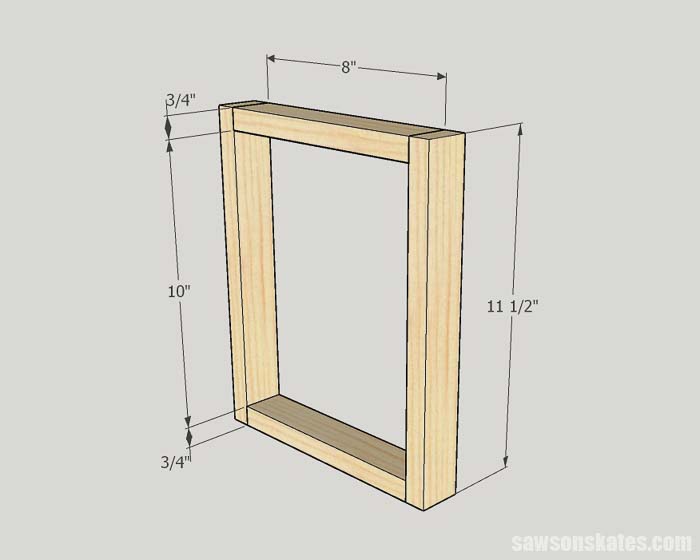
Building the Glass Frame
The wood we’ll be using to make the frames are 1×2s. A 1×2 measures 3/4” thick by 1-1/2” wide. The rails or horizontal pieces will be cut to 8”.
The glass frame is slightly different than the face frame. The wood for the glass frame stands on end. In this case, we’ll need to add 1-1/2” to our vertical dimension of 10” for a total of 11-1/2”. Adding 1-1/2” will make the ends of the stiles or vertical pieces meet the outside edges of the rails.
Helpful Tips for Making DIY Wood Picture Frames
- Always cut the top and bottom pieces or rails first. Then, the side pieces or stiles will cover the end grain of the top and bottom pieces. This will give the frames a polished look.
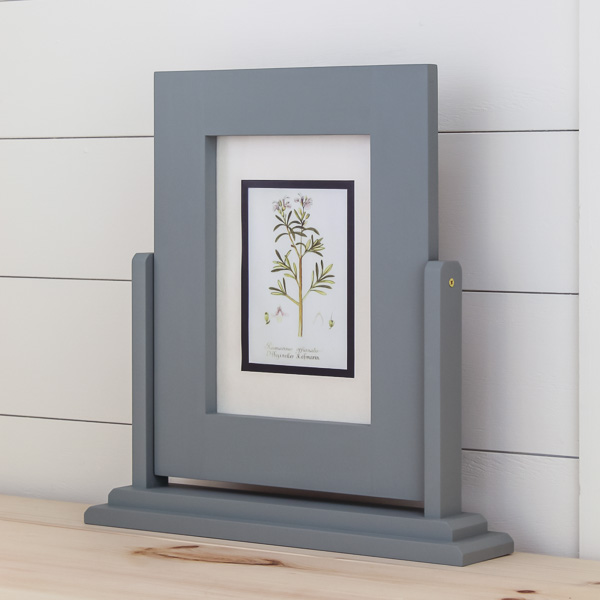
- I used inexpensive common pine for this project. You can give the frames an upscale look by using more expensive wood like maple, oak or cherry.
- You can further customize the look by using a router with a decorative bit on the outside and inside edge of the frame.
- Sometimes it can be difficult to find 1×2s that are straight. In that case, you use a table saw to rip a larger board like a 1×4 to 1-1/2”.
How to Make DIY Picture Frames
Printed Plan
- Get the PDF plan here (includes detailed instructions, measurements, and bonus tips).
Supplies
- Wood (per printed plan – amount will depend on the size of your frame)
- 1-1/4” Pocket Screws
- 2″ #8 Wood Screws
- Wood Glue
- Glass (you can buy frames from the Dollar Store and remove the glass)
- Push Pins (to hold picture and glass in the frame)
Tools
- Tape Measure
- Miter Saw
- Drill
- Pocket Hole Jig
- Bar Clamps
- Countersink Drill Bit
Step 1. Measure the Photo or Artwork
See How to Measure for Custom Size Artwork for more details.
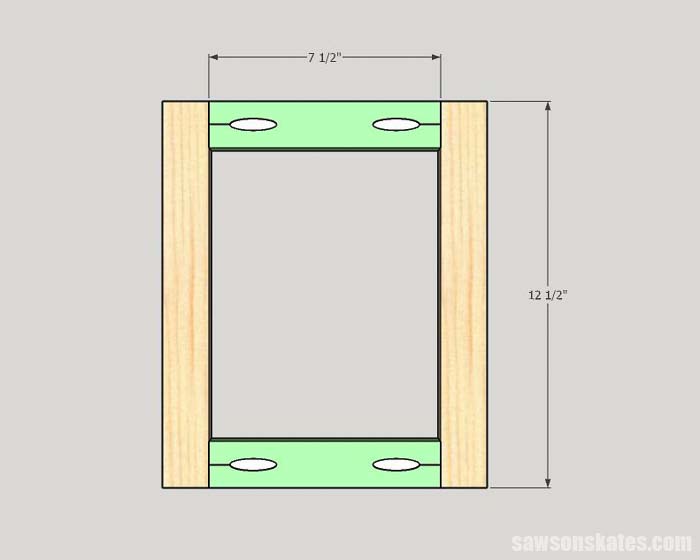
Step 2. Make the Face Frame
Cut two pieces of wood to length for the stiles. Cut two pieces of wood to length for the rails and drill one pocket hole in each end.
Related: How to Use a Pocket Hole Jig
Apply wood glue to the ends of the rails, position on the stiles and clamp. Attach with pocket screws.
Step 3. Make the Glass Frame
Cut two pieces of wood to length for the stiles. Cut two pieces of wood to length for the rails and drill one pocket hole on each end.
NOTE: Be sure the glass will fit the opening in the glass frame. See How to Measure for Custom Frames for more details.
Apply wood glue to the ends of the rails, position on the stiles and clamp. Attach with pocket screws.

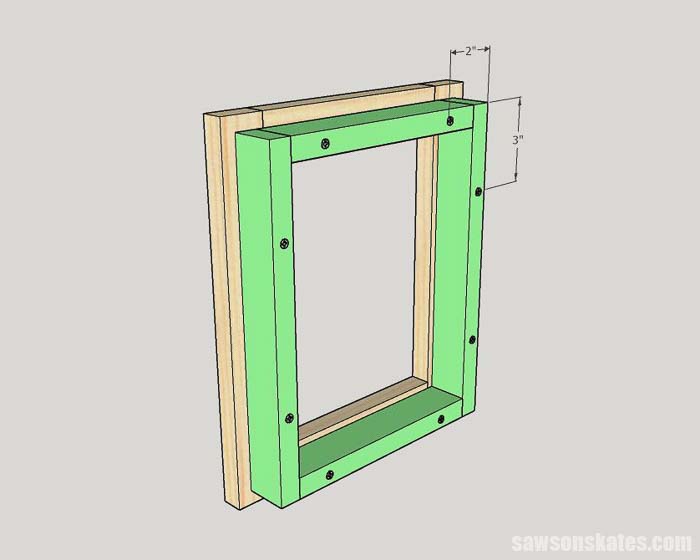
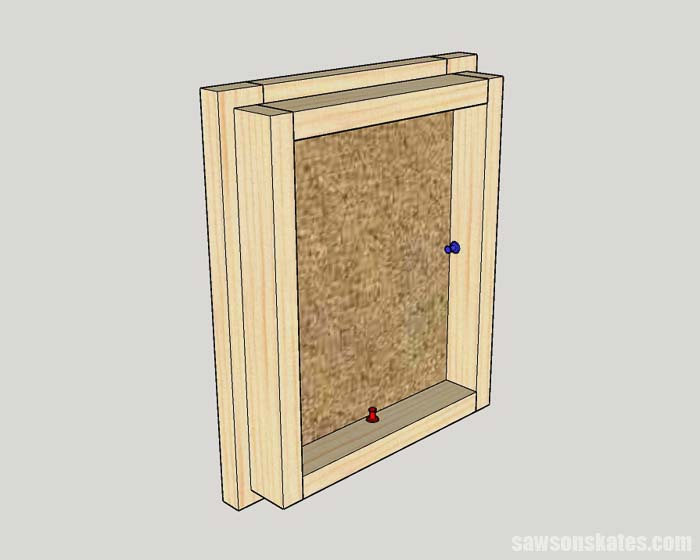
Step 4. Join the Face Frame and Glass Frame
Center the glass frame on the face frame’s opening. Use the diagram to mark the locations for countersink holes. Then, use an awl to make a starting point for the drill bit.
Related: What is an Awl? (and How to Use It)
Drill countersink holes on the back of the glass frame.
Related: How to Use a Countersink Bit
Attach to the face frame using glue and wood screws.
Step 5. Finish the Custom Frame
Sand the frame smooth. Finish with paint, wood stain or leave natural. Cut a piece of cardboard to fit inside the glass frame opening. An Amazon box works great for this. Insert the glass, mat, photo, and cardboard into the glass frame opening.
Then, use push pins to hold everything to the back of the frame. Now your wood frame is ready to hang on the wall or give as a gift.
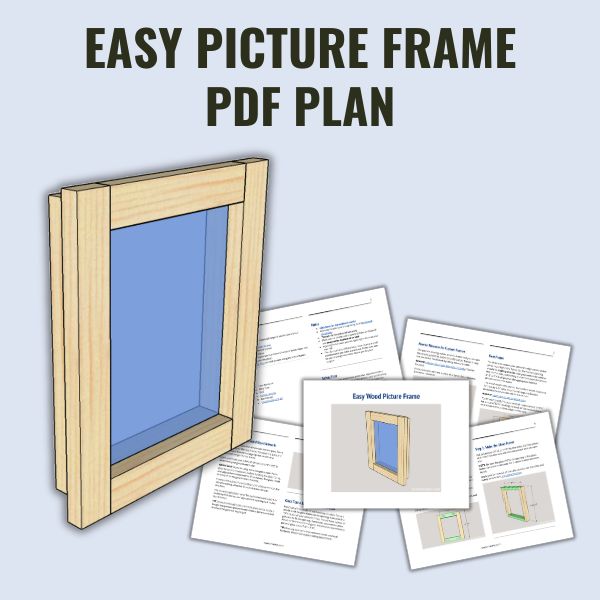
Includes:
- List of tools and materials
- Complete measurements (in inches)
- Easy-to-follow instructions
- Step-by-step photos
- Detailed diagrams
Final Thoughts
Store-bought picture frames can be expensive. Save money and make your own custom wood picture frames with these plans. These frames are easy to make with a few basic woodworking tools and inexpensive pine boards.
Get the PDF plan (including the detailed instructions and measurements) now!
Thank you for stopping by. If you found this information helpful, would you please pin it to Pinterest? Other DIYers would appreciate it and I would too! Thank you – Scott
Recommended For You
Pin This For Later

Hi there – I’m Scott, a woodworking enthusiast and creator of Saws on Skates, a site I started in 2015 to share easy-to-follow tutorials, space-saving shop tips, and project inspiration for DIYers at any skill level. Learn more about my woodworking journey here.
Awesome! I love the style very much! Thank you for sharing. This project is something I want to tackle hopefully in the near future! 🙂 Koko
Thank you for the compliments! They are really easy to make… I just made a batch of them for gifts 🙂 Please share some pics when you make them.
Lucky gift recipients! They are going to love them! 🙂
Thank you kind sir, I have just started crafting and intend to make my own frames. Well now I can.
These look great, how did you attach them to the wall ?
Thank you Peter – You could add a mounting bracket if you like, but there is substantial lip on the back of the frame and I usually just rest this lip on a nail in the wall, etc.
Sorry in advance if this is super obvious, but how do you add and secure the glass and picture?
Hi Irina – Thank you for stopping by. That’s a good question. Step 9 describes adding and securing the glass: “Insert glass, a mat, a photo and use push pins to hold everything in place.” Hope that helps. Please let me know if you have any other questions.
Yep, that’s exactly what I was wondering! How do you use pushpins to hold all of that in place? Do they go into the mat, and is the mat meant to be as large as the outer frame? Is that strong enough for glass and such? Have you tried it, by any chance? I recently built a (less cool) frame and had lots of trouble with that last part 🙂
Hey Irina – The glass and mat are standard 8×10 sizes and fit within the “glass frame”. The pushpins are pushed into the sides of the wood glass frame. By doing it this way the side of pushpins presses against the glass, mat and photo which holds everything in place. I have these in my own home, made a batch of them for gifts and friend even used them to submit photo entries in a local county fair and the pushpins have always been strong enough to hold everything in place.
Hi there, this looks great but one of the supplies is more expensive than a frame (Krel Jig). Can you make the jig without the Krel Jig using something like cardboard? Sorry I’ve never done any wood work!
Hi Kay – Thank you for stopping by. I understand how you feel about the Kreg Jig, but like any tool, it’s an investment. Plus, the jig can be used for many other projects other than making frames. There are less expensive pocket hole jigs like the Kreg Jig Mini. If you don’t use pocket holes to assemble the frame you’ll need some other type of fastener to keep the frame together and I’m not sure what the fastener would be. In reviewing the plan there isn’t enough space to use a mending plate. Driving a screw into end grain doesn’t create a strong joint and the screw would be visible on the outside of the frame. I think pocket hole joinery is the best way to go for this project.
Good luck and please let me know if you have any other questions.
Could you tell me if it’s possible to make without using the Kreg tool? Also, I want to make an 18×24 frame, so what do I use for measurements for the jig? Thank you. This is a great way to help me make an easy frame
Hi Elizabeth – Thank you for stopping by. If you don’t use pocket holes to assemble the frame you’ll need some other type of fastener to keep the frame together and I’m not sure what the fastener would be. In reviewing the plan there isn’t enough space to use mending plates. Driving a screw into end grain doesn’t create a strong joint and the screw would be visible on the outside of the frame. I think pocket hole joinery is the best way to go for this project. If you are looking for an inexpensive pocket hole jig the Kreg Jig Mini is a great option.
As for the measurements I think you could use 17-1/2″ x 23-1/2″ for the face frame. I would recommend checking these measurements on your artwork to be sure it will fit within the opening and adjust the measurements if necessary. I think you could use 18″ x 24″ for the glass frame. Again, I would recommend that you check these measurements to be sure your glass will fit inside the opening and adjust the measurements if necessary.
Good luck and please let me know if you have any other questions.
Hi Scott, I really like your plan. Looking over the supplies list it states 1 X 2 X 8. That seems kind of narrow for 2 pocket holes. Is there a trick to make sure that I don’t split the wood?
Hi Mark – Thank you for stopping by. The Kreg Jig can be used on 1×2 material, but you’re right, it does have more of a chance of cracking. I would recommend following all of the rules you would use for other pocket hole joints to avoid cracking. Use fine thread pocket hole screws for hardwoods and coarse thread pocket hole screws for softwoods. Go slow when driving the screw and don’t over tighten. Wax can also be applied to the screw to help it slide through the wood a little easier.
Alternatively for this plan you could use just one pocket hole in each end to make the face frame. You’ll just have to be careful where you position the screws in the glass frame so they don’t drive into the pocket screw in the face frame.
Do you sell the frames already made? Thanks
Hi Linda – Thank you for stopping by. I’m not currently selling the frames at this time.
Making 2 for my wife, we liked the design & simplicity. Thanks for posting the project.
Hi Richard – Thank you for stopping by and for the compliments. I’m glad you like the frames!
Scott, I accidentally found your website Saws and Skates and have found it is the most thorough plans for all projects that even I can understand and follow, and that is saying a lot. Thank you so very much.
Hi Nelson – Thank you for stopping by and for the compliments. I’m glad that you’re enjoying the plans and that they are easy for you to follow.