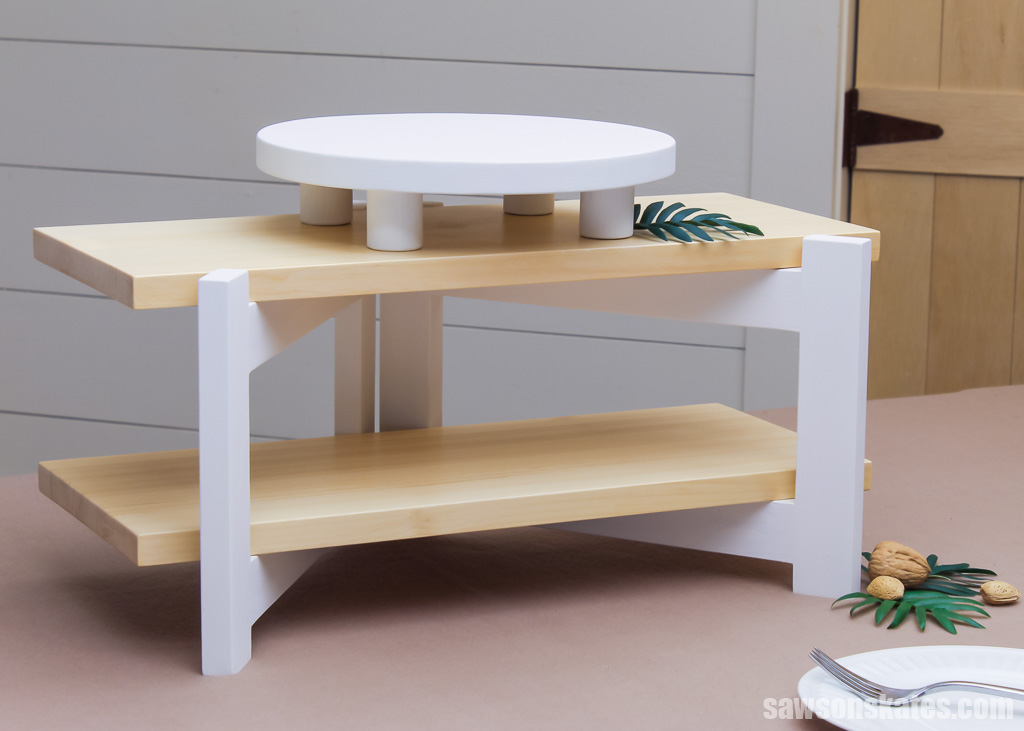
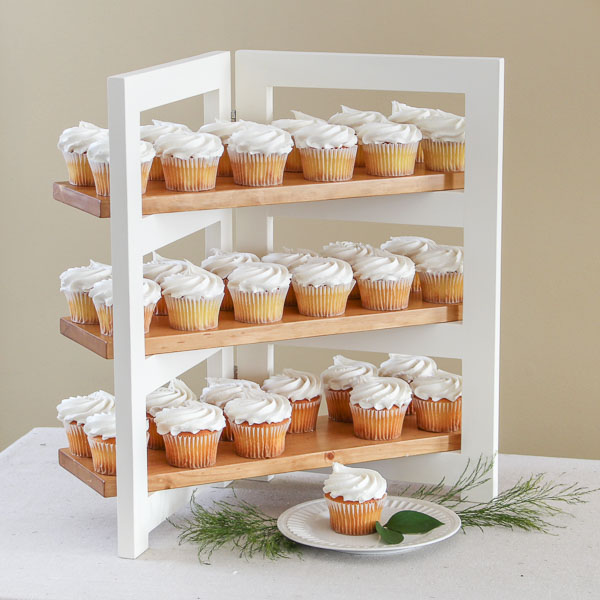
DIY Cake and Cupcake Stand (Perfect for Weddings)
Elevate your dessert displays. Literally! In this easy-to-follow tutorial, I’ll show you how to make a clever DIY cake and cupcake stand, perfect for showcasing everything from birthday cakes and wedding centerpieces to baby shower treats and graduation goodies. Even better, it folds flat when the party’s over. Impress your guests at your next celebration with this versatile, space-saving project.
What Should I Build Next?
That's the question I help answer.
Every week, I send woodworking ideas to 17,000 DIYers who love building things.
You'd fit right in.
Table of Contents
This article contains affiliate links. If you purchase from these links, I may earn a small commission at no additional cost to you. Visit my site policies for more information.
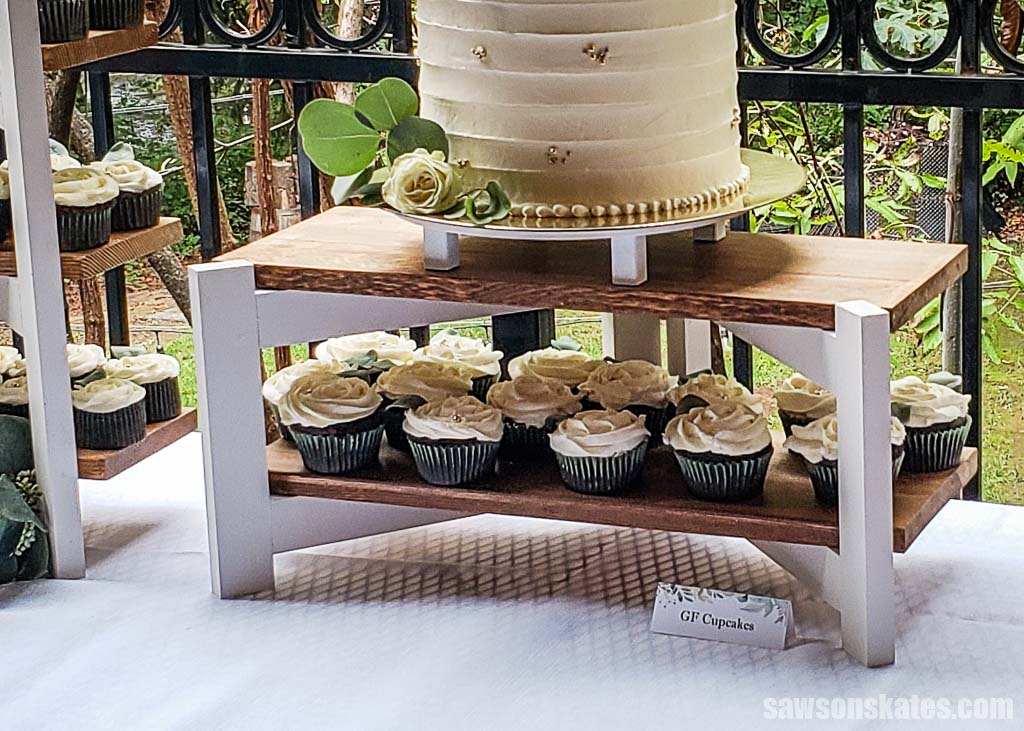
Theresa recently emailed me saying she and her granddaughter built two cupcake stands (like these) for her 50th Anniversary Celebration. They also modified the plan to hold the celebratory cake, and the shelf below gave them a spot to display gluten-free cupcakes. They kept the shelf spacing the same as the cupcake holders so they would line up perfectly.
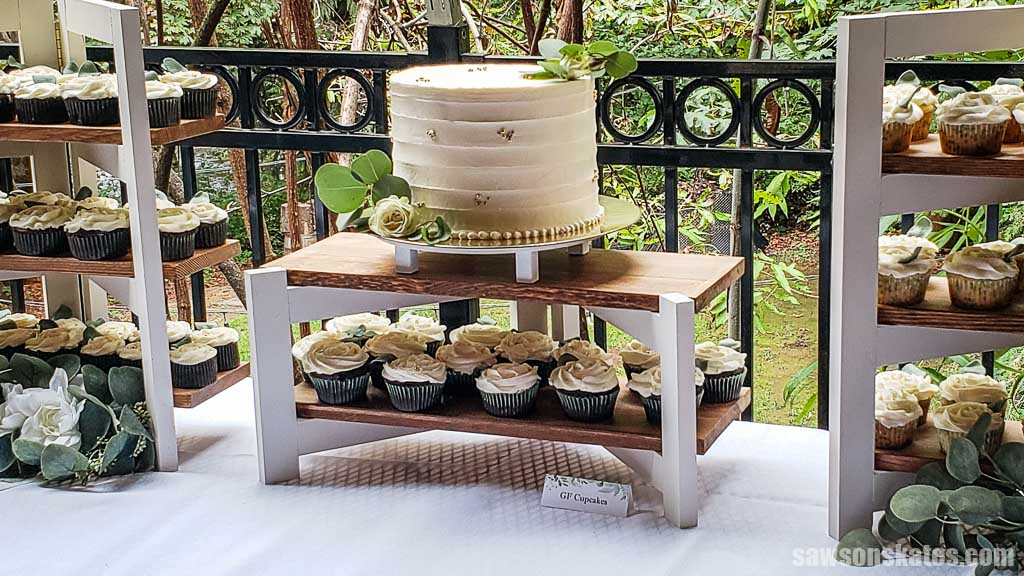
Their cake stand idea was absolutely brilliant! I was so impressed that I couldn’t wait to share it so you can make one for your next wedding, anniversary, graduation, birthday, or baby shower.
Using Theresa’s measurements, I made a few minor design tweaks. Here’s my take on her fantastic idea: a stylish cake and cupcake stand that’s perfect for any gathering and conveniently folds flat for easy storage when the party’s over.

What Wood Should You Use?
I used 1× pine lumber from my local home improvement store to make my cake stand, but you could use almost any wood to make yours.
Related: Beginner’s Guide to Wood Sizes
To take your stand to the next level, consider using hardwoods like cherry, oak or walnut for the entire project. Or you can paint the frame, as I did, and use hardwood for the shelves to add a stylish contrast.
What Tools Do You Need?
I used six tools to make my cake stand:
- Miter Saw
- Jigsaw
- Drill
- Drill Press (optional)
- Pocket Hole Jig
- Table Saw (optional)
Tips for Your Dessert Stand Display
Once you’ve made your stand, you’ll find it’s more versatile than expected.
- Showcase a Variety of Treats: Don’t limit yourself to cakes and cupcakes. This stand is perfect for all kinds of treats. I love it for cookies, brownies, pastries, and fruit.
- Use the Cake Plate Separately: One of my favorite tricks is using the cake plate separately from the stand to display cakes, pies, or baked goods, adding height to tablescapes.
Whether planning a wedding, setting up a dessert table, or just sprucing up your backyard BBQ, your stand will come in handy in more ways than one.
Customize Your Cake and Cupcake Display
I kept my stand pretty simple, but there are many ways you can customize yours to match your style or event theme. If you want to add a more elegant touch, consider using a router to create decorative edges on the shelves and cake plate. This small detail can make a big impact, giving your stand a polished, upscale look.
How to Make a DIY Cake and Cupcake Stand
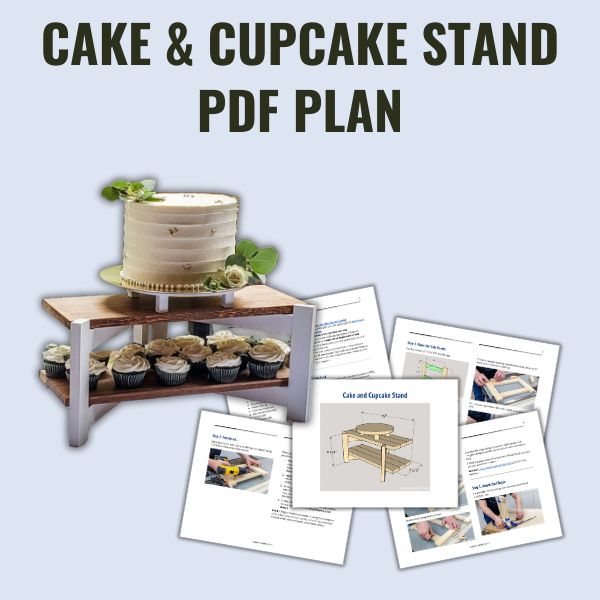
Printed Plan
Get the PDF plan here (includes detailed instructions, measurements, and bonus tips)
Materials
- Wood (per the printed plan)
- Wood Glue
- 1-¼” Fine-Thread Pocket Hole Screws
- (2) Hinges (I used these)
Tools
- Tape Measure
- Kreg Multi-Mark
- Miter Saw
- Jigsaw
- Drill
- Drill Press (optional)
- Pocket Hole Jig
- Table Saw (optional)
- Disc Sander (optional)
- ⁵/₆₄” Drill Bit
- 1-¼” Forstner Bit
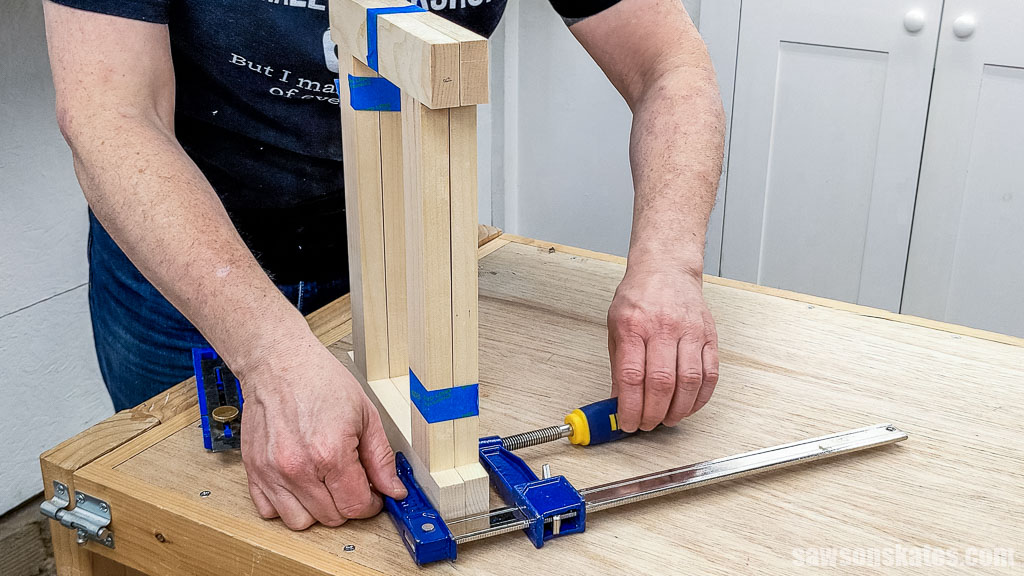
Step 1. Make the Frame
Cut four pieces of wood to length for the legs.
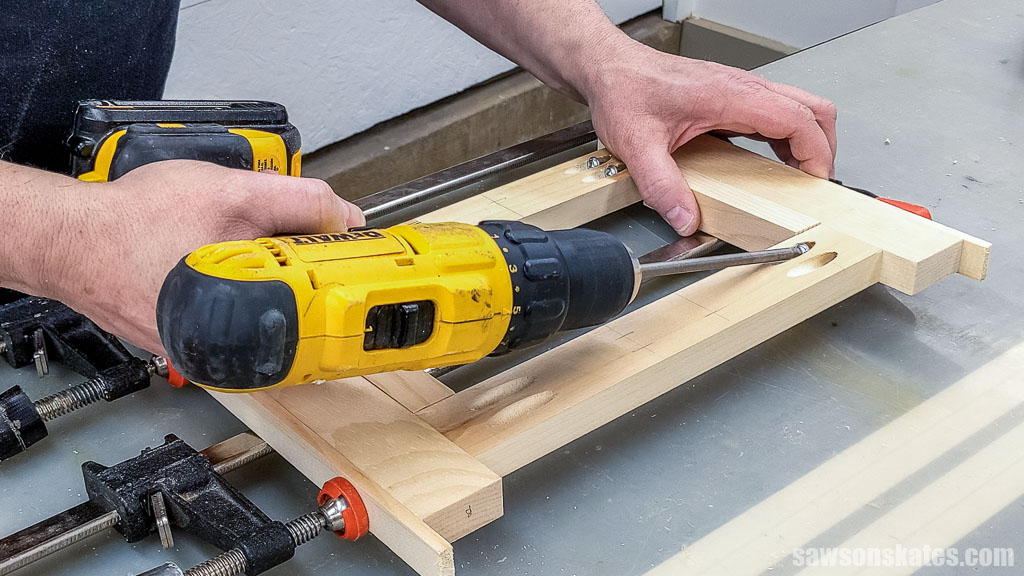
Cut four pieces of wood to length for the rails, and drill pocket holes in each end.
Related: How to Use a Pocket Hole Jig

To ensure proper spacing, I positioned scrap wood at the base of each leg.
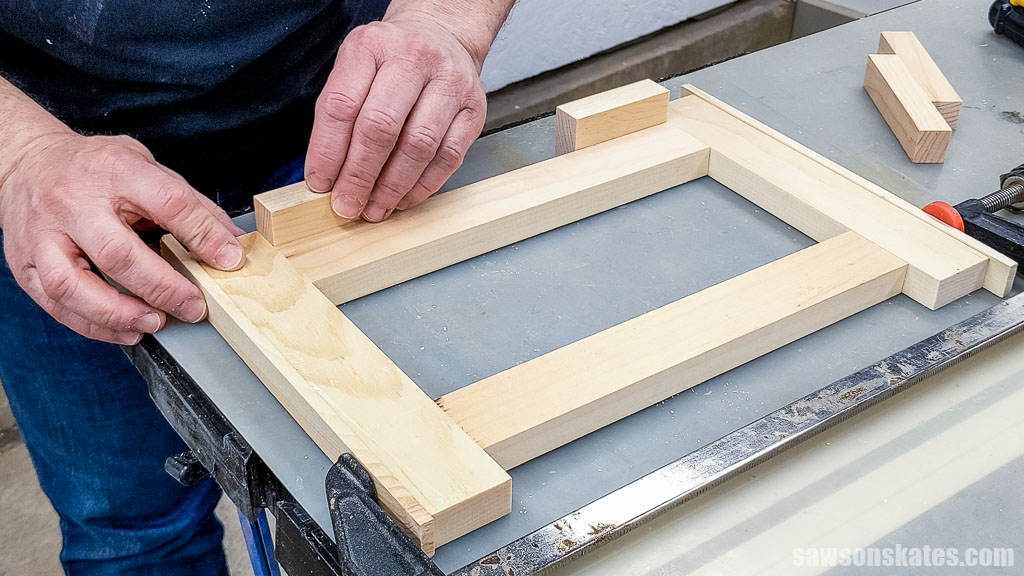
For the spacing between the rails, I used scrap wood pieces cut to length.
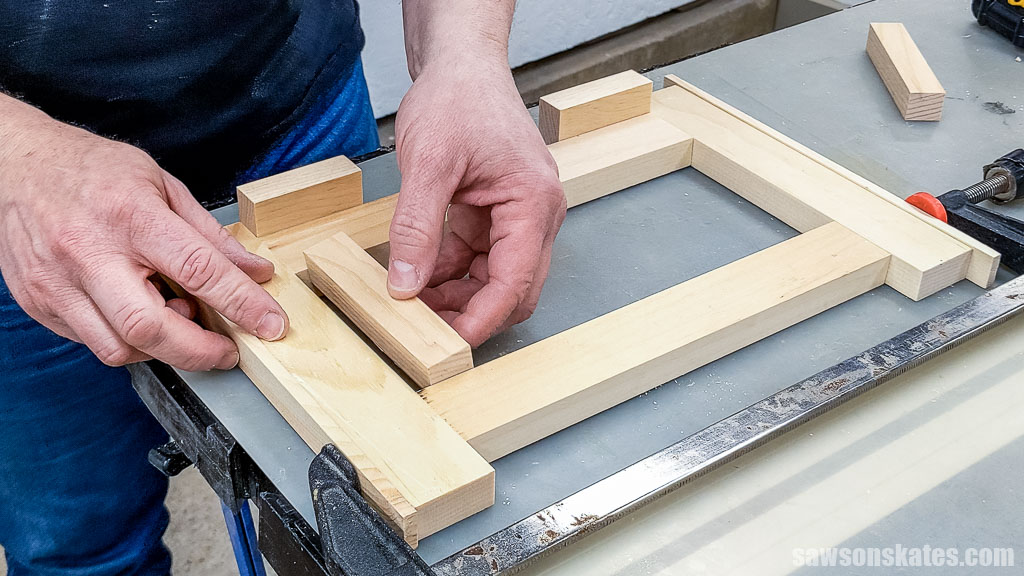
Apply glue to the rails, clamp to the legs, and attach using pocket hole screws.
NOTE: I forgot to follow one of my tips for joining narrow workpieces, using face clamps to control the pocket hole screw’s outward force. Luckily, none of my workpieces cracked while I was driving them.
For a polished look, I filled the pocket holes with pocket hole plugs. You can use store-bought plugs or make your own.
Related: How to Make Pocket Hole Plugs
I applied glue to the holes.
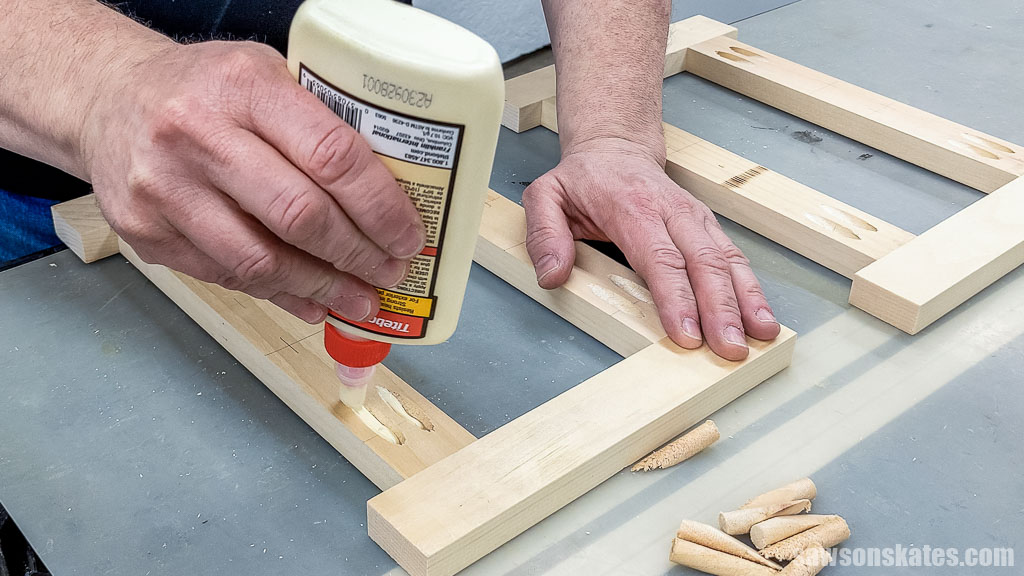
And pressed a plug into each one.
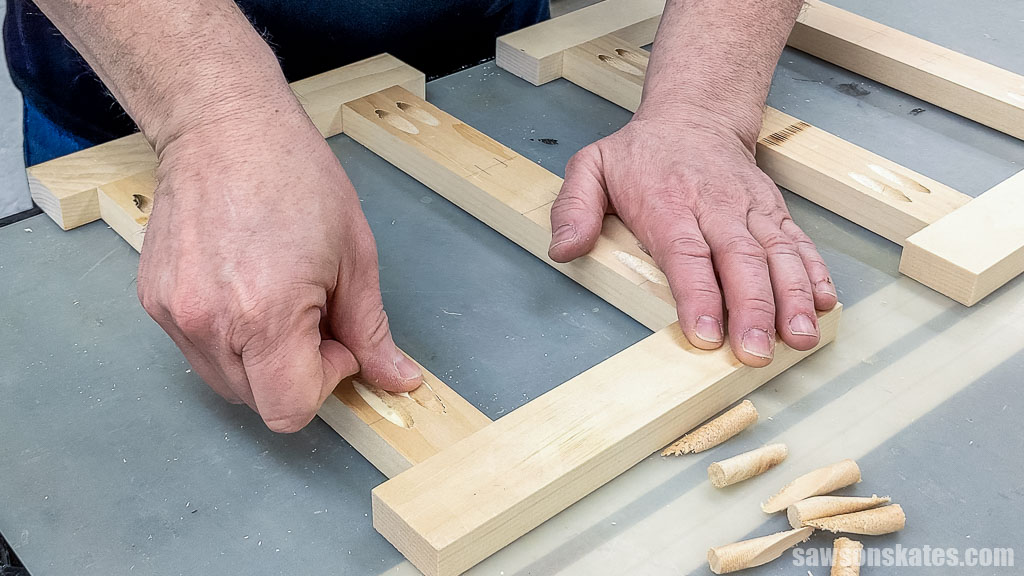
I sanded the plugs using my random orbit sander and 100-grit sandpaper until they were flush with the frame’s face.
I filled any gaps around the holes with Ready Patch, but you can use wood filler instead.
Related: Does Stainable Wood Filler Work? (Here’s the Answer)
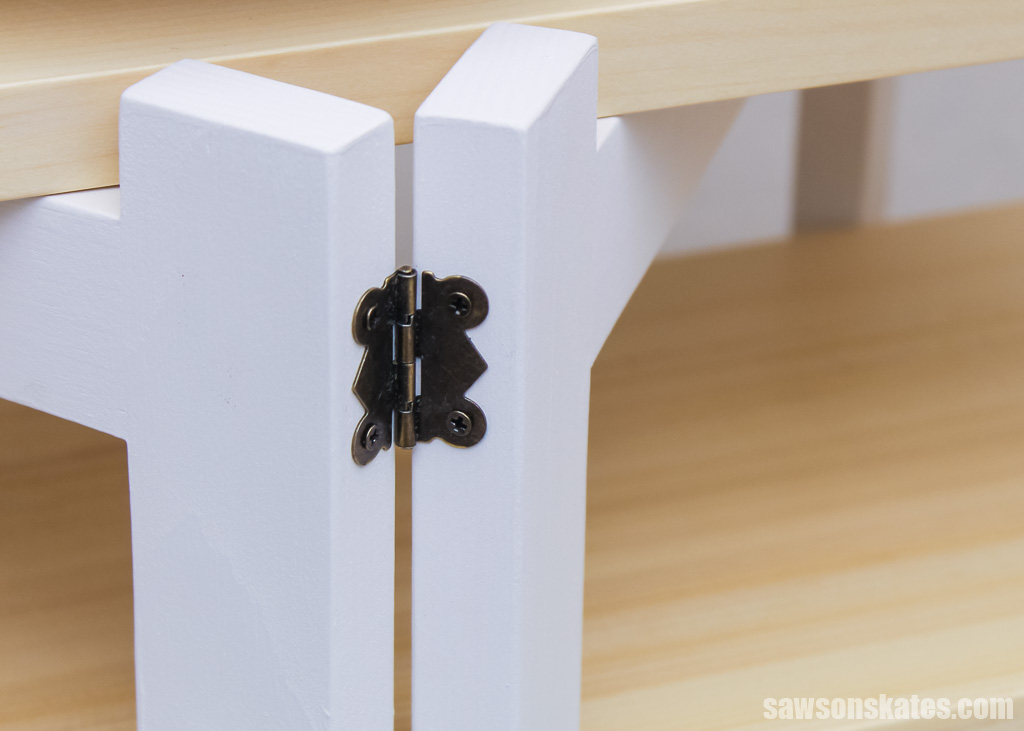
Step 2. Attach the Hinges
I placed the frames side by side and used a clamp to stabilize them.
On the opposite end, I used my Kreg Multi-Mark to position a hinge 1″ from the end and centered it from side to side.
TIP: I love these miniature hinges. They were the perfect size for my key cabinet and rustic bread box projects. The bag has quite a few, so I have plenty left for future projects.
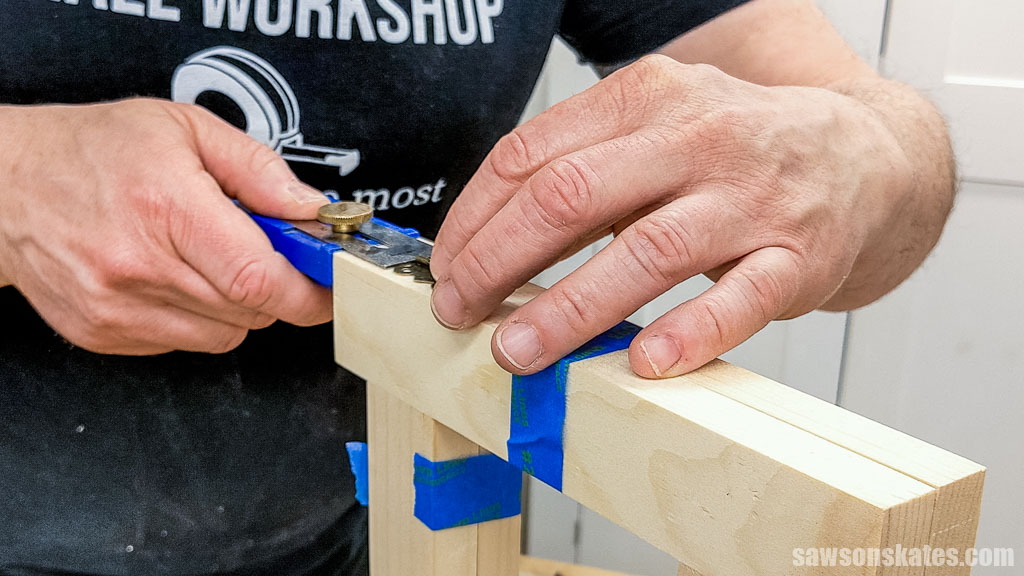
With a pencil, I traced the hinge’s holes onto the frames.
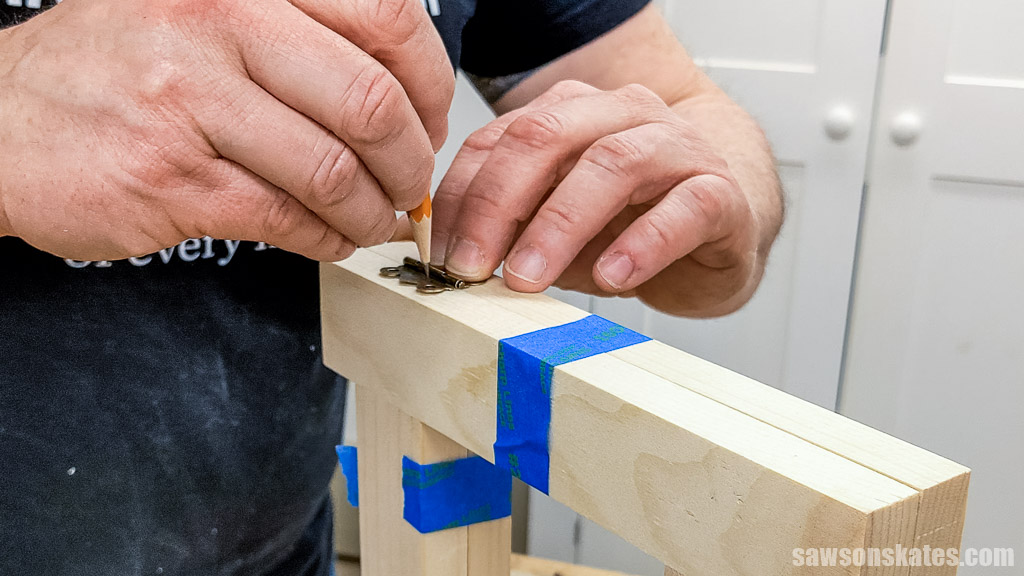
Using an awl, I made a starting point for the drill bit.
Related: What is an Awl? (& How to Use It)

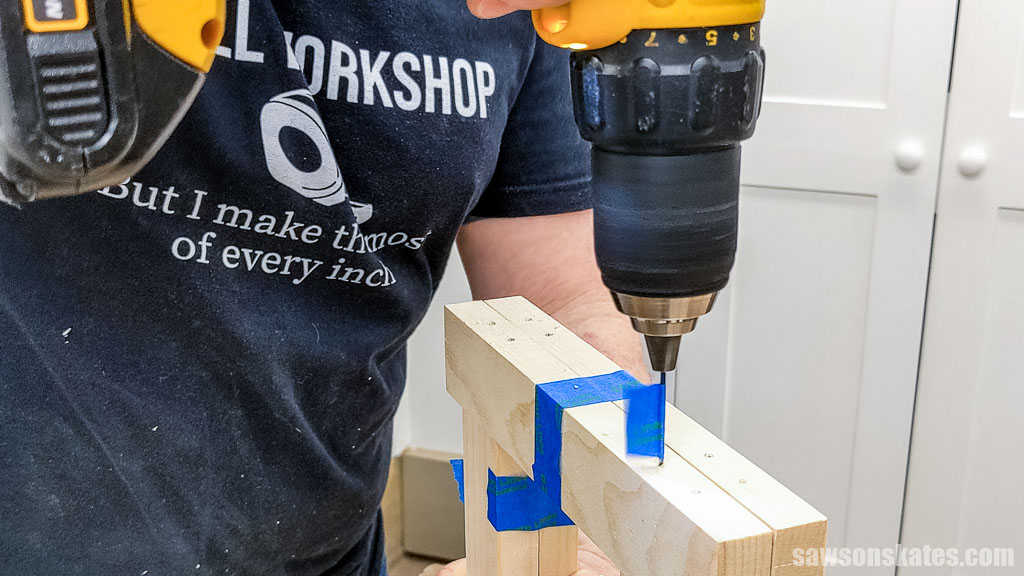
Using a drill bit with painter’s tape as a depth stop, I made a pilot hole for the screws.
Related: How to Drill Pilot Holes (Why, When & Correct Size)
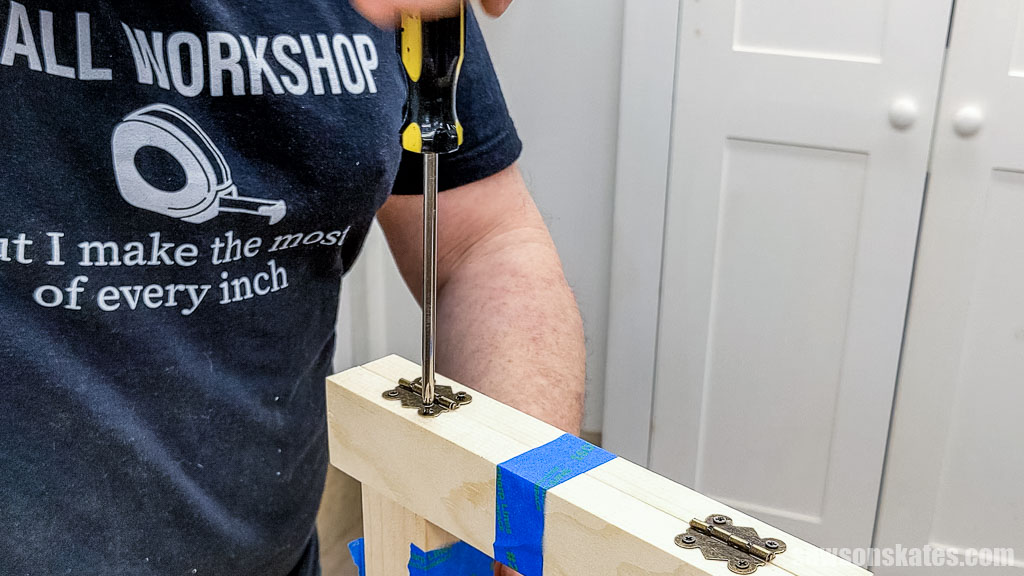
I attached the hinges to the frames using the screws that came with them.
TIP: I left the hinges attached while painting, coating all surfaces except the hinged edges. Once the main areas were dry, I removed the hinges, painted the remaining sections, and reattached them. This method felt like the easiest way to paint the frames to me.
Step 3. Make the Shelves
Theresa used 1×8 boards for her cake stand, which measure 7-¼” wide. If you’re wondering why a 1×8 isn’t 8″ wide, you may find my Beginner’s Guide to Wood Sizes article helpful.
One downside of using wider boards, like a 1×8, is their tendency to cup, when the wood curves across its width, forming a concave shape similar to a smile or frown.
Narrow boards are less likely to cup, so I built my shelves by gluing three narrow boards together, creating a panel.
Both methods work well. A 1×8 board saves time since there’s no need for gluing, but it’s more prone to cupping. Using narrower boards reduces the risk of noticeable cupping; however, it adds extra time to your build.
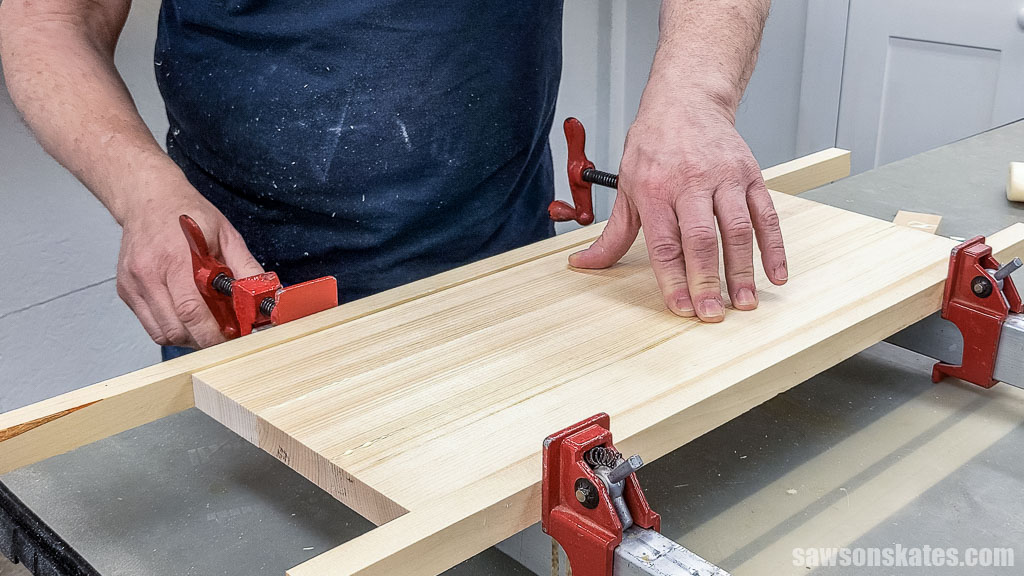
I applied glue to the board’s edges and clamped them to form two panels. When the glue was dry, I cut them to their final length. First, I’ll trim one end, measure, and then cut the second.
Related: Why Can’t I Make Accurate Cuts? (& How to Fix It!)
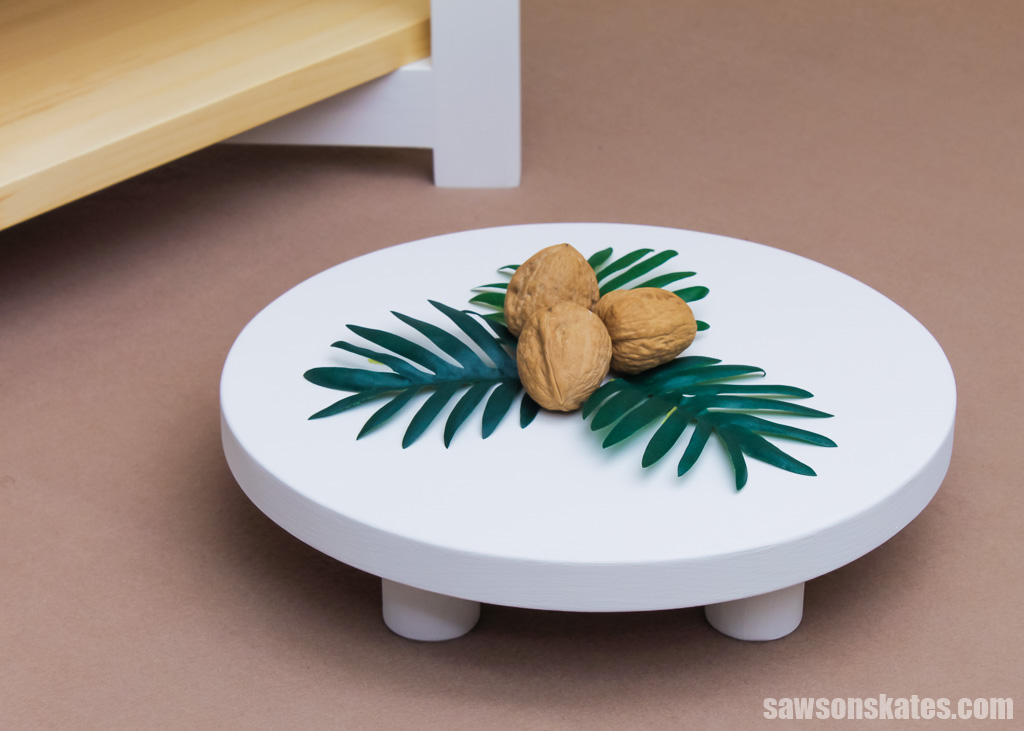
Step 4. Make the Cake Plate
I prepared the cake plate template while the glue was drying on shelves.
TIP: When printing the template, make sure the scale is set to 100% (usually found under “more settings”).
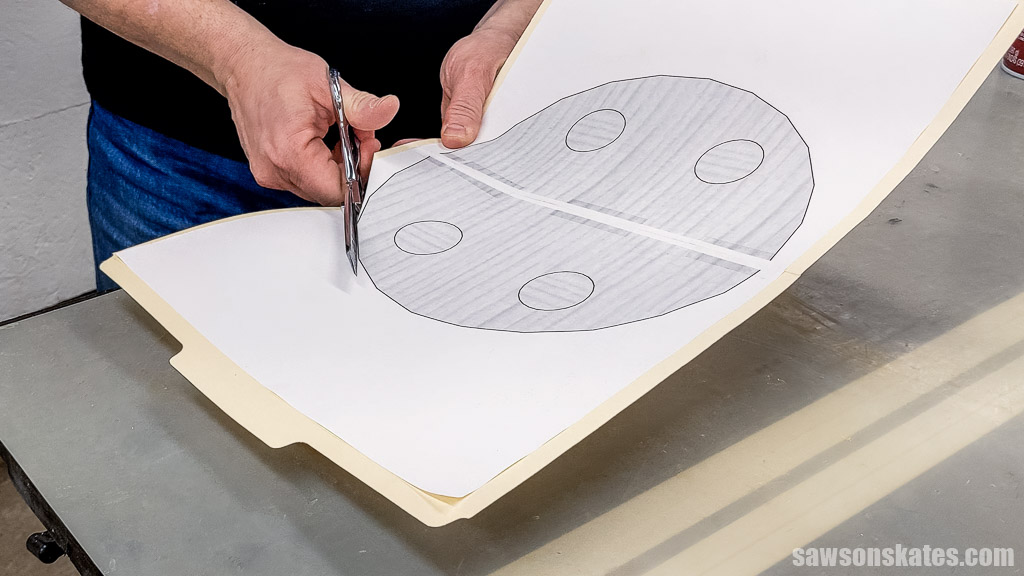
The sheets have a white border around them, but they need to be joined together at the edges.
I ensured the lines were positioned correctly and joined them using tape.

Using scissors, I cut out the template.
I made the cake plate following the same method as the shelves, cutting two boards to length and squaring their edges using my table saw.
I applied glue to their edges and clamped them to form a panel.
NOTE: I had a panel left over from another project, so I used it for my cake plate, even though it was much longer than necessary.
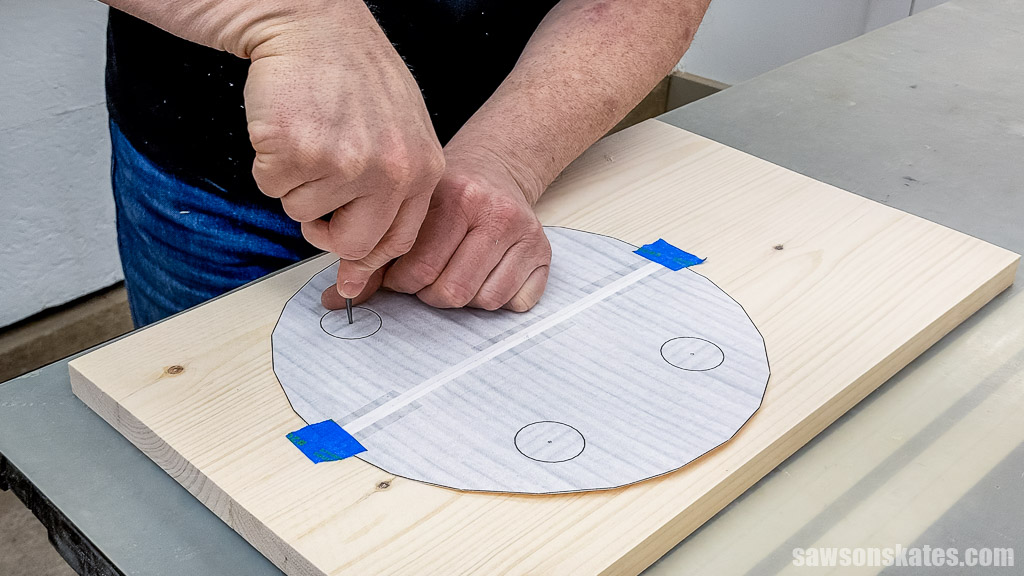
I placed the template on the panel and temporarily attached it using painter’s tape.
TIP: If one side of your board is more visually appealing, place the template on the opposite side (the one that will face down).
Using an awl, I made a starting point for the drill bit.
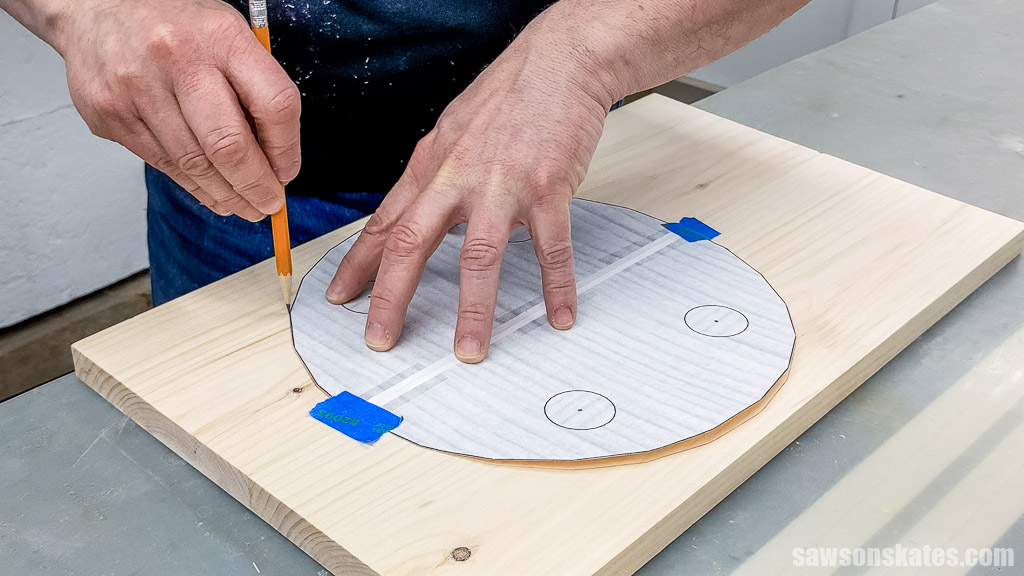
I traced the template with a pencil.
I cut the shape using a jigsaw. What’s my secret for perfect curves? I cut just beyond the pencil line, then sand, removing the saw marks and refining the shape.
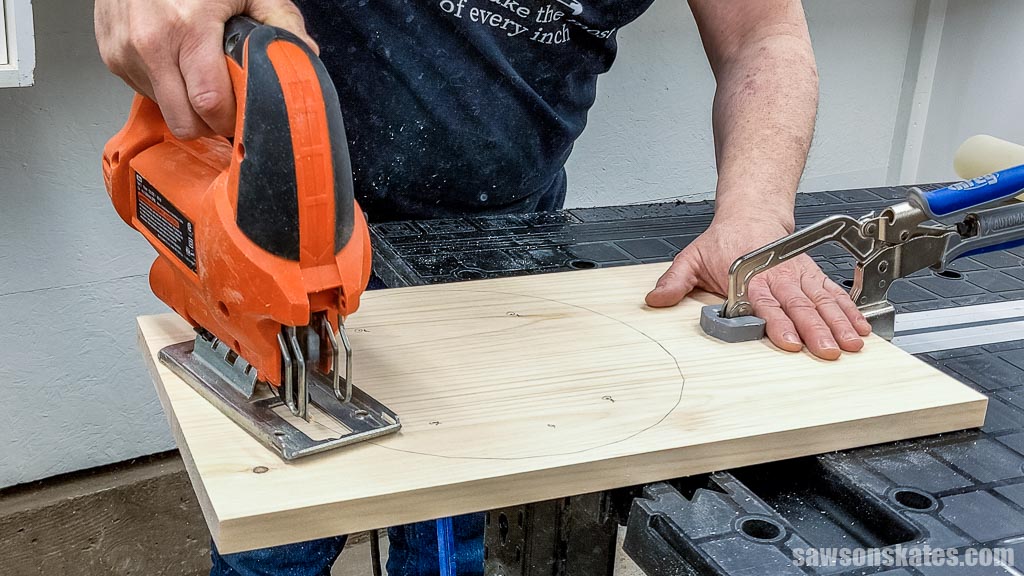
A disc sander is an excellent way to smooth the outside curves; however, you can smooth the edges with sandpaper if you don’t have one, but it will take a little more time.
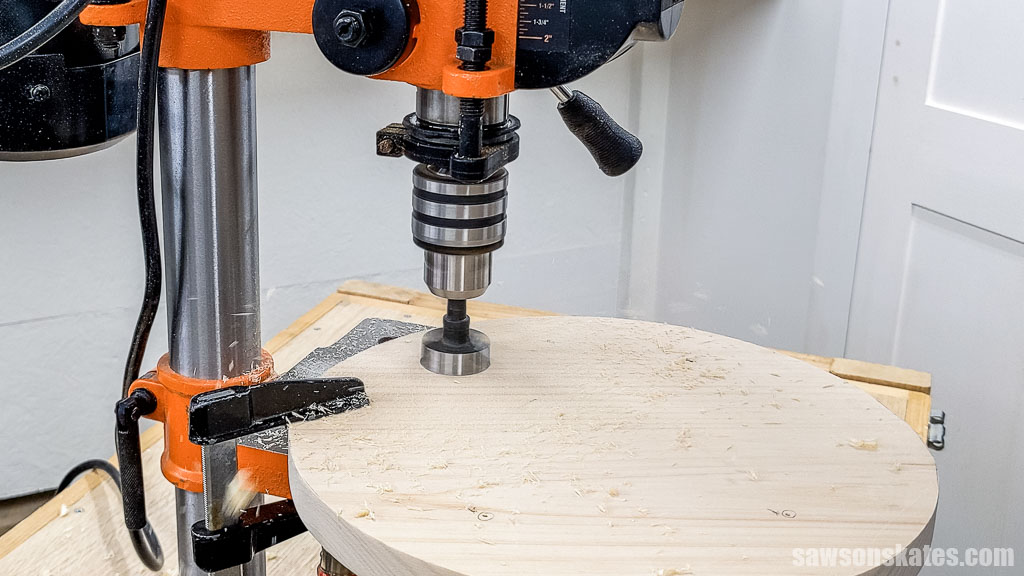
I used my drill press to make the holes for the legs, but you can use a handheld drill instead. Just keep in mind the holes may not be as precise.
I installed a Forstner bit in my drill press and adjusted the depth.
Related: What is a Forstner Bit? (& How to Use It)
With the drill press turned off, I lowered the bit’s spur into the small hole I made with the awl.
With the workpiece in position, I clamped it to the table.
Use Forstner bits at a steady speed with moderate pressure for the best performance. Applying too much force or rushing can lead to overheating, which can damage the bit.
I repeated these steps for the remaining holes.
TIP: The legs are made from wooden closet rod. While your drill press is set up, I recommend drilling a hole in a piece of scrap wood and bringing it with you when buying the rod to ensure the best fit. I had two scrap pieces of closet rod in my shop; one fit snugly, while the other was too large.
Using my miter saw, I cut four pieces of closet rod to length.
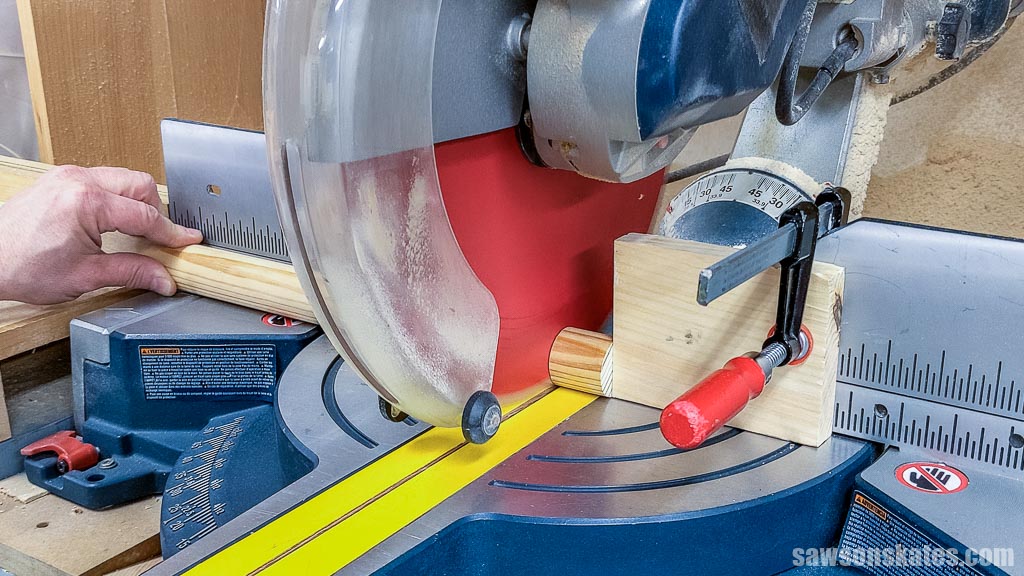
I used a sanding block to bevel one end of the leg (the end that rests on the table) for a more finished look. If you’re having trouble fitting the legs into the holes, try beveling the other end to help it slide in more easily.
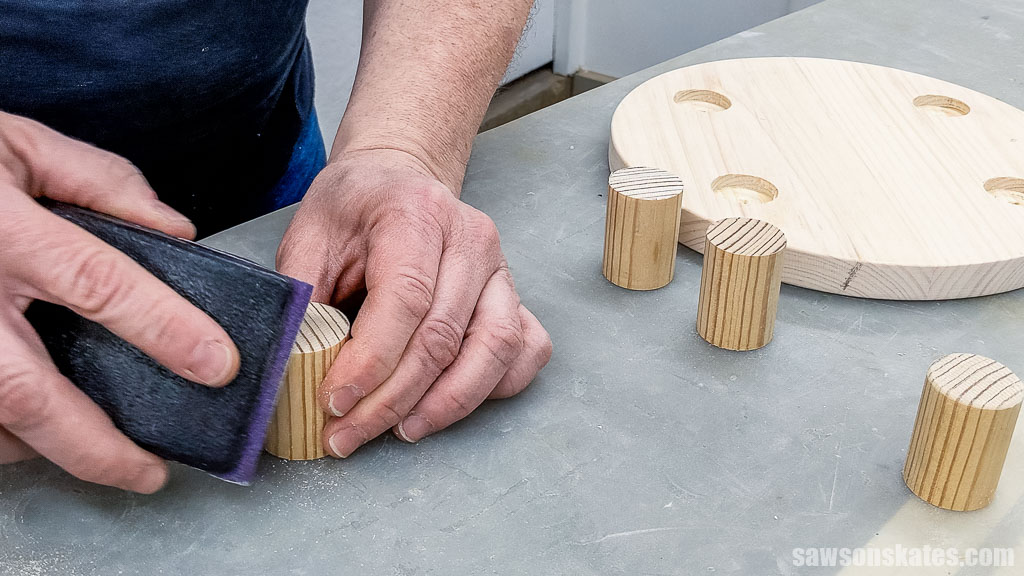
Sanding the surface also helps the legs fit more easily.
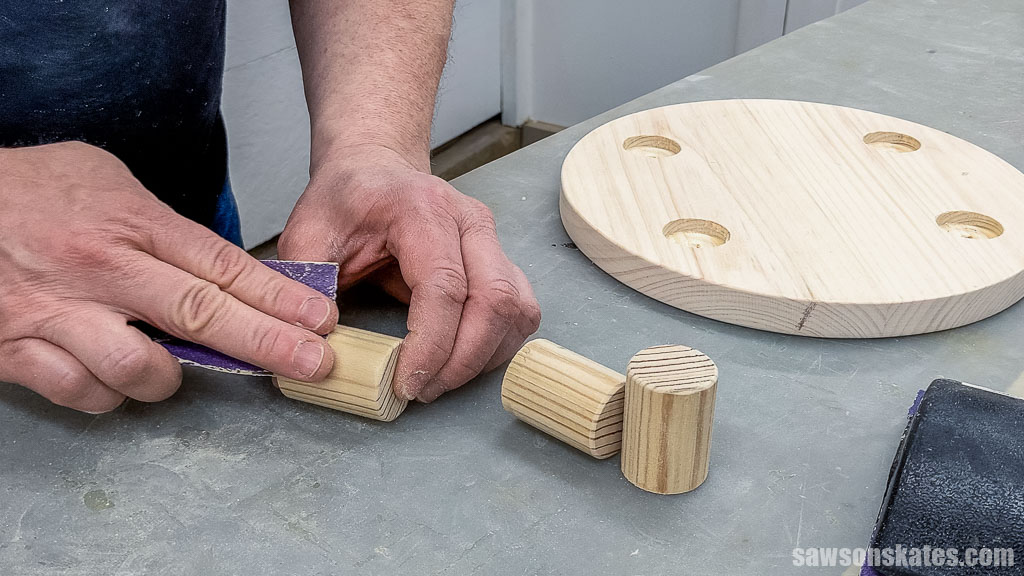
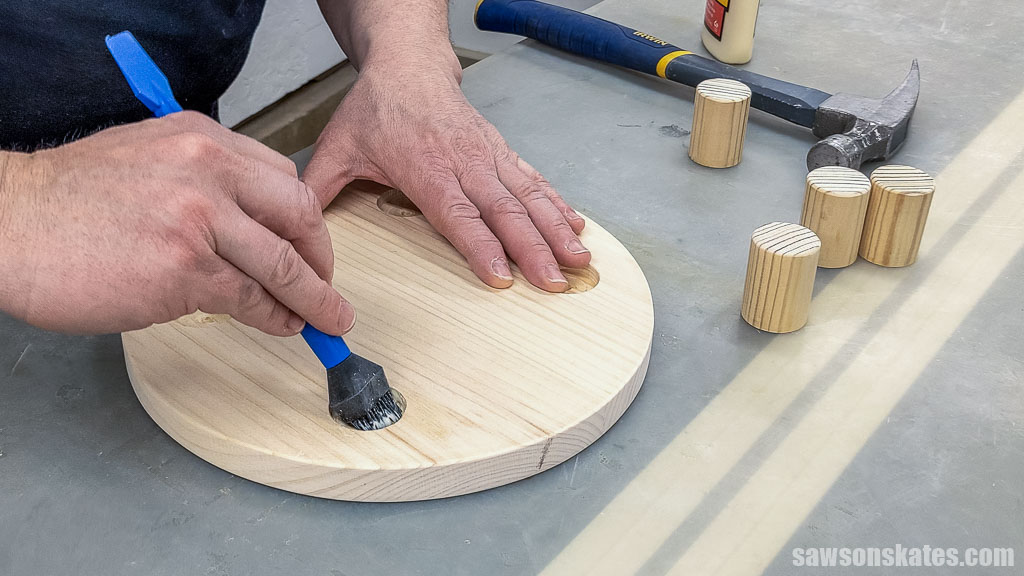
Using a silicone brush (this one is similar to mine), I applied glue to the hole’s edges. You can also use an inexpensive artist’s brush or your finger. Just make sure to coat the edges, as it will provide the most holding power.
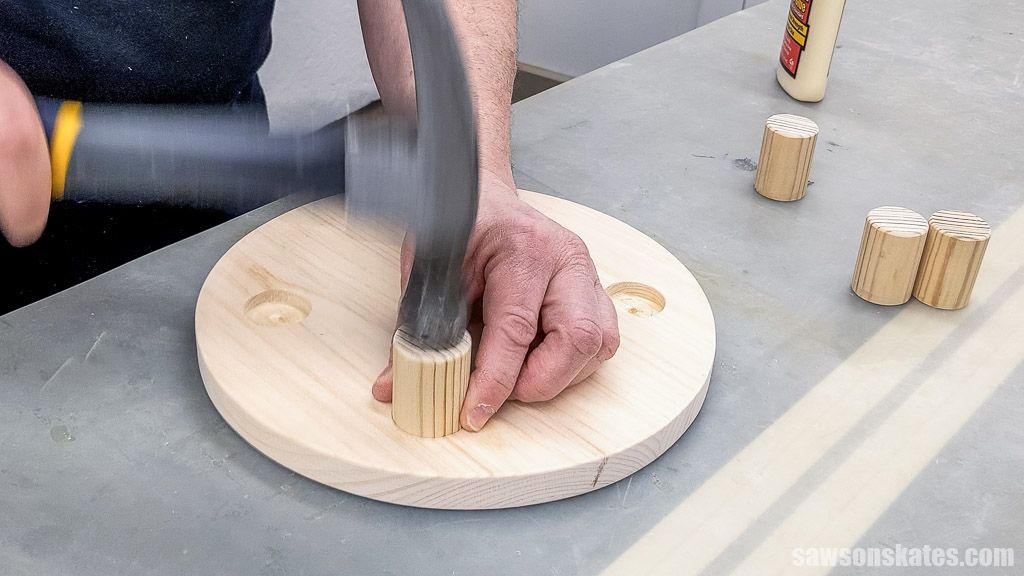
I positioned the leg in the hole and lightly tapped it with a hammer until it was fully seated. I repeated these steps for the remaining legs.
Step 5. Finishing Touches
For the finishing touches, I painted the frame and applied three coats of a matte sheen polyurethane alternative to the shelves for a smooth, durable finish.
Theresa took it a step further by adding finishing nail “pegs” to the cake plate’s legs, holding it in place on the top board. She said, “It lifts off easily, the holes in the board are hardly noticeable, and the other side has no holes.”
As an alternative, I also considered using double-sided tape on the shelves and cake stand to keep everything securely in place.
Includes:
- List of tools and materials
- Complete measurements (in inches)
- Easy-to-follow instructions
- Step-by-step photos
- Detailed diagrams
or get the best value:
Final Thoughts
A huge thank you to Theresa for sharing her brilliant idea! This DIY cake and cupcake stand is a versatile, space-saving solution that adds a special touch to weddings, anniversaries, birthdays, and more. Whether you follow my plan or add your creative tweaks, this stand is sure to impress, and the best part? It folds flat for easy storage once the party’s over.
Don’t wait. Get your PDF plan (including the detailed instructions and measurements) now!
Thank you for stopping by. If you enjoyed this tutorial, would you please take a moment and pin it to Pinterest? I’d really appreciate it!
Recommended For You
Pin This For Later

Hi there – I’m Scott, a woodworking enthusiast and creator of Saws on Skates, a site I started in 2015 to share easy-to-follow tutorials, space-saving shop tips, and project inspiration for DIYers at any skill level. Learn more about my woodworking journey here.