How to Make a French Cleat (2 Easy Ways)
Looking for a simple, strong way to mount shelves, tools, or cabinets? A French cleat is the perfect solution! In this tutorial, I’ll show you two easy ways to make one; whether you have a table saw or a circular saw, you’ll get a rock-solid cleat sturdy enough to hang almost anything.
What Should I Build Next?
That's the question I help answer.
Every week, I send woodworking ideas to 17,000 DIYers who love building things.
You'd fit right in.
Table of Contents
- What is a French Cleat?
- Choosing the Right Wood for Your French Cleats
- How to Hide a French Cleat for a Clean Look
- Best Saws for Cutting French Cleats
- How to Make a French Cleat
- How to Install a French Cleat
- Get the French Cleat Handbook
This article contains affiliate links. If you purchase from these links, I may earn a small commission at no additional cost to you. Visit my site policies for more information.
What Is a French Cleat?
A French cleat is a game-changer if you’ve ever needed a rock-solid way to hang something heavy on the wall. I love using this method because it’s simple, sturdy, and easy to customize for different projects.
It works with two interlocking strips, each with a 45-degree beveled edge. First, you attach one cleat to the wall, securing it to the studs with the bevel facing up and away from the wall. Then, you fasten the second cleat to the back of whatever you’re hanging, with the bevel facing down toward the wall.
When you lift the object onto the wall-mounted cleat, the two pieces lock together, and gravity does the rest. No fasteners are needed to join the cleats, which makes it easy to remove and reposition whatever you’re hanging. That’s why I love using French cleats; they’re flexible and endlessly reconfigurable, perfect for everything from workshop storage to cabinets and even wall art.
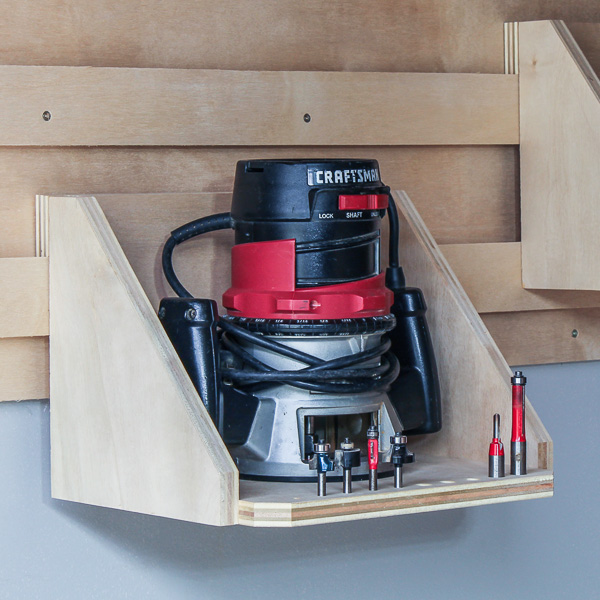
Related: How to Make a French Cleat Tool Storage Wall
Where Can You Use a French Cleat?
- Cabinets
- Mirrors
- Artwork
- Fireplace mantles
- Headboards
- Shelving units
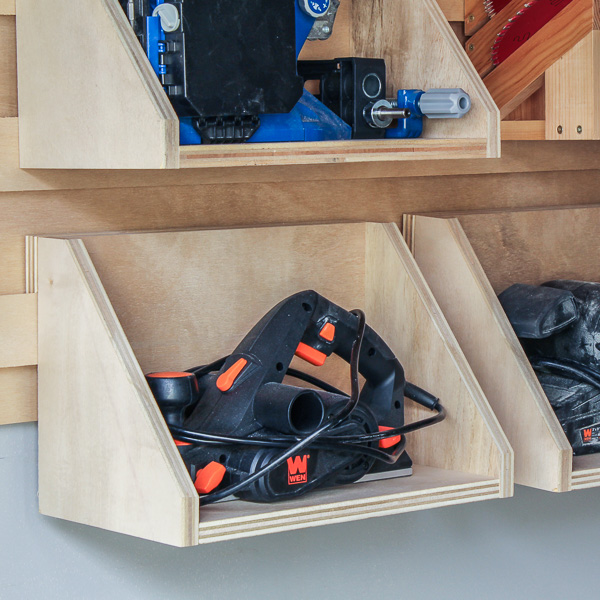
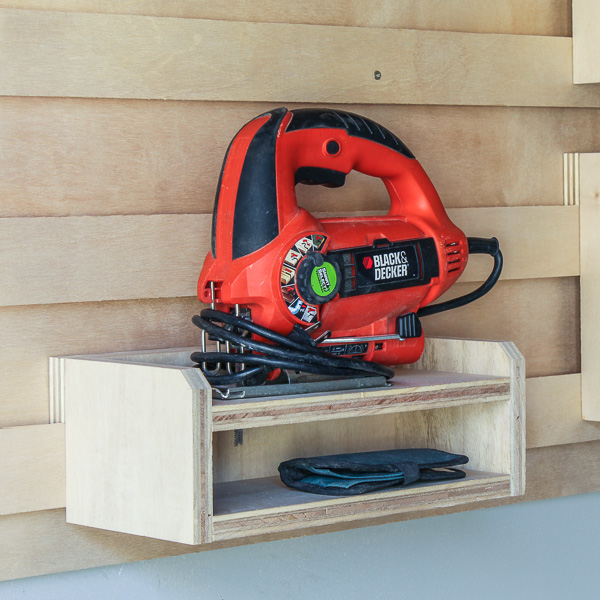
- Tool storage for workshop or garage
Choosing the Right Wood for Your French Cleats
One of the great things about French cleats is how versatile they are; you can make them from almost any wood. I’ve used solid boards like 1×4s and 1×6s, but most of the time, I rip ½” or ¾” plywood into strips. Just make sure to pick a good-quality sheet with minimal voids and knots for the best results.
Related: Beginner’s Guide to Wood Sizes
How Thick Should a French Cleat Be?
- ½” wood – Works well for lighter items like mirrors and artwork.
- ¾” wood – A better choice for heavier projects like cabinets.
What’s the Best Width?
I usually make my French cleats about 3 to 5 inches wide. If I need extra strength, I go wider. If I’m hanging something smaller, I’ll make them narrower.
What’s the Best Angle for a French Cleat?
I usually cut French cleats at a 45-degree angle, but it doesn’t have to be exact. If you’re just making a single cleat for something like hanging a mirror, a slight variation, say 47 degrees, still works fine since the two pieces will lock together.
But when making multiple cleats, like for my tool storage wall, I always stick with the same angle. Keeping it consistent ensures everything fits together correctly, so I can move things around and swap out items without any hassle.
How to Hide a French Cleat for a Clean Look
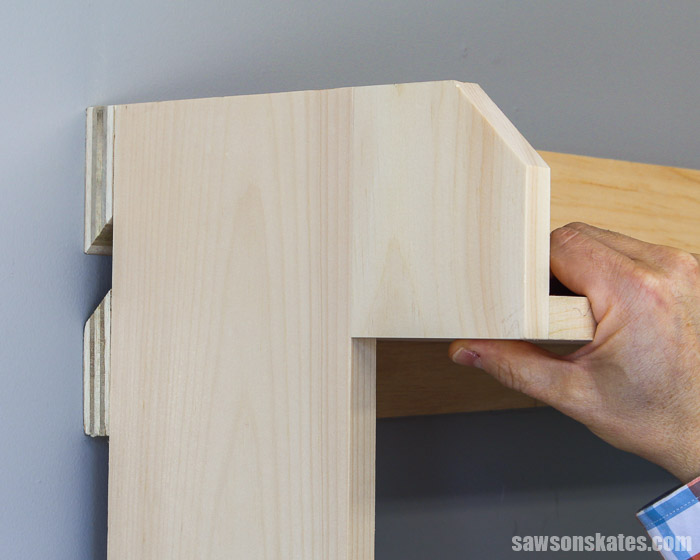
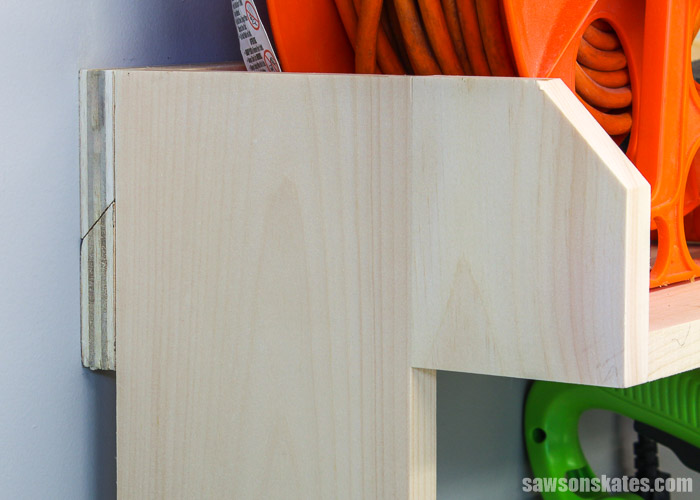
French cleats are super functional, but let’s be honest, they’re not always the prettiest thing to look at. Since they usually sit on the back of a project, they can end up being visible. But with a bit of planning, I’ve found it’s easy to hide them for a cleaner look.
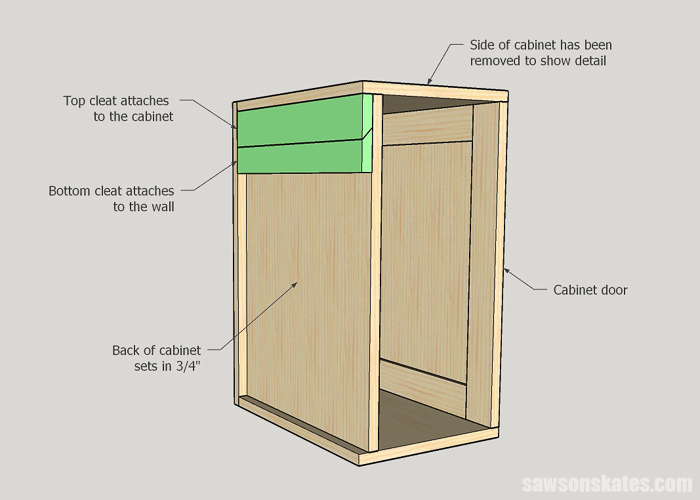
For example, when I mount a cabinet to the wall with a French cleat, I don’t make the back panel flush with the sides. Instead, I set it in ¾” to leave just enough space for a ¾” cleat. That way, the cleat tucks neatly inside, hidden by the cabinet’s sides. It keeps everything secure but gives the project a much more polished look.
Best Saws for Cutting French Cleats
When cutting French cleats, a table saw or circular saw will get the job done. Both work well, but the key is making sure your cut is as straight as possible.
If the cut isn’t precise, the two cleats won’t make full contact, which can weaken the joint. And if the angle is off, whatever you’re hanging might not sit perfectly level. Taking your time to get a clean, accurate cut will ensure the cleat locks in securely and keeps everything aligned.
Essential Table Saw Tips
A table saw is one of the most powerful tools in your shop, but it’s also one of the most dangerous. That’s why I always take a few extra steps to
ensure I’m working safely and getting the best cuts possible.
WARNING: Table saws are capable of causing severe injuries, including lacerations, amputations, eye damage, and broken bones.
Table Saw Safety Checklist
- Read and understand the manufacturer’s instructions.
- Wear proper safety gear: eye protection, ear protection, and a dust mask.
- Make sure safety devices like the riving knife are properly installed and working correctly.
Related: 21 Table Saw Safety Rules (& Mistakes to Avoid)
Parallel the Rip Fence
A misaligned rip fence can affect the quality of your cuts and increase the risk of kickback when a workpiece binds against the blade or drifts away from the rip fence toward the blade, propelling it back at a high rate of speed. Kickback is dangerous. Learn an easy way to parallel a rip fence in here.
Install the Riving Knife
A riving knife is a crucial safety feature that helps prevent kickback. Ensure your table saw has a riving knife or splitter installed and properly adjusted behind the saw blade. Check your saw’s manual if you need help setting it up.
Use a Rip Blade
When ripping material on a table saw, a rip blade reigns supreme over its versatile cousin, the combination blade.
Rip blades typically have fewer teeth (24 to 30) than combination blades (usually 50). Fewer teeth prevent binding, reduce friction, and require less force to push the workpiece, making rip cuts easier, faster, and less demanding on your saw’s motor.
While combination blades offer the convenience of handling both rip and crosscuts (cuts across the grain), they sacrifice dedicated performance in both areas. Their higher tooth count makes them less efficient for ripping, leading to slower cuts and potential binding.
I recently started using this 24-tooth ripping saw blade.
Clean the Blade
Wood pitch can build up on saw blades. This buildup can increase the chances of burning the edges of your workpiece. The buildup can also require more feed pressure. In other words, the buildup can make a sharp blade feel like a dull blade. Learn how to clean saw blades and which cleaner I use here.
Wax the Table Saw
Wood pitch not only builds up on your saw blades but also on the table and rip fence of your table saw. This buildup causes friction. Waxing your table saw reduces friction and reduces the chances of oxidation. Learn how to wax your table saw and which wax I use here.
Set the Blade Angle
Sometimes, precisely setting the blade angle can be difficult. Using a digital angle gauge is a quick and easy way to precisely set the angle of your table saw every time. Learn how to use a digital angle gauge here.
Set the Blade Height
Setting the blade 2″ to 3″ above the workpiece produces the least friction and the least amount of heat. But it also creates a greater chance for injury because more of the blade is exposed. I set my blade about an ⅛” above the material. Setting the blade an ⅛” above the material helps to reduce injuries because a smaller amount of the blade is exposed.
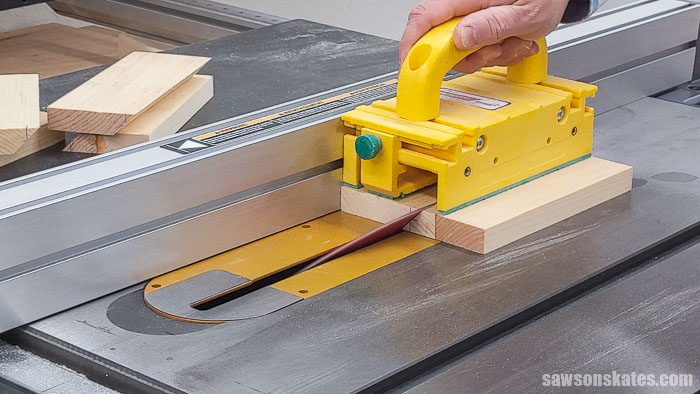
Use a Push Block
Long push sticks provide less control over a workpiece and create a pivot point, which could allow your hand to fall into the blade. Instead of a push stick, I use a push block with a lower center of gravity so it doesn’t create a pivot point like a push stick.
Make a Test Piece
Use a piece of scrap wood to run a test piece to make sure everything is adjusted the way you want before making any cuts on the pieces for your project.
Circular Saw
Just like a table saw, a circular saw can benefit from a clean saw blade. Waxing the baseplate of the circular saw will help reduce friction.
Related: How to Change a Circular Saw Blade
A circular saw is a handy tool, but it doesn’t usually cut straight without a bit of help from a fence or a guide. This means you’ll need a guide to cut a French cleat.
I used the Kreg Straight Edge Guide to make the French cleats for this tutorial. I have to give credit where credit is due. In my review of the Straight Edge Guide, I said that I would use it again, but “there are a few tools that I might reach for first before using my Straight Edge Guide.”
But I have to say the Straight Edge Guide was a quick and easy way to make French cleats.
Related: How to Use a Kreg Straight Edge Guide
How to Make a French Cleat with a Table Saw
Printed Instructions
- Get a FREE copy of the French Cleat Handbook including measurements and step-by-step instructions.
Supplies
- Wood (You could use 1×4s, 1×6s, or plywood. I used ¾” plywood for my cleats.)
- Tape Measure
- Kreg Multi-Mark
- Speed Square
- Digital Angle Gauge
- Table Saw
- Push Block (I used this one)
Tools
📝 NOTE: I’m showing just one way to use a table saw to make a French cleat. In this tutorial, I’m using ¾” plywood. You could use 1× material like a 1×4 or 1×6 instead. I’m making the two sections of the French cleat from one piece of plywood. You could also rip a 45-degree bevel on the edge of two pieces instead.
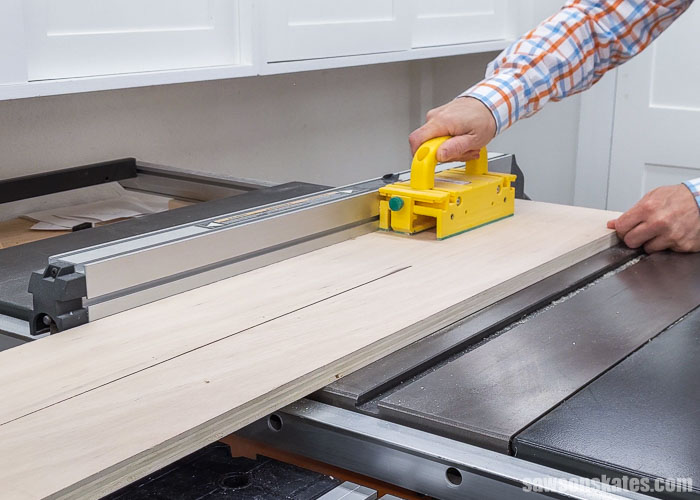
Step 1. Rip the Plywood to Width
To get started, I ripped a piece of ¾” plywood to 5”.
Important Safety Reminder: After changing the blade, I made a mistake and forgot to reinstall my table saw’s riving knife, a crucial safety feature for preventing kickback. Please ensure your riving knife is in place before using your saw.
Step 2. Mark the Angle
First, I located the center on the width of the board.
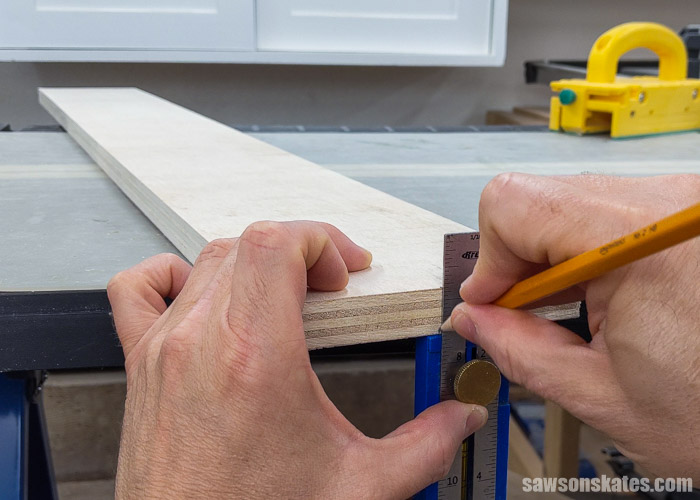
Next, I located the center on the height of the board.
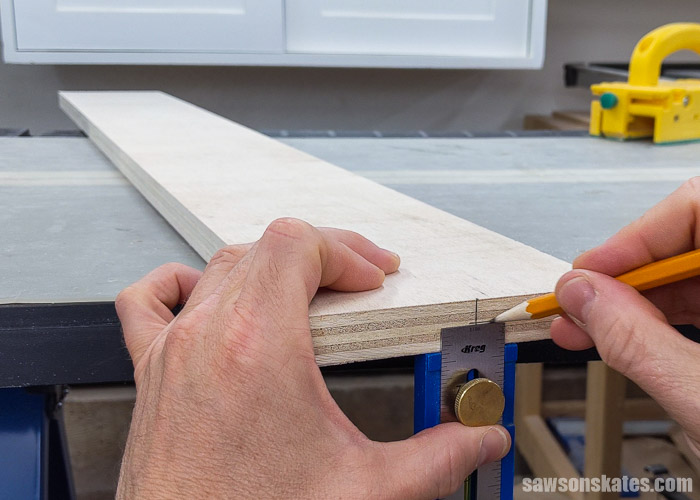
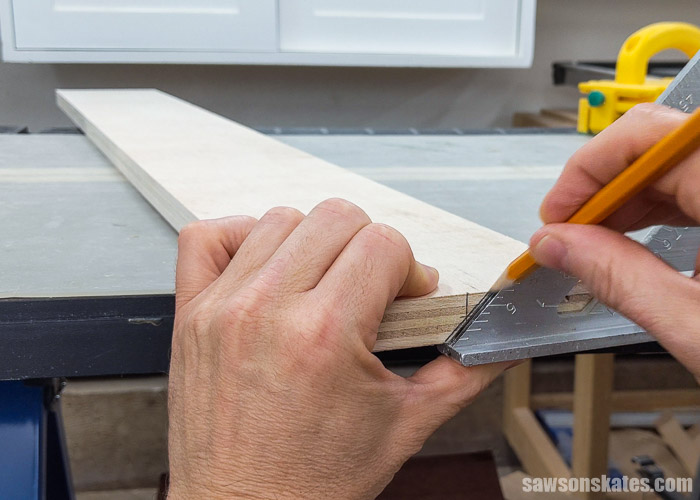
Then, I used a speed square to mark the intersection of those two points.
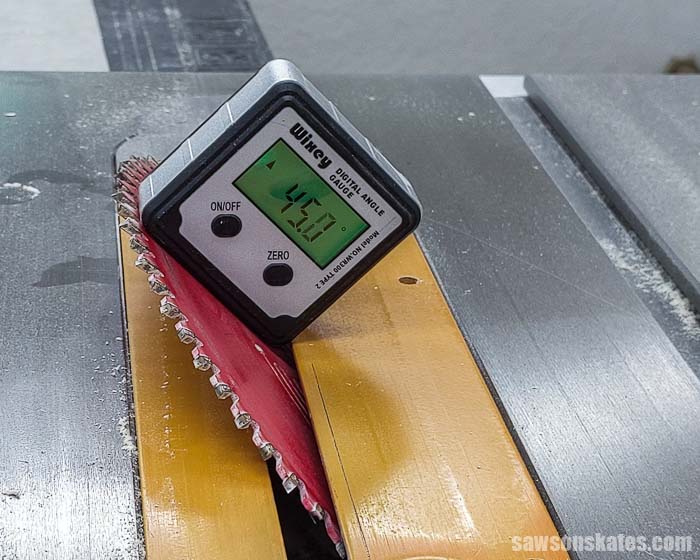
Step 3. Cut the Bevel
I used a digital angle gauge to set the blade to 45 degrees.
Related: How to Use a Digital Angle Gauge
Before I made any cuts on the pieces for my project, I tried the setup on a few test pieces.
With the saw turned off, I positioned the 45-degree mark on the workpiece so that it was centered from side to side on the saw blade.
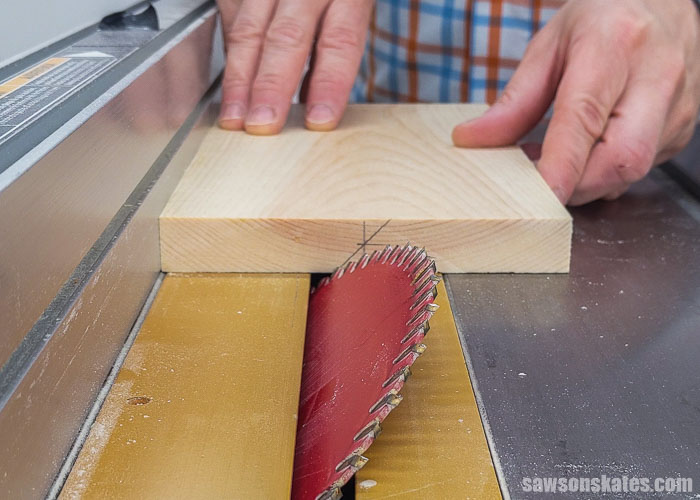
Then, I used a push block to make the test cut.
I used my finger to feel both edges of the test piece and adjusted the fence until the pieces were the same width.
📝 NOTE: The pieces don’t have to be the same width if you make cleats for a single object; however, you may want them to be the same for some projects. Let’s say you’re making a batch of cleats for a tool storage wall. You’ll likely want them to be the same width, ensuring the objects can be removed and reconfigured and all of the cleats will fit together correctly.

When I was happy with the setup on my test pieces, I made the cut on the plywood for my project.

How to Make a French Cleat with a Circular Saw
Printed Instructions
- Get a FREE copy of the French Cleat Handbook including measurements and step-by-step instructions.
Supplies
- Wood (You could use 1×4s, 1×6s, or plywood. I used ¾” plywood for my cleats.)
- Rigid Foam Insulation
- Tape Measure
- Kreg Multi-Mark
- Circular Saw
- Kreg Straight Edge Guide
Tools
📝 NOTE: I’m using the Straight Edge Guide opposite of the Kreg instruction manual. Typically you would position the Straight Edge Guide on the good side (the side you want to keep) and cut on the waste side. In this tutorial, I’m positioning the guide on the waste side and cutting on the good side (the side I want to keep).
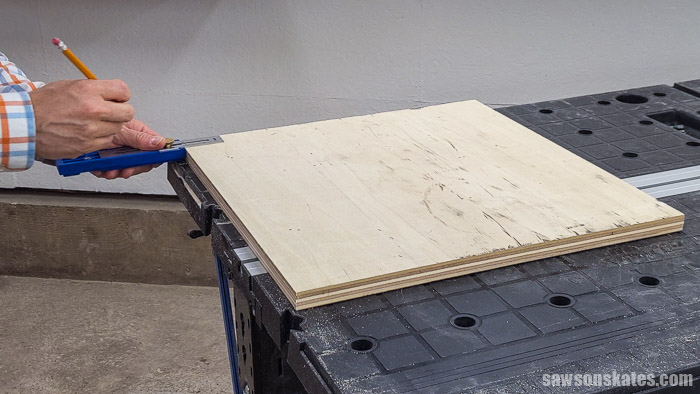
Step 1. Make the First Cleat
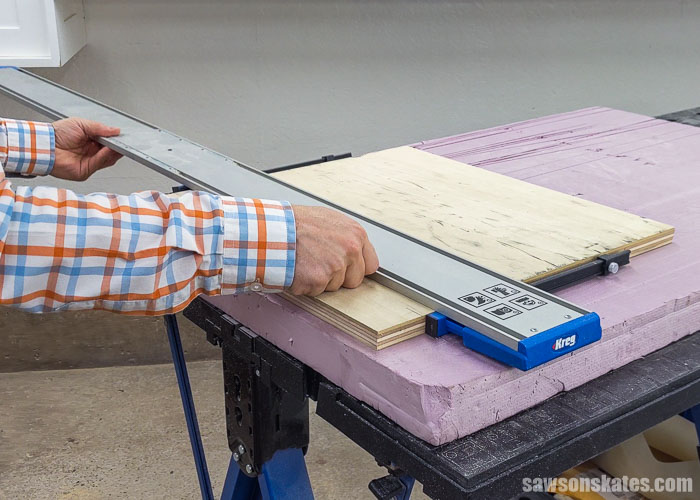
I used a Kreg Multi-Mark to measure in 2″ on each end of the board.
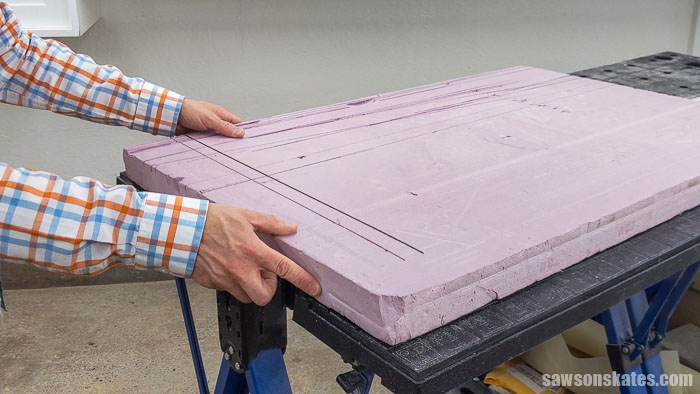
Next, I placed a piece of rigid foam insulation on my workbench. The insulation will protect my workbench when making the cuts.
Then, I placed the Kreg Straight Edge Guide on my workpiece. I positioned the cut line indicators on my marks, clamped the guide, and pushed the cut line indicators towards the guide.
Related: How to Use a Kreg Straight Edge Guide
I set my circular saw blade to 45 degrees.
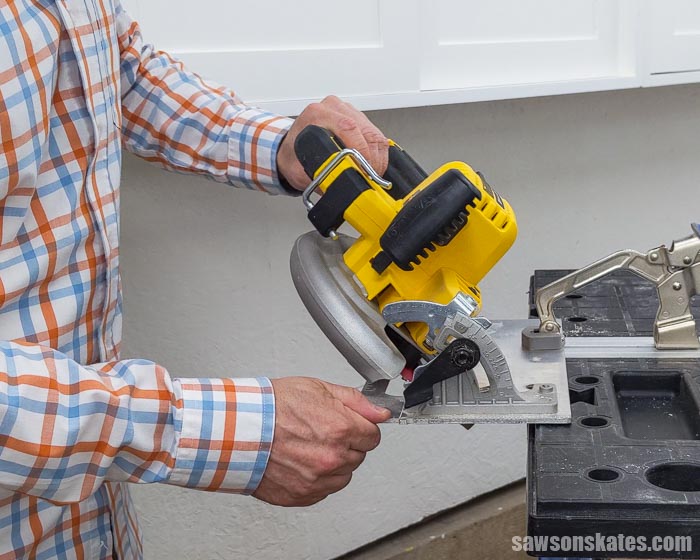
Next, I made the cut making sure to keep the baseplate of the saw against the guide for the entire length of the cut.

Step 2. Make the Second Cleat
NOTE: You may have to adjust the measurements below depending on the width of your circular saw’s baseplate.
I used a Kreg Multi-Mark to measure in 2-¾” on each end of the board.
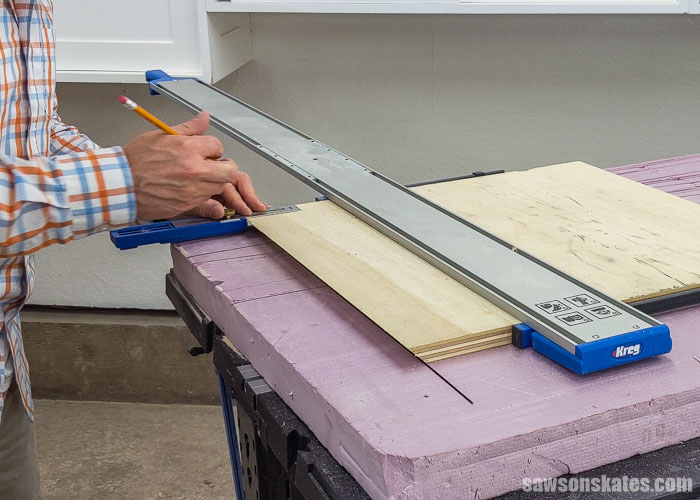
Next, I placed the Kreg Straight Edge Guide on my workpiece. I positioned the cut line indicators on my marks, clamped the guide, and pushed the cut line indicators towards the guide.
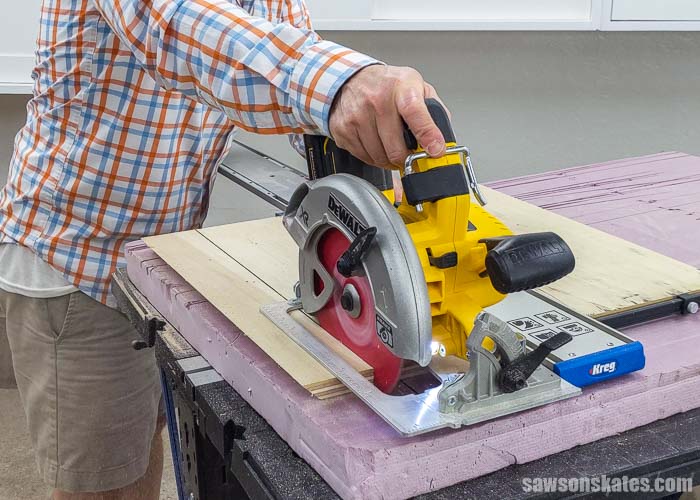
I set my circular saw blade back to 90 degrees.
Then, I made the cut making sure to keep the baseplate of the saw against the guide for the entire length of the cut.
How Do I Prefer to Make French Cleats?
I’ve always made French cleats using my table saw. This was my first time making cleats with a circular saw and the Straight Edge Guide.
As I mentioned earlier, I have to give credit where credit is due. In my review of the Straight Edge Guide, I said that I would use it again, but “there are a few tools that I might reach for first before using my Straight Edge Guide.”
But I’ve had a change of heart. The Straight Edge Guide was a quick and easy way to make French cleats. The next time I need to make some cleats, I will be using a circular saw, and my Straight Edge Guide instead of my table saw.
How to Install a French Cleat
Printed Instructions
- Get a FREE copy of the French Cleat Handbook including measurements and step-by-step instructions.
Supplies
- 1-¼” Wood Screws
- 2-½” Wood Screws
- Tape Measure
- Kreg Multi-Mark
- Drill
- Countersink Drill Bit
- Level
- Stud Finder
Tools
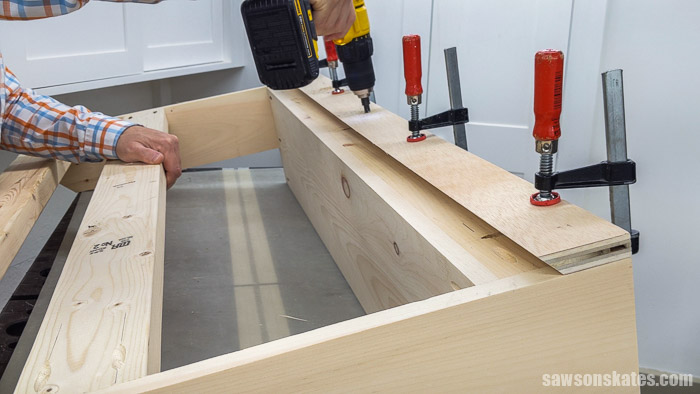
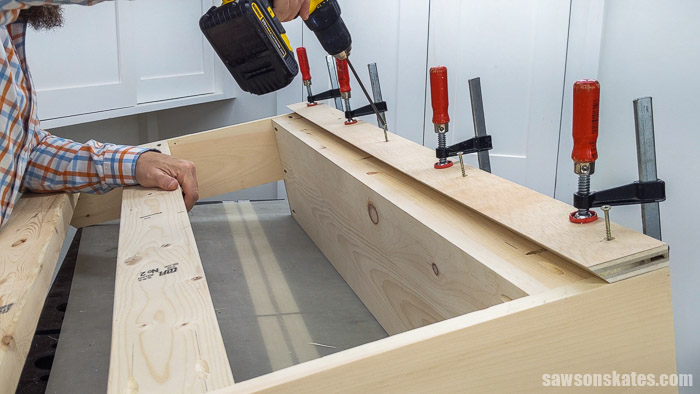
Step 1. Attach the Cleat to the Object
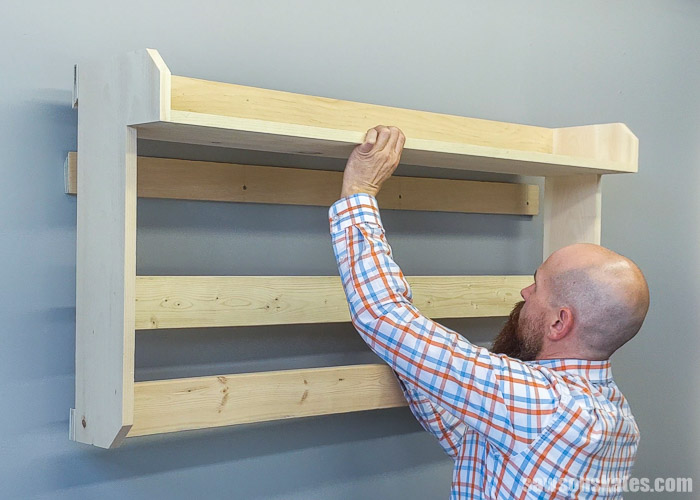
On the wide side of the cleat, layout the locations for countersink holes. The shorter side of the cleat will face the object. The countersink holes will attach the cleat to the object that you want to hang on the wall. For my project, I was mounting this yard tool rack on the wall in my garage.
Related: How to Make a DIY Yard Tool Rack
I used an awl to make a starting point for the drill bit.
Related: What is an Awl? (and How to Use it)
I used a countersink bit to drill a hole at each mark.
Related: How to Use a Countersink Bit
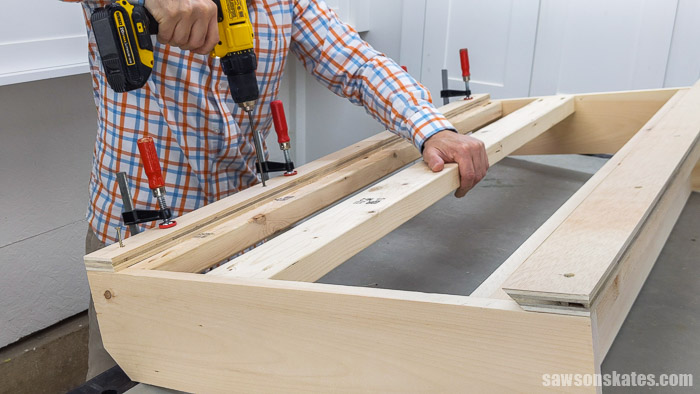
I attached the cleat using 1-¼” wood screws.
📝 NOTE: You may need to use a different length screw for your project.
I attached a piece of wood the same thickness as the cleat on the bottom of the rack. This piece makes the rack stand straight up and down on the wall.
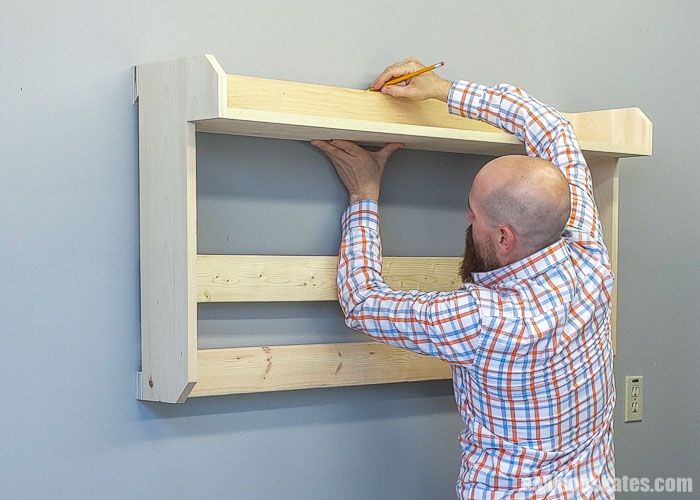
Step 2. Attach the Cleat to the Wall
First, I positioned the rack where I wanted it on the wall. I used a pencil to mark the top edge and each side.
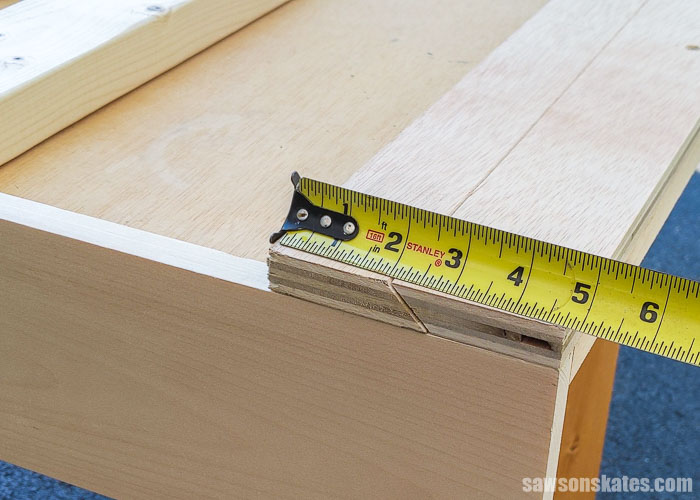
Next, I placed the second cleat on the back of the rack and measured to the bottom of the cleat. Mine measured 4-¾”.
📝 NOTE: Your measurement may be different.
At the wall, I measured down 4-¾” from the pencil line and made a mark.
Related: How to Use a Tape Measure Correctly (Tips for Success)

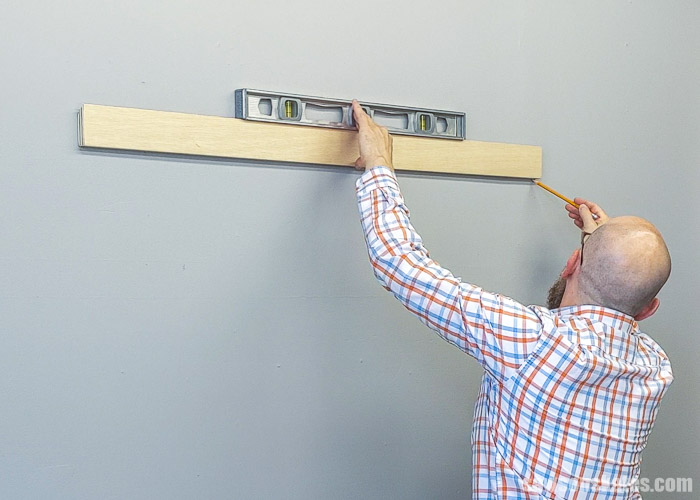
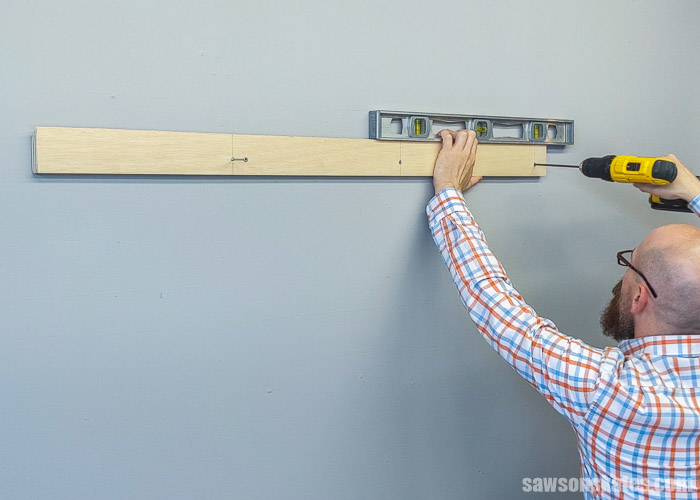
Then, I placed the bottom of the cleat on that mark. Be sure the short side is facing the wall, and the bevel is facing up. I leveled the cleat and used a pencil to draw a line the entire length of the cleat.
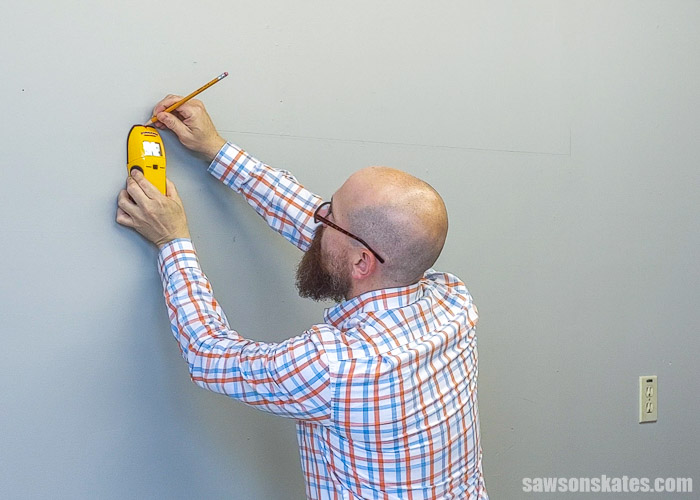
I used a stud finder to locate the studs along that line. After I found all of the studs, I used a pencil to mark the center of each stud on the wall.
Next, I placed the cleat back on the line and transferred the center of the studs from the wall onto the cleat.
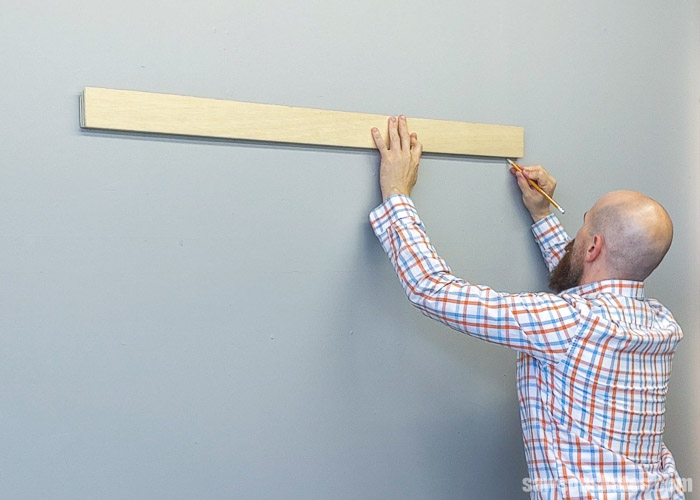
I marked locations for countersink holes that will attach the cleat to each stud.
Next, I used an awl to make a starting point for the drill bit.
Then, I used a countersink bit to drill a hole at each mark.
At the wall, I placed the cleat back on the line with a level on top of the cleat. I attached the cleat using 2-½” wood screws.
Then, I hooked the cleat on the back of the rack onto the cleat on the wall.
Video: How to Make and Install French Cleats
Final Thoughts
A French cleat is a strong, simple way to hang heavy items like cabinets, artwork, tools, and more. They are easy to make with a table saw or circular saw.
Get the free French cleat handbook (including the detailed instructions and measurements) now!
Thank you for stopping by. If you enjoyed this tutorial, would you please take a moment and pin it to Pinterest? I’d really appreciate it!
Recommended For You
Pin This For Later

Hi there – I’m Scott, a woodworking enthusiast and creator of Saws on Skates, a site I started in 2015 to share easy-to-follow tutorials, space-saving shop tips, and project inspiration for DIYers at any skill level. Learn more about my woodworking journey here.
Hi All,
Here in the uk we’ve been using French cleats for years in my case some 65years since my dad taught me.
We use it in both upper and lower cabinets in kitchen installation and bed room,bathrooms as well.
All our shop and garage storage is the same they’re so easy to produce and install.
However the best use is according to the boss ( my wife) after I showed her how to make them is for her bird boxes, bat rests and planters.
When the birds have finished raising their young off they pop then she starts sterilising them and replaced them after repairs as needed.
As for her planters they are hung on any available vertical structure, wall, fence, post ect where ever she sees fit and the removal is so easy lift straight up and pull away.
So dont be afraid of using this system it’s easy and providing you put the receiving pieces up level you’ll have no problems at all.
Enjoy
Ian and Margaret