Mistakes with Wood Can Cause Your DIY Furniture to Crack
We build our DIY furniture projects with wood, but do we really understand how wood works? If we build without taking into consideration the seasonal movement of wood, our projects will crack and split.
What Should I Build Next?
That's the question I help answer.
Every week, I send woodworking ideas to 17,000 DIYers who love building things.
You'd fit right in.
If we build using proper techniques, our projects will become family heirlooms. Today I’m sharing how you can be a better builder, prevent your wood furniture from cracking and ensure your projects will last a lifetime.
This tutorial contains affiliate links to supplies and tools. Purchases made using these links help support the Saws on Skates website and allows me to share more projects and tips with you. There is no cost to you for using these links. Visit my site policies for more information.
A few weeks ago, I shared my 9 Pocket Hole Mistakes You Don’t Want to Make. I received lots of feedback that the information was helpful. By the way, thank you for the feedback – I love hearing from you!
In addition to discussing possible pocket hole mistakes, I also touched on wood is a living thing and that seasonal changes cause movement. From the feedback, I could tell I needed to dive a little deeper into the movement of wood, what causes wood to crack, and share some DIY furniture construction tips.
Wood is a Living Thing
Wood is a living thing. Wait, did I just say wood is a living thing?! Well, not exactly living, but it is hygroscopic. Wait, did I just say hygroscopic – what’s that? Simply put, hygroscopic means it absorbs moisture from the air.
Wood is constantly absorbing and releasing moisture, just as it did when it was a tree growing in the ground.
The grain or fibers of wood run the length of a board. Before a tree becomes a piece of lumber, the tree’s roots would drink water, and that water traveled through these fibers.
The best way to think of those wood fibers is like a box of drinking straws. When the tree becomes a piece of lumber, it still “drinks” water. Instead of drinking water through the roots, moisture is absorbed by all exposed surfaces of the wood into those drinking straws or wood fibers.
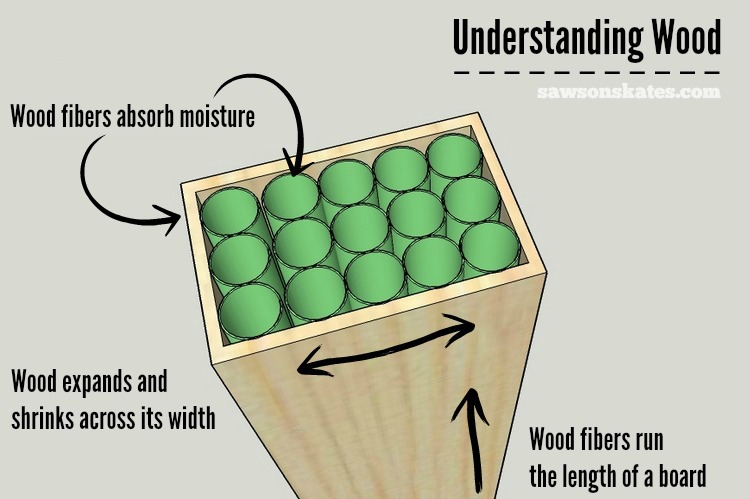
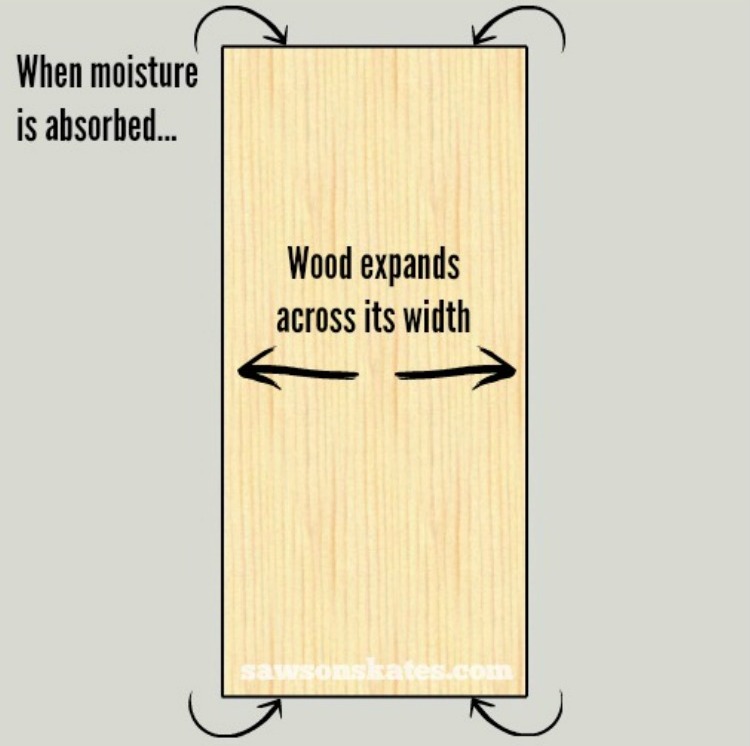
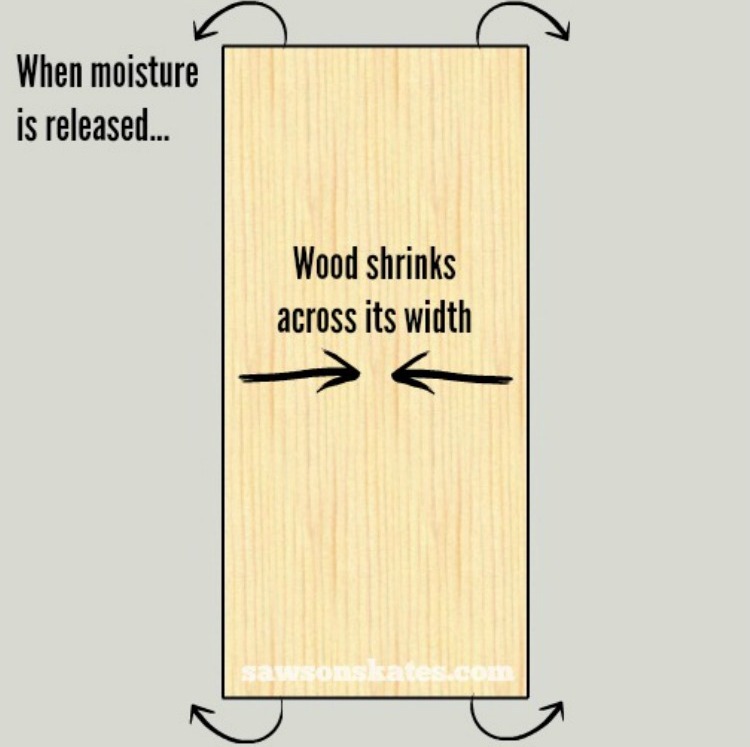
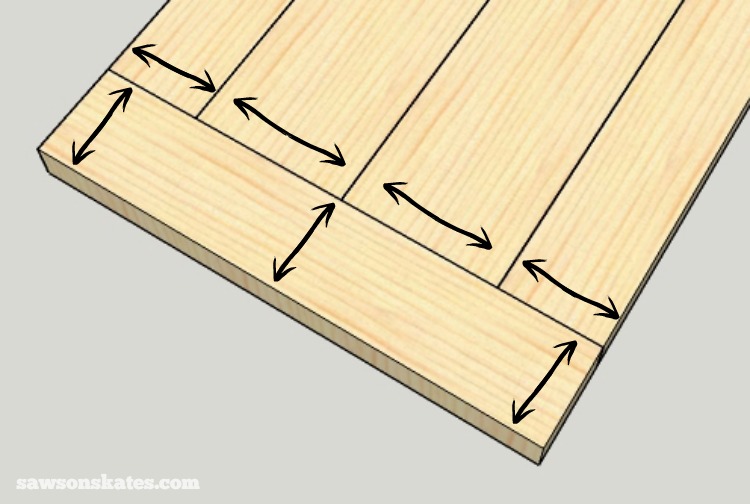
When it’s more humid, the drinking straws, ummm wood fibers, absorb moisture, so the wood swells and gets bigger. When it’s less humid, the wood releases moisture, so it shrinks and gets smaller.
If you build a furniture project when it’s humid, you may notice when the air is drier that some of the joints don’t fit as well as they did when there was more moisture in the air.
Why Wood Cracks
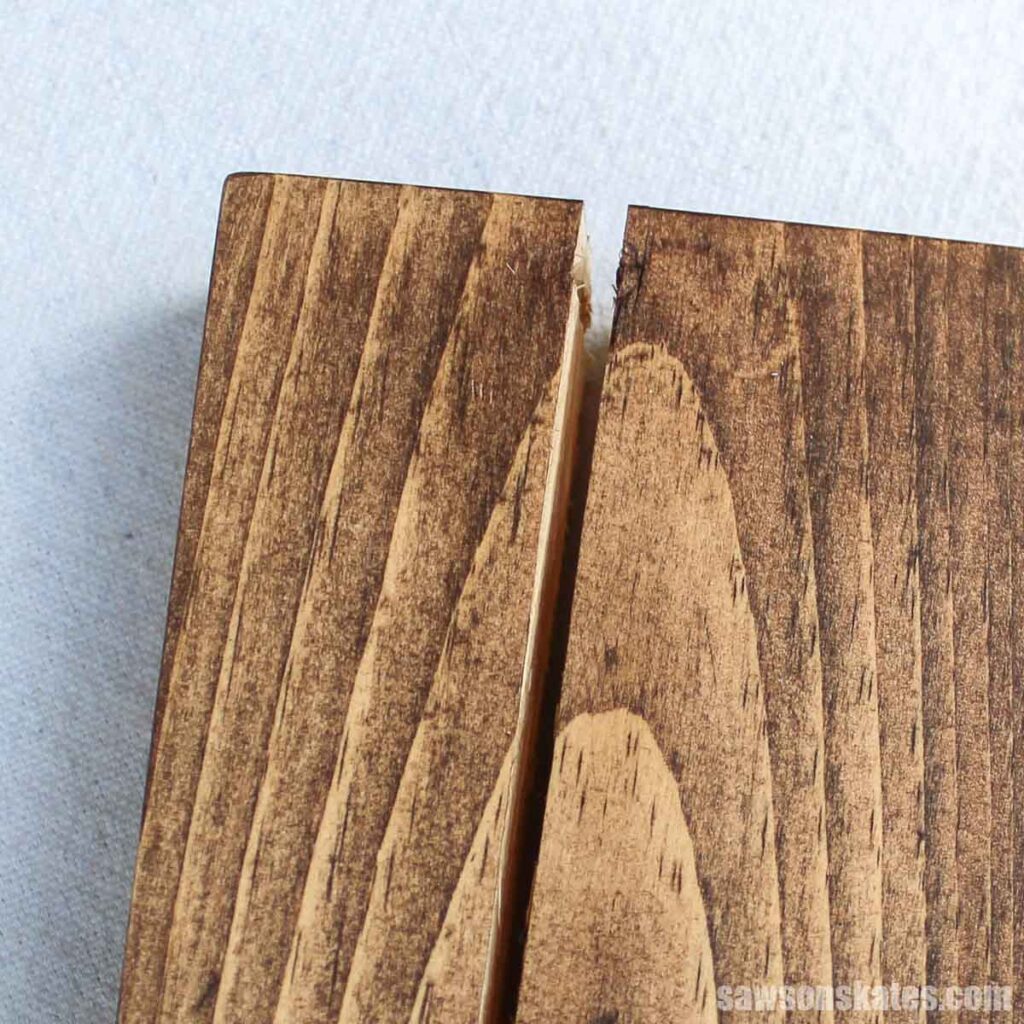
The continuous swelling and shrinking movement of wood can cause some issues. When it’s more humid, the moisture in the air is absorbed by those drinking straws or wood fibers, and the wood swells.
The swelling occurs the most across the width of a board and actually has enough force to pull joints apart. Worse yet, if the wood is joined improperly, it can cause the wood to crack and split.
When it’s less humid, moisture is released by those drinking straws or wood fibers, and the wood shrinks. The shrinking occurs the most across the board’s width and actually has enough force to pull joints apart. Worse yet, if the wood is joined improperly, it can cause the wood to crack and split.
Understanding Wood
As DIYers, we need to understand and account for this persistent swelling and shrinking movement of wood to create furniture projects that will last. Accounting for that movement means understanding some ground rules when working with wood.
- We cannot stop wood from moving. As I mentioned earlier, instead of drinking water through the roots, moisture is absorbed by those drinking straws or wood fibers. There is no way to stop this process. It’s a fact that we have to understand and accept.
- We cannot limit the movement of wood. Trying to limit or prevent the wood from moving will make the wood CRACK! Let’s say you make a frame from 2×4s and a panel to fit within that frame from 1×4s. To attach the panel to the frame, you use your Kreg Jig to drill pocket holes around the edges of the panel. You apply glue to the edges of the panel, insert it into the frame and attach it to the frame. This sounds OK, right? Wrong! This assembly limits or prevents the panel from moving.
Let’s take a closer look at our example from above. The panel described above is “trapped” within the frame and doesn’t allow for the wood’s normal swelling and shrinking movement.
Remember, as the panel absorbs moisture, the 1×4s of the panel will expand side to side. Because the panel is attached to the frame with pocket screws, the sideways expansion could crack the panel. It could also push the frame’s joints apart, leaving a gap between the rails and stiles.
We’ll look at some alternatives for installing panels a bit later in this article.
Finishing Wood
To help the wood absorb and release moisture more evenly, it’s a good idea to apply a finish to all surfaces including, the outside, inside, and underside of your project.
Just imagine sealing one side of a board but not the other. The raw side of the board would absorb and release moisture more quickly than the sealed side. Absorbing and releasing moisture at different rates could cause the board to crack over time.
Before I apply any finish, I properly prepare the project by smoothing the surface of the wood with sandpaper.
Related: 11 Secrets for Sanding Wood Projects Like a Pro
Next, I inspect the piece and fill any nail holes, gaps, or cracks with wood filler.
Related: Does Stainable Wood Filler Work? (Here’s the Answer)
If I’m going to use an oil-based wood stain, first, I apply a homemade wood conditioner like black tea. Using tea helps prevent blotchiness and gives my DIY furniture projects a rich, uniform color when the wood stain is applied.
Related: What I Use Instead of Wood Conditioner
Other times, I’ll stain my projects with a natural wood stain such as coffee or black walnut hulls.
Related: How to Stain Wood With Coffee
When the stain is dry, I’ll top coat my project with a sealer like polyurethane, Polycrylic, or a polyurethane alternative.
Related: Polycrylic vs Polyurethane: Are They The Same?
Joints Prone to Cracking
Now that we understand wood movement and why wood cracks, it’s important to recognize the types of joints prone to cracking when building or designing DIY furniture. Here are four popular joints that could crack over time.
Cross-Grain
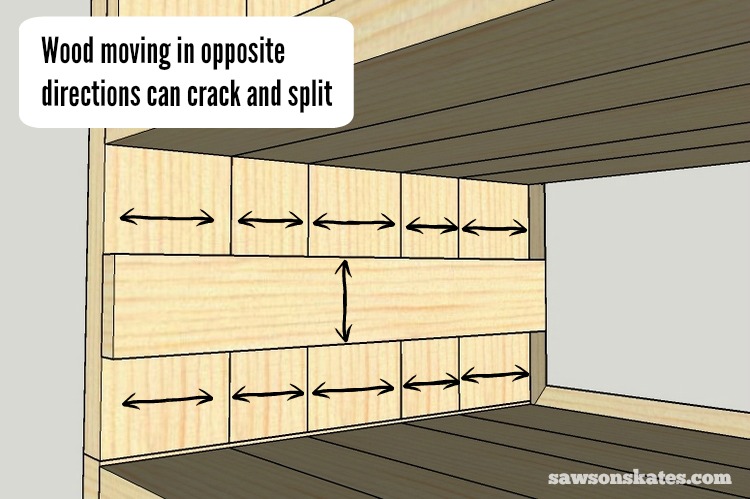
A cross-grain joint is where pieces of wood are attached perpendicular to each other.
Here’s an example. To mount drawer slides in this nightstand, I needed to attach a brace front to back on the side panels.
Related: How to Build DIY Drawers
If I were to glue and screw a 1×4 brace on the side panel, the assembly would move in different directions. The side would move side to side while the brace would move top to bottom. This dissimilar movement could crack the wood over time.
It’s best to avoid a cross-grain joint, but if you can’t, don’t glue the joint. This will at least allow for a bit of movement.
For my nightstand project, I glued up a brace from several pieces of wood to match the direction of the wood on the side panels. It’s a little more time-consuming, but this way, the side and the brace will move in the same direction.

Panels
Earlier in this article, we attached a panel made of 1×4s to a frame made from 2×4s with pocket hole screws. We saw how the frame prevented the panel from moving with seasonal changes, which could cause the wood to split or crack.
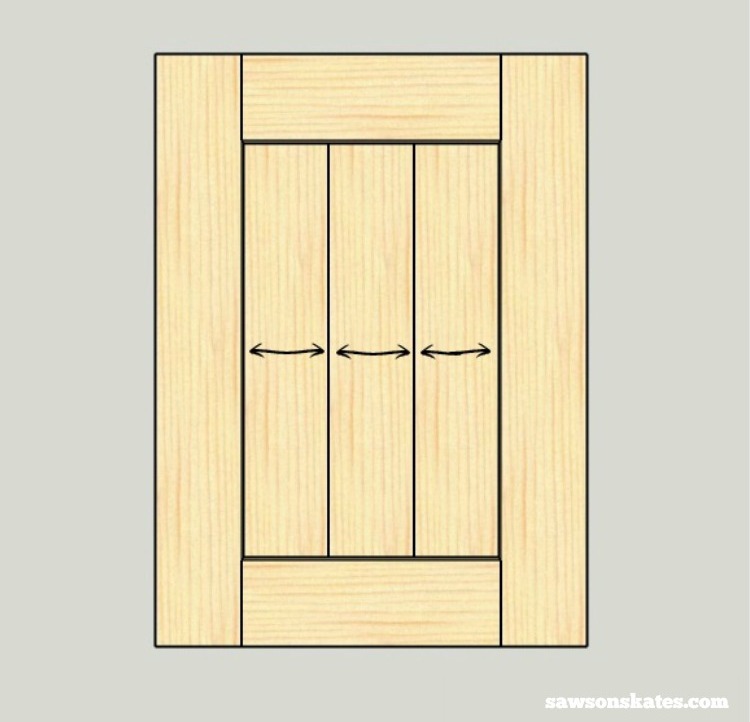
A better method for building an assembly like this is with frame-and-panel construction.
Cabinets and furniture are often constructed using frame-and-panel a construction, which involves a wooden frame with a wood panel in the center.
The panel floats in a groove cut into the frame, allowing it to expand and contract with seasonal changes. This is a common construction technique used in Shaker-style cabinet doors.
Related: How to Build DIY Shaker Cabinet Doors
Let’s think about our 2×4 frame and 1×4 panel example again. This time we’ll assume you don’t have a router to make a groove for the panel. In this case, you could use a plywood panel instead.
Related: How to Use a Router Table for Beginners
Plywood is made using many thin layers of wood glued together in a cross-grain pattern. Earlier, we covered how cross-grain joints are prone to cracking, but moisture absorption isn’t much of an issue because the plywood sheets are so thin. Compared to solid wood, plywood hardly moves with seasonal changes.
To reduce the chances of cracking, you could swap the 1×4 panel with a plywood panel. Plywood would virtually eliminate side-to-side movement caused by the panel. The parts of the frame, on the other hand, would continue to move, so while this assembly has a decreased risk of cracking, it is still a possibility.
Table Tops
One of the common mistakes DIYers make is to attach a table top in a way that prevents it from moving with seasonal changes. I’ve never had a table top crack, but I am guilty of attaching tops incorrectly.
Let’s look at how I attached the top to this step stool incorrectly. When I first built the stool, I drilled pocket holes through the aprons and used pocket hole screws to attach the top of the stool.
Table aprons are pieces of wood that run perpendicular to the table top and connect the legs of a table. Aprons help strengthen the table and provide support for attaching the tabletop to the legs.
Attaching a table top to the aprons with pocket hole screws is incorrect because it prevents the top from shrinking and swelling along with changes in humidity and temperature.
The top of the table may crack with time, or the top might have enough force to push or pull the base’s joints apart.

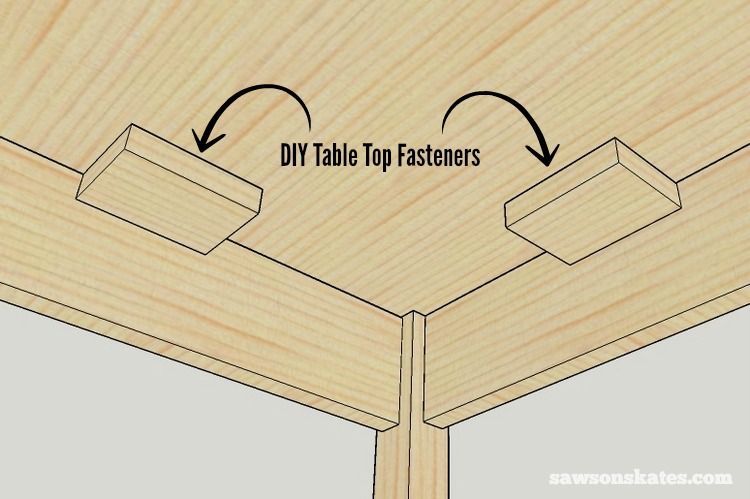
A better option for attaching table tops to aprons is with table top fasteners. Table top fasteners attach to the underside of a table top and the aprons and allow the top to expand and contract.
Figure 8, “Z” fastener clips, and expansion braces are just a few of the table top fasteners available.
Related: How to Attach a Table Top to a Base (The Right Way)
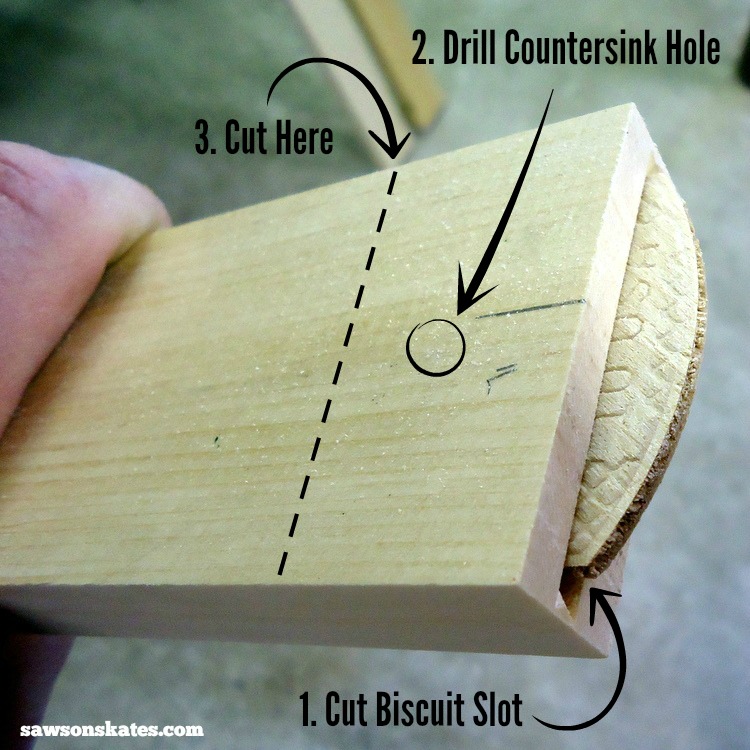
You can also make your own table top fasteners using a biscuit joiner. First, cut a biscuit slot into a piece of wood like a 1×3, drill a countersink hole, and cut the piece to length.
Related: How to Use a Countersink Bit
📝 NOTE: The image below is just a demonstration. It’s actually easier to cut several biscuit slots in the side of the board (rather than the end), drill a countersink hole behind each slot, and then cut into individual pieces.
Cut several biscuit slots into the aprons. Then slide a biscuit into the apron, place a DIY table top fastener over the biscuit and attach it to the table top with a screw.
If it’s not possible to attach your table top to the aprons, as was the case with this wine cabinet and apothecary cabinet, try this. I drilled oversized holes in the top braces. Then through the holes, I attached the top with washers and screws. The large holes allow the top to move freely while the washers keep the screws from falling into the holes.
Breadboard Ends
Breadboard ends are a beautiful way to finish a table top, but they create a cross-grain situation which we’ve learned is prone to cracking. When breadboard ends are attached to a table top with pocket hole screws, it’s usually just a matter of time before the wood splits.
I collaborated with my buddy Mike from Kreg Tool to create a simple solution for do-it-yourselfers who want to attach breadboard ends with pocket hole joinery. OK, I’ll confess, except for a couple of ideas, the design was mostly his!
Related: DIY Farmhouse Table Top Plans (with Breadboard Ends)
Final Thoughts
It’s critical to understand how wood works and consider the seasonal movement of wood for us to be better DIYers. Building with proper techniques will reduce the chances of our furniture cracking and ensure our projects will last a lifetime.
Thank you for stopping by. If you enjoyed this tutorial, would you please take a moment and pin it to Pinterest? I’d really appreciate it!
Pin This For Later

Hi there – I’m Scott, a woodworking enthusiast and creator of Saws on Skates, a site I started in 2015 to share easy-to-follow tutorials, space-saving shop tips, and project inspiration for DIYers at any skill level. Learn more about my woodworking journey here.
Good day. I’ve built a timber top table last December. The top was built from Doug fir. 3×10. I hollowed out 1 ” of the under side of each board. Togune and grooved each one together. Glued and screwed a 1/2″ plywood to the under side. The top split 1/4″ wide gaps. Due to the planks being restricted to shrink. How could this be prevented? Kiln dry top prior to building? I can send pictures if you send a email address! Thanks for your time.
Hey Jordan – I’m sorry to hear about your table top. I would definitely like to see some pics of your project. I’ll send you an email now and we’ll get this figured out.
Generally good information. Most new Woodworker’s do not understand wood movement and only learn the hard way.
But wood does NOT only or even primarily absorb and release moisture through the ends. Moisture moves through all the exposed spaces. This is why finishes need to be applied on the under side of a panel as well as the top. Why veneered faces should be balanced, etc.
Hey Ralph – Thank you for stopping by. I appreciate your info and for reminding me that I omitted the tip about applying a finish to not only the outside, but the underside as well. I always strive for much more than just generally good information, so I appreciate you bringing it to my attention and I’ll make the updates ASAP. Thank you again – Scott
I believe mostly what your saying, but what I tell my customers is too control your humidity in your house .and same as I build ,I try to control environment
Cracking is tough that’s why I believe most of your furniture (tables)are veneers
Thank you so much for this great article! I would love if you could explain more in depth how to attach table tops and add illustrations – I had a hard time visualizing what you meant in your post about your apothecary cabinet and the screws/washers.
I don’t have a router or biscuit joiner. Is it a lost cause until I have one of those?
Hi June – Yes, I would be a happy to explain in more detail about how to attach table tops. I’ll put together the options and get something out soon.
I have a solid cherry coffee table that I built aboit 15 years ago. This year it has developed two small cracks. The craxks are not at the joints, but instead they are in the middle of the board. I also have another cherry table that the top has cracked as well. This time it is one big sit in the middle of the board. This cherry table is about 7 years old. It is not due to a lack of moisture. I have a whole house humidifier that I keep at about 40 percent humidity. I also have a 75 gallon aquarium in my basement, so needless to say rhe humidifier doea not run much. I live in Wisconsin where we have dry winters and humid summers. I am starting to think the humidity level is too high. What are your thoughts? If you would like to see pics feel free to send me an email at [email protected]
Thanks,
Ryan
Hey Ryan – I’m sorry this happened to you. Does the humidifier keep the house at 40 percent humidity year round or just in the winter months? What is the humidity level in the summer? Were all of the exposed surfaces (even the underside) sealed? Sealing all of the surfaces helps to reduce the effects of seasonal changes.
It must be wonderful to know how to make all those things. How in the world did you learn how to do all the woodworking you do? School? Your dad? My father was talented in being able to fix almost anything but he was mostly self-taught. Thank you for the time you put into your web site and for sharing the information you do in trying to teach us. Sharon
Thank you for stopping by and for the compliments! Along with being self-taught and a big fan of research projects, I have also taken a number of furniture making classes and a week long timber framing workshop. It’s true what they say… never stop learning!
Hello Scott!! That’s a really nice and informative post! Thanks!
If you don’t mind, I’m sharing with you one question I have. We leave in a city (Brasilia, capital of Brazil) that have severe drought season (June to September) and high humidity from November to March.
Our city Its well know as a place that wood wont stop att all, no matter what wood…. lol
So after looking online I found your post and would like to ask your opinion or how to join and glue (or not) this wood to make a TV rack. I have posted the picture of my design, the idea is to make the main structure of plywood or solid door sheets and them glue or screw some solid wood to give it a nice finish. What would be your approach to this specific idea? Would you mind sharing your thoughts?? I really appreciate. Regards! (image of the project and detail of how I thought about doing). https://ibb.co/jQ7ymd https://ibb.co/j7k7ey
Hi Alessandro – Thank you for stopping by! I’m thinking you’re definitely going to have some issue with this design considering the climate you described. Seasonal changes have very little affect on plywood as compared to solid wood. I think the solid wood (which will move during seasonal changes) either glued or screwed to plywood (that doesn’t really move during seasonal changes) is going to lead to the solid wood cracking. Is it possible to build your design entirely with solid wood so the entire piece will move during seasonal changes? And if not, could you do a veneer on the plywood?
Hello Scott,
Thank you for your very informative post!
My husband and I have a small custom woodworking business, and we sell a lot of those farm style tables with the breadboard ends. We are in Iowa (very humid summers and dry winters) and since the winter started we have had 2 customers come to us with cracks or gaps in their tables! This is only our 3rd year of woodworking with no formal training, so we are figuring it out as we go.
My question is about the breadboard tops. They are very popular. Is there any way to attach them without the cracking? The cracks have been along the boards in the middle. One was a crack down an entire board and another was a gap that formed down the length of the table between 2 boards.
Since they are rustic style pieces, I feel confident that we could fill them and they will still look nice and from now on we will be testing the moisture content of our wood before using it (and warning our customers about the possibility of this happening). But I’d also like to know if ther is any way to attach the boards on the tops that will allow them to move? Is ther anything that could be put between them like a putty or resin?
Thanks again!
Hi Mary – Thank you for stopping by. I haven’t done breadboard ends since I took some furniture making classes many years. I *think* the way we did it was to attach the breadboard with mortise and tenon joints. Holes are drilled for dowels from the bottom of the breadboard through a tenon on the table top. Then the holes are elongated side to side in the tenon. Only the dowel holds the breadboard in place. No glue is applied to the tenon as this would prevent movement. The elongated hole allows the dowel to slide as the wood of the table top expands and contracts. It’s a little tricky to explain without some diagrams. You’ll want to avoid any joinery method that prevents the wood from moving.
I am sick, i made a beautiful cabinet fir a store that was grand opening. So many compliments snd now its a mess. Im hoping you can tell me how to correct this without starting over completely becsuse j want to mske it right.
I see from reading above Imade every mistske possible.
1 cross grain. Pocket holes and glue. Can you please give me dome ideas
Hi Marla – Thank you for stopping by. I’m sorry to hear about your cabinet. It’s really tough to say what could be done without seeing your project. I know from experience with my own projects that sometimes once the damage is done that it can be difficult to repair.
Hello, great article! I’m a huge fan of pocket holes. What would you recommend for attaching a breadboard instead of using pocket holes.
Hi David – Thank you for stopping by and for the compliments. I’m a HUGE fan of pocket holes too! It’s been a while since I’ve done breadboards. I *think* the way we did it in my furniture making classes was to attach the breadboard with mortise and tenon joints. Next holes are drilled for dowels from the bottom of the breadboard through the tenon on the table top. Then the holes are elongated side to side in the tenon. Only the dowel holds the breadboard in place. The elongated hole allows the dowel to slide as the wood of the table top expands/contracts.