30+ Christmas Wood Crafts (Easy Ideas Anyone Can Make)
Looking for easy-to-make Christmas wood crafts? Here are 30 clever project ideas you can make with a few basic tools and simple supplies!
What Should I Build Next?
That's the question I help answer.
Every week, I send woodworking ideas to 17,000 DIYers who love building things.
You'd fit right in.
Woodworking Projects for Christmas
Christmas is coming, and that means it’s time to get crafty! If you’re looking for easy holiday wood crafts that almost anyone can make, you’ve come to the right place.
I’m sharing 30 of my favorite Christmas-themed woodworking project ideas. From ornaments and wreaths to Advent calendars and trees, there’s something for beginners and DIYers of any skill level.
These easy afternoon projects are perfect for decorating your home, hosting a craft night, or making budget-friendly gifts for family, friends, neighbors, and coworkers. So gather your supplies and let’s get started.
This article contains affiliate links. If you purchase from these links, I may earn a small commission at no additional cost to you. Visit my site policies for more information.
Want a Shortcut?
Grab my Ultimate Holiday Plan Collection — 9 beginner-friendly projects you can build with basic tools and scrap wood. From porch decorations to tabletop decor, this bundle has everything you need for a handmade holiday.

Includes:
- 9 popular holiday project plans in one bundle
- Complete tool and material lists
- Step-by-step instructions for each project
- Full-color photos to guide you from start to finish
- Beginner-friendly builds you can make with basic tools
1. Christmas Lanterns
Festive lanterns bring a warm glow to your home during the holiday season. Use them to light up your fireplace mantel or even as centerpieces on your dining room table.
You can make a traditional-style lantern decorated with Christmas-themed elements or a festive shape like a tree or snowman.
This adorable snowman lantern is easy to make with craft paint and a few pieces of wood from the home improvement store. The free step-by-step plan includes a pattern for his smiling face!
Related: How to Make a DIY Snowman Lantern

2. Advent Calendars
An advent calendar or countdown calendar is a Christmas tradition that dates back nearly 200 years. Each day leading up to Christmas, family members open one of the 24 doors on the calendar and find special surprises like candy, little toys, or notes.
Making your own advent calendar out of wood is easy and fun. Ideas range from tabletop apothecary-style cabinets with drawers or doors to flat tree-shaped designs with hooks or clips to hang treats.
I’ve even seen adult versions with holes allowing you to countdown to Christmas with beer bottle caps. Pair one with this easy-to-make bottle opener, and you have the perfect gift for a craft beer fan.
Whatever design you choose, your family will love counting down the days to Christmas with this festive homemade creation.
3. Wood Block Christmas Decor
Scrap pieces of square 4×4 posts are perfect for making wooden Christmas crafts. Simply cut two or three pieces of 4×4 to length, apply glue to the blocks, then stack them up.
Next, use festive colored craft paints to transform these blank slates into Christmas trees, snowmen, Santas, nutcrackers, and more. Add cotton balls for Santa’s beard or a fabric scarf to the snowman for even more dimension.
Wood block decorations are perfect for mantels, shelves, or nearly any room in your house. Plus, they’re easy enough for beginners and make great gifts too! Give these blocks a try this holiday season.
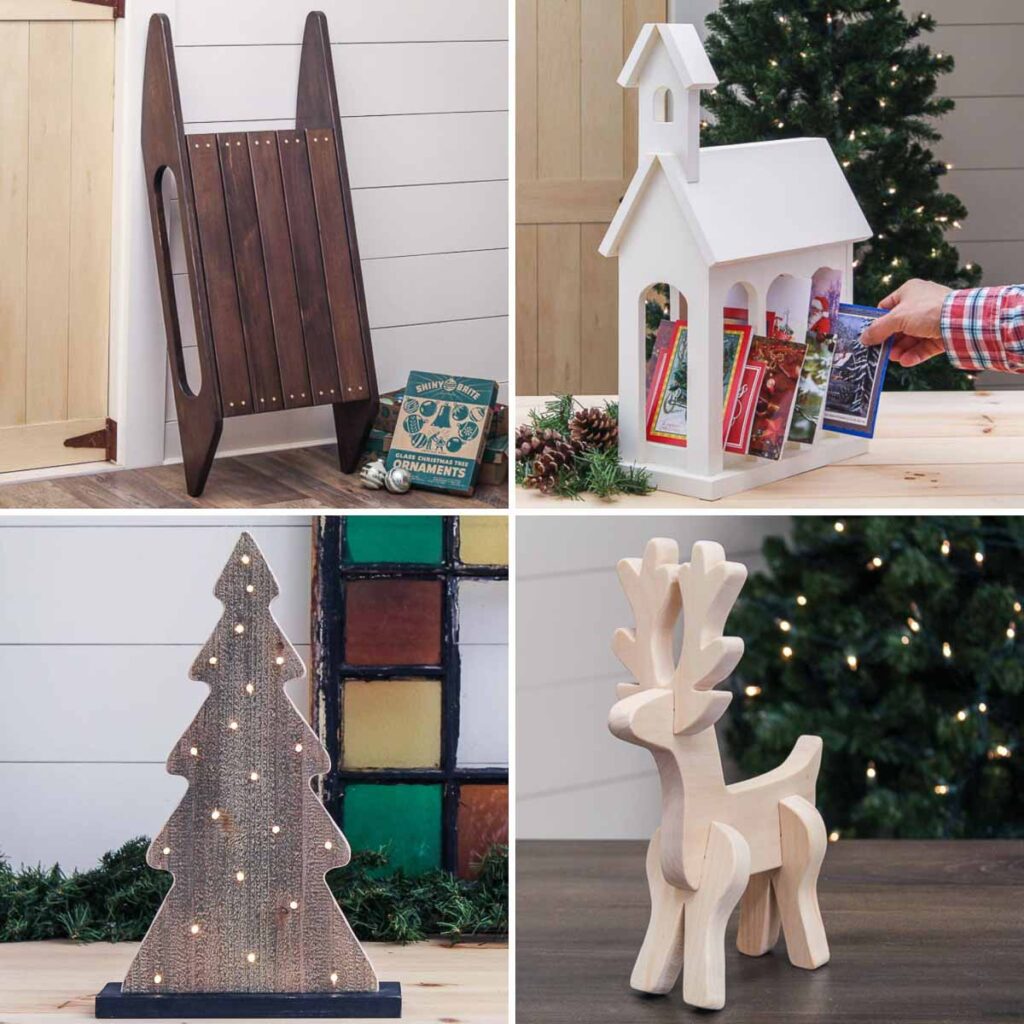
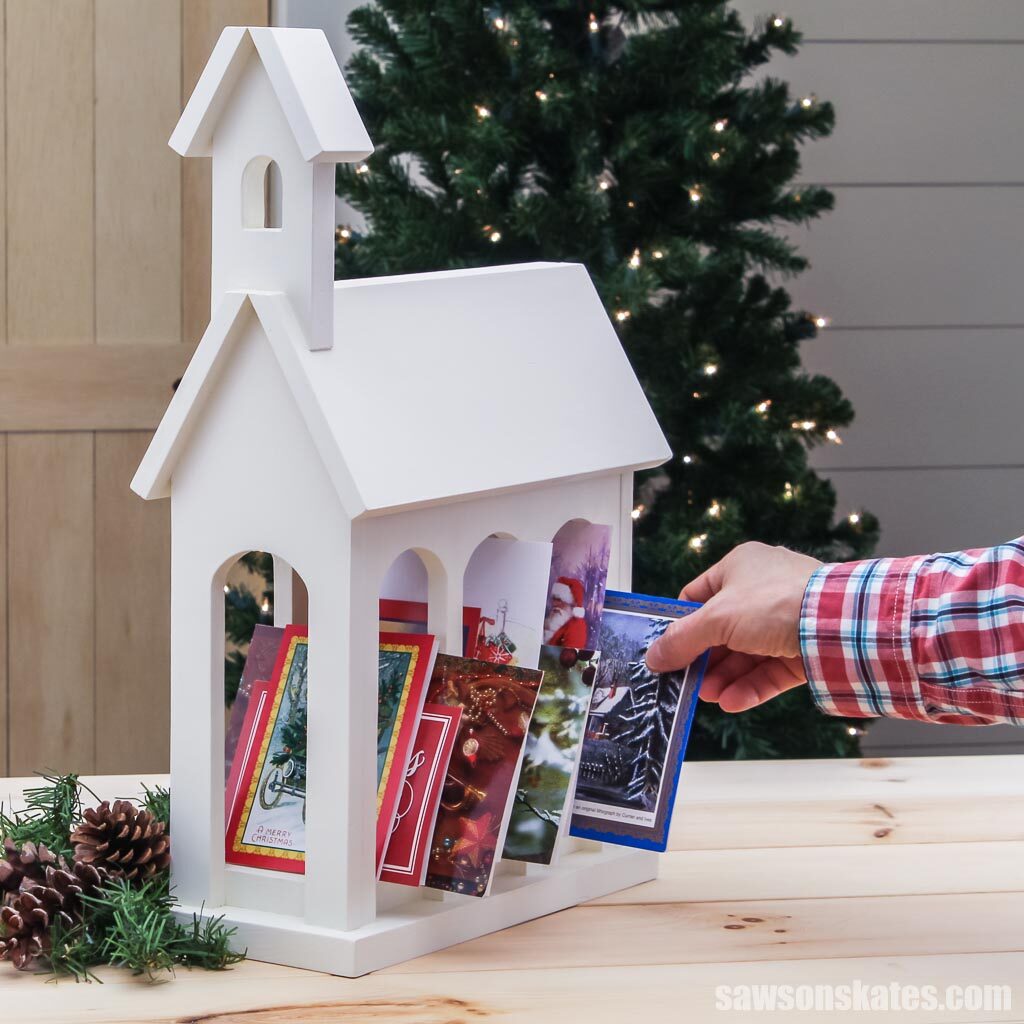
4. Christmas Card Holders
Everyone loves receiving Christmas cards, but where do you store them? Keep your cards organized and display them for your holiday guests to enjoy with a festive Christmas card holder.
The two common styles are wall-mounted and tabletop.
You can make a simple wall-mounted holder from a single board mounted vertically. This version is often decorated with Christmas greetings either painted freehand or using stencils, and cards are attached with either clips or clothespins. You can also get creative and make your wall-mounted holder in the shape of a tree or candy cane.
Tabletop holders come in a variety of styles, from a simple box to shapes like this adorable church.
Related: How to Make a DIY Tabletop Church Christmas Card Holder
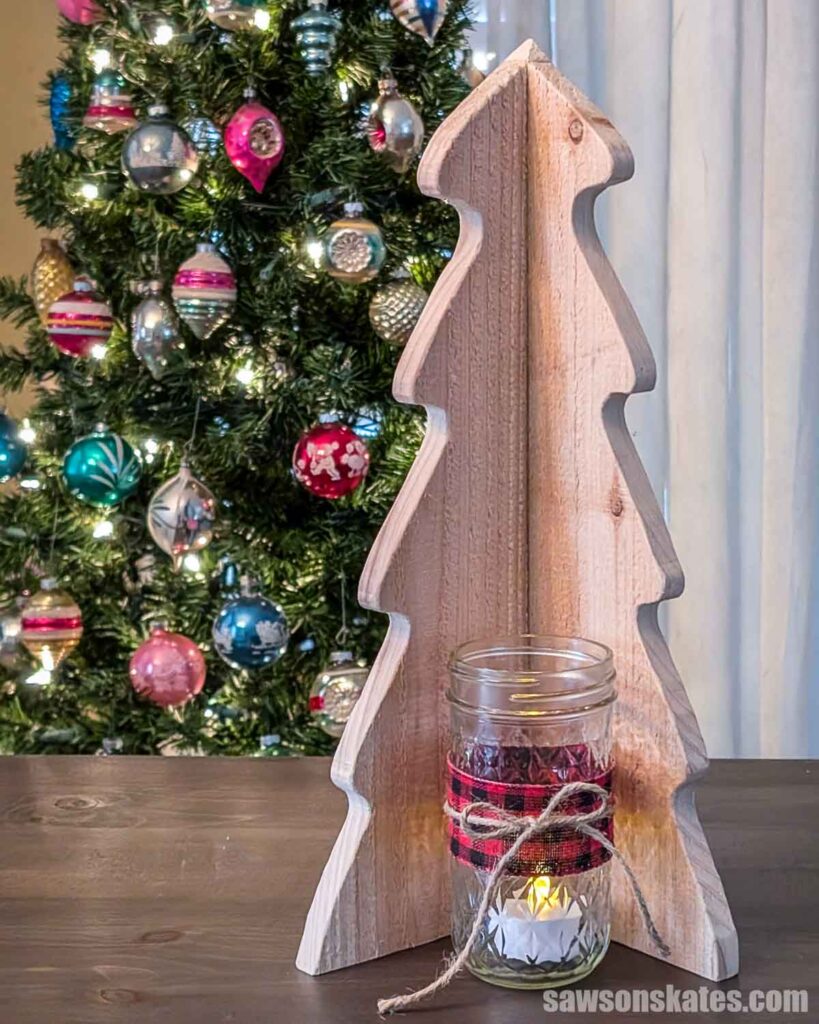
5. Candle Holders
Candles bring a peaceful, calming atmosphere to your home and are a beautiful way to decorate for Christmas. Make your own Christmas-themed candle holders out of wood for the perfect finishing touch during the holidays.
You can make an attractive candle holder with a few pieces of wood, a mason jar, and a flameless LED tea light.
One option is this rustic Christmas Tree Candle Holder made from the offcuts of my wooden Christmas tree project. The mirrored scraps fit together at a right angle and create a cozy little backdrop for a mason jar. It’s quick to make, uses leftover wood, and adds a warm glow to a mantel or sideboard.
Another idea is this Snowman Candle Holder. I made from a few stacked wood “snowballs,” a simple base, and a mason jar on top for a flameless tea light. A quick coat of paint and a friendly face, and you’ve got a cute, cozy accent for your mantel or bookshelf.
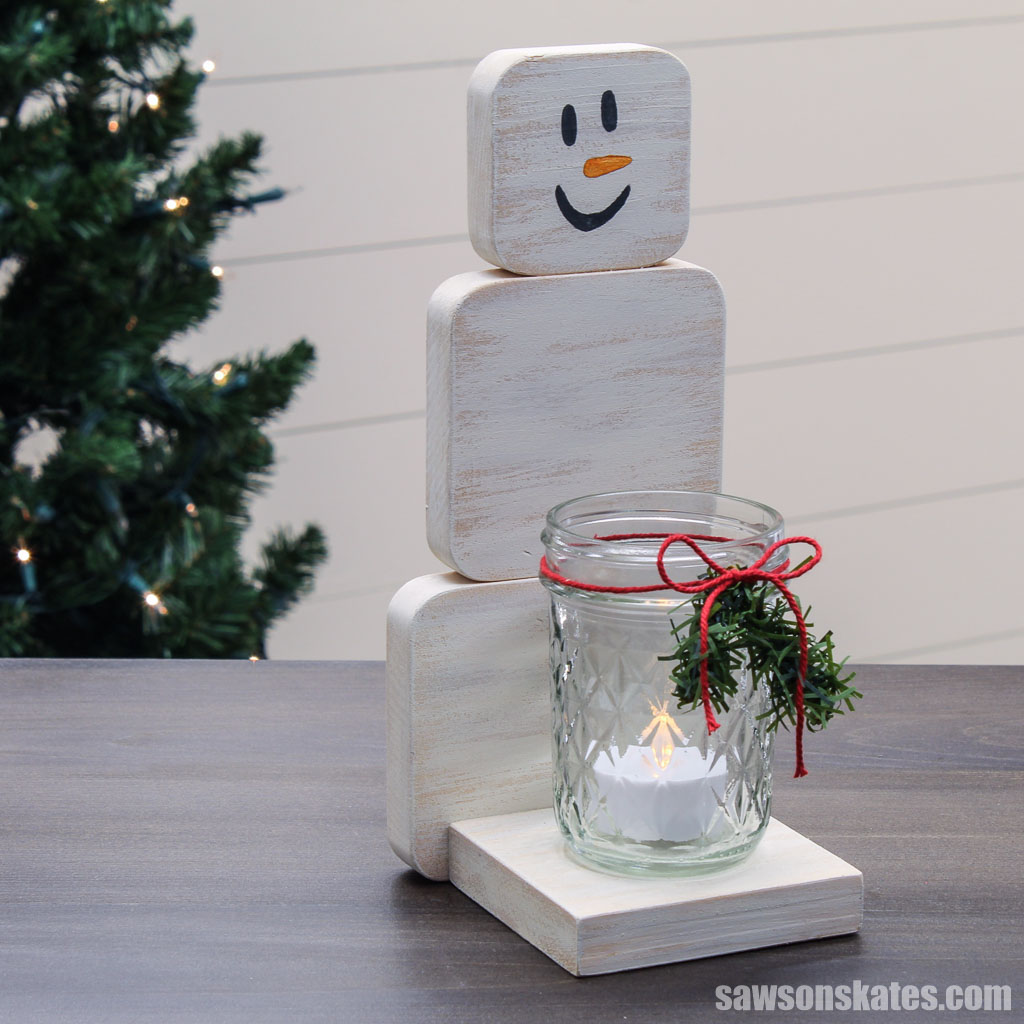
Tie ribbon or twine in a bow around the top of the mason jar. You can also add two or three miniature ornaments to the ribbon before you tie the bow.
Related: How to Make a Wooden Dowel Bow Maker
Now it’s time to make the Christmas tree candle holder glow. Just slip a flameless LED tea light into the mason jar, and you’re ready to go. Make sure you use a flameless candle because a real candle would be a fire hazard.
6. DIY Christmas Tree Ornaments
Wooden ornaments are the perfect way to add some festive cheer to your Christmas tree. Try painting, staining, or woodburning holiday shapes like snowflakes, bells, reindeer and more. Tie a ribbon or twine loop, then display it on your tree with pride!
Looking for even more ornament inspiration? Check out these 21 DIY wooden Christmas ornament ideas.
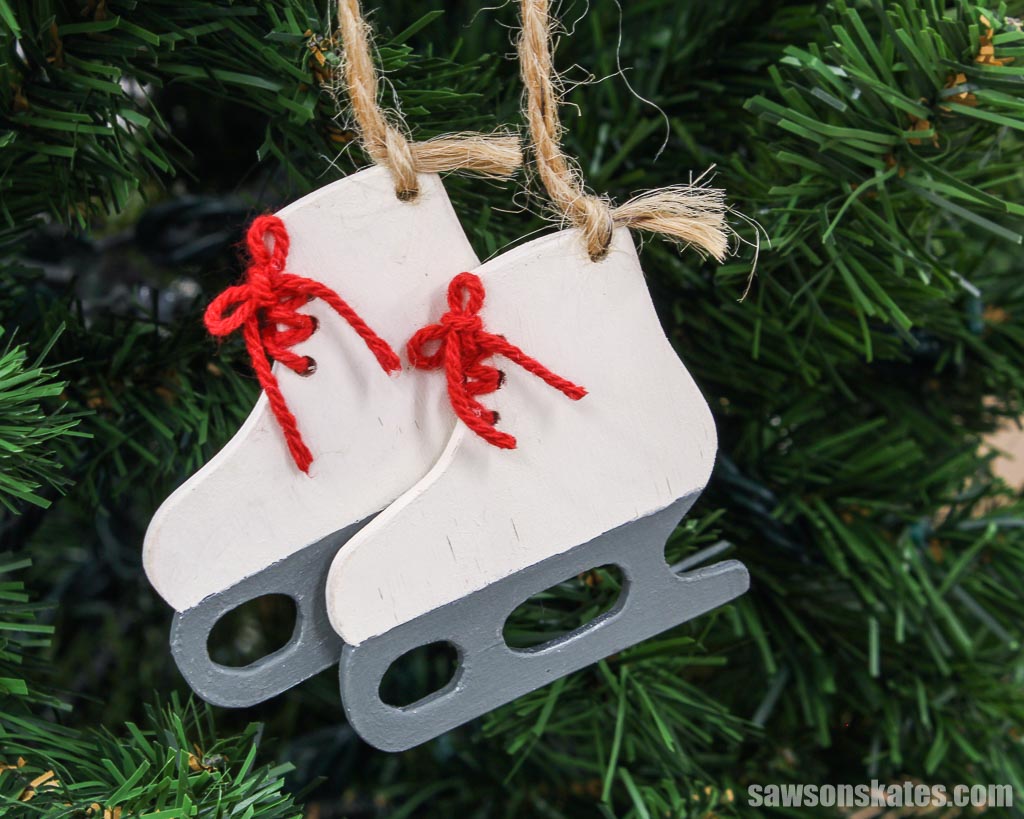
Ice Skate Ornaments
These wooden ornaments, made with scrap wood and a scroll saw, are shaped like a pair of vintage ice skates. They’re joined with twine, but you could also use yarn or ribbon.
Related: How to Make DIY Ice Skate Ornaments
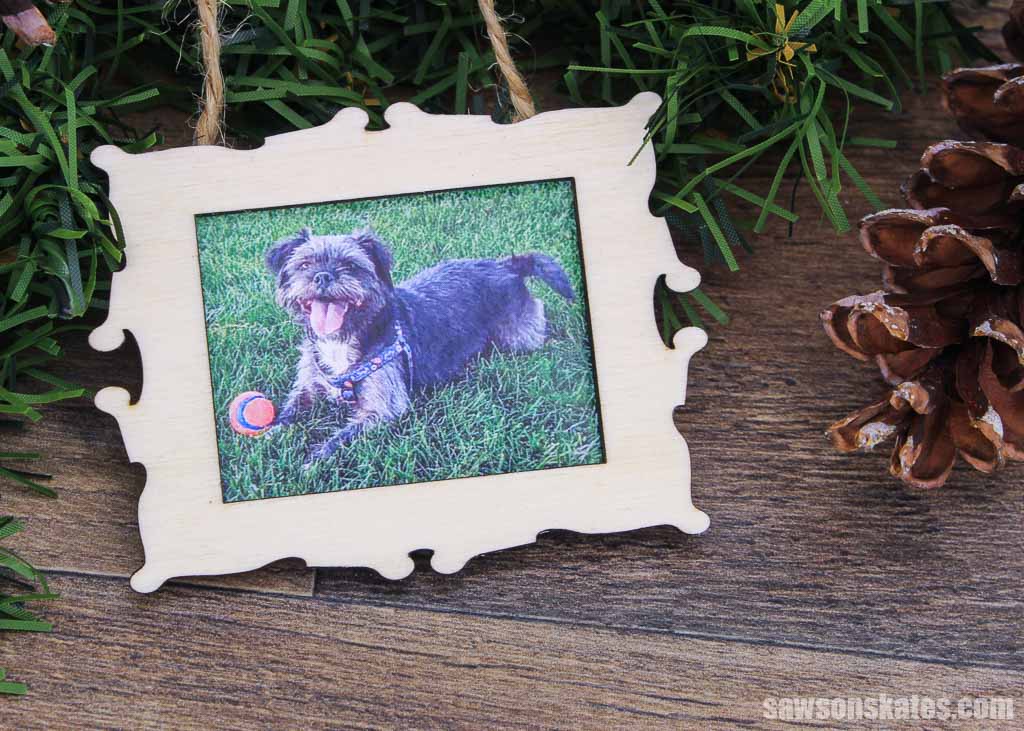
Picture Frame Christmas Ornaments
You can use wood to make ornaments in the shape of a picture frame. It’s the perfect way to display photos of family, friends, and pets. These were cut using a laser engraver, but you could use a scroll saw instead.
Related: How to Make DIY Picture Frame Ornaments
Mitten Christmas Ornaments
This easy, no-sew tutorial will turn your wood scraps into adorable mitten ornaments. All you’ll need are some thin pieces of wood, glue, and craft paints.
Related: How to Make DIY Mitten Ornaments

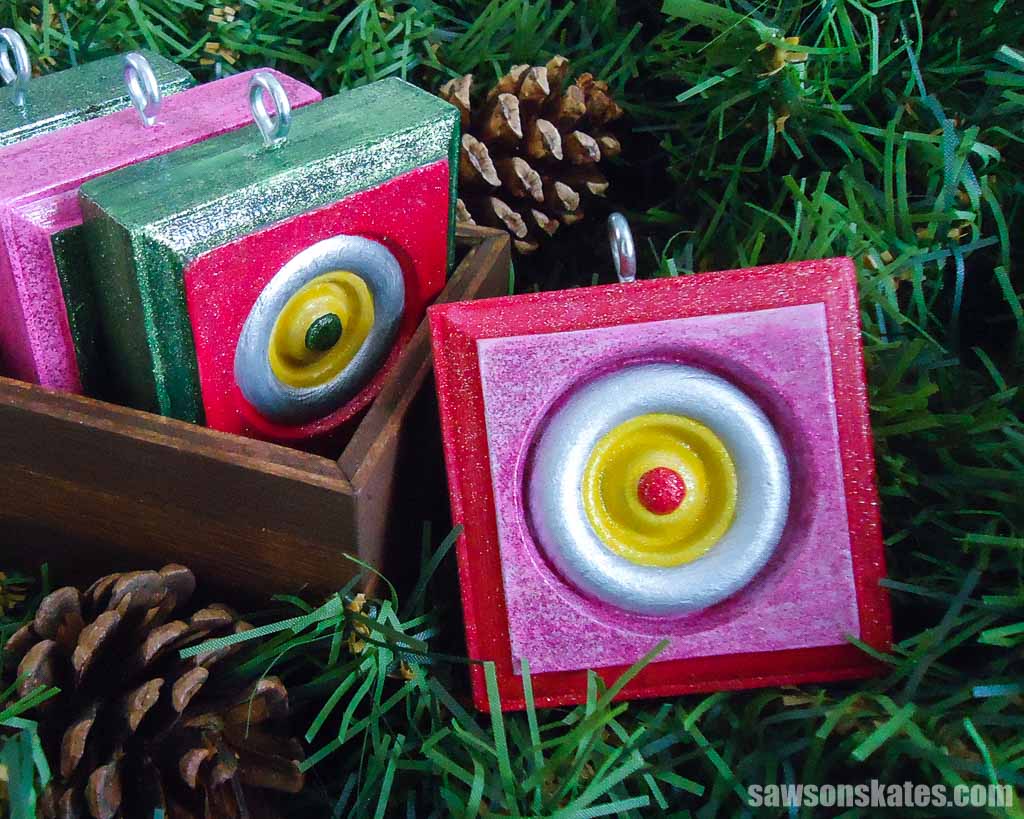
Vintage-Style Wood Christmas Ornaments
I love these ornaments because they look like vintage glass ornaments, but they’re made from wood trim rosettes, so you don’t have to worry about them breaking.
Rosettes are decorative wooden pieces often used to embellish the corners of doorways and windows. You can find them in the molding section of most home improvement stores, and they come in a variety of sizes and styles.
I painted these rosettes with colors reminiscent of the ornaments from the 50s and 60s, but you could also paint them in more neutral tones for a farmhouse look.
Add an eye hook, finish it off with some Christmas ribbon, and hang them on your tree.
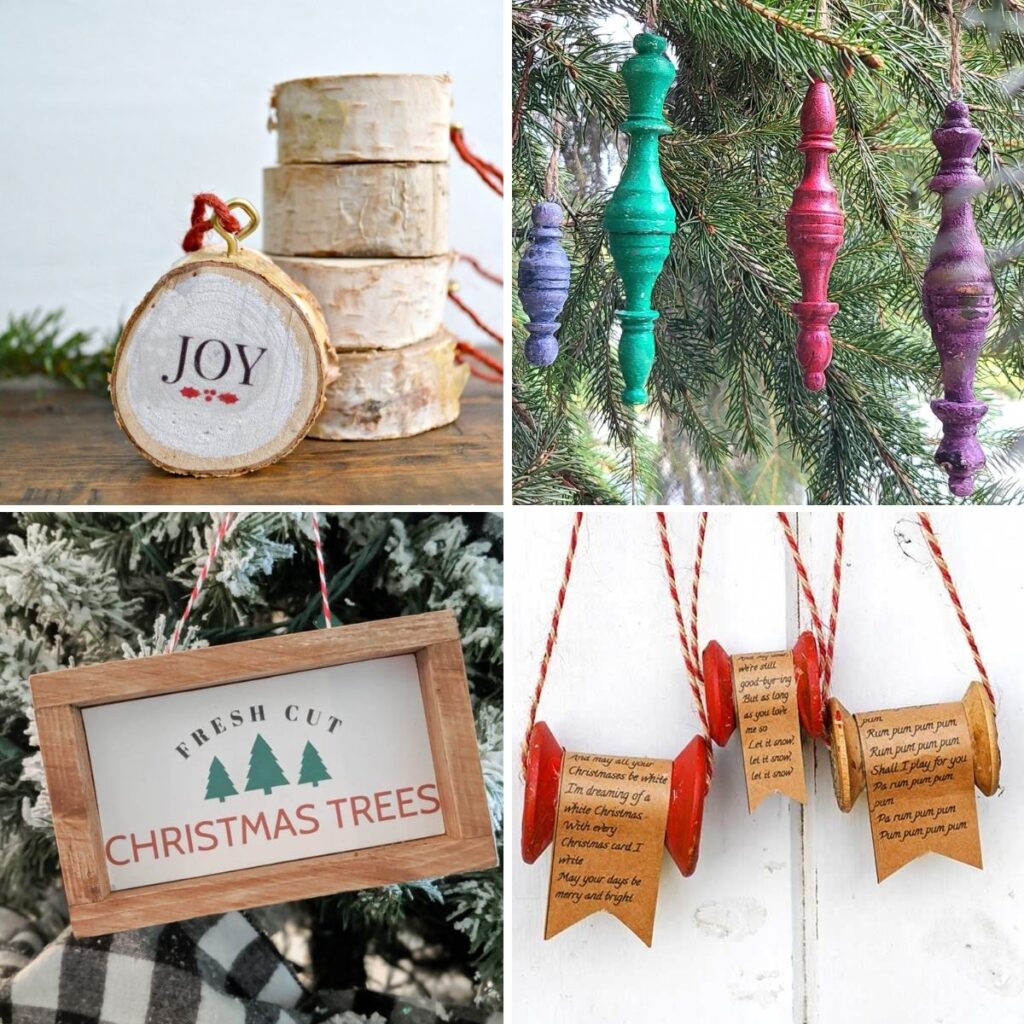
Wood Slice Christmas Ornaments
For something unique, try making wood slice ornaments. You can buy slices or create your own using downed limbs and cutting them with a band saw, or hand saw.
Then use Christmas-themed stencils and craft paints to decorate the slices. Or you can apply images using decoupage glue. Using a woodburning tool, you can even personalize them with names or dates.
Add twine or ribbon and hang them on the tree.
7. Christmas Tree Toppers
Bring your Christmas tree to life with a beautiful wooden tree topper.
Cut a piece of scrap wood in the shape of a star, angel, snowman, or even Santa’s hat. Then stain or paint it to coordinate with your decor.
Related: 71 Scrap Wood Projects (Clever Ways to Reuse Old Wood)
To attach the topper to the tree, Diane at In My Own Style made a coil of 14 gauge wire and inserted it in a small hole in the bottom of her topper.
For something extra special, you can embellish your topper with glitter or attach a string of fairy lights to make your tree sparkle from every angle!
8. Nativity Scene
A wood nativity scene is a project you can make as basic, or as detailed as you like.
You can make the figures from simple wood blocks or use a scroll saw to create more intricate shapes. Leave them natural or paint the figures in classic colors. You can even add more details with a woodburning tool.
Depending on how complex you want your nativity scene, you can stop once you’ve created figures or go further and make a stable. If you’re keeping it simple, a silhouette of a stable can be made from a single board, but if you want something more three-dimensional, use multiple pieces of wood to construct it.
9. Wood Slice Wreath
A wood slice Christmas wreath is a fantastic way to add a rustic touch to your Christmas decor.
Start by gathering some wood slices. You can either buy them pre-cut or make your own using a band saw or hand saw. You’ll also need something to attach slices to, such as a store-bought wreath form, or you can make your own with a thin piece of plywood and a jigsaw.
Once you have your slices and base ready, it’s time to get creative. Use an adhesive like E6000 to attach the slices onto the base in an overlapping pattern.
Next, add some greens, a bow, and ribbon or twine for a hanger. You can also add fairy lights for some extra twinkle.
10. Stocking Holders
As the classic tale “The Night Before Christmas” goes, “the stockings were hung by the chimney with care.” But what if you don’t have a place to hang them? No problem. Make your own Christmas stocking holders!
Stocking holders are super easy to make from wood in various shapes, like trees, snowflakes, and Santa’s sleigh. You can use paint or a wood stain to give your holder the perfect holiday touch. Add some metal hooks, and you’ll be ready to hang your stockings in no time!
This set of four stocking holders looks like an adorable rustic village with three houses and a church.
Related: How to Make Village-Style Stocking Holders
11. Nutcracker
Nutcrackers are a Christmas tradition, and with a bit of creativity and some basic tools, you can make your own simple version with a single board.
It’s your call on the size, but starting small may be best if you’ve never made one. For example, you could cut a piece of wood like a 1×4 to 12 inches for the body.
Related: Beginner’s Guide to Wood Sizes
Then you could cut a 4-inch piece for the feet. Center the feet on the bottom of the body and attach it using screws or brad nails. You’ll want to center the feet, so your nutcracker doesn’t tip over.
Next, paint the nutcracker and add details like eyes, a hat, etc. Don’t forget to give him a big smile too.
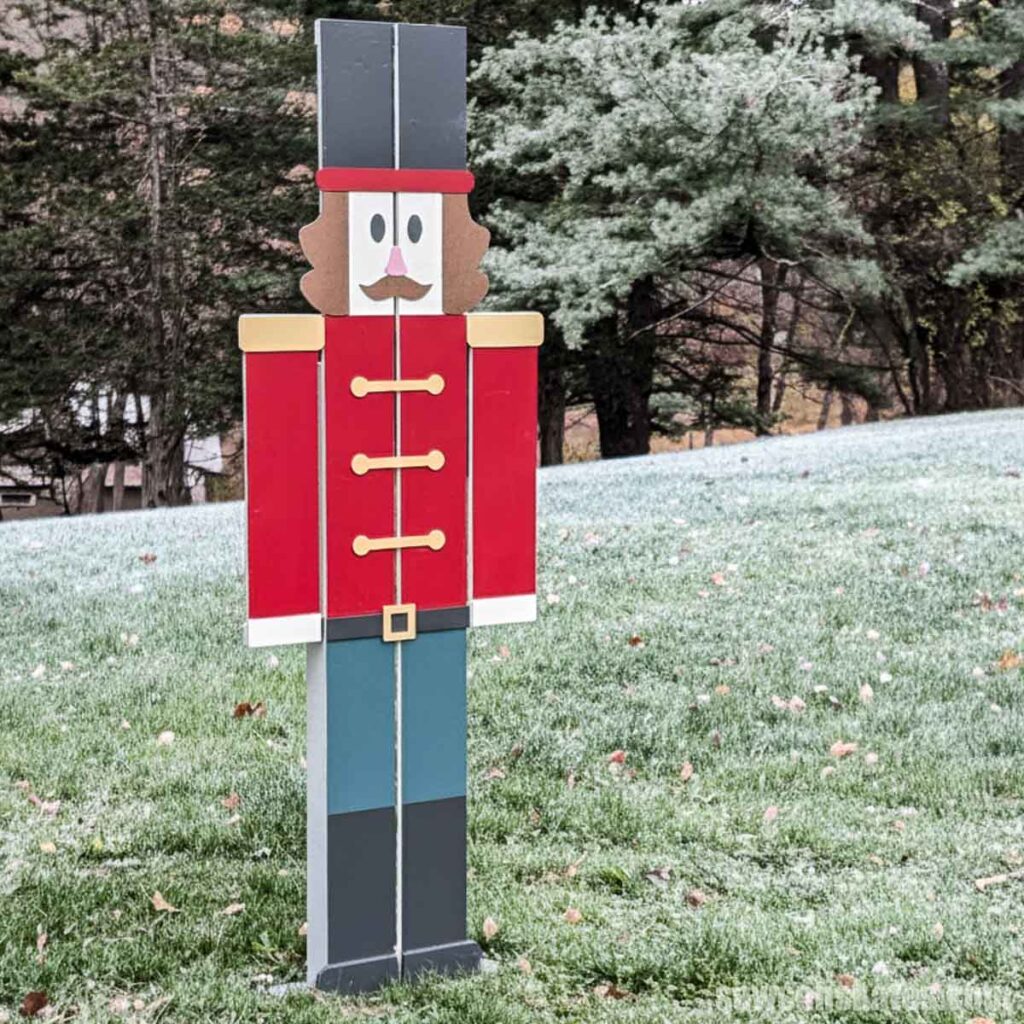
Looking for a larger version?
I built this six-foot-tall DIY nutcracker for outdoor decorating—basic materials, eye-catching size, and great for the yard.
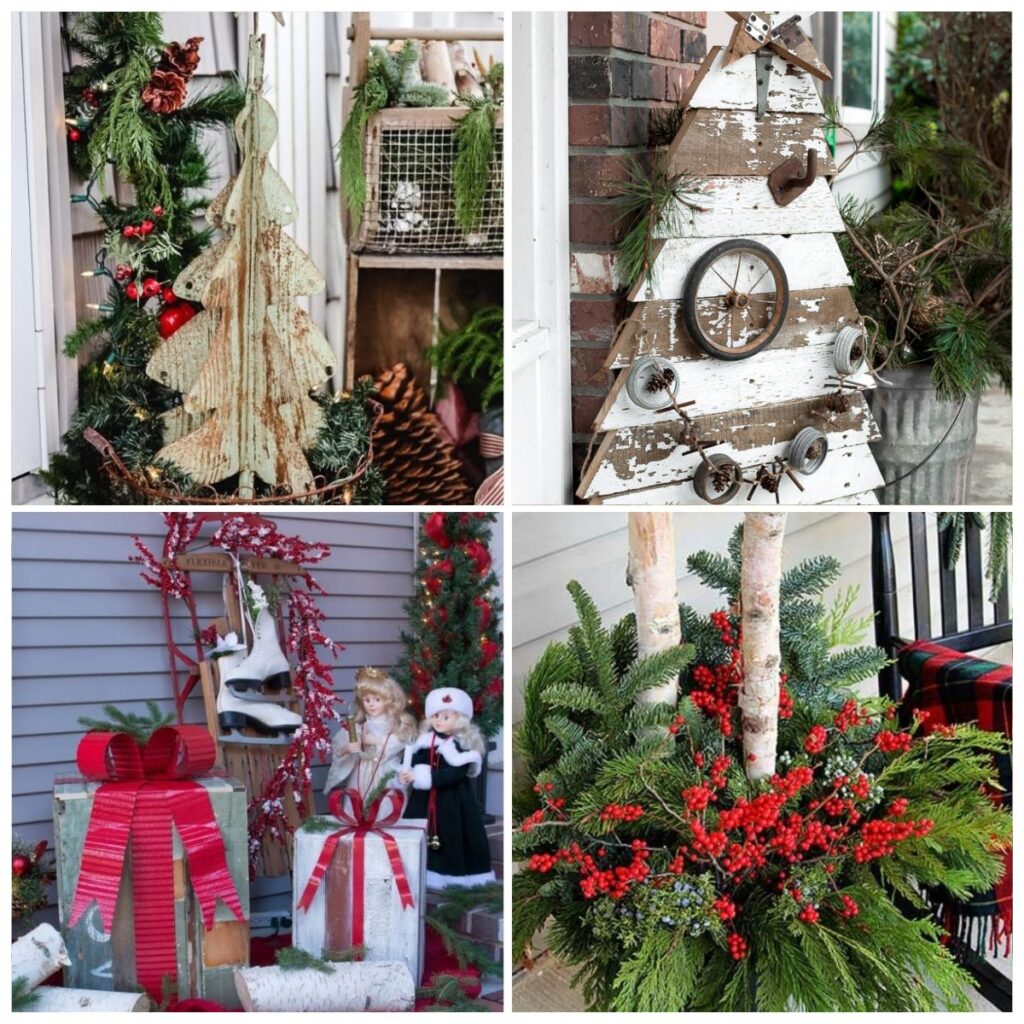
And if you’re decorating the porch or yard this season, my 21+ Classic Christmas Outdoor Decor Ideas to DIY has even more ideas that go hand-in-hand with a life-sized nutcracker.
12. Tabletop Wooden Christmas Trees
A tabletop Christmas tree is the perfect way to add holiday cheer to any room. They’re also relatively easy and inexpensive to make, especially if you have some scrap wood lying around.
This video shows how to do it in just a few simple steps. Add some tiny Christmas lights for extra sparkle.
If you want something rustic, this wooden Christmas tree with lights is built from simple boards, assembles quickly, and adds a warm glow to your holiday display.

13. Tabletop Reindeer
Looking for a not-so-Christmasy way to decorate your home for the holidays? This tabletop reindeer is a perfect project for crafters of all skill levels. Using just a few scrap pieces of wood and a scroll saw, you can create a unique decoration that will add a touch of wintertime cheer to any room.
The tutorial includes a reindeer template that you can trace onto your wood of choice. Once you’ve cut out the parts, use a sander to smooth the edges. The deer’s legs and antlers interlock, creating a sturdy and stable decoration. It also disassembles for easy storage when the season is over.
You can decorate it any way you like: paint, stain, or leave it natural. For an extra festive touch, you could even add a small wreath or scarf to your reindeer.
Related: How to Make a DIY Tabletop Reindeer

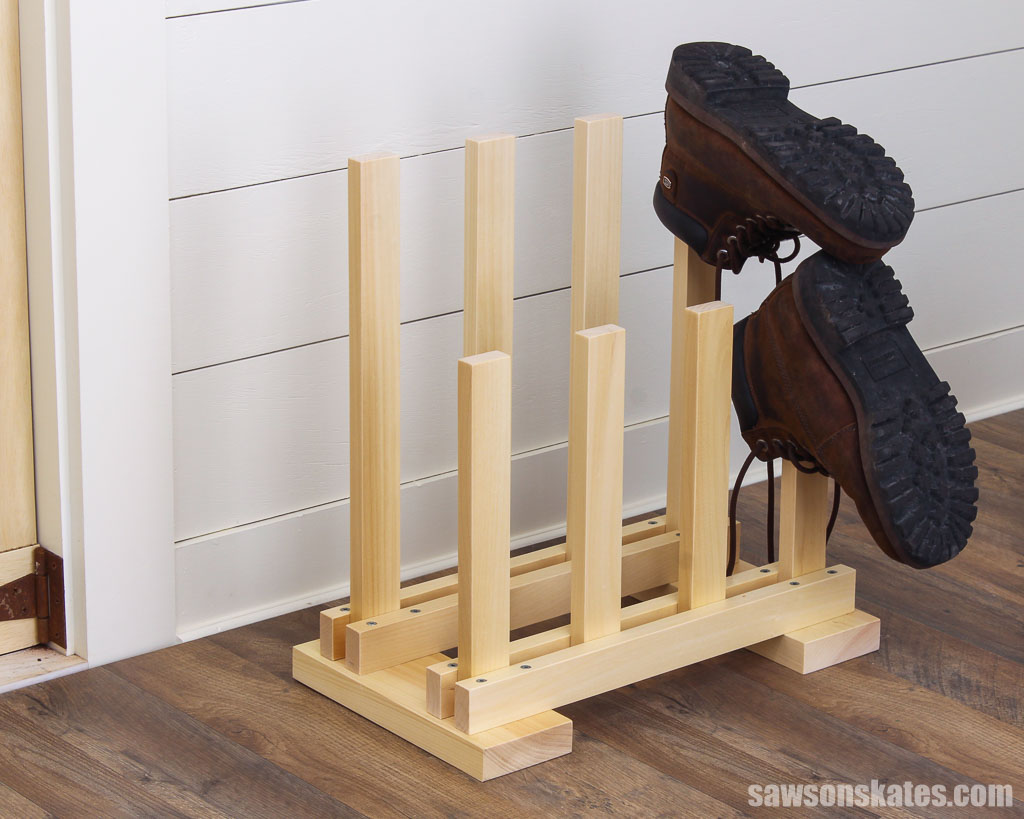
14. Boot Rack
A boot rack is not exactly Christmas-themed, but snow boots are typically worn around Christmastime, and Santa wears boots, so I think it counts!
Boot racks are perfect for storing and organizing your family’s footwear during the cold winter months and can also be used year-round to store your shoes.
This boot rack is easy to make with a few pieces of wood, a miter saw, and a drill.
Related: How to Make a DIY Boot Rack
15. Wooden Snowflakes
If you’re looking for a project that will have everyone admiring your work, a wooden snowflake is it. Snowflakes are a classic for Christmas, but they’re also great for decorating throughout the winter season.
Start with two or three pieces of 1×2 boards cut to the same length. This will be the base of your snowflake. Stack them in a crisscross pattern or a sort of “star pattern” and attach them with wood glue and brad nails.
Next, use a miter saw or jigsaw to cut some shorter pieces with parallel 30-degree angles on each end. You’ll use these pieces to create the “V” shape often seen in snowflakes. Arrange these pieces on the base and attach them with glue and brad nails.
Finally, apply a coat of white paint. And there you have it, a beautiful wood craft perfect for a mantel, shelf, or hanging in your window!
16. Wood Christmas Garland
Wood garland is a unique way to decorate your Christmas tree, mantel, or doorway.
Start with some thin wood such as plywood, lauan, hardboard, or even some scrap pieces of paneling. Then use a scroll saw to cut out festive shapes like trees, snowflakes, or gingerbread men. If you need more inspiration, you can use your Christmas cookie cutters to trace shapes on the wood!
When all of the pieces are cut, drill a hole through each one, and use craft paint to decorate them. Once the paint is dry, attach the shapes with twine or ribbon, and hang your garland.
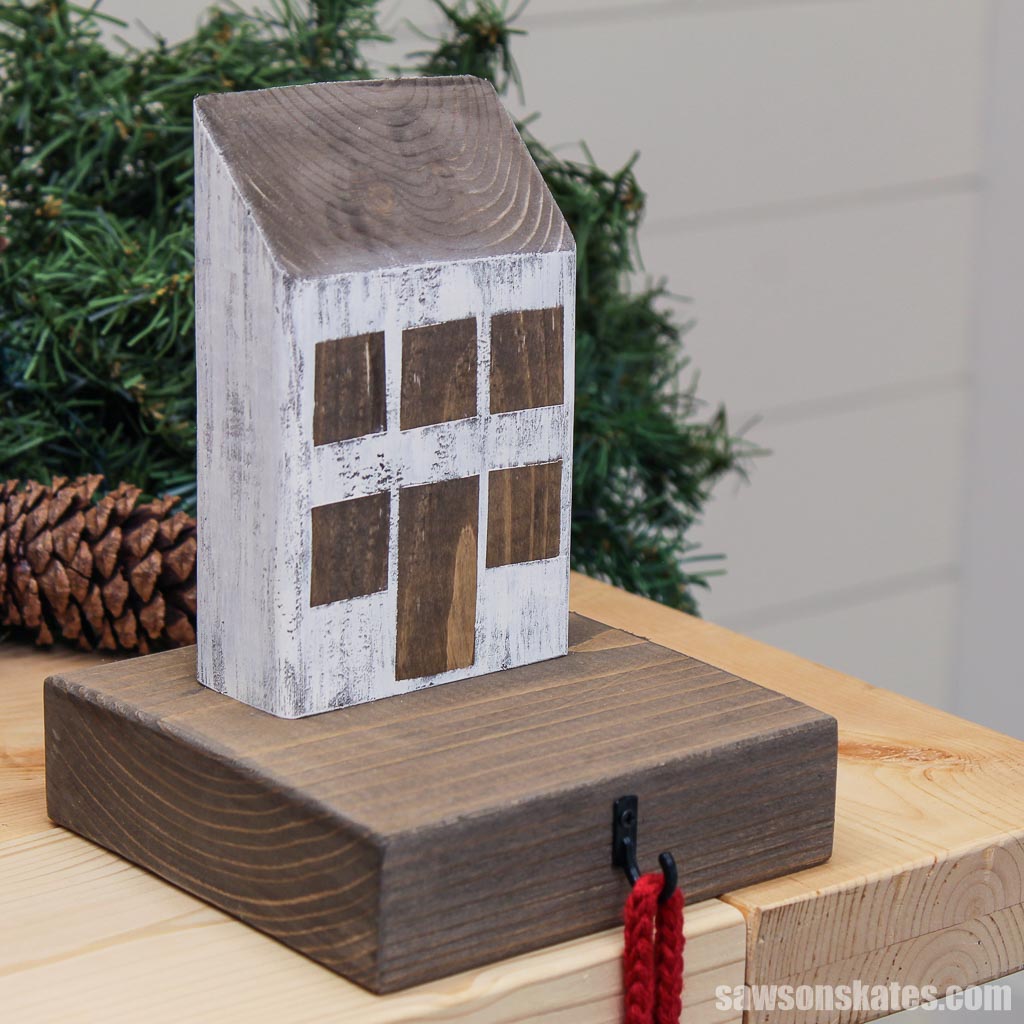
17. Christmas Villages
Villages are classic Christmas decorations that you can make from wood. Start with pieces of scrap wood, then use a miter saw or scroll saw to cut out the buildings and other parts of the village like trees, cars, and more. You can finish your village with paint or a wood stain when all of your pieces are cut and sanded.

18. String Wall Art
String art is a technique where a colored string is woven around small nails to create a pattern.
It’s a great way to add Christmas spirit to your home and makes a great holiday gift!
All you need is wood, nails, a hammer, and some colorful string or yarn.
You’ll also need the design of your choice. Christmas trees, snowflakes, candy canes, reindeer, or even words like “joy” are all great options for string art.
To start, print out your pattern. Then, place a piece of carbon paper on your board, position the template on top and trace your design onto the wood.
Next, hammer nails around your pattern, spacing them a 1/2 to 1 inch apart. Small brad nails work, but these brass escutcheon pins will give your project a more polished look.
Once the nails are in place, tie a knot around one of the nails and wrap the string around the nails to create your pattern. I recommend using the yarn to outline the design first, then randomly weaving in and out of the nails to fill it in.
When you’re happy with the design, tie a knot around one of the nails and trim off any excess.
If you want to hang your string art on the wall, attach a sawtooth picture hanger on the back, and you’re ready to display your artwork.
19. Christmas Tree Wall Shelf
A Christmas tree shelf or shadow box is perfect for showing off your Christmas or holiday greeting cards. This version is easy to make with a few boards and the step-by-step instructions.
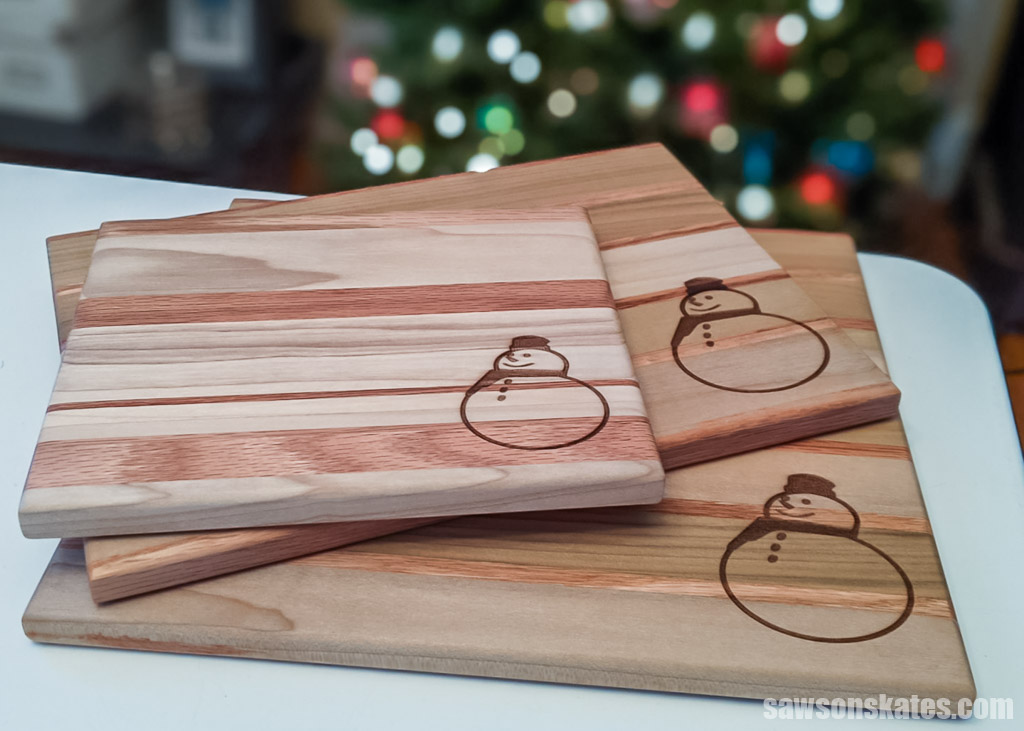
20. Serving Boards
Make Christmas-themed serving boards with hardwood such as walnut, cherry, and maple. Then decorate them with images like Christmas trees, snowflakes, or reindeer using a woodburning tool or a laser engraver.
One of the members at the local historical society where I volunteer donated a handful of wooden boards he handcrafted, and I added an adorable snowman using my laser engraver. They’re perfect for serving cheese at a holiday party or cookies for Santa Claus.
You may also enjoy this deviled egg serving tray and this wood trivet with dovetailed feet.
Remember to finish them with a food-safe sealer to keep them looking good for years to come.
21. Coasters
Wood coasters make a great Christmas gift and are easy to make with just a few tools.
You can make them with store-bought coasters, a single piece of wood, or gluing up multiple pieces like the serving boards above.
Related: How to Make Mini Pallet Coasters
Then you can give them some Christmas flair with a woodburning tool or a laser engraver. Add images like a gingerbread house, snowman, or words like “Merry Christmas!”
22. Wooden Gift Tags
Wooden gift tags are easy to make and a great way to add a personalized touch to your gifts. All you need is some thin pieces of wood such as plywood, lauan, hardboard, or even some scraps of paneling.
First, use a scroll saw to cut the wood into rectangles, circles, trees, snowflakes, and other Christmas shapes. Then, drill a small hole for a piece of ribbon or twine to attach the tag to your gift.
Next, paint or stain them for a festive look, or use a woodburning tool to add phrases, greetings, the recipient’s name, or your initials.
Finally, hang the tags on your presents for a truly special touch. The best part is not only is it a gift tag, but it can also be used as a tree ornament!
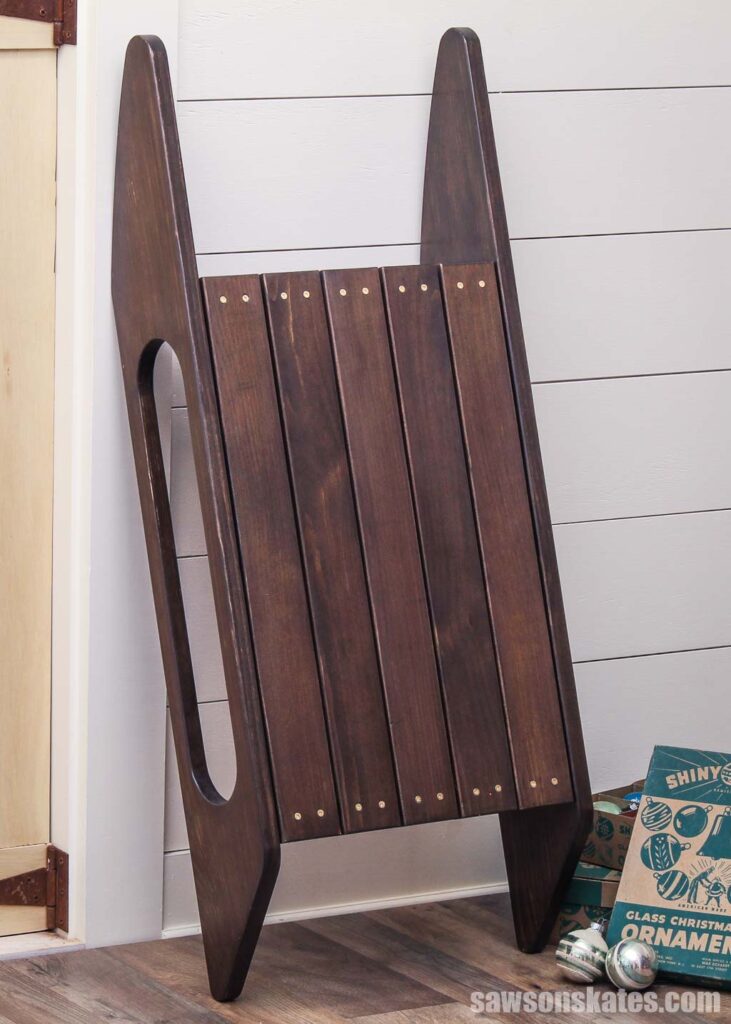
23. Wooden Sled
Bring a touch of nostalgia to your holiday decor with this classic wooden sled you can build in an afternoon. Inspired by vintage sleds, it features curved runners, simple joinery, and a timeless, hand-rubbed-like finish that gives it an aged look right from the start.
Display it on your porch with greenery and twinkle lights, lean it by the tree, or use it as a base for a festive winter vignette. It’s made from basic boards, requires only common tools, and is beginner-friendly; perfect if you want something that looks like an heirloom without the hours of restoration work.
24. Christmas Shelf Sitters
Shelf sitters are a quick Christmas project — small, simple, and perfect for decorating mantels, tiered trays, or bookcases. You can make them from scrap wood, customize the colors, and whip up a whole batch in no time.
Gnome Shelf Sitter
Make a gnome shelf sitter with wood scraps, paint, and some basic tools. This is an easy project that you can finish in an afternoon.
Start by cutting a piece of wood into a triangle shape for the body.
The point of the triangle will be the gnome’s hat, which you can paint any color you want. Below the hat, add a small flesh-toned band to represent the gnome’s face. The remaining part of the gnome’s body can be the same color as the hat, or switch it up and choose something different.
Next, add some faux fur for the beard. You can find faux fur at your local craft store or online. Glue it to the body using a hot glue gun.
Finally, add a wooden craft bead for the nose using hot glue.
Now your gnome is ready to add a festive touch to your holiday mantel, side tables, or shelves!
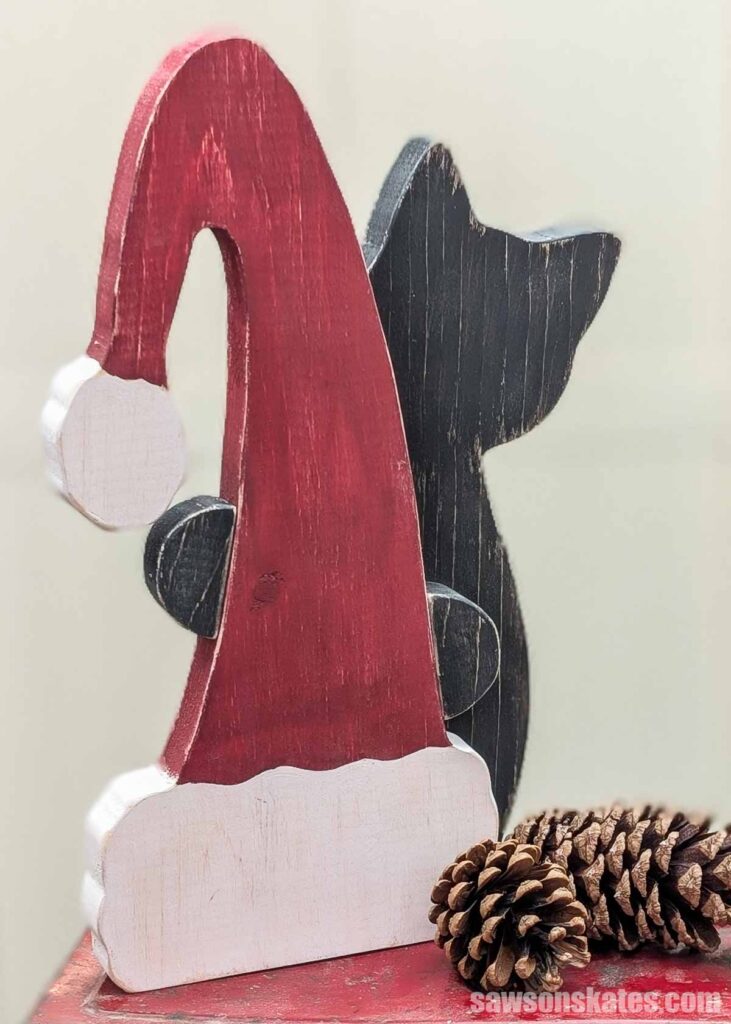
DIY Cat and Santa Hat Christmas
This simple scrap wood project features a cat peeking around a Santa hat. Easy to customize and perfect for gifting or adding a little holiday charm to a shelf.
25. Christmas Tree Collar
Christmas tree collars are an excellent way to spruce up the bottom of your tree and a great alternative to fabric tree skirts. The best part is that they’re easy to make with wood and common tools.
The simplest collar to make is a box. For example, you can cut four pieces of plywood and attach them using glue, brad nails, or screws. Then you can attach inexpensive pine boards or molding to give the box a finished look.
Once the box is assembled, paint or stain it to coordinate with your decor.
26. Place Card Holders
Christmas place card holders are a great way to add a festive touch to your dining table. To make them, start with pieces of scrap wood, and a scroll saw.
Cut the wood into shapes like trees, snowmen, gingerbread men, or round ornaments, then cut a slot for the place cards to slide into. You can leave them natural or finish them with wood stain or paint.
27. Centerpiece Box
Centerpieces are a great way to dress up your Christmas table. For example, you can make a simple rectangular box with some pieces of 1×4, glue, and brad nails.
Once it’s assembled, you can finish with paint or stain. Next, you can fill the box. My favorite filler is vintage ornaments, but you can also use greenery such as pine boughs or holly to give your centerpiece a festive look.
28. Door Hanger
A door hanger is similar to a wreath but much easier to make.
The sky is the limit when it comes to door hanger shapes. I’ve seen trees and stockings, but the most popular design is a round ornament.
Once you decide on your shape, draw it on a piece of plywood, and cut it out using a jigsaw. Sand the edges and use paints, stains, or Christmas-themed stencils to dress it up. Finally, add some greenery and a bow and hang it on your door.
29. Magnets
Magnets are a great way to add Christmas cheer to your refrigerator. Start with pieces of scrap wood cut into Christmas shapes, such as snowmen, trees, or gingerbread men.
Then, paint or stain the front using festive colors. Finally, attach a magnet to the back with E6000.
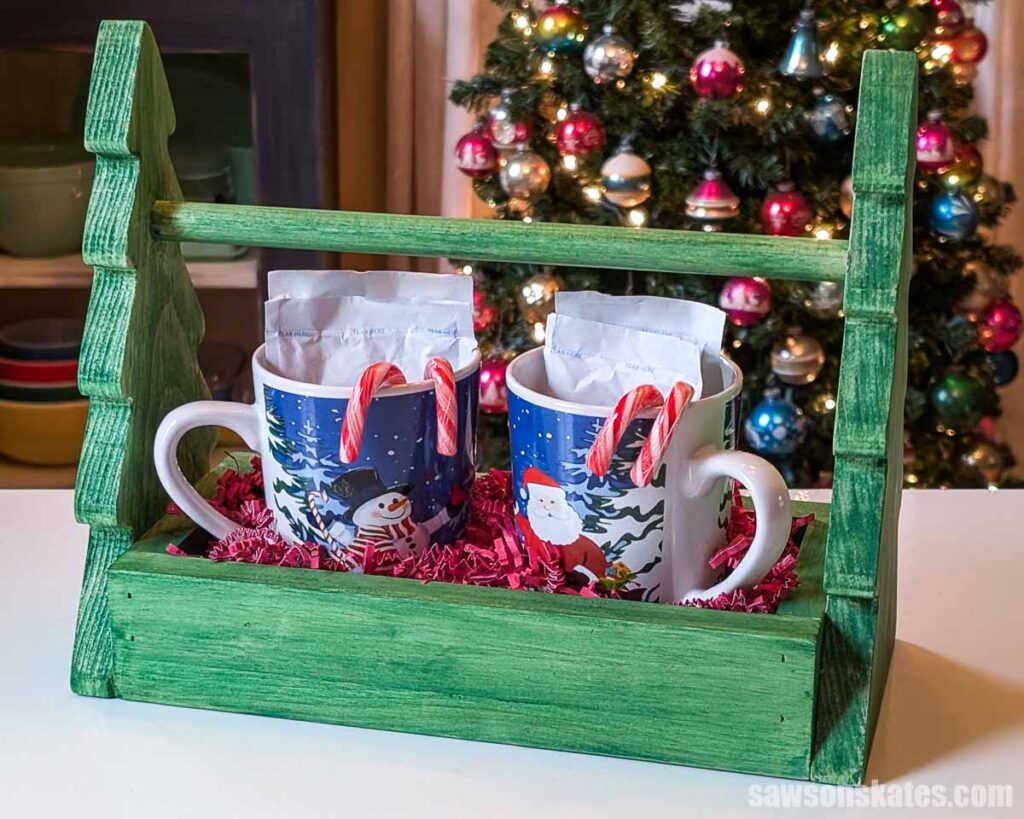
30. Hot Chocolate Caddy
This adorable tree-shaped cocoa caddy is quick to make from scrap wood and perfect for gifting. I based the shape on my tabletop tree, then added a simple tray to hold mugs and cocoa packets. It also works for candles, ornaments, or just about anything you want to gift. It’s inexpensive, customizable, and adds a cozy holiday touch to any table or kitchen counter.
Related: How to Make a DIY Tree-Shaped Hot Cocoa Caddy
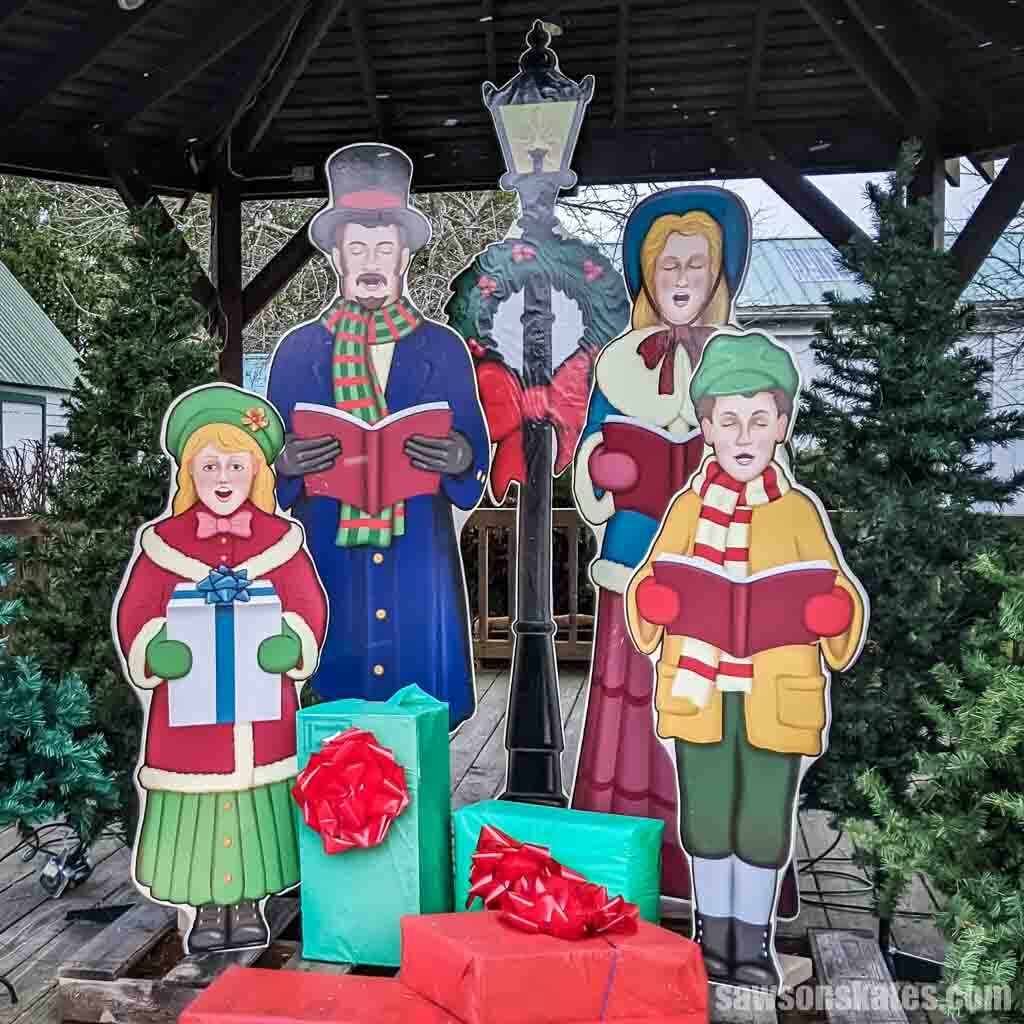
31. Outdoor Christmas Carolers
Remember those old-time wooden cutouts that stood in your grandparent’s front yard at Christmastime? Well, you can make them too!
Start with a piece of plywood and use a jigsaw to cut out Christmas caroler silhouettes. You can find Christmas caroler templates online or use your imagination and draw your own. Once all the pieces are cut out, paint the carolers in festive Christmas colors and attach them to a stake to place in your yard.
I made this set of carolers for the historical society where I volunteer, which was a big hit at our open house!
Ready to Start Your Handmade Holiday?
Grab my Ultimate Holiday Plan Collection — 9 beginner-friendly projects you can build with basic tools and scrap wood. From porch decorations to tabletop decor, this bundle has everything you need for a handmade holiday.
Includes:
- 9 popular holiday project plans in one bundle
- Complete tool and material lists
- Step-by-step instructions for each project
- Full-color photos to guide you from start to finish
- Beginner-friendly builds you can make with basic tools
Final Thoughts
Christmas wood crafts create a cozy, festive atmosphere in your home. And you don’t have to be an experienced woodworker to make them either!
Whether you’re looking for decorations or gifts, these crafts are sure to please. So grab some wood and get creative this holiday season!
Thank you for stopping by. If you enjoyed this tutorial, would you please take a moment and pin it to Pinterest? I’d really appreciate it!
Recommended For You
Pin This For Later

Hi there – I’m Scott, a woodworking enthusiast and creator of Saws on Skates, a site I started in 2015 to share easy-to-follow tutorials, space-saving shop tips, and project inspiration for DIYers at any skill level. Learn more about my woodworking journey here.