Essential Tools Every DIY Furniture Builder Needs in Their Workshop
Tools are needed for building DIY furniture, but which ones do you need the most? We’ll look at the must-have tools essential for building DIY furniture.
Tools… you know you need them to build DIY furniture, but which ones do you need the most? Today, we’ll look at the must-have tools essential for building DIY furniture projects.
For your convenience, this post contains affiliate links to supplies or tools I used to complete this project. Purchases made using these links help support the Saws on Skates website and allow me to share more DIY projects. and DIY tips with you. There is no cost to you for using these links. Click here to visit my site policies.
I was not compensated for this post. All thoughts and opinions are my own.
A few weeks ago I received an email from Wayfair.com. They were asking DIY bloggers to share with their readers “What’s in Your Toolbox?” a look at “toolbox essentials”. I was excited for the invite but reluctant to participate because well, my toolbox is pretty pitiful. My toolbox is actually not a toolbox at all. I’m pretty sure it was designed to carry cleaning supplies rather than tools!
I’ve tried using toolboxes in the past, but they just don’t work for me. Just like when we chatted about scrap wood storage options I mentioned that I need to have everything in my sight or I won’t use it. It’s the same way with a toolbox. If it’s out of my sight, it’s out of my mind.
The second part of the challenge was to show how to use those essential tools to do home improvement projects like install kitchen/bathroom fixtures, install floor/wall tile, plumbing, vanities, lighting, and just general home improvement projects. Oh no… strike two!
I love home improvement projects and from time to time I do share home improvement project tutorials. And sure, I shared how to build this DIY bathroom vanity (my DIY vanity was actually inspired by this vanity I found on Wayfair.com!), but primarily I share free DIY furniture plans and helpful DIY tips.
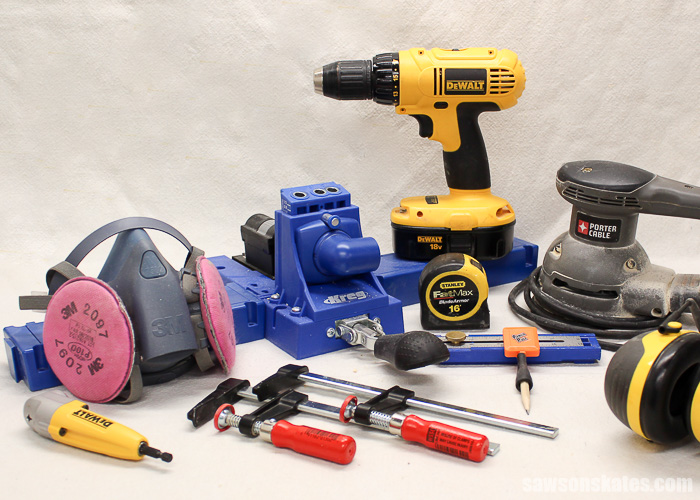
Still, I wanted to participate. I hope you’re not upset with me Wayfair.com but I changed up the assignment a little bit. Instead of sharing “What’s in Your Toolbox” I’m going off script and sharing “What’s on My Workbench”. We’re going to take a look at the essential tools I keep in my workshop for building my DIY furniture projects.
Related: My 12×13 Small Woodshop Layout
Before we look at the tools for building DIY furniture we’ll need something to build on. We need a workbench. Did you know Wayfair.com not only offers an extensive variety of toolboxes, but they also offer an assortment of workbenches? It’s true! I always think space-saving first so I’m really digging this folding compact workbench. I also like this workbench kit that you can customize to the size of your workshop.
Related: 9 Clever Ways to Make Your Small Workshop Feel Bigger
Want to DIY your own workbench? Here I’ve rounded up 5 DIY workbenches perfect for small workshops. Also perfect for a small workshop is my space-saving DIY folding workbench. I use this workbench all the time from sanding my furniture projects, and using my miter saw to painting projects and even grooming my dog! Set it up when you need it then fold and store when you’re done.
A fliptop workbench is another great way to maximize space in your workshop. You can mount a tool on one side then flip the top to use the workbench for assembly. Get my free DIY fliptop workbench plans here.
What if you don’t have a place to put a workbench? What if you don’t have a workshop, or garage, or basement to build DIY furniture? I got you covered! Here are 5 ways to build DIY furniture when you don’t have a workshop.
Essential Tools Every DIY Furniture Builder Needs in Their Workshop
Trust me, I know tools can be expensive. Especially when you’re just starting to DIY. When you’re just starting you need EVERYTHING. Don’t panic. There’s an inexpensive option. Buying used tools is a great way to build your arsenal. To help out I’ve put together the Beginner’s Guide to Buying Used Tools.
Safety Gear
Before we pick up any tools we need to think about safety. Read, follow, and understand the safety instructions for your tools. If you don’t understand, contact the manufacturer or ask a pro. We need to protect our eyes with safety glasses, our ears with hearing protection and our lungs with a quality respirator.
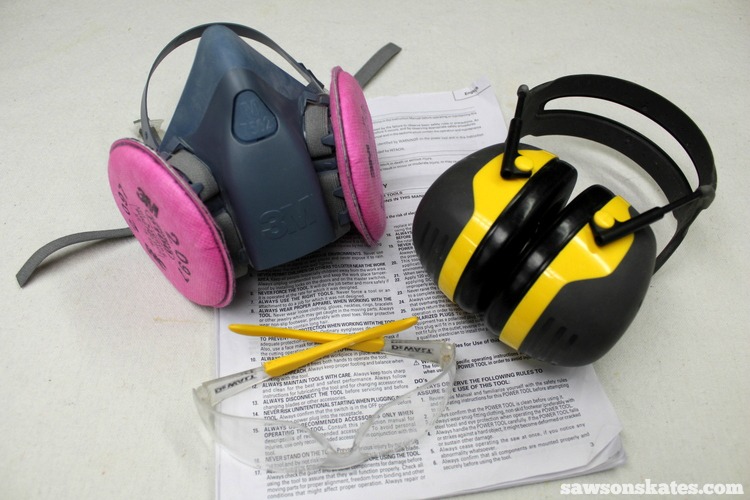
Do you think safety gear isn’t important? Take a look at my sunglasses in my 9 Paint Sprayer Mistakes You Don’t Want to Make post. If I hadn’t been wearing any sort of eye protection those paint specs would have been in my eyes. Worse yet if I hadn’t been wearing a respirator those paint specs could have ended up in my lungs. Don’t DIY without safety gear.
Sili Mat
Have you ever used or seen those silicone mats used for baking cookies? The Sili Mat works just like that. It’s an 1/8” silicone rubber mat specifically designed for your workbench. Instead of preventing cookies from sticking to the cookie sheet the Sili Mat prevents glue spills from sticking to your workbench, countertop or workstation.
And just like cookies slide off the silicone baking mat glue slides right off the nonstick Sili Mat. You can either wipe up any spilled glue with warm water or let the glue dry and it peels right off! HOW EASY IS THAT?! No more glue dried on the top of our workbenches. No more ruined workbenches. No more replacing the top of your workbench.

Barry, a member of the Saws on Skates community messaged me after I published the Sili Mat post. He prefers to use wax paper to protect his workbench I have used wax paper in the past, but the Sili Mat has an additional benefit over wax paper. The Sili Mat not only protects your workbench, but it also protects the surfaces of your DIY furniture projects as you build.
We all know how soft pine is and how easily corners can be dented. That’s not as much of a concern with the Sili Mat. Remember the mat is 1/8” thick silicone, so there is less of a chance of denting your furniture projects when you’re assembling. My Sili Mat has a permanent home on the top of my fliptop workbench cart.
Tape Measure
If you’re going to build a DIY furniture project or take on any DIY project for that matter, you’ll definitely need a tape measure. The FatMax tape measure is my go-to tape measure. Not only is it accurate, but I LOVE the way the rounded case fits in my hand.

Kreg Multi-Mark
I could go on for days about how much I love the Kreg Multi-Mark! This tool is indispensable! I use it on nearly EVERY furniture project I build. The Kreg Multi-Mark is great for setting the depth of a saw blade, marking measurements and more. Just take a look at the build photos from any of my furniture plans and chances are you’ll see me using the Multi-Mark.

![]()
Pencil Pull
Here’s another item I use on EVERY project. I was constantly losing my pencil before I got a Pencil Pull. Then I attended a timber framing workshop. A fellow student had a pencil pull. I watched him over the week-long course. He never lost his pencil once! I immediately bought one as soon as I got home from the class. With a Pencil Pull, you’ll never lose your pencil again and it will always be right where you need it.

![]()
Apron
From keeping wood chips and sawdust off your shirt, to keeping your most commonly used tools at hand, an apron is a great addition to your DIY furniture building. I use mine anytime I’m working in my shop.

![]()
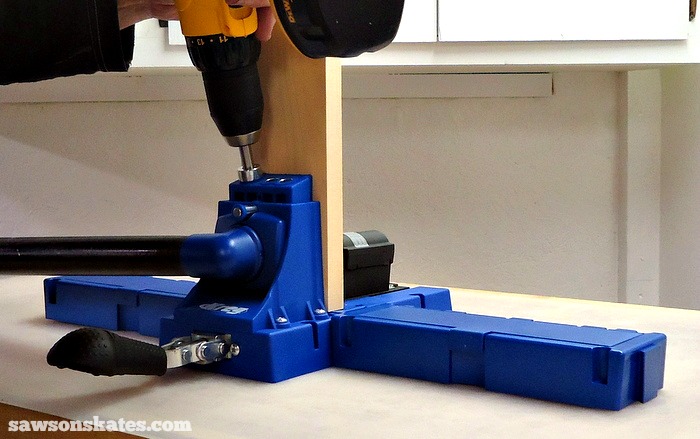
Kreg Jig
If you want to build DIY furniture, then you NEED a Kreg Jig. With the Kreg Jig, furniture building is quick, easy and the finished product looks nothing less than professional. I use the Kreg Jig on nearly every furniture project I build. I started out using the Kreg Jig K3, but have since upgraded to a Kreg Jig K5 and love all of the additional features.
If you’re new to using the Kreg Jig, be sure to check out my quick start guide for setup tips and how to use the jig. Then head over to my 9 Pocket Hole Mistakes You Don’t Want to Make post for tips and tricks to ensure you pocket hole success. Sometimes pocket holes are difficult to reach so in this post I’m sharing my secret weapon for hard-to-reach pocket holes. Sometimes you’ll want to hide the pocket holes and a pocket hole plug cutter is a great way to make pocket holes virtually disappear.
Cordless Drill
You’ll need a drill to use the Kreg Jig and nothing beats the convenience of a cordless drill. The DEWALT cordless drill I use for all of my projects features an easy to operate keyless chuck and it’s super durable. I can’t count the number of times I’ve dropped it and it’s still going! Right now I’m using the 18-volt version but would like to upgrade to the 20-volt version in the future.
Need a place to store your drill? Use these free plans to build a DIY Cordless Drill Storage Rack.
Related: How to Use a Drill and Change a Drill Bit

![]()
Right Angle Attachment
If you build DIY furniture long enough it will happen to you at some point. You’ll chuck the pocket hole driver in your drill, attempt to drive the pocket hole screw into the pocket hole and… CRASH!!! The drill/driver combo is too large to fit in our DIY furniture project. It happened to me when I was building the outdoor coffee table. So what do we do now?
The answer is a right angle attachment. A right angle attachment chucks in your drill and accepts just about any hex-shank bit like a pocket hole driver. It’s an indispensable secret weapon you need in your toolbox. It’s the perfect tool for hard-to-reach pocket holes and any screw in a tight space.
Related: Why You Need a Right Angle Drill Attachment
Clamps
Have you ever met a DIYer who said: “I have too many clamps”? Nope, and you never will! That’s because you can never have too many clamps. For building DIY furniture I like to have an assortment of bar clamps in a variety of lengths. My favorite bar clamps are Bessey Bar Clamps.

![]()
Did you know there is a science to clamping? What’s the best position for clamps? How many clamps do you really need? Check out my 6 Tips to Clamp Your DIY Project Like a Pro for the answers to these questions and for tips to ensure clamping success.
Now that you have a bunch of clamps where will you store them? Don’t worry, I’ve done the homework for you! Here’s a roundup of 7 Clever Clamp Storage Ideas for a Small Workshop.
Miter Saw
Hands down the miter saw is the saw I use the most to build my DIY furniture projects. In fact, I can’t think of a DIY furniture project that didn’t need a board trimmed to length. There’s a lot of options when it comes to choosing a miter saw.
The Hitachi miter saw is a great option for a DIYer just starting out, as a second miter saw. This is the miter saw I use for my outdoor DIY projects and the saw I take with me to a buddy’s house to help with home improvement projects. Check out my setup tips and review of the Hitachi miter saw here.

![]()
For building my DIY furniture projects I use a 12″ sliding miter saw (similar to the one below) equipped with a 100 tooth Diablo saw blade. A sliding miter saw is great for cutting larger width boards like 1x12s.
Related: How to Change a Miter Saw Blade

![]()
Be sure to check out my 7 Miter Saw Tricks Every DIYer Should Know it’s loaded with hints and tips for getting the most out of your miter saw. Using a miter saw on a workbench is OK, but having a dedicated miter stand is ideal and you can DIY your own. Here’s a round up for 6 DIY Space-Saving Miter Saw Stand Plans for a Small Workshop.
Related: How to Adjust a Miter Saw for Accurate Cuts
Random Orbit Sander
When I first started building DIY furniture I sanded my projects with a palm sander. A palm sander is not my favorite tool. It vibrates like a jackhammer, you have to cut the sandpaper, then thread the sandpaper like a needle and after all of that the palm sander actually scratches the surface of our project. There has to be a better way and a better tool, right?
Yes, there is. Enter the random orbit sander. Instead of rotating in a singular, circular direction, a random orbit sander rotates in a random pattern. This random orbit pattern gives the sander less of a jackhammer feel. Sure, it still vibrates, but to me it doesn’t vibrate any where near a palm sander. The best part is it leaves the surface of my furniture projects smooth and free of scratches.
Related: 11 Secrets for Sanding Wood Projects Like a Pro
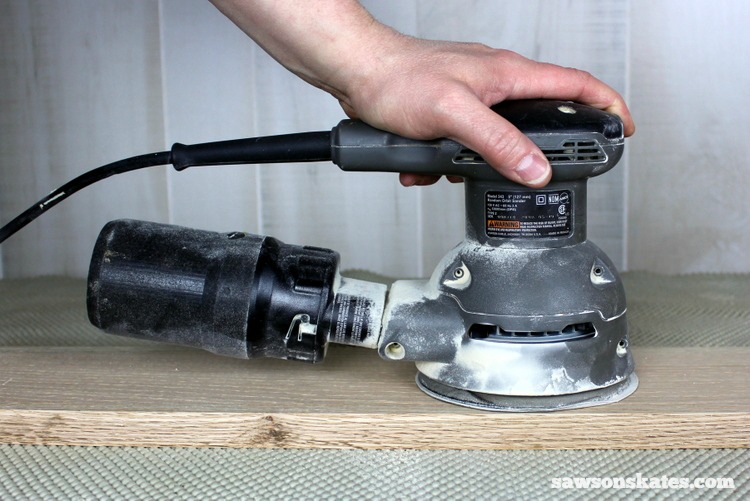
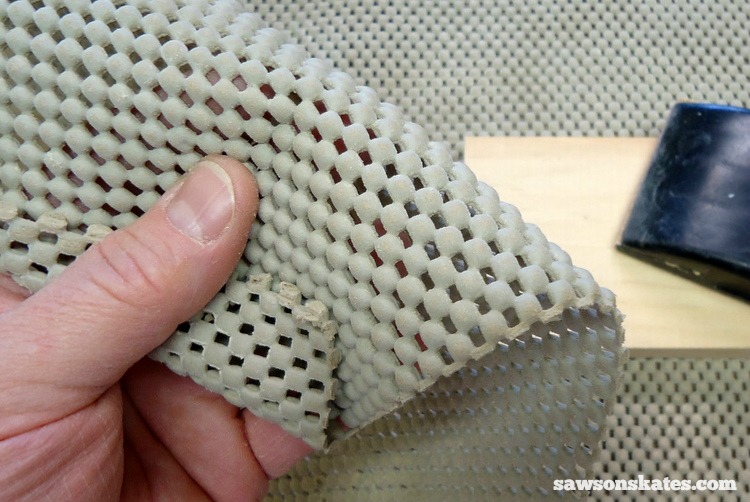
Non-Slip Pad
When I sand the parts for my furniture projects I do it on a non-slip router pad. The rubber grips to the parts and minimizes the “chase game” around the workbench. Sure, the parts still move a bit, but nothing like they do without the pad. For people like me who don’t like sanding, the non-slip router pad makes the task a little more tolerable. Plus, you can also use it with your router and sanding block too.
Final Thoughts
These are the essential tools I use for building DIY furniture. Thank you to Wayfair.com for asking me to participate. Do you need a new toolbox? Be sure to check out the amazing selection at Wayfair.com.
What tools are essential for you when building DIY furniture? Please share your thoughts with me in the comments.
Thank you for stopping by to check out the essential tools for furniture building. If you found this information helpful, would you please pin it to Pinterest? I’d really appreciate it! Thank you – Scott

Hi there – I’m Scott, a woodworking enthusiast and creator of Saws on Skates, a site I started in 2015 to share easy-to-follow tutorials, space-saving shop tips, and project inspiration for DIYers at any skill level. Learn more about my woodworking journey here.