DIY Sandpaper and Sander Storage Organizer
Get your sandpaper and sanders organized with this DIY storage organizer. This sander storage rack is easy to make with a few pieces of wood and these simple plans.
What Should I Build Next?
That's the question I help answer.
Every week, I send woodworking ideas to 17,000 DIYers who love building things.
You'd fit right in.
Sander Storage Organizer
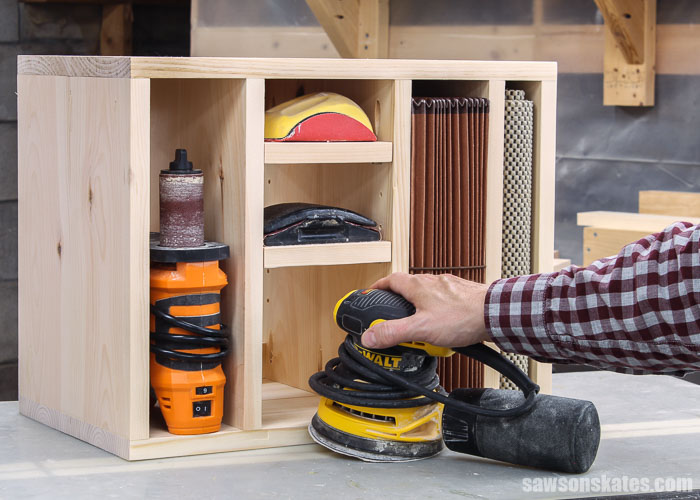
Is your sandpaper scattered across your workshop? Are your sanders taking up valuable space on your workbench? Get them organized with this DIY sandpaper and sander storage organizer. It’s easy to make with a few simple cuts and a few common woodworking tools.
The cabinet has space for organizing sandpaper, random orbit sanders, spindle sanders, sanding blocks, and more. Two adjustable shelves allow you to customize the rack for your storage needs.
The plan includes all of the measurements and detailed step-by-step instructions. Get the plan now and get your workshop organized today.
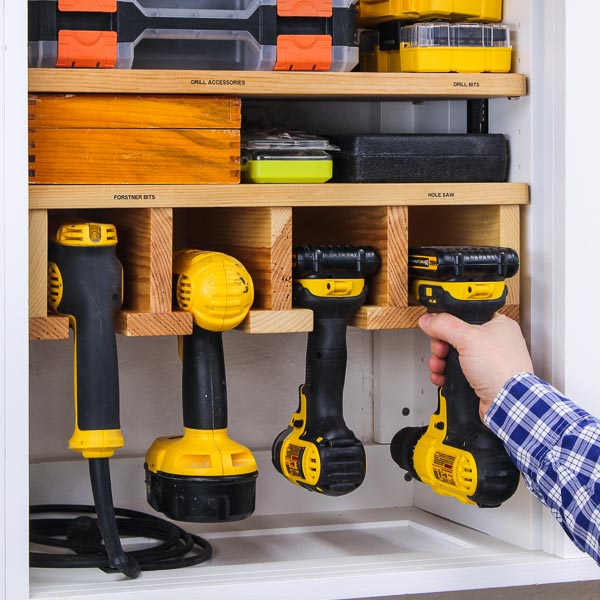
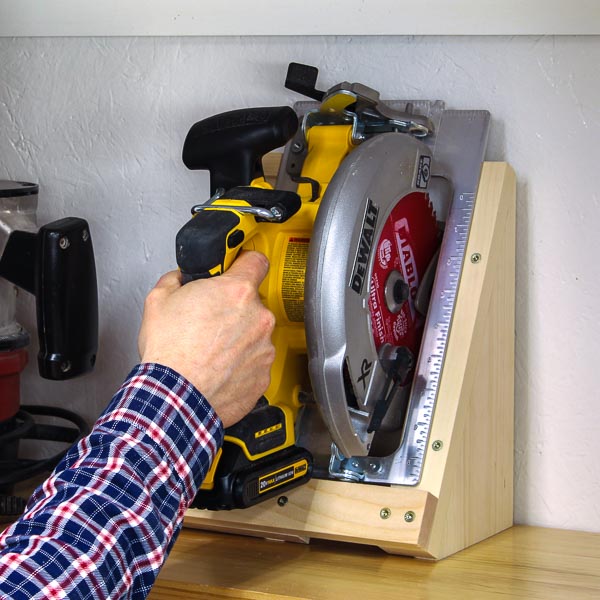
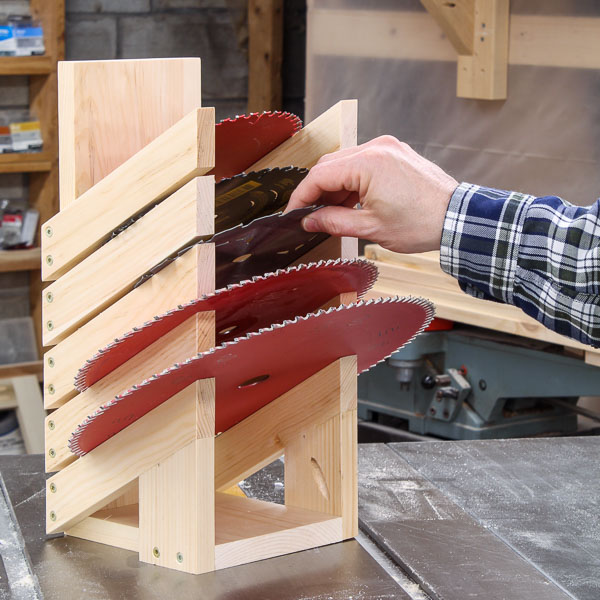
You may also enjoy this DIY drill holder, DIY circular saw holder, and this DIY saw blade storage rack.
Table of Contents
- Inspiration for This Project
- What Can You Store in This Organizer?
- Where Can You Use This Organizer?
- What Tools Do You Need to Make a Sander Storage Organizer?
- What Wood Should You Use?
- How Do You Make Adjustable Shelves?
- How Do You Finish the Organizer?
- How to Make a DIY Sander Storage Organizer
- Get the PDF Plan
Inspiration for This Project
A while back I gave my small workshop a makeover. First, I built these DIY tool storage cabinets. Later on, I built some organizers like this drill holder, circular saw holder, screwdriver holder, and saw blade rack. And I used these five tips to help organize all of the tools in my shop.
Related: 9 Clever Ways to Make Your Small Workshop Feel Bigger
Recently, I bought this portable spindle sander. This thing is awesome! It makes quick work of smoothing any saw marks on curved cuts.
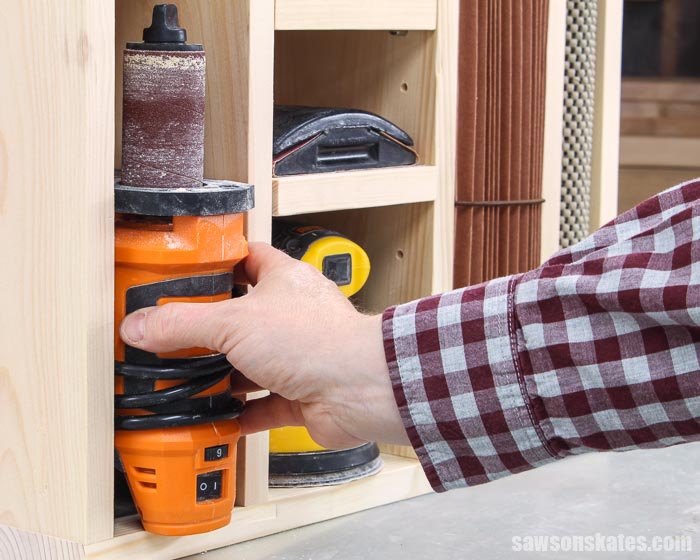
I’ve been storing the spindle sander on the shelf with my orbital sander. But the shelf was starting to look a little cluttered, and it was becoming difficult to grab what I needed.
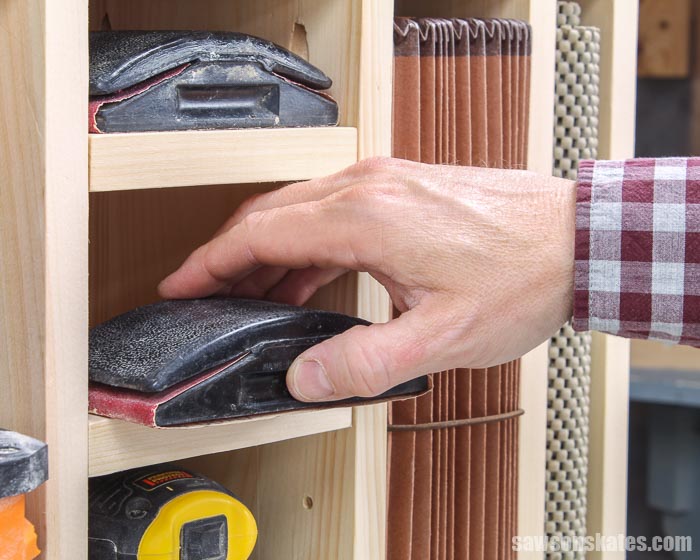
So I designed this sander storage organizer. It has space to organize sandpaper, orbital sanders and palm sanders, a spindle sander, sanding blocks, and more. It also has two adjustable shelves that allow you to customize the rack for your storage needs.
Back to Table of ContentsWhat Can You Store in This Organizer?
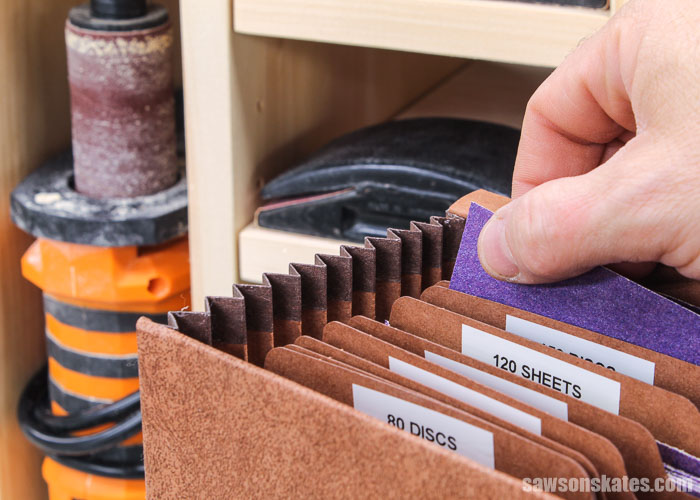
- Sandpaper, Sanding Discs, and Sanding Belts
- Random Orbit Sander
- Palm Sander
- Spindle Sander
- Sanding Blocks
In the past, I used this zippered accordion folder to organize my sandpaper. When I upgraded to this DIY sander organizer I also upgraded my accordion file.
Related: How to Organize Sandpaper in a Small Workshop
I added some additional grits to my original accordion file, and it was becoming difficult to close it. This expanding accordion file has more space for my sandpaper.
The accordion file is a great way to organize sandpaper. If I need to do a sanding project in my backyard or at a buddy’s house, I can just grab the accordion file and go.
There’s also a storage area for a router mat. I use a router mat to keep workpieces in place when using my random orbit sander.
Related: 11 Secrets for Sanding Wood Projects Like a Pro
Back to Table of ContentsWhere Can You Use This Organizer?
You could store this rack on a workbench or attach a French Cleat to the back of the rack and hang it on the wall.
Related: How to Make a French Cleat
📝 NOTE: I didn’t attach a back to the organizer because I planned to place it against a wall. You may want to attach a back if the organizer will be freestanding on a workbench, etc.
Back to Table of ContentsWhat Tools Do You Need to Make a Sander Storage Organizer?
This organizer is a simple project that can be made using basic woodworking skills and just a few common woodworking tools.
Tools like a miter saw, pocket hole jig, and a drill.
Miter Saw
I used a miter saw to cut all of the parts to length for this project.
Related: 7 Miter Saw Tricks Every DIYer Should Know
Pocket Hole Jig
We can use any pocket hole jig to drill the pocket holes for this project. I used the Kreg K5 to drill the pocket holes for my sander organizer. The Kreg K5 is no longer available and has been replaced by the Kreg 720PRO.
Related: 9 Pocket Hole Mistakes You Don’t Want to Make
Drill
The drill was used to drill the pocket holes and to drill the shelf pin holes for the adjustable shelves. The drill was also used to drive the pocket screws that join the pieces together.
Related: Impact Driver vs Drill: What’s the Difference?
It’s handy to have a right angle drill attachment. The pocket hole locations that join the top and bottom of this project could be tricky to reach with a traditional driver.
A right angle drill attachment is the perfect tool to drill in a tight spot or to drive screws in hard-to-reach places.
Related: How to Screw in Hard-to-Reach Places
Additional Tool
A shelf pin jig was used to add adjustable shelves to this project. If you don’t have a shelf pin jig, you can build this organizer with fixed shelves instead.
Related: How to Use a Shelf Pin Jig
Back to Table of ContentsWhat Wood Should You Use?
This sander cabinet can be made with just about any type of wood. I used common pine to build mine. Pine is easy to work with and relatively inexpensive compared to other types of wood. You could also build this project with plywood instead.
I purchased the pine 1×6s at my local home improvement store.
Related: Beginner’s Guide to Wood Sizes
🔄 OPTIONAL: I didn’t attach a back to the organizer because I planned to place it against a wall. You may want to attach a piece of ⅛” hardboard to the back if the organizer will be freestanding on a workbench, etc. Hardboard is usually located near the plywood section in the home improvement store.
Back to Table of ContentsHow Do You Make Adjustable Shelves?
I used my Kreg Shelf Pin Jig to drill shelf pin holes in the sides of the cabinet. Then, shelf pins are installed in the holes to support the shelves.
Related: How to Use a Shelf Pin Jig
The jig is simple to use. Clamp the jig to the board and drill through the guides in the jig. It’s just that easy.
Related: How to Make DIY Shelf Brackets (with Scrap Wood)
Back to Table of ContentsHow Do You Finish the Organizer?
This sander organizer could be finished in a variety of ways. It could be left natural, painted, etc.
I used shellac to finish the shelves of my tool storage cabinets and this DIY drill holder, so I want to use shellac on this project too.
I haven’t applied the shellac yet, but when I do, I’ll apply three coats.
Related: What You Need to Know About a Shellac Wood Finish

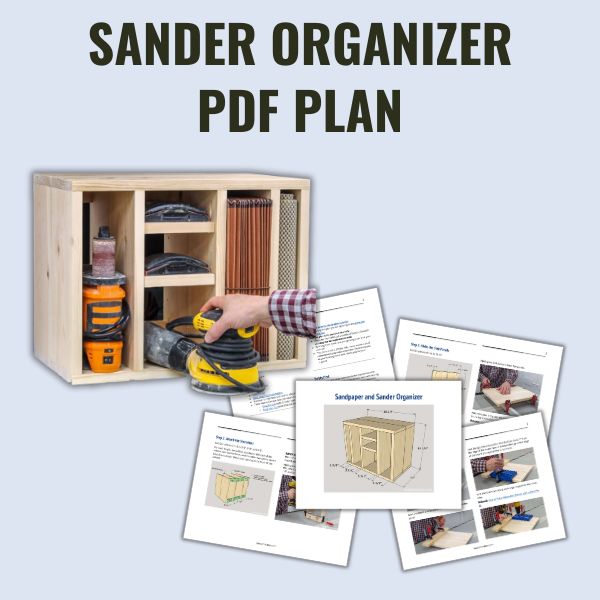
DIY Sandpaper and Sander Storage Organizer
Printed Plan
- Get the PDF plan here (includes detailed instructions, measurements, and bonus tips)
Supplies
- Wood (per printed plan)
- 1-¼” Pocket Screws
- Wood Glue
- Shelf Pins
- ⅝” Brad Nails (optional to attach back)
Tools
- Tape Measure
- Drill
- Kreg Jig
- Kreg Multi-Mark
- Miter Saw
- Shelf Pin Jig
- Right Angle Drill Attachment
- Hammer or Nail Gun (optional to attach back)
- Table Saw or Circular Saw (optional to cut back)
- Kreg Rip-Cut (with Circular Saw)
- Kreg Accu-Cut(with Circular Saw)
Step 1. Make the Side Panels
Cut 10 pieces of wood to length for the side panels. Apply glue, and clamp to form 5 panels.
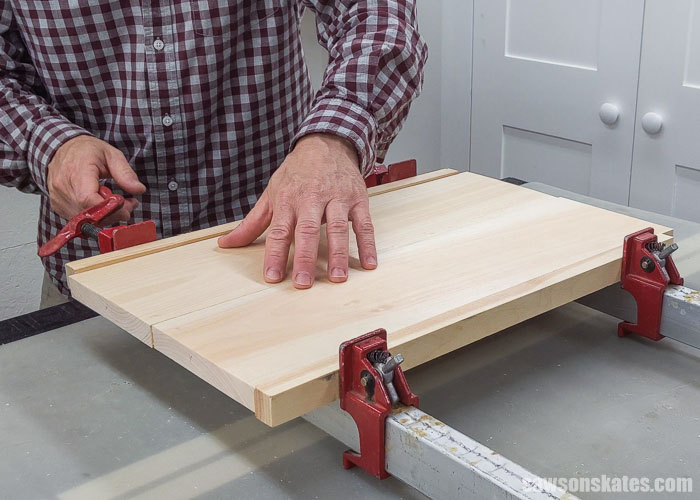
Use the diagram in the printed plan to drill pocket holes in the top and bottom of each panel.
Related: How to Use a Kreg Jig
In 2 of the panels, I used a shelf pin jig to drill shelf pin holes for adjustable shelves.
First, I labeled the bottom of the 2 panels as “bottom”.
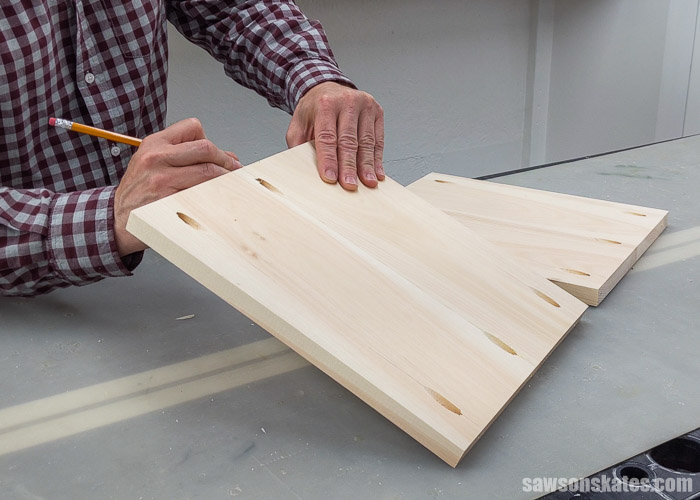
Next, I clamped a scrap piece of scrap wood to the bottom of the panel.
I set the fence on the jig to position the shelf pin holes 1″ from the edge of the board. Next, I clamped the jig on the edge of the board and against the scrap wood.
Drill shelf pin holes along each edge. Repeat for the second panel.
Related: How to Make Adjustable Shelves with a Shelf Pin Jig
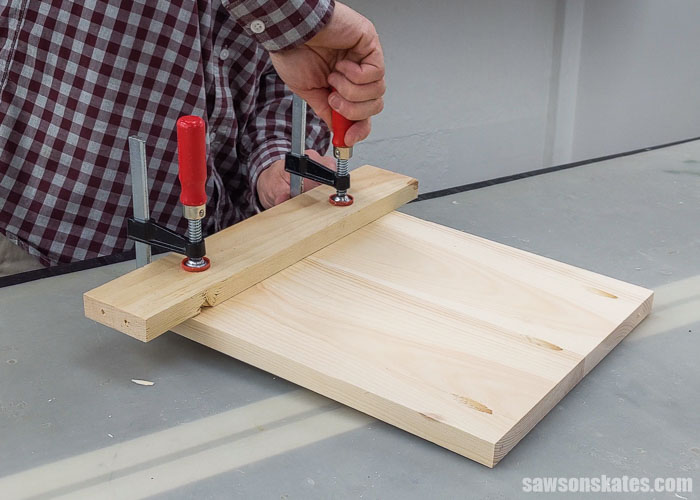
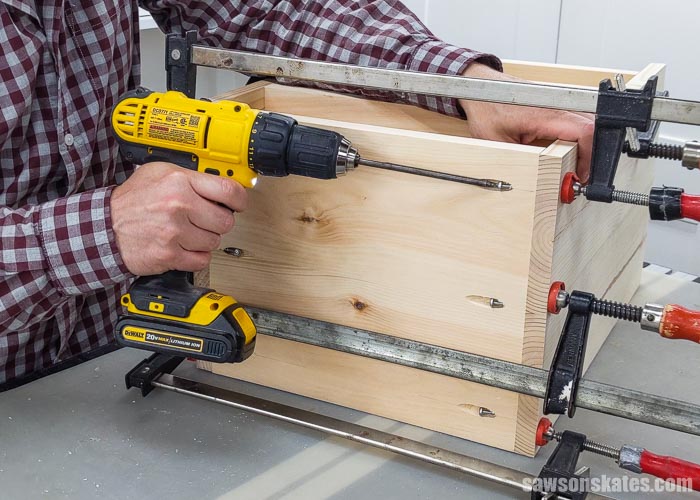
Step 2. Attach the Stretchers
Cut 12 pieces of wood to length. 6 pieces will be attached to the back of the cabinet with pocket holes, and the other 6 pieces will be used in Step 3 to maintain the proper spacing at the front of the cabinet.
Apply glue to the ends of the stretchers, position at the top and bottom of the panels, and clamp. Attach using 1-¼” pocket screws.
❕ IMPORTANT: Join the panels with the shelf pin holes with the long stretchers. Be sure the shelf pin holes are facing inward with the end labeled “bottom” facing down.

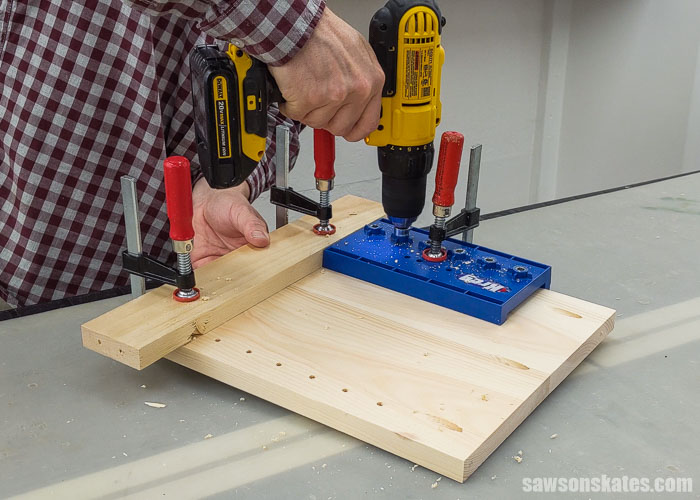
Step 3. Attach the Top and Bottom
Cut 4 pieces of wood to length for the top and bottom. Apply glue, and clamp to form 2 panels.
I started by joining one end of the side panel assembly to the top and bottom.
Position the side panel assembly on the top and bottom and clamp. Attach using 1-¼” pocket screws.
💡 TIP: To help maintain the proper spacing, temporarily place the extra pieces from Step 2 in between the panels.
These pocket holes could be tricky to reach. It’s helpful to have a right angle drill attachment. Attach using 1-¼” pocket screws.
Related: How to Screw in Hard-to-Reach Places
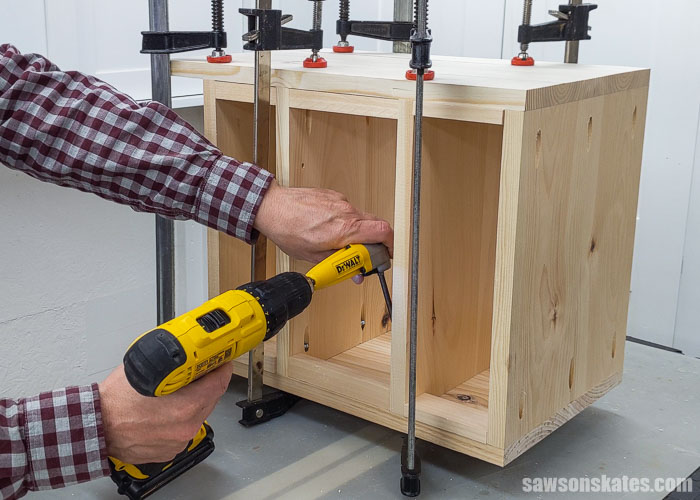
Position the remaining panel and clamp. Attach using 1-¼” pocket screws.
Step 4. Make the Shelves
Cut 4 pieces of wood to length for the shelves. Apply glue to 2 pieces and clamp to form a shelf. Repeat for the remaining pieces.
Step 5. Attach the Back (optional)
Cut 1 piece of hardboard to size for the back. The back could be cut with a table saw or a circular saw.
Related: 4 Ways to Make Straight Cuts with a Circular Saw
Apply glue, center the back on the opening, and attach using ⅝” brad nails.
Step 6. Finish the Sander Storage Organizer
To give this project a finished look, you may want to fill the exposed pocket holes with pocket hole plugs.
Related: How to Make Pocket Hole Plugs
Insert shelf pins into the holes at the desired height and place the shelves.
See How Do You Finish the Sander Storage Organizer? for more information.
Video: How to Make a Sandpaper and Sander Organizer
Includes:
- List of tools and materials
- Complete measurements (in inches)
- Easy-to-follow instructions
- Step-by-step photos
- Detailed diagrams
Final Thoughts
Get your sandpaper, random orbit sanders, spindle sanders, sanding blocks, and more organized with this DIY sandpaper and sander storage organizer. It’s easy to make with a few simple cuts and a few common woodworking tools.
Get the PDF plan (including the detailed instructions and measurements) now!
Thank you for stopping by. If you enjoyed this tutorial, would you please take a moment and pin it to Pinterest? I’d really appreciate it!
Recommended For You
Pin This For Later

Hi there – I’m Scott, a woodworking enthusiast and creator of Saws on Skates, a site I started in 2015 to share easy-to-follow tutorials, space-saving shop tips, and project inspiration for DIYers at any skill level. Learn more about my woodworking journey here.